
Veleno Designs Quantum D2 Flashlight Review
The Veleno Designs Quantum D2 is a twisty 10180 light by the well-known Steve Ku. Despite being available for years, they’re still available!
Official Specs and Features
Here’s a link to the Veleno Designs Quantum D2 product page.
Versions
This is a bit of a tough one since I think the Quantum has gone through some revisions. This is the Quantum D2. At the very least there was a Quantum DD, which had the QTC (more on that later) in a different, less favorable, position.
The current version, the D2, is available in a few different emitter options (at least of and on). Cree XP-G3 (NW or CW), Nichia 219c, and occasionally Cree XP-L HI.
There also might be a coated version of the D2. I’m talking to Steve Ku now and I’ll flesh out this section for historical purposes, as much as he’s willing, and when he’s willing.
Price
All current options are $60, and while they aren’t in stock they do come in waves. Most times they get mentioned on the Veleno Designs Facebook page, which you can find here: facebook.com/VelenoDesigns
Short Review
This is a very cool and well considered little keychain light. There are a couple of things that make it a light I won’t use much, but it’s one I’m happy to have. I don’t love twisties, first of all. Secondly, while I love the technological side of QTC, in practice I almost never love lights with it. While it works well and fine here, it’s still QTC.
Long Review
The Big Table
| Veleno Quantum | |
|---|---|
| Emitter: | Cree XP-G2 (I think) |
| Price in USD at publication time: | $60.00 |
| Cell: | 1×10180 |
| Highest Runtime | Highest Runtime |
| LVP? | No |
| Switch Type: | Twisty |
| On-Board Charging? | No |
| Claimed Lumens (lm) | – |
| Measured Lumens (at 30s) | 31^ |
| Claimed Throw (m) | – |
| Candela (Calculated) in cd (at 30s) | 17lux @ 2.172m = 80cd |
| Throw (Calculated) (m) | 17.9^ |
| All my Veleno reviews! | |
^ Measurement disclaimer: Testing flashlights is my hobby. I use hobbyist-level equipment for testing, including some I made myself. Try not to get buried in the details of manufacturer specifications versus measurements recorded here; A certain amount of difference (say, 10 or 15%) is perfectly reasonable.
What’s Included


- Veleno Designs Quantum D2
- Keychain Triangle (2)
- Spare O-ring
My package was purchased used and did not include a 10180. I had one, so it didn’t matter – but according to the documentation on the official page, a 10180 is included with the purchase price.
Package and Manual
The package is a plastic form fit (seen above) and a zip-top bag. There is no manual.
Build Quality and Disassembly

As I said above, the Quantum is a well-considered light. The body is stainless steel, which means that while living on a keychain and receiving a ton of abuse, it should have a long and happy life. Stainless is a very robust material.


This is a twisty light, and while there’s no knulring anywhere on the body, there are “vertical” lines into the head which allow grip enough for twisting.

The threads are very fine and also very long. That’s perfectly reasonable since it’s a progressive twisty. The tighter the head is twisted onto the body, the more output is obtained.

The tail end is a “dumb” cavity, too. Just a metal piece; no electronics or QTC bits or anything. (I believe in the Quantum DD, the QTC was in fact in the tail end; I think this differentiates the two).
Below, you can see the head (center) which includes the tiny square of the QTC compound.

The tail on all models has two sets of fins. These aren’t for cooling, but strictly for decoration – tritium fits in here. Steve will install these for free with the purchase of light and tritium. The tritium size is 1.5x6mm.

These tritium vials are visible from the side (through the fins) and also from the end.

Size and Comps


A proper smol light.


Here’s the test light with the venerable Convoy S2+. Mine’s a custom “baked” edition Nichia 219b triple. A very nice 18650 light.


And here’s the light beside my custom-engraved TorchLAB BOSS 35, an 18350 light. I reviewed the aluminum version of that light in both 35 and 70 formats.


Below is another 10180 light. It’s different in a number of ways. First, this Astrolux M01 is titanium. Secondly, inside the body is a charge port! Since my Quantum didn’t come with a charger, I used this Astrolux as a charger. This is a reasonable trade off, since Steve’s [very cool] charger is $20, and the M01 itself is only $15ish and also includes a cell (which could be seen as a spare cell for the Quantum).
If you wonder does the M01 make me wish the Quantum was titanium? Yes, yes it does.

Retention and Carry
I always just throw this light in a pocket, but primarily you’ll probably use it on a keychain. There’s a very beefy triangle for connection, and a loop through the tail of the body for connecting this loop, too.

It’s probably possible to remove this triangle and connect the Quantum directly to a spit ring, too. This could be beneficial because you could grip the [bigger] split ring for easier twisting of the head for operation.

There’s no magnet, no pocket clip, nothing else for carrying the Quantum.
Power and Runtime
All Quantums are powered by a single 10810 cell. That’s a lithium-ion cell, so has a nominal voltage of 3.7V and fully charge should be around 4.2V. The 10180 cell that the Quantum needs is a bit specialized since the bottom (negative) needs to be revealed as seen below. I had to remove the wrapper with a razor blade, from the cell of the Astrolux M01.

As most lights, the cell goes into the light with the anode toward the emitter.
Here’s a runtime with the cell shown above. Output is quite low in my testing – from what I read, the D2 should be around 120 lumens. At startup, I’m only seeing around 55 lumens. This doesn’t bother me, since I’m not using this light in a way to need 120 lumens. And my version is old, so maybe with newer emitters, you’ll see higher output, too.
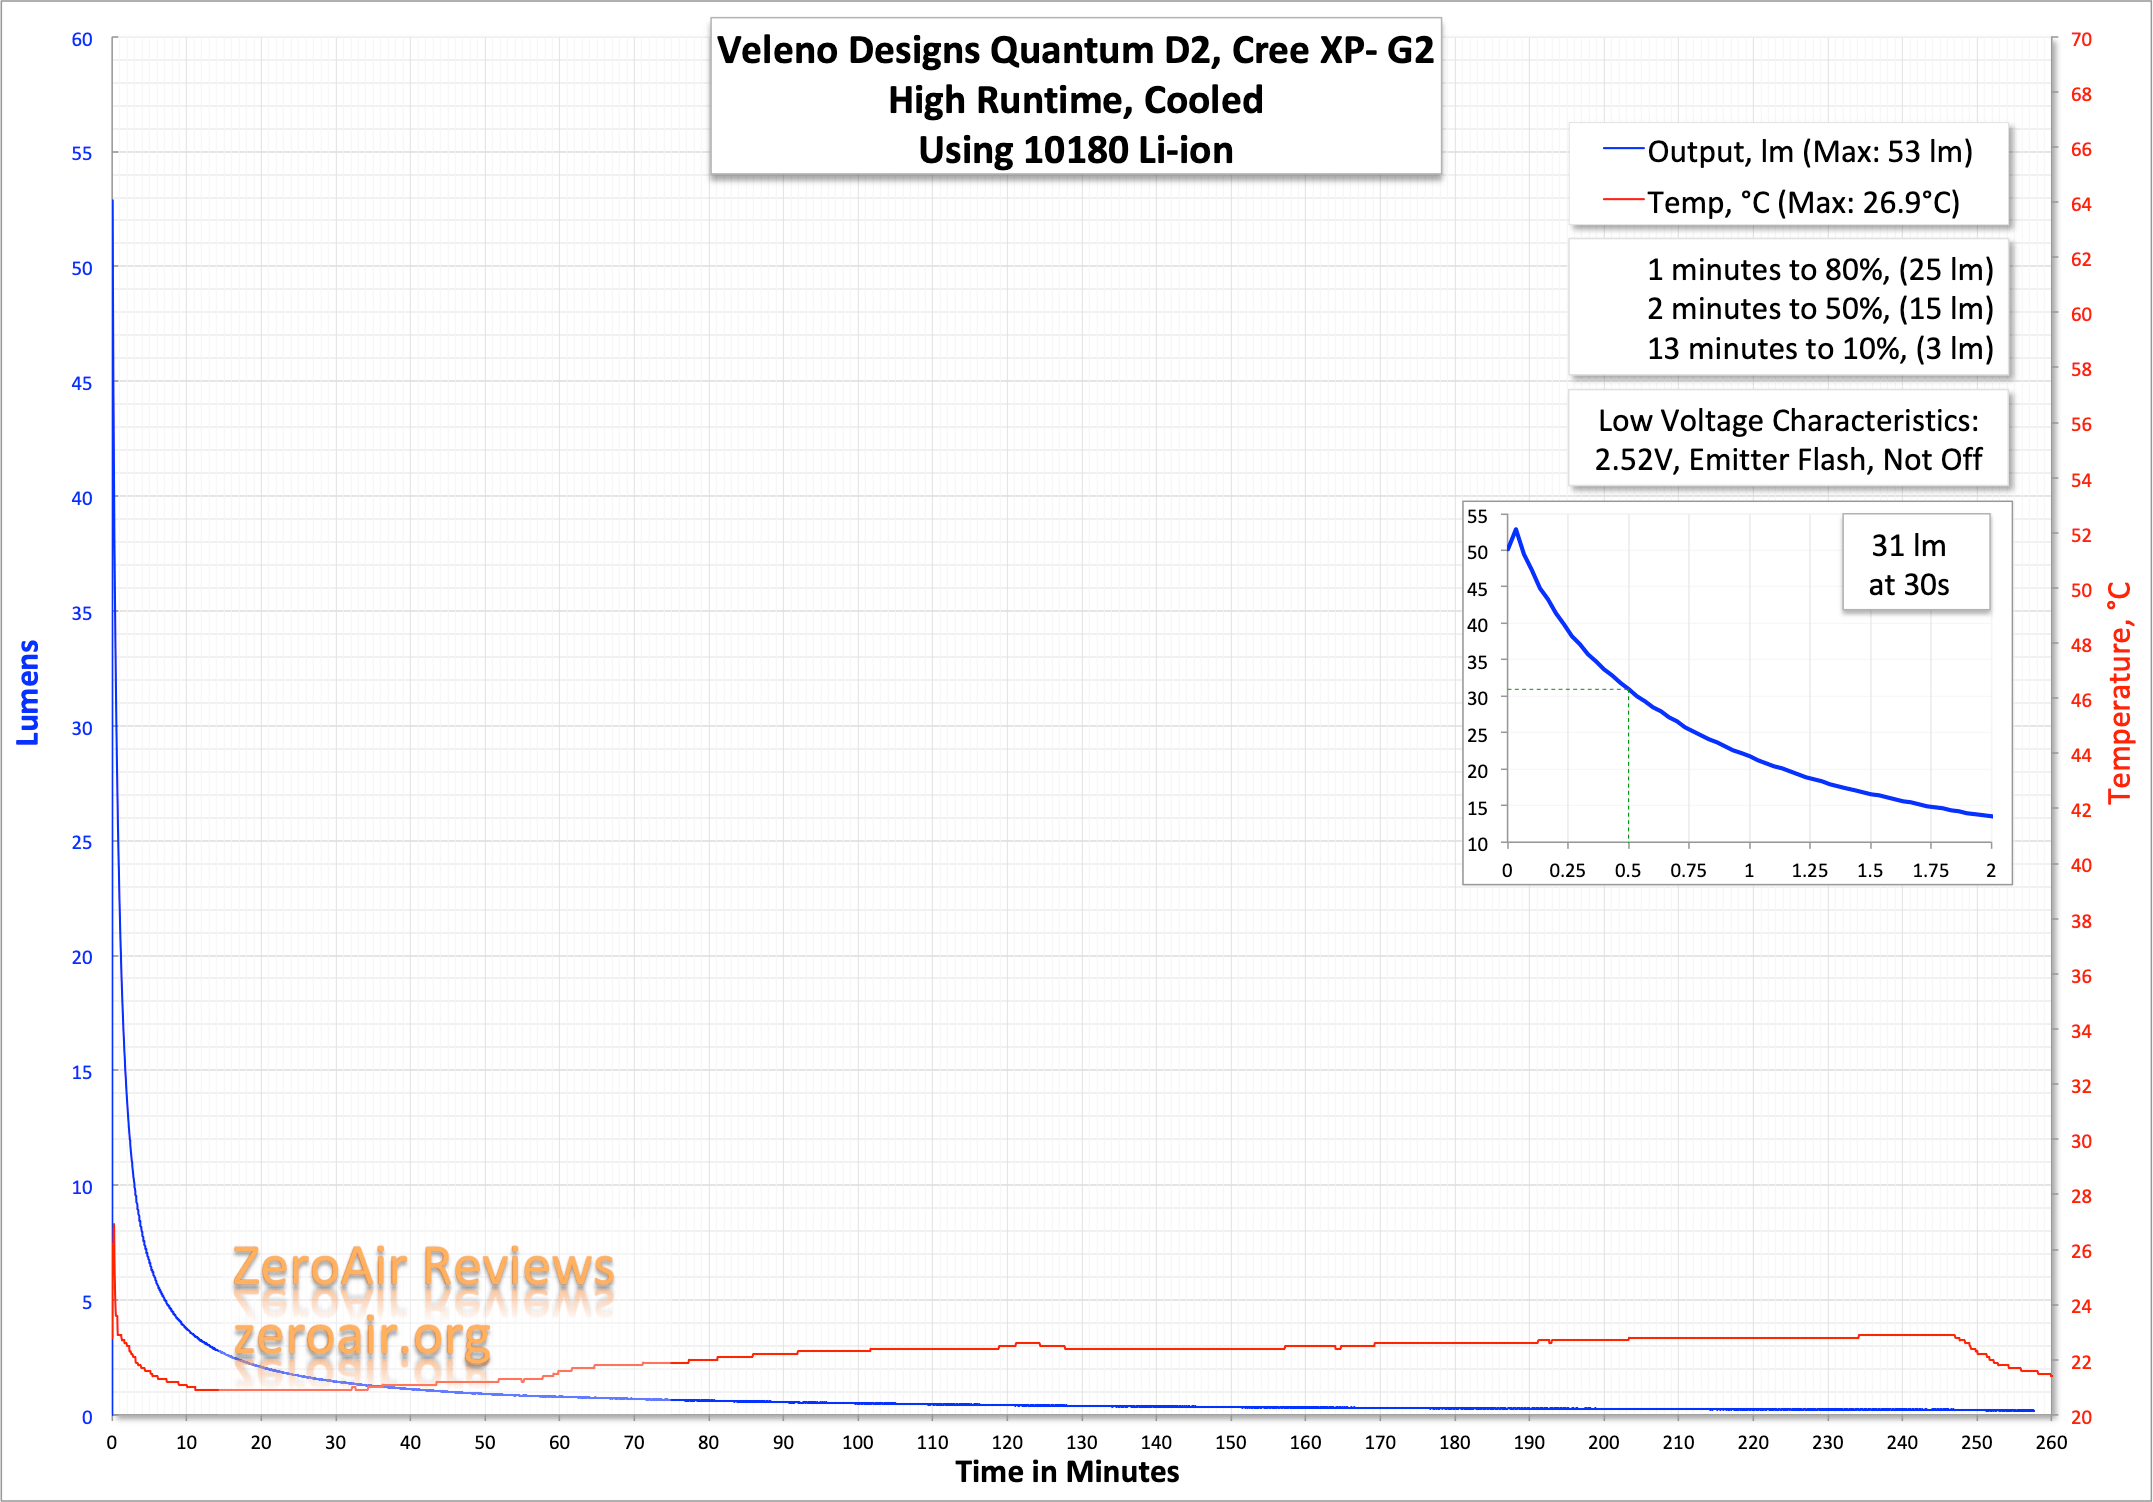
Neither runtime exhibited LVP; I ultimately shut the light off manually.
Also these two runtimes are essentially the same – I just twisted the light as tight as I could for “Highest” and ran that twice. Since the lower modes aren’t defined, picking one of those wouldn’t be all that meaningful for testing.

Pulse Width Modulation
No evidence of PWM on any mode. Three lower randomly selected modes, and finally the highest mode, too.


Here you can see a “baseline” – a chart with almost no light hitting the sensor.
Then there’s the Ultrafire WF-602C flashlight, which has some of the worst PWM I’ve seen. It’s so bad that I used a post about it to explain PWM! Here are multiple timescales (10ms, 5ms, 2ms, 1ms, 0.5ms, 0.2ms) to make comparing this “worst” PWM light to the test light easier. That post also explains why I didn’t test the WF-602C at the usual 50us scale.
User Interface and Operation
The user interface (and really how it works) is the real kicker. Yes, it’s a twisty. But it’s not a typical discreet mode twisty. It has a “ramping” progressive output, due to QTC. QTC is quantum-tunneling composite.
Quantum-tunnelling composite (QTC) is a flexible polymer which contains tiny metal particles. It is normally an insulator but if it is squeezed it becomes a conductor. QTC can be used to make membrane switches like those used on mobile phones, pressure sensors and speed controllers.
So in the application of flashlights, the more compressed the composite becomes (by twisting the head tighter), the more current it conducts. Which leads to more output.
It’s a very neat thing. QTC can wear out though, and so Steve includes a spare patch with the Quantum. I am not the biggest QTC fan, but this sample has worked great.
Here’s a user interface table!
| State | Action | Result |
|---|---|---|
| Off | Tighten Head | On |
| On | Tighten Head More | Brighter |
| On | Loosen Head | Low to Off |
LED and Beam

I purchased this used but was told it’s a Cree XP-G2. It’s an older variant, so that’s probably reasonable. If I was buying now I’d definitely get Nichia 219c or Cree XP-L HI. Those are good choices.
These beamshots always have the following settings: f8, ISO100, 0.3s shutter, and manual 5000K exposure. These photos are taken at floor level, and the beam hits the ceiling around 9 feet away. Sort of random modes from lower to highest output.


Tint vs BLF-348 (KillzoneFlashlights.com 219b version) (affiliate link)

I compare everything to the Killzone 219b BLF-348 because it’s inexpensive and has the best tint!
Conclusion
What I like
- Great attention to build details
- Includes (or can include) tritium
- Updated to current emitter options
- Steve is a great maker to support
What I don’t like
- It’s a small twisty, so if you have big man hands it might be cumbersome to use
- You need to really like QTC to like it
- Pricey since it’s stainless and charger is extra
Notes
- This light was provided by me for review. I was not paid to write this review.
- This content originally appeared at zeroair.org. Please visit there for the best experience!
- For flashlight-related patches, stickers, and gear, head over to PhotonPhreaks.com!
- Use my amazon.com referral link if you’re willing to help support making more reviews like this one!
- Please support me on Patreon! I deeply appreciate your support!