
Convoy M4U Flashlight Testing
Convoy has released the M4U Flashlight, a new 26650 light. It’s a thrower, but with built-in charging and a side mechanical switch. Read on!
Official Specs and Features
Here’s a link to the Convoy M4U Flashlight product page. That’s the official Convoy page.
Versions
There’s only one body, and only one emitter available, but it’s available in four emitter temperatures: 6500K, 5000K, 4000K (seen here), and 3000K.
Price
This light is $27.99 at BangGood. That’s an affiliate link – click it just for good times! That doesn’t affect your price but does keep the reviews coming!
Short Review
Solid build, good specs, and built-in charging. Seems like a winner at $28!
Long Review
The Big Table
| Convoy M4U | |
|---|---|
| Emitter: | Cree XP-L HI (4000K) |
| Price in USD at publication time: | $27.99 |
| Cell: | 1×26650 |
| Turbo Runtime | High Runtime |
| LVP? | ? |
| Switch Type: | Mechanical Side Switch |
| Quiescent Current (A): | ? |
| On-Board Charging? | Yes |
| Chargetime | |
| Power off Charge Port with no Cell? | Lowest 4 modes. With cell, all modes. |
| Claimed Lumens (lm) | 1000 |
| Measured Lumens (at 30s) | 764 (76.4% of claim)^ |
| Claimed Throw (m) | – |
| Candela (Calculated) in cd (at 30s) | 1367lux @ 5.77m = 45511cd |
| Throw (Calculated) (m) | 426.7^ |
| All my Convoy reviews! | |
^ Measurement disclaimer: Testing flashlights is my hobby. I use hobbyist-level equipment for testing, including some I made myself. Try not to get buried in the details of manufacturer specifications versus measurements recorded here; A certain amount of difference (say, 10 or 15%) is perfectly reasonable.
What’s Included

- Convoy M4U Flashlight
- Two o-ring 26650 to 18650 adapters
- Lanyard (attached)
Package and Manual


The light ships in a slip-fit cardboard box. The label on the side indicates the temperature, but not the model number (???)
There is no manual, but the product page gives this UI description.

Build Quality and Disassembly

Typical good Convoy build quality.


The switch is easy to access.

There are adequate fins in the head for cooling.

The knurling is plentiful and also not aggressive.

The bezel has crenelations.


The cell tube is not reversible. The threads are not even the same size, so it’s not possible to flip it accidentally. The anodized end is the tail end.

The driver is held in place by a brass retaining ring. Since this is a side mechanical switch, it’s also held in place by the bezel on the switch. And charge port. There’s really a lot going on here.


The tail end has a big soft spring.

These tailcap threads are big and beefy, anodized, well lubed, and square-cut. This means locking the light out takes only breaking the contact between the tailcap and body. (The same can’t be said for the head end.) Also, see that o-ring below? It’s pushed up too high on my light. Because of that, when twisting on the tailcap, I eventually wore that o-ring out and it broke. So keep it lower than what you see here, or you’ll cut yours too.


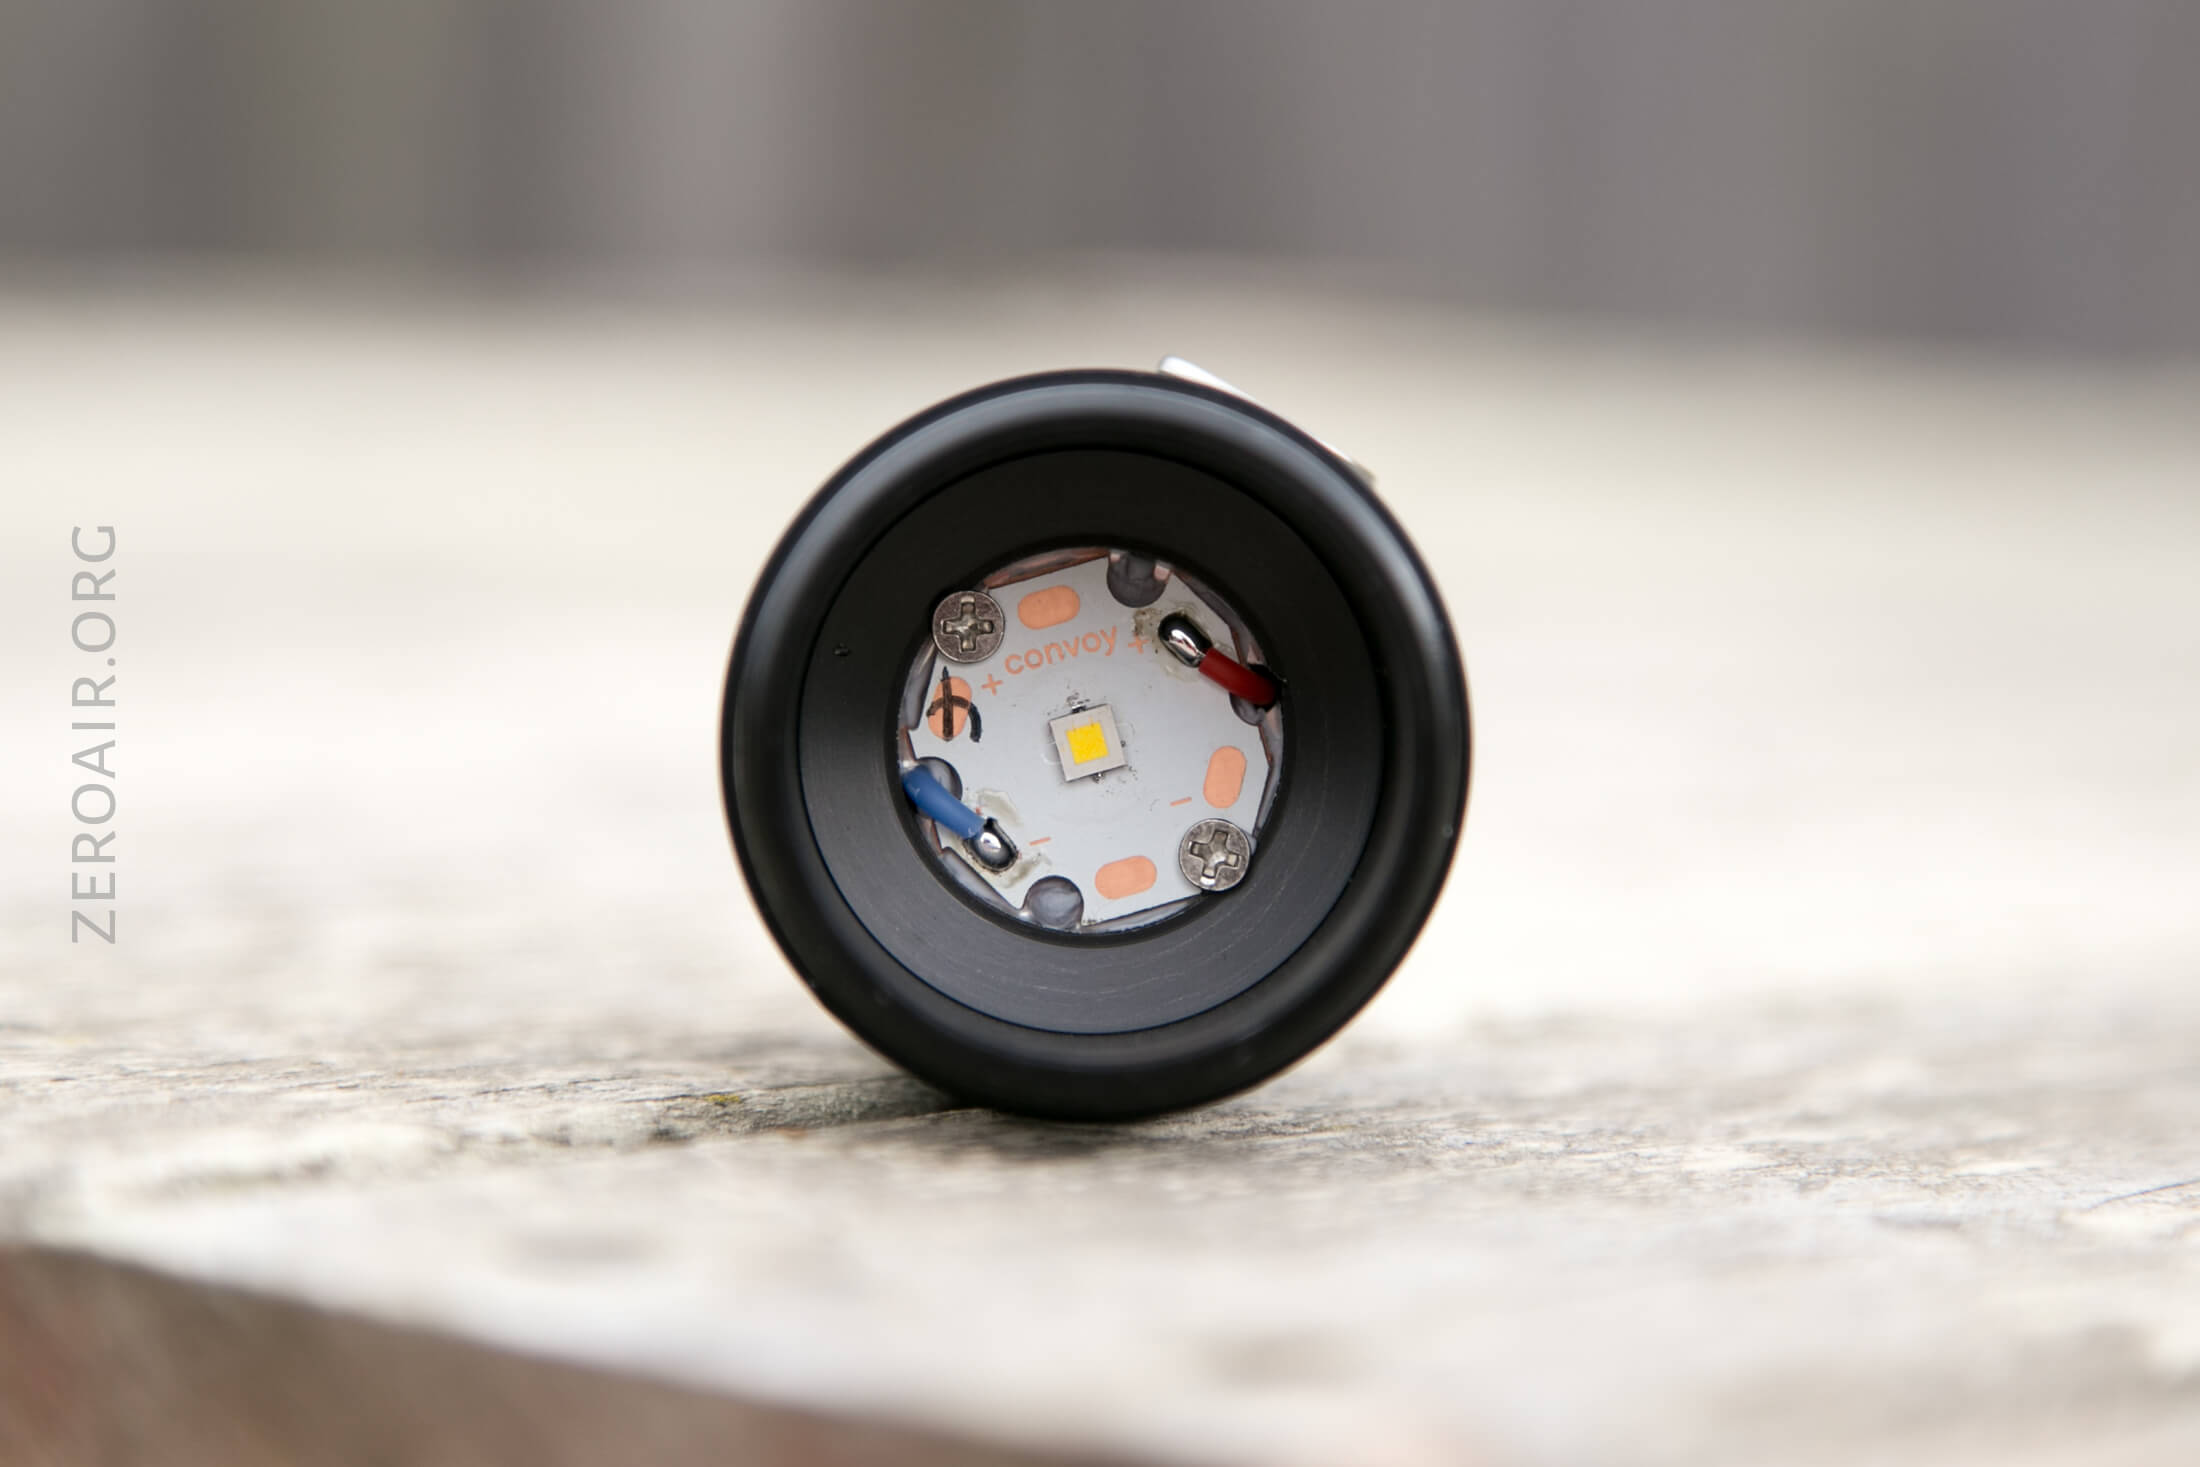
The bezel comes off easily, revealing the reflector et al.

There’s an emitter-centering ring.

And of course, the emitter is very easy to get to at this point.
Size and Comps
Head diameter 41.3mm
Body diameter 33.2mm
Length 142mm
Flashlight Weight 60g


Here’s the test light with the venerable Convoy S2+. Mine’s a custom “baked” edition Nichia 219b triple. A very nice 18650 light.


And here’s the light beside my custom engraved TorchLAB BOSS 35, an 18350 light. I reviewed the aluminum version of that light in both 35 and 70 formats.

Retention and Carry
The only way intended for carry of the M4U is the included, and attached lanyard. It’s a fine, uncomplicated lanyard.

I’ve said this before about Convoy and I’ll say it again – I feel like this is not the right way to connect this lanyard. There are two holes here – use them. Attaching it this way (below) means that the light doesn’t tailstand as smoothly. It’s not a big deal though, and easy to change.

There are no pocked clip attachment points, no magnets, no pouches, etc. The lanyard is all.
Power and Runtime
The M4U is a single cell light. It’s meant for a single 26650, and with springs on the head and tail, any type will work.
Also included are these two o-ring adapters, which allow flawless use of 18650 cells.
Here are a couple of runtimes. The highest mode (not officially called Turbo, but “100%”). Output is more or less stable for almost an hour, then trails off toward the low voltage cutoff, of over 3V.

Regarding the highest output being a good bit lower than spec – that could be due to a number of things. Possibly this light needs a high drain cell and the cell I tested with wasn’t pushing enough current (unlikely, but possible.) It seems the light only pulls around 2.3A on 100%, so the cell shouldn’t really matter.
High (again not “High” officially but “35%”) looks about the same but lasts much longer. Again, the cutoff is over 3V.

Charging
The M4U has built-in charging. This happens via micro-USB, and there’s a little indicating emitter in that hole beside the port. When charging, the light is red. The port cover is a good one. It presses in very securely.


Charging proceeds at around 1A (just over, in fact). This means the charge rate is good (perfect) for 26650s, and quick for 18650s. Either is safe to charge here.

Modes and Currents
| Mode | Mode Claimed Output (lm) | Claimed Runtime | Measured Lumens | Tailcap Amps |
|---|---|---|---|---|
| 100% | 100% | – | 764 | 2.37 |
| 35% | 35% | – | 322 | 1.07 |
| 10% | 10% | – | 72 | 0.25 |
| 1% | 1% | – | 12 | 0.04 |
| 0.1% | 0.1% | – | ~ | 0.01 |
Pulse Width Modulation
There’s PWM on all modes but the highest. I don’t notice it though, so you will probably not either.


For reference, here’s a baseline shot, with all the room lights off and almost nothing hitting the sensor. Also, here’s the light with the worst PWM I could find. I’m adding multiple timescales, so it’ll be easier to compare to the test light. Unfortunately, the PWM on this light is so bad that it doesn’t even work with my normal scale, which is 50 microseconds (50us). 10ms. 5ms. 2ms. 1ms. 0.5ms. 0.2ms. In a display faster than 0.2ms or so, the on/off cycle is more than one screen, so it’d just (very incorrectly) look like a flat line. I wrote more about this Ultrafire WF-602C flashlight and explained a little about PWM too.
User Interface and Operation
There’s a single switch on the M4U. It’s a mechanical switch, and it’s in the head. There is no tailswitch on this light – just the uncommon side mechanical switch here!
If you glance at that switch and what you see is the standard metal switch from the Convoy S2+, then I’d say you’re probably right – the switch cover is almost certainly identical. But likely the covers are the same. This version is a much squishier version and has a centering ring. There is no backlight though.
Here’s the standard Biscotti flowchart.
Here’s a UI table!
| State | Action | Result |
|---|---|---|
| Off | Click | Low (if no Mode Memory disabled (default)), Next Mode (if MM enabled) |
| On | Click | Off |
| On | Tap | Mode advance |
| On | Long tap (>0.5s) | Reset to Low (if no MM), No action (if MM enabled) |
| On | Tap >10x | Configuration Mode^ |
^ Configuration mode allows a few things to be changed. Once configuration has been entered, the light will stop responding to repeated taps. Stop tapping, and the light will flash once, then “buzz” (very fast, low strobe). Click during this strobe to enter group selection. (Clicking the light completely off will work, as will tapping, in every case I’ve tested.) Once in group selection, the light will blink for mode group numbers. Click (or tap) the light after the count of the group you want, and you’ve set the group. Ie if you want group 3, wait til the light blinks one blink, then pauses, blinks twice, pauses, blinks three times, and click during this pause.
If no click is made during the first buzz, the light will flash twice, then buzz again. Click during this to iterate mode memory (on or off).
LED and Beam
The emitter of choice here is a Cree XP-L HI, and mine’s 4000K. There are three other temps; one warmer (3000K) and two cooler (5000K, 6500K). But 4000K is best K.
The reflector is deep and very smooth.


Below highlights the travel of the switch. Again, I find it a bit squishy but it’s not bad.


These beamshots are always with the following settings: f8, ISO100, 0.3s shutter, and manual 5000K exposure.


Tint vs BLF-348 (KillzoneFlashlights.com 219b version) (affiliate link)
I keep the test flashlight on the left, and the BLF-348 reference flashlight on the right.

I compare everything to the Killzone 219b BLF-348 because it’s inexpensive and has the best tint!
Conclusion
What I like
- Good throw
- Nice build quality
- Good charging
What I don’t like
- Killed the o-ring – may be the groove for it isn’t developed enough
- Didn’t hit 1000 lumens as claimed (though that isn’t necessarily a light fault)
Notes
- This light was provided by BangGood for review. I was not paid to write this review.
- This content originally appeared at zeroair.org. Please visit there for the best experience!
- For flashlight-related patches, stickers, and gear, head over to PhotonPhreaks.com!
- Use my amazon.com referral link if you’re willing to help support making more reviews like this one!
- Please support me on Patreon! I deeply appreciate your support!

I would say it doesn’t hit the 1000 lumen claim because you’re testing the 4000K version, warmer tints are always less. The 6500K would be a lot closer. This should of been mentioned. It has nothing to doing with the battery