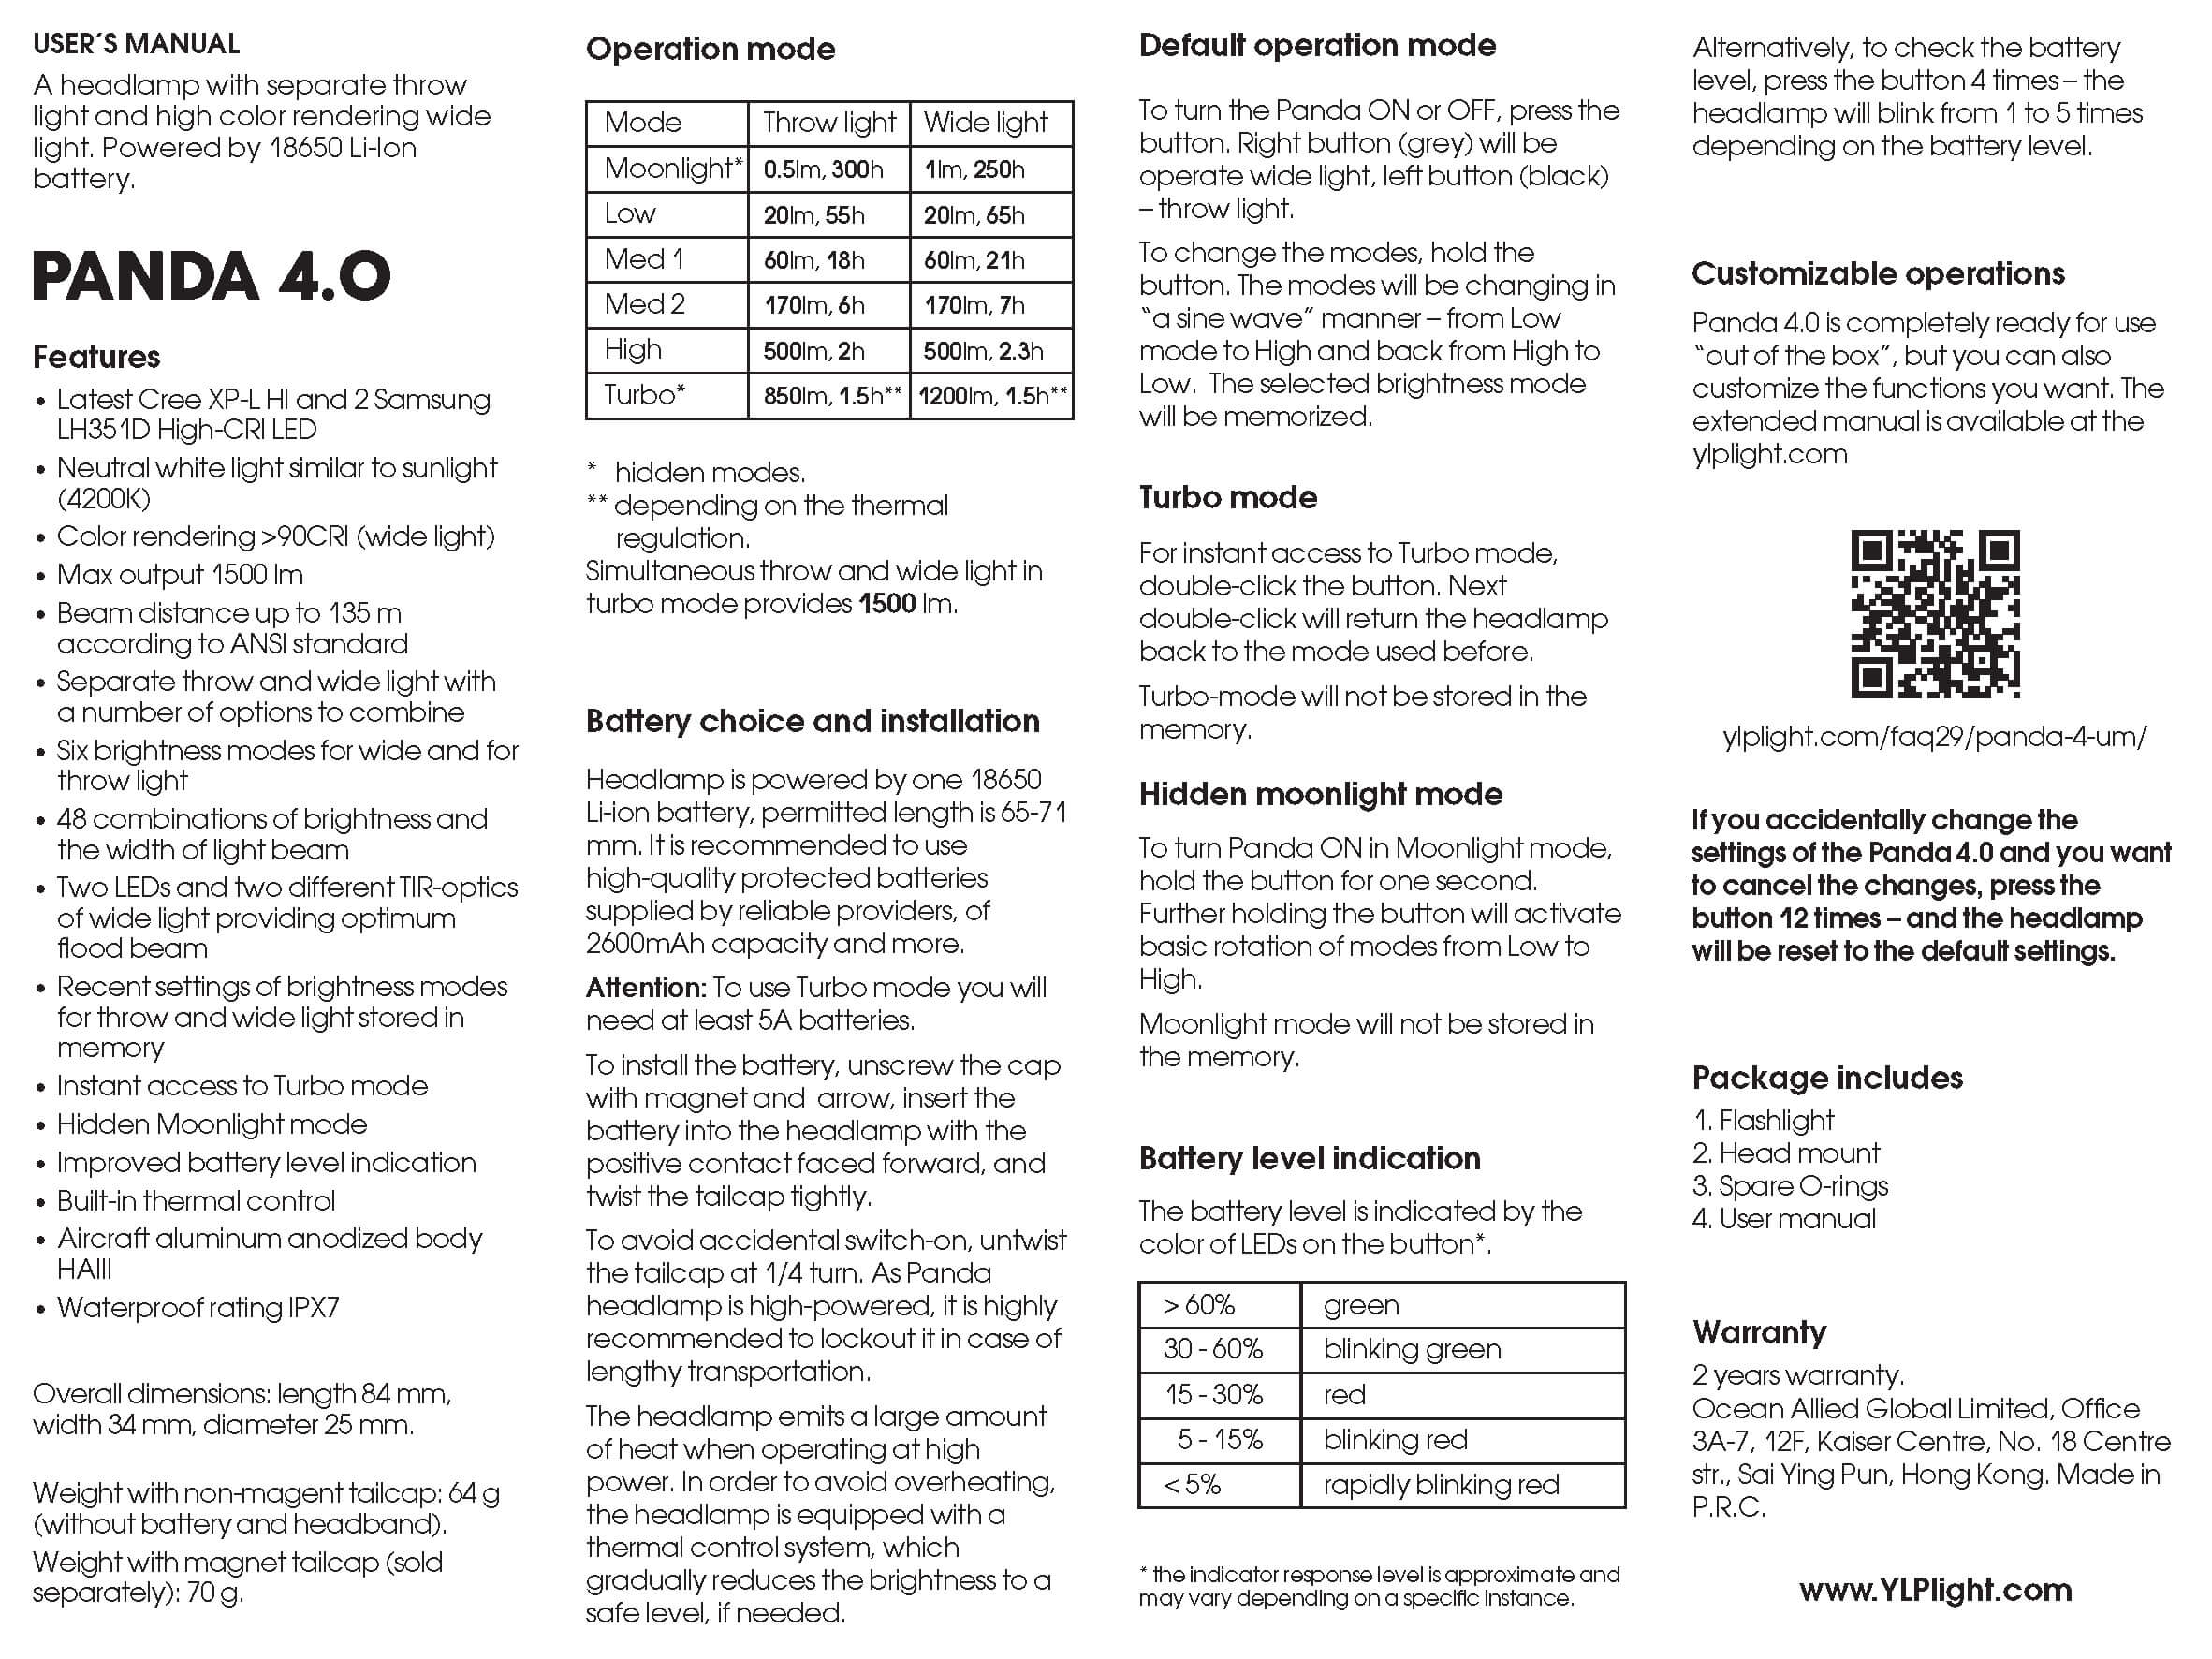
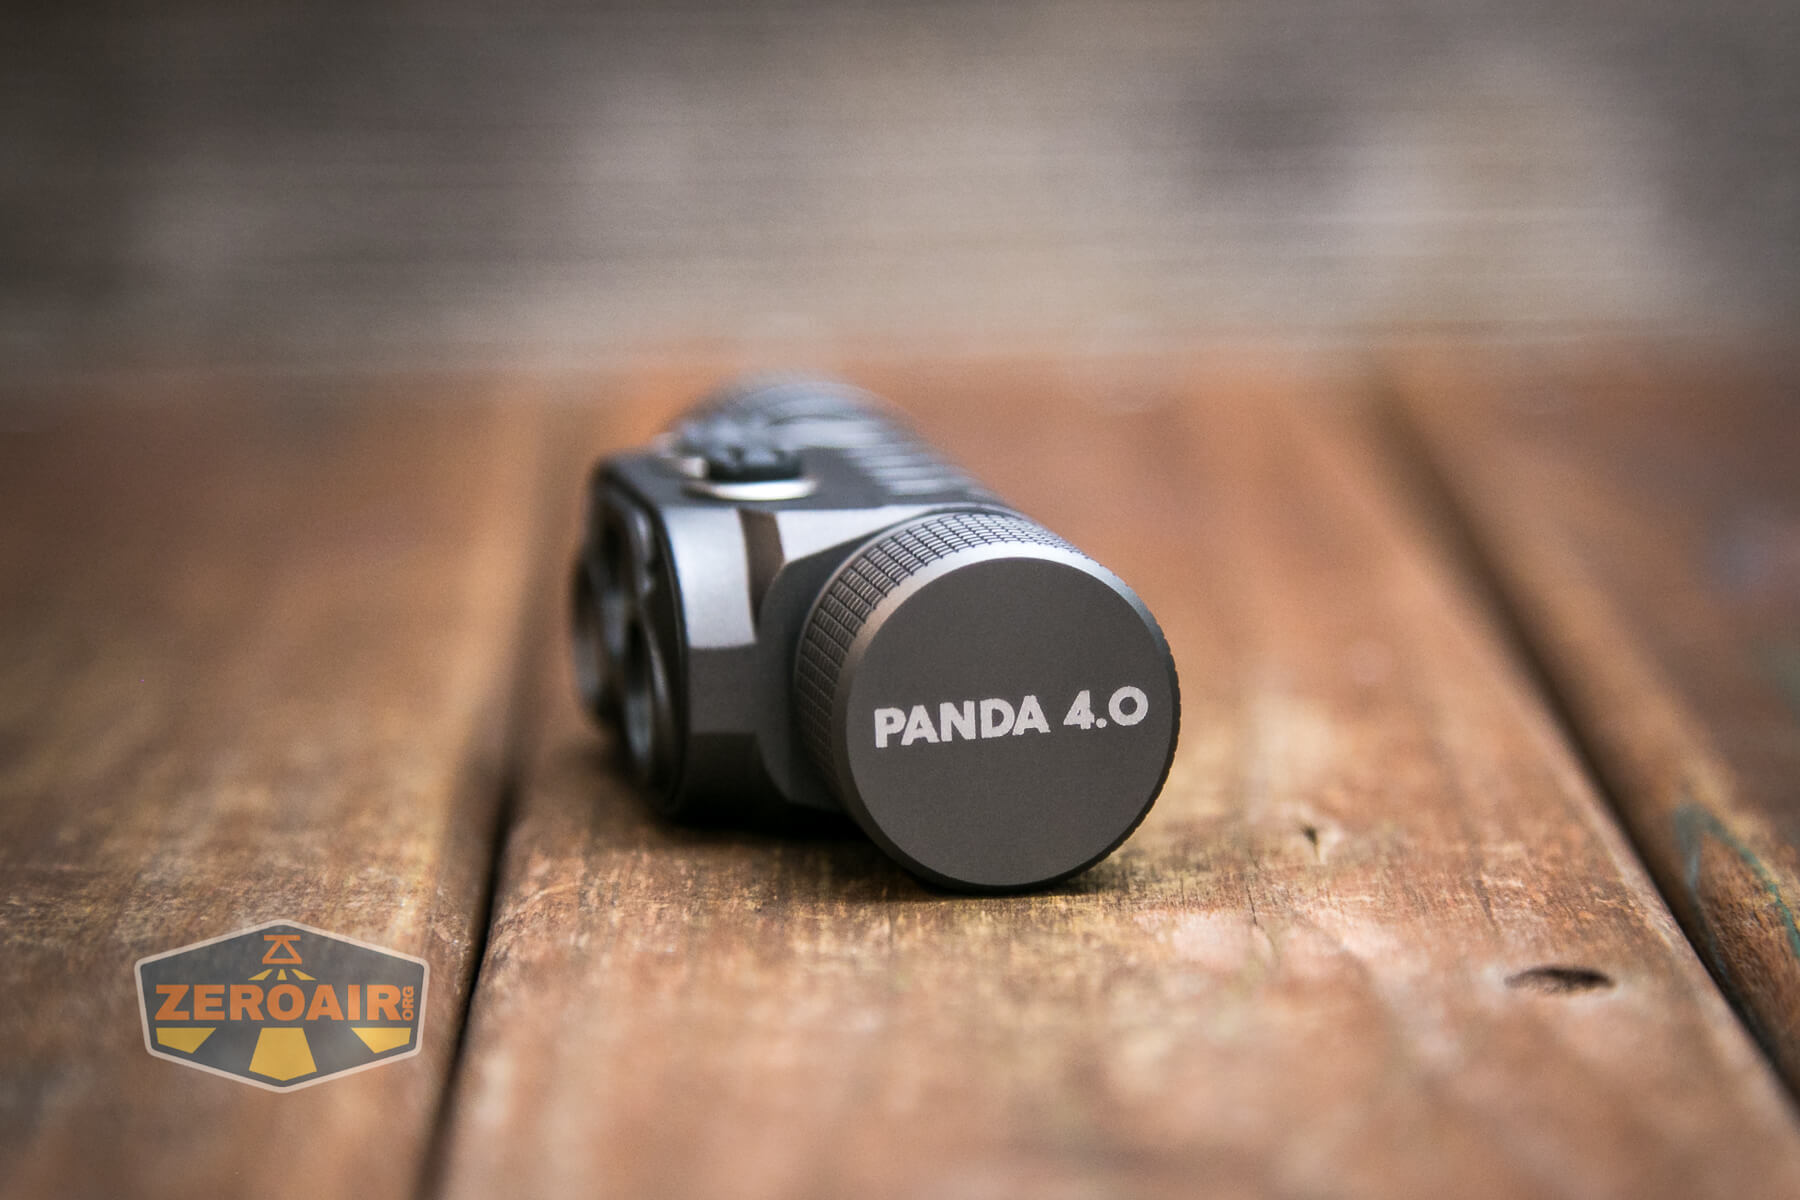
YLP Panda 4.0 Headlamp Review
The YLP Panda 4.0 Headlamp is a new iteration of the popular headlamp by YLP. This dual e-switch headlamp has two output types and runs one 18650 cell. Read on!
Official Specs and Features
Here’s a link to the YLP Panda 4.0 headlamp product page.
Versions
Of the YLP Panda 4.0 headlamp specifically, there is just one version. But of course, this is a revision – there are Panda 3 versions and Panda 2 versions.
Price
While this headlamp shows as temporarily out of stock, the price is still indicated. That price is $64, and it seems pretty reasonable for this headlamp.
Short Review
I applaud YLP once again for the emitter choice in the YLP Panda 4.0 headlamp. This time, both emitters are neutral to warm, and the emitter choices really suit their usage nicely. I measured the output a little below specification, but the output is still good, so I am not considering that a very big negative here. Importantly, on the lower modes, the output is very flat and stable.
Long Review
The Big Table
| YLP Panda 4.0 Headlamp | |
|---|---|
| Emitter: | Both |
| Price in USD at publication time: | $64.00 |
| Cell: | 1×18650 |
| Turbo Runtime Graph | |
| LVP? | Switch warning |
| Switch Type: | E-Switch |
| Quiescent Current (mA): | 0.6uA |
| On-Board Charging? | No |
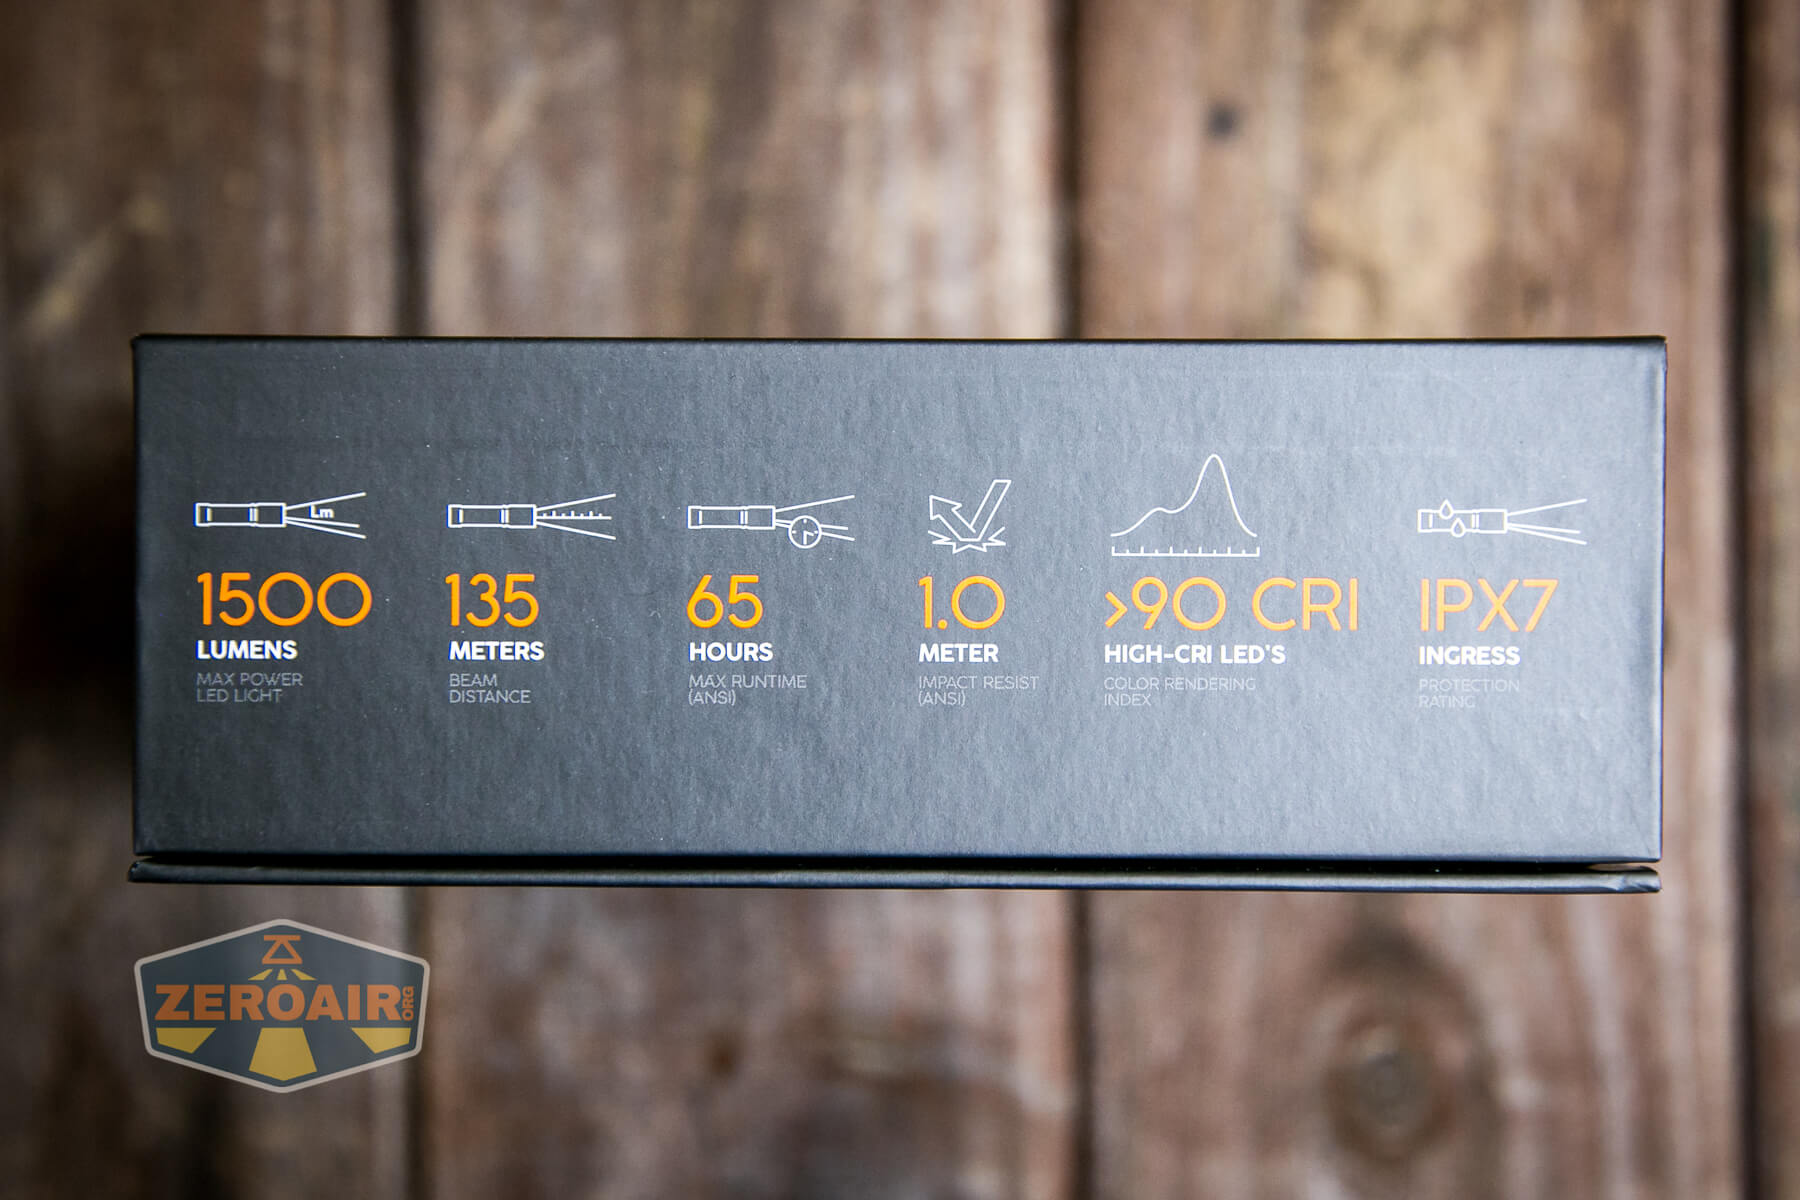
| Claimed Lumens (lm) | 1500 |
| Measured Lumens (at 30s) | 1153 (76.9% of claim)^ |
| Candela per Lumen | 5.5 |
| Claimed Throw (m) | 135 |
| Candela (Calculated) in cd (at 30s) | 375lux @ 3.627m = 4933cd |
| Throw (Calculated) (m) | 140.5 (104.1% of claim)^ |
| Claimed CCT | 4000-4200K |
| Measured CCT Range (K) | 3900-4200 Kelvin |
| Item provided for review by: | YLP |
| All my YLP reviews! | |
| YLP Panda 4.0 Headlamp | |
|---|---|
| Emitter: | Cree XP-L HI (Spot) |
| Price in USD at publication time: | $64.00 |
| Cell: | 1×18650 |
| Turbo Runtime Graph | |
| LVP? | Switch warning |
| Switch Type: | E-Switch |
| Quiescent Current (mA): | 0.6uA |
| On-Board Charging? | No |
| Claimed Lumens (lm) | 850 |
| Measured Lumens (at 30s) | 780 (91.8% of claim)^ |
| Candela per Lumen | 6.5 |
| Claimed Throw (m) | 135 |
| Candela (Calculated) in cd (at 30s) | 312lux @ 3.959m = 4890cd |
| Throw (Calculated) (m) | 139.9 (103.6% of claim)^ |
| Claimed CCT | 4000-4200K |
| Measured CCT Range (K) | 3900-4200 Kelvin |
| Item provided for review by: | YLP |
| All my YLP reviews! | |
| YLP Panda 4.0 Headlamp | |
|---|---|
| Emitter: | Samsung LH351d (Flood) |
| Price in USD at publication time: | $64.00 |
| Cell: | 1×18650 |
| Turbo Runtime Graph | Med2 Runtime Graph |
| LVP? | Switch warning |
| Switch Type: | E-Switch |
| Quiescent Current (mA): | 0.6uA |
| On-Board Charging? | No |
| Claimed Lumens (lm) | 1200 |
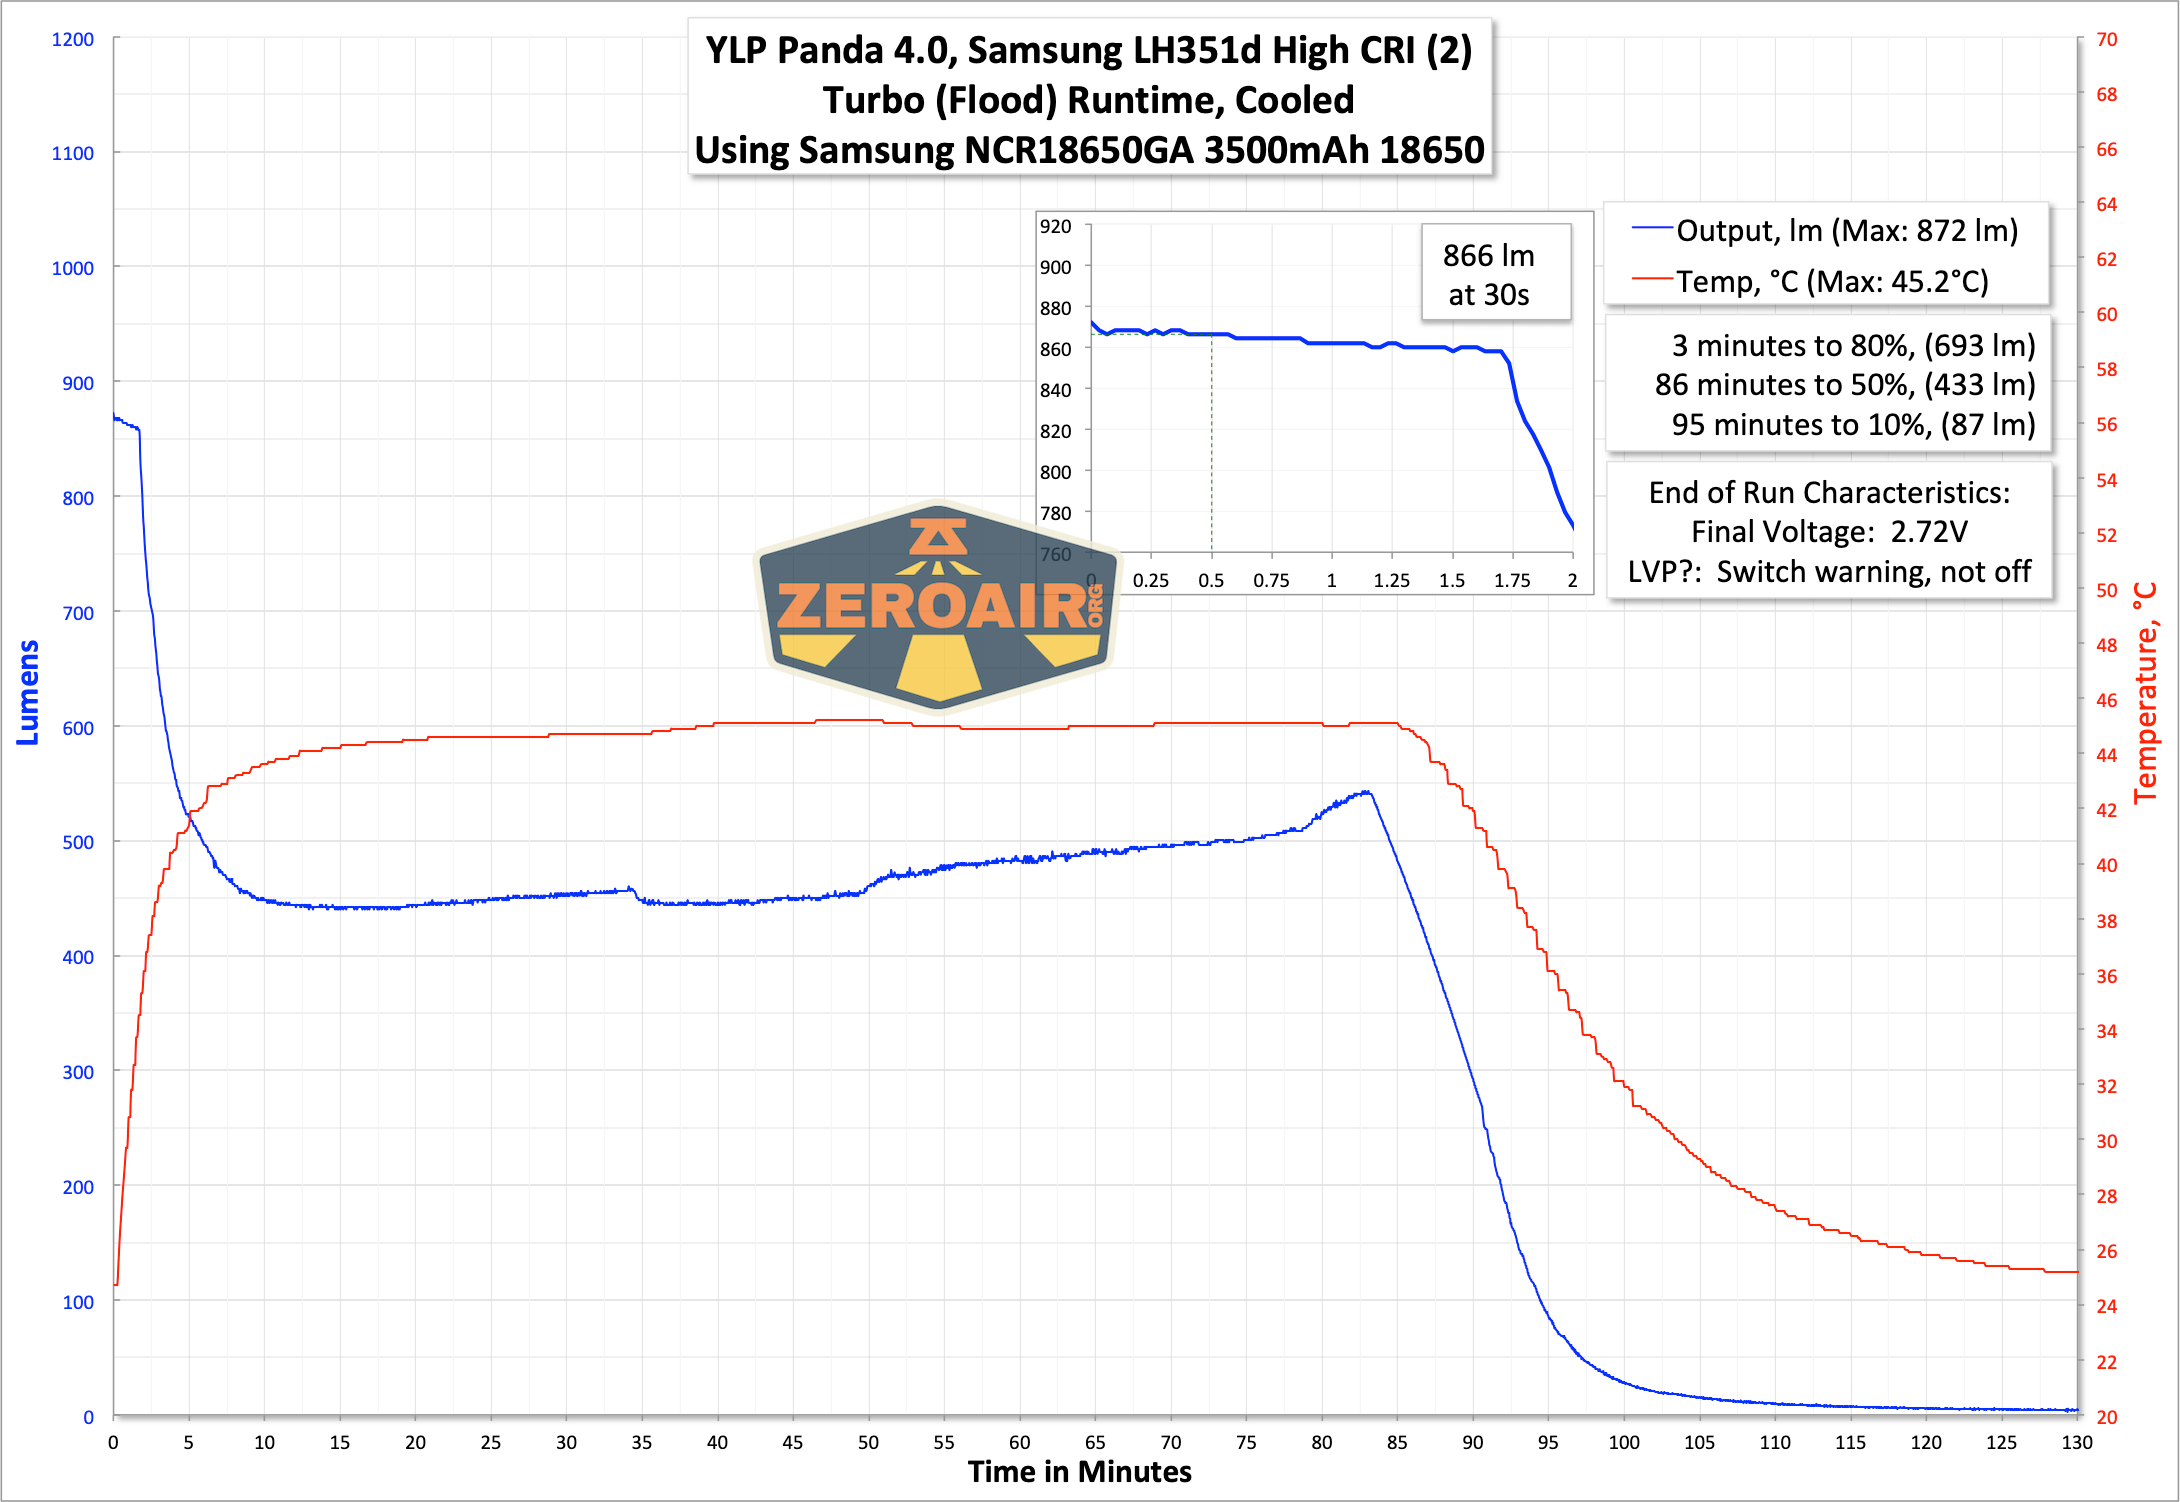
| Measured Lumens (at 30s) | 866 (72.2% of claim)^ |
| Candela per Lumen | 1.8 |
| Claimed Throw (m) | 135 |
| Candela (Calculated) in cd (at 30s) | 192lux @ 2.918m = 1635cd |
| Throw (Calculated) (m) | 80.9 (59.9% of claim)^ |
| Claimed CCT | 4000-4200K |
| Measured CCT Range (K) | 3900 Kelvin |
| Item provided for review by: | YLP |
| All my YLP reviews! | |
^ Measurement disclaimer: Testing flashlights is my hobby. I use hobbyist-level equipment for testing, including some I made myself. Try not to get buried in the details of manufacturer specifications versus measurements recorded here; A certain amount of difference (say, 10 or 15%) is perfectly reasonable.
What’s Included
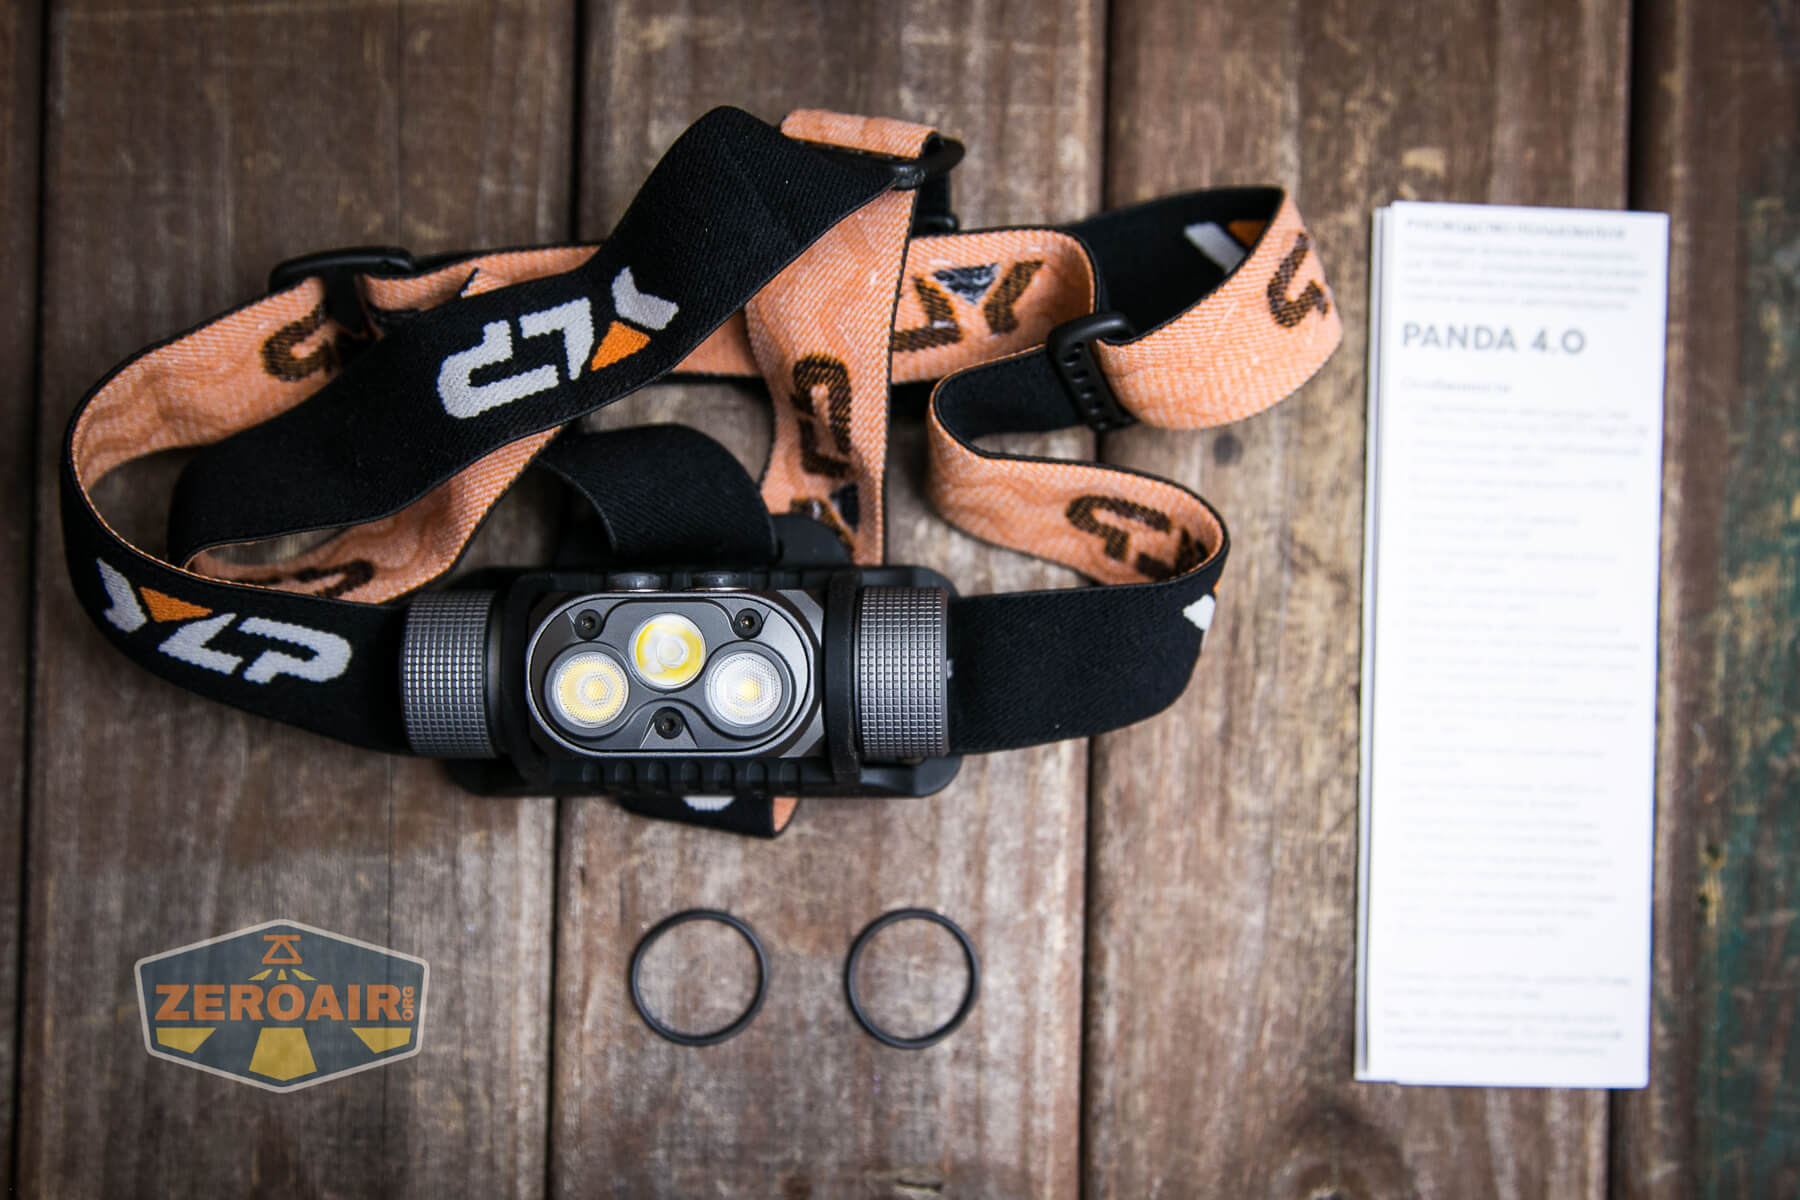
- YLP Panda 4.0 headlamp
- Spare o-rings (2)
- Headband
- Manual
Note that the package no longer includes both tailcap options. However, a magnet tailcap option is available as an additional purchase at $4. (I prefer this solution! In fact, I’m fairly sure I recommended this solution!)
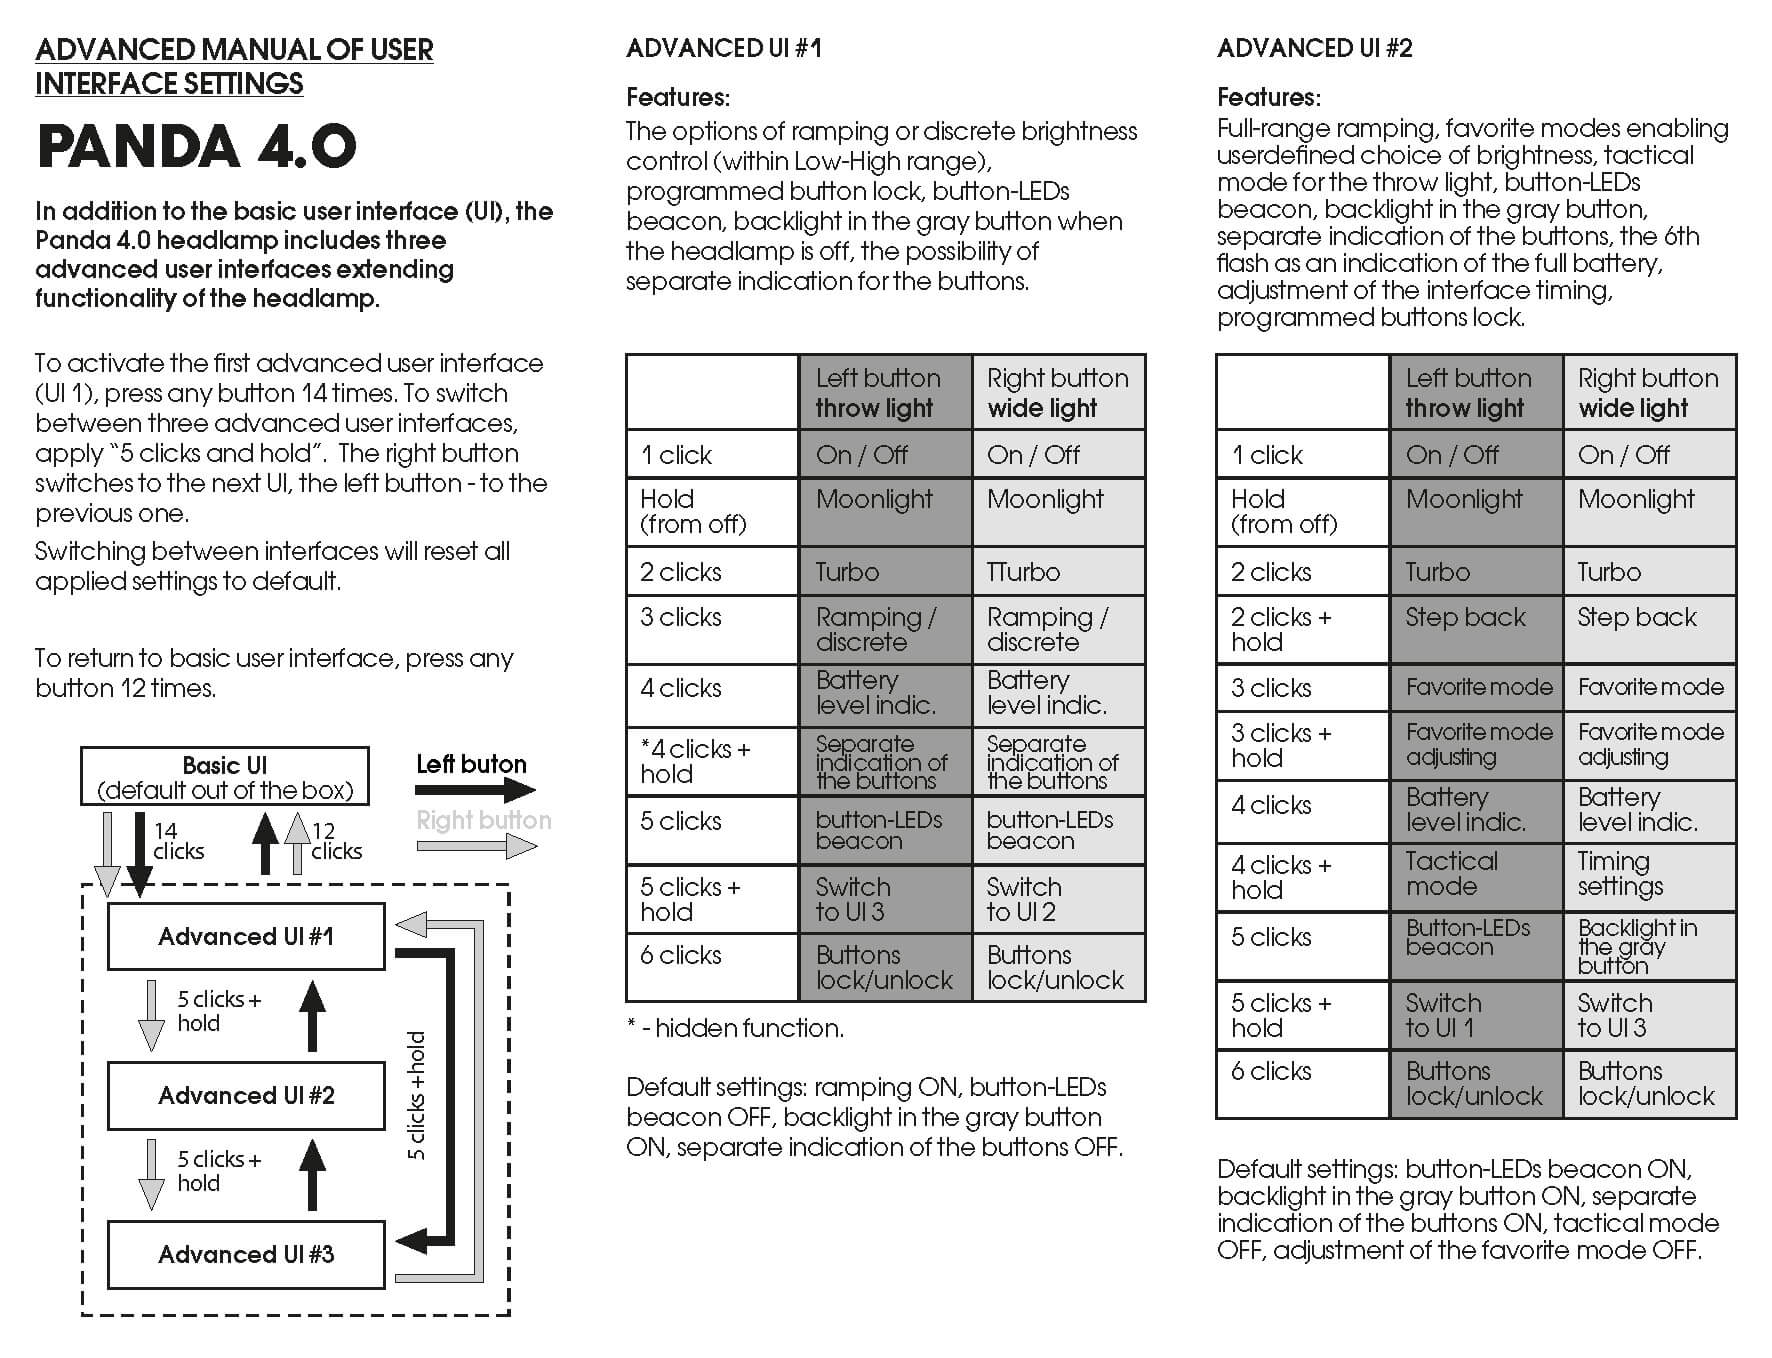
Package and Manual
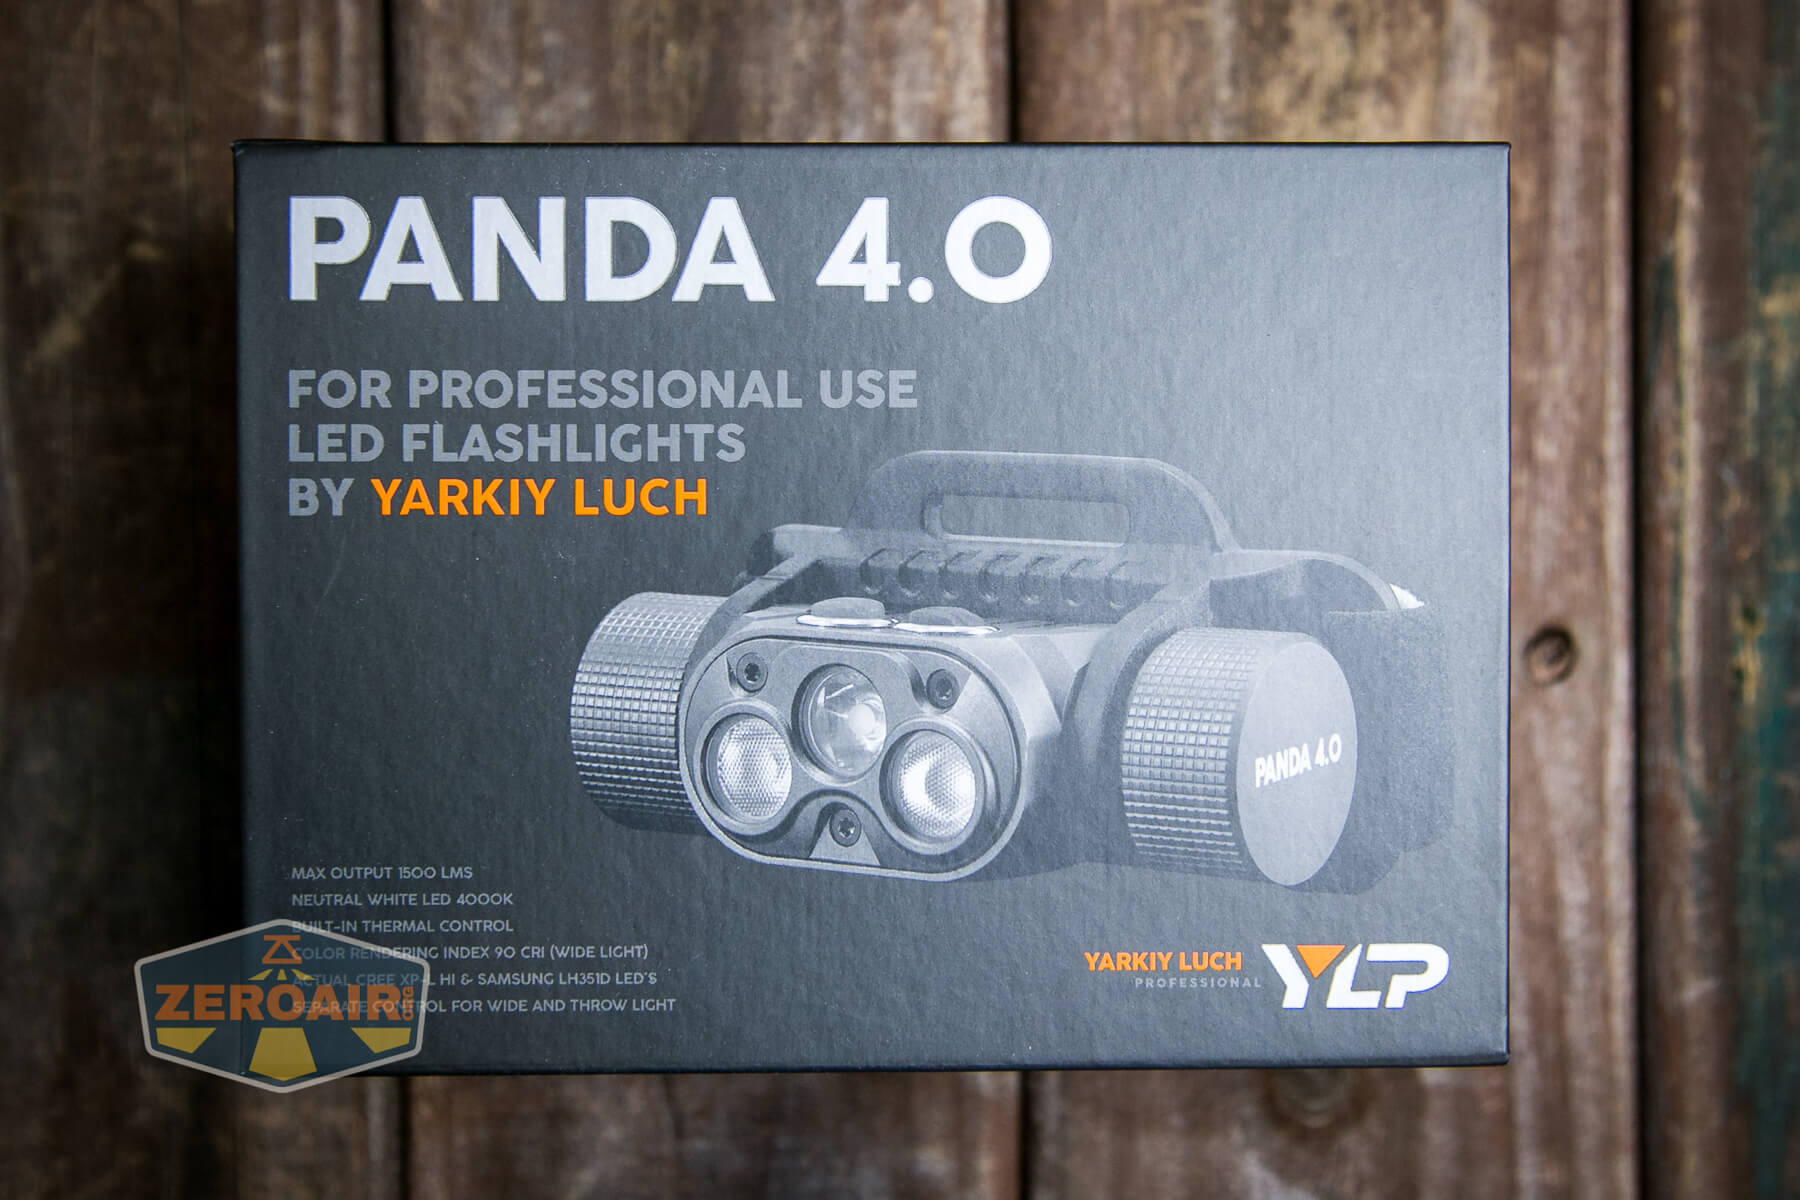
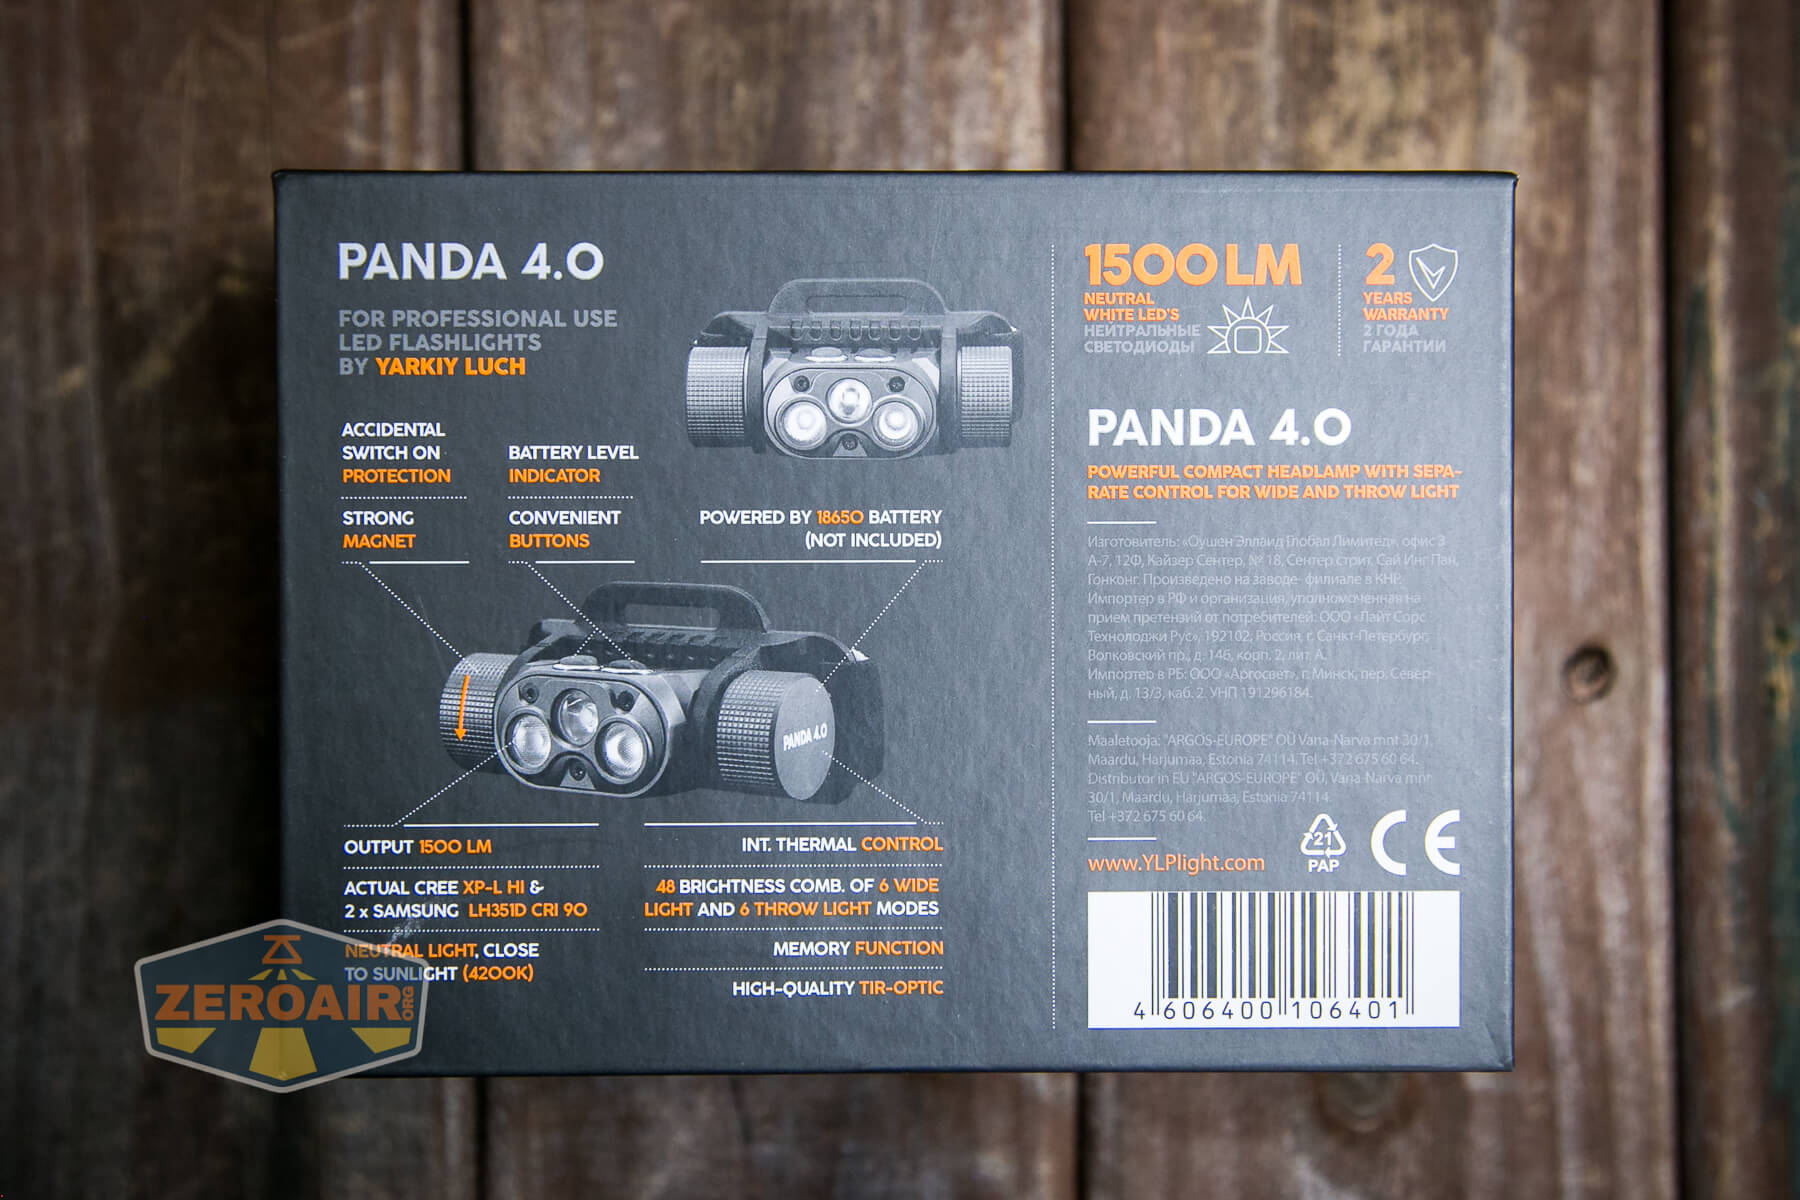
Above is the manual that ships in the package. Below is the engineer’s manual, which offers many “extra” things. We’ve seen this on other YLP lights (and based on what I hear, it’s very popular.)

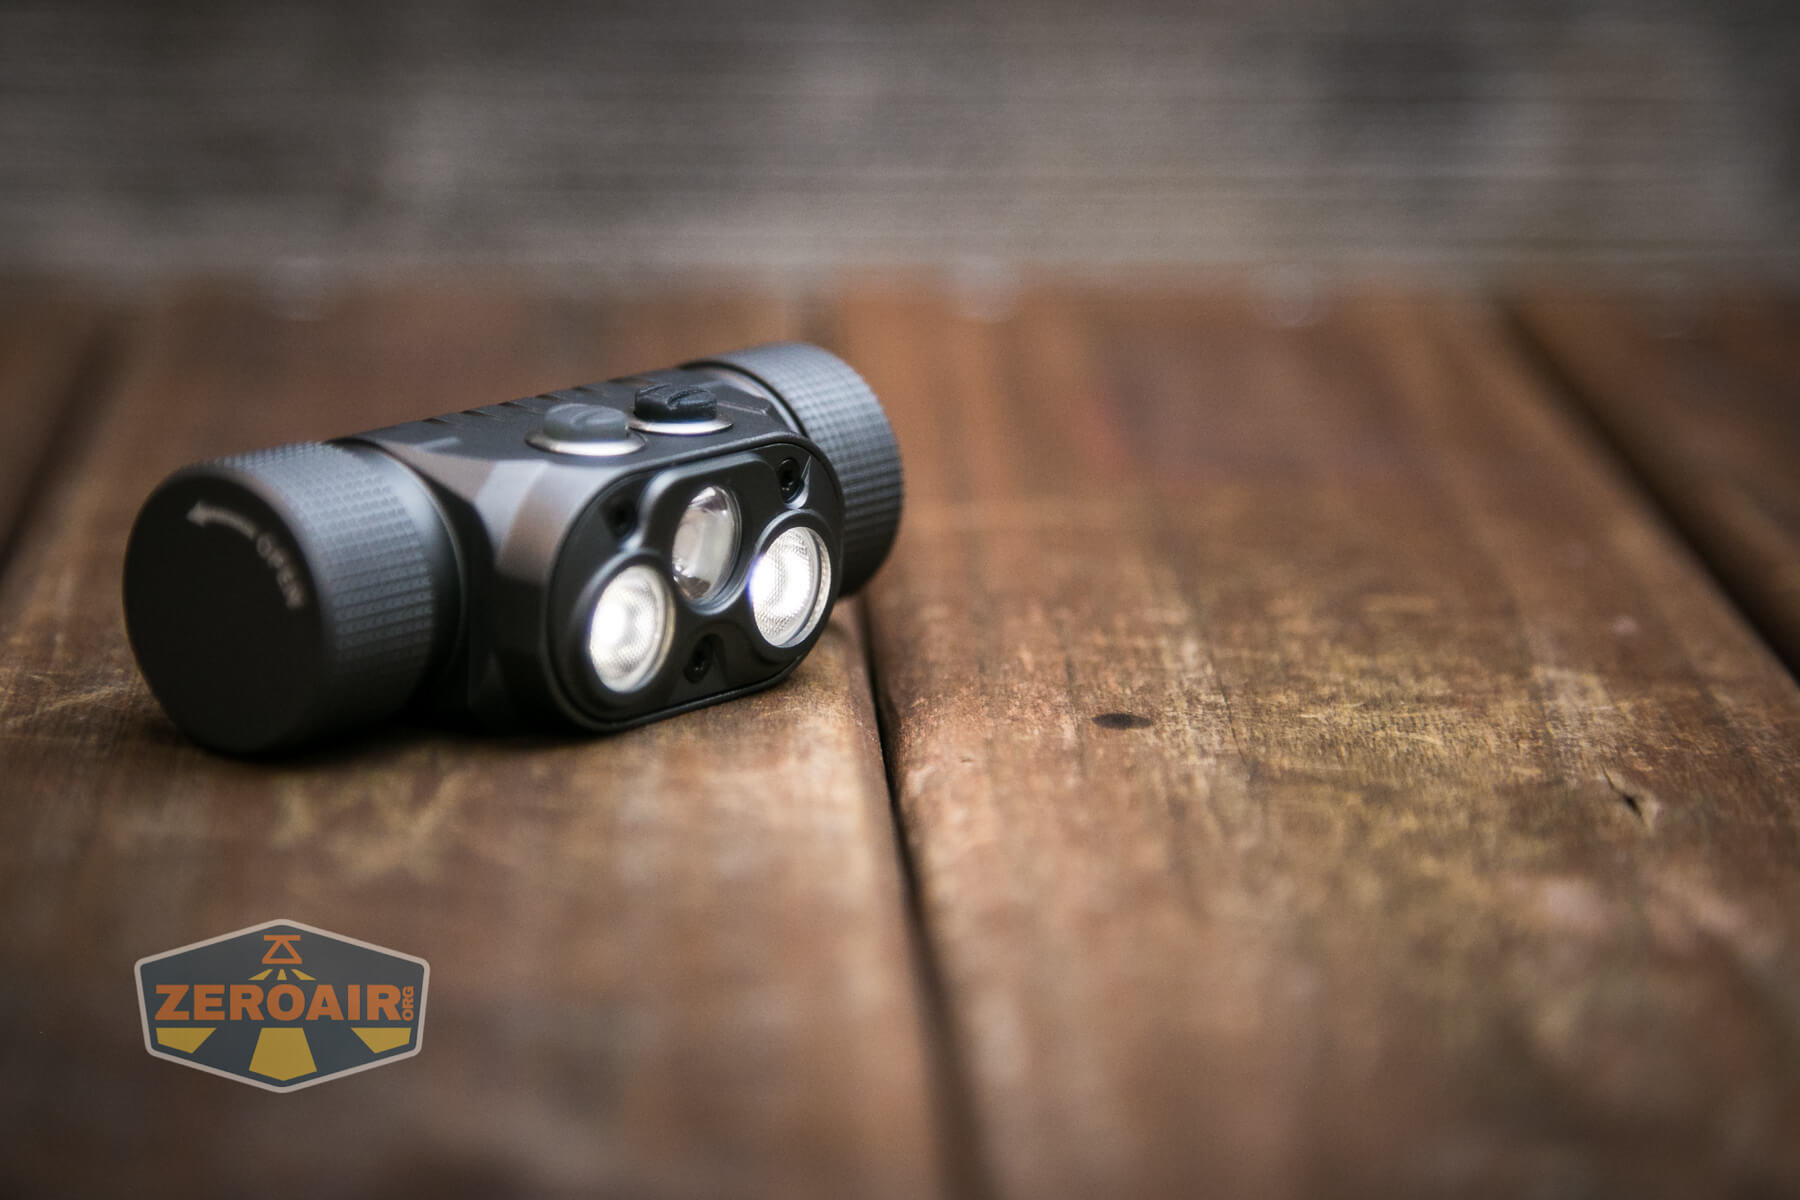
Build Quality and Disassembly
What we see with the Panda 4.0 is an iterative design on the Panda 3. I tested the Panda 3R specifically (I think there are other Panda 3’s, though), and many of the features on that light are seen again on this light. (That’s fine, the 3R was a fine headlamp!)
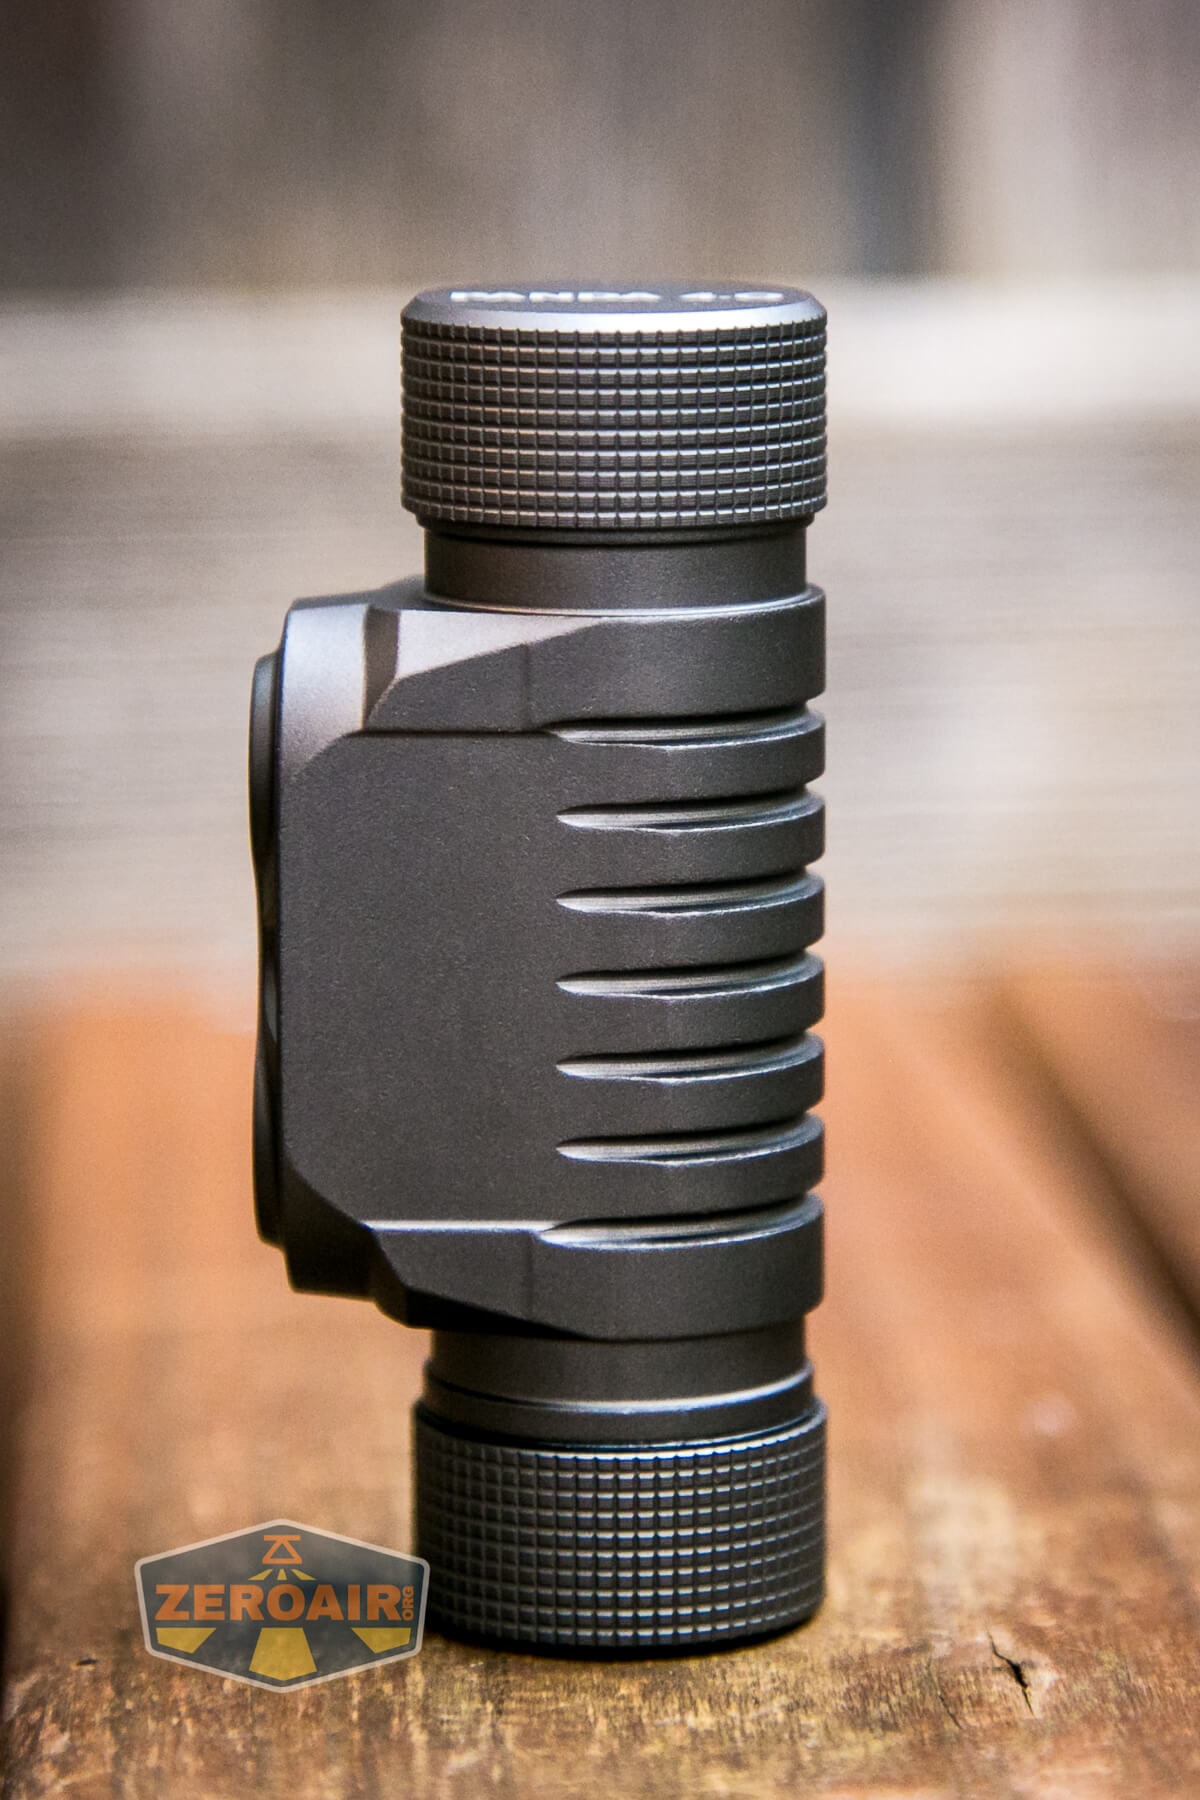
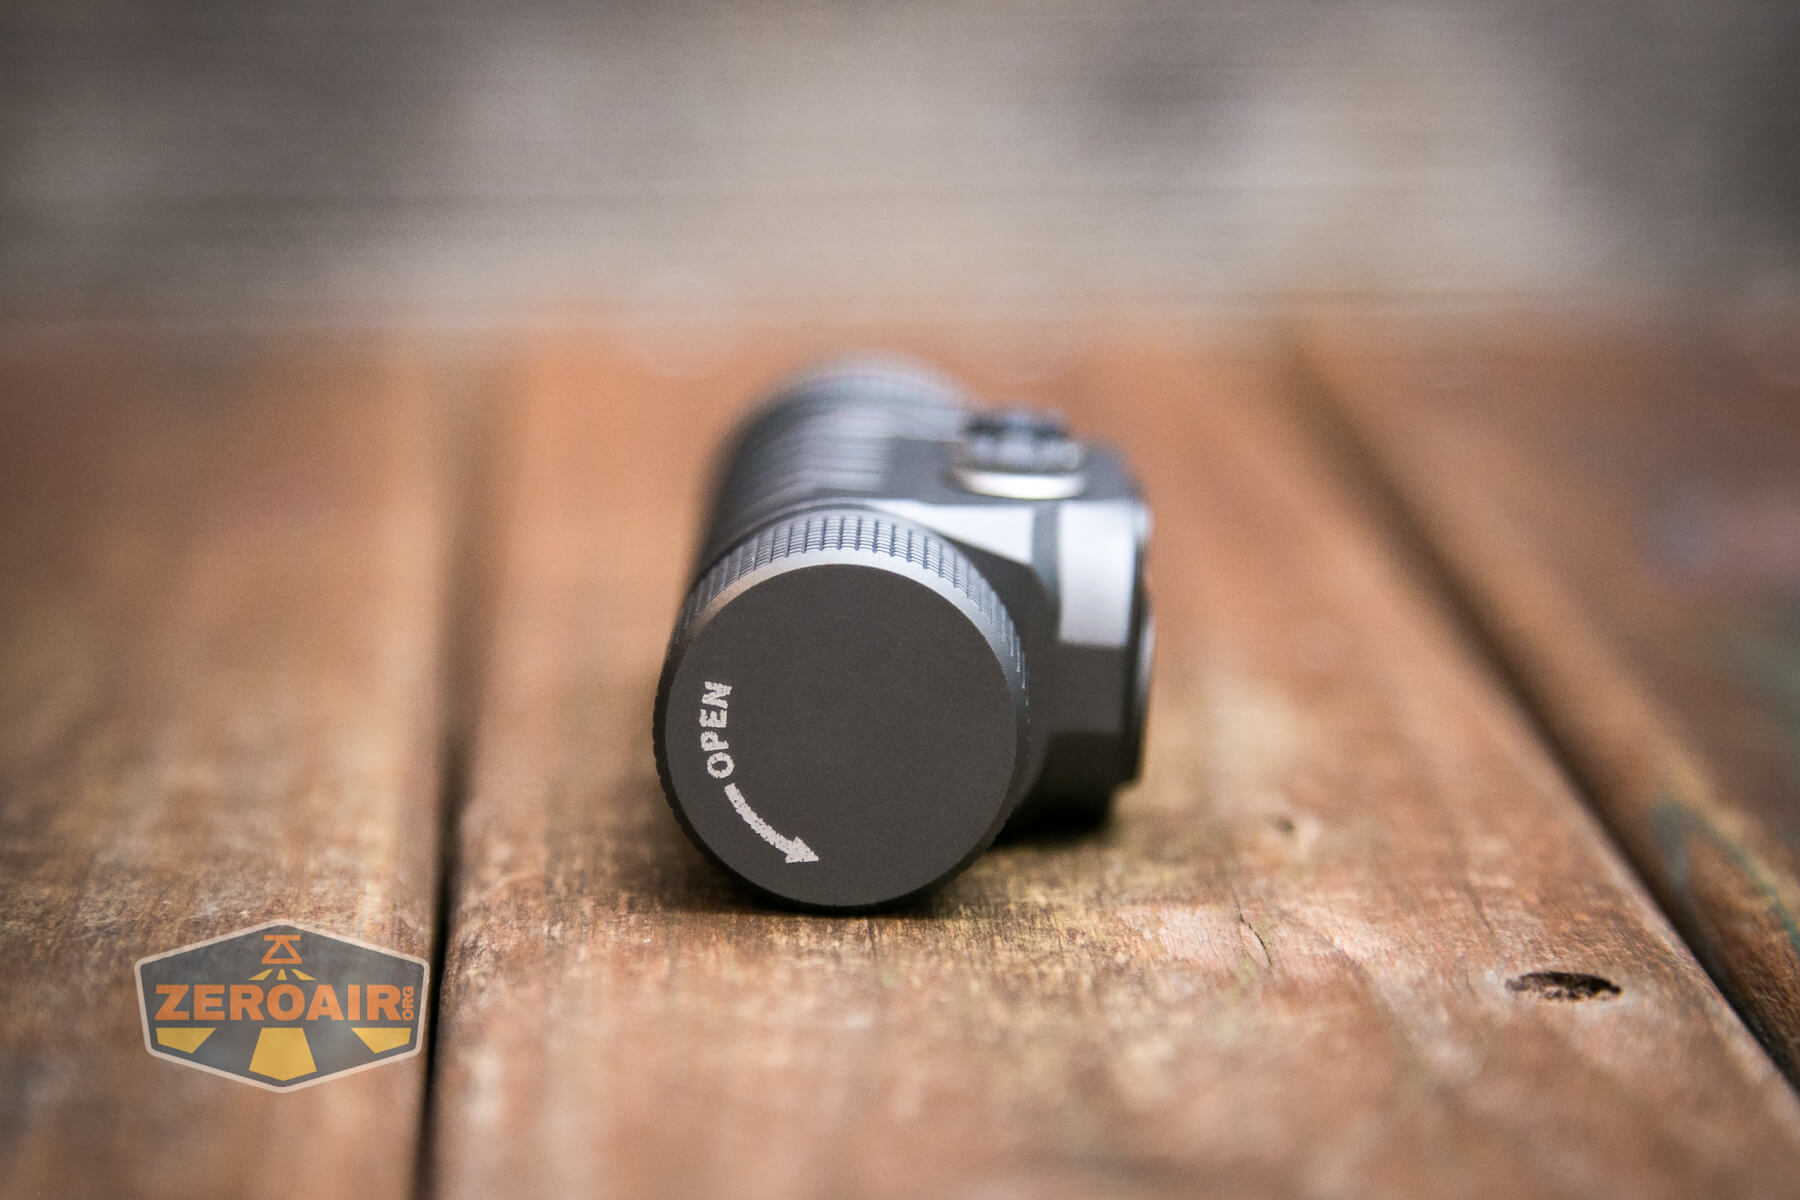
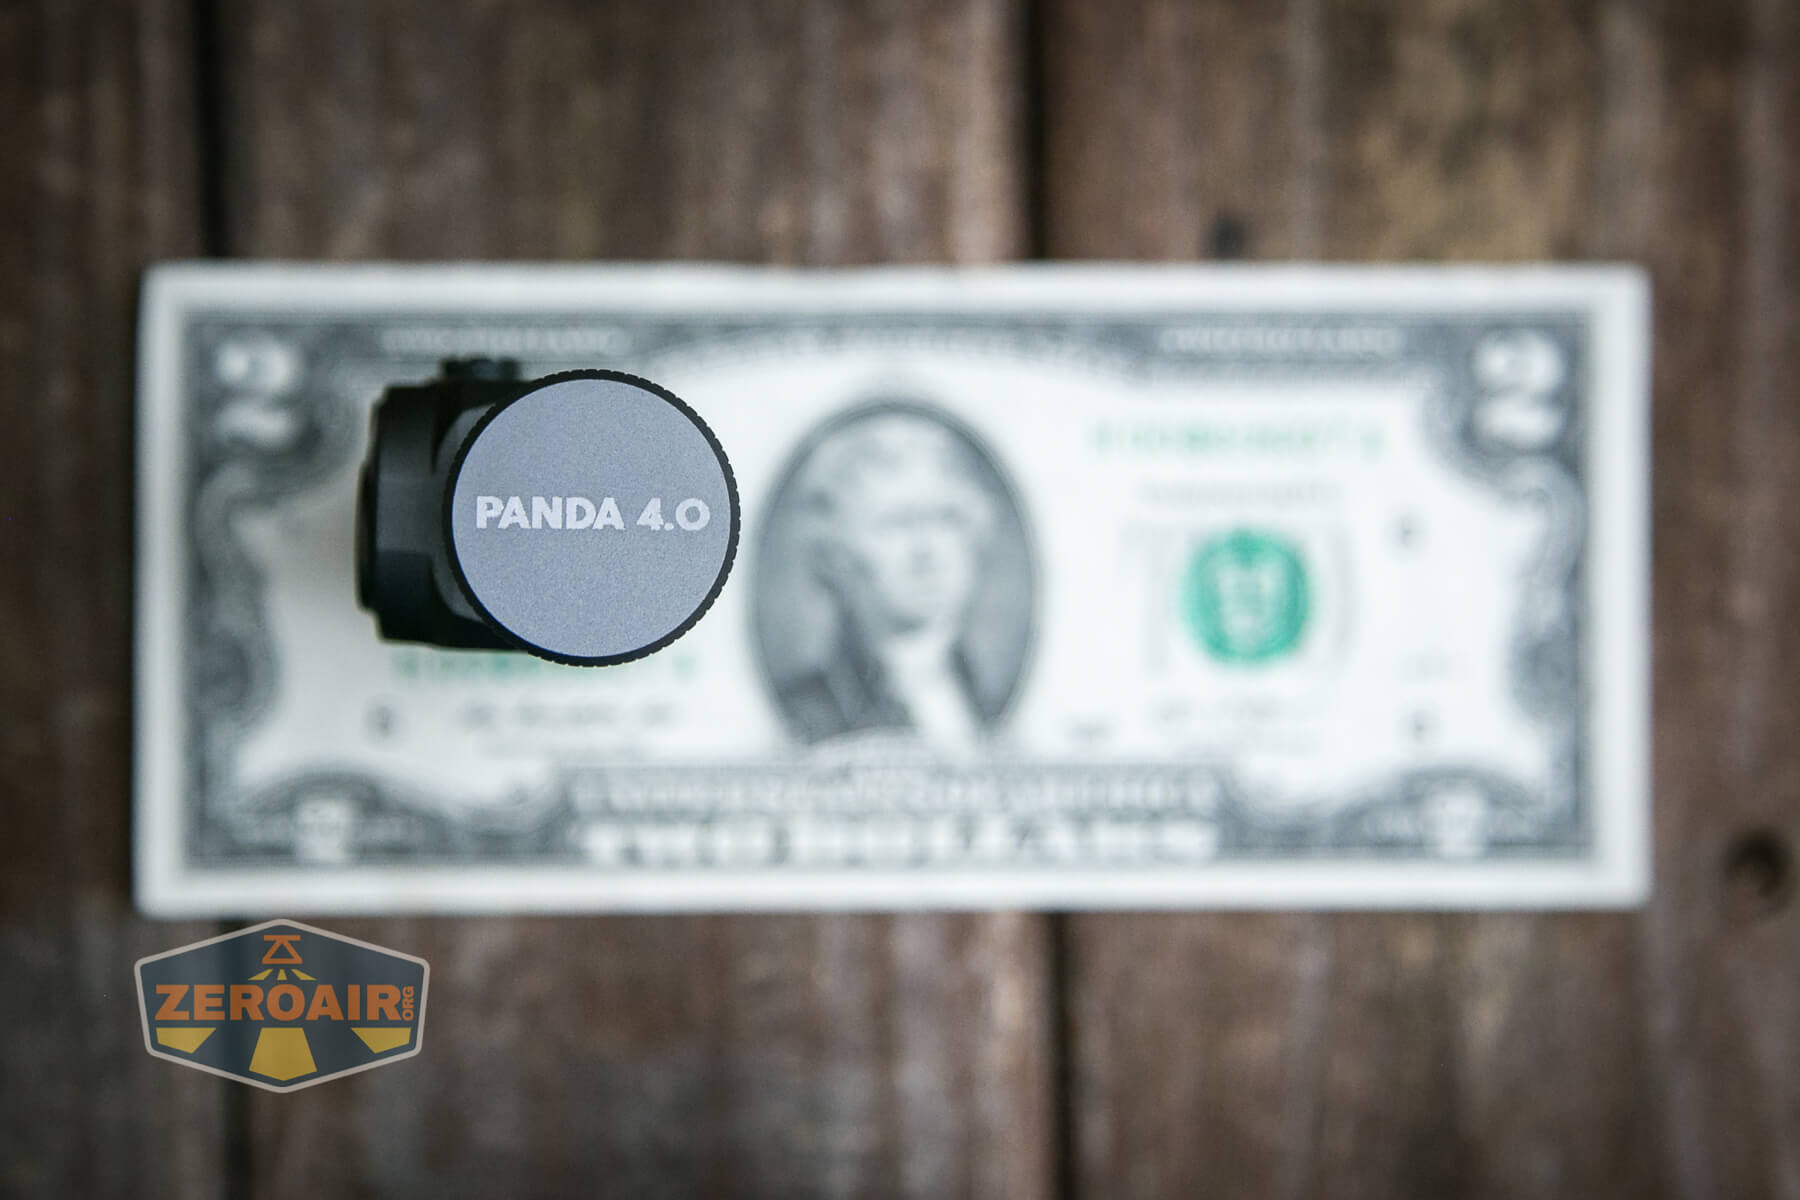
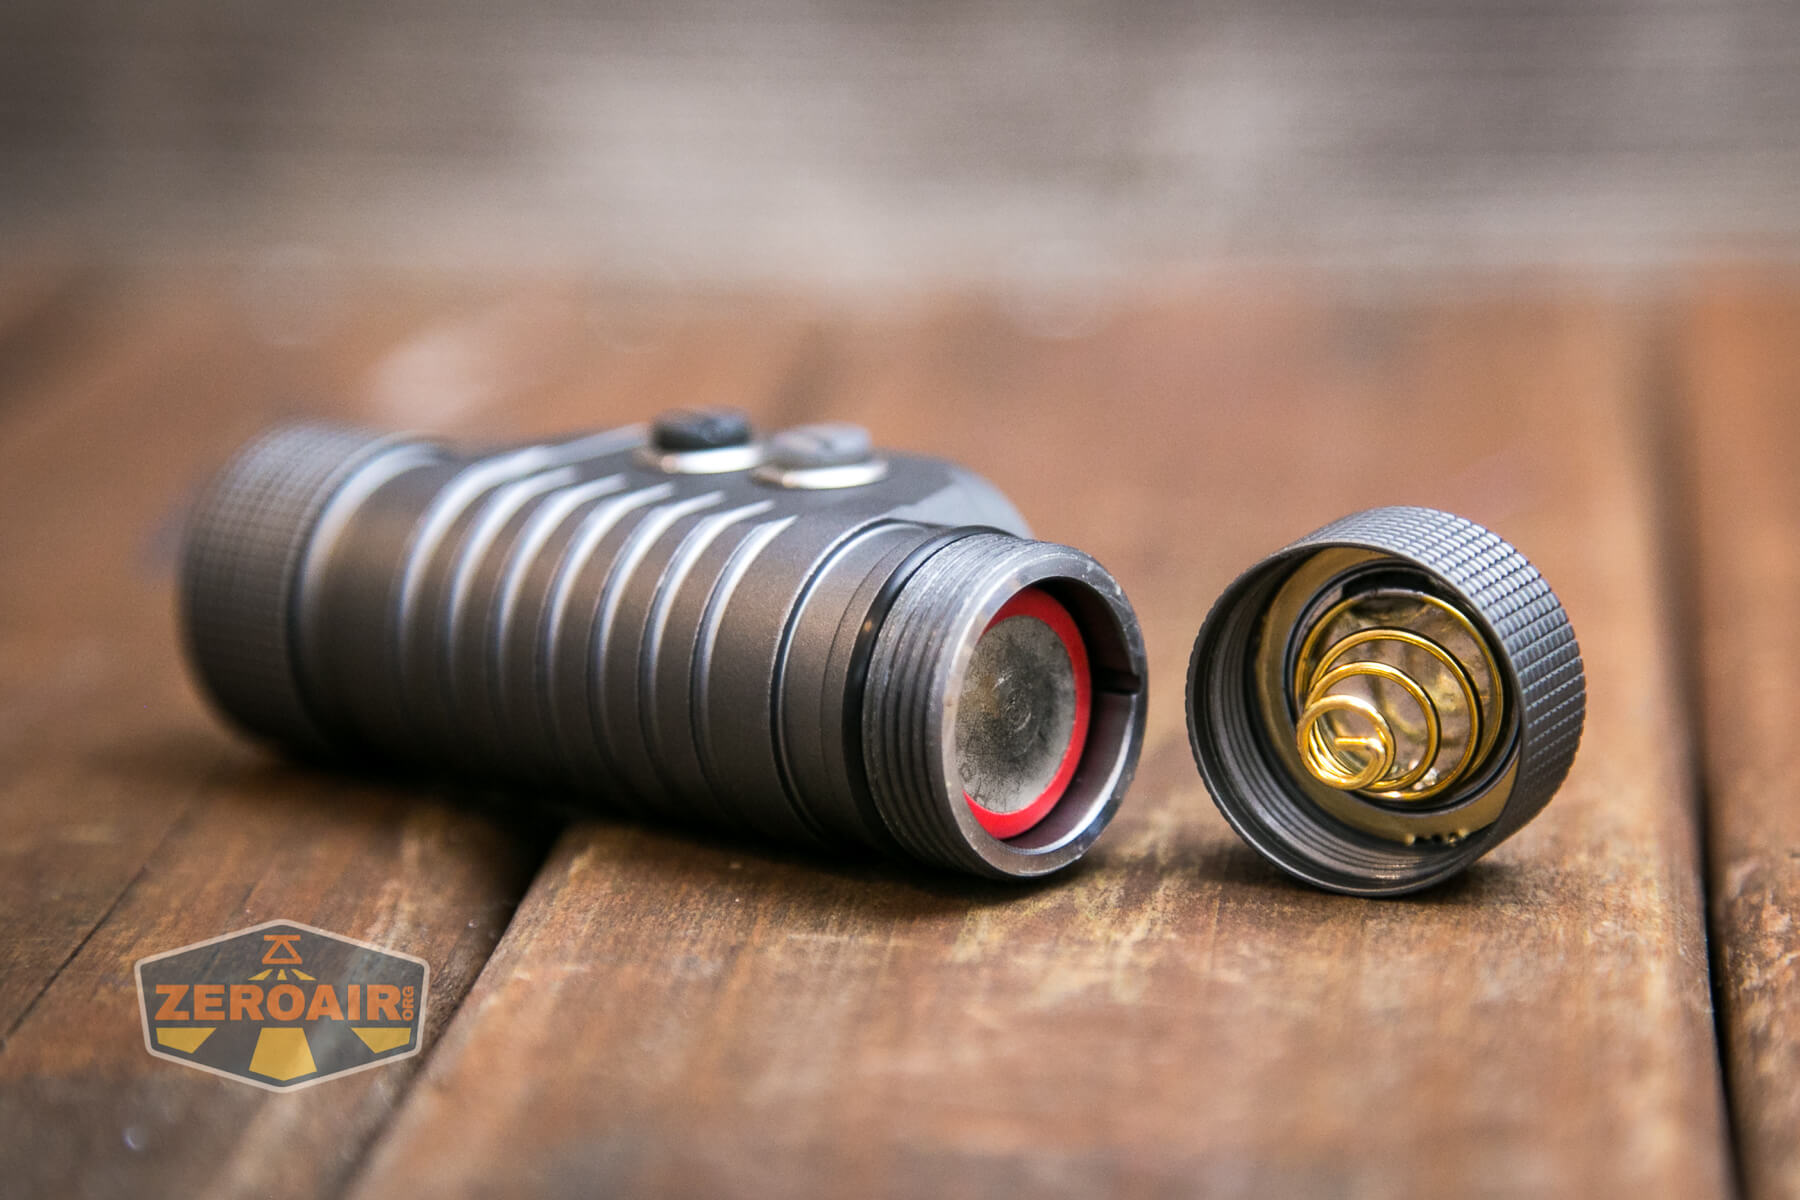
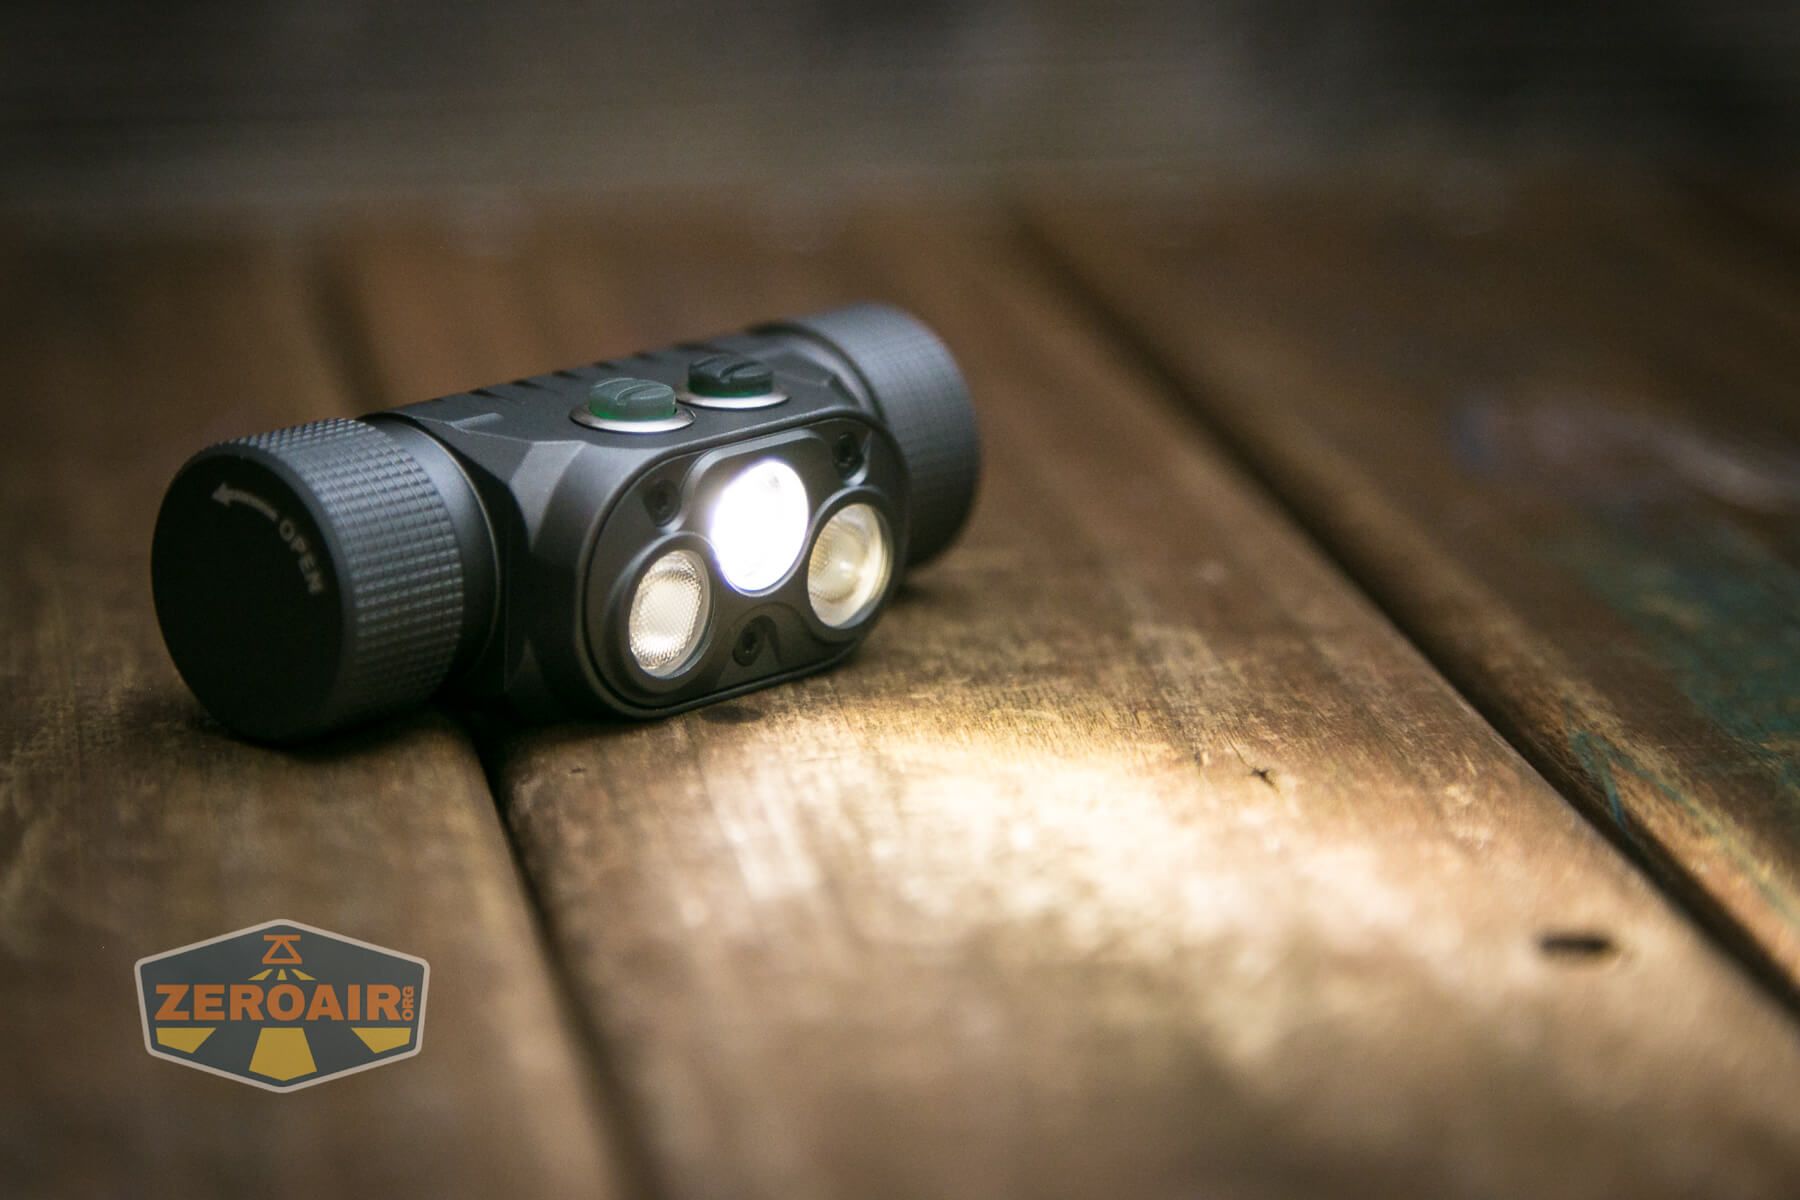
This tailcap is not removable.
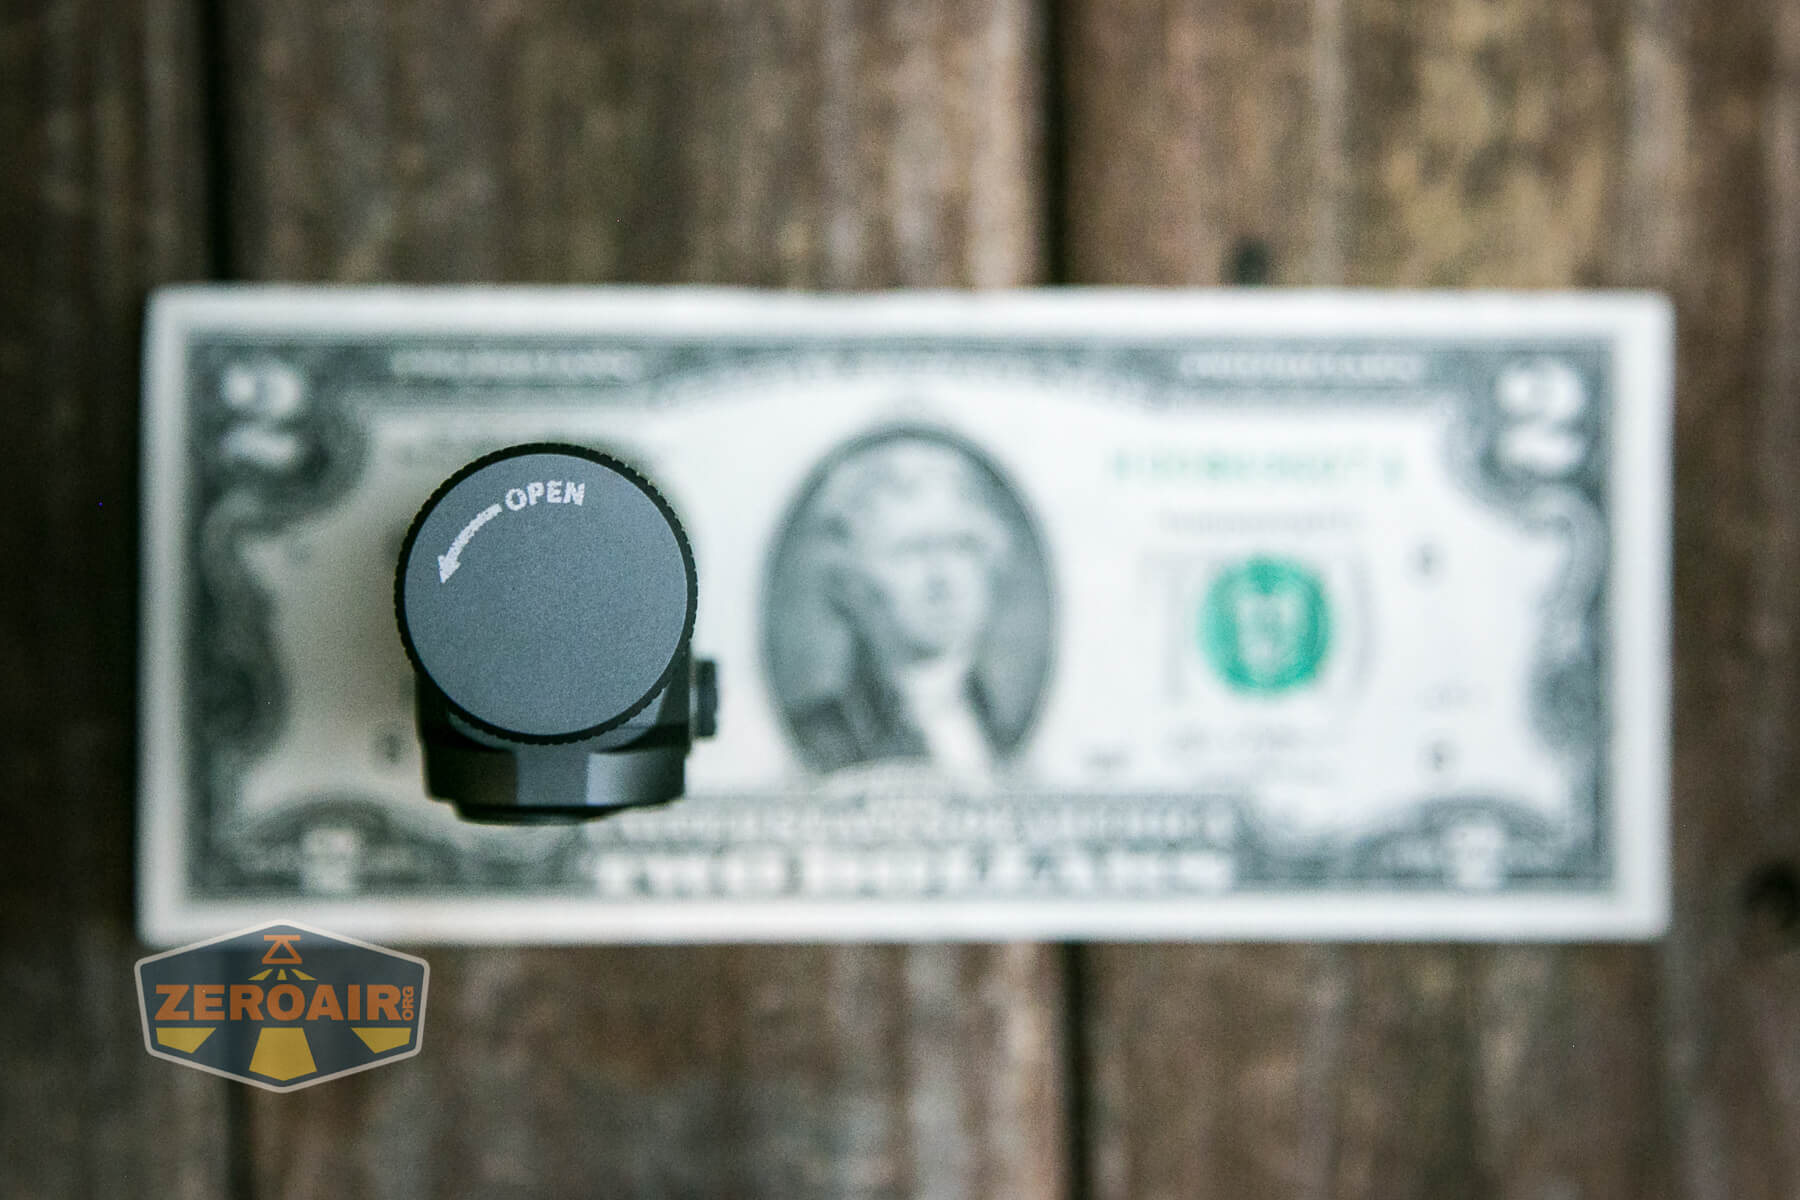
On the other hand, this tailcap is removable, and this is where you’ll swap cells.
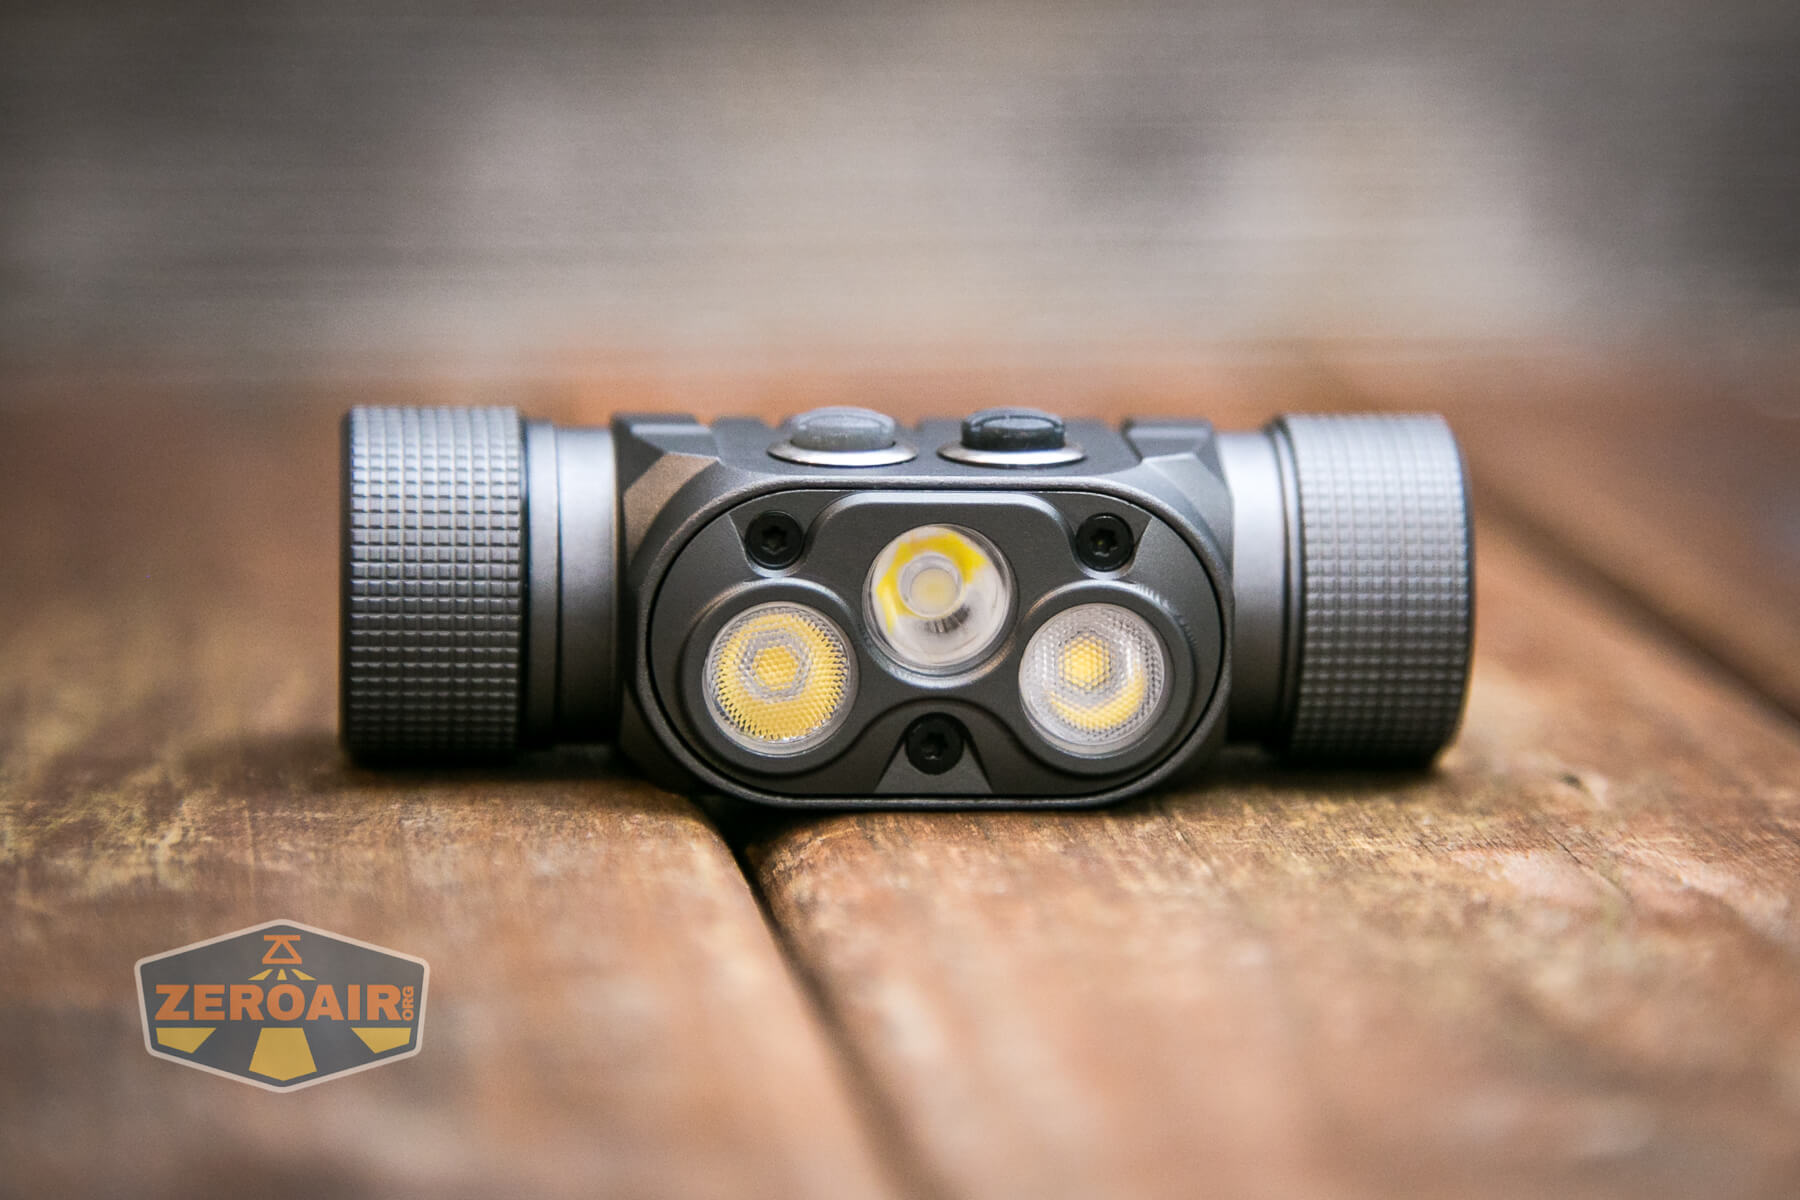
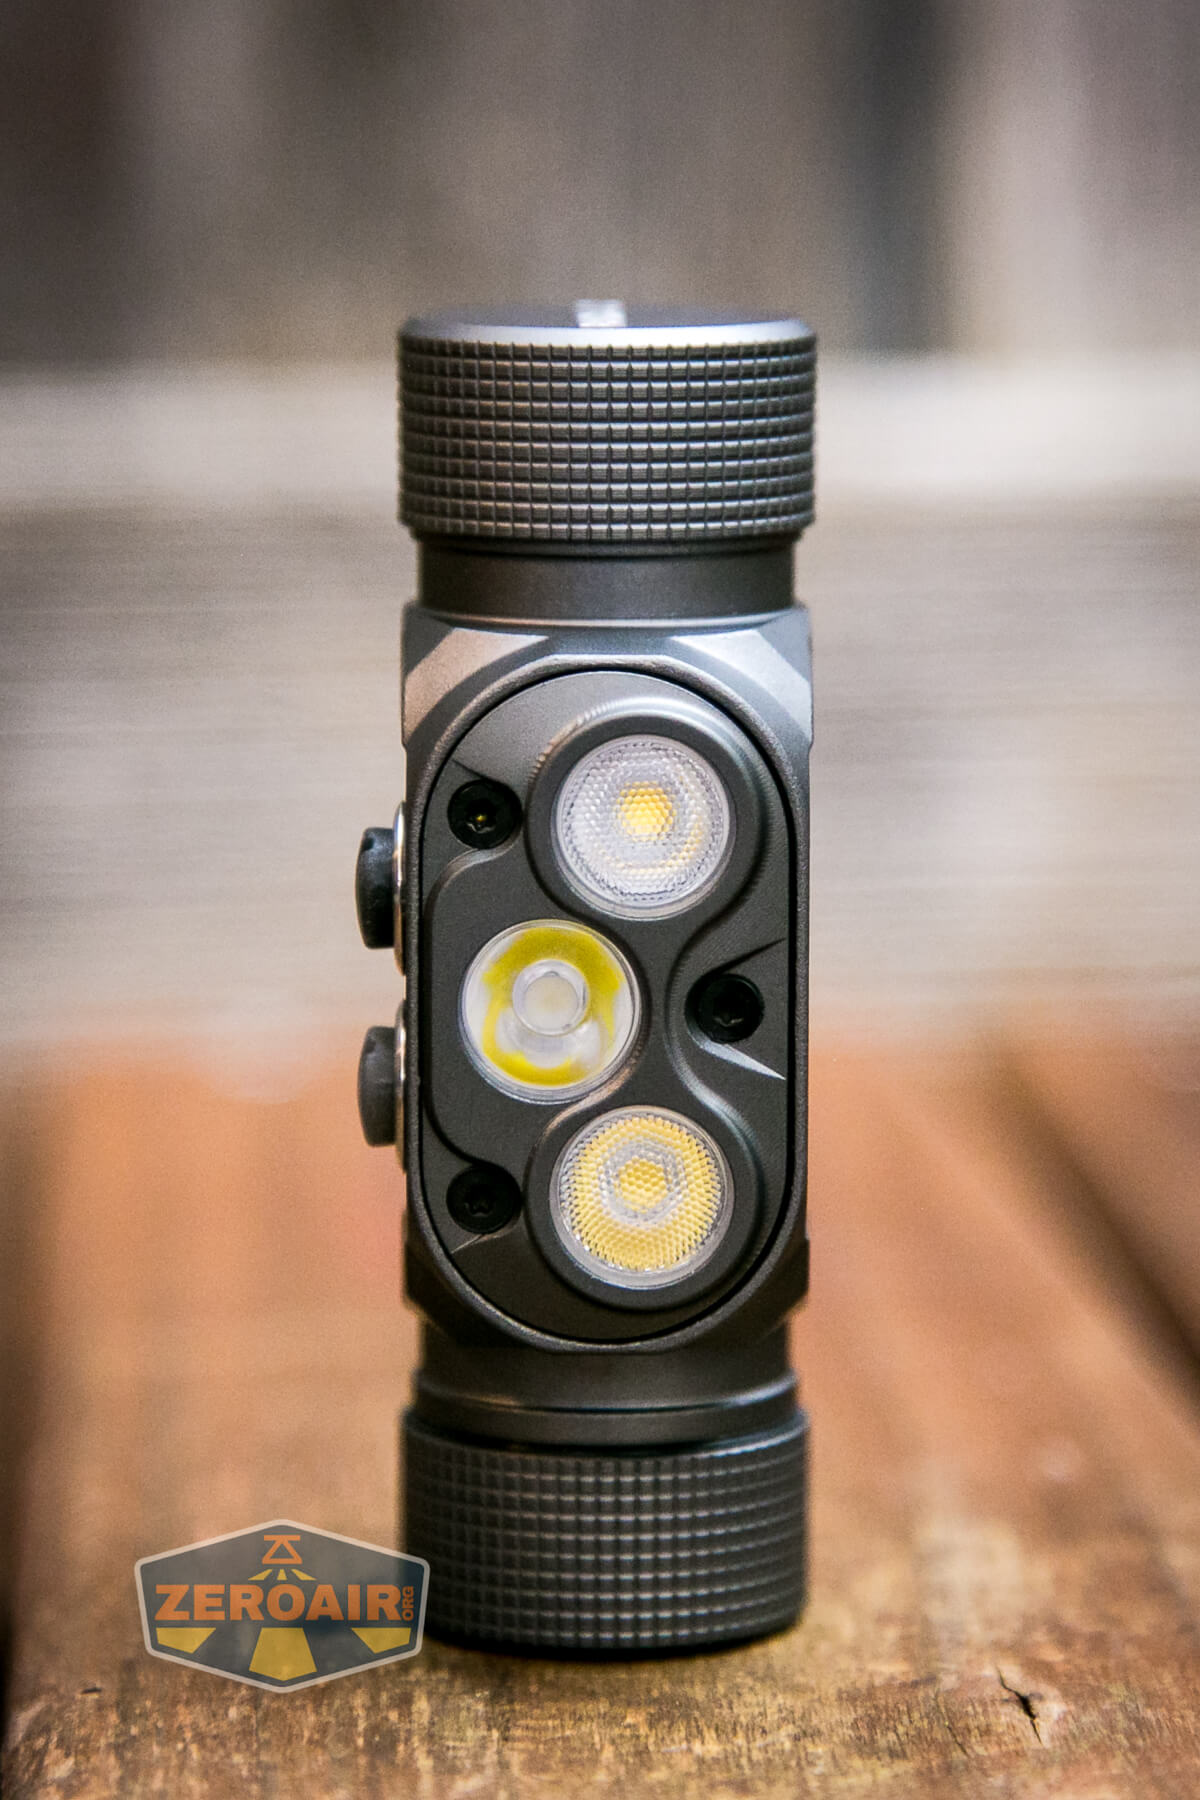
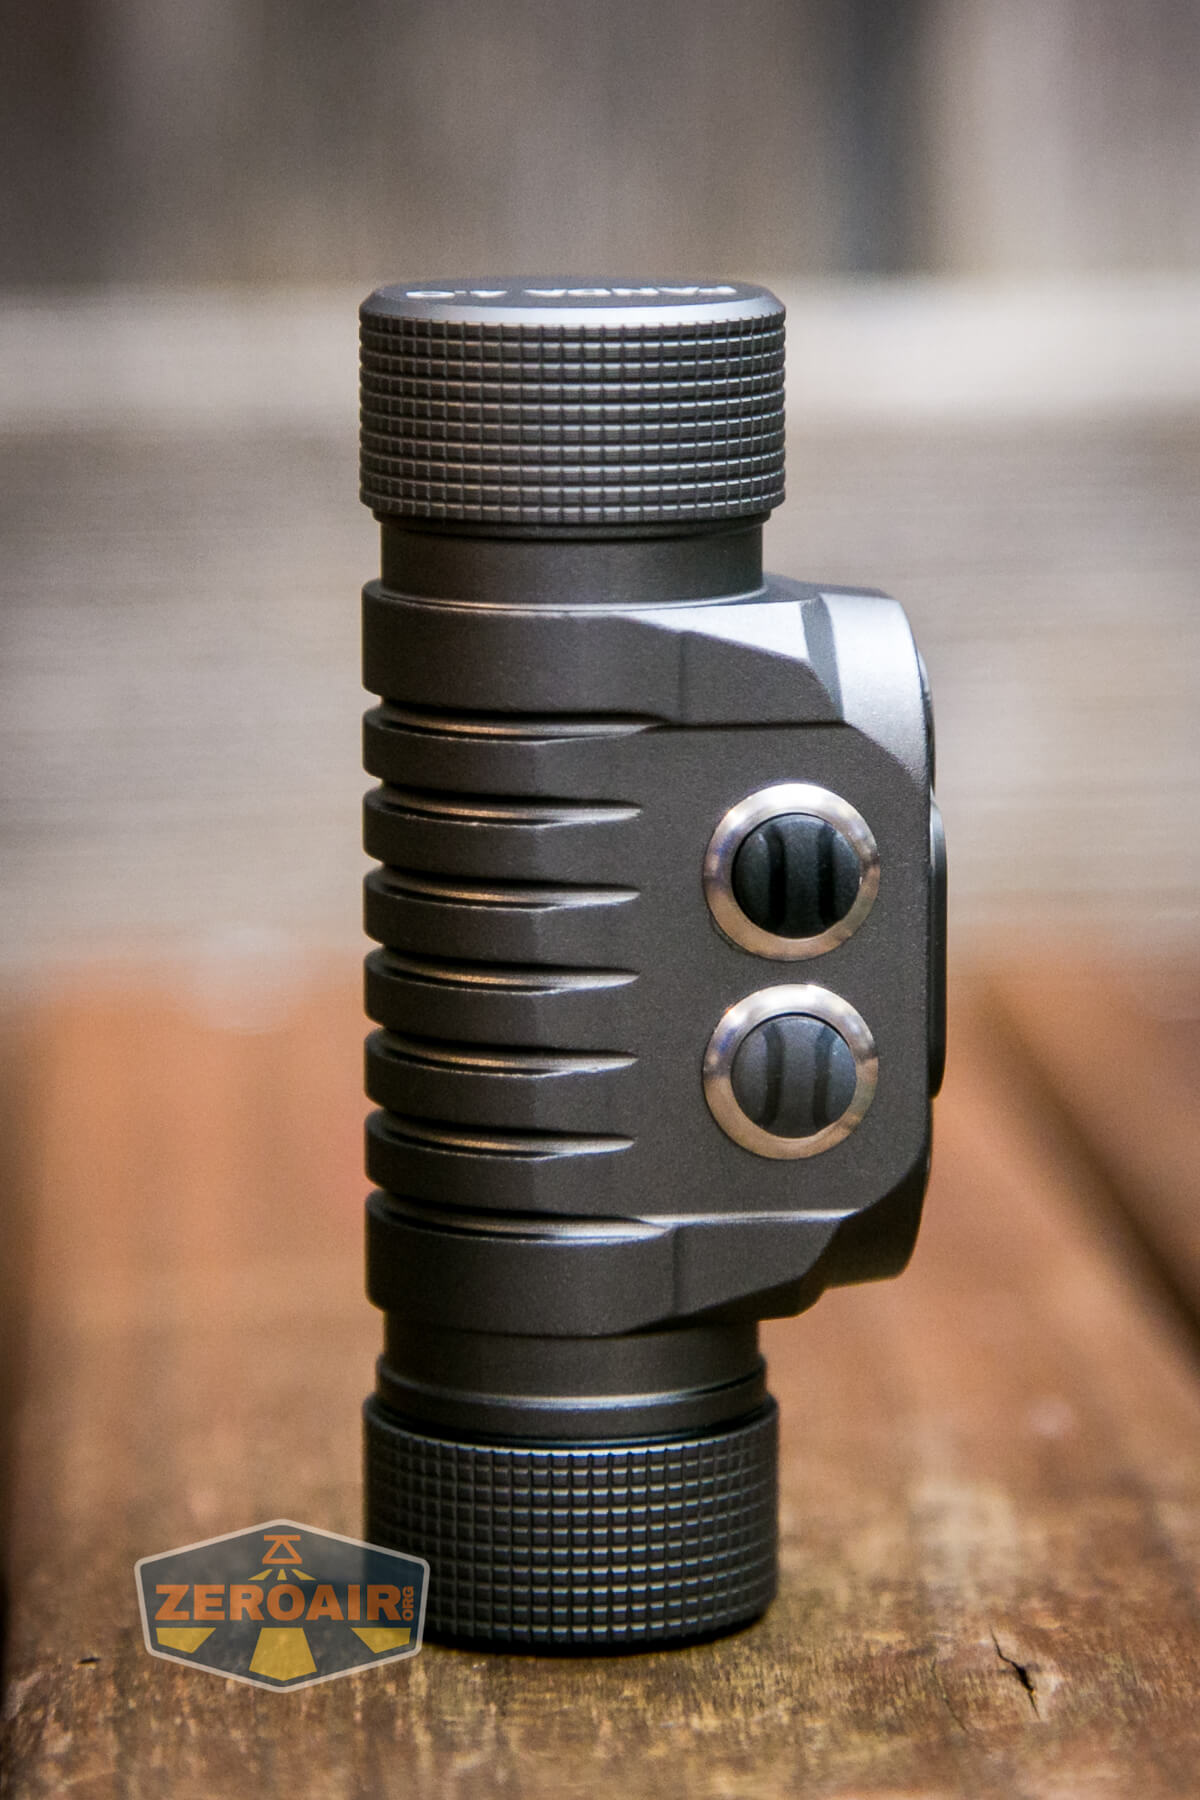
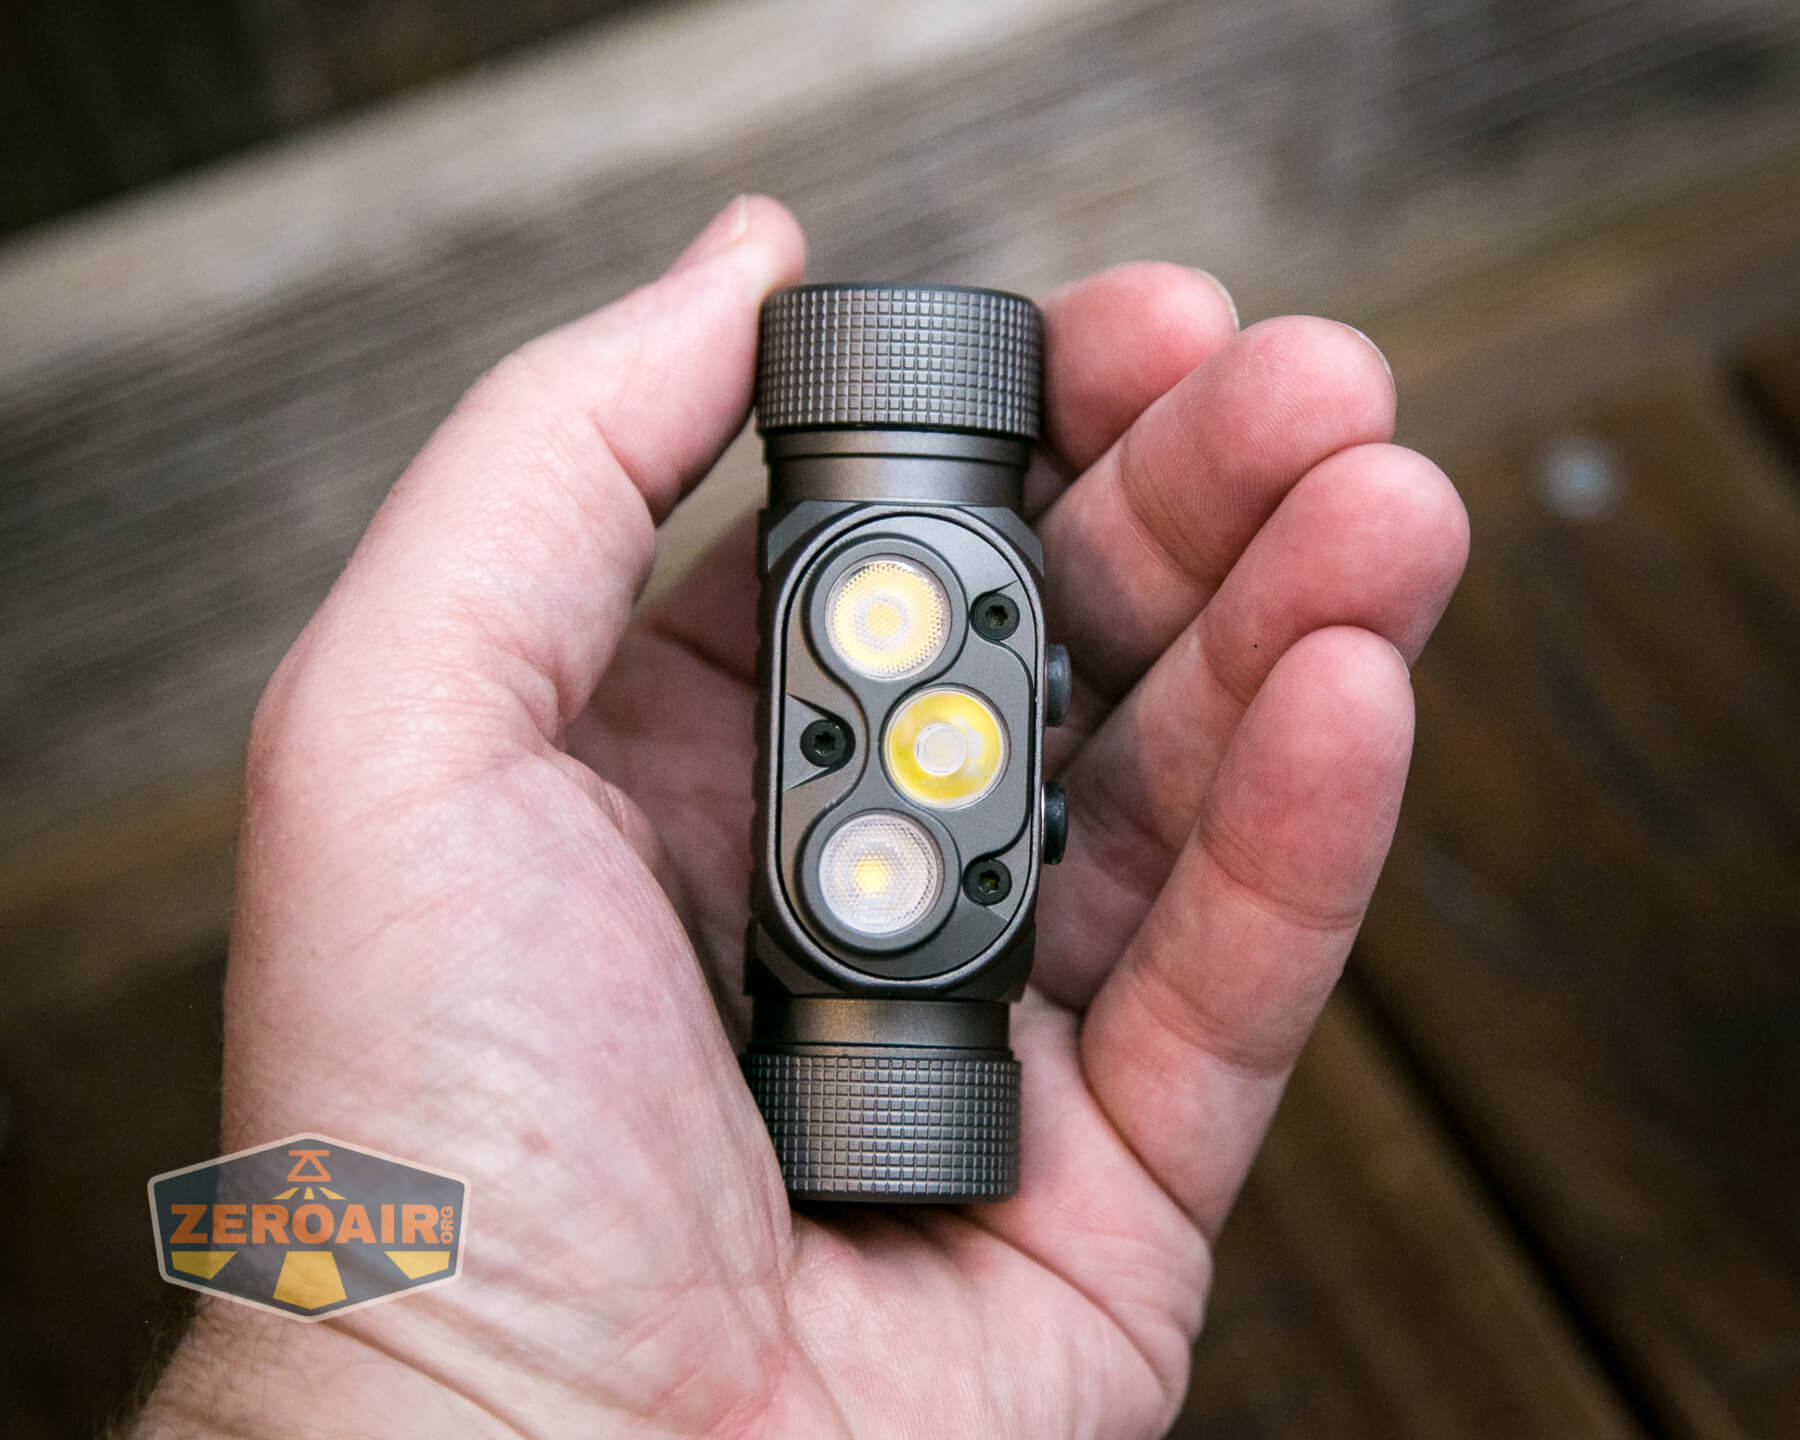
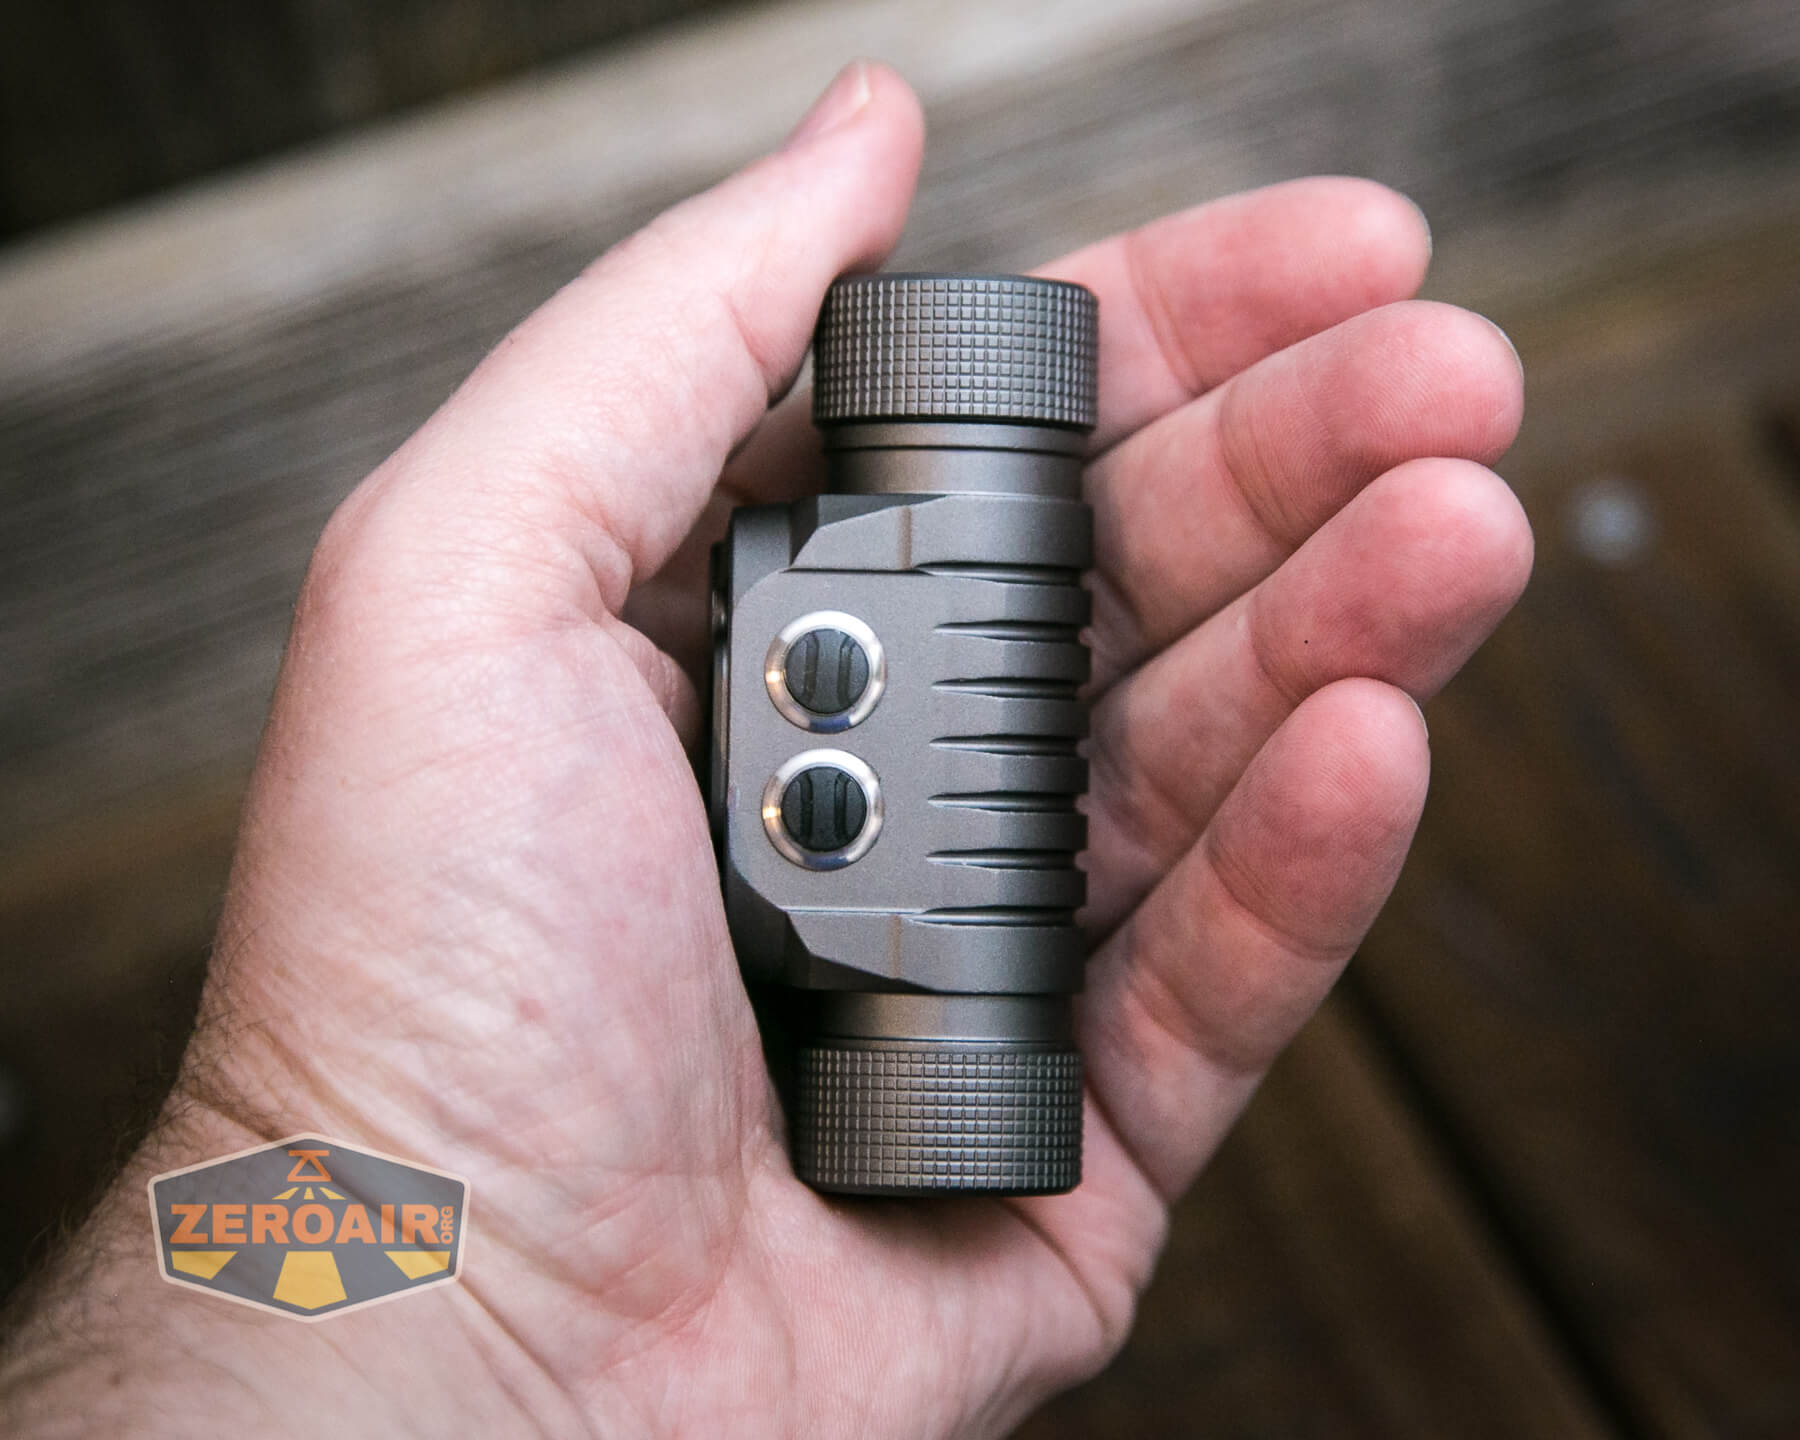
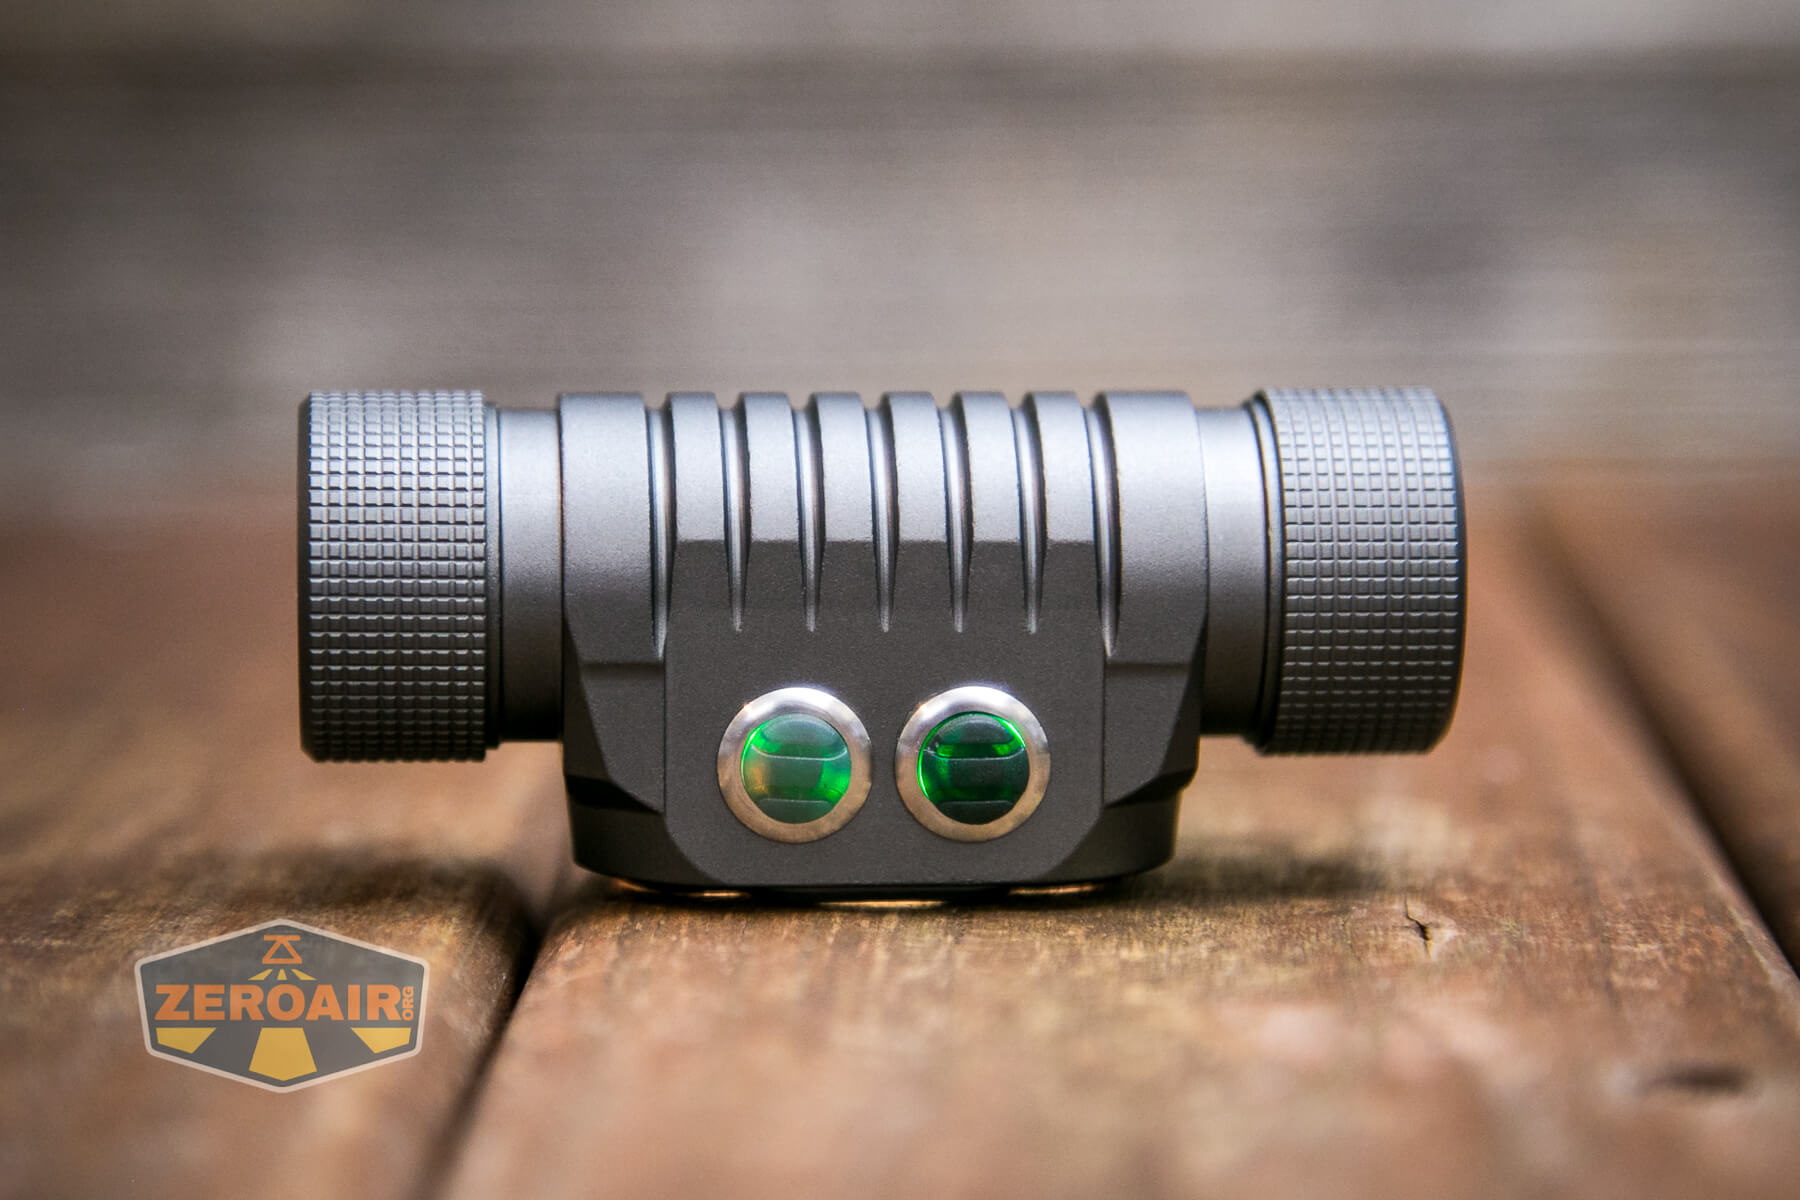
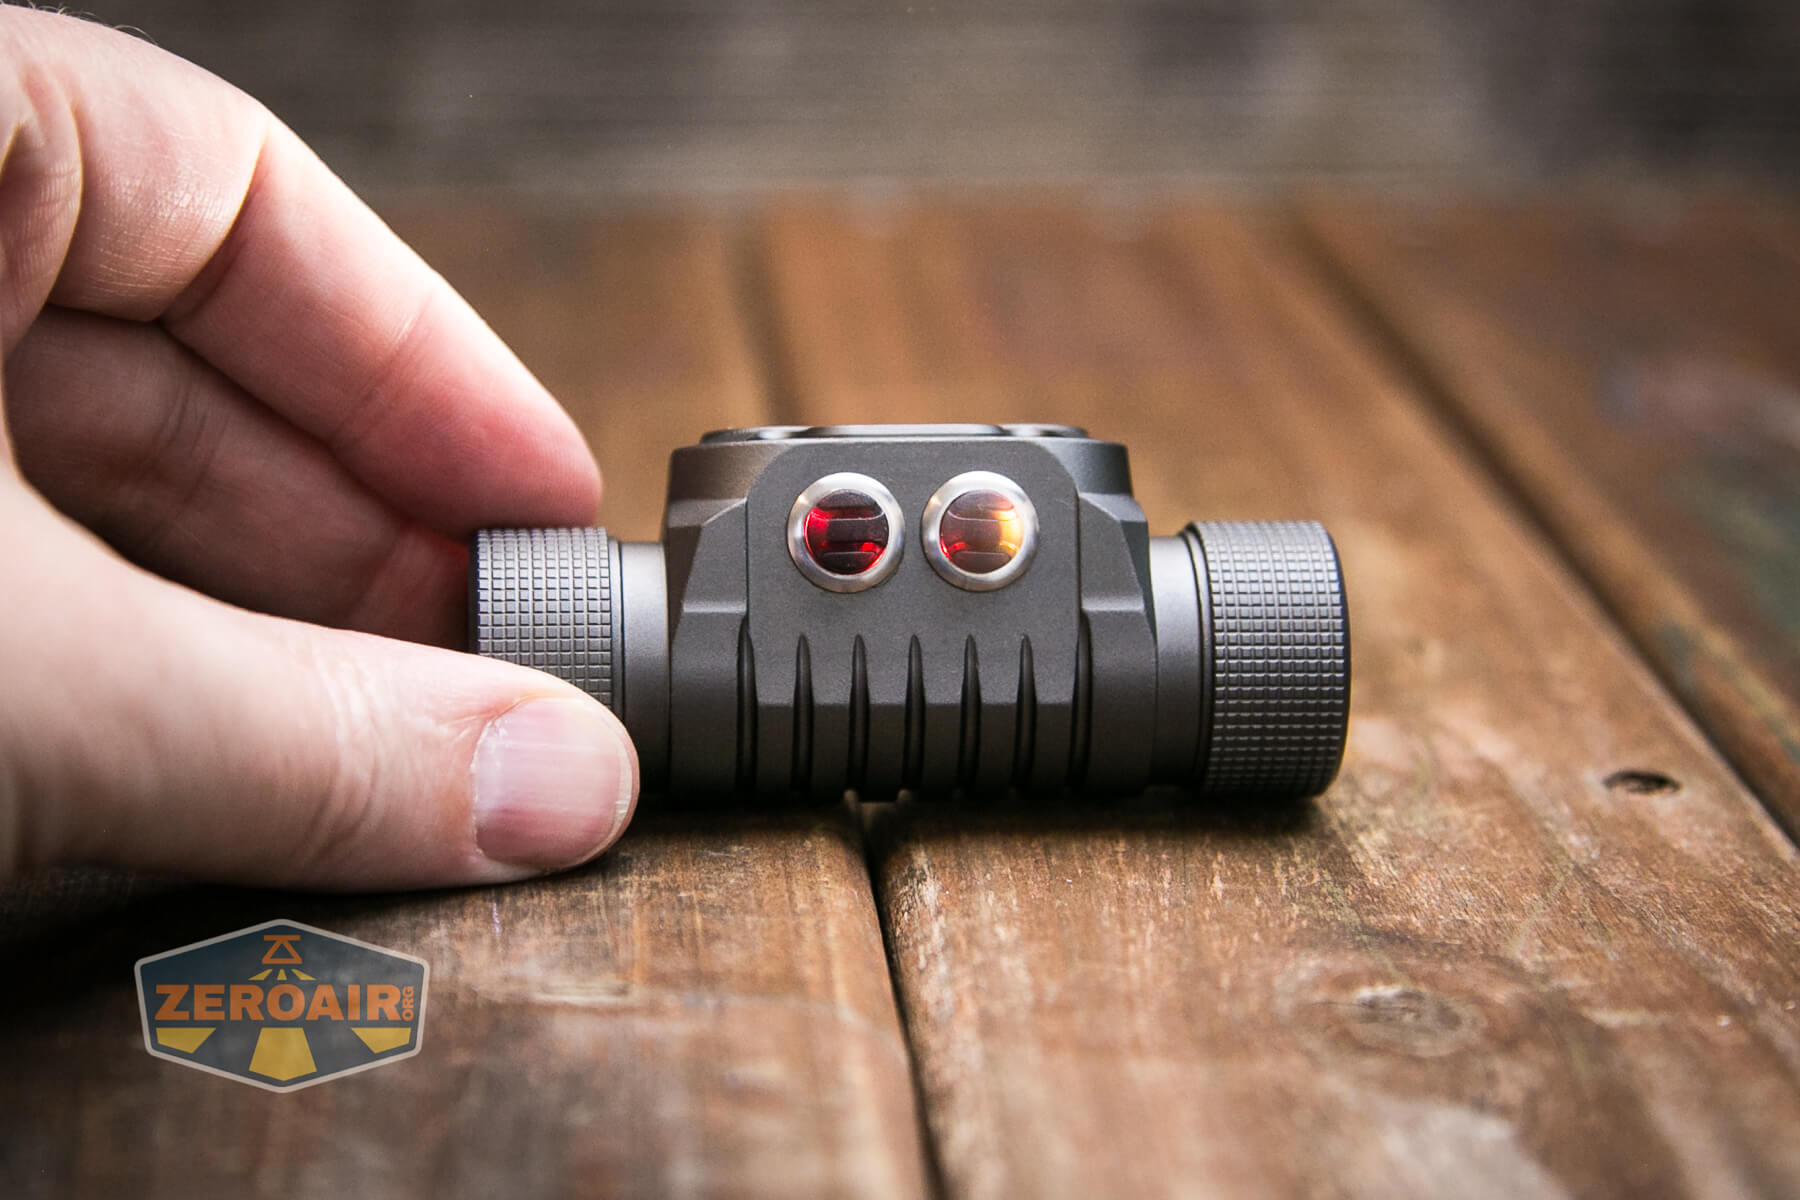
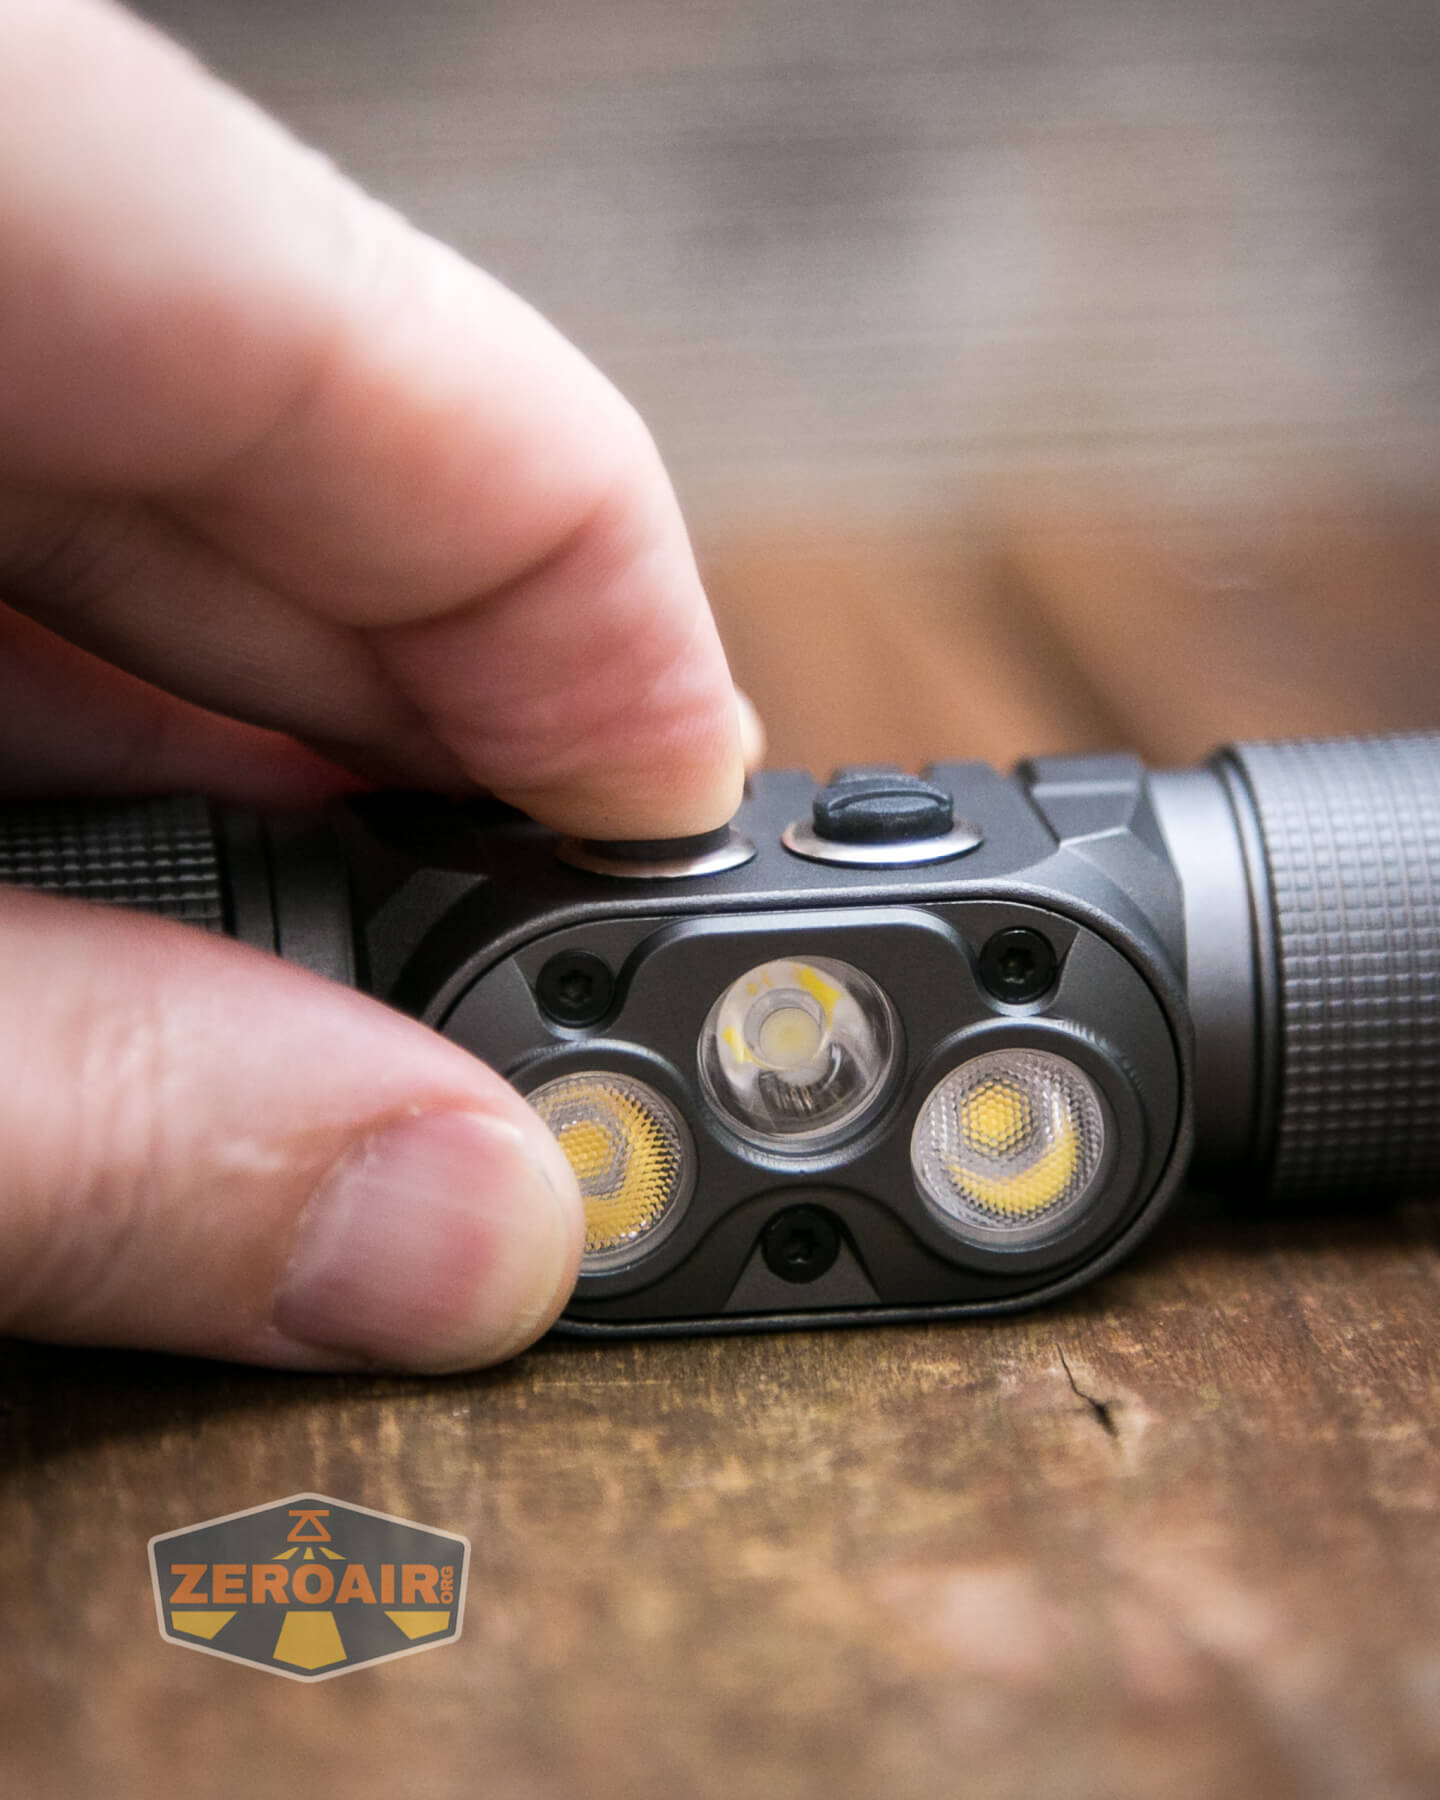
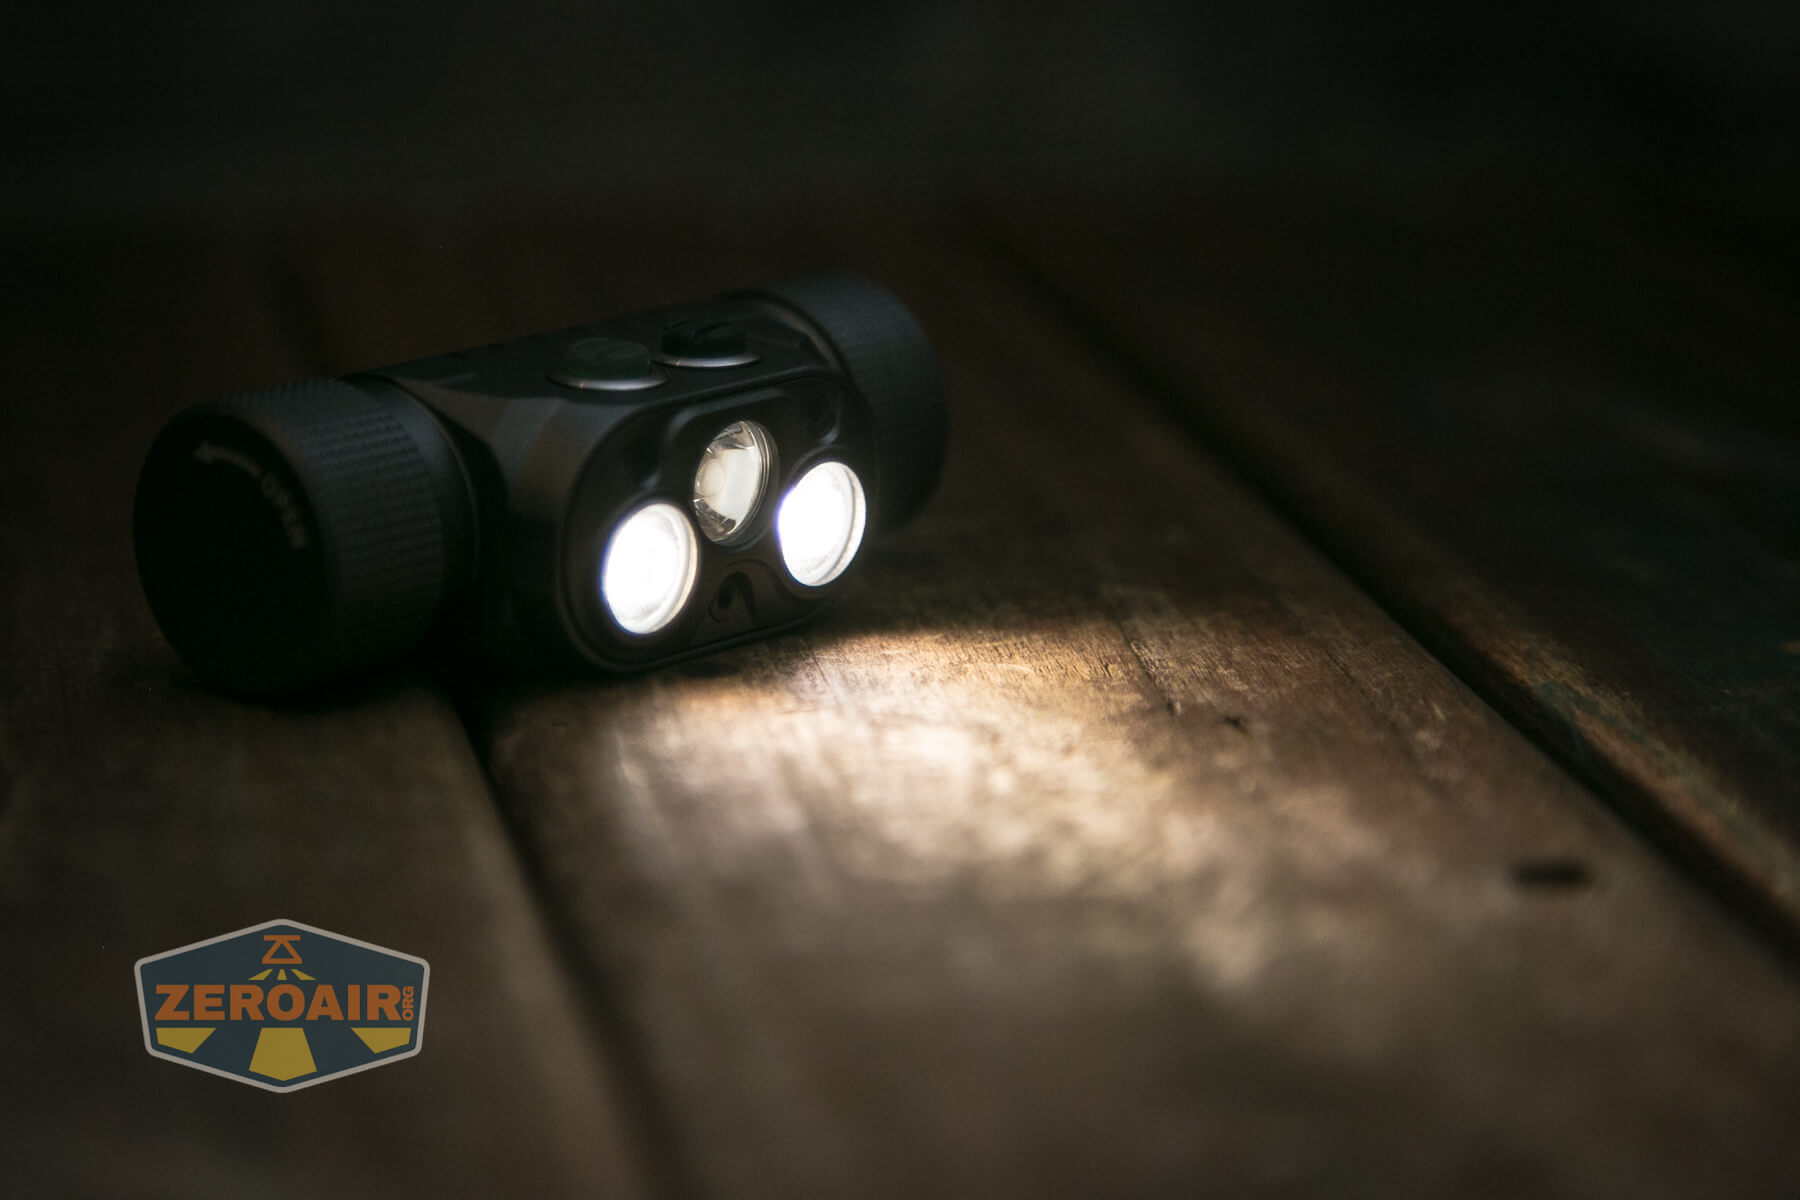
Switches here are just as we saw on the Panda 3R. Two indicating e-switches, side by side on the top of the light.
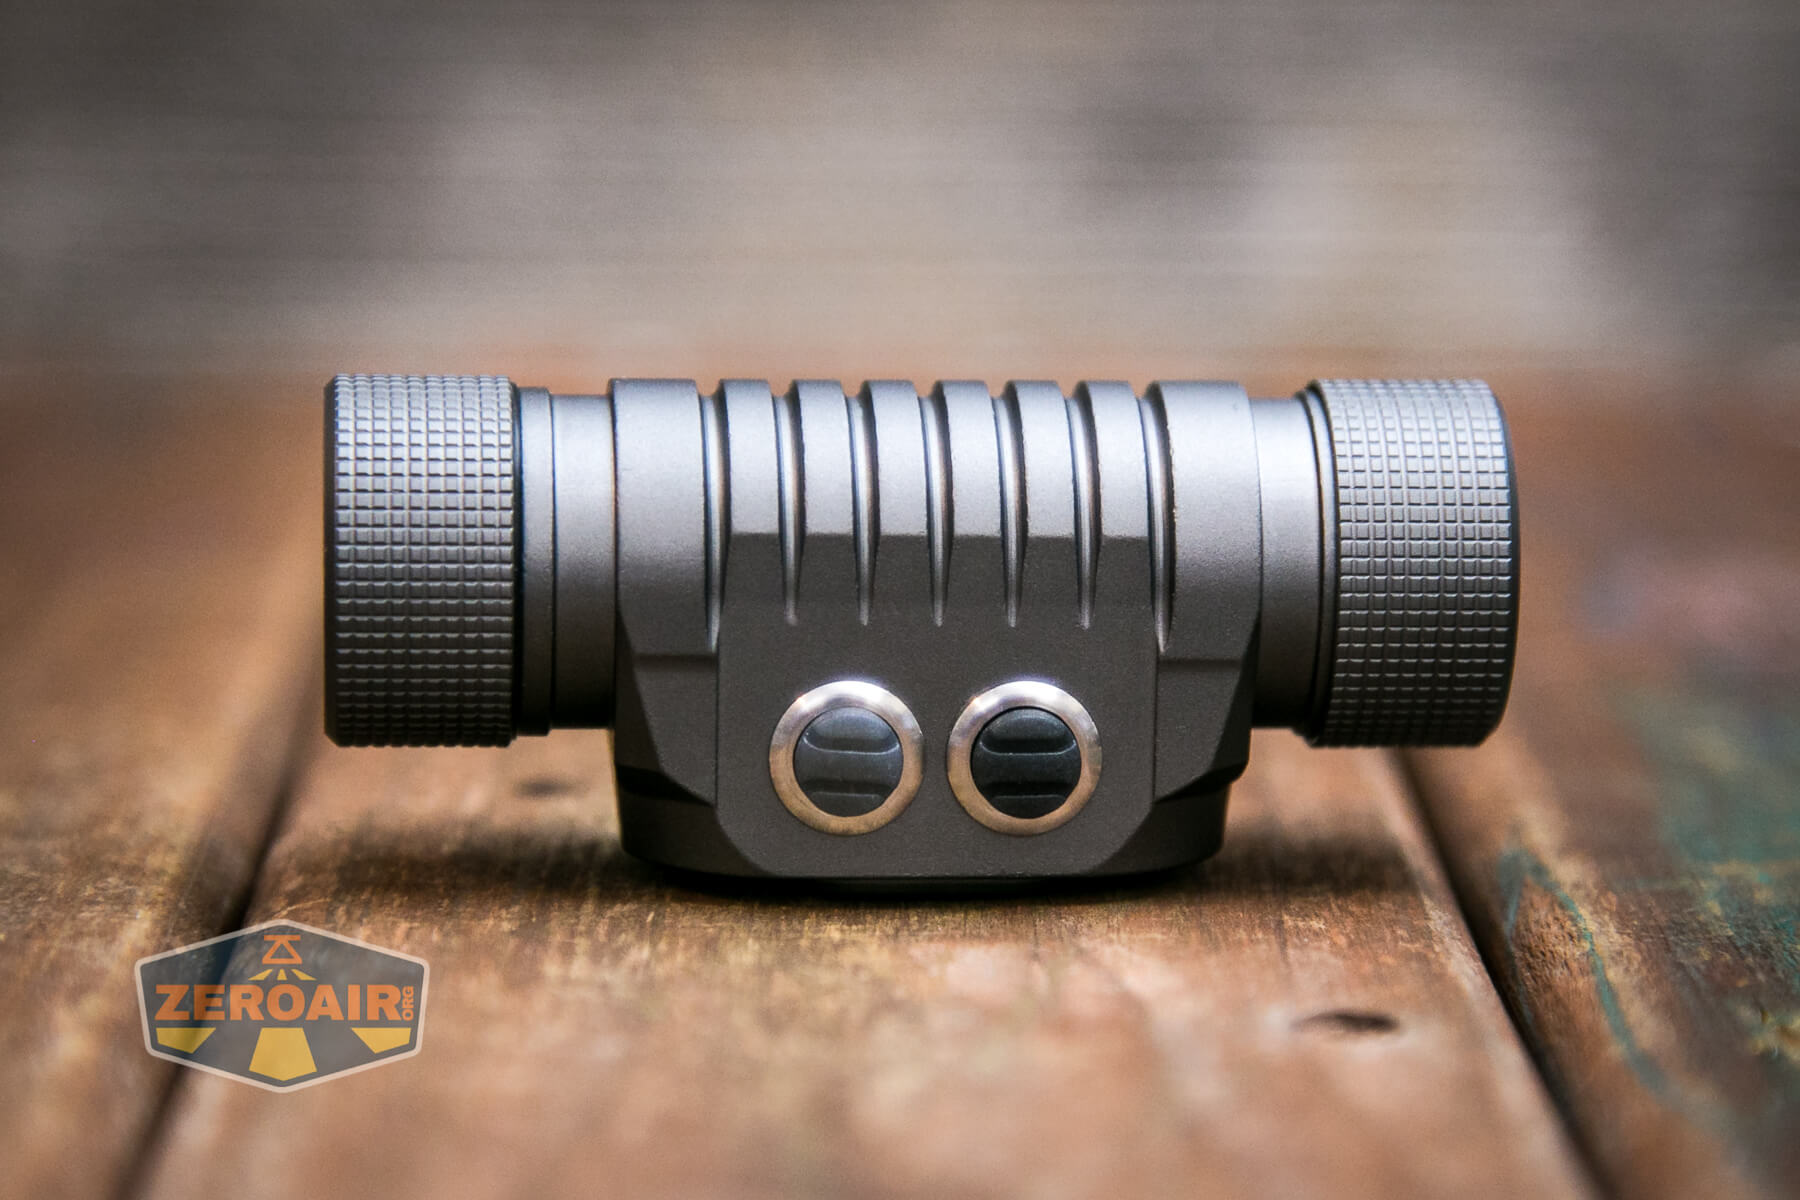
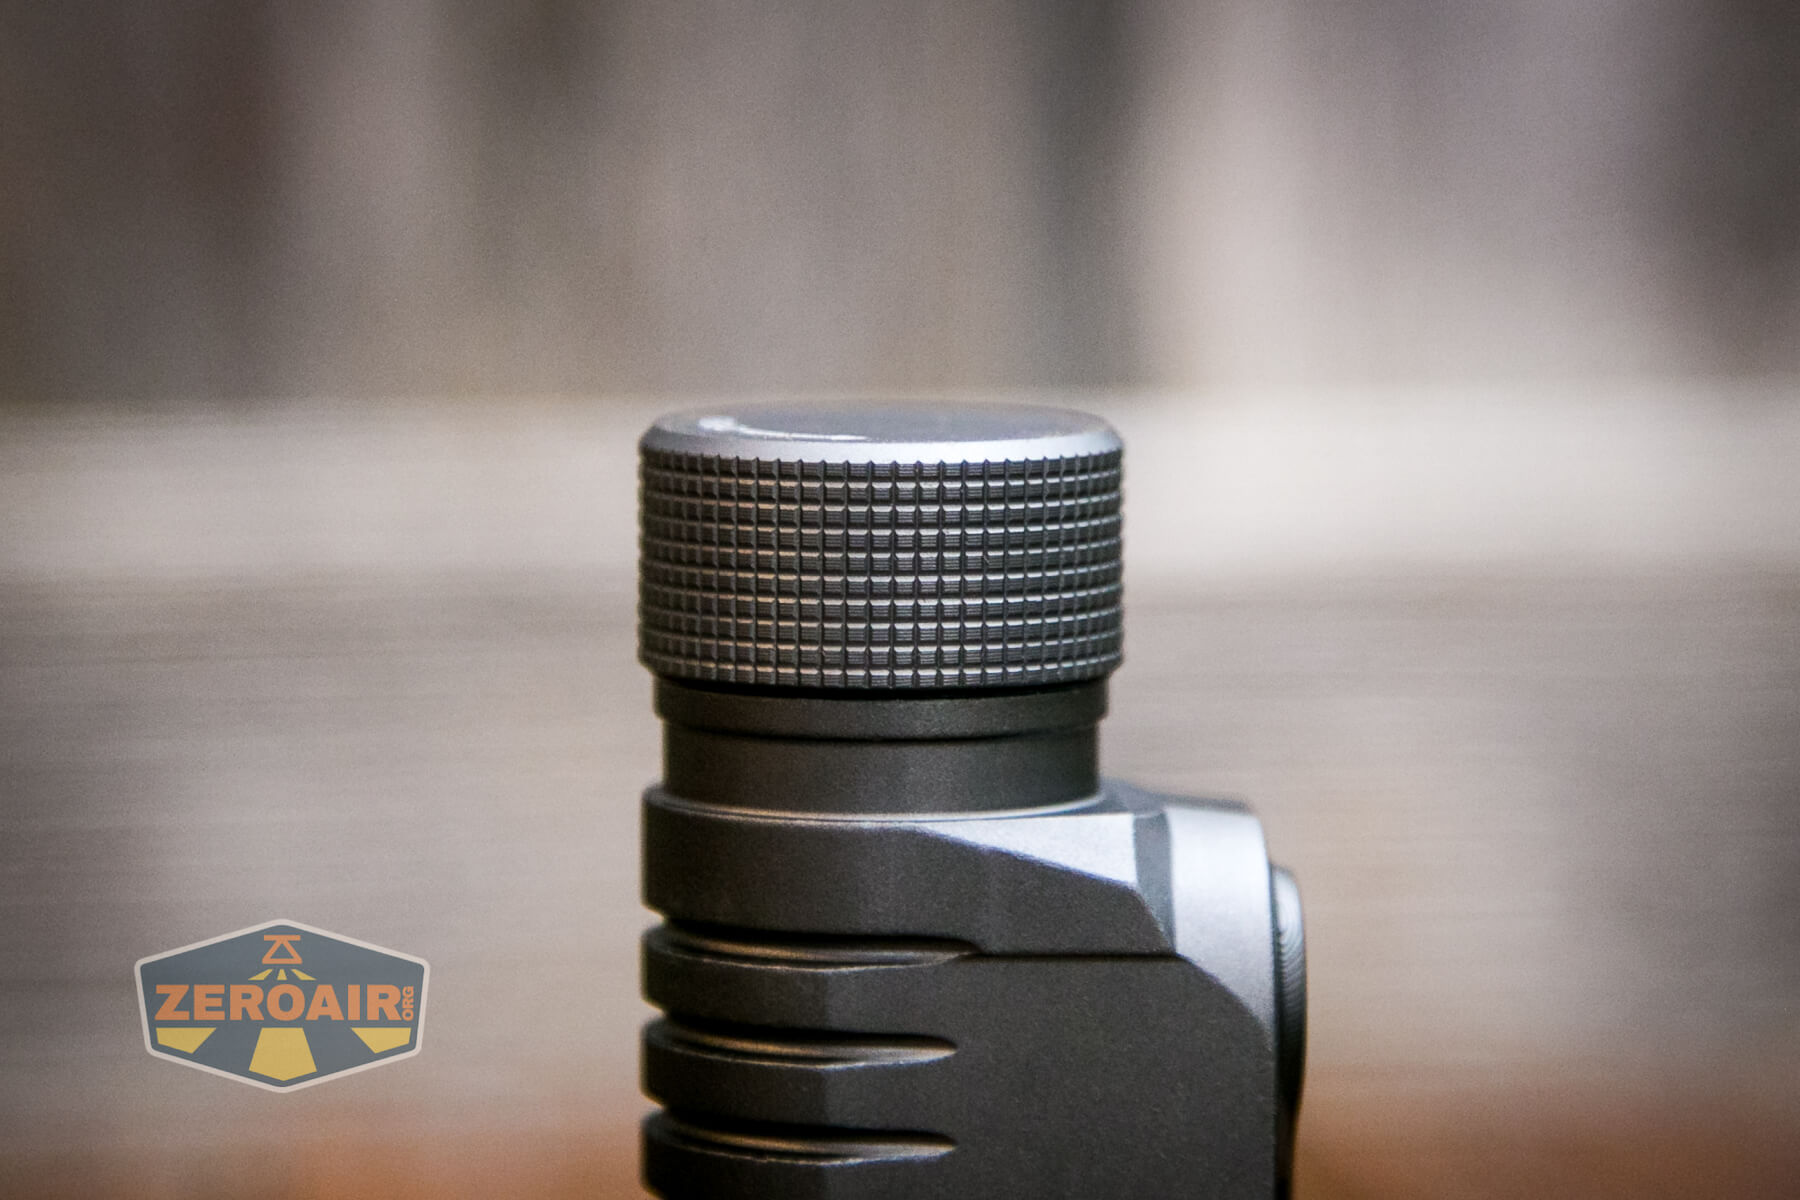
I quite like the grip area on the tailcap. It’s not aggressive but perfectly suitable for grip. It’s not really knurling, either – it seems to be a milled grill pattern.
Threads on the removable-tailcap end are nice and smooth. They’re anodized and have an appropriate amount of lube. It’s possible to lock the light out mechanically just by loosening this tailcap very minimally.
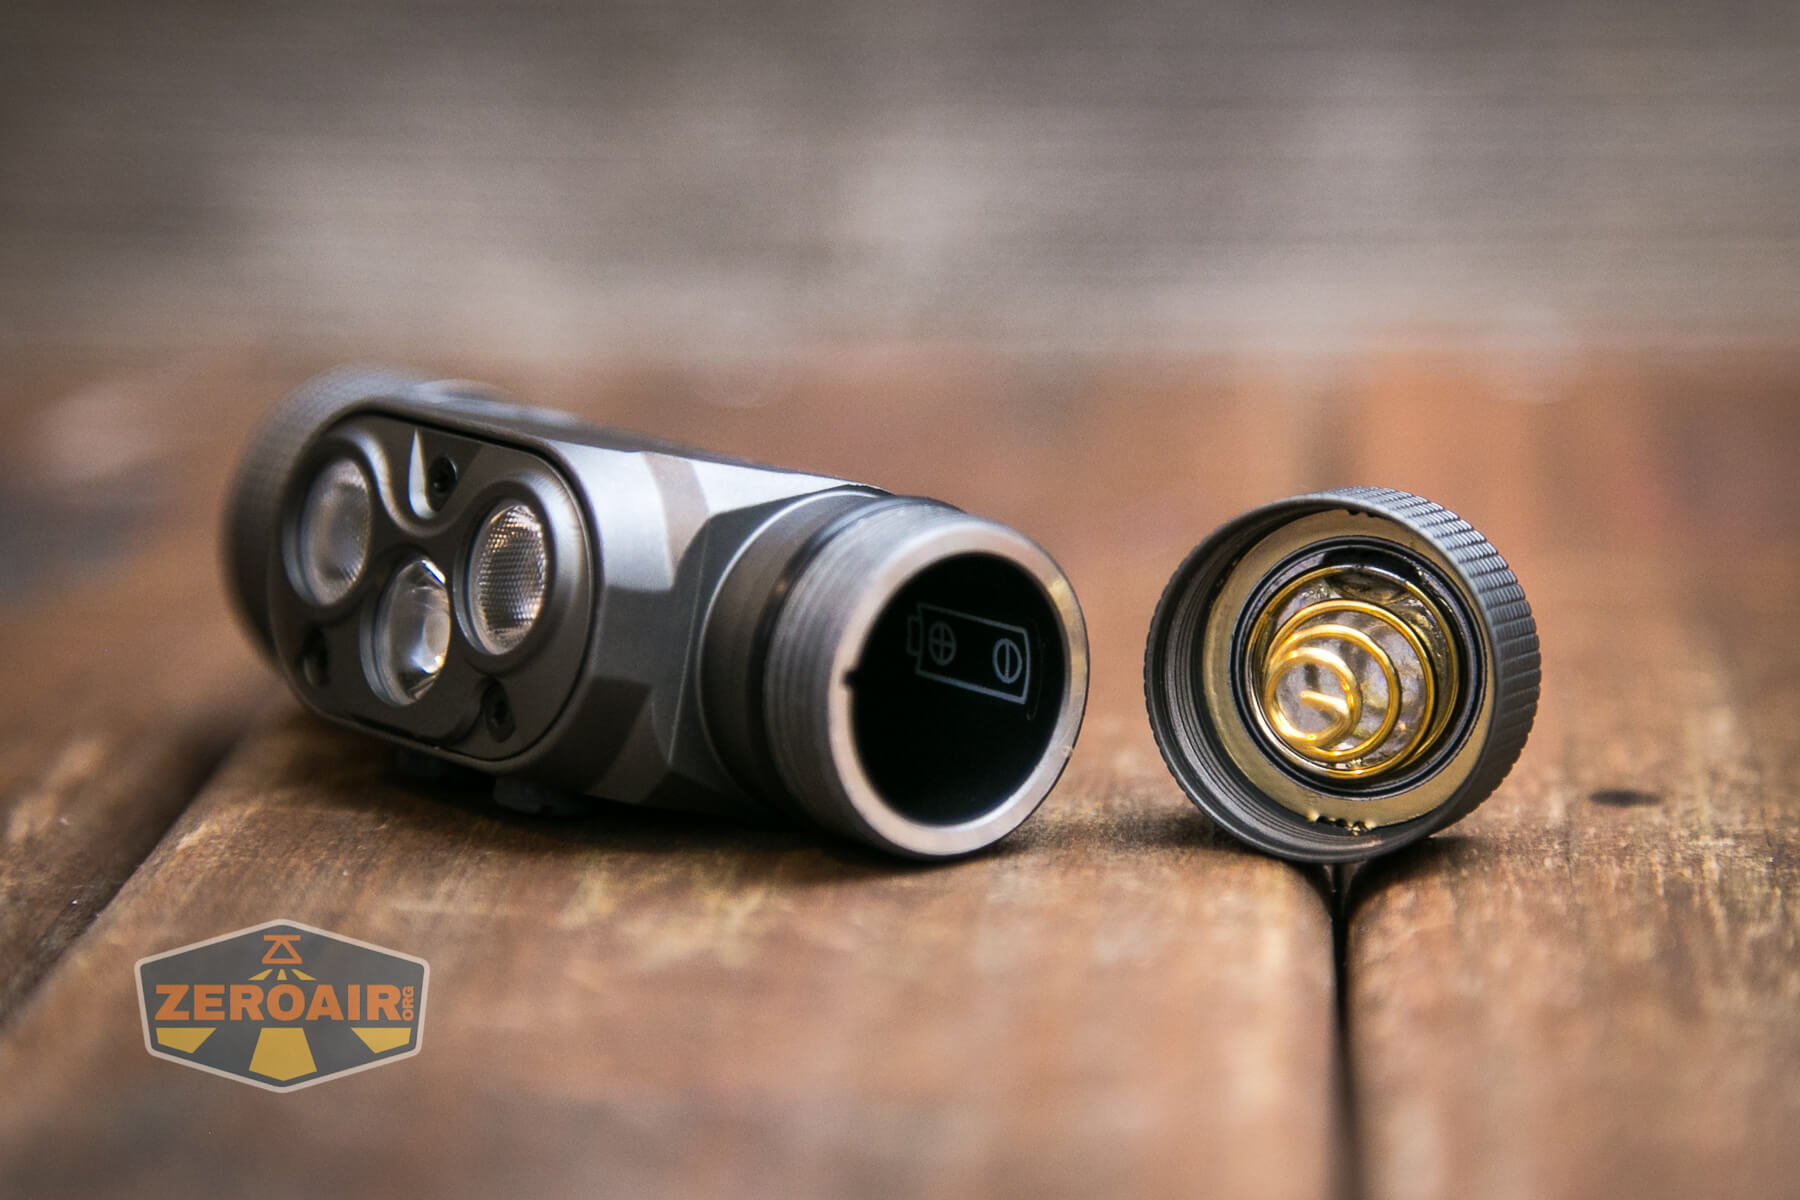
Both the head and tail have springs. The tailcap has a much beefier spring, but I appreciate the head having a spring, too (even if of minimal size).
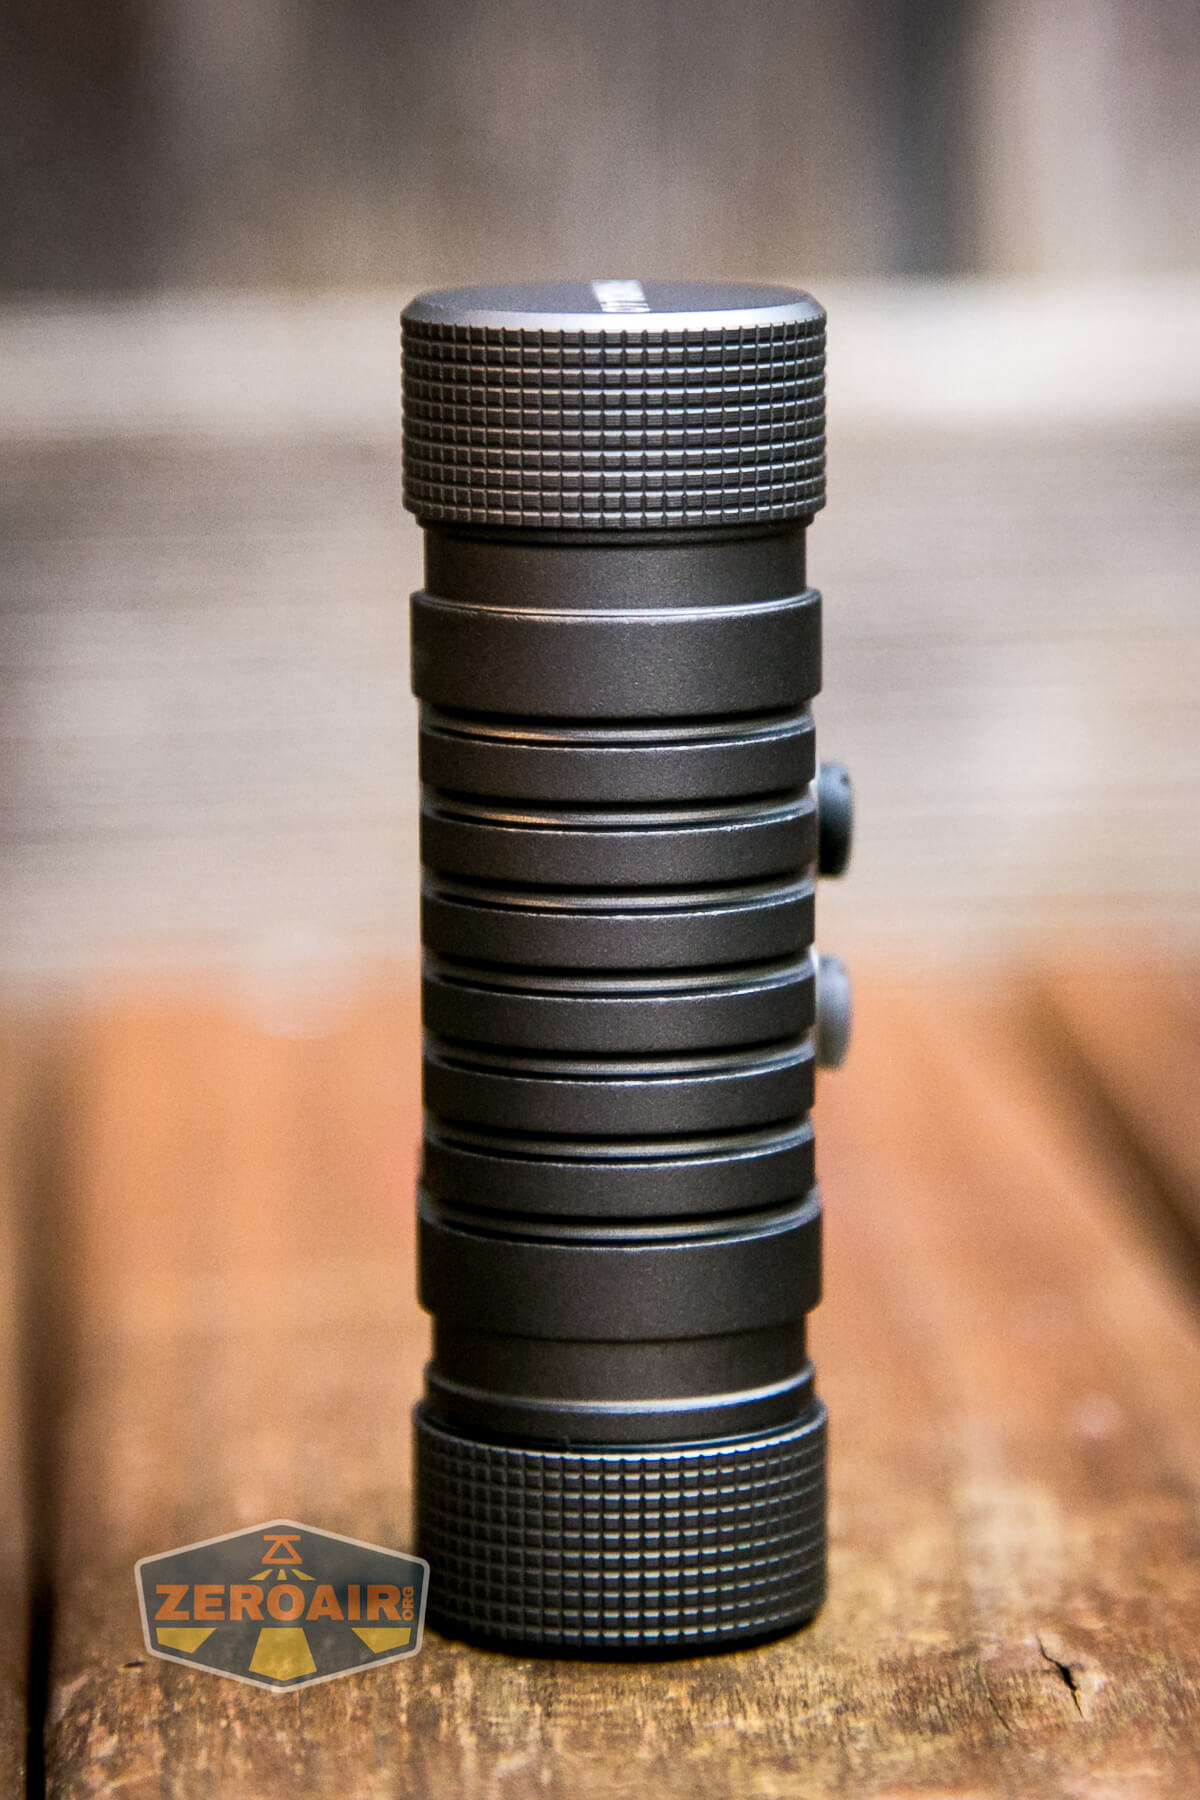
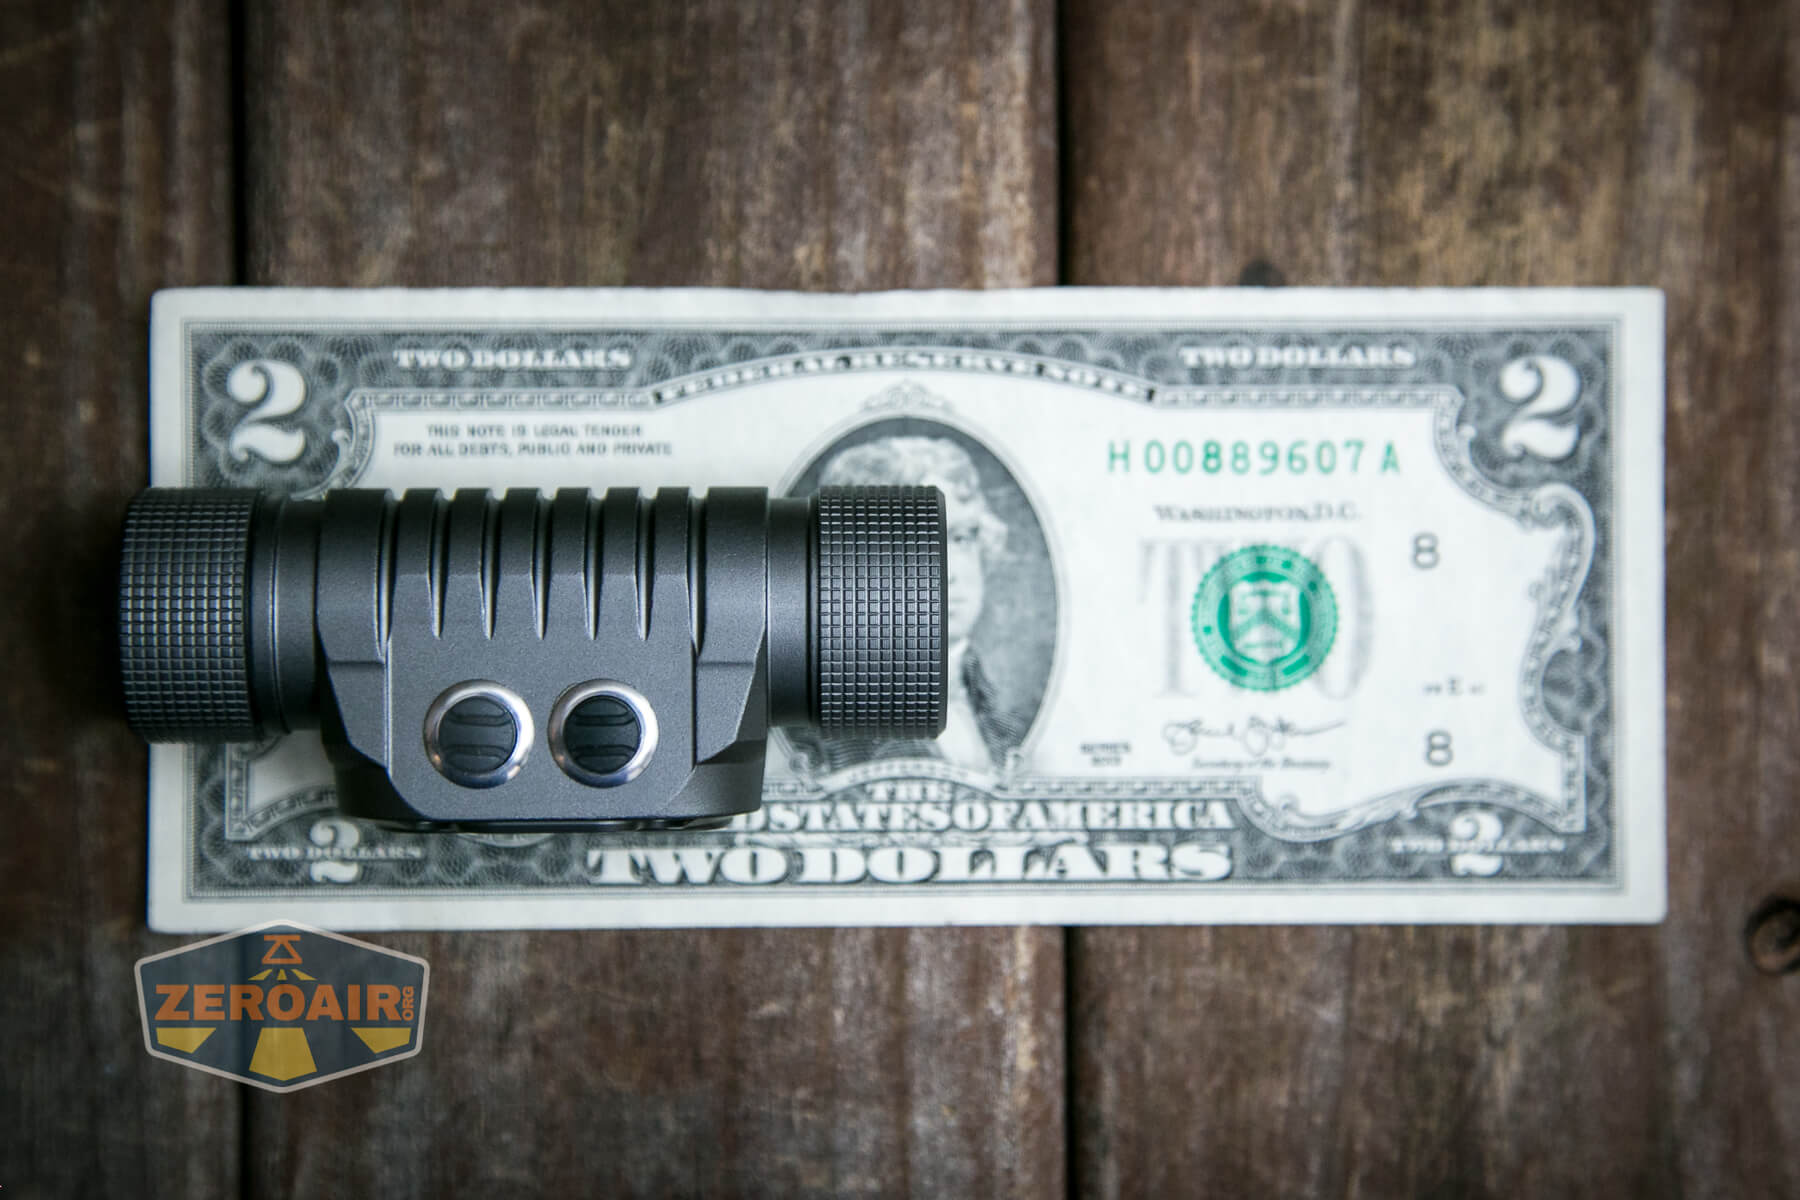
Size and Comps
Length: 84mm
Width: 34mm
Diameter: 25mm
Weight 64g
If the flashlight will headstand, I’ll show it here (usually the third photo). If the flashlight will tailstand, I’ll show that here, too (usually the fourth photo).

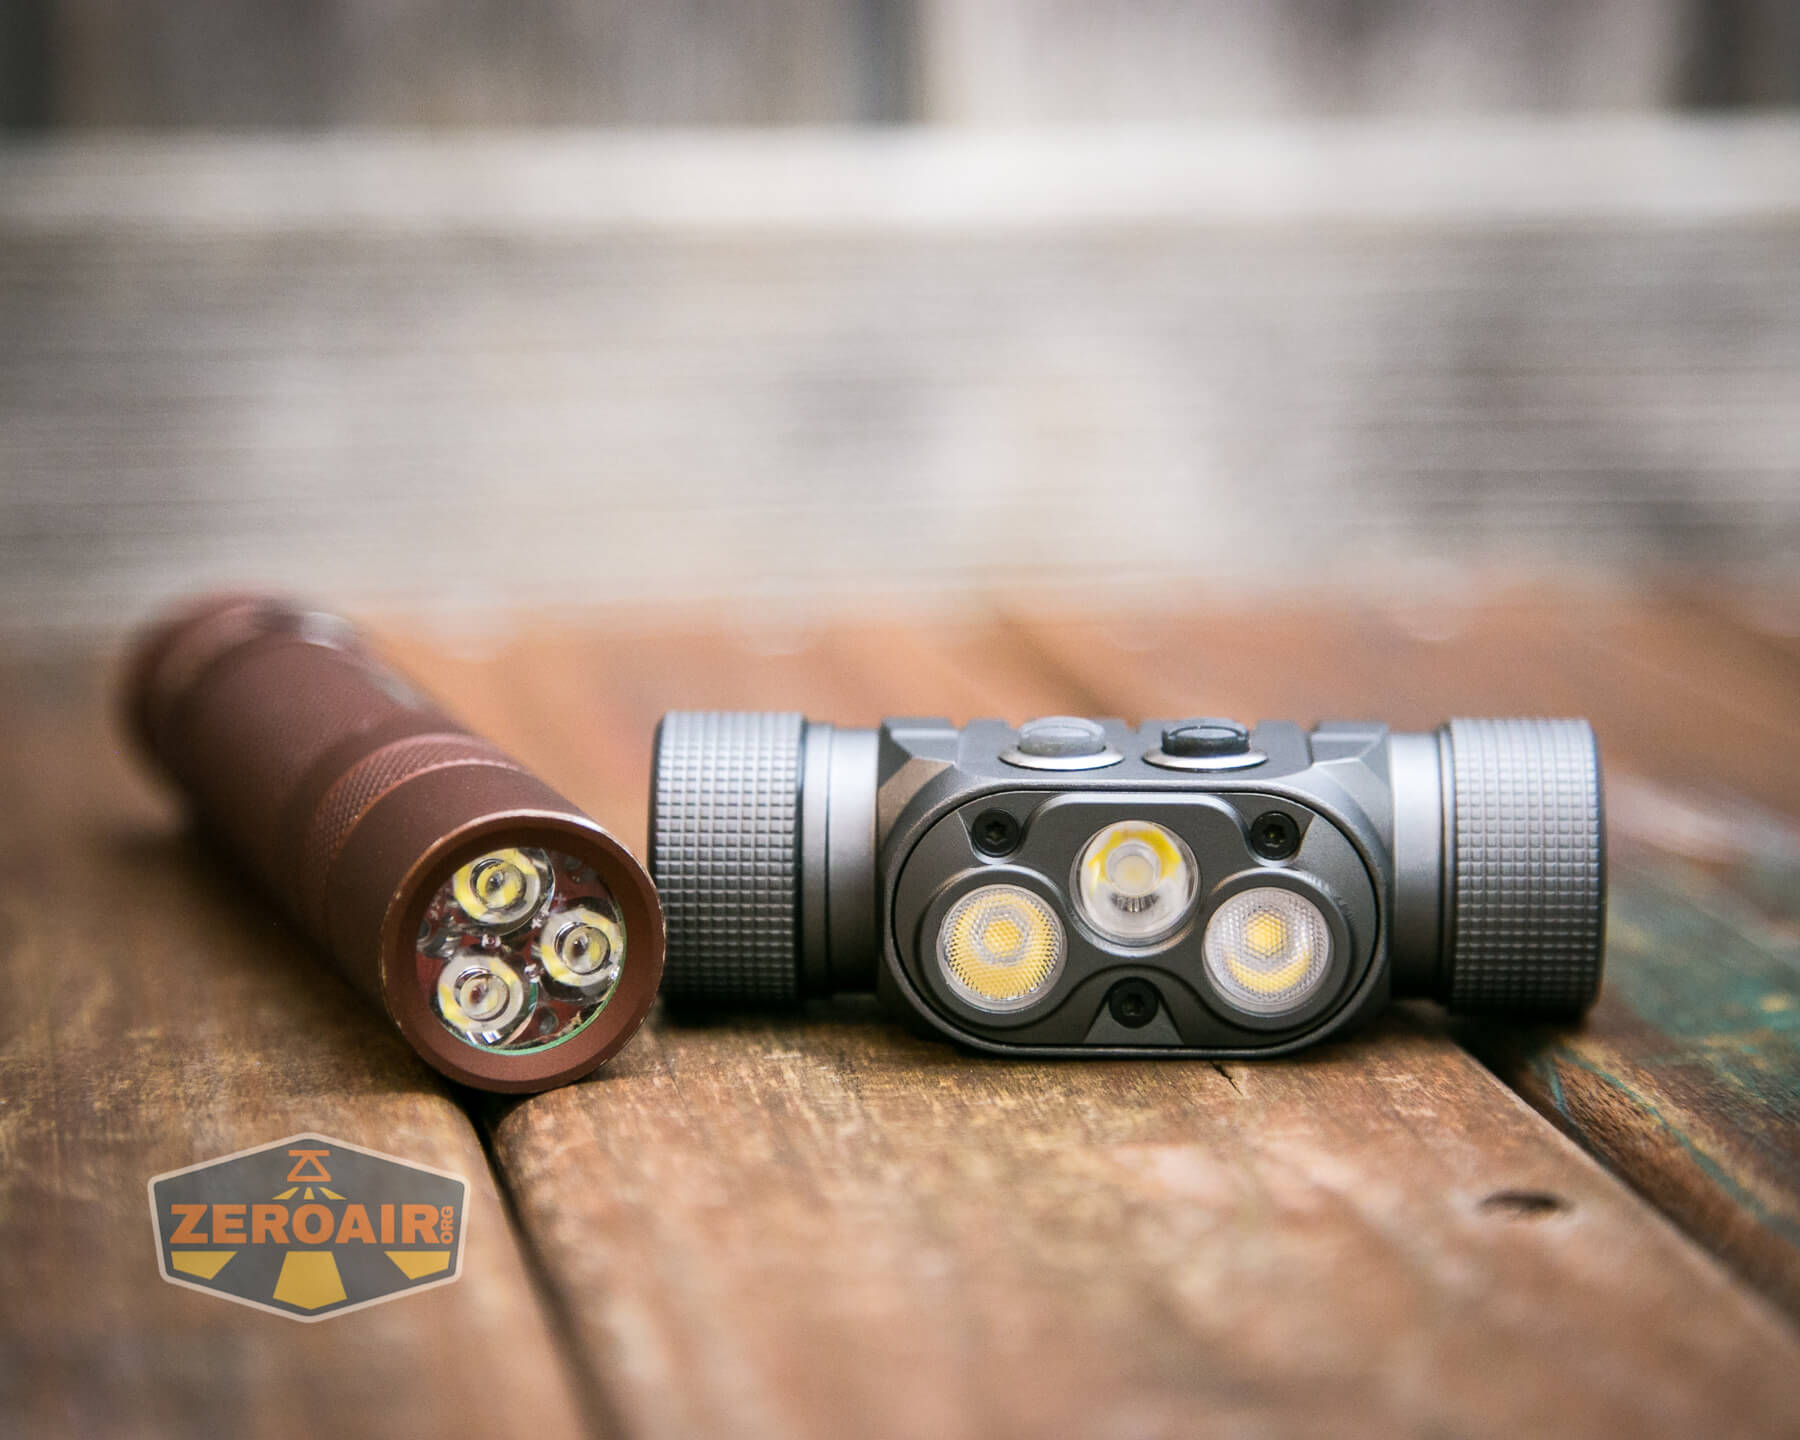
Here’s the test light with the venerable Convoy S2+. Mine’s a custom “baked” edition Nichia 219b triple. A very nice 18650 light.
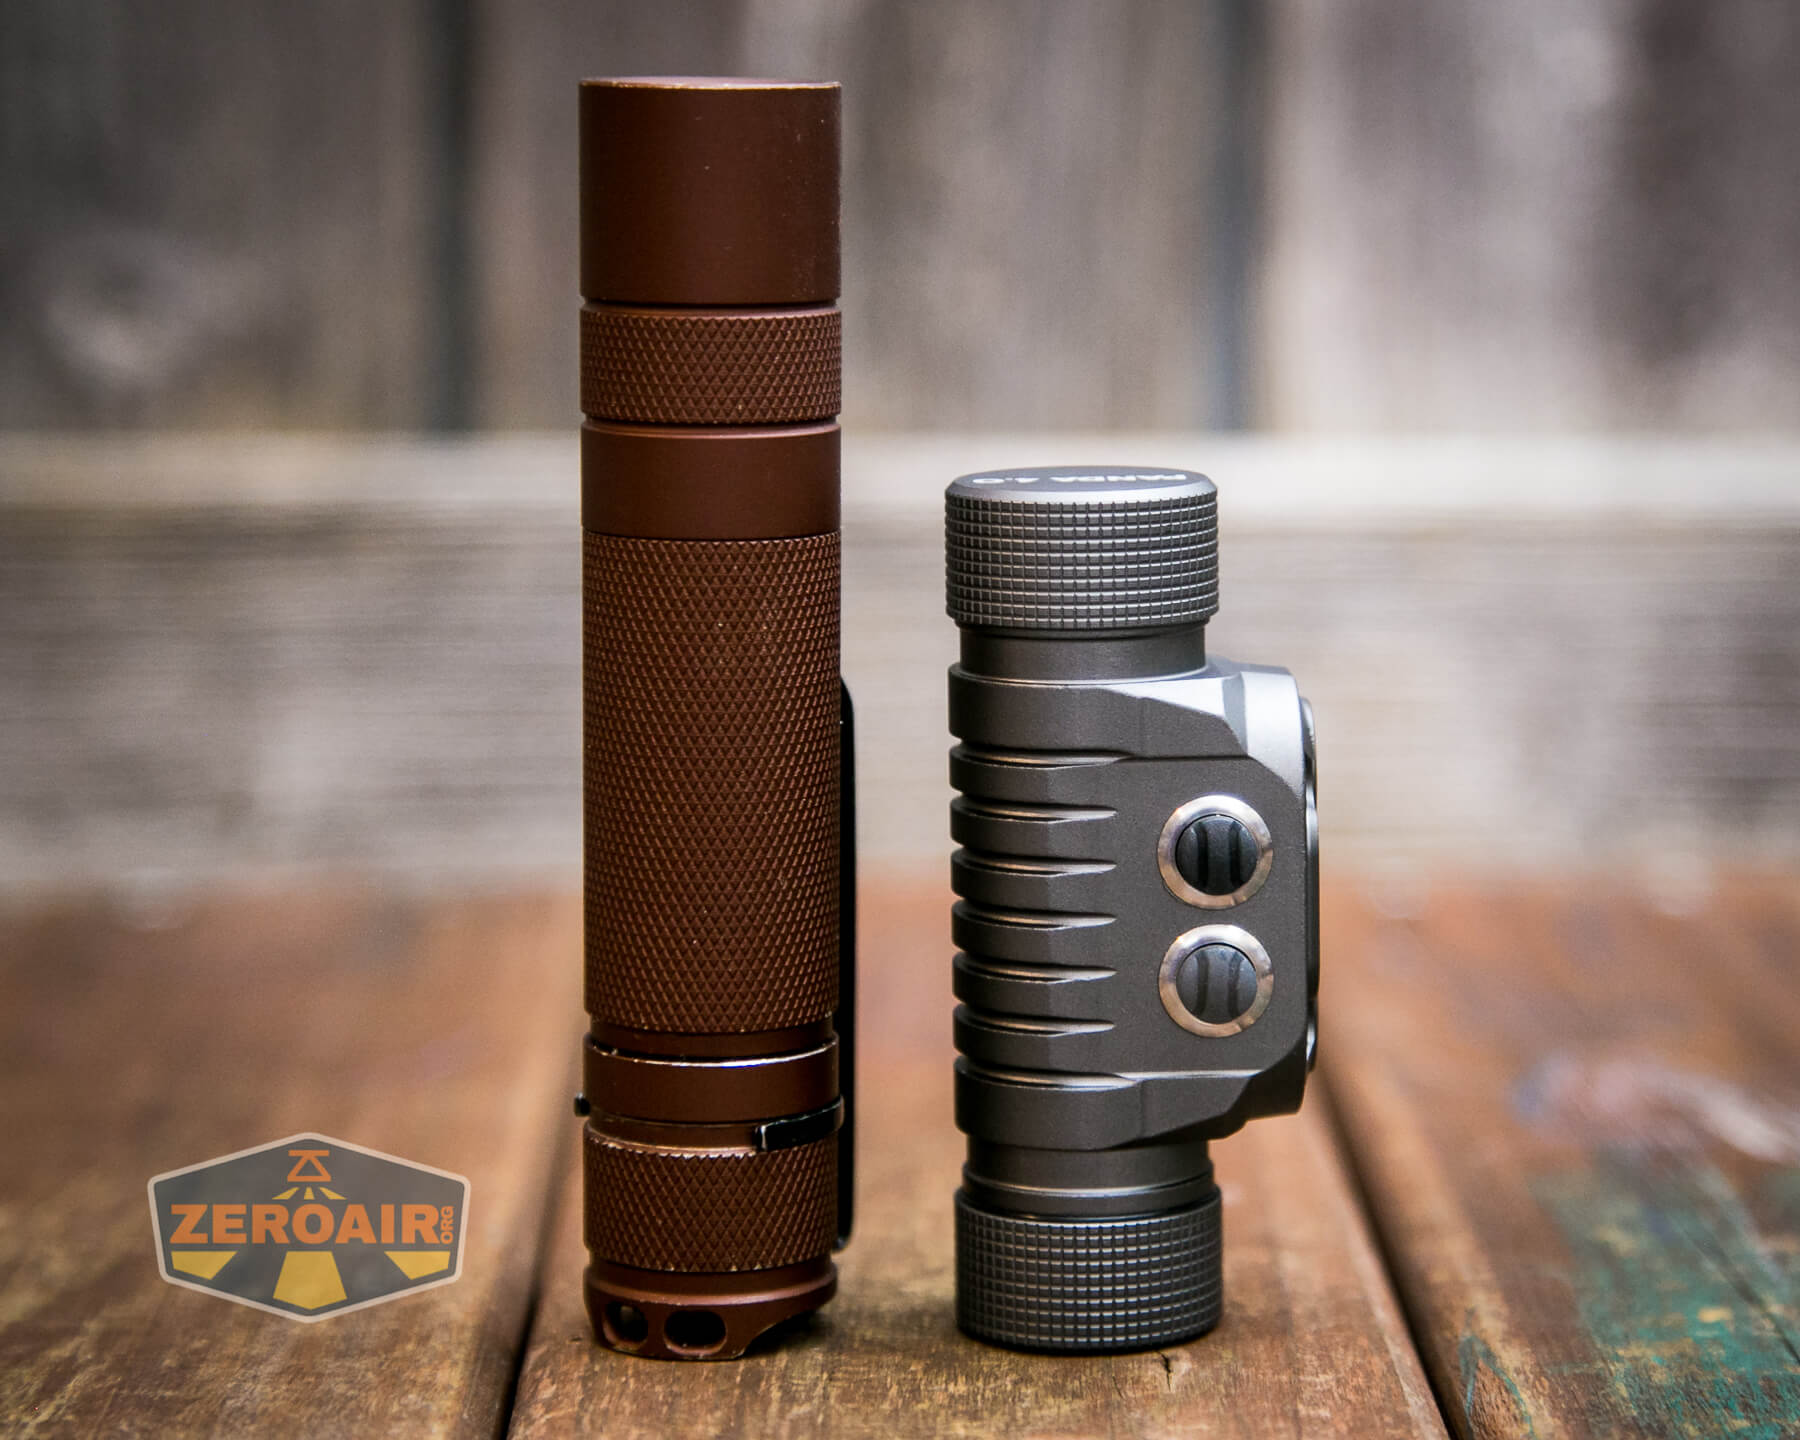
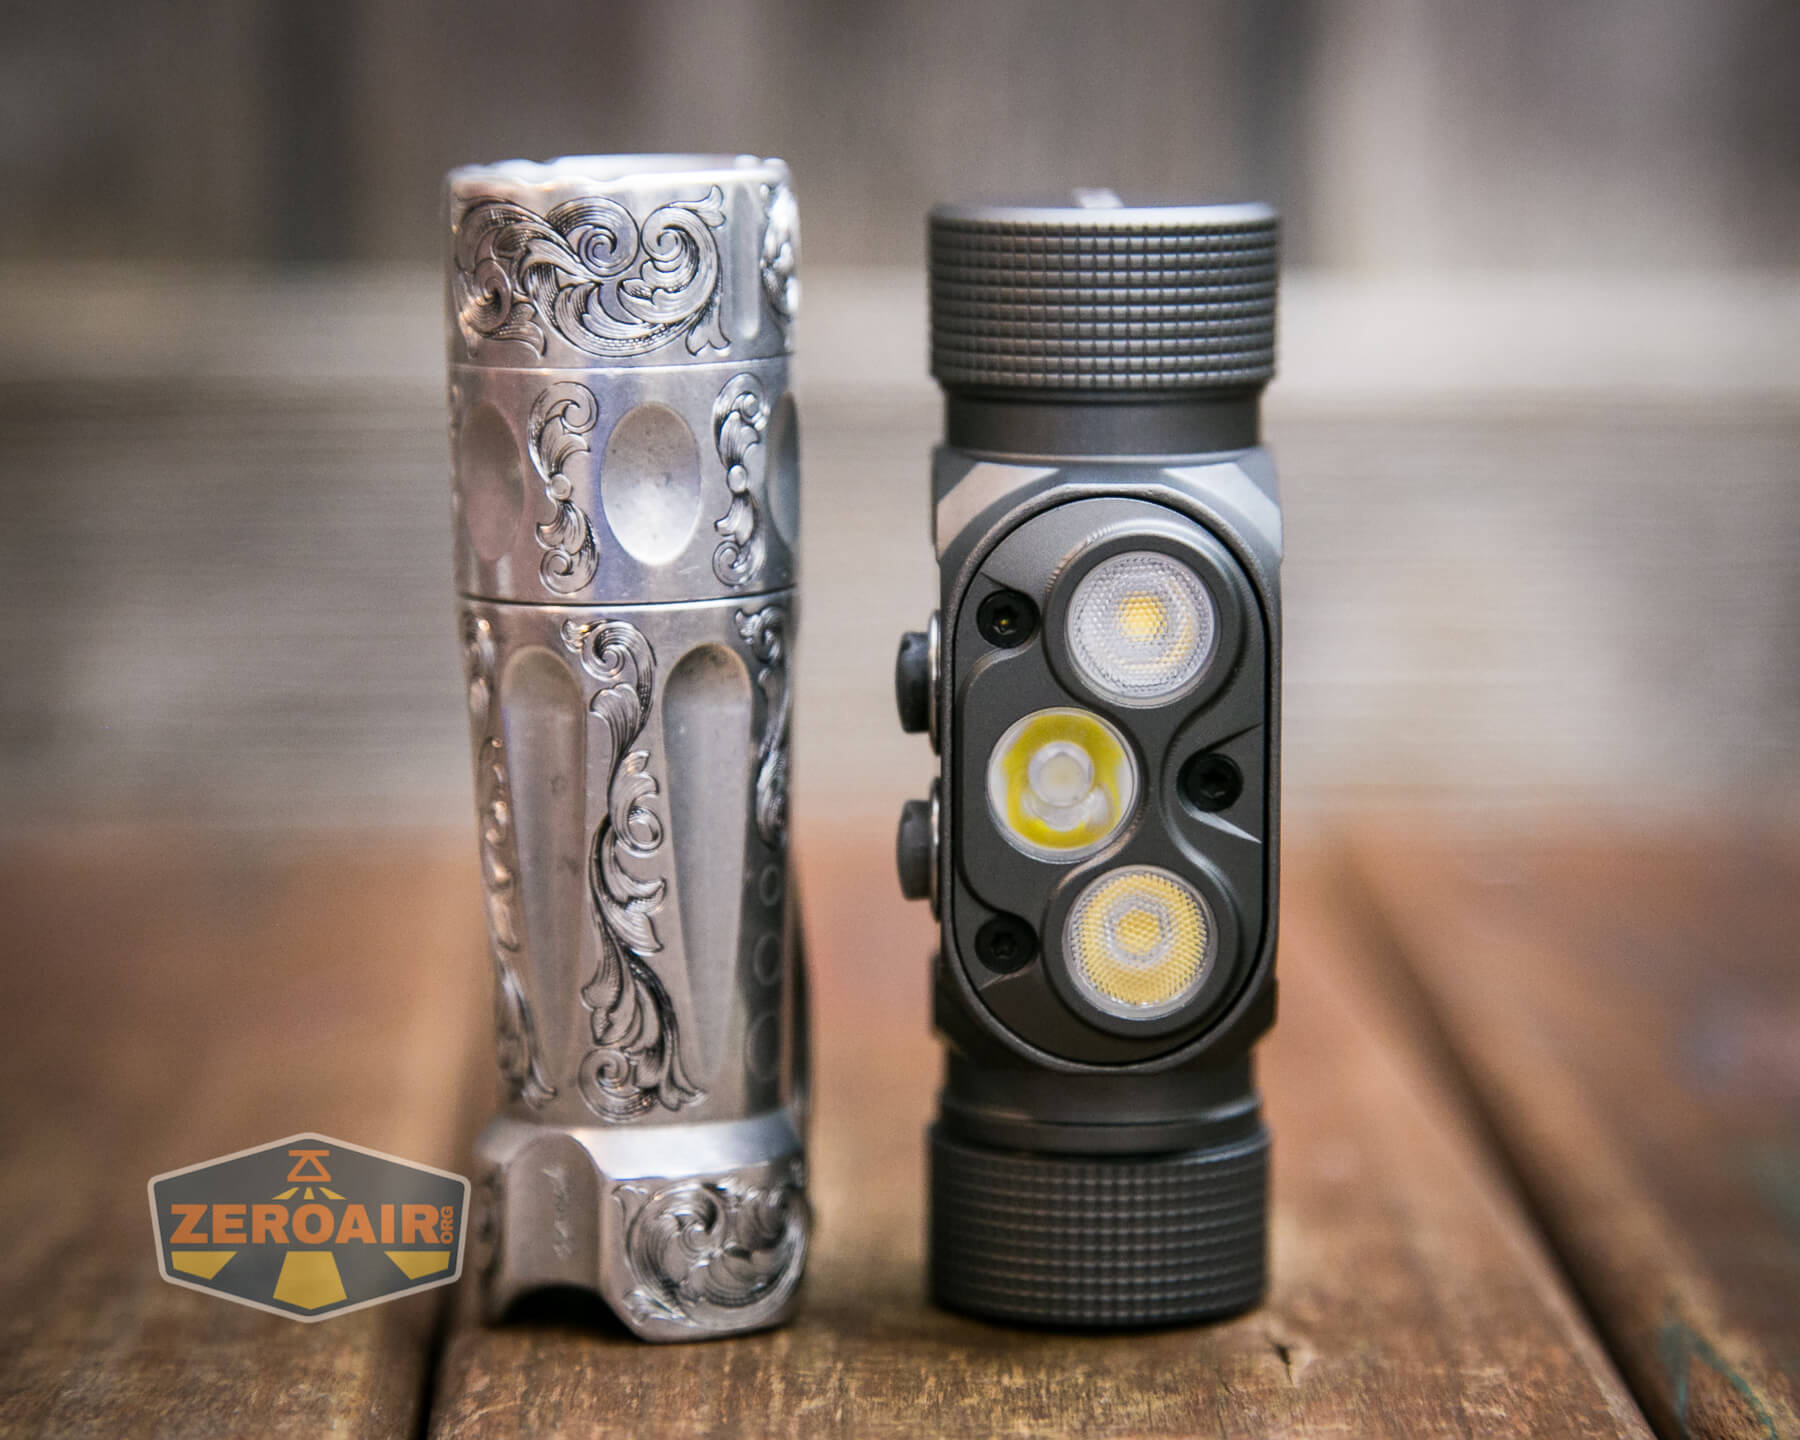
And here’s the light beside my custom-engraved TorchLAB BOSS 35, an 18350 light. I reviewed the aluminum version of that light in both 35 and 70 formats.

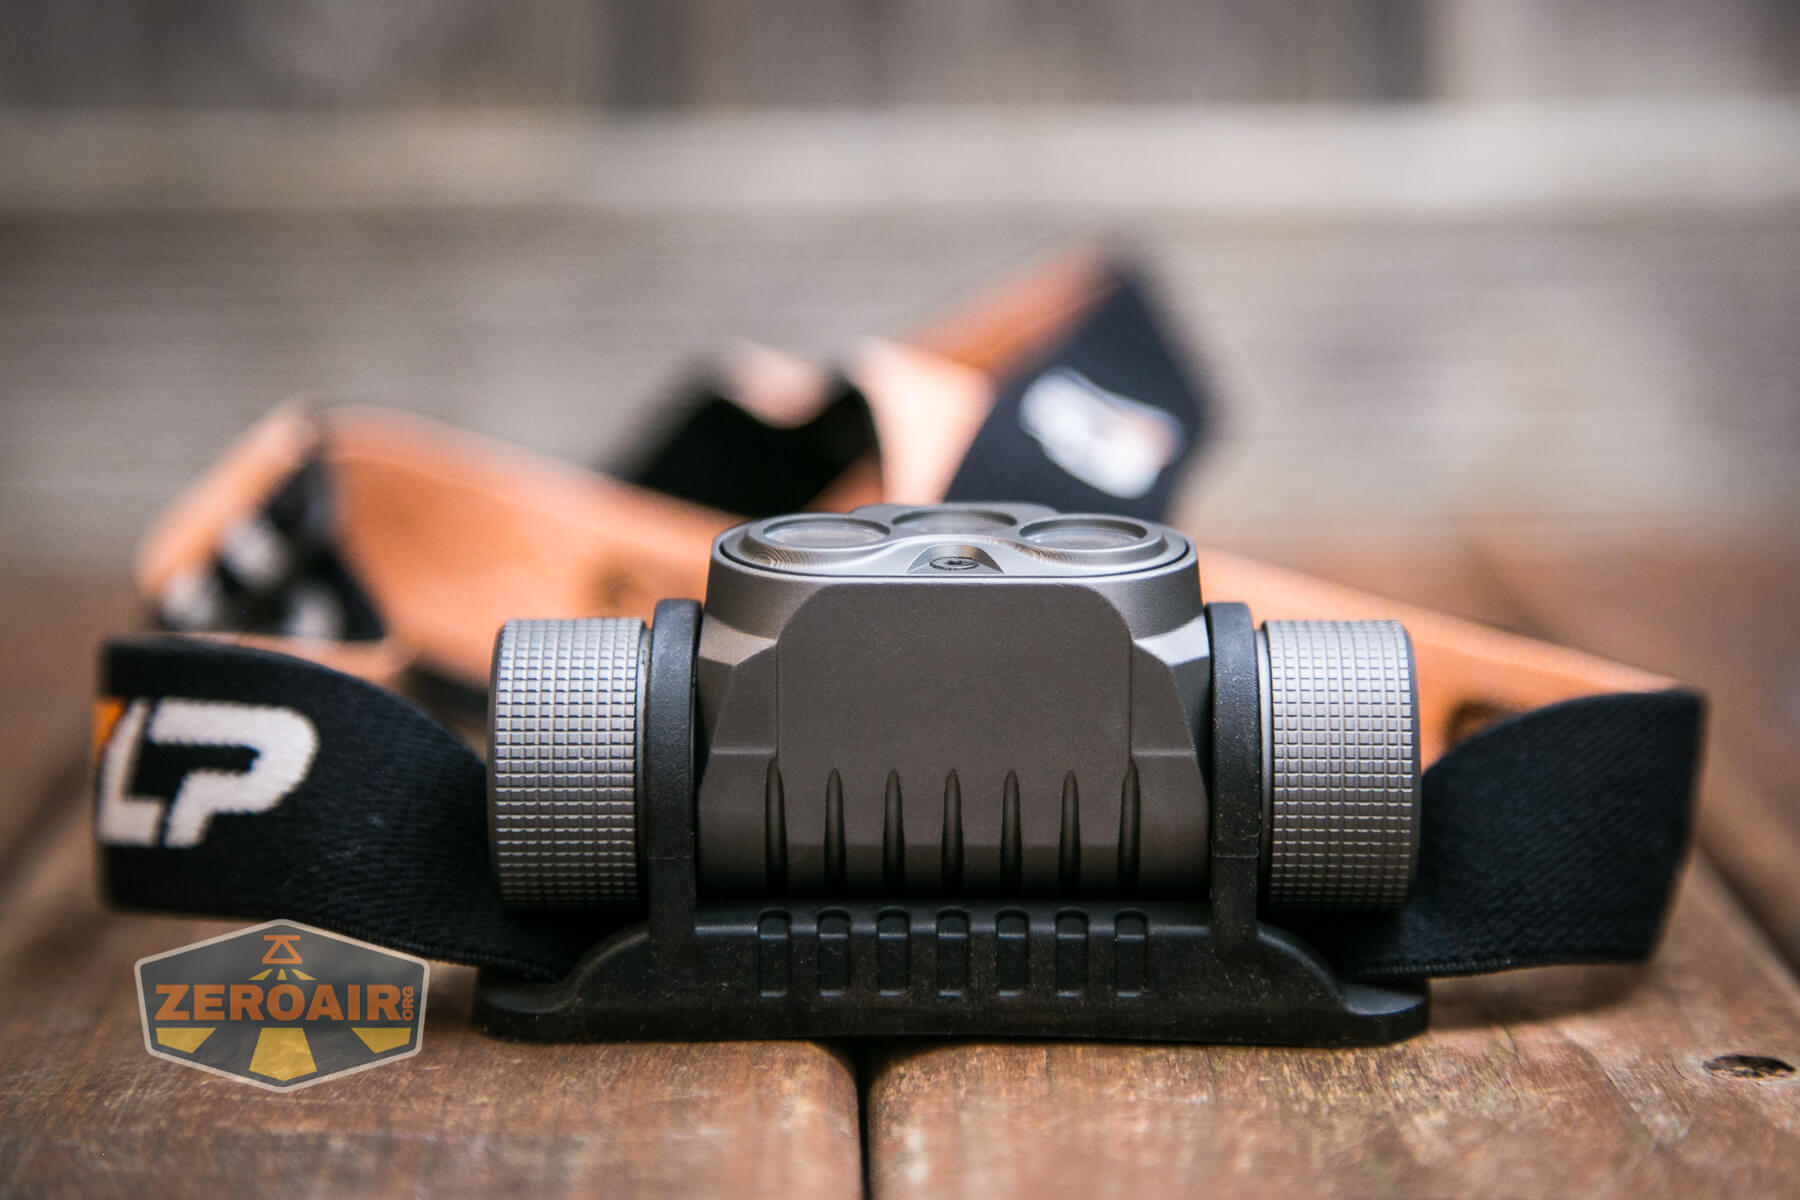
Retention and Carry
This is a headlamp, and a headband is included. It’s a nice soft stretchy band, with YLP branding. This headband is not exactly like the one from the 2M CRI, but practically the same in form.

The holder is a silicone loop holder that fits over both ends. The light installs with little difficulty.
The over-the-top strap doesn’t appear to be removable – see below that the silicone part has a molded spot for connection.

This is an exceptionally comfortable headband!


I consider this to be “the right way” – that is, with the buttons on top. The product images support that, but you could flip it if you wished to or needed to.

The grip pattern (again, not “knurling”) on both ends really helps with adjusting the light angle while the light is in the band.
There is no pocket clip, magnet, or any other means for carry. I wouldn’t consider that a bad thing – this is really a dedicated headlamp anyway. Again, a magnet tailcap is available for $4.
Power and Runtime
The YLP Panda 4.0 headlamp is powered by a single lithium-ion cell. A 18650 fits, and an appropriate cell is available from YLP as an additional purchase ($14). I tested almost exclusively with the Samsung GA seen below.
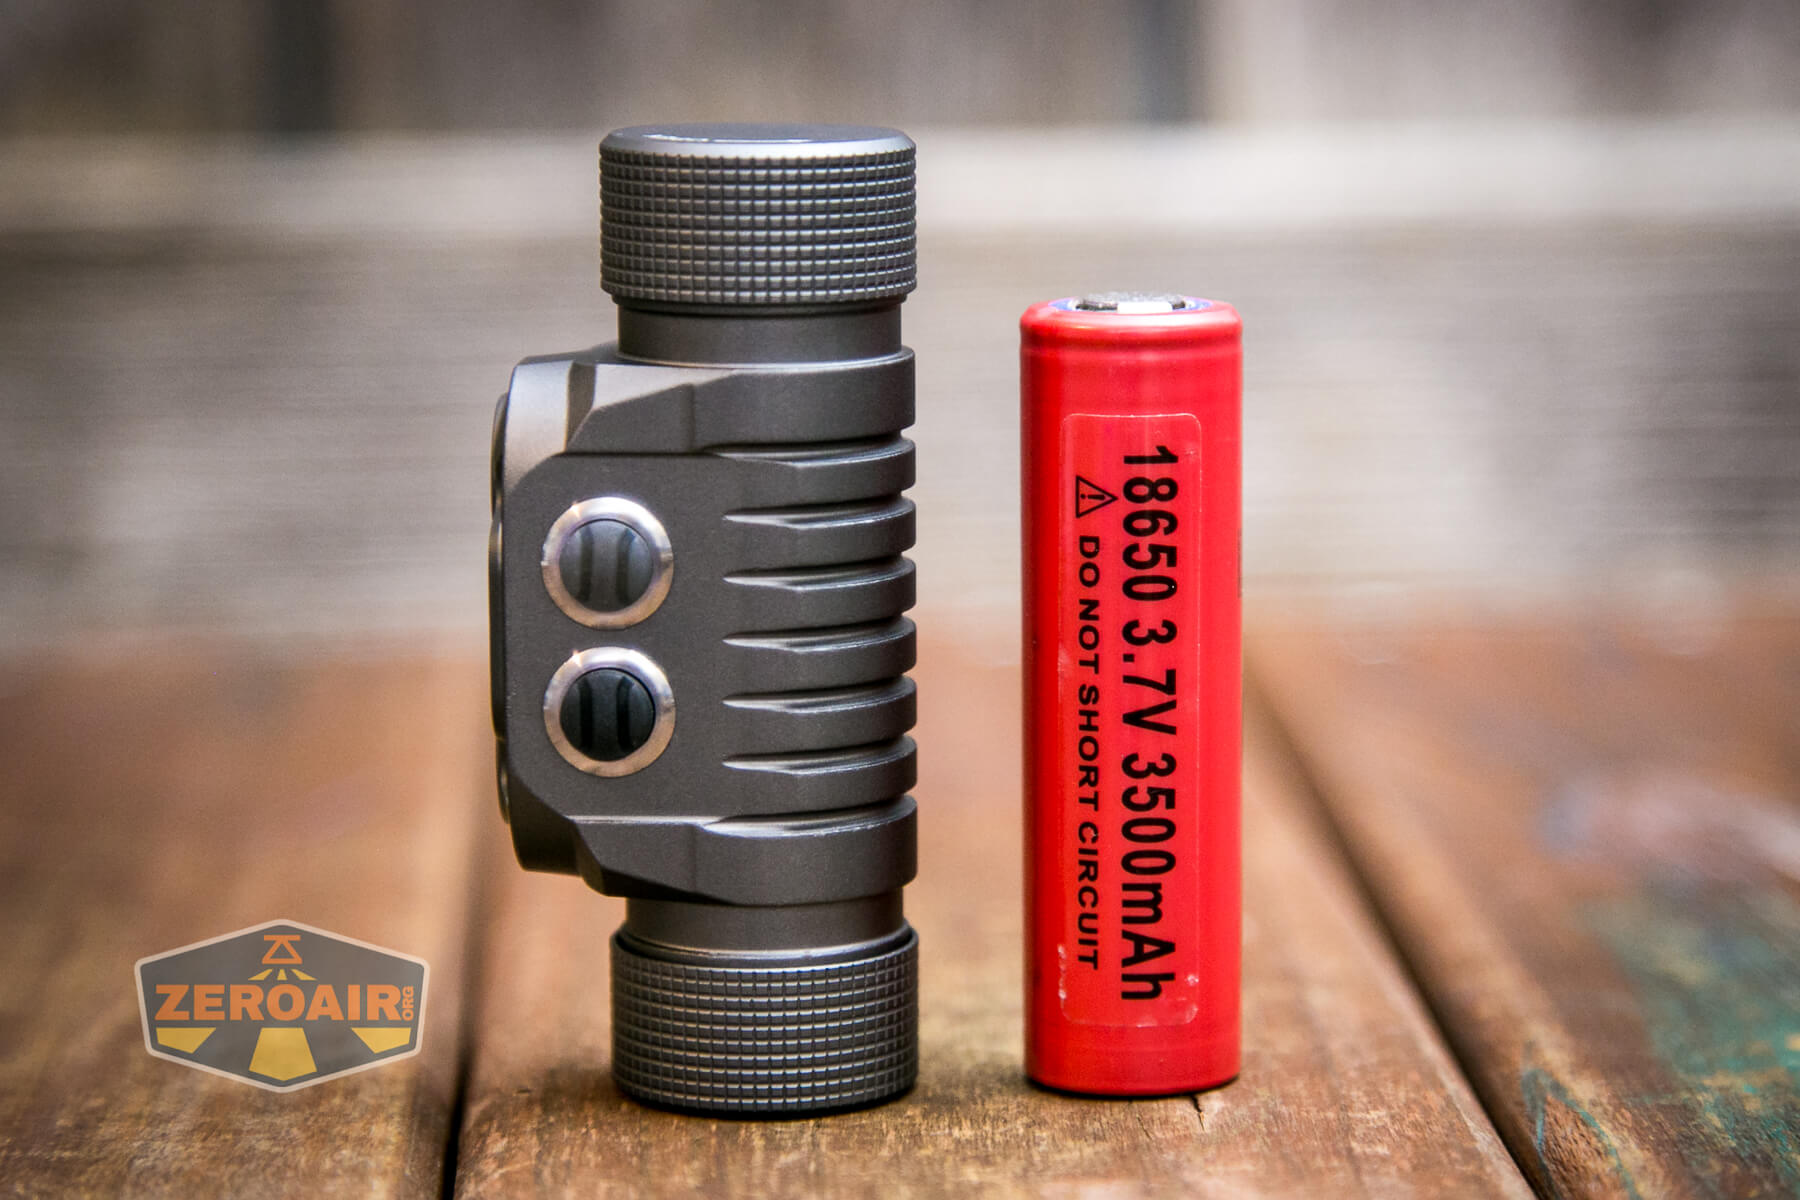
The cell is installed by putting the positive (button) end first.
In case you forget that you can regard this tiny little icon inside the cell tube, which indicates the cell direction.
Here is a smattering of runtime tests. I tested all three highest output levels (turbo for both emitters, turbo for flood, and turbo for spot) and a few lower modes. On the highest option, we see the “intelligent thermal control” YLP mentions – the output drifts back upward as the test goes on.
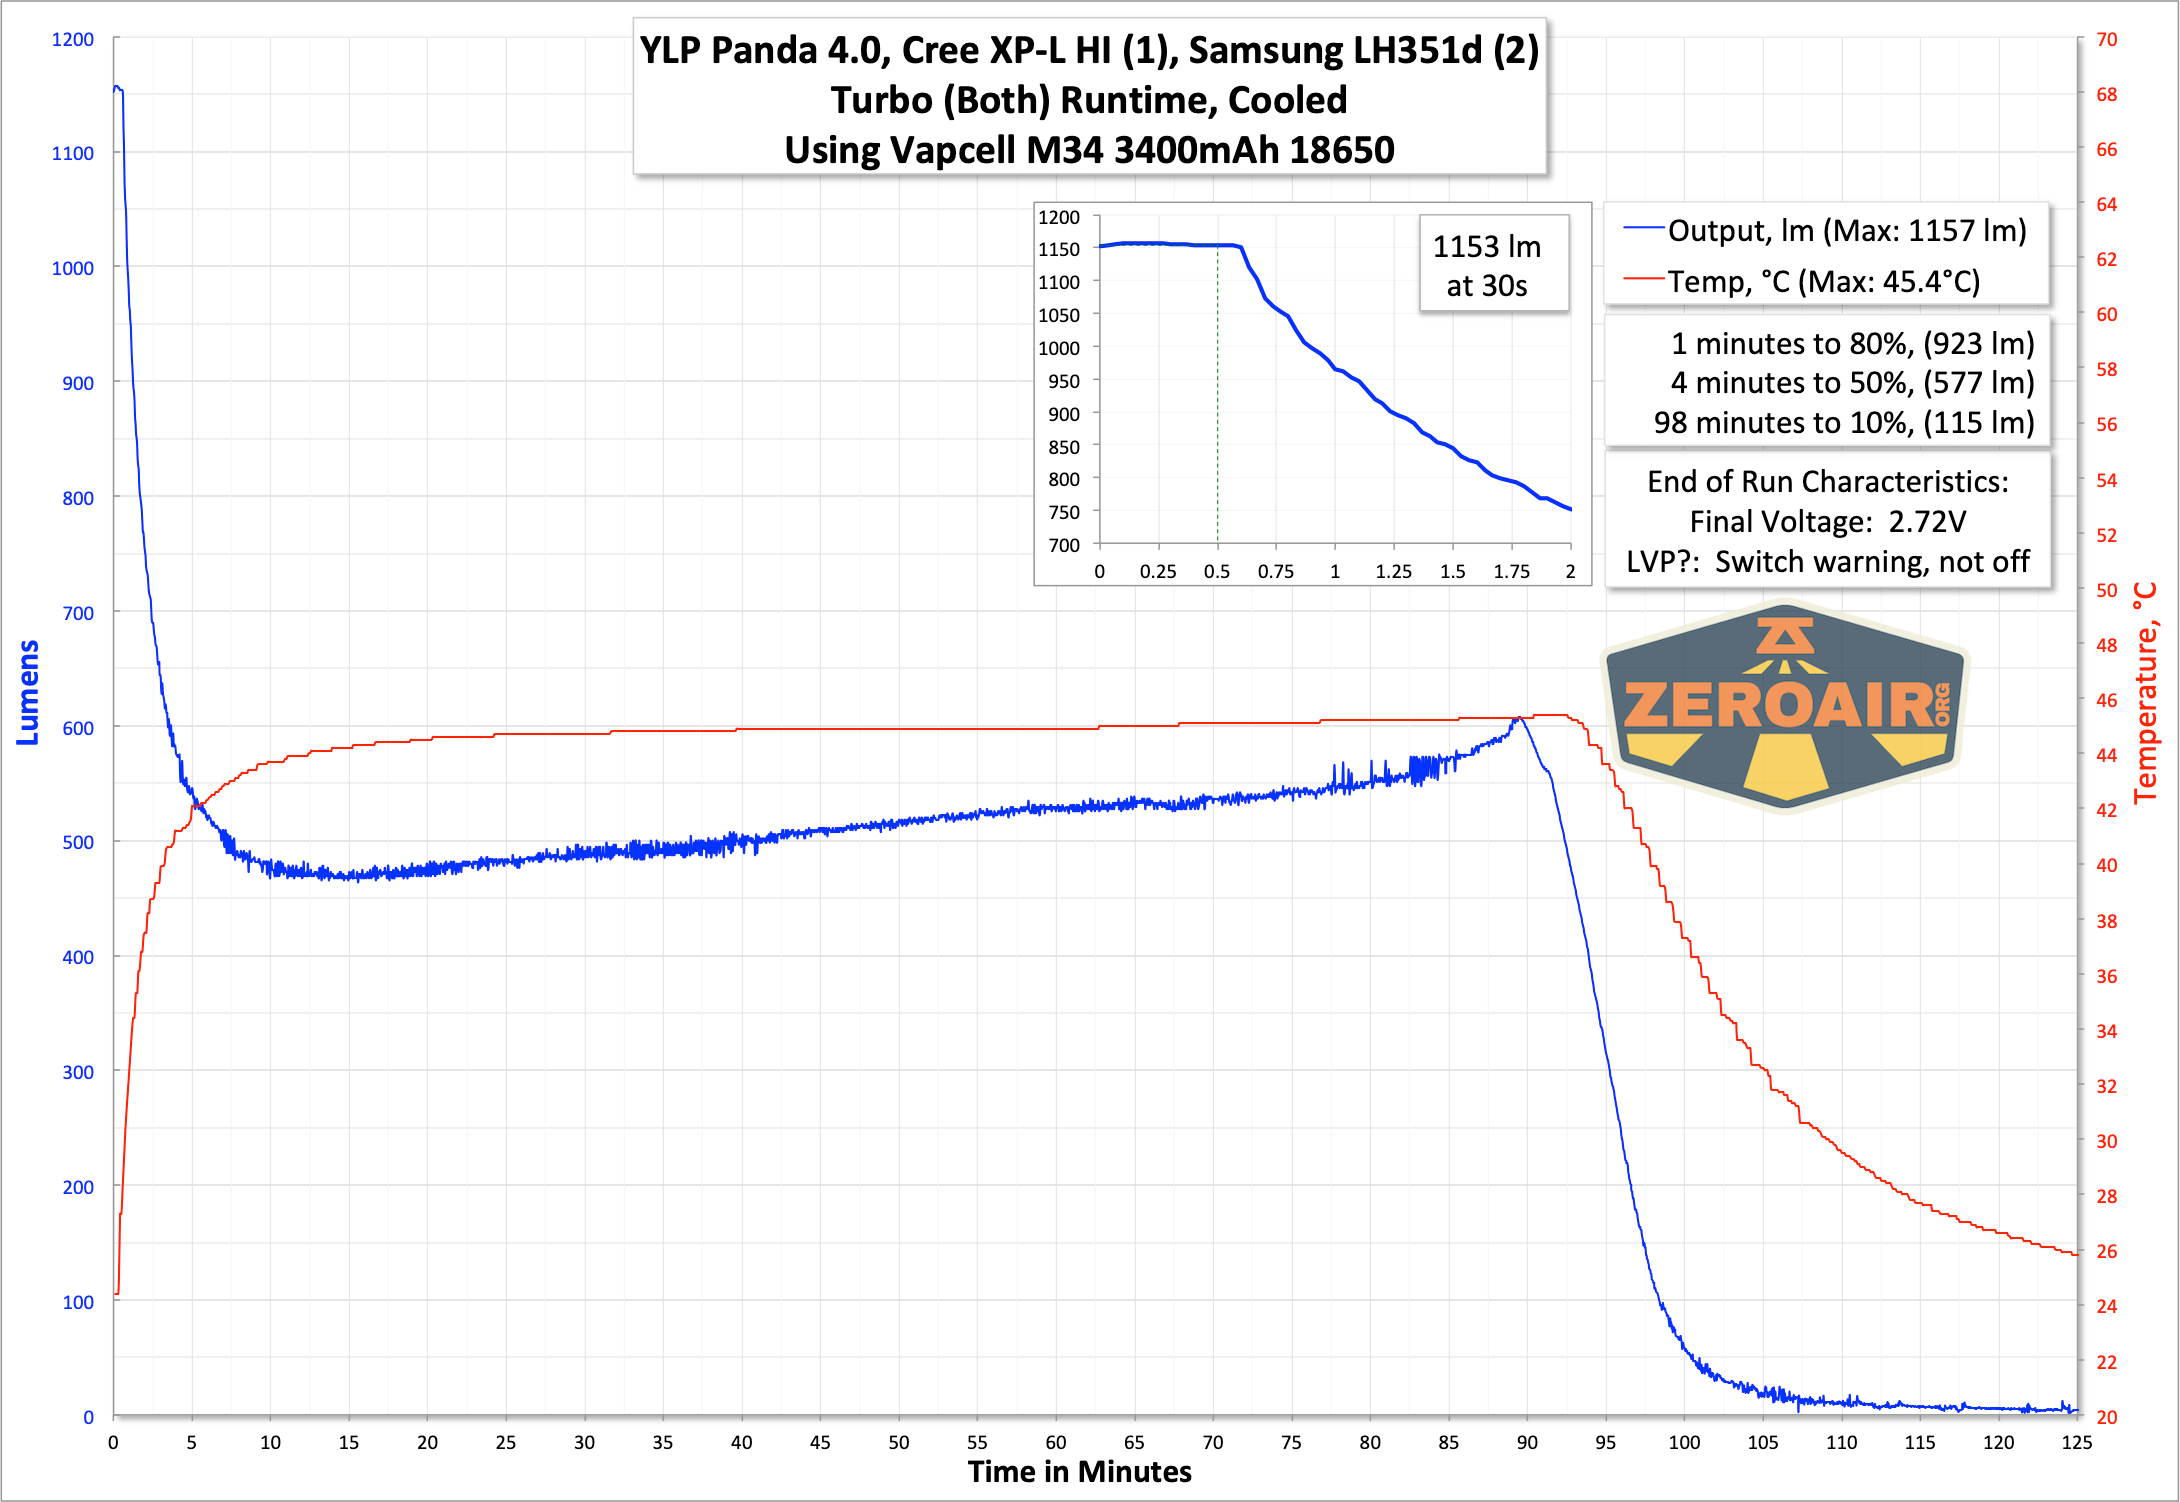
I had a little hiccup with temperature logging at the beginning of this test.
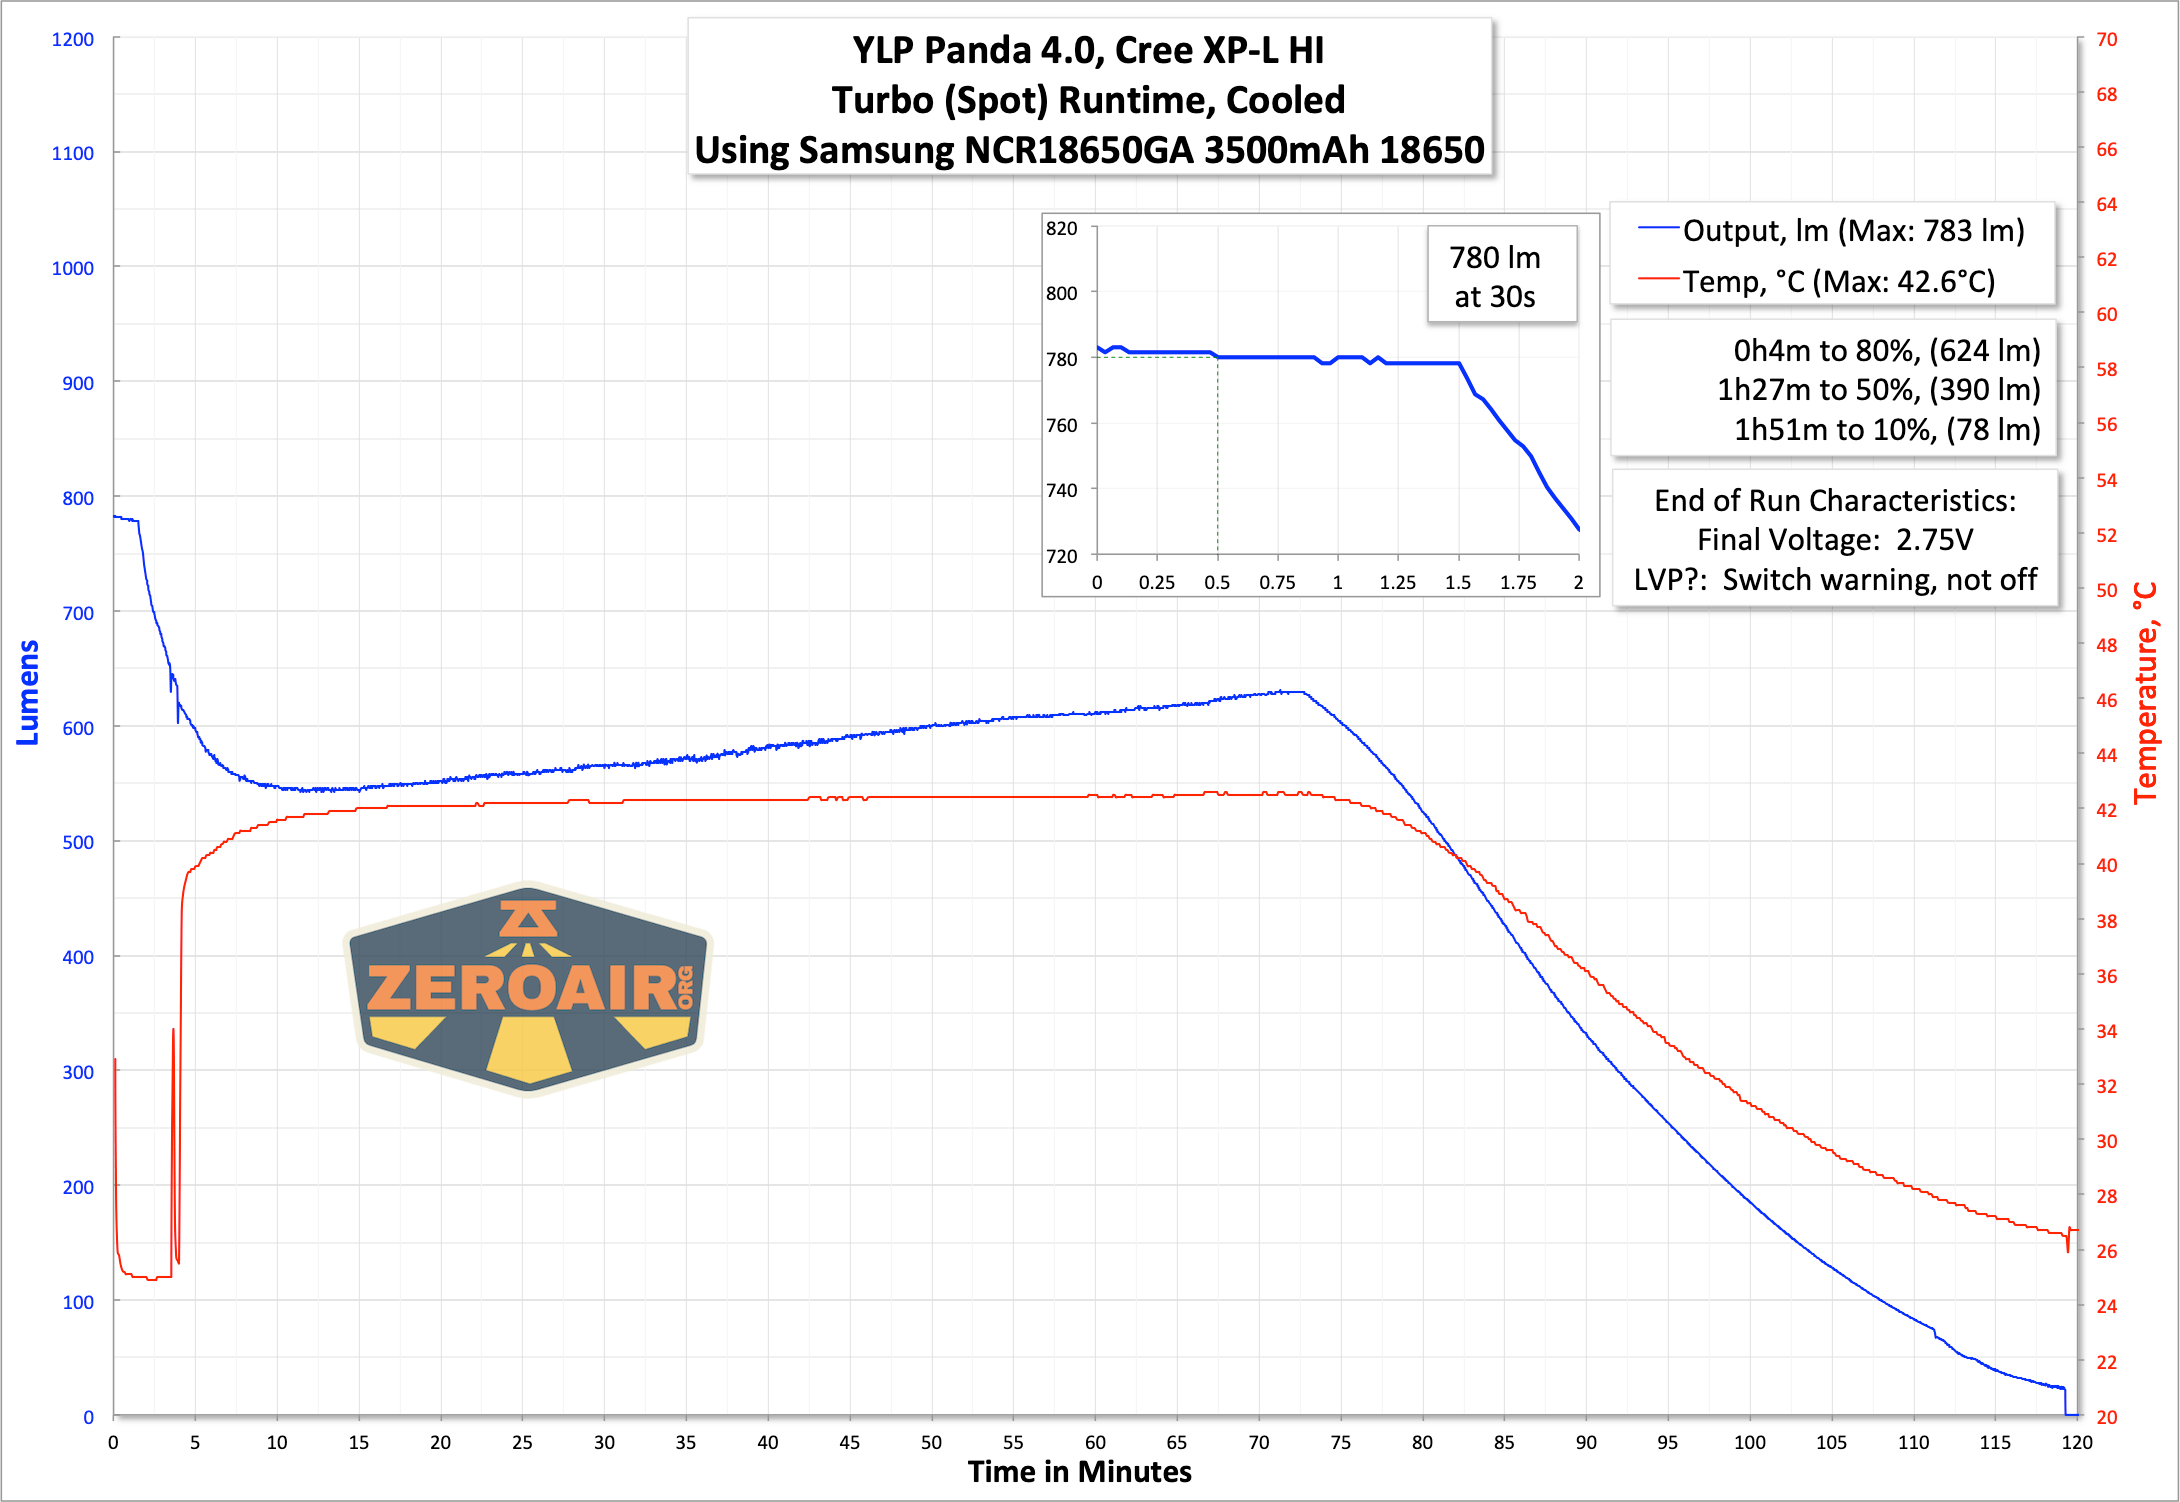
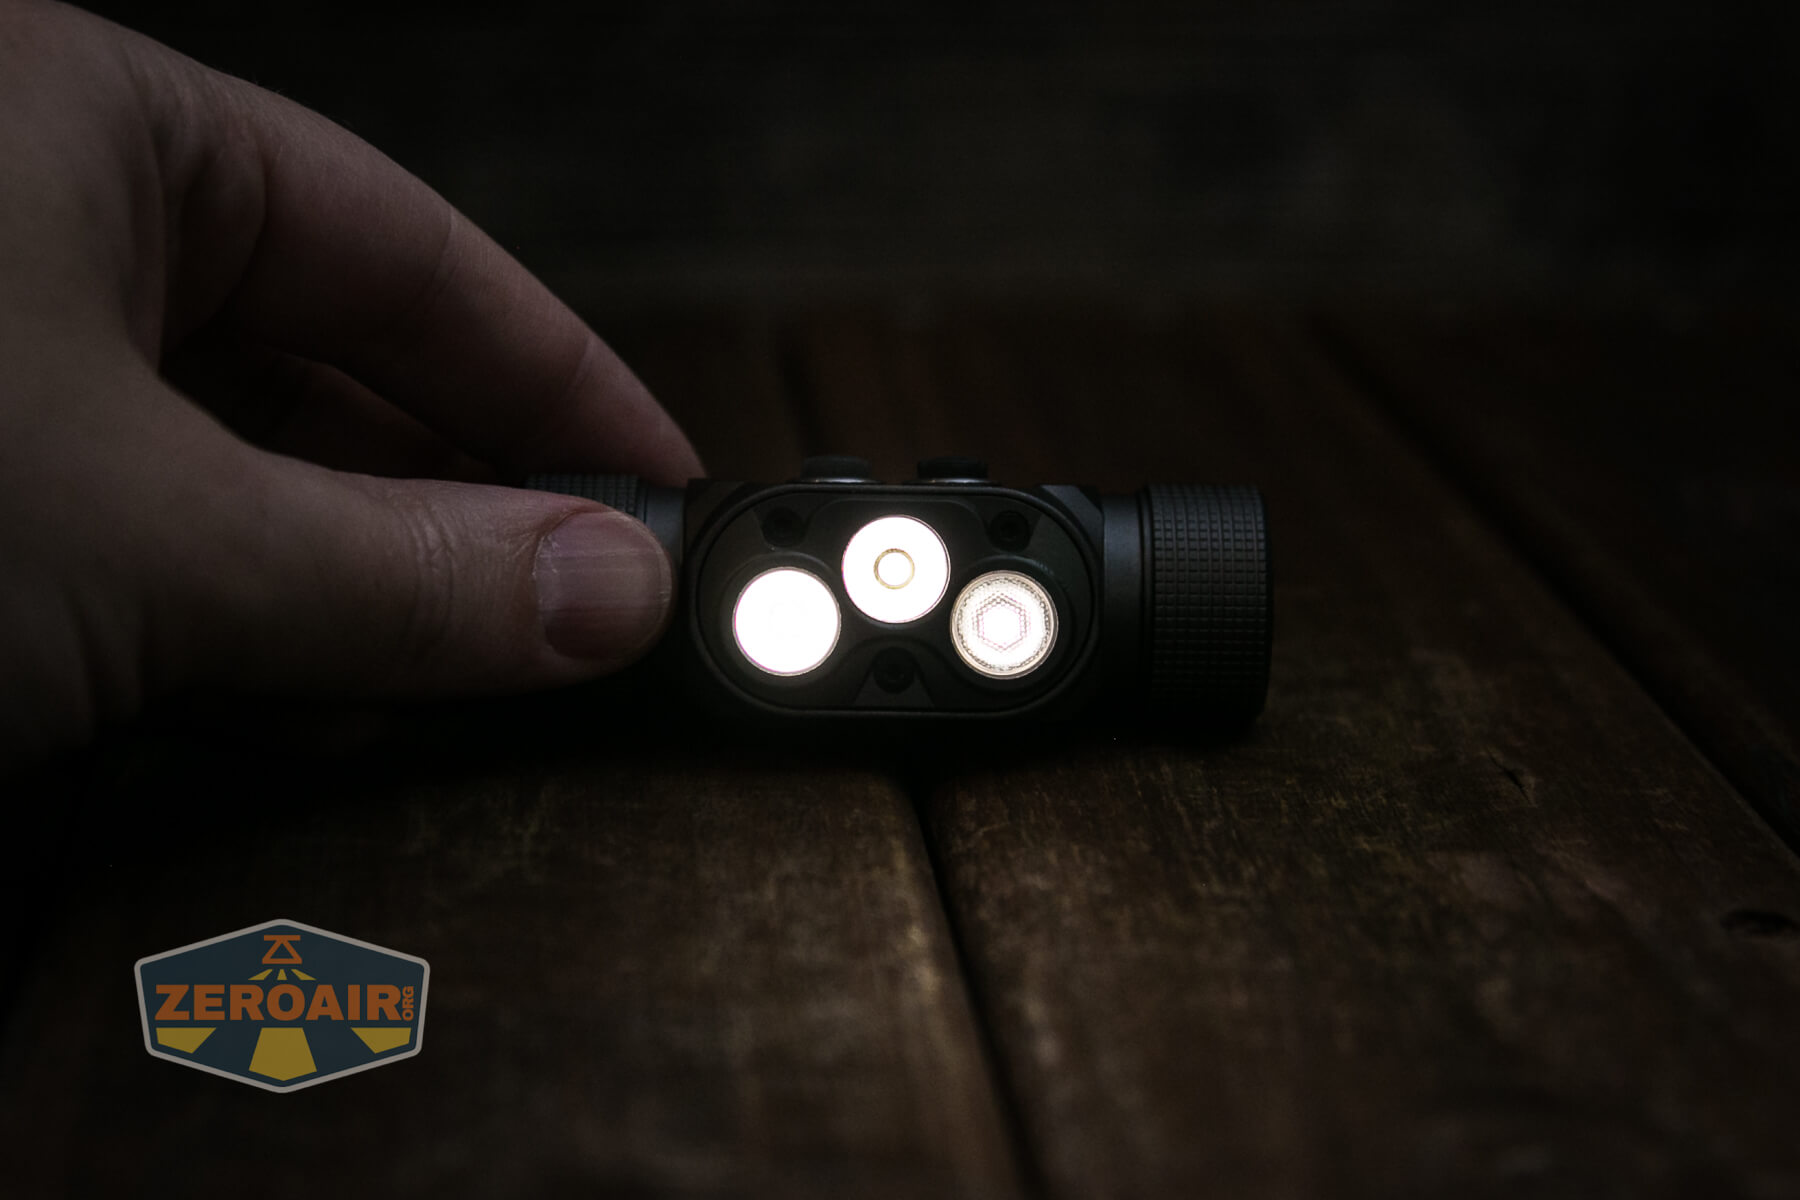
Between flood and spot, the flood should have a higher output (and it does). This output uses two Samsung LH351d emitters, while the spot uses a single Cree XP-L HI. Both are neutral to warm emitters (measured around 4000K).
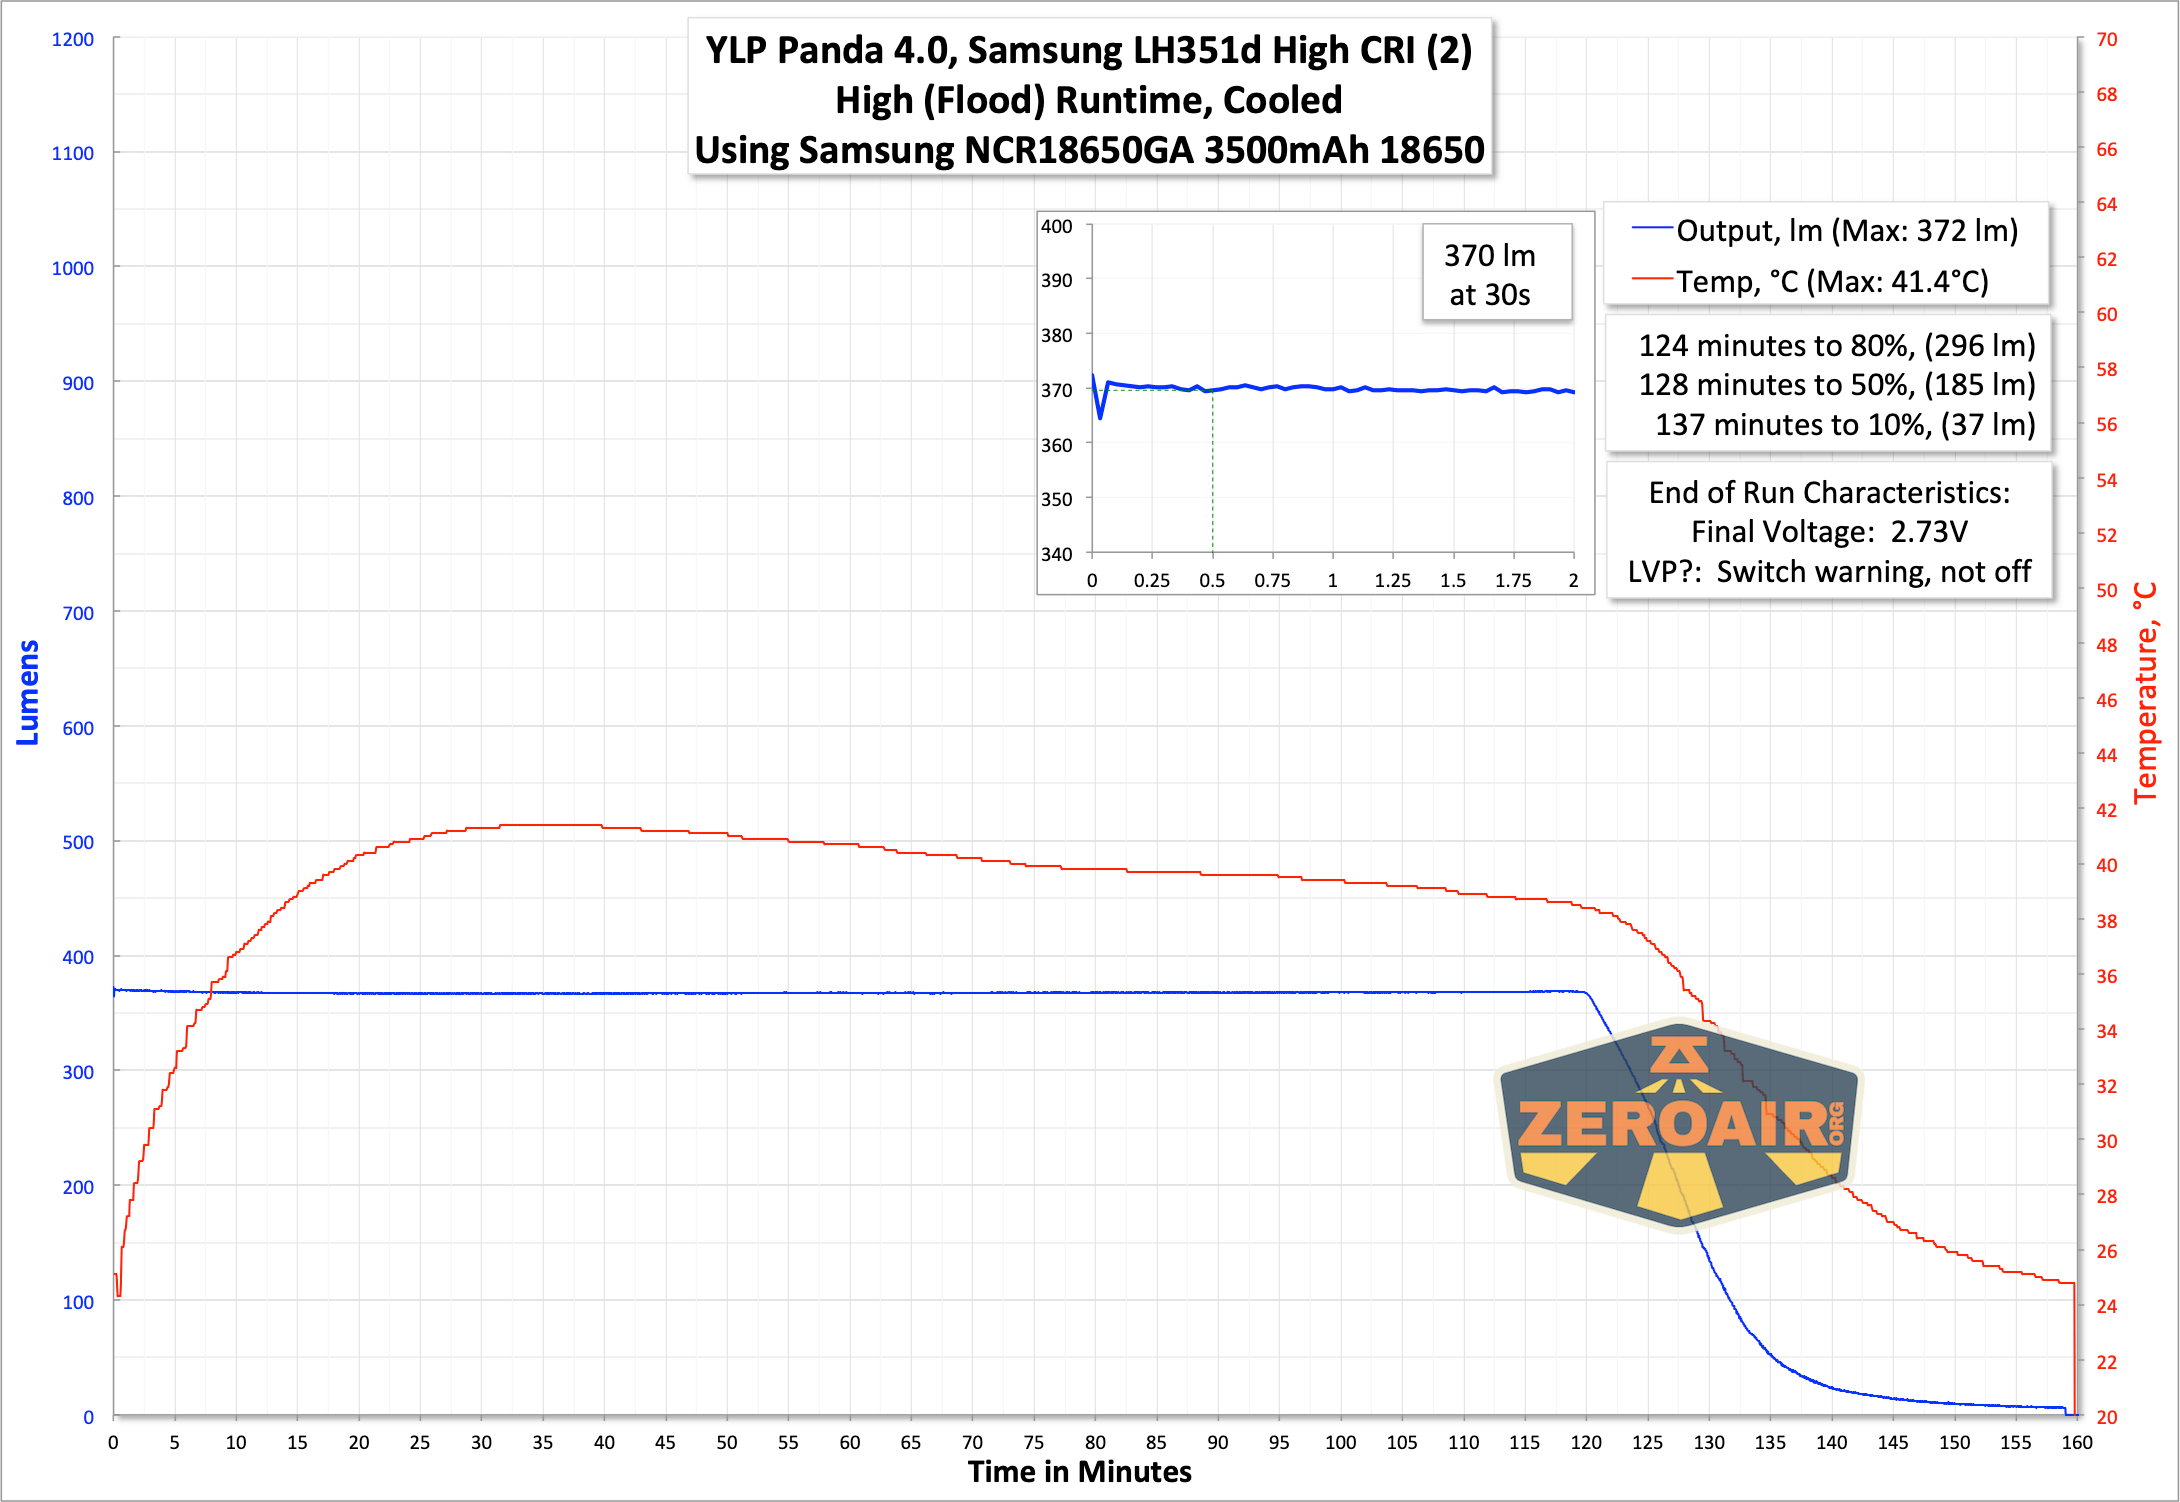
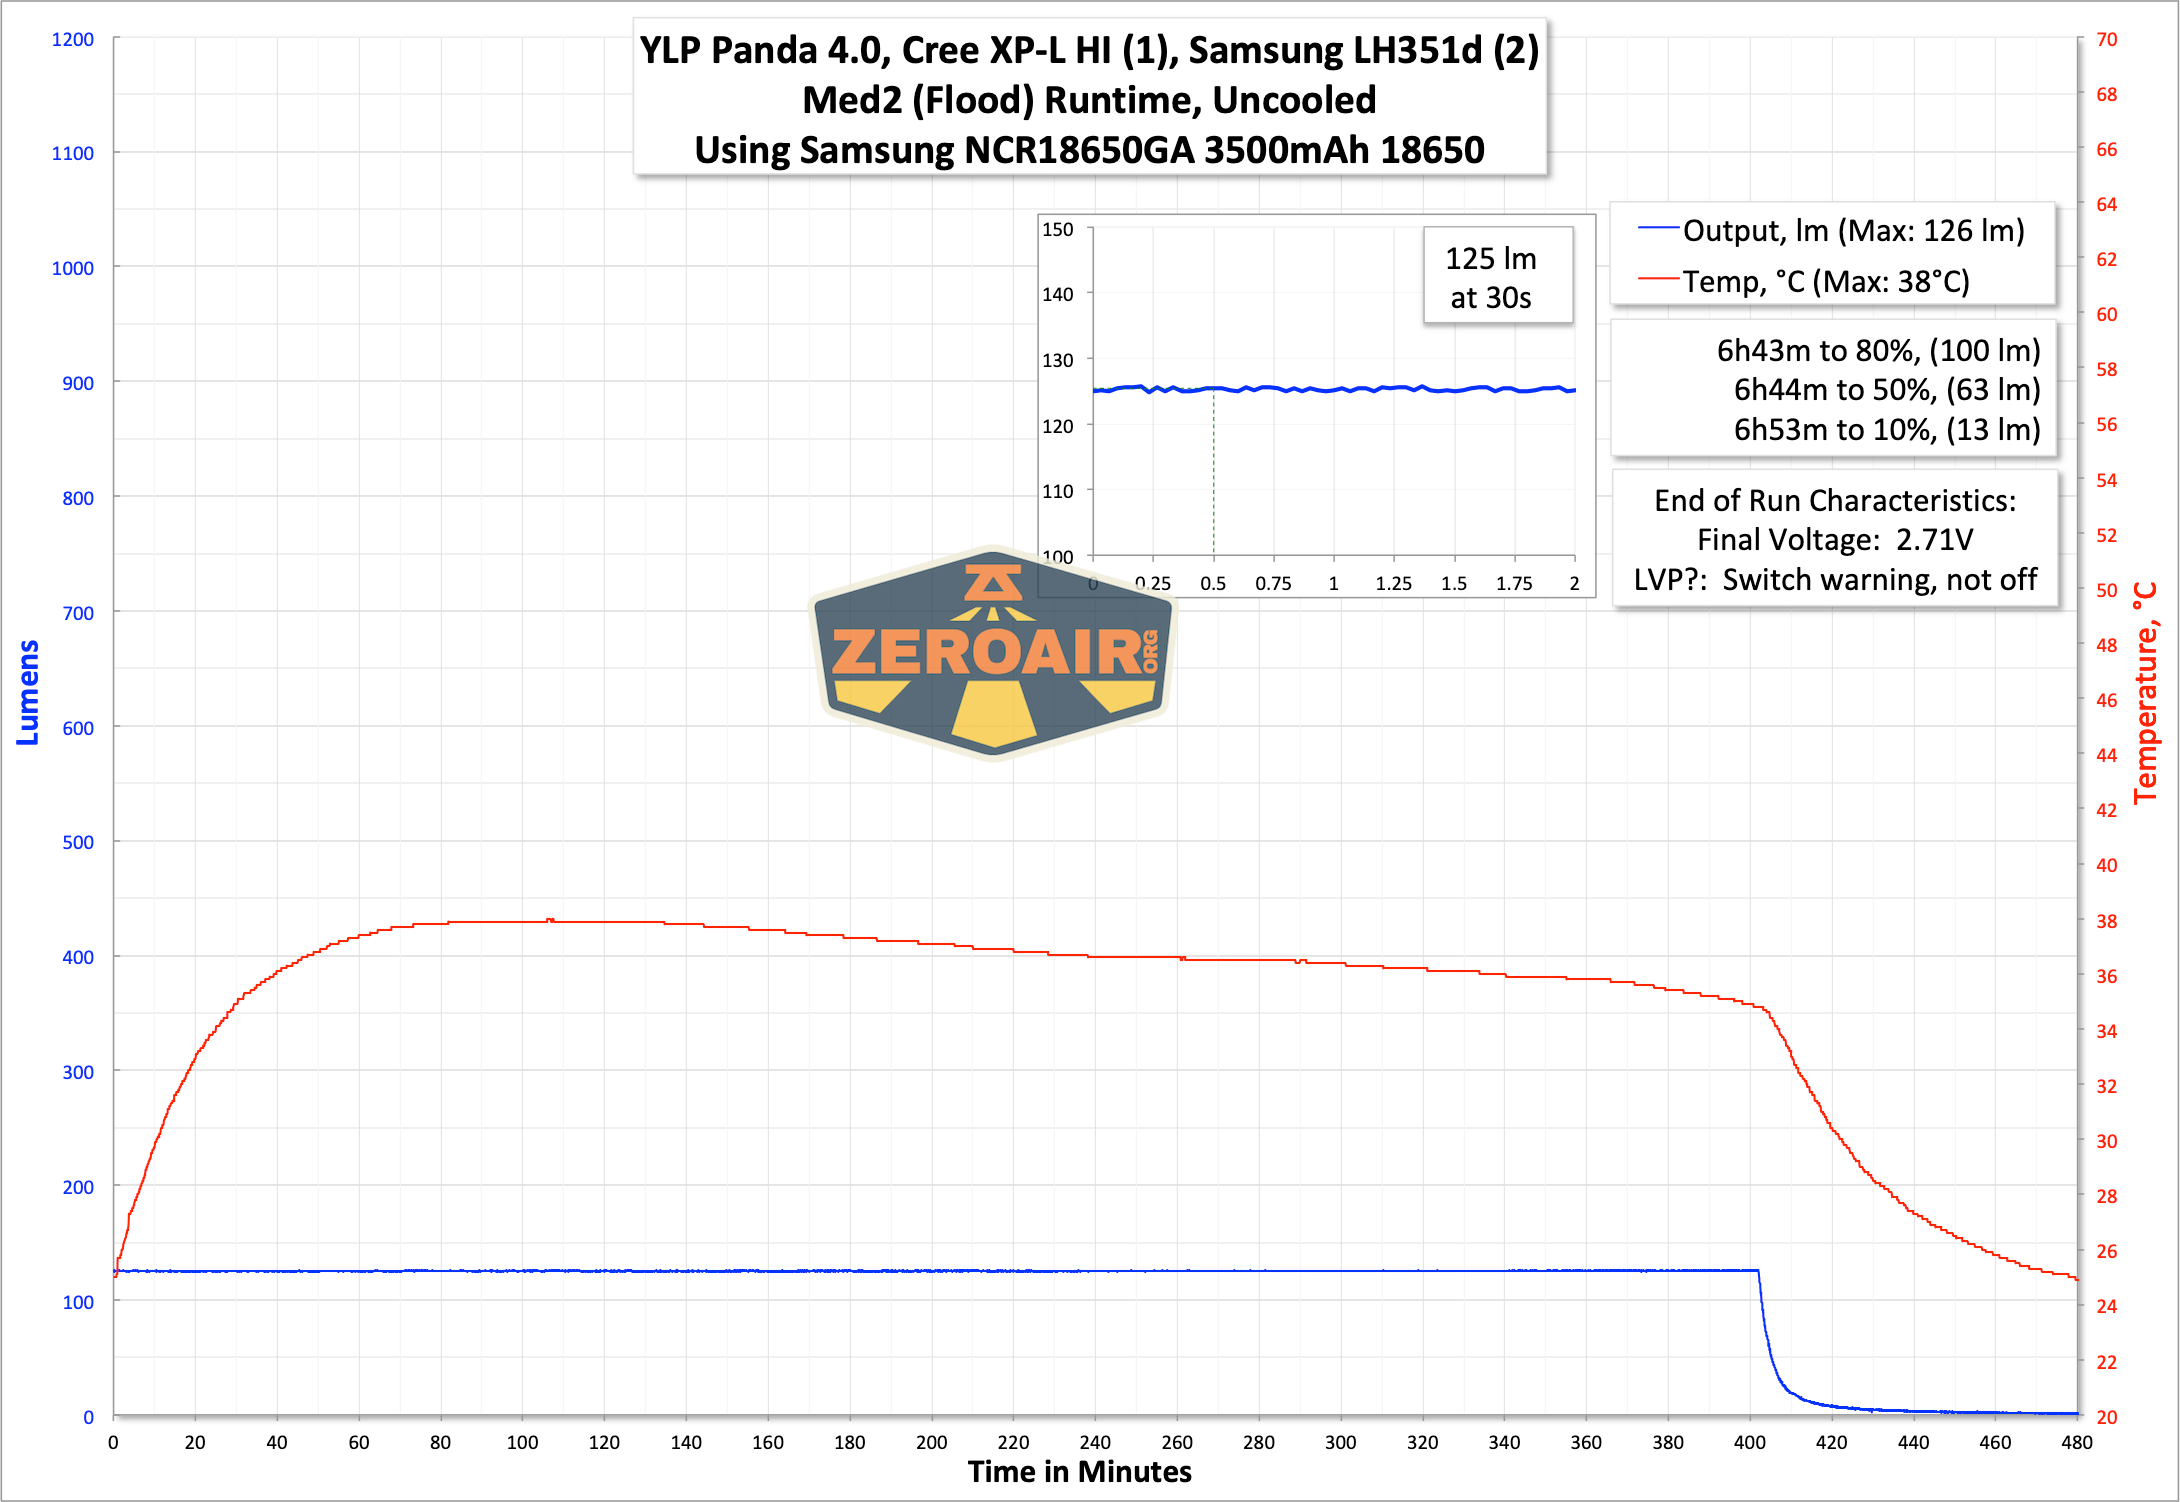
With no cooling on the Med2 level, the output remains extremely stable for nearly 7 hours.
In every test above, the switch (both switches, actually) indicated that the cell voltage was low. The light never shut off, though, but this is likely by design. This could be a case for running the light “upside down” in the headband – maybe you could see the switch indicating that the cell voltage is low. Otherwise, you’d have to take the whole apparatus off your head to check.
The switches indicate as follows:
Green: >60% power
Green Blinking: 30-60% power
Red: 15-30% power
Red Blinking: 5-15% power
Red Rapid Blinking: <5% power
Modes and Currents
From here down, I’ll attempt to be consistent with the output order. Above, I tested both emitters, then Spot, then Flood. I’ll do the same from here all the way to the end.
| Mode | Mode Claimed Output (lm) | Claimed Runtime | Measured Lumens | Tailcap Amps |
|---|---|---|---|---|
| Turbo – Both | 1800 | – | 1153 | 4.66 |
| High – Both | – | – | 737 | 2.90 |
| Med2 – Both | – | – | 249 | 0.87 |
| Med1 – Both | – | – | 88 | 0.29 |
| Low – Both | – | – | 29 | 0.10 |
| Moonlight – Both | – | – | 0.8 | 1.14 |
| Mode | Mode Claimed Output (lm) | Claimed Runtime | Measured Lumens | Tailcap Amps |
|---|---|---|---|---|
| Turbo – Spot | 850 | 1.5h | 780 | 2.62 |
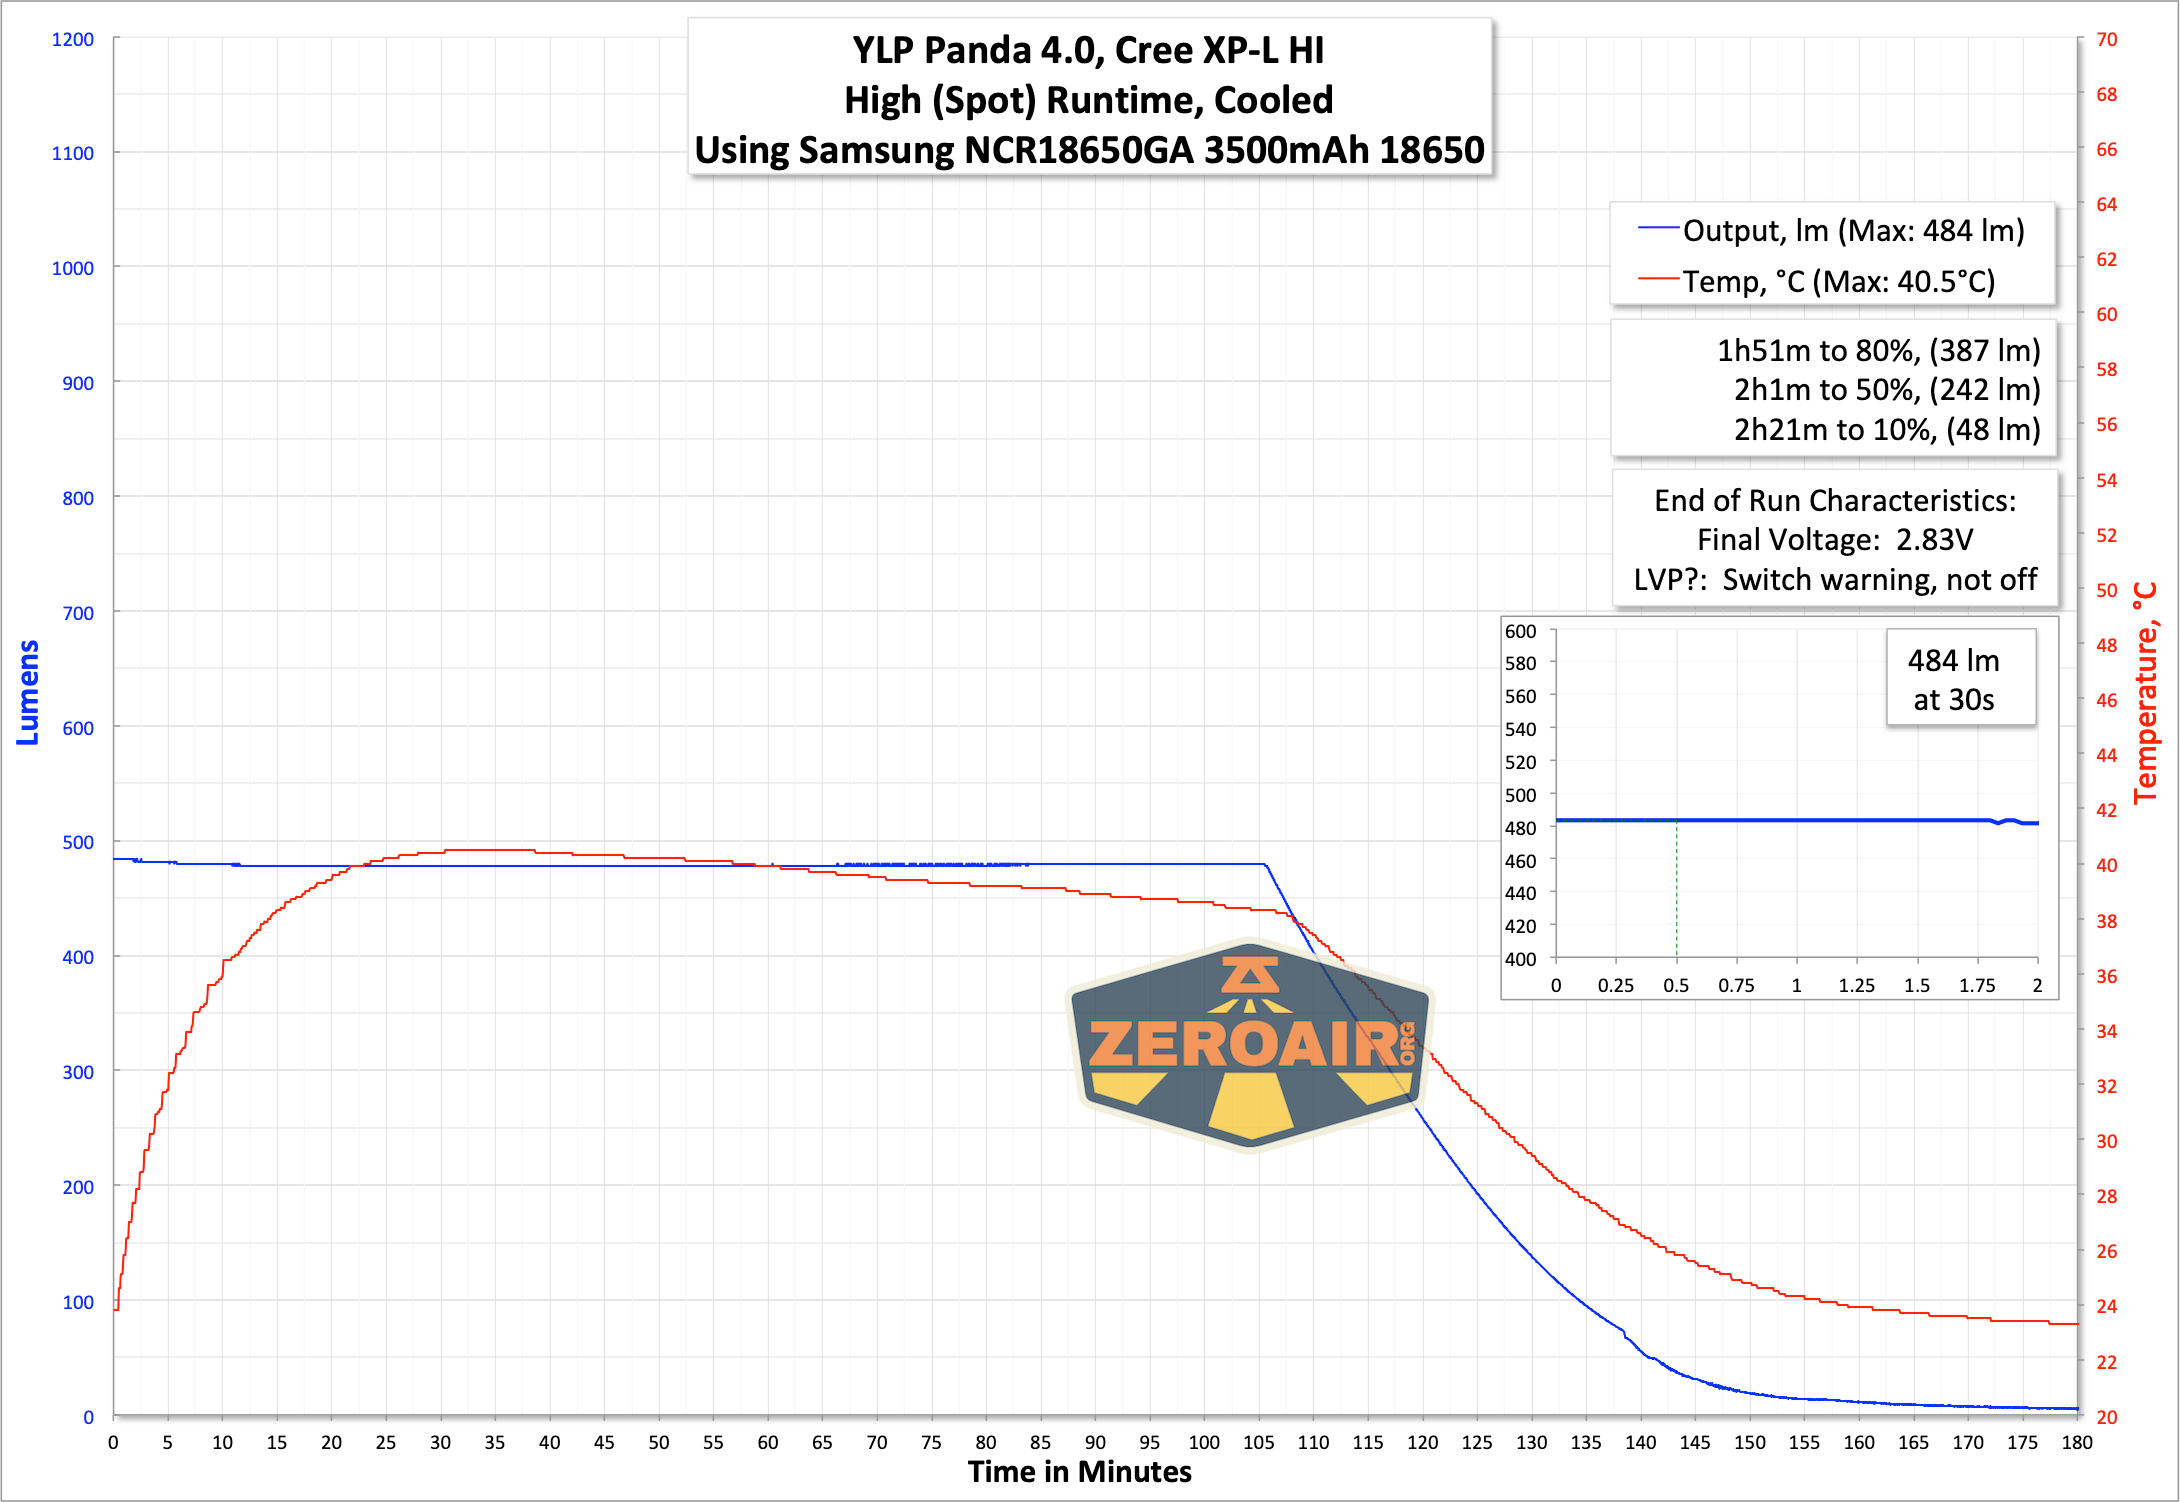
| High – Spot | 500 | 2h | 484 | 1.45 |
| Med2 – Spot | 170 | 6h | 162 | 0.43 |
| Med1 – Spot | 60 | 18h | 56 | 0.14 |
| Low – Spot | 20 | 55h | 19 | 0.05 |
| Moonlight – Spot | 0.5 | 300h | 0.2 | 1.06mA |
| Mode | Mode Claimed Output (lm) | Claimed Runtime | Measured Lumens | Tailcap Amps |
|---|---|---|---|---|
| Turbo – Flood | 1200 | 1.5h | 866 | 3.97 |
| High – Flood | 500 | 2.3h | 370 | 1.41 |
| Med2 – Flood | 170 | 7h | 125 | 0.45 |
| Med1 – Flood | 60 | 21h | 44 | 0.15 |
| Low – Flood | 20 | 65h | 15 | 0.05 |
| Moonlight – Flood | 1 | 250h | 0.8 | 1.0mA |
Pulse Width Modulation
No PWM is seen on any of the modes, including combined modes.
Both emitters:
 Flood emitters:
 Spot emitter:
 Here you can see a “baseline” – a chart with almost no light hitting the sensor.
Then there’s the Ultrafire WF-602C flashlight, which has some of the worst PWM I’ve seen. It’s so bad that I used a post about it to explain PWM! Here are multiple timescales (10ms, 5ms, 2ms, 1ms, 0.5ms, 0.2ms) to make comparing this “worst” PWM light to the test light easier. That post also explains why I didn’t test the WF-602C at the usual 50us scale.
User Interface and Operation
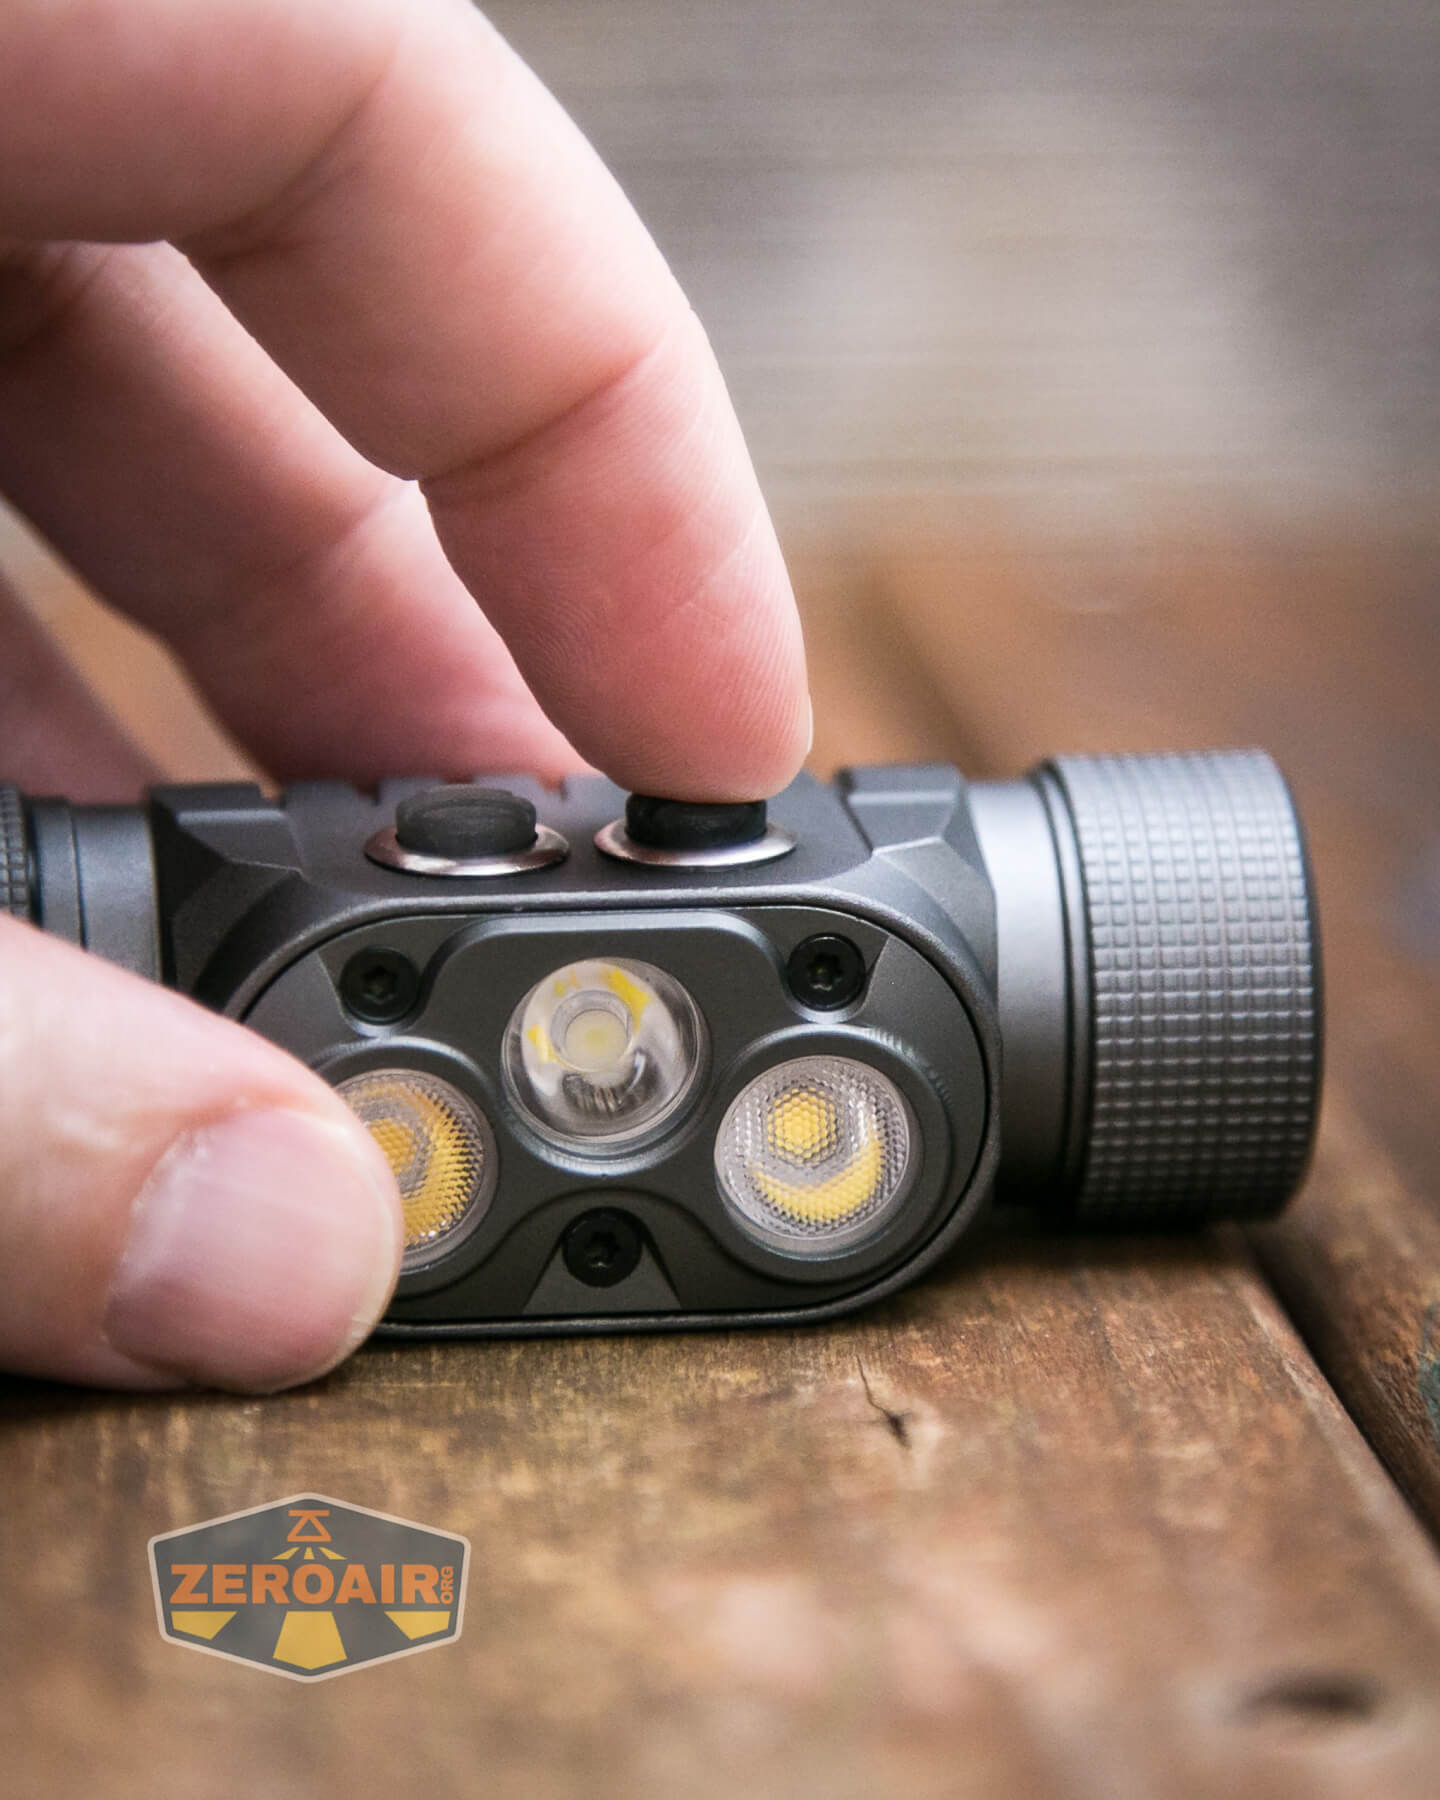
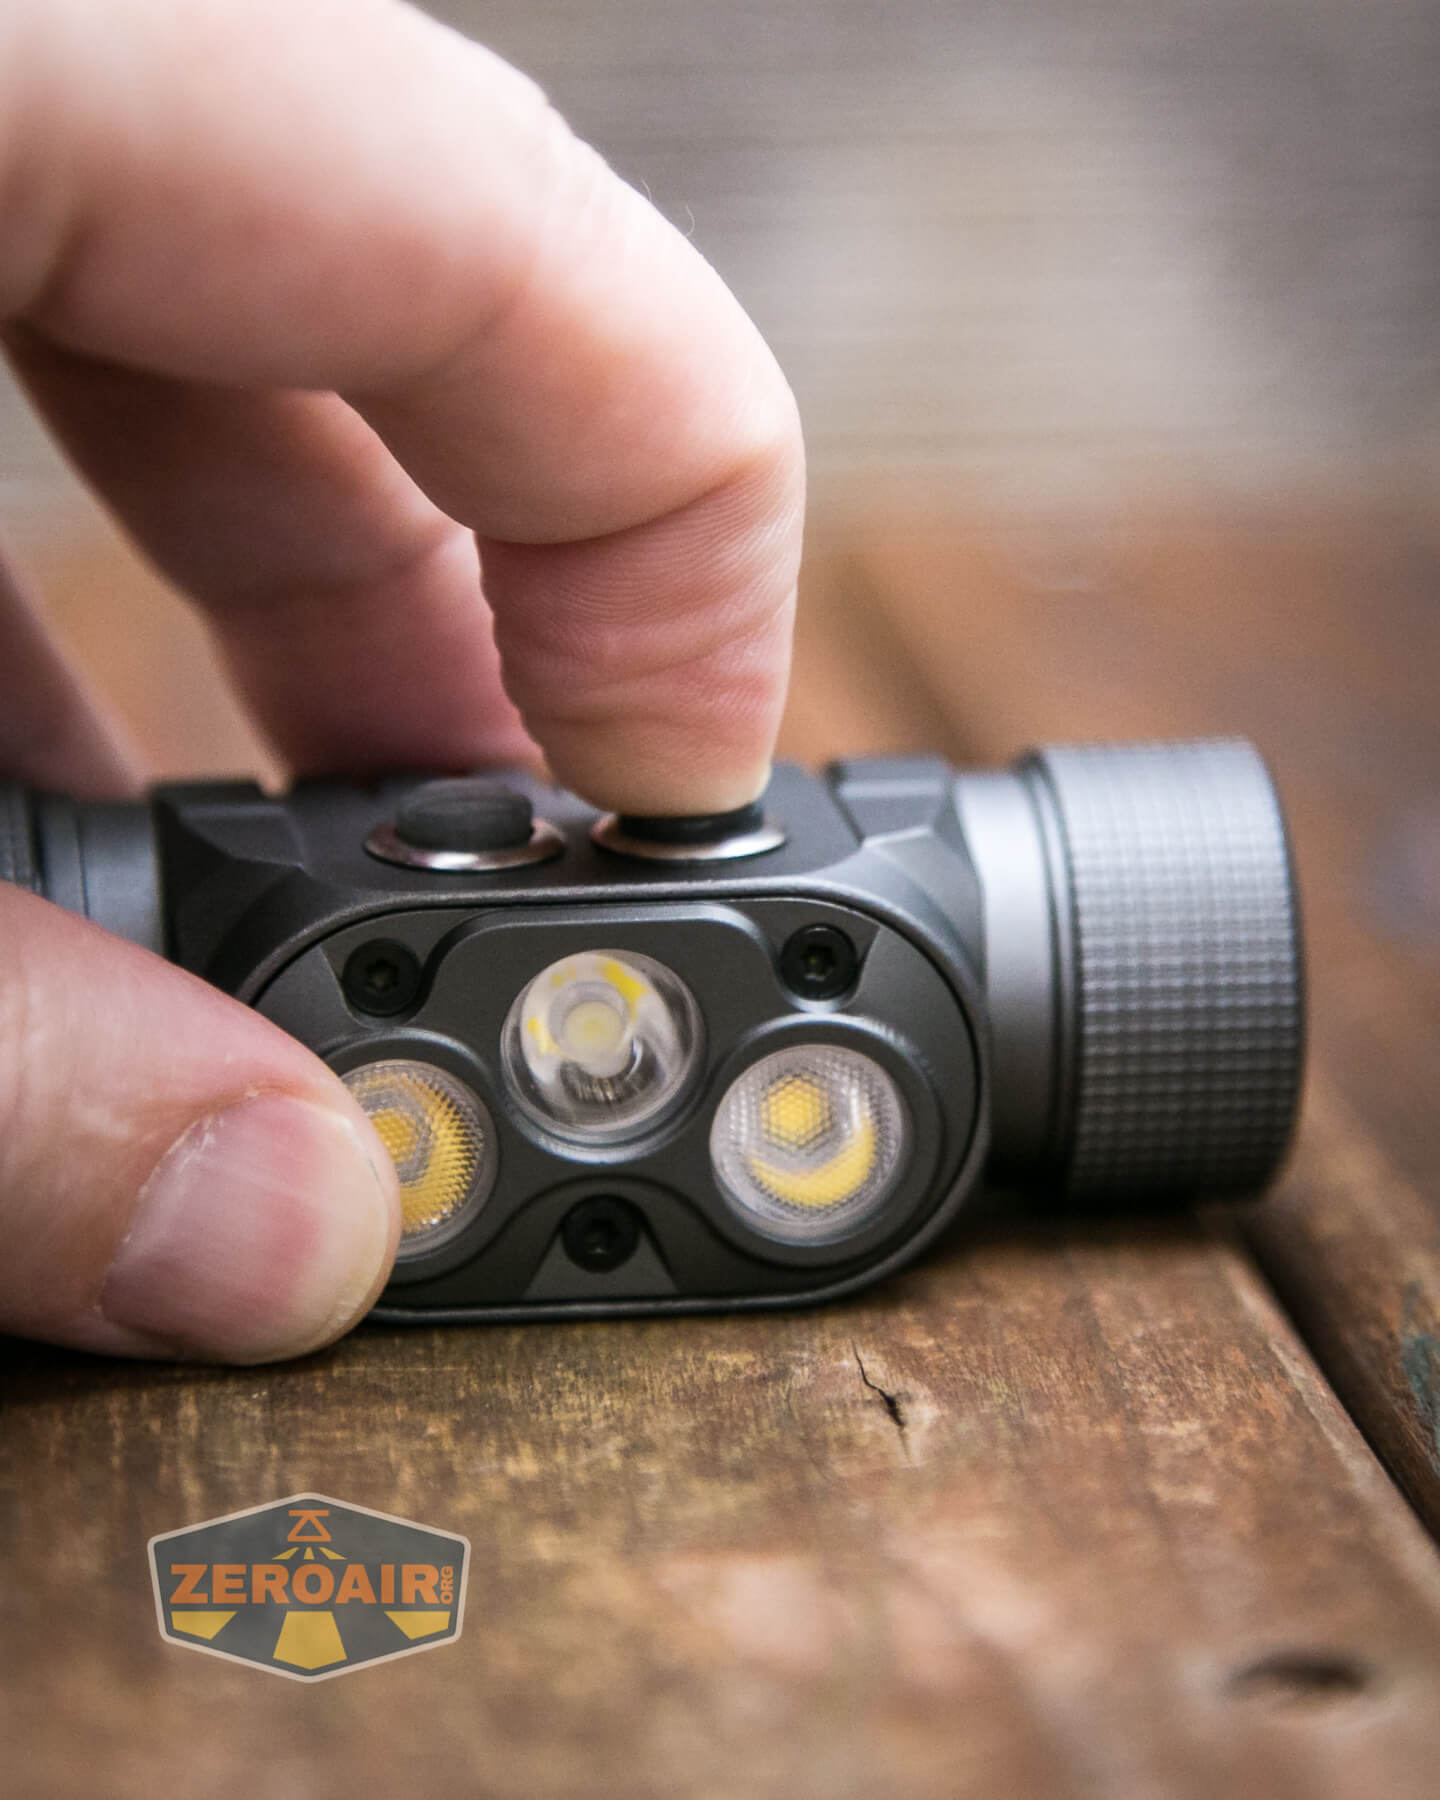
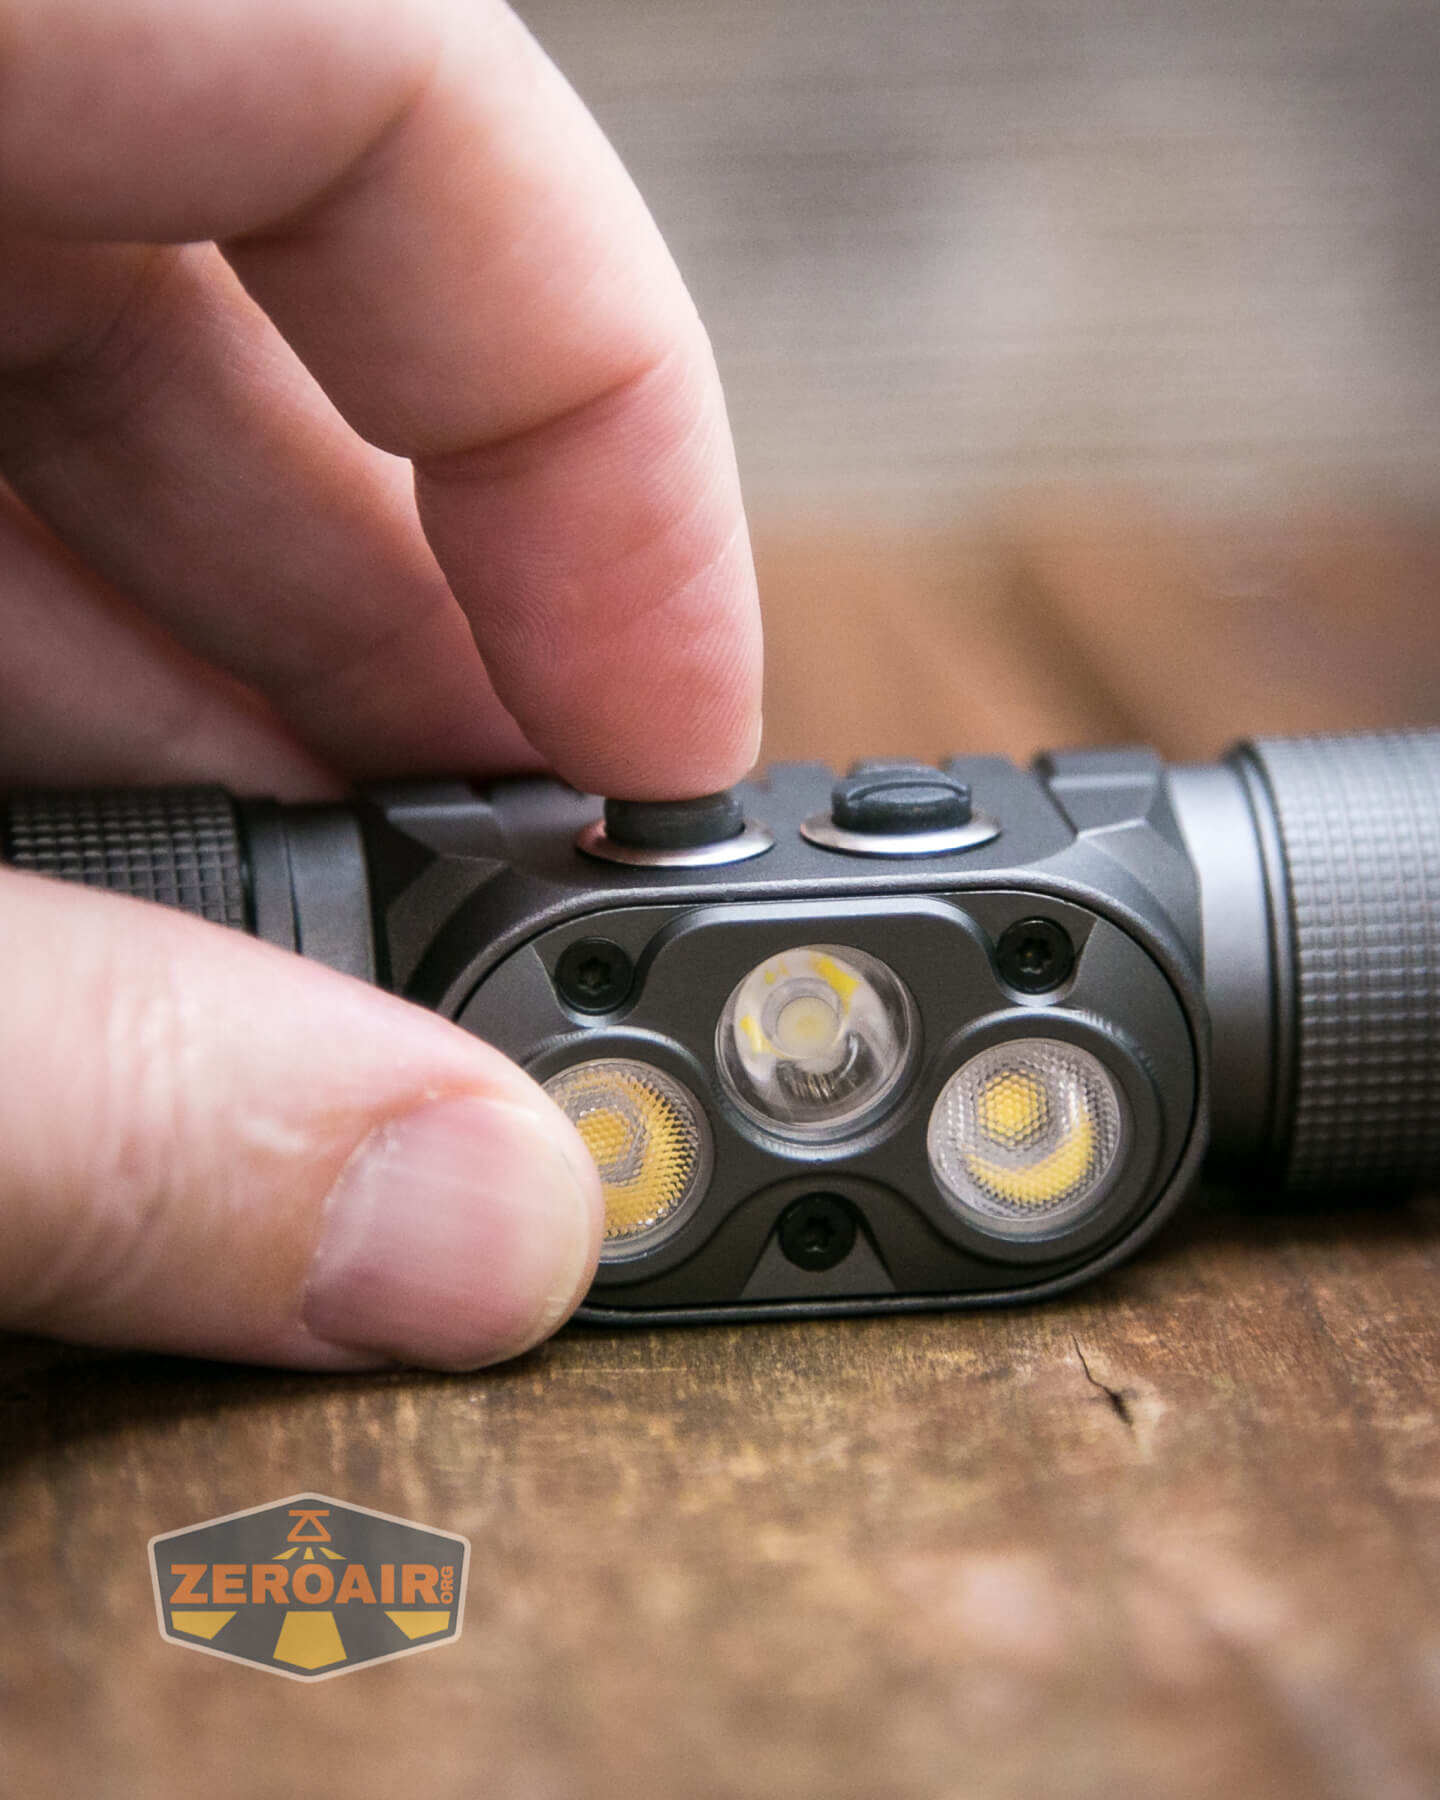
There are two switches on the YLP Panda 4.0 headlamp. They’re referred to in the manual as “the gray one” and “the black one”. When situated on the headband “properly”, the buttons are on top and thus the gray one is on the right, and the black one is on the left. These buttons are very clicky and require deliberate action to click. They make a positive click sound and require some force. In fact, you’re likely to have to grip the whole headlamp in a pinching manner to click either switch.
That also means they’ll be hard to press accidentally, which is a good thing.
Above, you can see the switch indicated in green. Below you can see red. Those are the two color options that the manual indicates, though I think there’s a bit of an amber option as well.
Here’s a user interface table! It seems that this light really should be considered two separate headlamps. Either switch controls only that output (Black controls Spot, Grey controls Flood). Neither can do any action at all on the other emitter. That complicates the table because, in any case, it doesn’t actually matter what the state of the other light is. For example, Spot can be on or off or whatever, and the action for the floodlight will not hinge on the Spot state at all. I’ll try to cover that in the table, but just bear it in mind.
| State | Action | Result |
|---|---|---|
| Off | Click Black Button | Spot On (Memorized mode, excluding Moonlight and Turbo) |
| Off | Click Grey Button | Flood On (Memorized mode, excluding Moonlight and Turbo) |
| Off | Hold Black Button | Spot Moonlight |
| Off | Hold Grey Button | Flood Moonlight |
| Spot On | Hold Black Button | Spot Mode advance Low toward High then back toward low. |
| Flood On | Hold Grey Button | Flood Mode advance Low toward High then back toward low. |
| Spot On | Click Black Button | Off |
| Flood On | Click Grey Button | Off |
| Any | Double-Click Black Button | Spot Turbo |
| Any | Double-Click Grey Button | Flood Turbo |
| Off | Click either 4x | Spot indicates battery level (blinks 1 to 5x, with 5x being the most full)^ |
| Off | Click either 14x | Advanced user interface 1 (see image below) (Spot blinks Moonlight to indicate)
(ramping, while maintaining Min/Max access) |
| Advanced user interface 1 | Click Grey 5x + Hold | Advanced user interface 2
(also ramping, but more, including some strobe options, battery check, tactical mode (completely momentary operation)) |
| Advanced user interface 1 | Click Black5x + Hold | Advanced user interface 3
(similar to the Basic UI, but with some memory change options, some switch indicator change options and other things) |
| Advanced user interface 2 | Click Grey 5x + Hold | Advanced user interface 3 |
| Advanced user interface 2 | Click Black 5x + Hold | Advanced user interface 1 |
| Advanced user interface 3 | Click Grey 5x + Hold | Advanced user interface 1 |
| Advanced user interface 3 | Click Black 5x + Hold | Advanced user interface 2 |
| Any Advanced UI | Click 12x | Returns to Basic UI |
^ The manual does not state this, but these 5 blink options almost certainly correspond to the five levels of charge indicated by the switch colors that are stated in the Power and Runtime section.
Fortunately, nothing about the basic user interface is confusing at all. Despite the fact that there are two switches making this light seem like two lights – that’s fine – the user interface between the two is exactly the same. This separation of these emitter groups is also interesting because you can combine any level of flood and throw – they are not mode synced. For example, you can use the turbo of Flood and Med1 of spot, to get that nice mix of flood and throw you might be needing. Note that in my testing, I did sync the modes when using “Both.”
The flip side of the basic user interface is the advanced user interface. They will certainly take a bit of practice to master, particularly with the switch resistance. Be prepared for some sore thumbs! In any case, there’s a lot to unpack in these advanced options, including ramping, and the ability to change a bunch of stuff that the switch indicators do. It’s very neat.
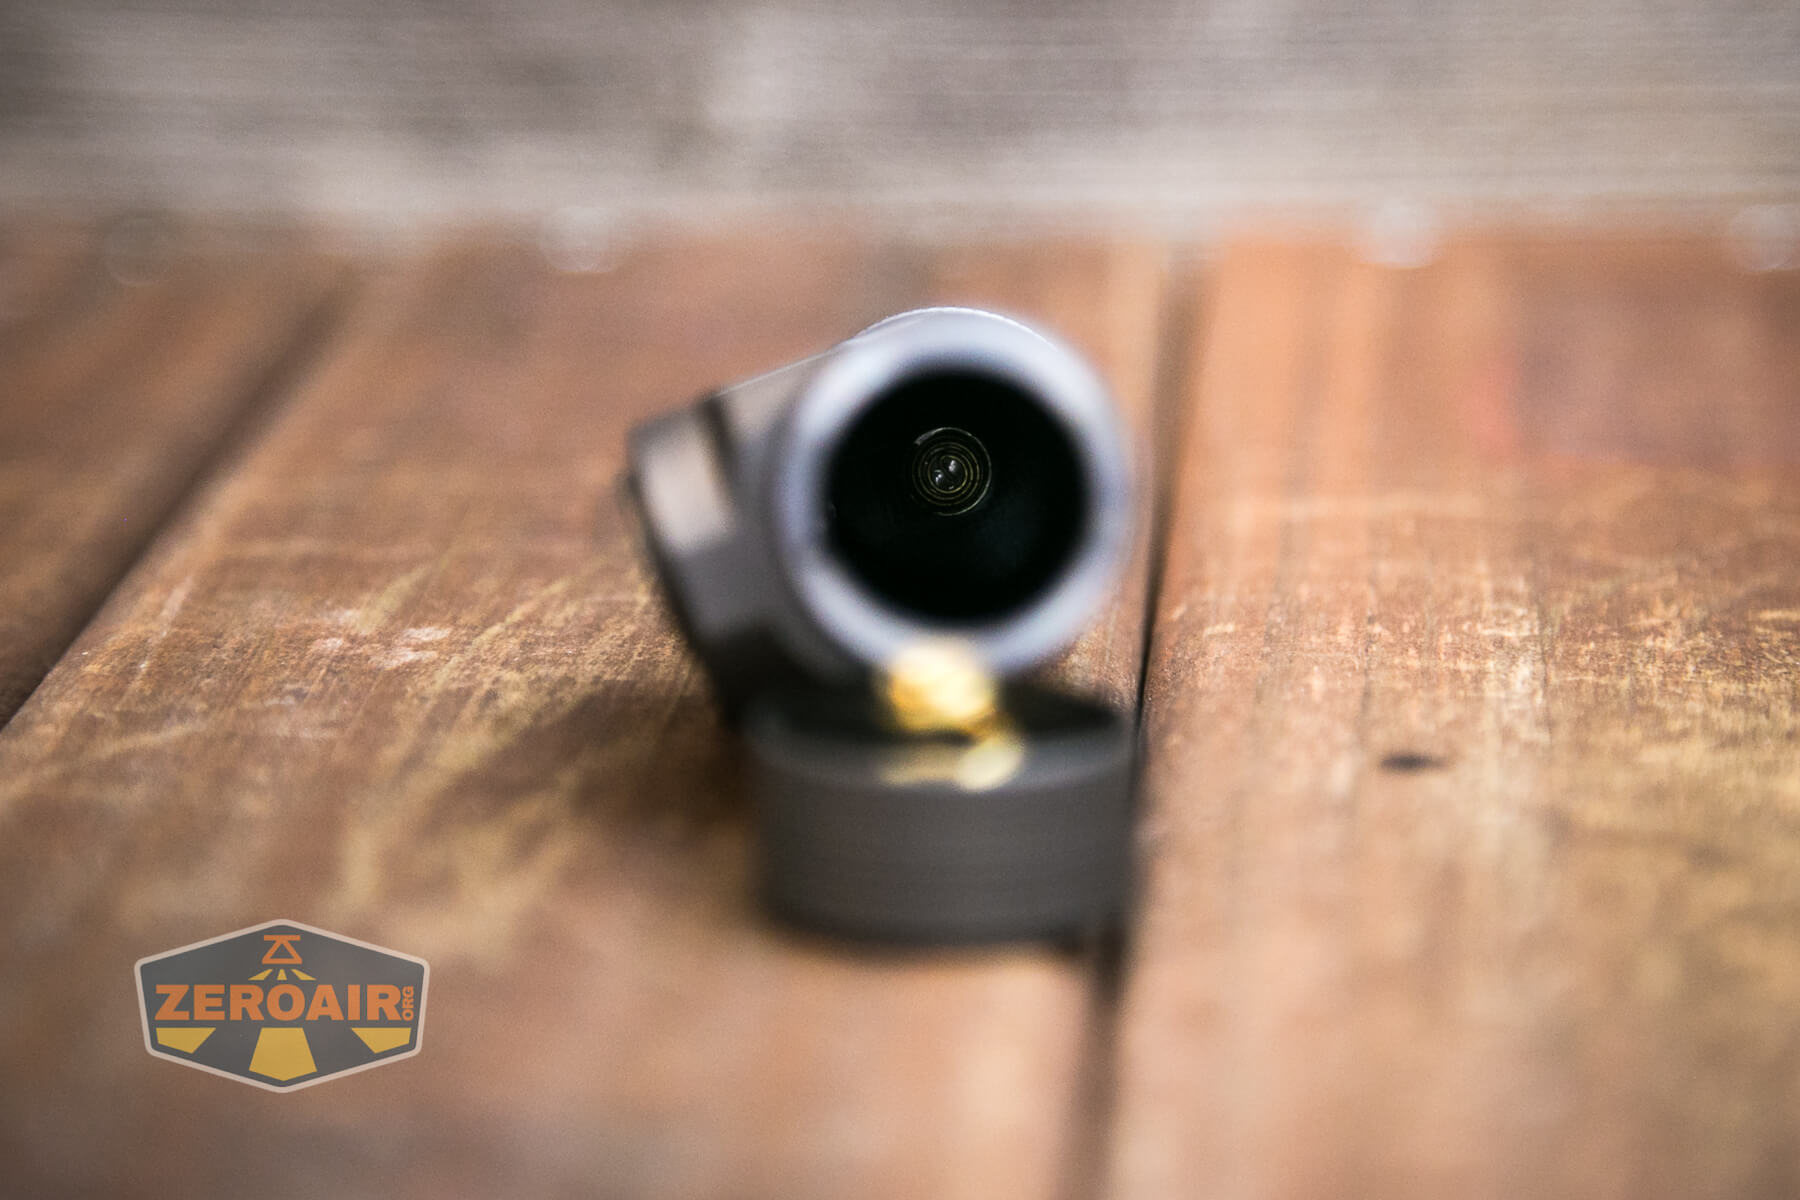
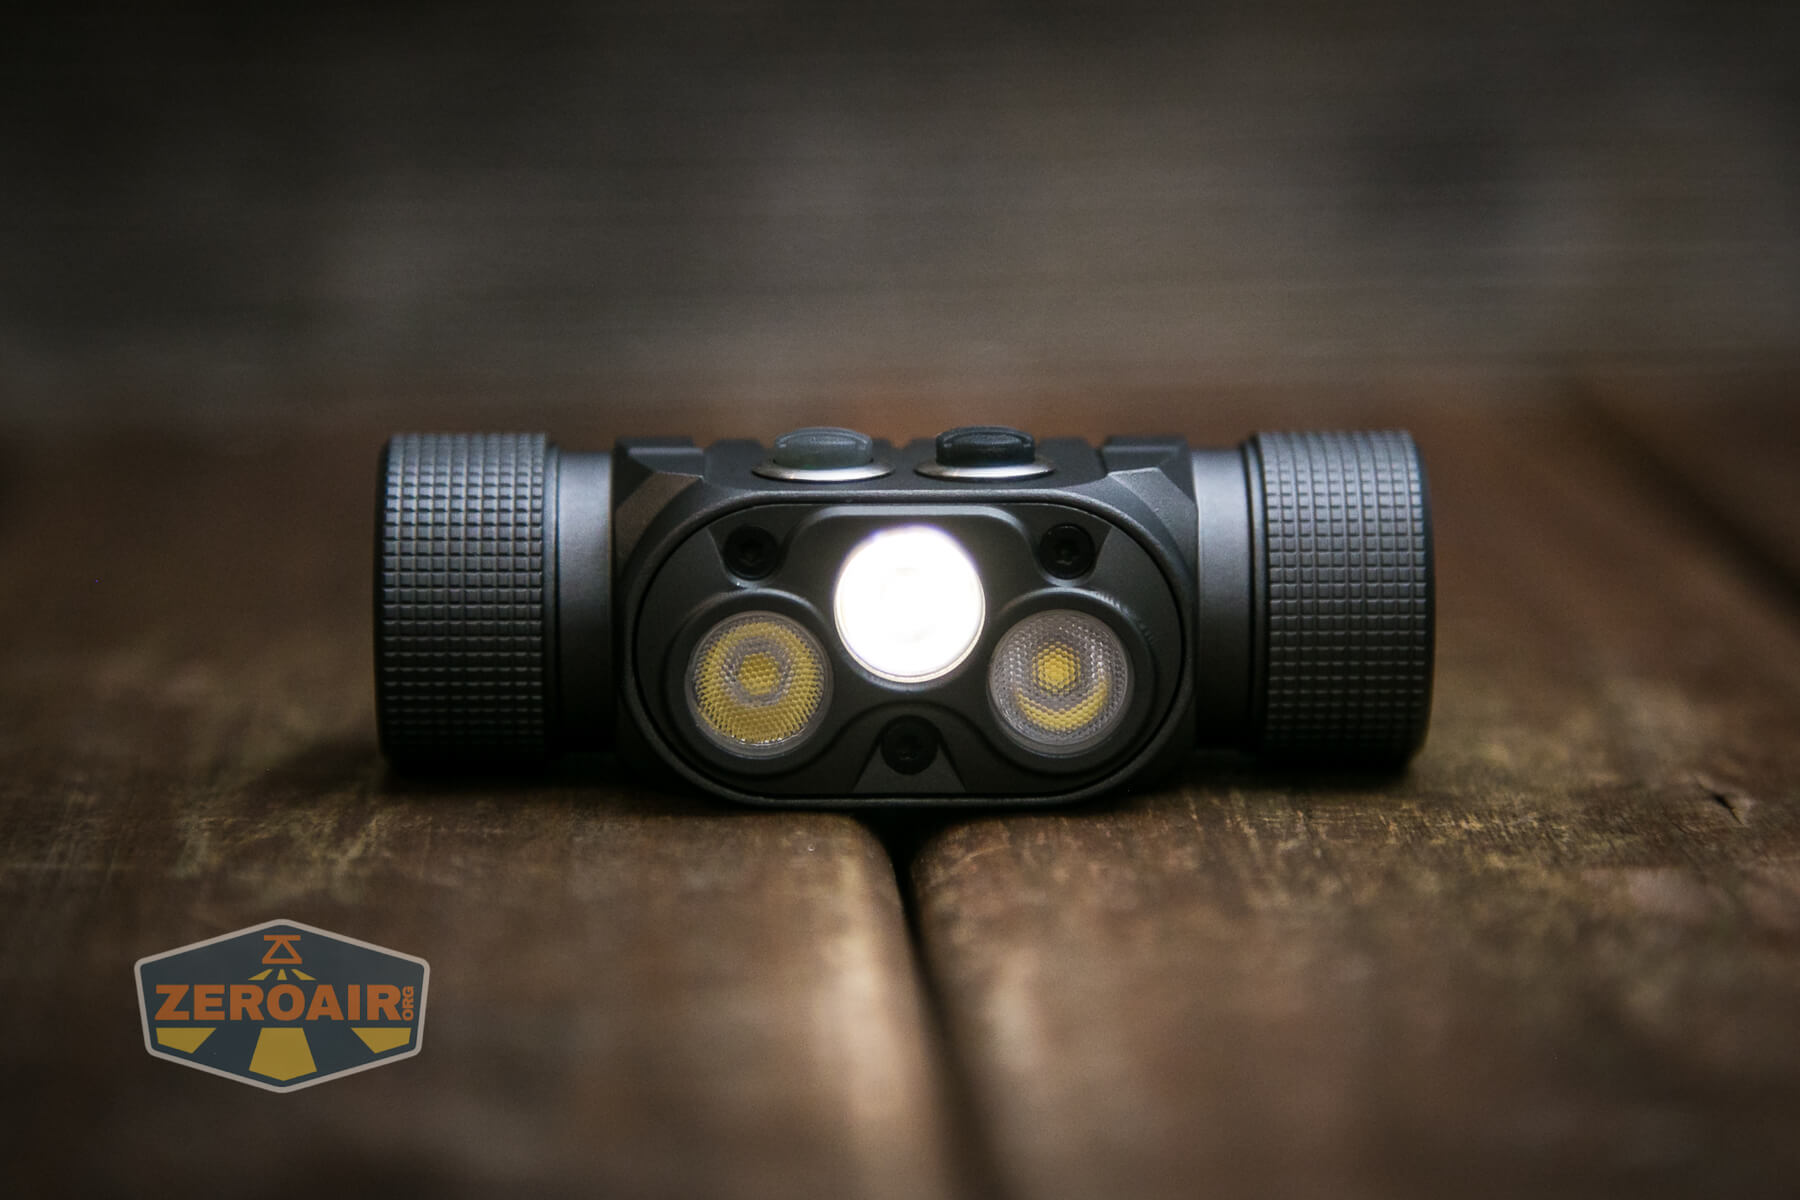
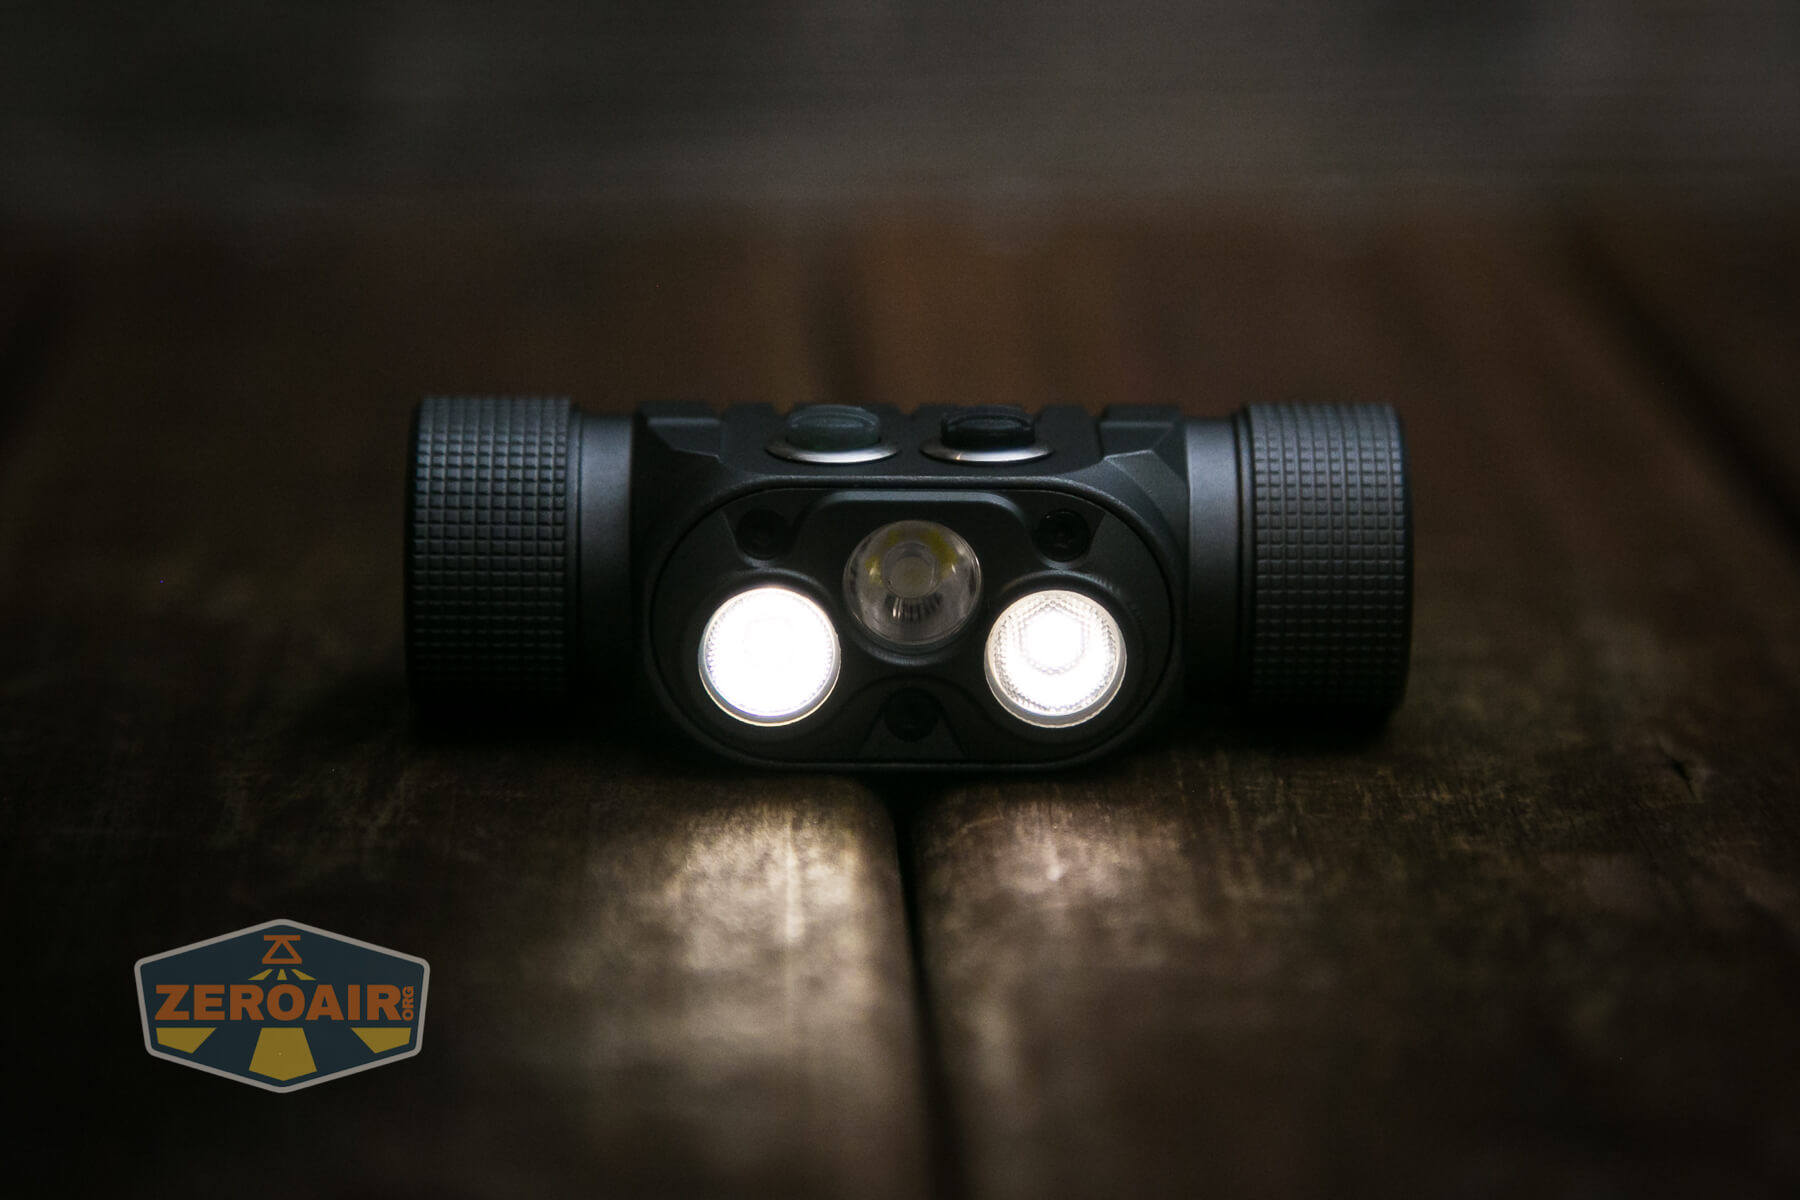
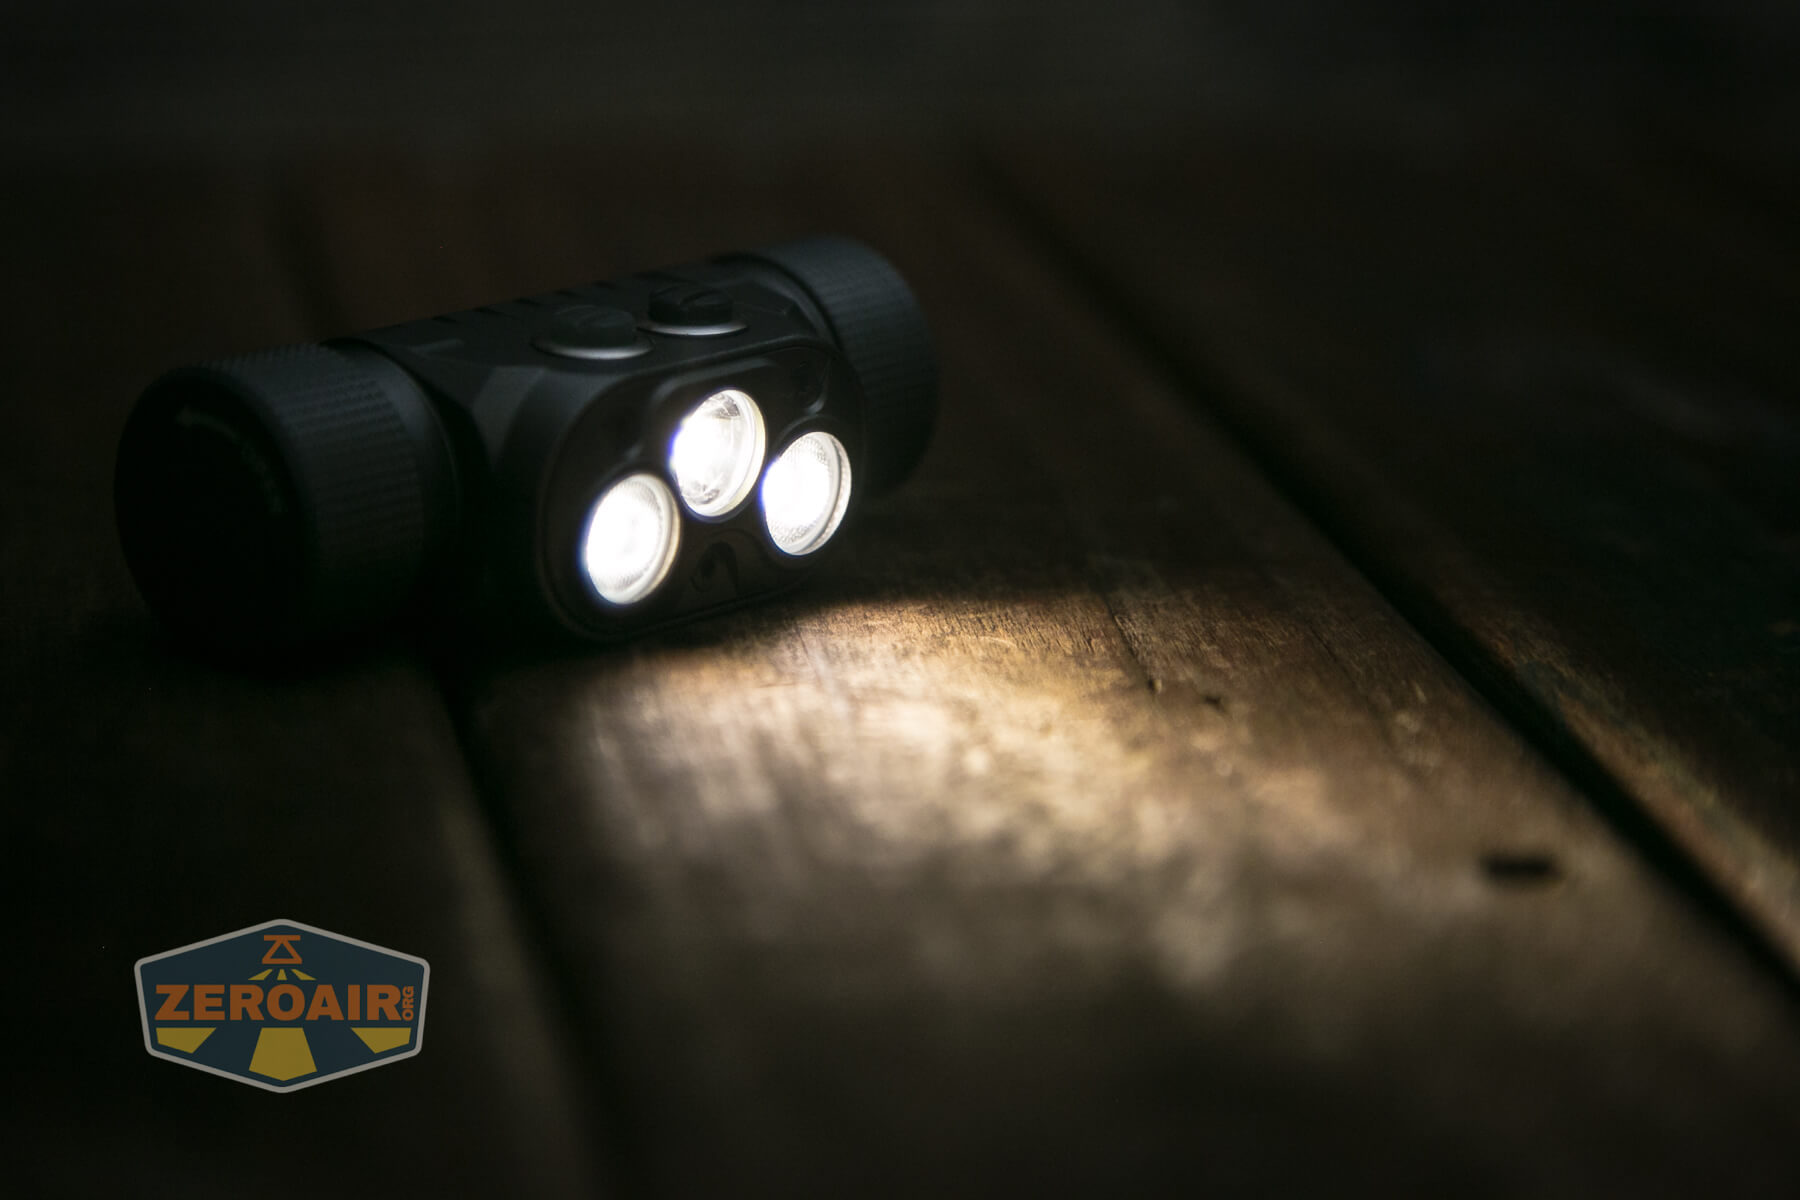
LED and Beam
There are two types of emitters in the YLP Panda 4.0 headlamp. First, I’ll cover the “Spot” emitter. It’s a Cree XP-L HI. YLP specifies “4000K-4200K” but doesn’t specify which emitter(s) that refers to. I’m fairly confident YLP means that both spot and flood are in this CCT range.
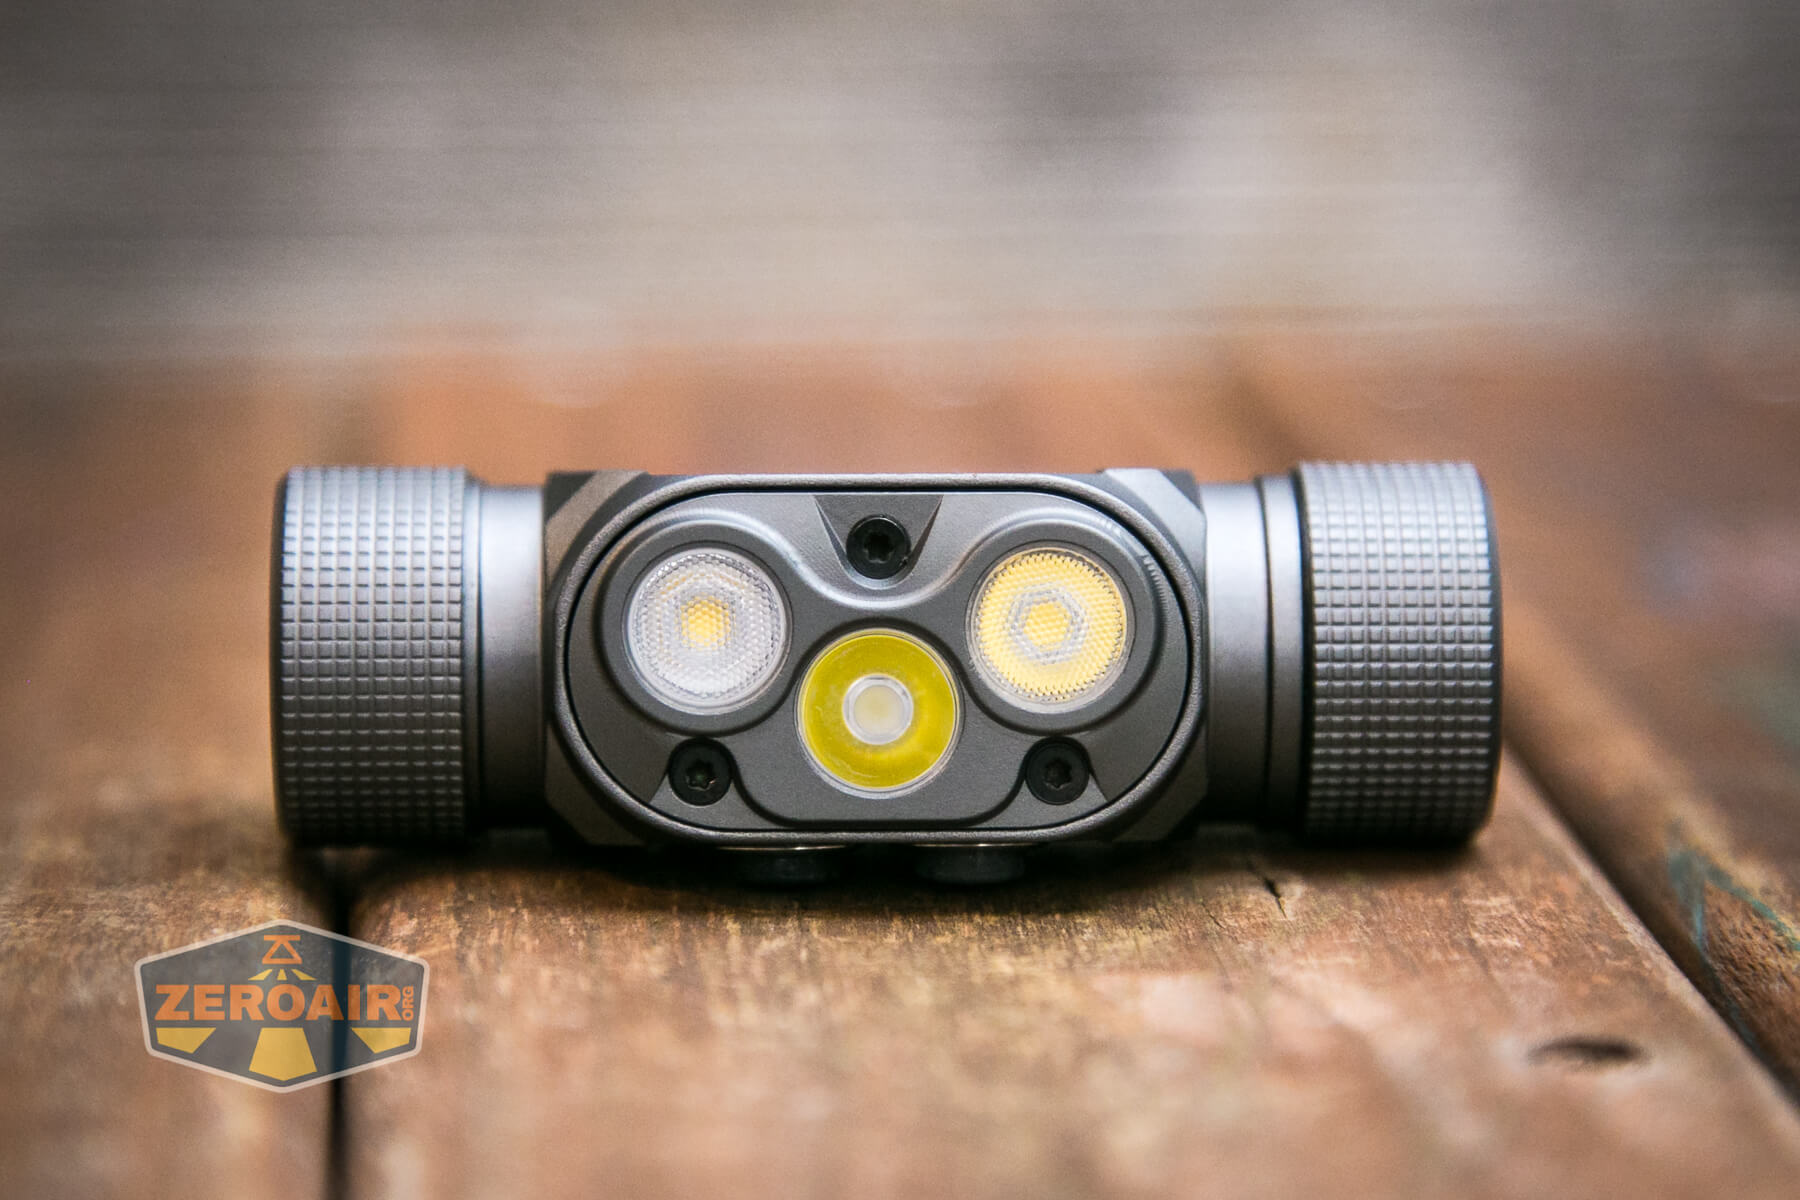
In the photo above, the Spot emitter is “on the bottom” (upside down). It’s the center emitter and has a clear optic. Also, if you said you see a face in the image above, I’m right there with you. I see it. It’s fine; we’re ok.
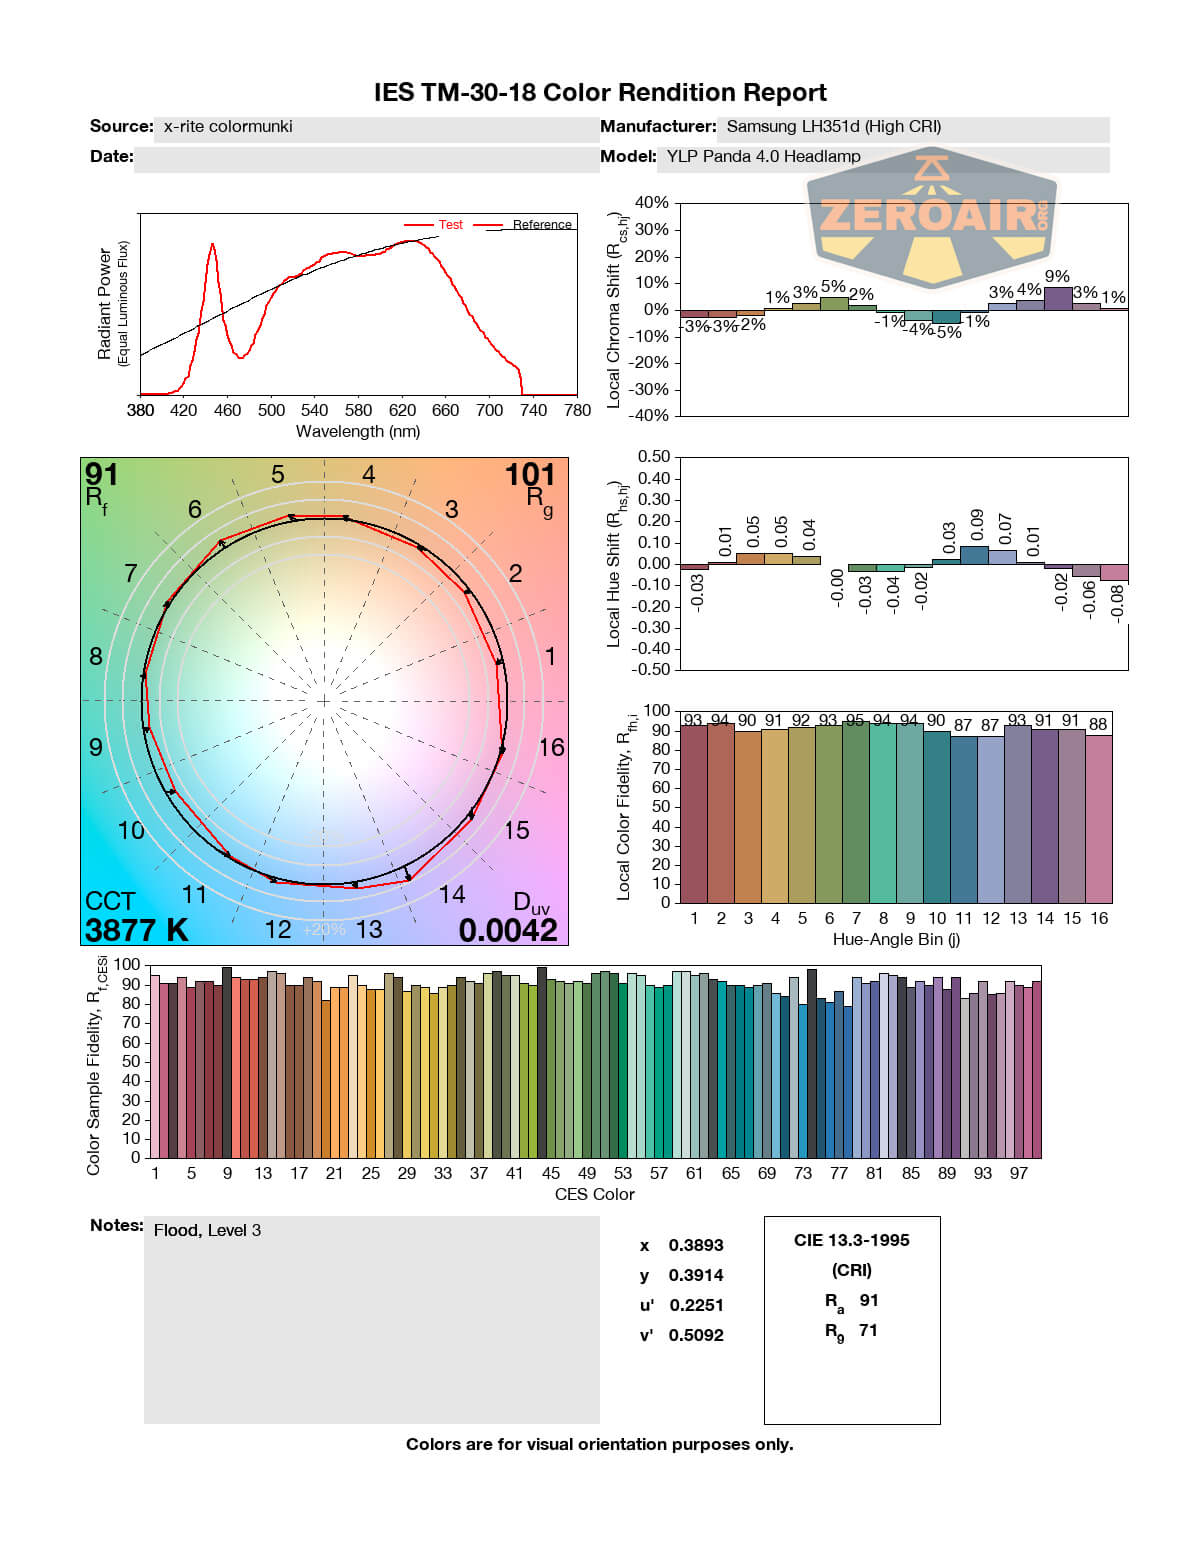
For Flood, YLP used a couple of Samsung LH351d emitters. Also, 4000K-4200K, but in this case specified as High CRI.

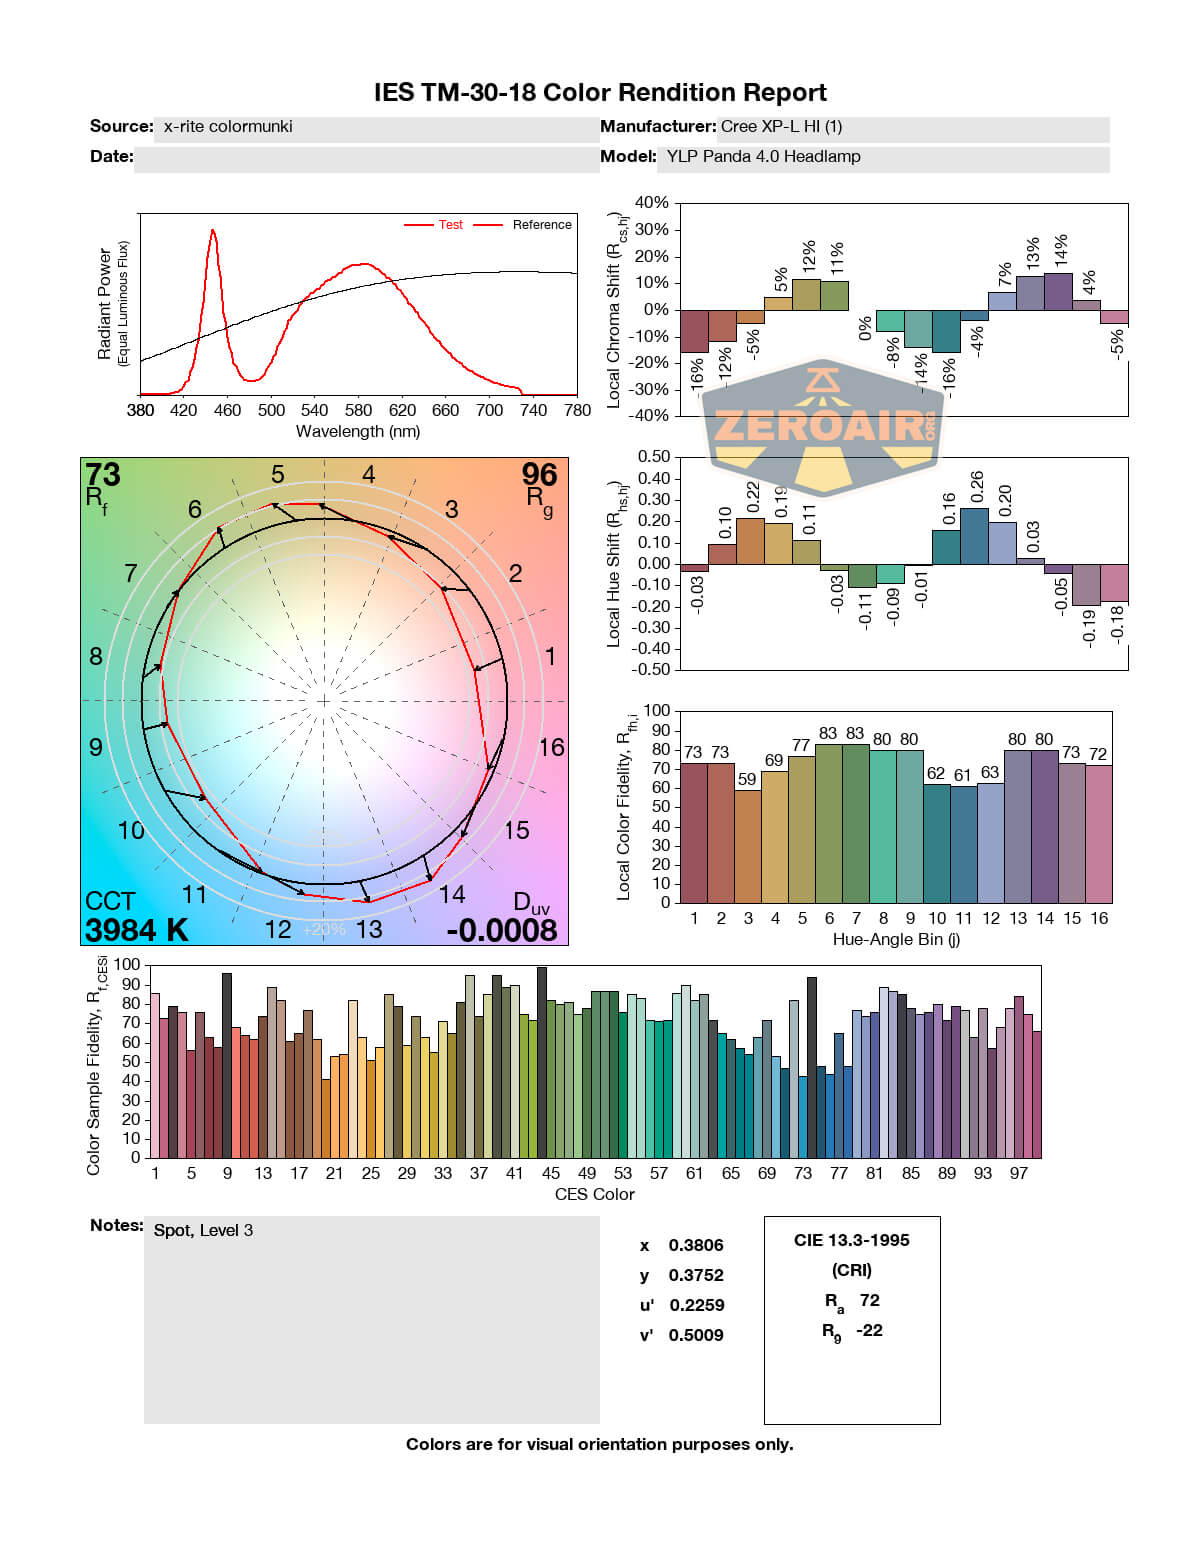
LED Color Report (CRI and CCT)
I tested everything, including “both” for the CCT/CRI reports. As above, the “both” report is first. In this test, the charts will likely be a little “spot heavy” – so we’ll over-report the CRI of the spot, for example. I didn’t see a good way around that.
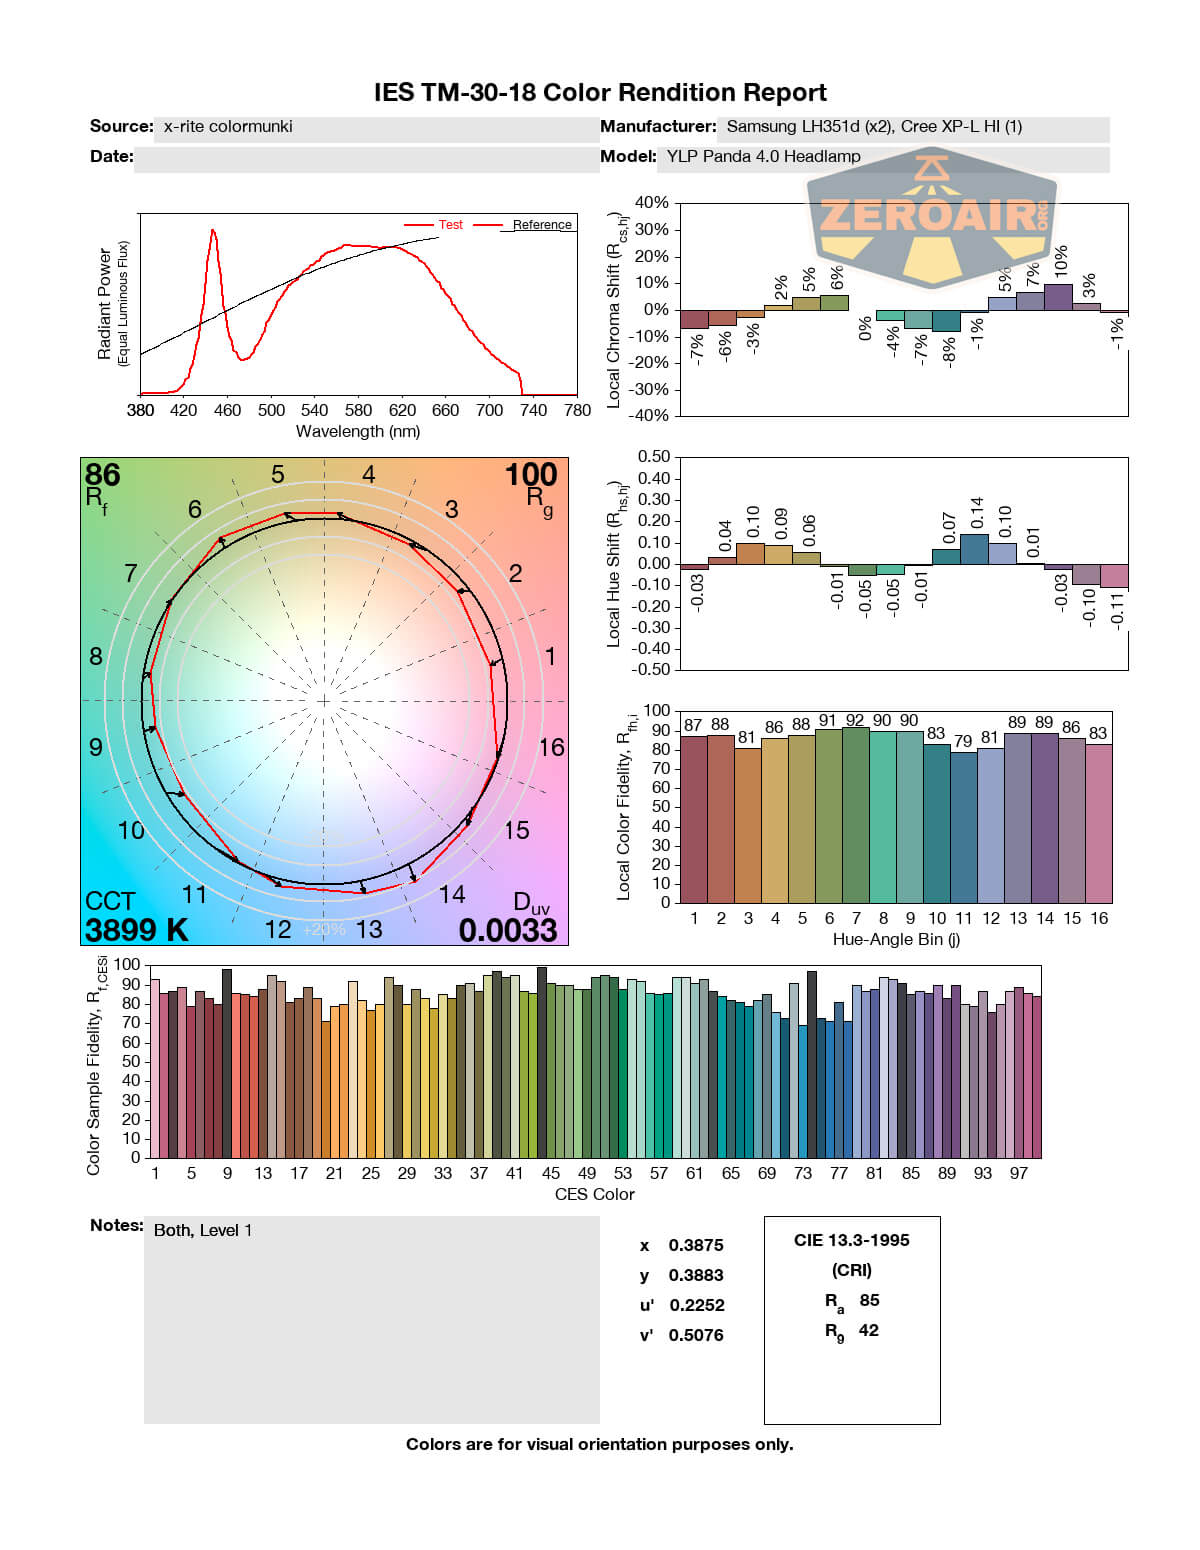
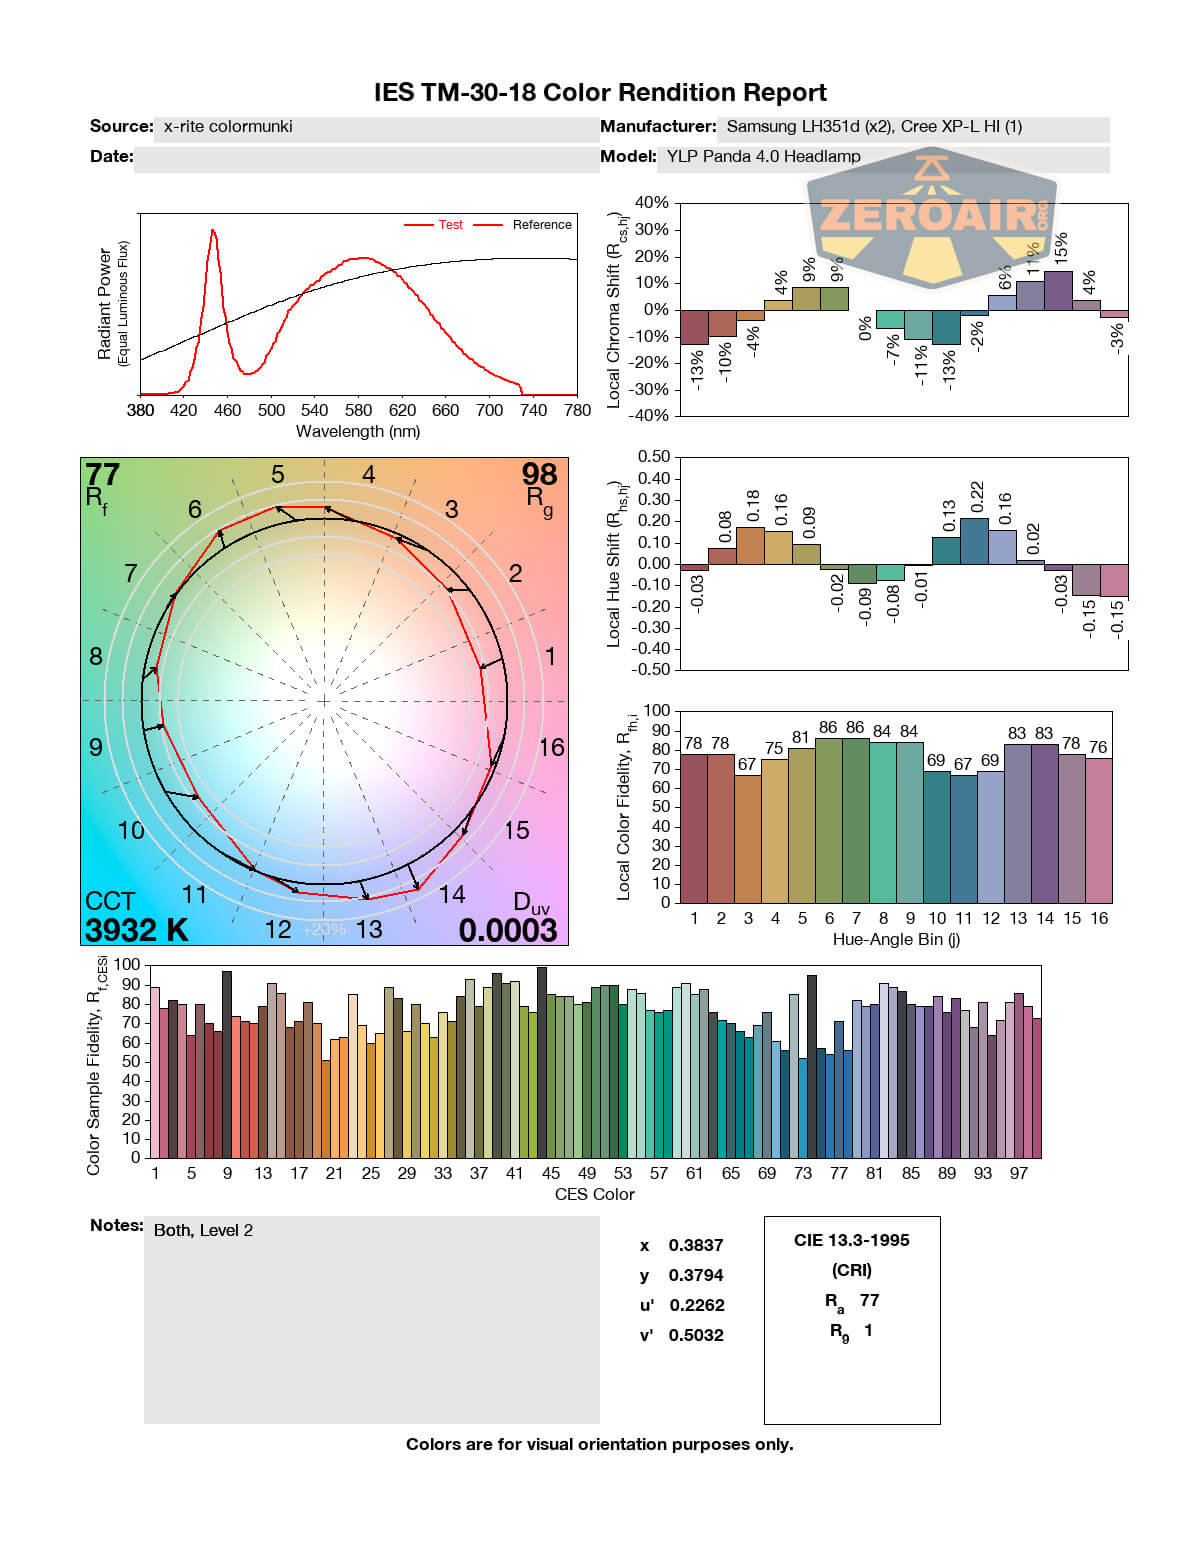

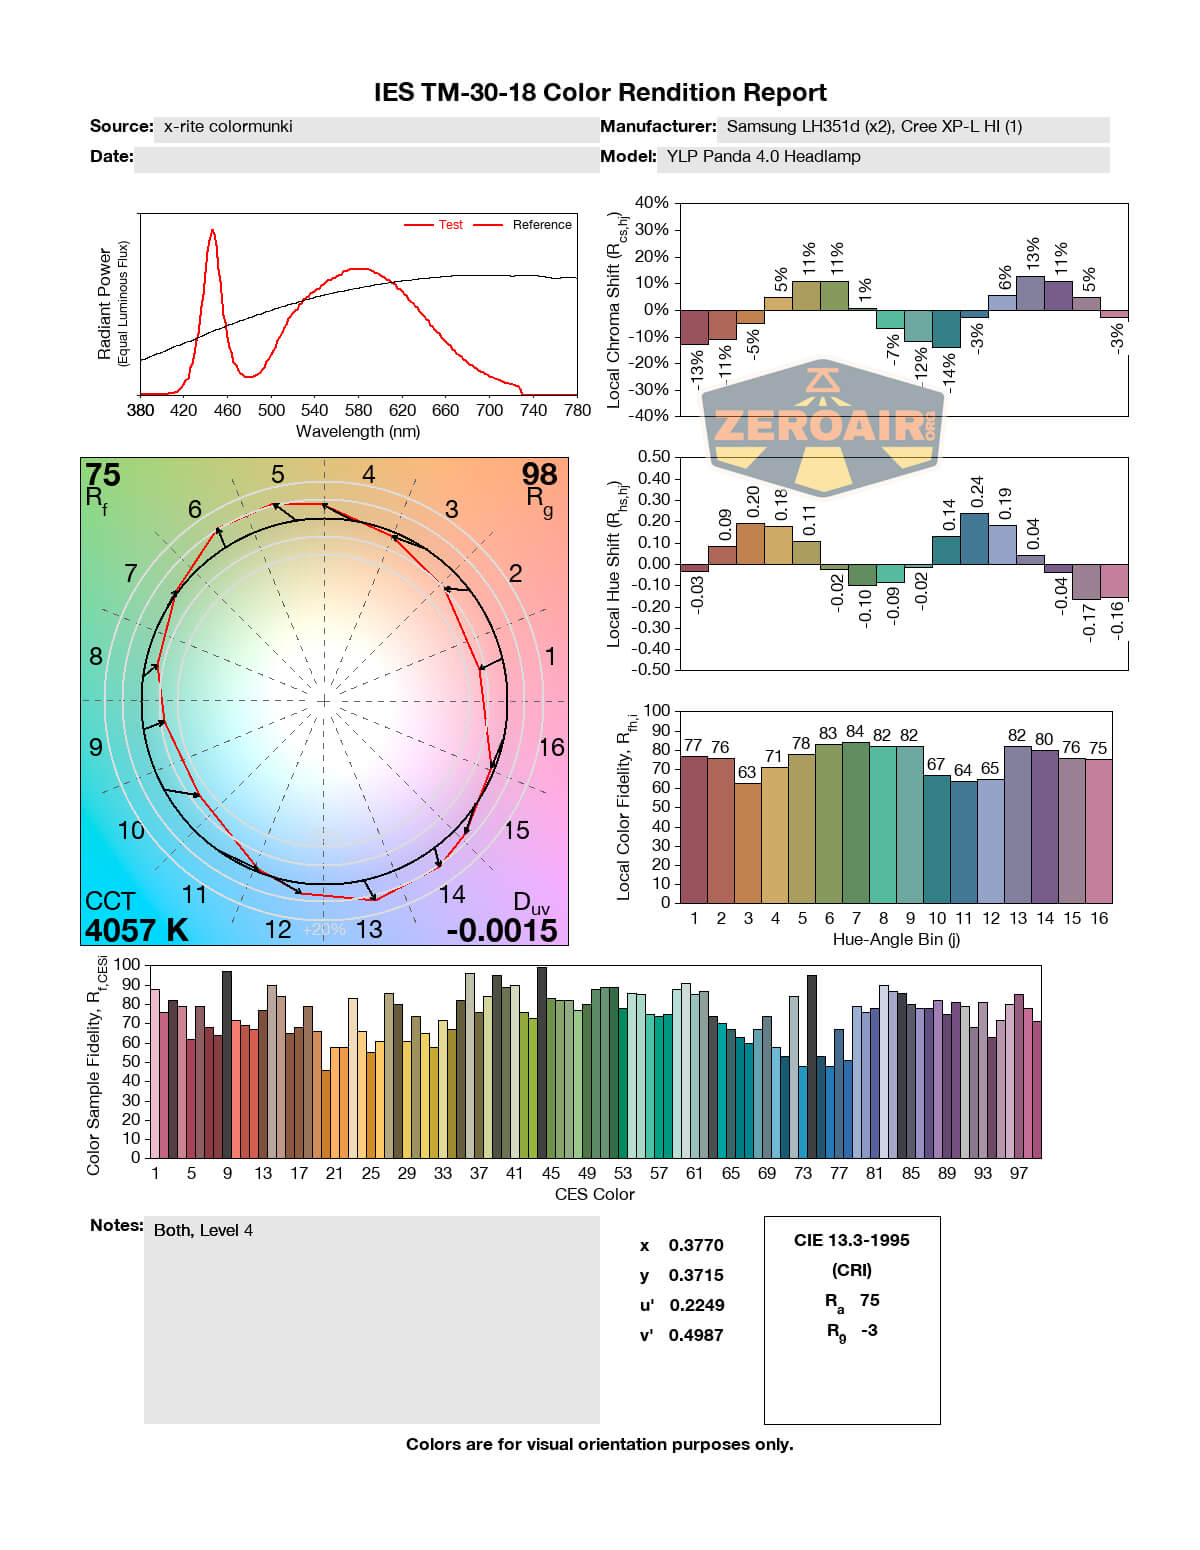
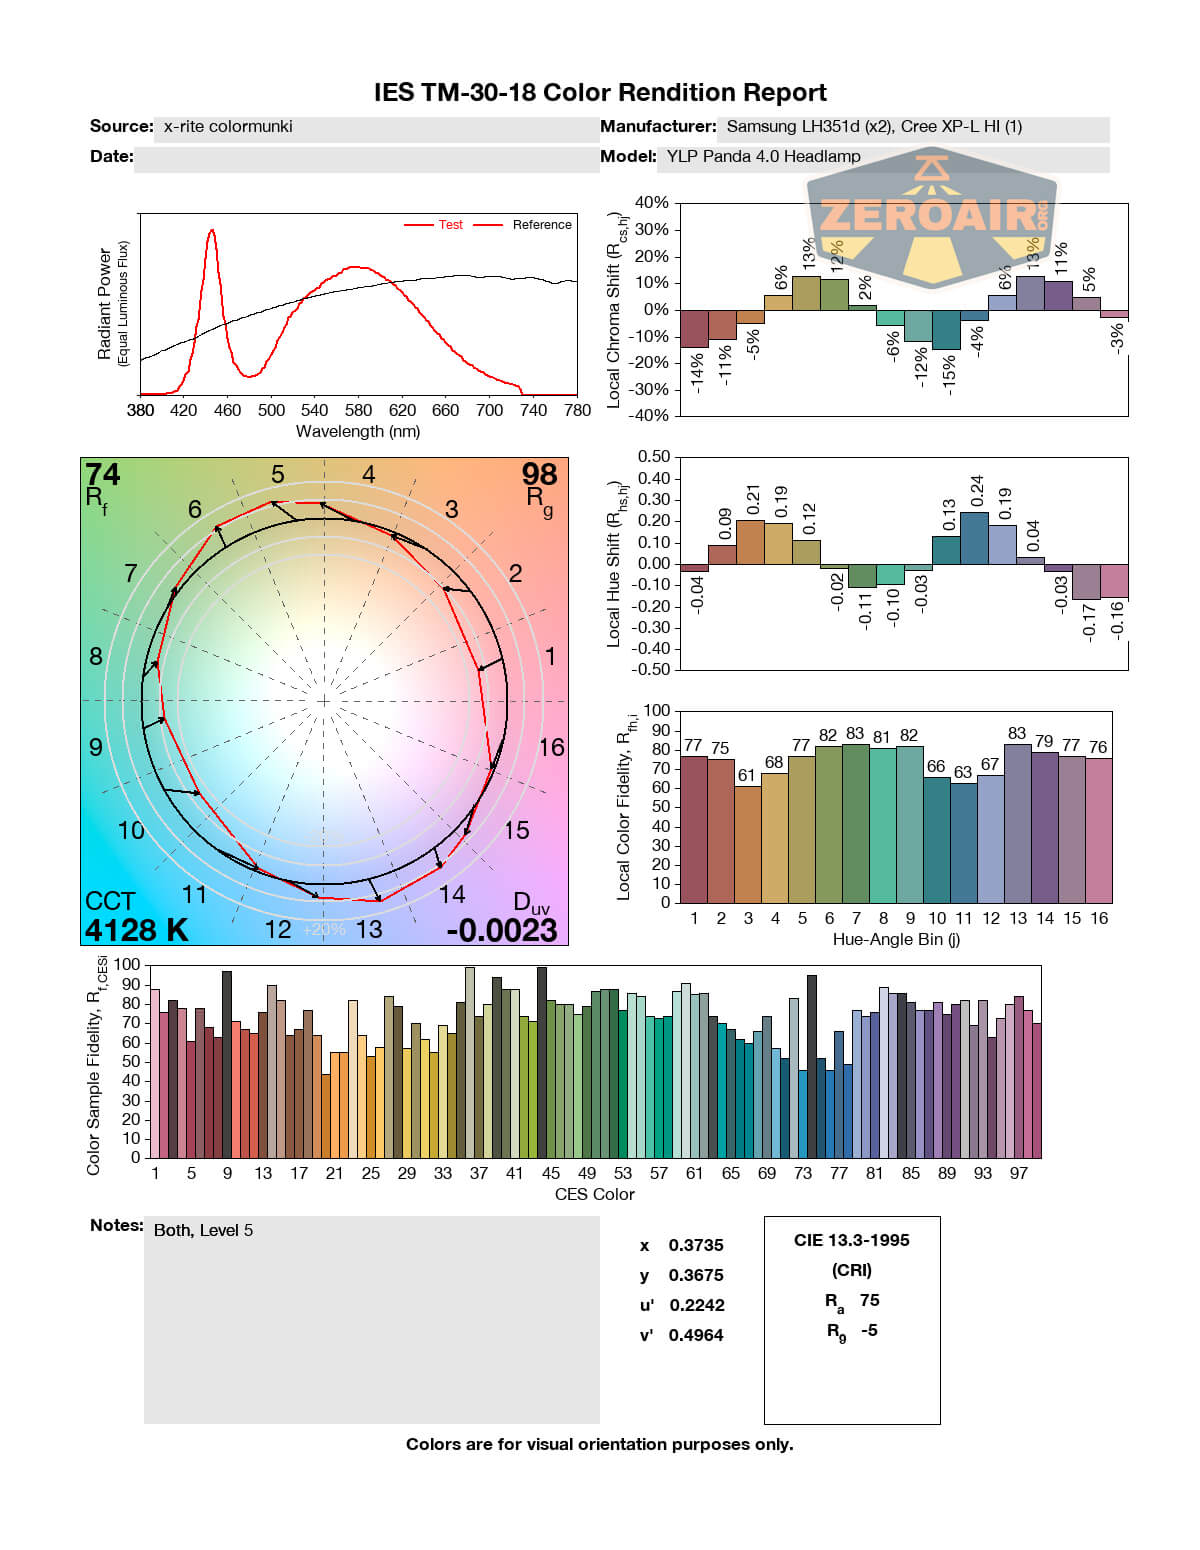

The Spot emitter isn’t claimed to have a certain CRI rating, but it looks to be in the 70s. Probably about what you’d expect from a Cree XP-L HI.


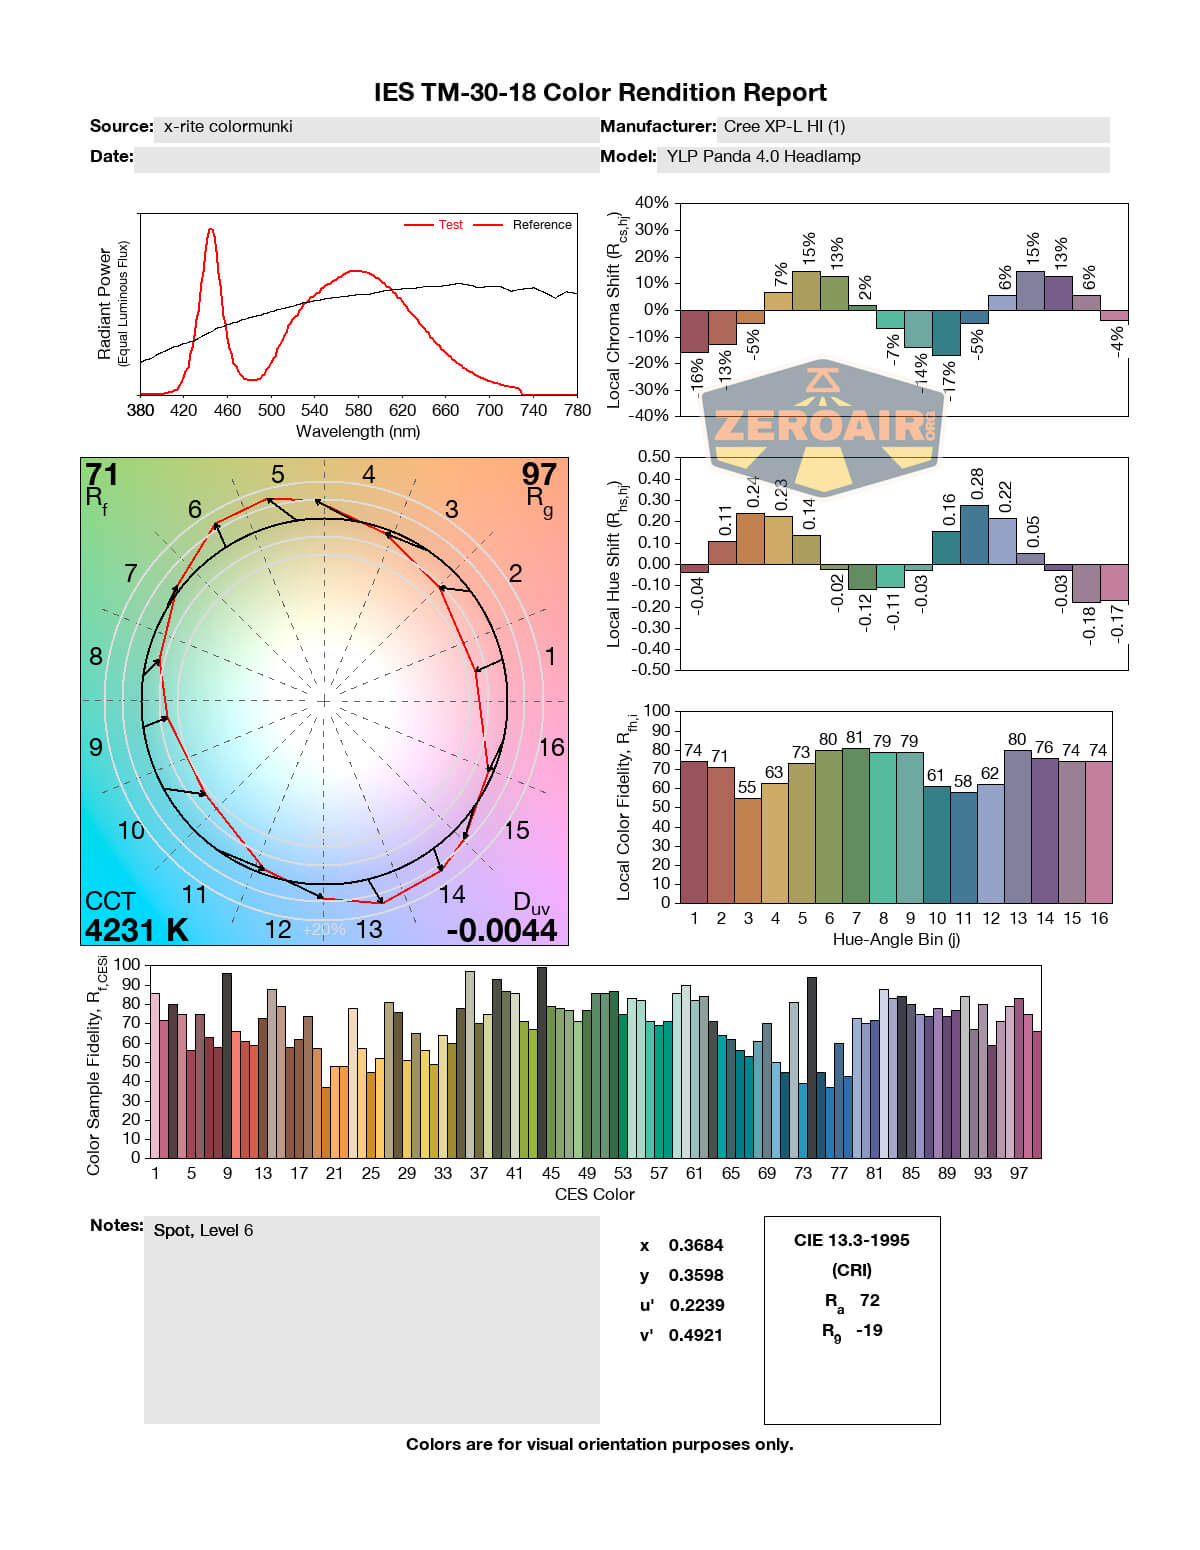
Flood does have a >90 CRI, which is great.


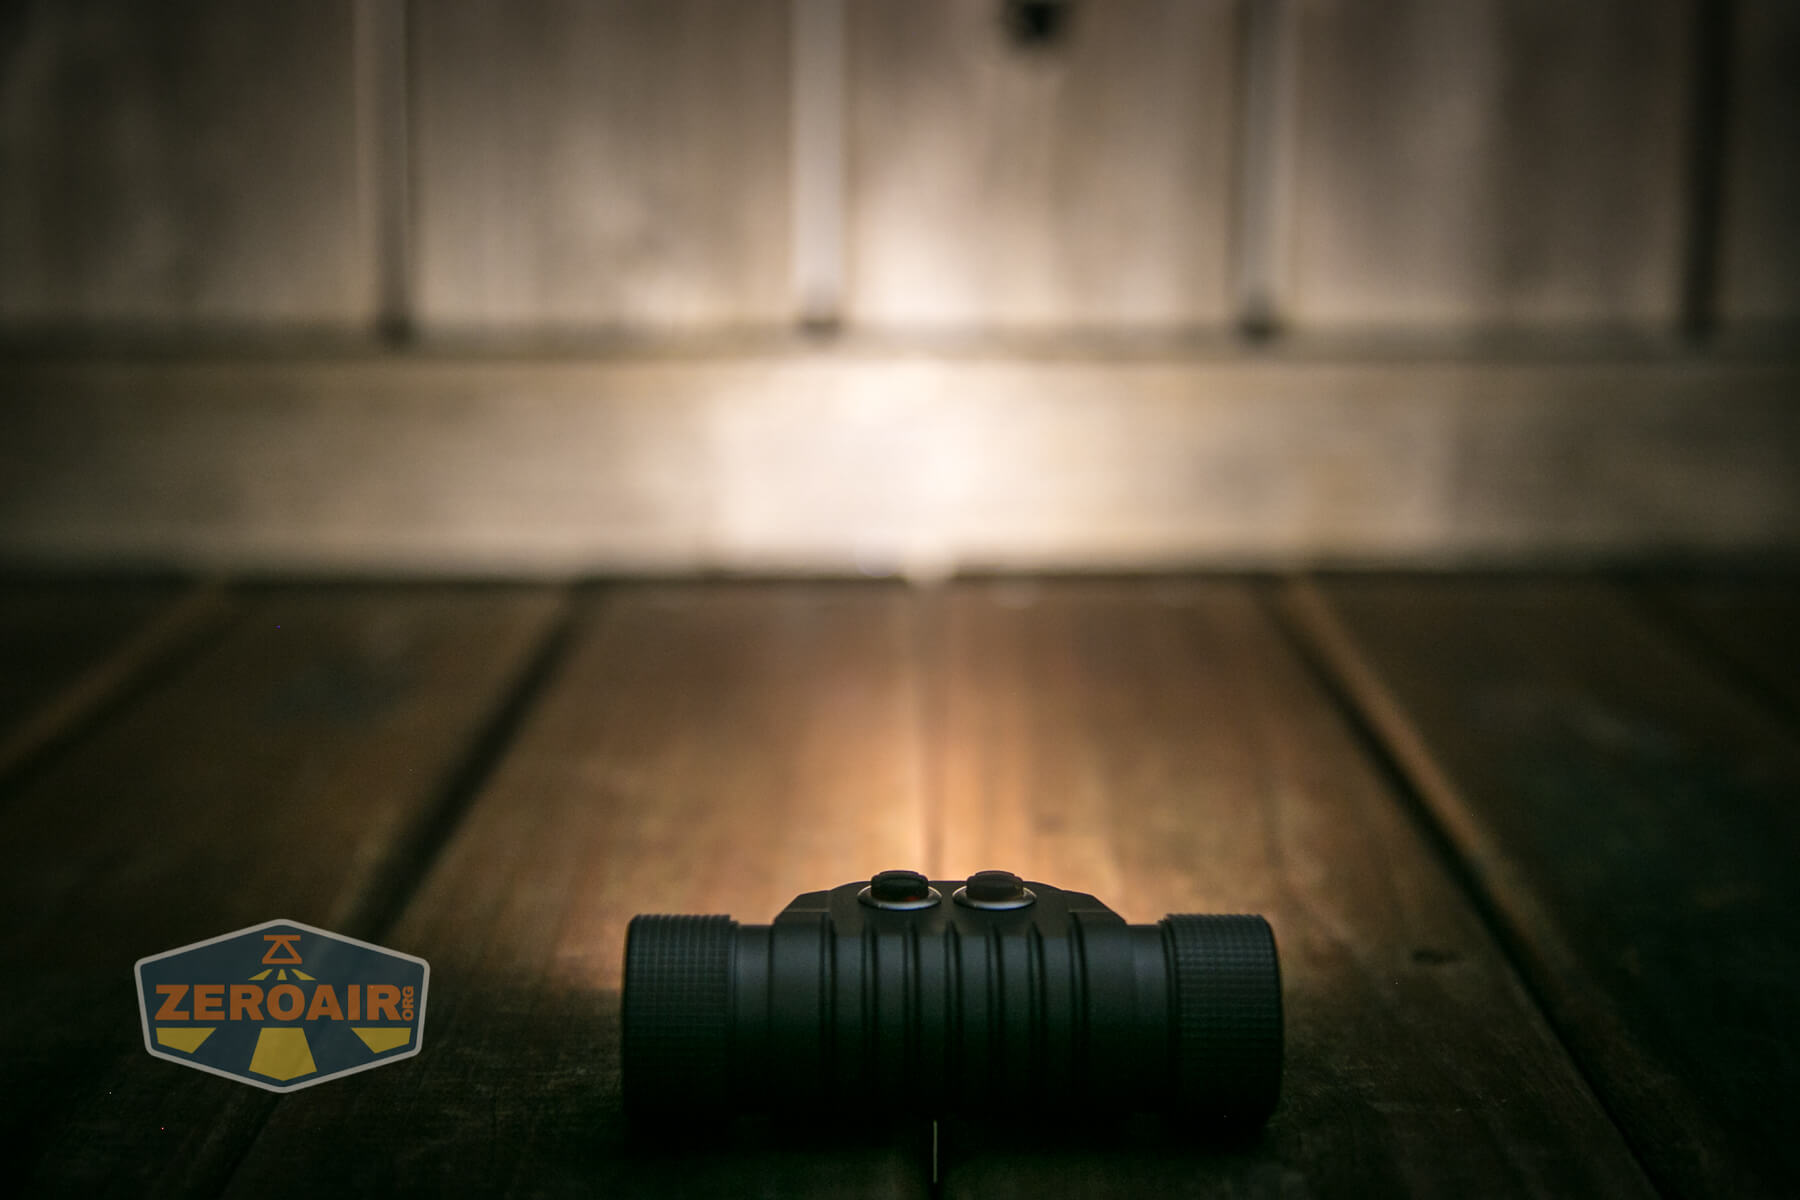
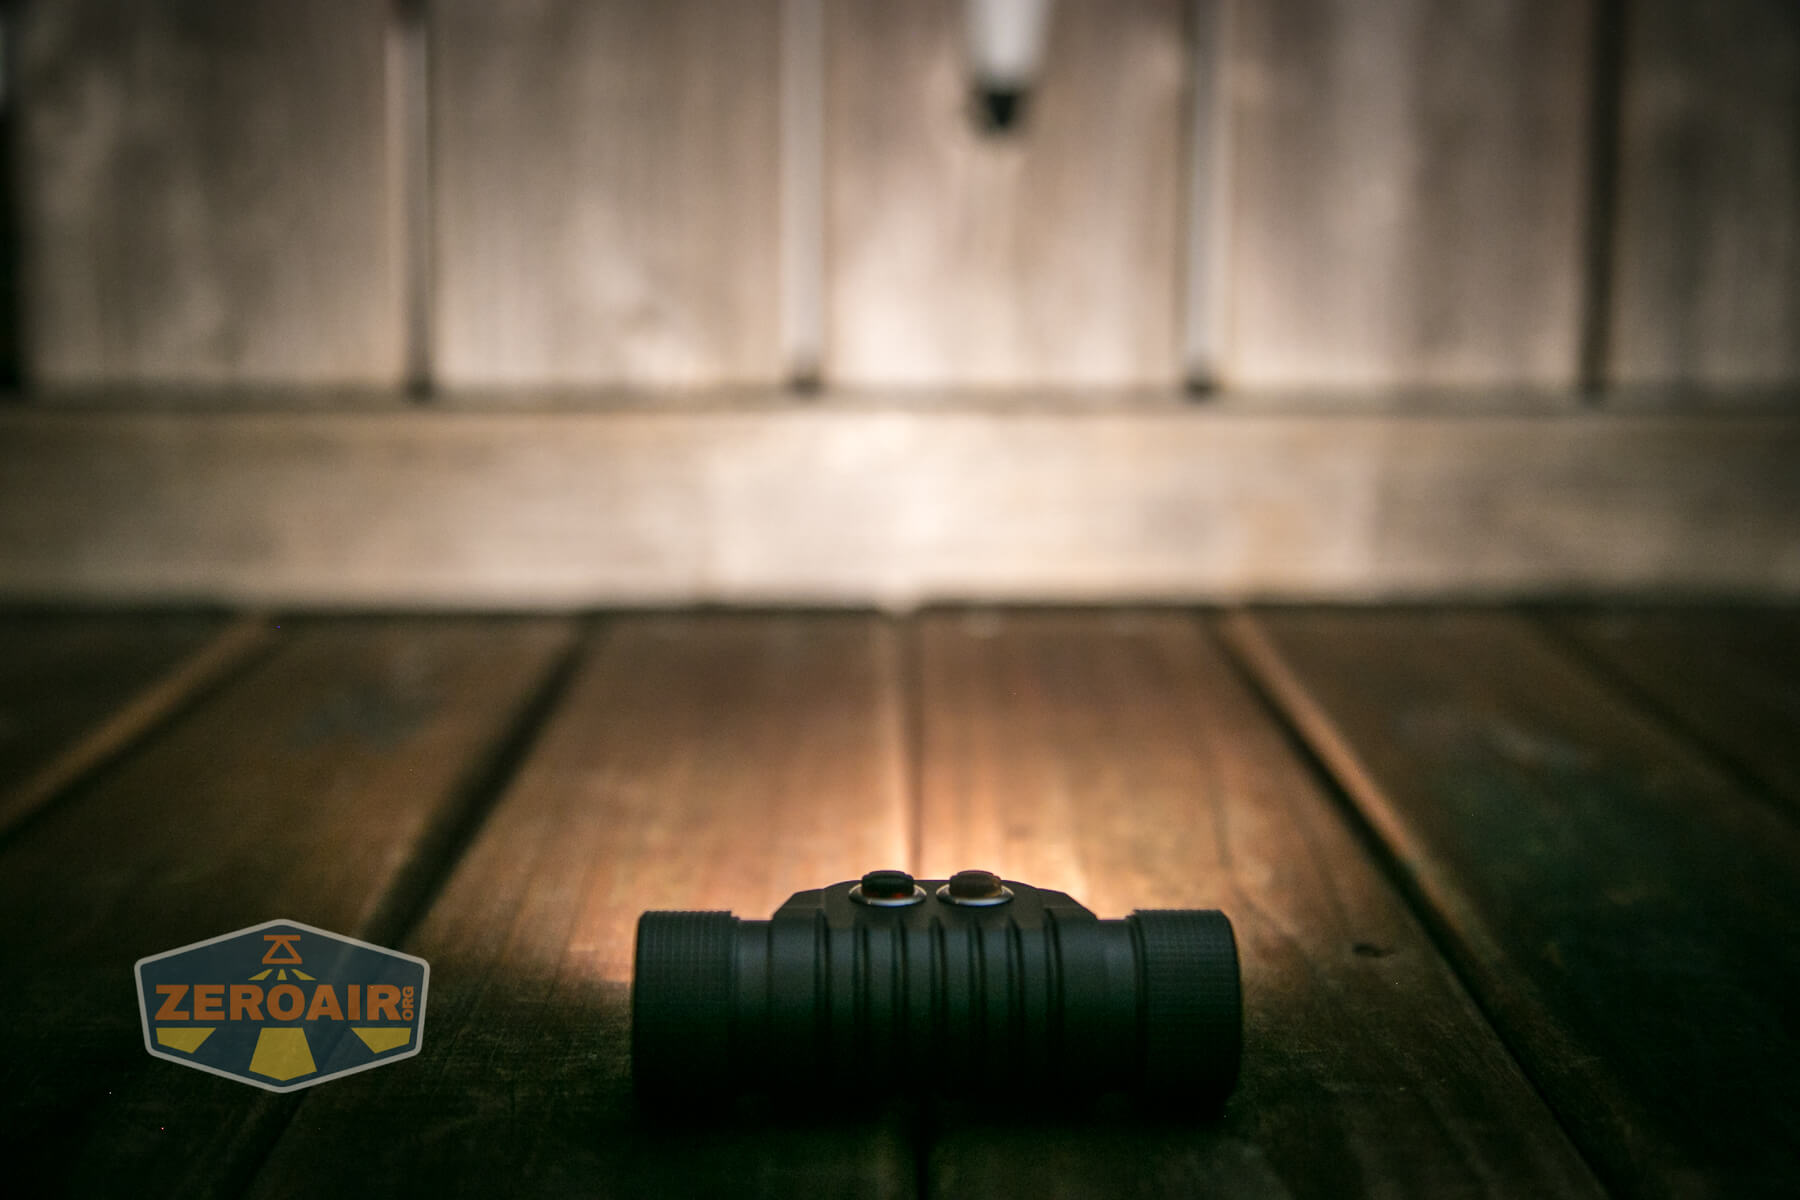
Beamshots
These beamshots always have the following settings: f8, ISO100, 0.3s shutter, and manual 5000K exposure. These photos are taken at floor level, and the beam hits the ceiling around 9 feet away.


Tint vs BLF-348 (KillzoneFlashlights.com 219b version) (affiliate link)
I keep the test flashlight on the left and the BLF-348 reference flashlight on the right.


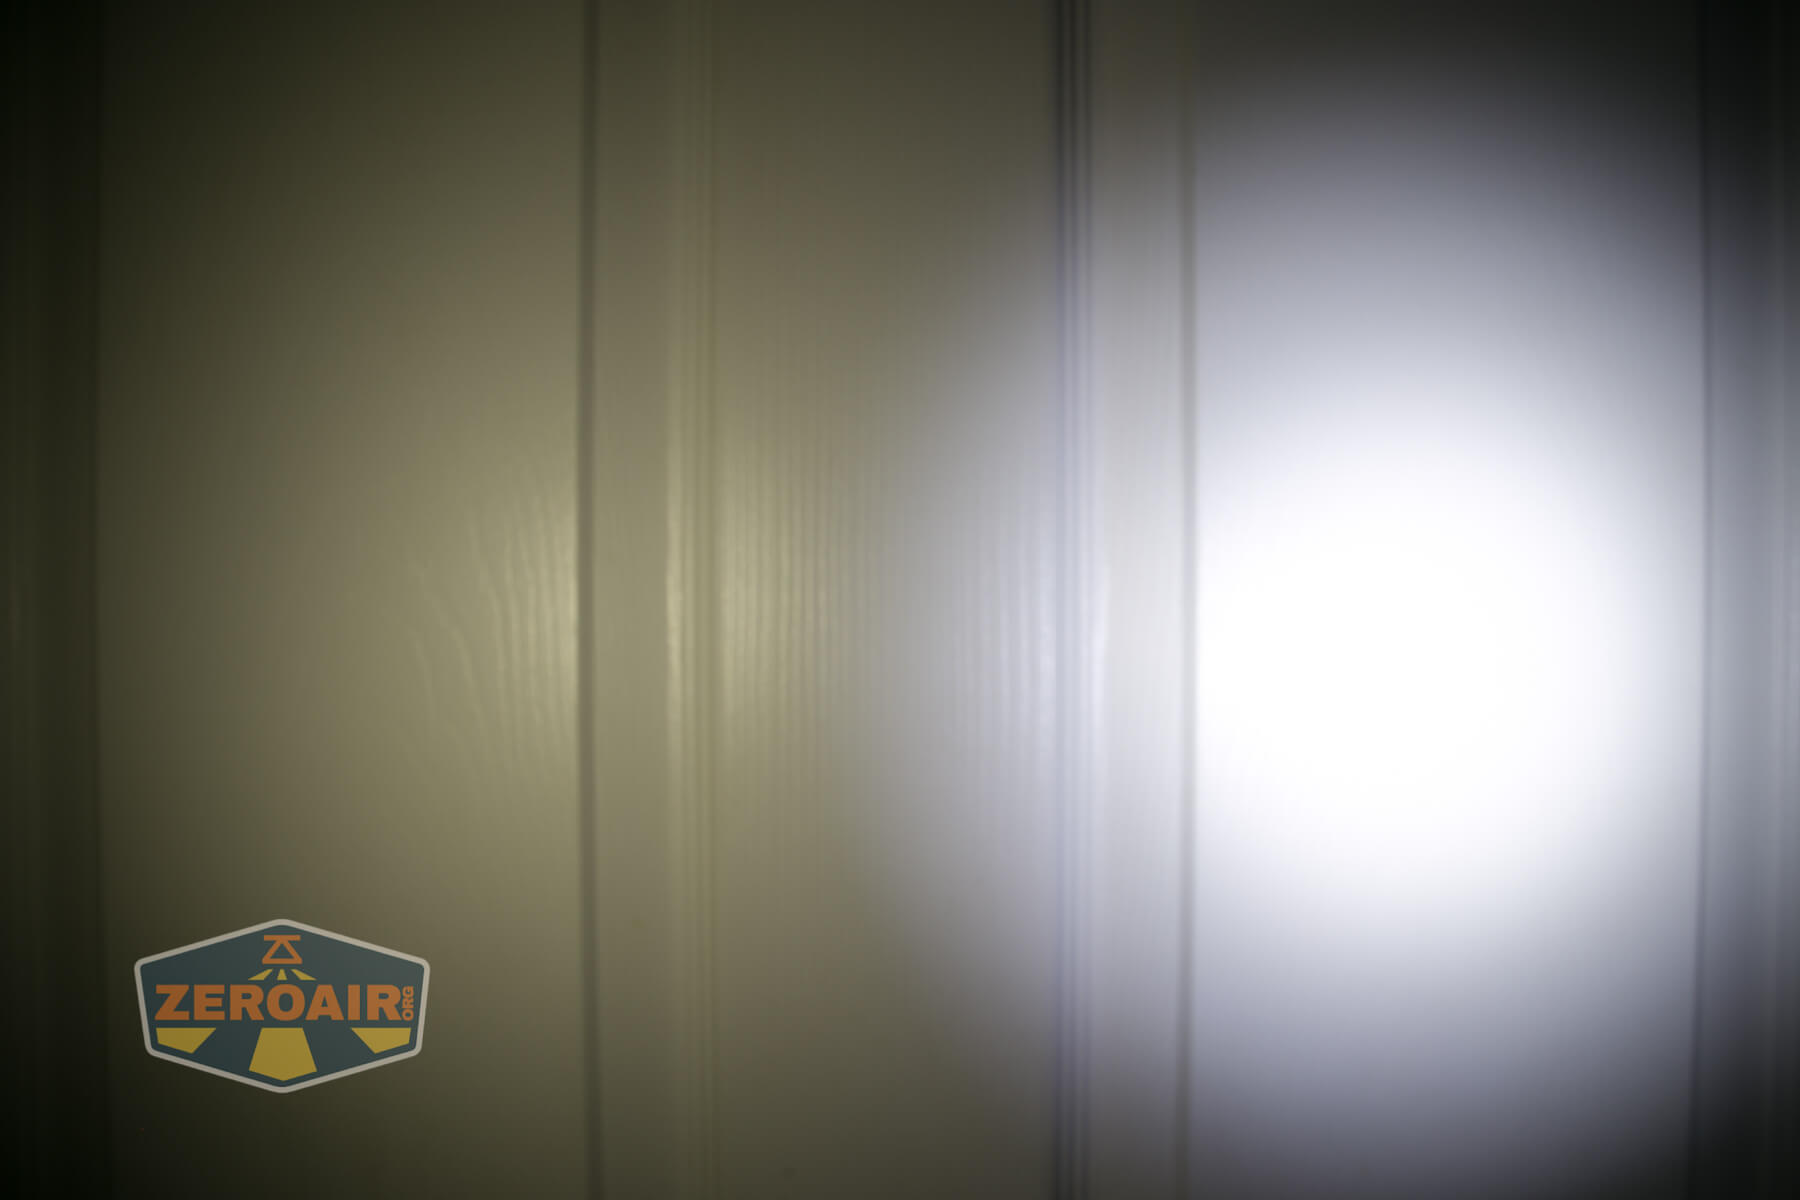


I compare everything to the KillzoneFlashlights.com 219b BLF-348 because it’s inexpensive and has the best tint!
Conclusion
What I like
- Neutral to warm emitters for both outputs
- Dual switches with the same user interface for both emitter options
- Possible to completely mix modes when using both emitter options
- Simple user interface
- Access to Moonlight from off
- Solid build quality
- High CRI flood
- Smart emitter choices (Throwy XP-L HI as a thrower, Floody LH351d as flooders)
- Comfortable headband
What I don’t like
- Doesn’t hit the output specifications
- Switches are hard to actuate
Notes
- This content originally appeared at zeroair.org. Please visit there for the best experience!
- Please use my Amazon.com referral link to help support zeroair.org!
- Please support me on Patreon! I deeply appreciate your support!
Discover more from ZeroAir Reviews
Subscribe to get the latest posts sent to your email.
Thanks for this new review!
I saw on another forum that the two flood lamps output at different levels, possibly due to different TIRs being used. Could you please take a look at this observation regarding the disparity between the output of the two flood lamps? The YLP website mentions different “combinations” of throw/flood so it could very well be that there are two levels of floodiness. Thanks!