
Olight Warrior 3S Dream Blue Flashlight Review
The Olight Warrior 3S Dream Blue flashlight uses an included 21700 cell. The dual switch interface combined with a great beam profile is very useful! Read on!
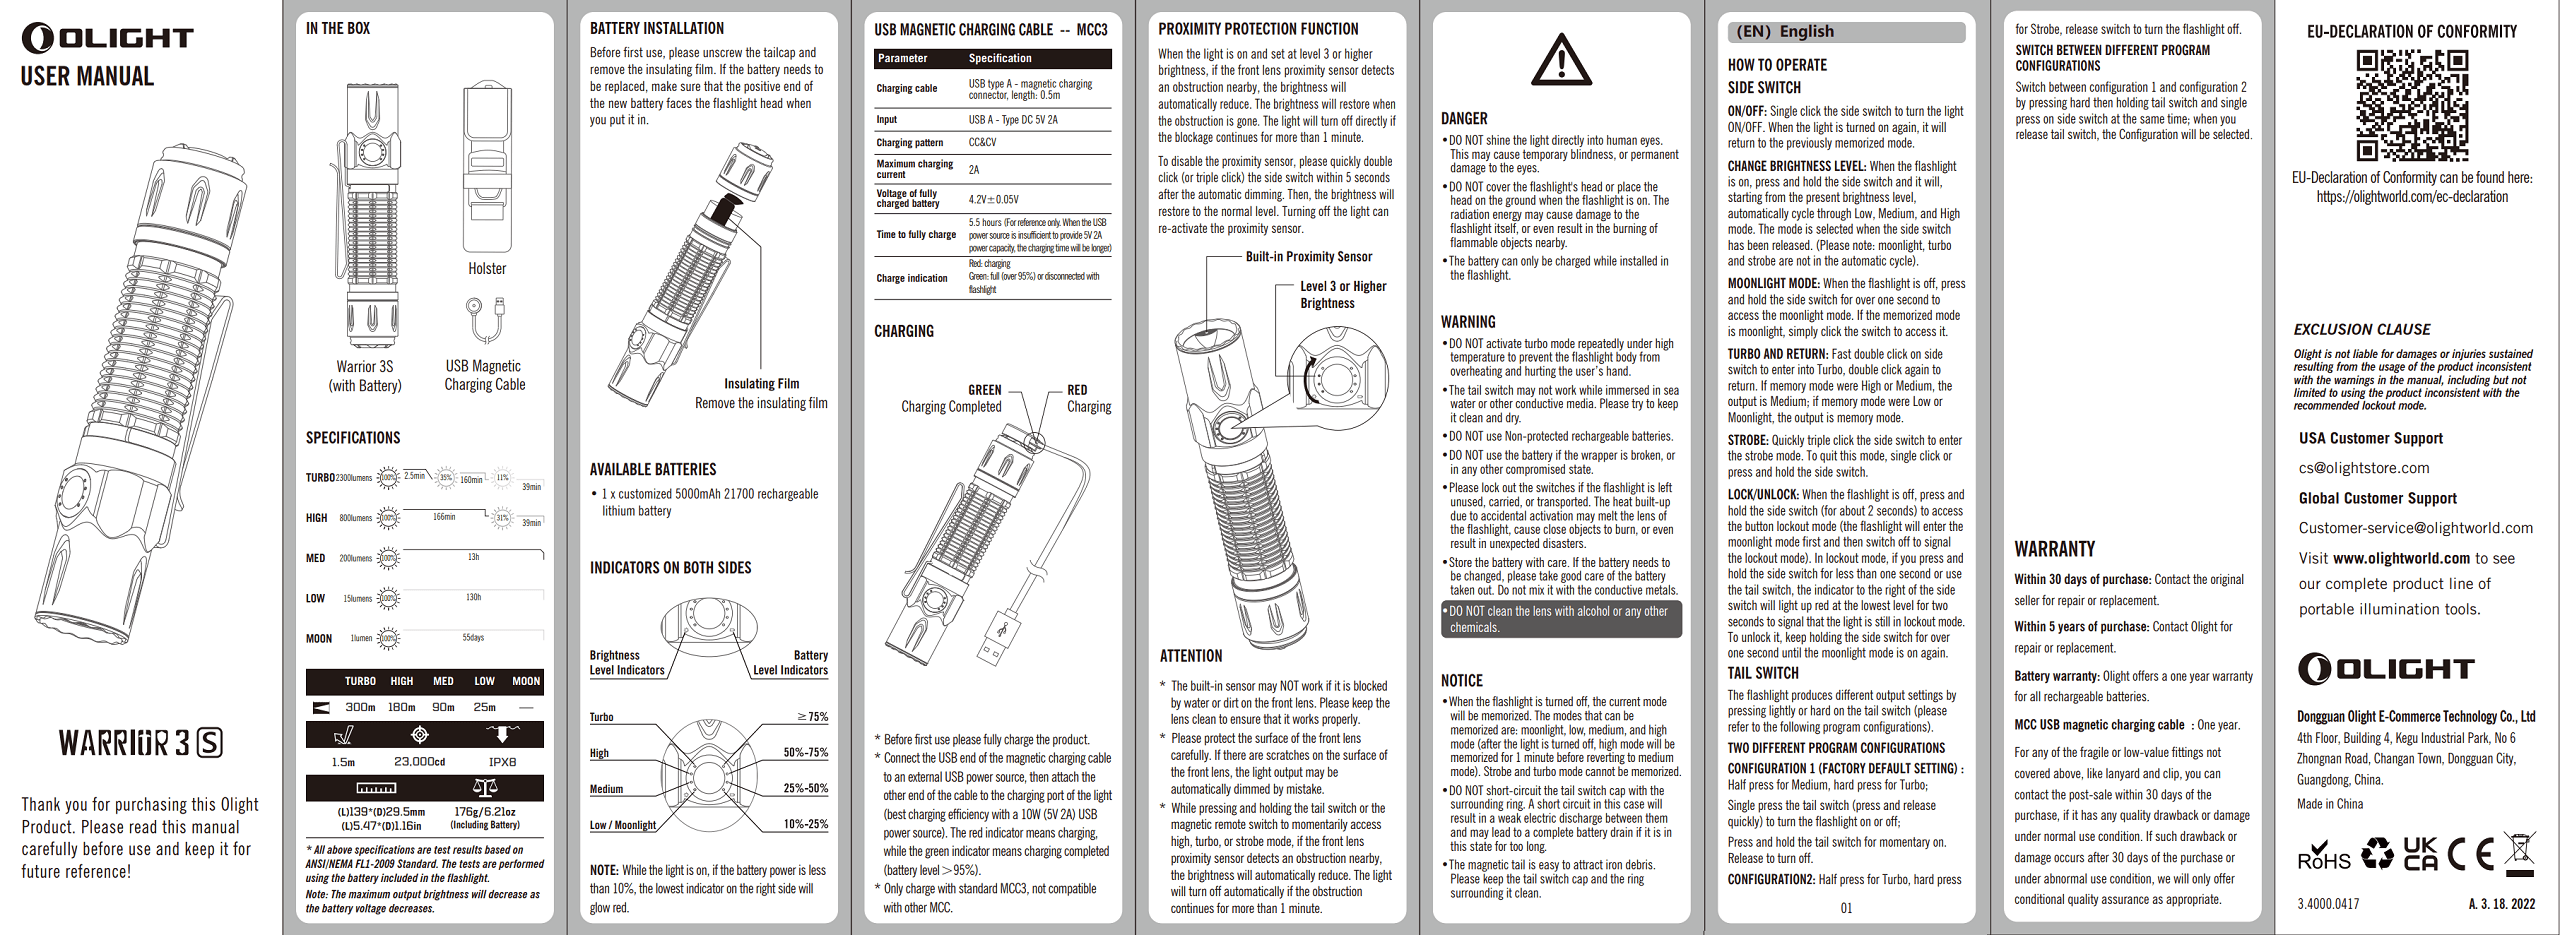
Official Specs and Features
Here’s a referral link to the Olight Warrior 3S Dream Blue flashlight product page.
Versions
At least three versions exist. There are a number of aluminum versions, including this Dream Blue. Also, titanium was available at one point!
Price
The MSRP for the Olight Warrior 3S Dream Blue flashlight is $119.99 but the introductory price is $89.99 and it’s available right now!
What’s Included

- Olight Warrior 3S Dream Blue flashlight
- Olight 5000mAh Proprietary 21700
- Nylon Carry Pouch
- Charge cable (USB to proprietary magnetic)
- Manual
Package and Manual


Build Quality and Disassembly

There’s not all that much updated on this Warrior 3S from the M2R Pro or Warrior 3. As I said, I like that model quite a bit, so I’m in line to like the Warrior 3S quite a bit, too. I believe the main (maybe even “the only”) difference is that the Warrior 3S adds the proximity sensor. (Maybe that’s what the “S” stands for! I don’t believe Olight says.) This “Dream Blue” edition is otherwise the same as other Warrior S models.


We still have the fairly standard tailcap setup here from Olight. The threads are so smooth, too. Just over 6 full turns are required for tightening the tailcap – quite long threads.

Both the head and tail have springs – that button on the tailcap is springy. Also, note the bit on the head end that makes the proprietary cell work. The spring is for positive contact, and the ring around it is for negative contact on the cell.

Size and Comps
Weight (g / oz) 176g/6.21oz
Length (mm / in) 139/5.47
Body Diameter (mm / in) 29.5/1.16


If the flashlight will headstand, I’ll show it here (usually the third photo). If the flashlight will tailstand, I’ll also show that (usually in the fourth photo).


Here’s the test light with the venerable Convoy S2+. The version you see below is a custom Convoy S2+ host that’s been laser engraved by GadgetConnections.com. I did a full post on an engraved orange host right here! Or just go straight to GadgetConnections.com to buy your Convoy S2+ now!


Also above is the light beside a TorchLAB BOSS 35, an 18350 light. I reviewed the aluminum version of that light in both 35 and 70 formats. I also reviewed that specific edition, the “Oveready BOSS FT Collector Vintage Brass” 35. I love it!
Retention and Carry
First off I’ll mention the pocket clip. Not only does it fit on the head or tail end of the light, it’s also a “two-way” friction-fit clip. The clip is long and well-suited for this light.


There’s a nylon pouch too, which is quite nice. Both ends have a drainage hole but do not offer access to the light itself. The pouch opens not with velcro, but with a little quick release.

Still probably the highest-quality nylon pouch I’ve seen with a light. I love this thing. In fact, I use it with other lights, too!
The Olight Warrior 3S Dream Blue flashlight does not ship with a lanyard.
Power and Runtime
The Olight Warrior 3S Dream Blue flashlight is powered by a proprietary 21700 cell. It’s proprietary in that both positive and negative terminals are exposed on the positive end of the cell. It will not be charged in a bay-type charger. Also, traditional 21700 cells will not work in the light, and can’t be charged by the light.


The cell goes into the light in the “normal” way – the positive end toward the head.

Here are runtime tests on the three highest outputs. Turbo steps down completely in under 2 minutes, but it takes over 1 minute to begin the dramatic decline. Once it’s stepped down, the output is exceptionally stable at around 800 lumens (as claimed). A final stepdown to around 250 lumens happens at ~150 minutes. These are timed step-downs, per the manual.


The output on High looks about like the output on Turbo, aside from the first blip of actual Turbo output. The duration overall is about the same.

Medium is even more remarkably stable than the above two.

Charging
As mentioned, the Olight Warrior 3S Dream Blue flashlight has on-board charging via a USB to a magnetic connector.

The name of this one is the MCC 1A/1.5A/2A, noteworthy since Olight makes a number of these charge bases.

The light will stand while on the charge base thanks to the tripod contact points seen below.
Here’s a charge test – the charge rate goes up to around 2A and takes around 4 hours. That stepdown at 270 minutes is probably where the indicator turns green.

Modes and Currents
| Mode | Mode Claimed Output (lm) | Claimed Runtime | Measured Lumens | Tailcap Amps |
|---|---|---|---|---|
| Turbo | 2300/800/250 | 2.5m/160m/39m | 2647 (0s) 2483 (30s) |
7.76 |
| High | 800/250 | 166m/39m | 888 | 1.57 |
| Med | 200 | 13h | 229 | 0.34 |
| Low | 15 | 130h | 19 | 0.03 |
| Moon | 1 | 55d | 0.9 | 0.00 |
Pulse Width Modulation
There’s no PWM on any mode.


For reference, here’s a baseline shot, with all the room lights off and almost nothing hitting the sensor. Also, here’s the light with the worst PWM I could find. I’m adding multiple timescales, comparing them to the test light will be easier. Unfortunately, the PWM on this light is so bad that it doesn’t even work with my normal scale, which is 50 microseconds (50us). 10ms. 5ms. 2ms. 1ms. 0.5ms. 0.2ms. In a display faster than 0.2ms or so, the on/off cycle is more than one screen, so it’d just (very incorrectly) look like a flat line. I wrote more about this Ultrafire WF-602C flashlight and explained a little about PWM.
User Interface and Operation
There are two switches on the Olight Warrior 3S flashlight. First is the metal tail switch which also is used in charging. (I forgot to grab a pic of this Dream Blue from this angle. Below, this is the titanium model.)

I love the two-stage switch on these 21700 lights. It’s less perfect on the smaller 18650 versions BUT that doesn’t stop me from wanting it in an 18350 format. I really love it.


Next is the side e-switch.

This e-switch on the side of the head is flat and pleasantly large. On both sides of the switch are four green LEDs. The right side indicates the cell charge level. The four on the left indicate which output level is selected.


Here’s a UI table!
| State | Action | Result |
|---|---|---|
| Off | Click Side Switch | On (Mode Memory; Moonlight can be memorized but Turbo can not) |
| Off | Hold Side Switch | Moon |
| Off | Double Click Side Switch | Turbo |
| Any | Triple Click Side Switch | Strobe |
| On | Click Side Switch | Off |
| On | Hold Side Switch | Mode Advance (L>M>H) (Moon and Turbo are excluded from the cycle) |
| Turbo | Double Click Side Switch | Return to previous mode (High and Medium both return to Medium) |
| Off | Long Hold Side Switch | Lockout (Technically “Moon then lockout”) |
| Lockout | Click Side Switch | Indicator around Side Switch blink red for 2s to indicate lockout |
| Lockout | Hold Side Switch | Unlock to Moonlight |
| Any | Hold (“half-press”) Tail Switch | Medium (in Config 1, default) Turbo (in Config 2) |
| Any | Click Tail Switch | Turbo (in Config 1) Strobe (in Config 2) |
| Off | Hold Tail Switch, Click Side Switch | Switch between Config 1 and 2 (there is no confirmation. You can differentiate by actuating the tail switch and observing the mode.) |
| Within 5 seconds after proximity sensor stepdown | Double click Side Switch | Proximity sensor is disabled until the light is turned off. |
One huge upgrade that Olight has been making (and is included in the Warrior 3S) is that the proximity sensor can be disabled! Here’s how. With the light on, cause the proximity sensor to activate. Within 5 seconds from the light stepping down, double click. The sensor is now disabled for this session. Double clicking will of course enter Turbo output, but you can cycle the modes and the proximity sensor will still be disabled. Turning the light off resets the proximity sensor!
LED and Beam
Olight carefully doesn’t mention what emitter is used in the Warrior 3S flashlight. Whatever is used has no dome, so the throw should be good.

Also, the Olight Warrior 3S flashlight uses a TIR, which further accentuates the already-throwy emitter profile.


LED Color Report (CRI and CCT)
Here’s a CRI report for all modes, after an emitter warmup. What can we say about this? No surprise that turbo turns cooler in the Kelvin range. Another thing we can say is that it’s decidedly low CRI (around 70). The third important point is “How are the reds” – the very negative R9 tells us this. And a final point is the Duv being positive (and really a “not small” positive number) indicates there’s enough green here that you’ll probably notice.


Beamshots
These beamshots are always with the following settings: f8, ISO100, 0.3s shutter, and manual 5000K exposure. These photos are taken at floor level and the beam hits the ceiling around 9 feet away.


Tint vs BLF-348 (KillzoneFlashlights.com 219b version) (affiliate link)
I keep the test flashlight on the left, and the BLF-348 reference flashlight on the right.


I compare everything to the KillzoneFlashlights.com 219b BLF-348 because it’s inexpensive and has the best tint!
Summary and Conclusion
The Olight Warrior 3S Dream Blue flashlight is not all that different from the M2R pro, and certainly not different from the previous Warrior 3S iterations. I happen to love my two M2R Pro’s… I have orange and the patriot edition. These two Olights have probably the top 3 temperatures and tints of any Olights I own! The S3 is an iteration of the Warrior 3, too, which performed very well. Functionally the Olight Warrior 3S is the same, I think. It’s a great size and using it is great, too. The addition of the indicators around the e-switch is welcome and consistent with other Olights.
The Big Table
| Olight Warrior 3S Dream Blue | |
|---|---|
| Emitter: | Luminus SFT70 (Cool White) |
| Price in USD at publication time: | $119.95 |
| Cell: | 1×21700 |
| Runtime Graphs | |
| LVP? | Yes |
| Switch Type: | Both |
| Quiescent Current (mA): | ? |
| On-Board Charging? | Yes |
| Charge Port Type: | Proprietary Magnetic |
| Charge Graph | |
| Power off Charge Port | with cell: all modes without cell: no modes |
| Claimed Lumens (lm) | 2300 |
| Measured Lumens (at 30s) | 2483 (108% of claim)^ |
| Candela per Lumen | 9.9 |
| Claimed Throw (m) | 300 |
| Candela (Calculated) in cd (at 30s) | 888lux @ 5.583m = 27679cd |
| Throw (Calculated) (m) | 332.7 (110.9% of claim)^ |
| Claimed CCT | – |
| Measured CCT Range (K) | 5600-6600 Kelvin |
| Item provided for review by: | Olight |
| All my Olight reviews! | |
^ Measurement disclaimer: Testing flashlights is my hobby. I use hobbyist-level equipment for testing, including some I made myself. Try not to get buried in the details of manufacturer specifications versus measurements recorded here; A certain amount of difference (say, 10 or 15%) is perfectly reasonable.
What I like
- Good build quality
- Fantastic beam profile
- Great dual switch interface
- Proximity sensor can be disabled
- The new “Fuel Gauge” trickling down from bigger lights to this one – a big positive
- Flat e-switch. This sounds minor, but it’s very pleasant.
What I don’t like
- Proprietary charging
- Customized 21700
- Cool white emitter
Notes
- This content originally appeared at zeroair.org. Please visit there for the best experience!
- Please use my Amazon.com referral link to help support zeroair.org!
- Please support me on Patreon! I deeply appreciate your support!
Discover more from ZeroAir Reviews
Subscribe to get the latest posts sent to your email.