
RovyVon E300S Angel Eyes Flashlight Review
RovyVon has introduced the E300S Angel Eyes, a triple emitter flashlight with an interesting heat management system. Read on for testing!
Official Specs and Features
Here’s a link to the RovyVon E300S Angel Eyes flashlight product page.
Versions
For now there’s just this version, but soon there will be a version with Nichia emitters. Mine has Cree XP-G3 emitters.
Price and Coupon
These are listed for $80 at RovyVon’s official site.
Short Review
This is a neat light. I’d love to say “neat little light” but this light just isn’t as little as I want it to be, for what it is. Otherwise I like it. “Right angle”, dual switches, good charging, and soon available in Nichia. It’s a novel combination.
Long Review
The Big Table
| RovyVon E300S | |
|---|---|
| Emitter: | Cree XP-G3 S5 (3) |
| Price in USD at publication time: | $80.00 |
| Cell: | Internal |
| Turbo Runtime | High Runtime |
| LVP? | Warning |
| Switch Type: | E-Switch |
| Quiescent Current (A): | – |
| On-Board Charging? | Yes |
| Chargetime | |
| Power off Charge Port with no Cell? | Yes |
| Claimed Lumens (lm) | 1600 |
| Measured Lumens (at 30s) | 1700 (106.3% of claim)^ |
| Claimed Throw (m) | – |
| Candela (Calculated) in cd (at 30s) | 417lux @ 4.521m = 8523cd |
| Throw (Calculated) (m) | 184.6^ |
| All my RovyVon reviews! | |
^ Measurement disclaimer: Testing flashlights is my hobby. I use hobbyist-level equipment for testing, including some I made myself. Try not to get buried in the details of manufacturer specifications versus measurements recorded here; A certain amount of difference (say, 10 or 15%) is perfectly reasonable.
What’s Included

- RovyVon E300S Angel Eyes Flashlight
- Charge cable
- Spare charge port cover
- Pocket clip
- Plastic case
- Paracord
- Manual and paperwork
Package and Manual
The light ships in another item that RovyVon sells: the RX10 EDC Organizer. Inside is a bit of foam to hold things in place properly. It’s a nice package, but I’ll have the light out and in use, and I won’t really need the organizer.

The manual is good, and includes all the needful information. It’s a two-sided piece of A4 paper.


Build Quality and Disassembly
This light has a very interesting and unusual look. Almost any other light I can think of in this format a) isn’t a triple and b) isn’t a right-angle light. That’s neither good nor bad, but it does make this light stand out.
The build quality feels good. As I said in the intro, the light is quite big for what it is and what I was expecting, and that’s reflected in how it sits in the hand.

There’s plenty of texture on the body, but none of it is particularly grippy. The light is well made, in any case.


Two Torx screws hold the body together. Yes just two! They’re on the head end of the light, and once removed allow the light to slide apart.
Here are a bunch of disassembly pics!!

Probably a temperature sensor there – normally in contact with the brass… thing… – I’ve lifted it for this pic. That’s just thermal paste, not glue or anything permanent.

Now look at this!!

That’s a heatsink with liquid! Oil, of course.
Really though, to get into the light, one must remove the bezel. It’s not easy; I finally just used pliers and grabbed the edges. Surprisingly didn’t really damage it, though! You’ll need access to the back (more or less), to keep the back bits in place for the removal of the bezel.

Once the bezel is out, and the three Torx (T6) screws are out of the PCB, parts start coming out!

The battery (confirmed 2200mAh).

The optic:

Here’s all the screws required to get things completely apart. Two Torx T6 on the outside, three on the inside:


Here’s the whole emitter/cooling all in one. This is as closed as I can get the liquid cooling now – it was probably installed under vacuum or something, to keep air out. With that in mind, I recommend that you don’t remove the brass cover. Better left closed.

There are two holes into the (non liquid part) of this container. They’re for the leads. I broke a lead when unscrewing – learn from my mistake. Don’t twist on this too hard! Should be an easy fix, though.

The MCPCB is thermal pasted down, but not glued. Easily removable – I’ll swap out these XP-G3’s asap.

Charge port and the LEDs beside it.

Side switch:


Size and Comps
Dimensions: L 101mm x W 36.7mm x H 17.3mm. The weight is around 95g, or 105g with clip.


Here is where you’ll probably recognize that this isn’t a small light. On the thin side, it’s almost as thick as the Convoy S2+. And much too close in length, too.


Retention and Carry
A pocket clip is included. It’s the same style as other RovyVon lights, with the clip basically friction fitting around the sides – a hugger clip, if you will. It’s different from many friction clips though, in that it can be positioned just about anywhere up and down the body of the light, front or back. That gives quite a few options, for very precise placement.

The clip is “ok.” The light actually rides quite well with the clip, and when putting the light into a pocket, it clears the shoulders fine. So it goes deep easily. And since the light is rectangular, the light does sit nicely in the pocket.

There are a couple of wiggles in the clip to help holding to a pocket, which is a good addition.


Something about the clip makes the light hard to remove from the pocket.


Then there’s the built-in loop on the tail end of the light. This could be used any number of ways, primarily with the included paracord. This is a good option, and while other parts of the light have sharp edges, this part doesn’t – it should give the paracord a long life.

There are no magnets. A big fat (ok “thin”) magnet right in the center of the internals, where the light could face outward would be a no-brainer for this light.
Power and Runtime
There’s a built-in battery for the E300S. No mention is made of replacing it, and no other power source can be used. So this light necessarily (like all internal cell lights) has a limited (probably reasonably long, of course) lifespan. The claim of the internal battery is 2200mAh.
The claim of 2000 lumens isn’t born out in my testing, but it’s within a reasonable amount – probably close enough to be called sampling error. At 30 seconds I measure around 1700 lumens. This is why the light ends up being so big – to get those big numbers, there needs to be adequate heat management and a big capable battery. Output steps down fairly hard at around 1 minute, and then just drifts downward until the side switch begins warning the user that the cell is depleted.

High looks about the same, and also has a noticeable stepdown, this time a little bit later. After that, the graph looks about the same as with Turbo, but at a lower output. The difference in output after the stepdown is actually specific, per the manual. Turbo steps to 350 lm, and High steps to 250lm.

Charging
With the internal battery comes built-in charging. There’s a micro-USB port on the side, plugged with a rubber cover just like on the Aurora series. (A spare cover is included.) Beside this port is a charge indicator.


RovyVon includes a USB to micro-USB cable, too.

Charging looks quite good, and is surprisingly over 2A to the cell. That’s probably not too much for the small cell, since the output at Turbo is likely draining it at a much higher C. Charging is quick, at just under an hour and a half (!!). The indicating switch over the charge port “breathes” blue and red when charging, and turns solid blue when charge is complete.

Testing indicates that the 2200mAh claim is probably accurate.
With the drift downward in output, and no way to test the leads really, it’s hard to say specifically about low voltage protection. At the very least there’s low voltage warning, provided by the side switch.
User Interface and Operation
There are two switches on the E300S. The main one I’ve used is the side switch. The “power switch” is on the top (and labeled with a power symbol).

They are both e-switches with rubber covers, and identical in size. Actually… both are labeled with a power symbol! Clearly the same cover. And they both have the ability to turn the light off, so that’s reasonable. (Also note in the picture below since I don’t think it shows elsewhere, how much the bezel sticks out from the body.)

Here’s a user interface table!
| State | Action | Result |
|---|---|---|
| Off | Click Side Switch (SS) | No action |
| Off | Click Top Switch (TS) | No action |
| Off | Hold SS | Moonlight |
| Off | Hold TS | Momentary Turbo |
| Off | Double Click TS | Strobe |
| Strobe Group | Click TS | Strobe advance (Strobe>SOS>Signal) |
| On | Hold either switch | Off |
| Moonlight | Click SS | Mode Advance (LMHTL) (Moonlight not in mode cycle) |
| Off | Double Click SS | 250 Lumen output (not “Low” or “Medium”) |
| From 250lm Output | Hold SS | Infinite Variable output (fast ramp up and down) |
| Off | Triple Click SS | Medium – 450lm |
There’s a chance I missed something in the UI. It’s fairly robust, but there’s a little overlap between the switches. The ramping is neat, but doesn’t blink or anything at the bookends – so it’s hard to get “exactly” low or “exactly” high (which are 60 and 1600, respectively, for the variable mode).
Modes and Currents
I can’t really test currents on this light! And I think the “2000” for Turbo (straight from the manual) is different from some branding I saw elsewhere. (I might call it 1600 elsewhere- that is why).
| Mode | Mode Claimed Output (lm) | Claimed Runtime | Measured Lumens |
|---|---|---|---|
| Turbo | 2000 | 210m | 1666 |
| High | 1000 | 360m | 900 |
| Medium | 500 | 200m | 540 |
| Low | 60 | 1080m | 66 |
| Moonlight | 5 | 20d | – |
LED and Beam
In this light are three Cree XP-G3 emitters. To be honest I haven’t had an XP-G3 light that I like, but some have been worse than others. The tint on this light is extremely cool, and has an icy tint throughout the beam that will not be appealing to neutral white light lovers.

One very positive aspect is the low – it’s quite low. Just about low enough to allow looking directly into the beam, but maybe not quite.
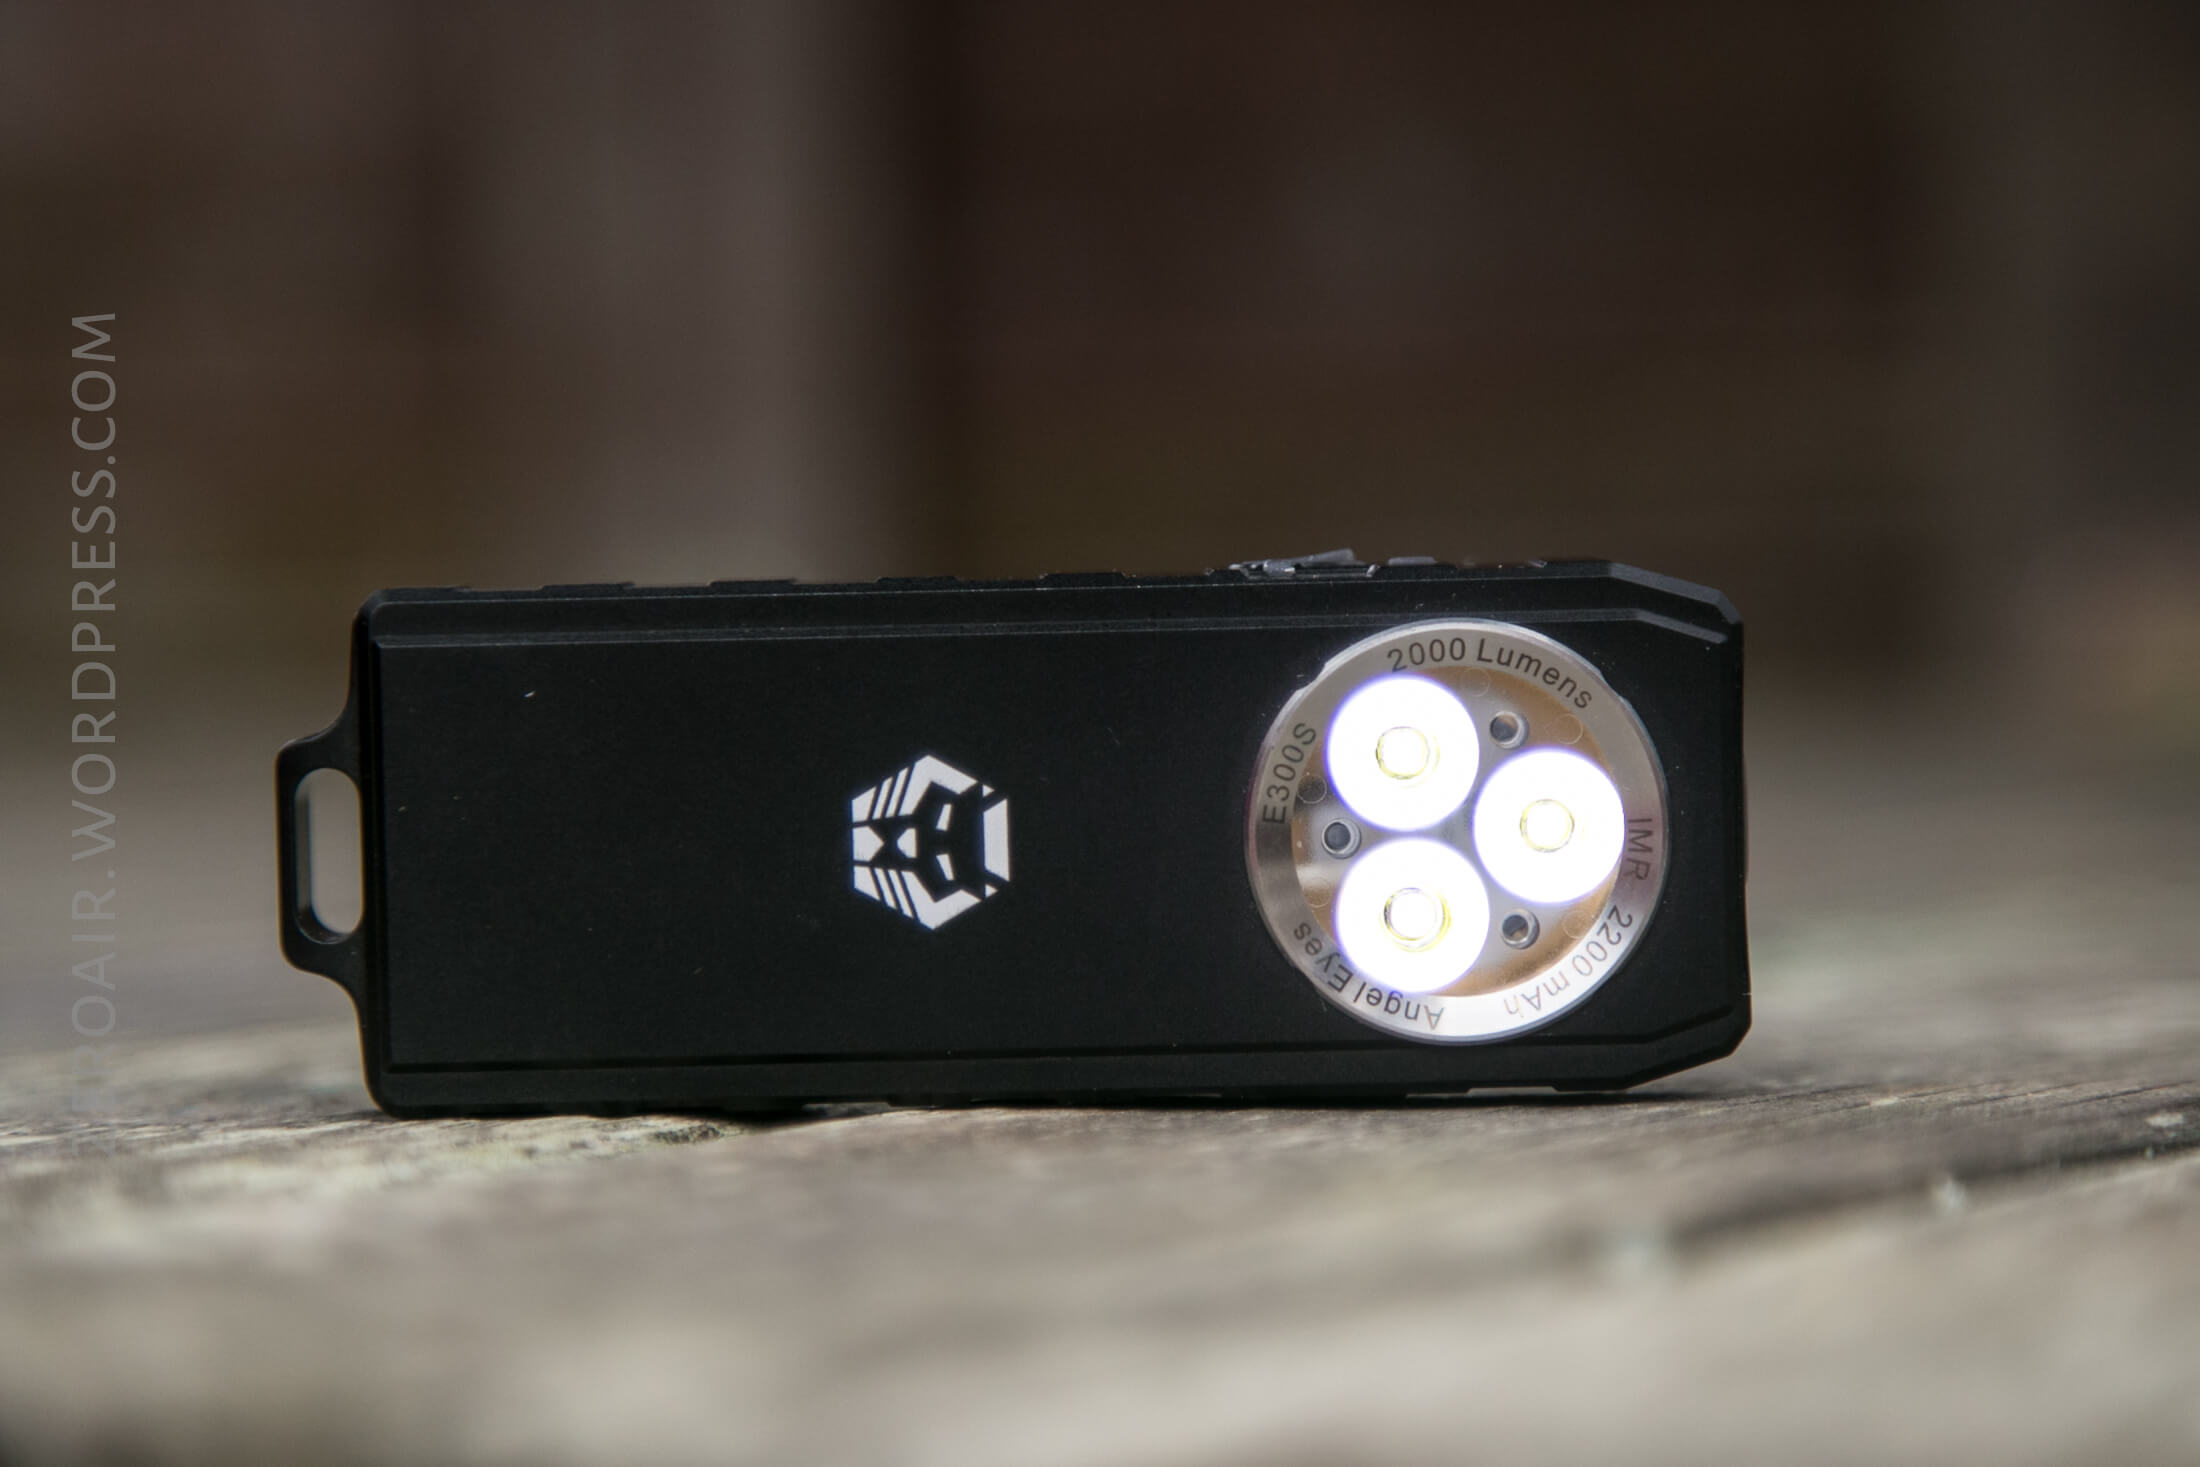
The beam has a distinct hotspot with a good bit of spill. The entire hotspot has the XP-G3 blueness.
Beamshots
These beamshots always have the following settings: f8, ISO100, 0.3s shutter, and manual 5000K exposure. These photos are taken at floor level, and the beam hits the ceiling around 9 feet away.


Edit, 20190105: I wasn’t satisfied with the XP-G3, and swapped in some Nichia 219c emitters. Here are beamshots with those emitters:


Tint vs BLF-348 (KillzoneFlashlights.com 219b version) (affiliate link)
The blown out nature of the beam-center in the photo below disguises the tint of these XP-G3’s. I think that’s literally the first time I’ve ever said that the test light beam looks better in the photo than in real life! I keep the test flashlight on the left and the BLF-348 reference flashlight on the right.

And here’s a beamshots with the swapped-in 219c emitters:

Random Comparisons and Competitive Options
There are a ton of triples, a bunch of triples with charging, and plenty of those that have Cree XP-G3. There is not another light like this one, though. Just… nothing.
Conclusion
What I like
- I like the novel idea of this style light
- Build quality seems good
- Charging is excellent, at over 2A
- The user interface has something for everyone!
What I don’t like
- Cree XP-G3 is still not satisfactory
- Overall, this light is too bulky
Notes
- This light was provided by RovyVon for review. I was not paid to write this review.
- This content originally appeared at zeroair.org. Please visit there for the best experience!
- Use my amazon.com referral link if you’re willing to help support making more reviews like this one!
- Please support me on Patreon! I deeply appreciate your support!
Hi Zeroair!
Just wanted to thank for your detailed review of this light! It helped a lot when modding mine (led replacement) !
Thanks for sharing this and your other reviews and ideas on flashlights!
Best regards!
Thank you for reading! Hope the reviews are helpful! This was one of the few lights I’ve actually done an emitter swap on and… not one of the easiest to do! But it can be done.