
Laulima Metal Craft Todai Flashlight Review
The Laulima Metal Craft Todai is a triple emitter flashlight with many options, great output, and a versatile Dragon driver. Read on for thoughts and testing!
Official Specs and Features
Here’s a link to the Laulima Metal Craft Todai flashlight product page.
Versions
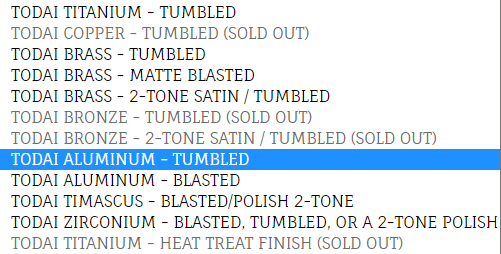
A ton of versions of the Todai are available! There are a bunch of metal options, including titanium, copper, brass, bronze, aluminum, and zirconium. Also, some finishes exist. Those include tumbled, satin, matte blasted, and heat-treated, among others.
Aside from the 18350 version of the Todai, there’s also a Todai Slim, which runs on a single 14500 cell and is thus slimmer and longer than this Todai.
Price
The least costly entry point to the 18350 Todai is this aluminum version, at $375. Price goes all the way up to a listed price of $2850 for timascus.
Short Review
If you’ve been paying attention to reviews lately you’ll note that I’ve used this Todai in a bunch of size comparison photos. In fact, it displaced a BOSS I used for a long time! I love the finish and feel while using the Todai. The shape is great. I love aluminum. Performance is very good, too. Usability of the light and customization from Laulima are hands down the best. While I might not want to pay $2850 for zirconium, I won’t hesitate to buy another light from Laulima (Todai Slim, I’m comin’ for you.)
Long Review
The Big Table
| Laulima Metal Craft Todai (tumbled aluminum) Flashlight | |
|---|---|
| Emitter: | Nichia 519a (Triple) |
| Price in USD at publication time: | $375.00 |
| Cell: | 1×18350 |
| Runtime Graphs | |
| LVP? | Sort of |
| Switch Type: | Mechanical |
| On-Board Charging? | No |
| Claimed Lumens (lm) | – |
| Measured Lumens (at 30s) | 1357 |
| Candela per Lumen | 6.1 |
| Claimed Throw (m) | – |
| Candela (Calculated) in cd (at 30s) | 316lux @ 4.587m = 6649cd |
| Throw (Calculated) (m) | 163.1 |
| Claimed CCT | 5700 (but dedomed by LMC) |
| Measured CCT Range (K) | 3500-4300 Kelvin |
| Item provided for review by: | Laulima Metal Craft |
| All my Laulima Metal Craft reviews! | |
^ Measurement disclaimer: Testing flashlights is my hobby. I use hobbyist-level equipment for testing, including some I made myself. Try not to get buried in the details of manufacturer specifications versus measurements recorded here; A certain amount of difference (say, 10 or 15%) is perfectly reasonable.
What’s Included

I don’t really think what you see above is a standard package. The bead and bead baggie, for example, are not included in the Todai purchase price. You do get many choices when you purchase, though, such as getting to pick which of those switch boot colors you want, and picking an optic. You also get to pick which emitters (from the list) that go into your light.
- Laulima Metal Craft Todai flashlight
- Laulima Metal Craft Todai cloth pouch
- Stickers (2)
- COA for Todai
Package and Manual


Build Quality and Disassembly

Build quality on the Laulima Metal Craft Todai flashlight is exceptional. I am not sure I have enough superlatives to describe it. Aside from the actual build quality, the design is also stunning. It’s not what I’d call an intricate design (not that I can speak to machining difficulty) but I can say that the flat areas on the light and the unadorned cylindrical nature of the head have given rise to collaboration opportunities. So you’ll see all manner of bespoke Todai lights out there, including lights dressed by Prometheus Design Werx and Starlingear.


Inside the head is a screw-in pill that houses the emitters and driver and all that. This is a standard Dragon driver (and mine has amber secondary emitters.) Threads on the body are nice and smooth, too.

Inside the cell tube, you can see the spring attached to the standard McClicky switch.

You can see a bit more detail on the head below. The head seam is very clean, but once opened reveals a fetching blue o-ring.

When closed, the seam is visible in such a way that it’s clearly supposed to be visible. It doesn’t play at invisibility, it demonstrates purposeful attention.


Size and Comps
Length – 3.5″
Diameter – .99″


If the flashlight will headstand, I’ll show it here (usually the third photo). If the flashlight will tailstand, I’ll also show that (usually in the fourth photo).


Here’s the test light with the venerable Convoy S2+. Mine is a custom “baked” edition Nichia 219b triple. A very nice 18650 light!


Also above on the left is a new feature light!! Laulima Metal Craft sent this titanium Todai for some size comparison photos like the ones above. Laulima has a bunch of incredible items. I’ve tested one (the Laulima Metal Craft Hoku) (the official site for Hoku is here) that was a Friend Fund Friday review. I was impressed enough by that Hoku that I bought a Laulima Metal Craft Diamond Slim (also in tumbled aluminum) (review is upcoming!) These lights by Laulima have impeccable build quality and not only that, they’re quite configurable. There are some (great, actually) default configurations, but Joshua Dawson (of Laulima Metal Craft) is open to ideas and emitter options and the like. I haven’t reviewed this Todai, but I have to say, it feels absolutely fantastic and I love it thus far. (Notably, I love how warm and eggy those emitters look through the TIR.)
Retention and Carry
Laulima really makes nearly everything they put in these lights. That includes the pocket clips, which are not just branded, but also unique. There’s a ball bearing (ceramic, I believe) in the mouth. This looks great; whether it adds function or not I can’t really say. Also note the Laulima logo – I think this is laser etched. It looks great, too. In case you didn’t know, Laulima got their start as a spinning top maker – that’s what the logo is.

Below you can see the profile and the little ball. These clips are nice and thick, too.

Laulima offers a bunch of screw colors. There’s also an option to have a shorty clip. Both are very good.

The screw holes extend through the tailcap. This can be seen as a feature, in case you have concerns – often when you swap in some other branded clip you’ll want to use those screws. Those screws might be longer or whatever, so these holes are intentional.

The lanyard Laulima included is also available as a separate purchase, but here are a few pics with it installed anyway. I have never used a lanyard or had a bead, so both are new experiences for me. The bead is very neat! And a lanyard like this didn’t get in the way like I thought it would.


Attaching lanyards in this way is actually specific – removing the light from your pocket is specifically functional in a way more than just “there’s a lanyard on my light.” For example, you can deep-pocket carry the light and have only the bead at the top of your pocket, then grab the bead to pull the whole light out.

The final way to carry the Todai is this included cloth pouch.

Power and Runtime
The Laulima Metal Craft Todai flashlight is powered by a single lithium-ion cell.

A cell is not included. I tested with an Orbtronic 1200mAh 18350, which is a flat top, but button tops should work (though it might be a tight fit).

The Dragon Driver uses percentages of output – so “Turbo” is just “100%.” The light gets pretty hot on Turbo but the head is managed electronically.


I’ll call the low voltage information a “warning” since the light switches to the secondary emitters when cell voltage gets low. I’m not sure that’s the ideal way, but it seems acceptable.
Modes and Currents
| Mode | Mode Claimed Output (lm) | Claimed Runtime | Measured Lumens | Tailcap Amps |
|---|---|---|---|---|
| Low Amber | – | – | 1.6 | 0.8 |
| High Amber | – | – | 24 | 1.53 |
| Moonlight | – | – | 0.53 | [low] |
| 5% | – | – | 67 | 0.16 |
| 15% | – | – | 211 | 0.80 |
| 35% | – | – | 504 | 2.76 |
| 50% | – | – | 738 | 5.53 |
| 100% | – | – | 1437 (0s) 1357 (30s) |
17+ |
Pulse Width Modulation
The Dragon driver uses PWM for most modes. You’re unlikely to notice the PWM, but I won’t say it’s impossible that you might. The FET turbo does not use PWM, nor does the highest output for the secondary emitter. The mode order shown here is the same as the table above, and the same as you’ll experience in the mode group that has all the modes listed in the table above. This is how the other group photos will be done below, too.


Here you can see a “baseline” – a chart with almost no light hitting the sensor.
Then there’s the Ultrafire WF-602C flashlight, which has some of the worst PWM I’ve seen. It’s so bad that I used a post about it to explain PWM! Here are multiple timescales (10ms, 5ms, 2ms, 1ms, 0.5ms, 0.2ms) to make comparing this “worst” PWM light to the test light easier. That post also explains why I didn’t test the WF-602C at the usual 50us scale.
User Interface and Operation
The Laulima Metal Craft Todai flashlight uses a McClicky switch, which is made by McGizmo. The McClicky is a forward clicky switch. This means momentary actuation is possible, but once the light is on, no mode changes can be made. As you can see around the orange custom switch boot below, there’s a black o-ring keeping things sealed nicely.


The switch cover (boot) does not extend past the edge of the light. This allows flawless tailstanding, of course.

But the switch is still plenty accessible.

Here’s a user interface table for the default mode group! There are 8 mode groups. The dragon on a McClicky is pretty straightforward, I think.
| State | Action | Result |
|---|---|---|
| Off | Click | Low Secondary |
| On | Click | Off |
| Off | Half press | Mode advance (Low Secondary, High Secondary, Moonlight, 5%,15%, 35%, 50%, 100%) |
| Off | Half press >15x | Configuration Mode (indicated by flashes) |
Here’s a list of the mode groups. Basically nothing difficult about them, so no point in a separate table.
1- low secondary, high secondary,ml,5,15,35,50,100
2- low secondary, high secondary,5,15,35,100
3- low secondary, ml,5,15,35,50,100
4- low secondary, 5,15,35,100
5- low secondary, high secondary,15,100
6- low secondary, 15,100
7- ML,5,15,35,50,100
8- 5,15,35,100
I showed in the table how to reach the configuration mode. Once in the configuration mode, you must select which thing you wish to change. If you wish to select a different mode group, for example, do the following:
- With the light off, half-press >15x and note when the light stops responding
- When the light stops responding, stop pressing but continue to hold the switch so that the light is “on”, and the light will begin flashing
- After the first flash (secondary emitters, High), the secondary will strobe on low for around a second. Click to turn the light off, during the low secondary strobe.
- Turn the light back on. This enters the mode group selection process.
- The secondary emitters will begin to flash slowly. Click to turn the light off after the number of the group you wish to select.
- Light is programmed
The same process is used for any of the other options. Those options are as follows:
1. Mode Group Select.
2. Memory Toggle.
3. Mode Order Toggle.
4. Temperature Calibration Mode.
5. Reversing Toggle.
Unfortunately past the very obvious actions those options present, not much further explanation is given. For example, I’m really not sure what “Reversing toggle” is, and because the configuration option to do that is so long, I’m not really inclined to try to figure it out.
But the temp configuration is covered.
When setting the temperature control the light will go from programming to turbo, turn the light off when it reaches the temperature you desire.
My experience is that each option has its own notification of which thing has been selected. For example, if you configure the “Mode order toggle”, the normal mode option (L>H direction) will be indicated by a solid beam immediately after configuration. Reverse order (H>L direction) will be indicated by strobe immediately after configuration.
I’d love to see a much more fleshed-out version of what’s what. There’s no good reason for there not to be a full discussion on the maker’s page of every option available, and how to manipulate it.
The emitters in this Todai are Nichia 519a with a base CCT of 5700K as the main triple, with amber XQ-E as the secondary triple. Joshua Dawson was kind enough to dedome my 5700K emitters. You should be interested in seeing the output changes below!


It’s been reported about the Dragon driver elsewhere that the secondary emitters are on when the main emitters are on – that is, the secondary emitters are always on if the light is on. In this light, in the Moonlight mode, the secondary emitters are noticeable. You can see it below but it’s much more visible in person. Now, that’s not necessarily bad in this case since Amber just sort of adds a “warmer” feel if anything to the total output. But my opinion is that this secondary channel should be completely inactive while the main emitters are on.


LED Color Report (CRI and CCT)
As mentioned above, the CCT really changes when these Nichia 519a emitters are dedomed. They go from a stock (unmeasured here) of 5700K down to what we see below (photos 3-8) of 3500K-4200K. You might hate that, but for me, it’s absolutely fantastic. Also, note the CRI – a minimum of 96. Incredible.


Beamshots
These beamshots always have the following settings: f8, ISO100, 0.3s shutter, and manual 5000K exposure. These photos are taken at floor level, and the beam hits the ceiling around 9 feet away.


Tint vs BLF-348 (KillzoneFlashlights.com 219b version) (affiliate link)
I keep the test flashlight on the left and the BLF-348 reference flashlight on the right.


I compare everything to the KillzoneFlashlights.com 219b BLF-348 because it’s inexpensive and has the best tint!
Conclusion
What I like
- Design
- Build quality (execution of design)
- Dedomed triple Nichia 519a
- User interface is good
- Laulima Metal Craft (the company, they’re great)
- Todai collaborations
- Tons of options for the light – very configurable
What I don’t like
- PWM of Dragon
- Secondary always-on-ness of Dragon
- Cost
- Having one just makes me want to have more (wait is that a negative… idk…)
Parting Shot

Notes
- This content originally appeared at zeroair.org. Please visit there for the best experience!
- Please use my Amazon.com referral link to help support zeroair.org!
- Please support me on Patreon! I deeply appreciate your support!
Discover more from ZeroAir Reviews
Subscribe to get the latest posts sent to your email.