Niwalker ET V2 Mini Flashlight Review
Niwalker has released the Niwalker ET Mini V2 flashlight, which offers both cool and warm white (6000K, 3000K) and USB-C charging, too! Read on!
Official Specs and Features
Here’s a link to the Niwalker ET Mini V2 flashlight product page.
Versions
Versions, whew. Well, first of all, this is version 2 of the ET Mini. So there’s a first version, which I’m not really covering here. These two versions seem to differ in that V1 has a single emitter (with a reflector), a cool white emitter, whereas V2 (seen here) has a triple emitter cool white setup.
As for the Niwalker ET Mini V2 flashlight specifically, there’s just one “version,” but it’s available in multiple body colors. Red, Orange, Blue, Green, and Black are all available.
Price
The Niwalker ET Mini V2 Flashlight is selling on BangGood for $50.79. This includes an 18650 cell.
Short Review
What a fun light. I figured it’d be “ok,” but the ET Mini V2 is actually quite nice to carry and use. The user interface was a little bit of a struggle at first, but now it’s possible (and easy) for me to switch between emitter options on the fly. I wish it shipped with a 20350 cell and also with the extension tube for 20700 cell usage, but I guess that option is seen with other lights in their lineup.
Long Review
The Big Table
| Niwalker ETMini V2 Flashlight | |
|---|---|
| Emitter: | Osram Pusra1.PM (Neutral White (3000K) (Single)) |
| Price in USD at publication time: | |
| Cell: | 1×18350 |
| LVP? | |
| Switch Type: | E-Switch |
| Quiescent Current (mA): | 0.7 |
| On-Board Charging? | Yes |
| Charge Port Type: | USB-C |
| Power off Charge Port | with cell: all modes
without cell: all except Turbo without body: all except Turbo |
| Claimed Lumens (lm) | 655 |
| Measured Lumens (at 30s) | 835 (127.5% of claim)^ |
| Candela per Lumen | 5.6 |
| Claimed Throw (m) | 183 |
| Candela (Calculated) in cd (at 30s) | 185lux @ 4.996m = 4618cd |
| Throw (Calculated) (m) | 135.9 (74.3% of claim)^ |
| Item provided for review by: | BangGood. Referral link for purchase is here! |
| All my Niwalker reviews! | |
| Niwalker ETMini V2 Flashlight | |
|---|---|
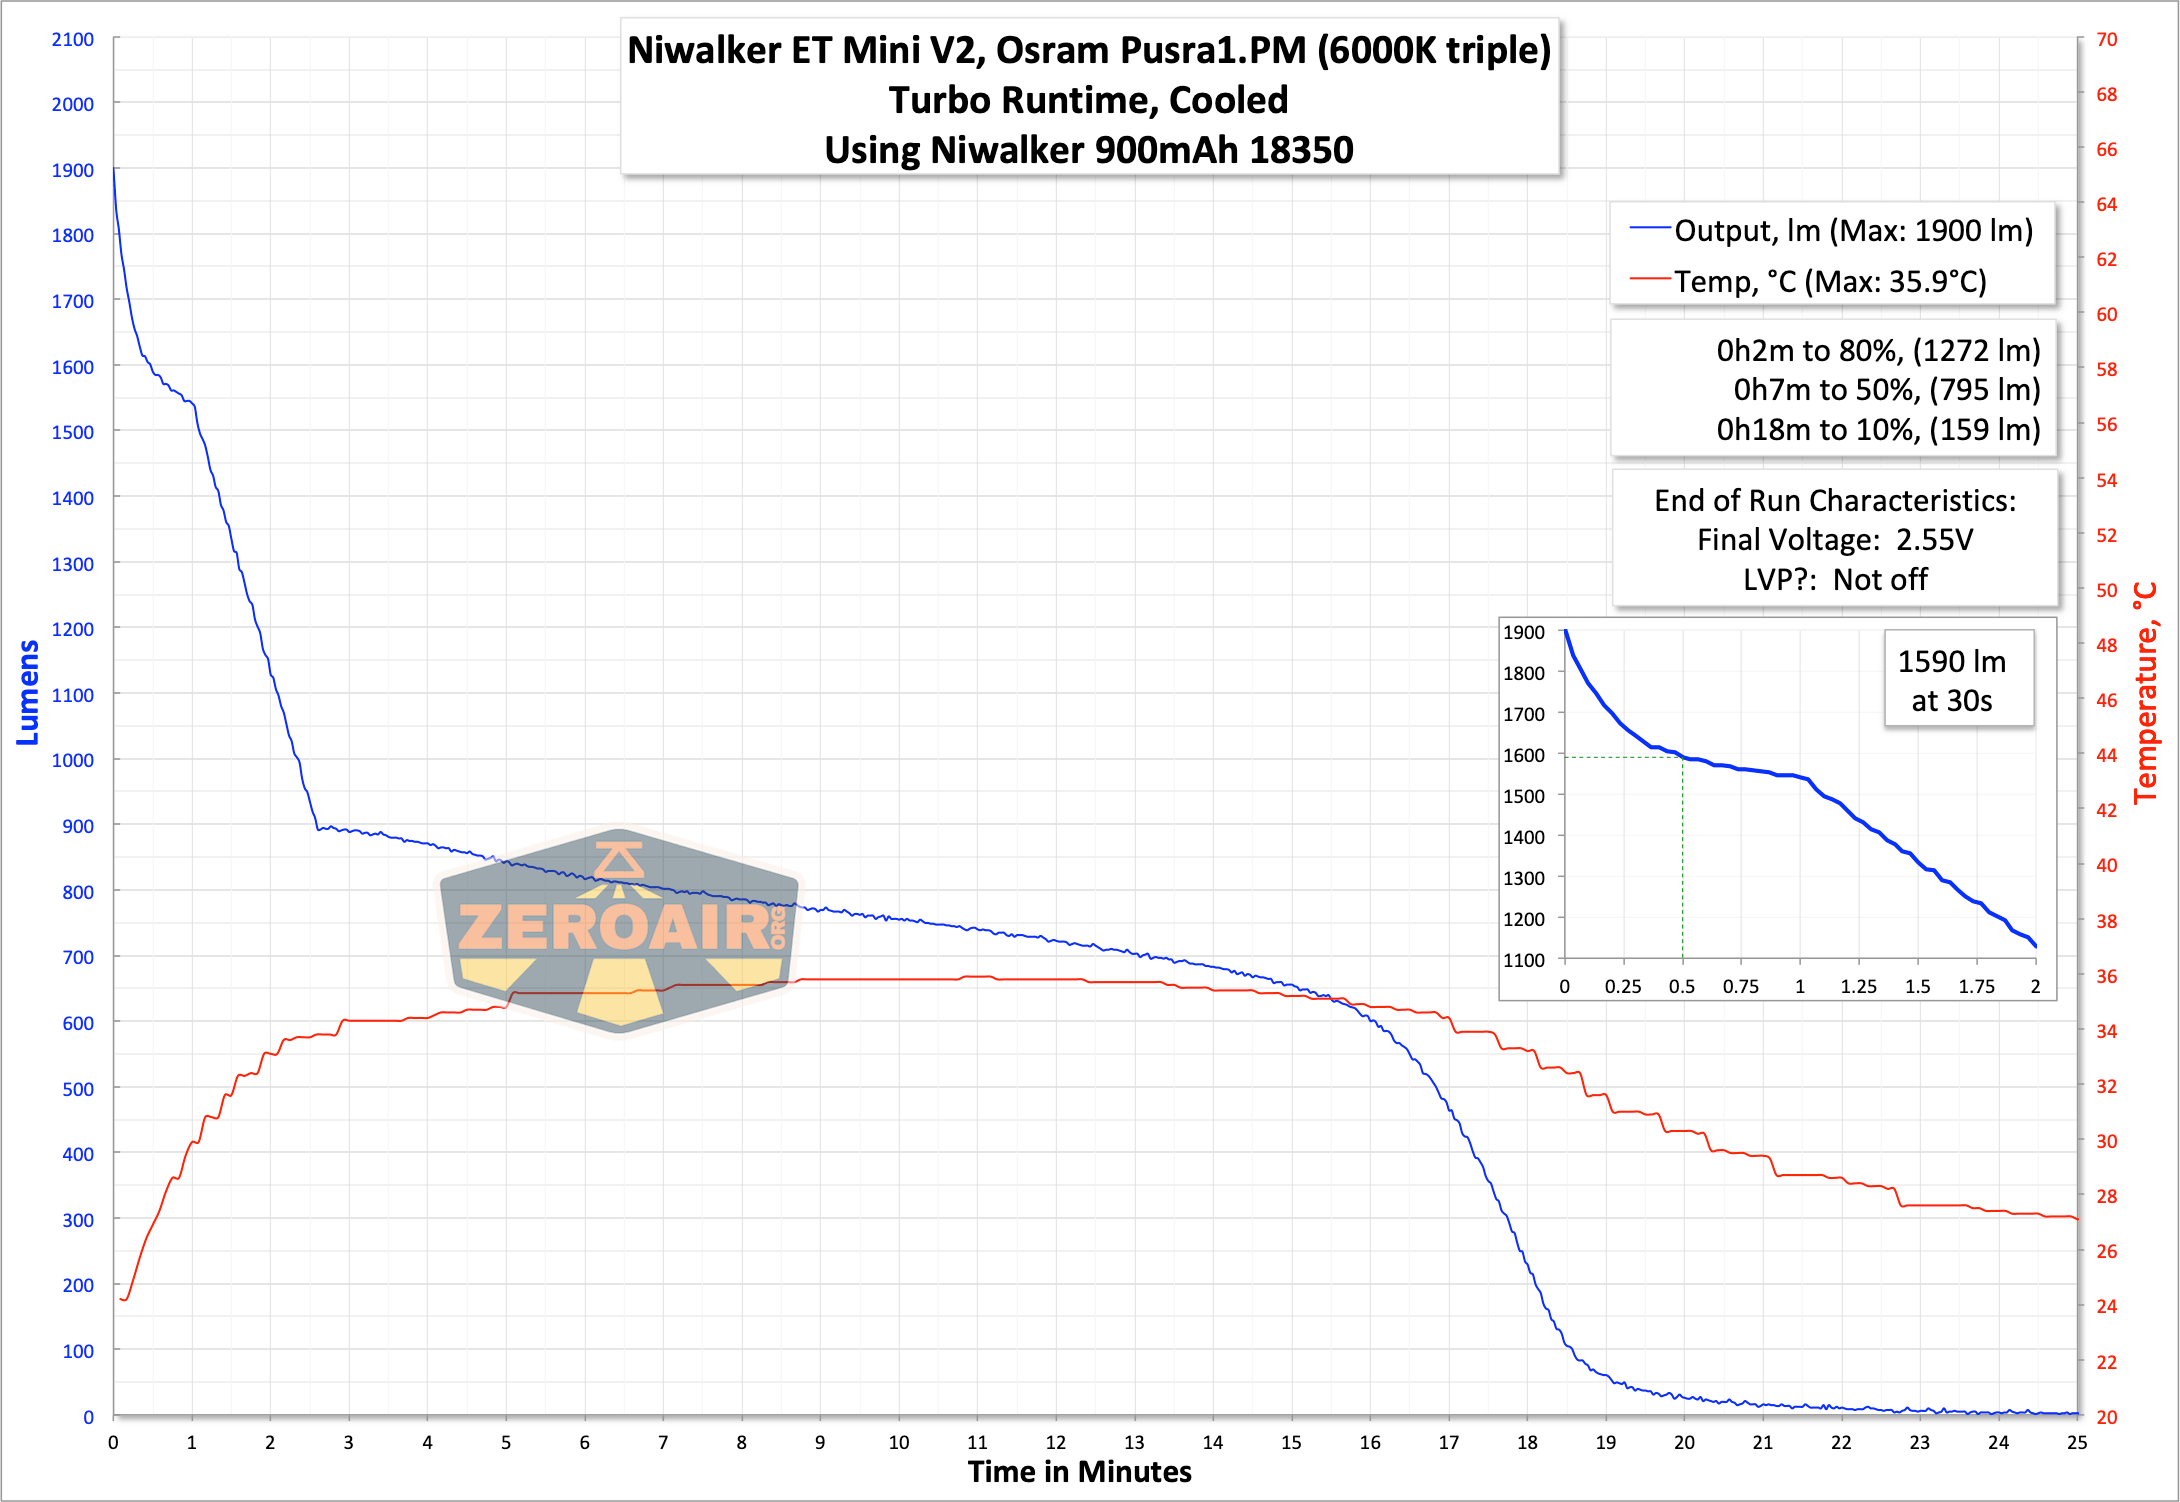
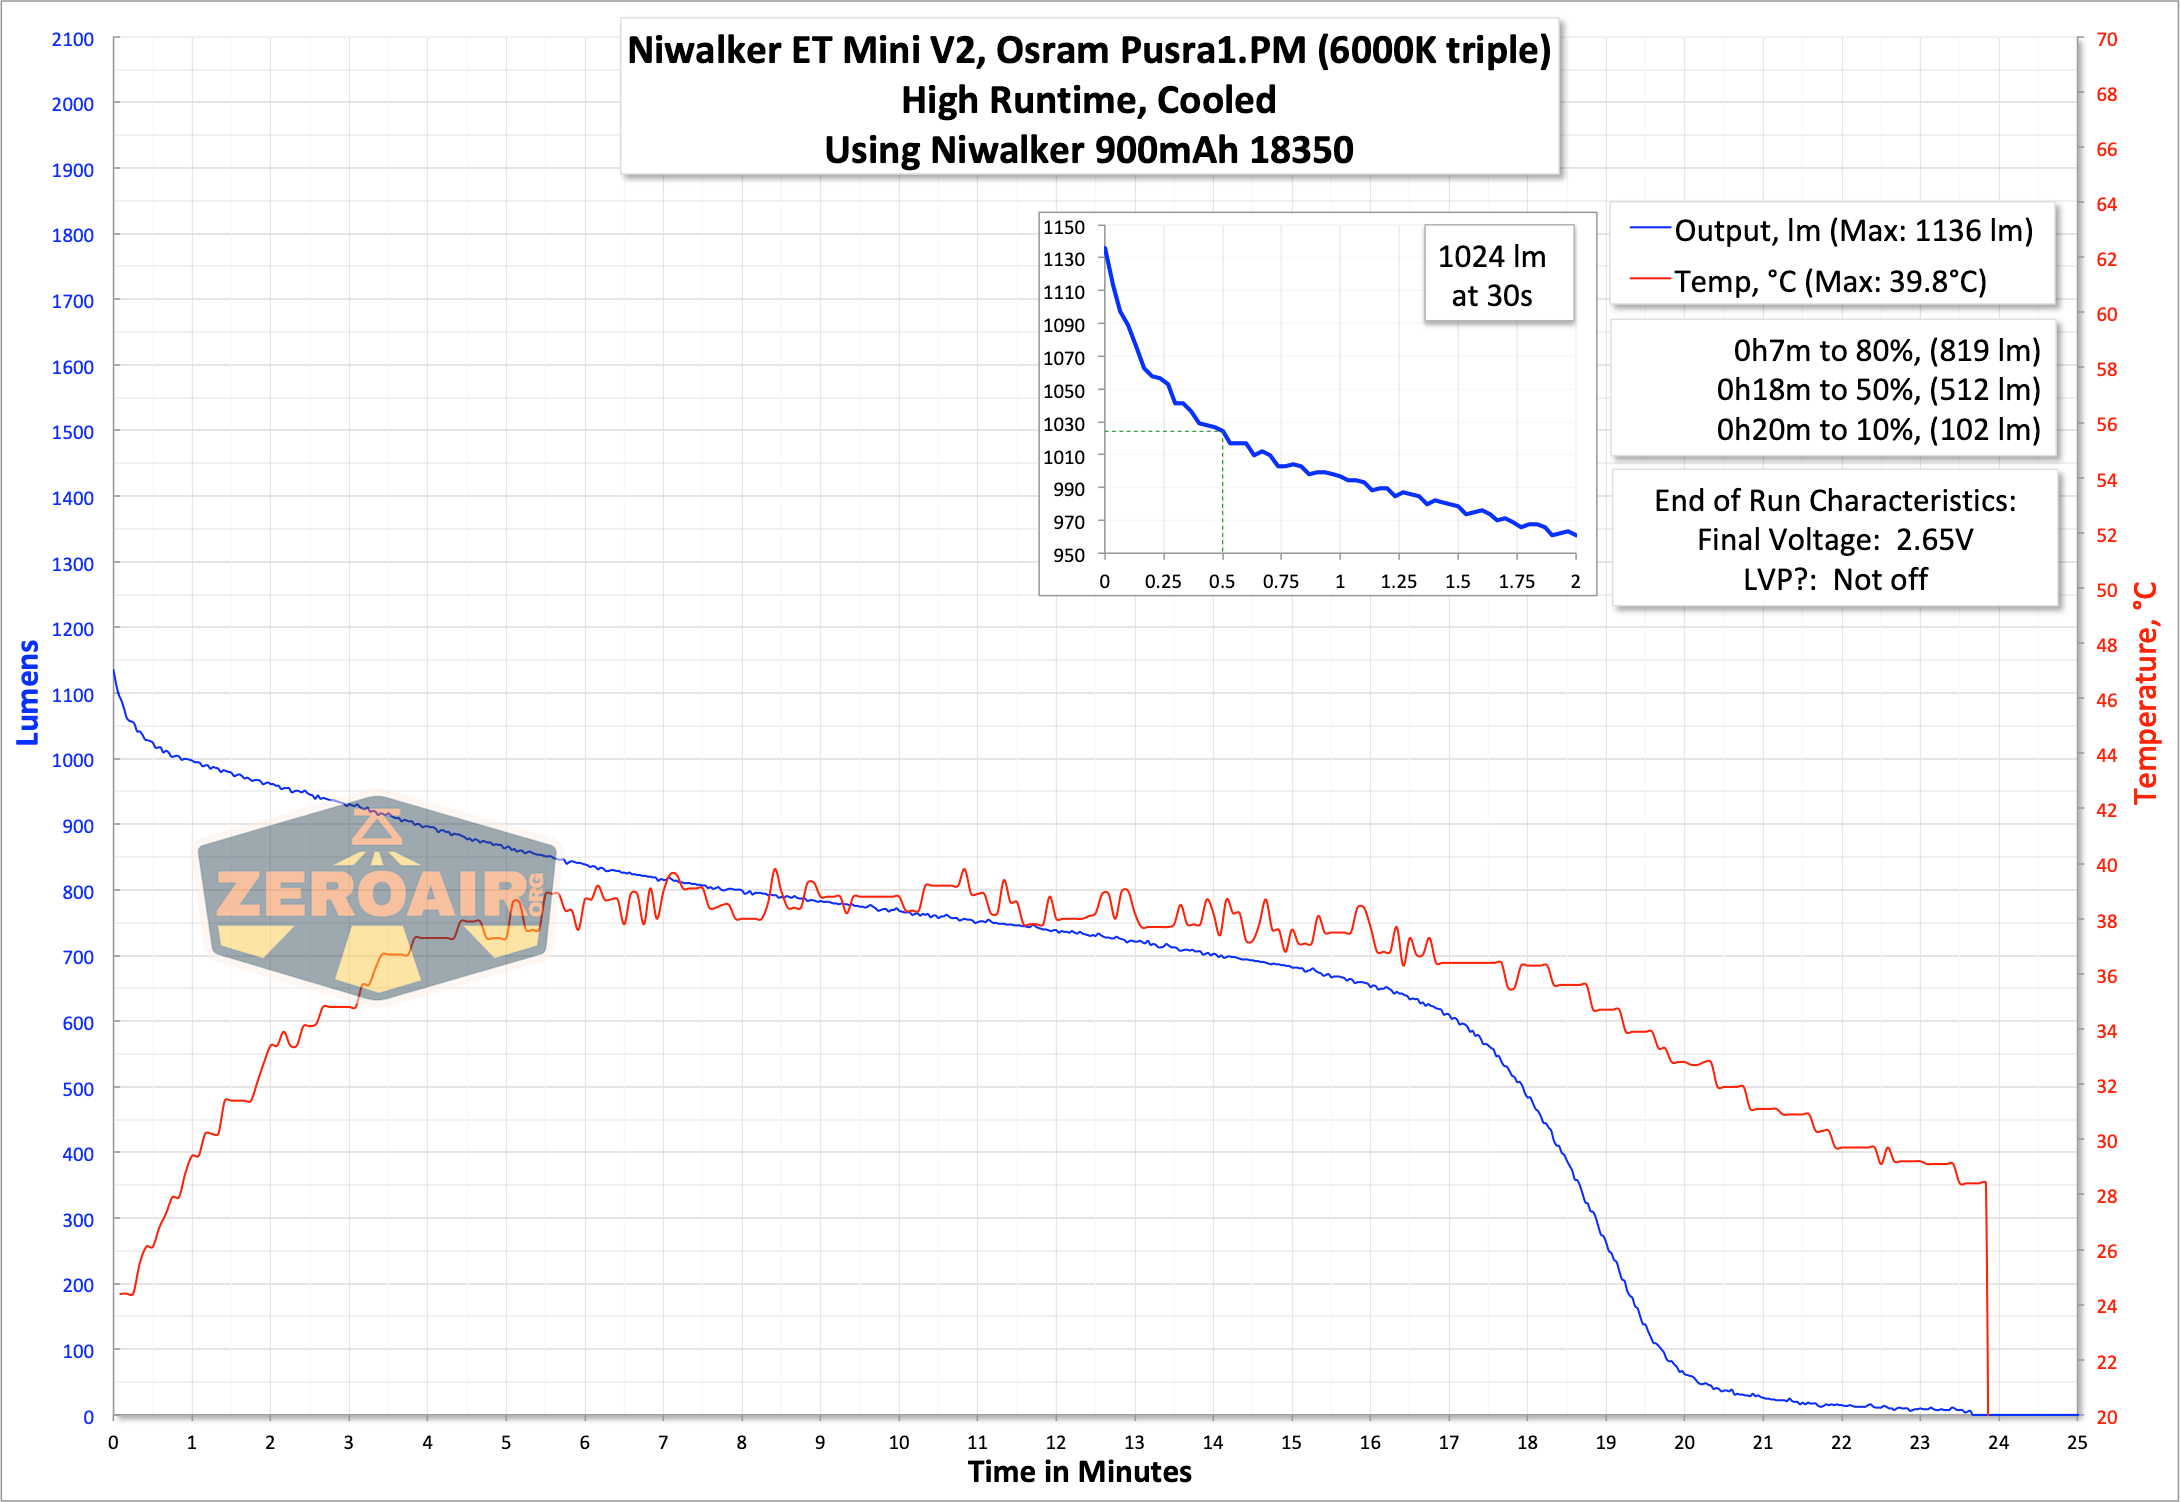
| Emitter: | Osram Pusra1.PM (Cool white (6000K) (Triple)) |
| Price in USD at publication time: | |
| Cell: | 1×18350 |
| Turbo Runtime Graph | High Runtime Graph |
| LVP? | |
| Switch Type: | E-Switch |
| Quiescent Current (mA): | 0.7 |
| On-Board Charging? | Yes |
| Charge Port Type: | USB-C |
| Charge Graph | |
| Power off Charge Port | with cell: all modes
without cell: all except Turbo without body: all except Turbo |
| Claimed Lumens (lm) | 1314 |
| Measured Lumens (at 30s) | 1590 (121% of claim)^ |
| Candela per Lumen | 5.1 |
| Claimed Throw (m) | 183 |
| Candela (Calculated) in cd (at 30s) | 374lux @ 4.973m = 9249cd |
| Throw (Calculated) (m) | 192.3 (105.1% of claim)^ |
| Item provided for review by: | BangGood. Referral link for purchase is here! |
| All my Niwalker reviews! | |
| Niwalker ETMini V2 Flashlight | |
|---|---|
| Emitter: | Osram Pusra1.PM (Both) |
| Price in USD at publication time: | |
| Cell: | 1×18350 |
| Turbo Runtime Graph | High Runtime Graph |
| LVP? | |
| Switch Type: | E-Switch |
| Quiescent Current (mA): | 0.7 |
| On-Board Charging? | Yes |
| Charge Port Type: | USB-C |
| Charge Graph | |
| Power off Charge Port | with cell: all modes
without cell: all except Turbo without body: all except Turbo |
| Claimed Lumens (lm) | 1788 |
| Measured Lumens (at 30s) | 1671 (93.5% of claim)^ |
| Candela per Lumen | 5.7 |
| Claimed Throw (m) | 183 |
| Candela (Calculated) in cd (at 30s) | 497lux @ 4.735m = 11143cd |
| Throw (Calculated) (m) | 211.1 (115.4% of claim)^ |
| Item provided for review by: | BangGood. Referral link for purchase is here! |
| All my Niwalker reviews! | |
^ Measurement disclaimer: Testing flashlights is my hobby. I use hobbyist-level equipment for testing, including some I made myself. Try not to get buried in the details of manufacturer specifications versus measurements recorded here; A certain amount of difference (say, 10 or 15%) is perfectly reasonable.
What’s Included
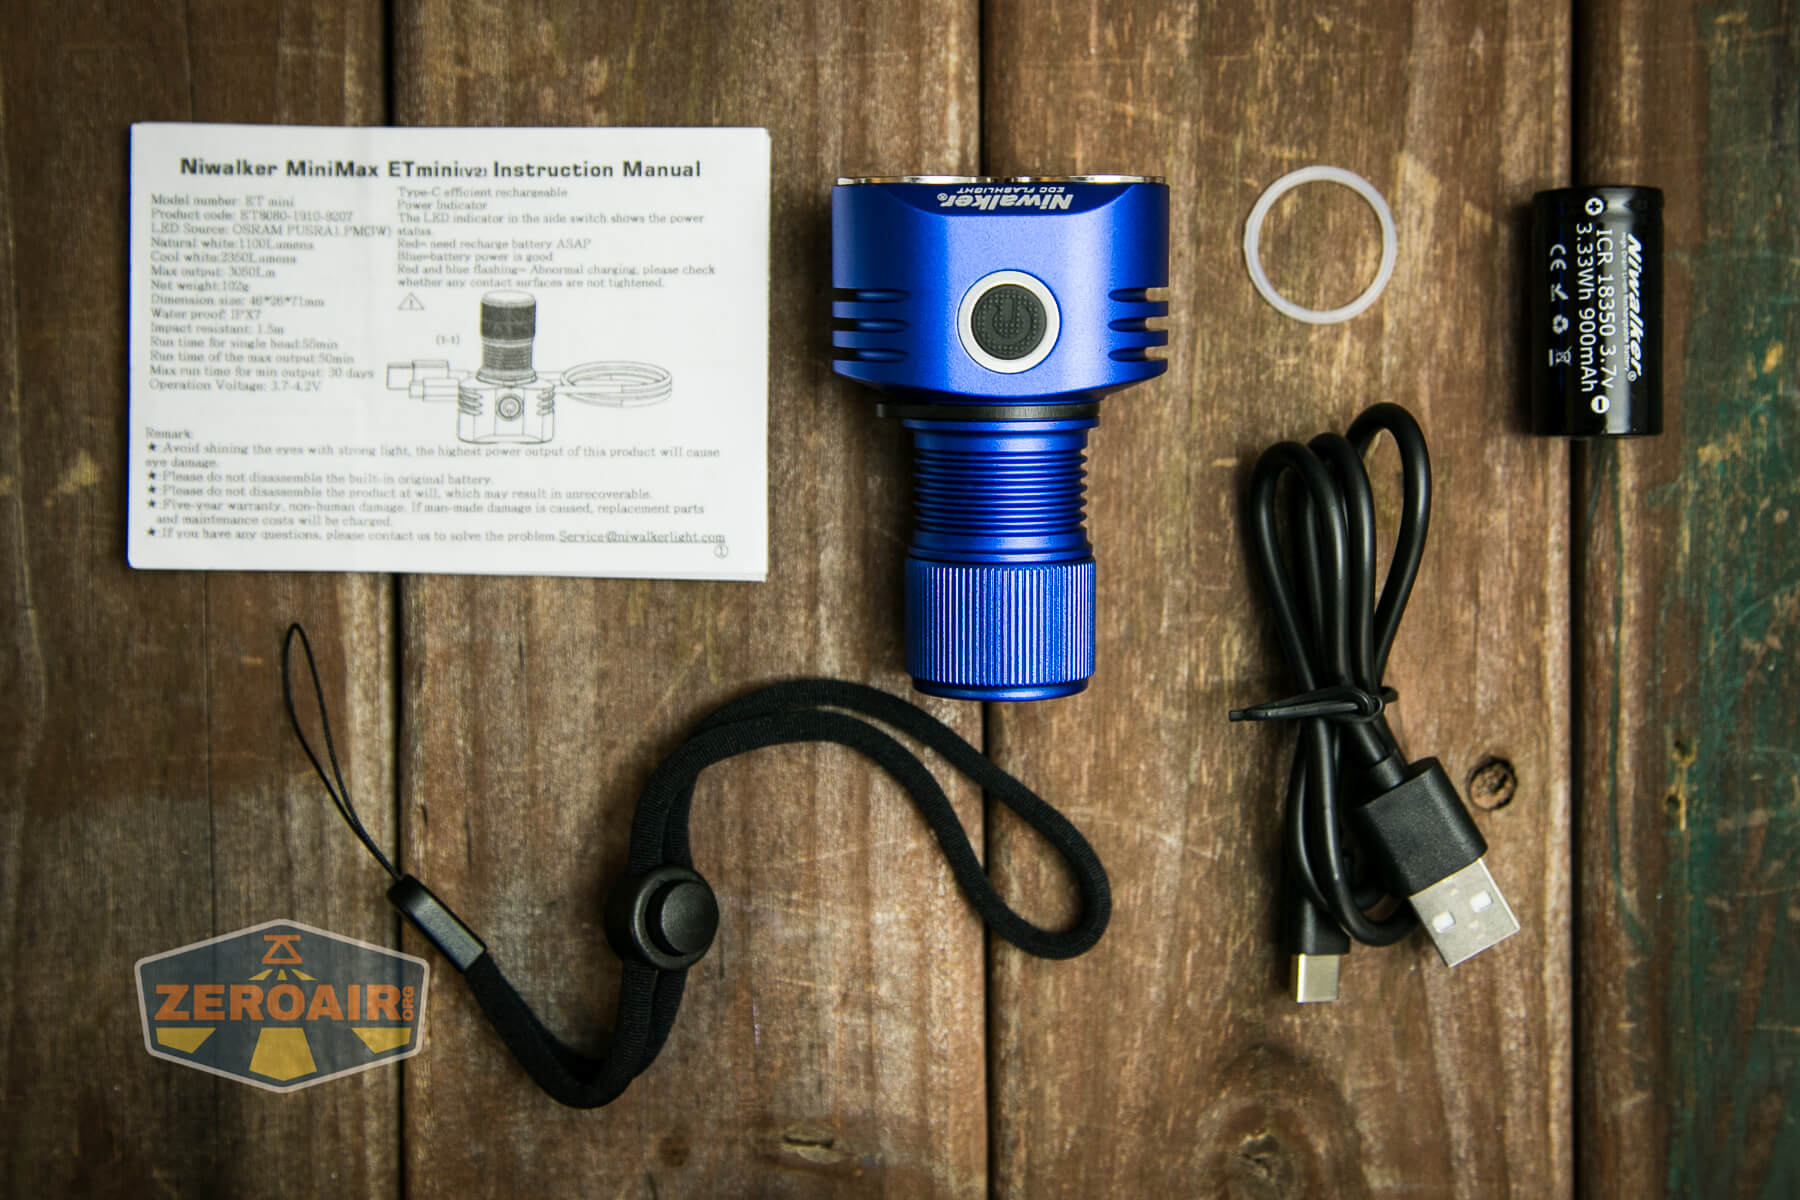
- Niwalker ET Mini V2 Flashlight
- Niwalker 900mAh 18350
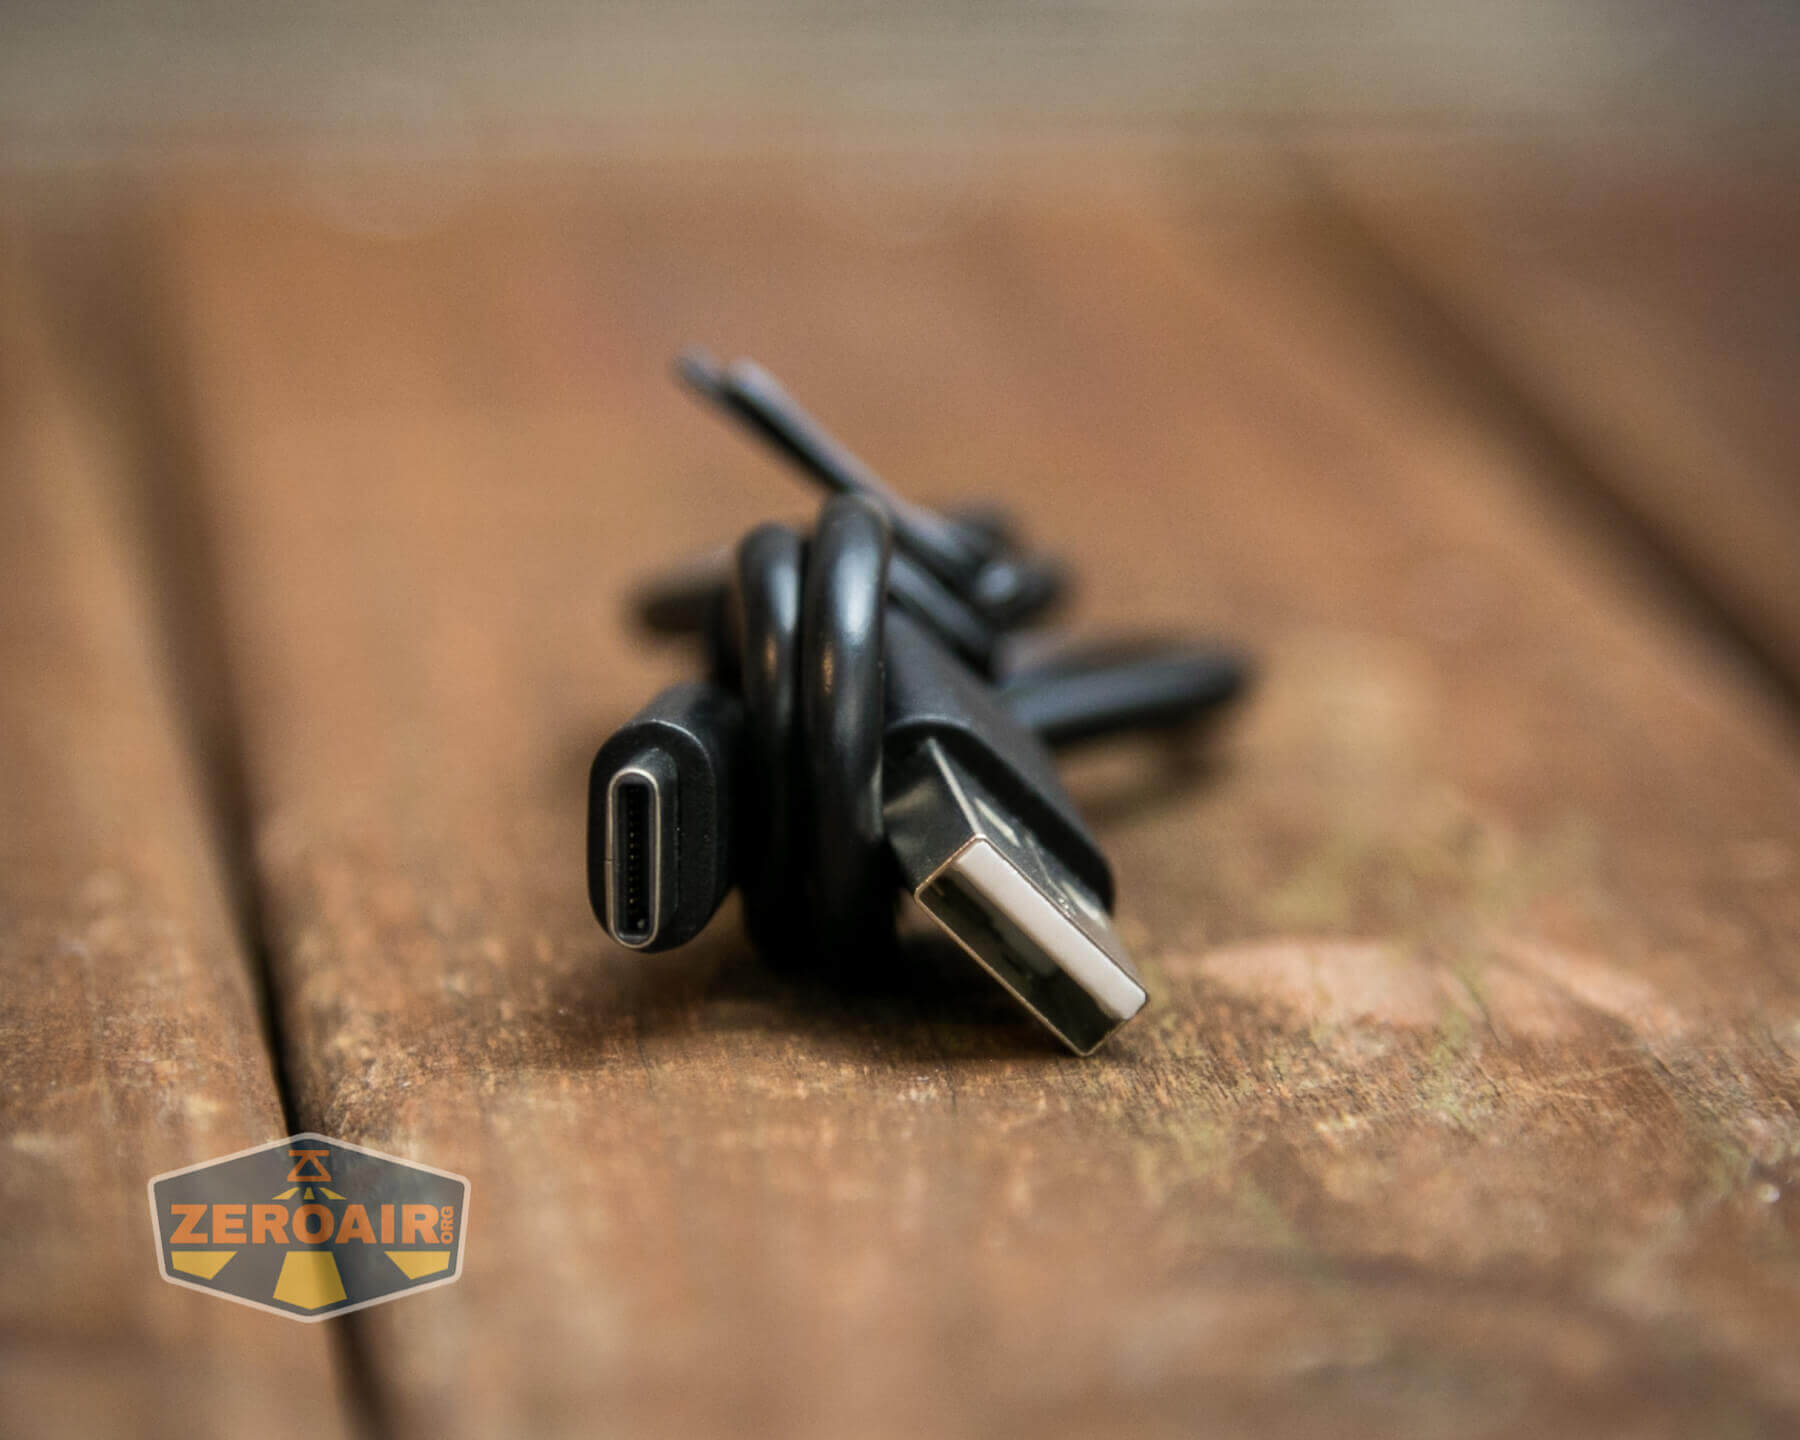
- Charge cable (USB to USB-C)
- Lanyard
- Spare o-ring
- Manual
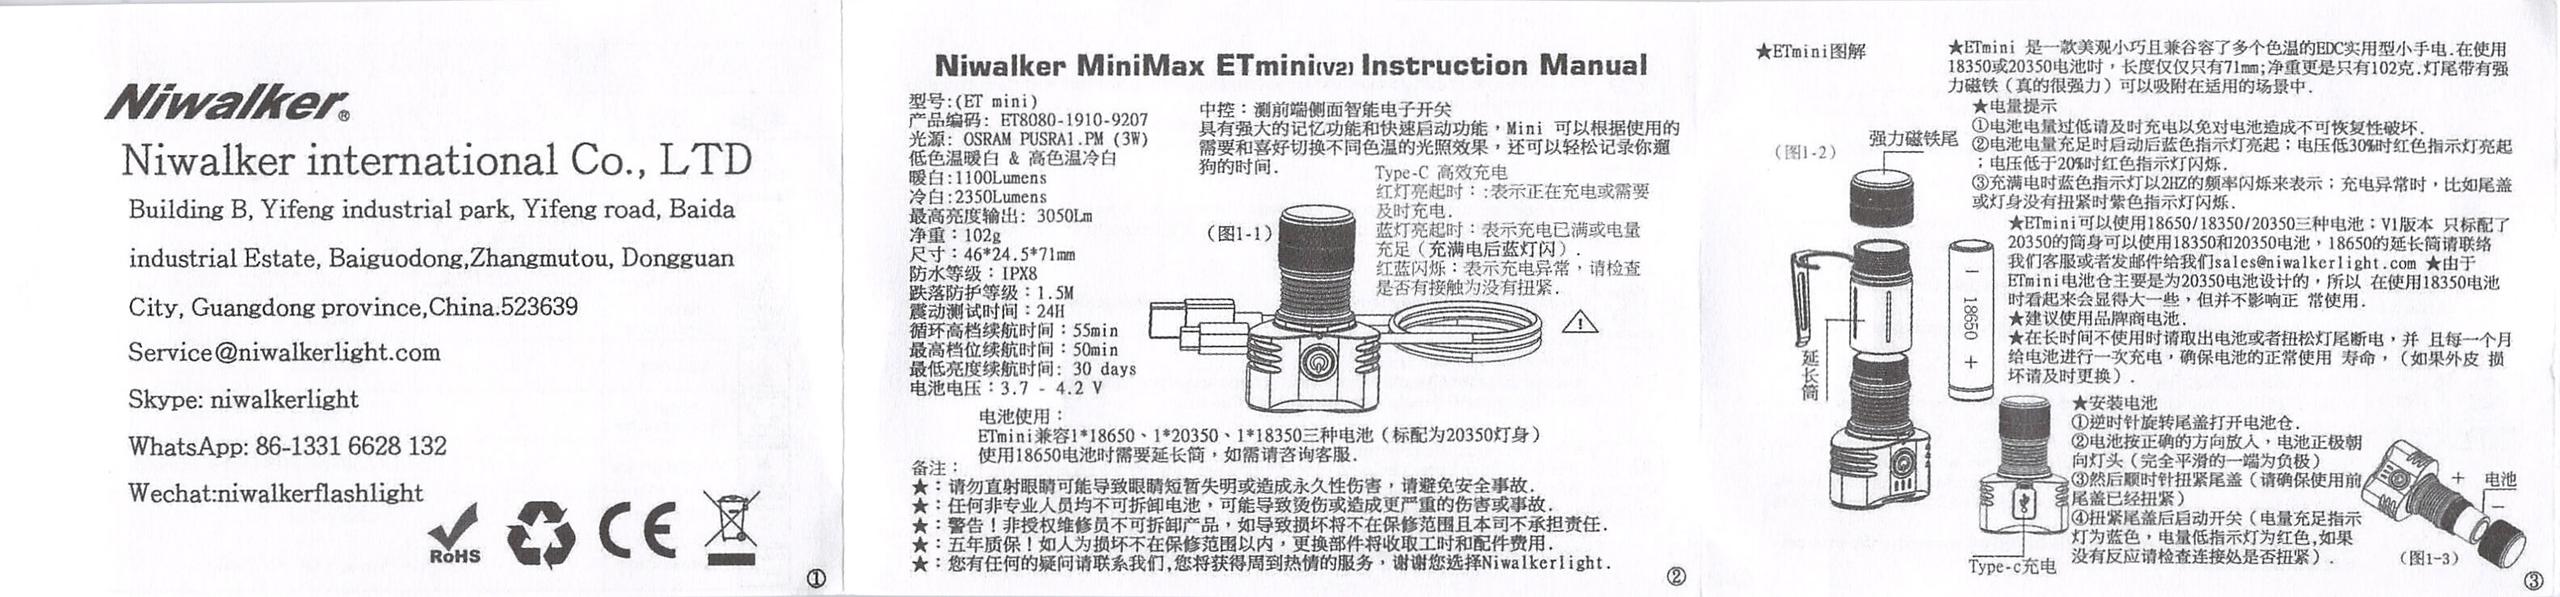
Package and Manual


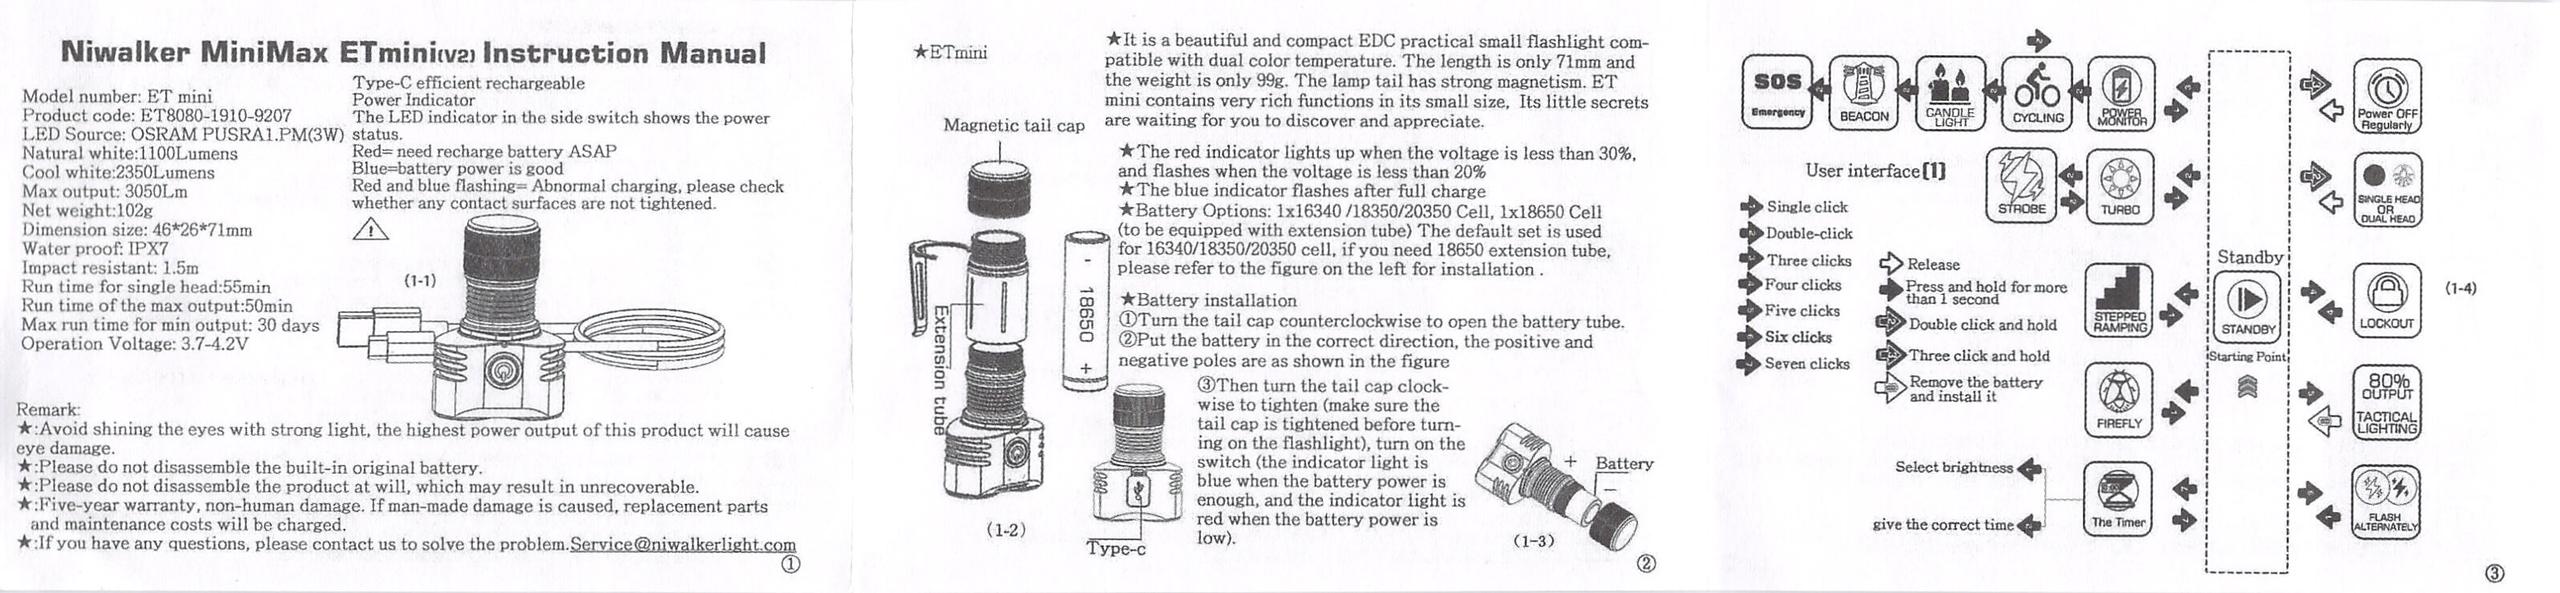
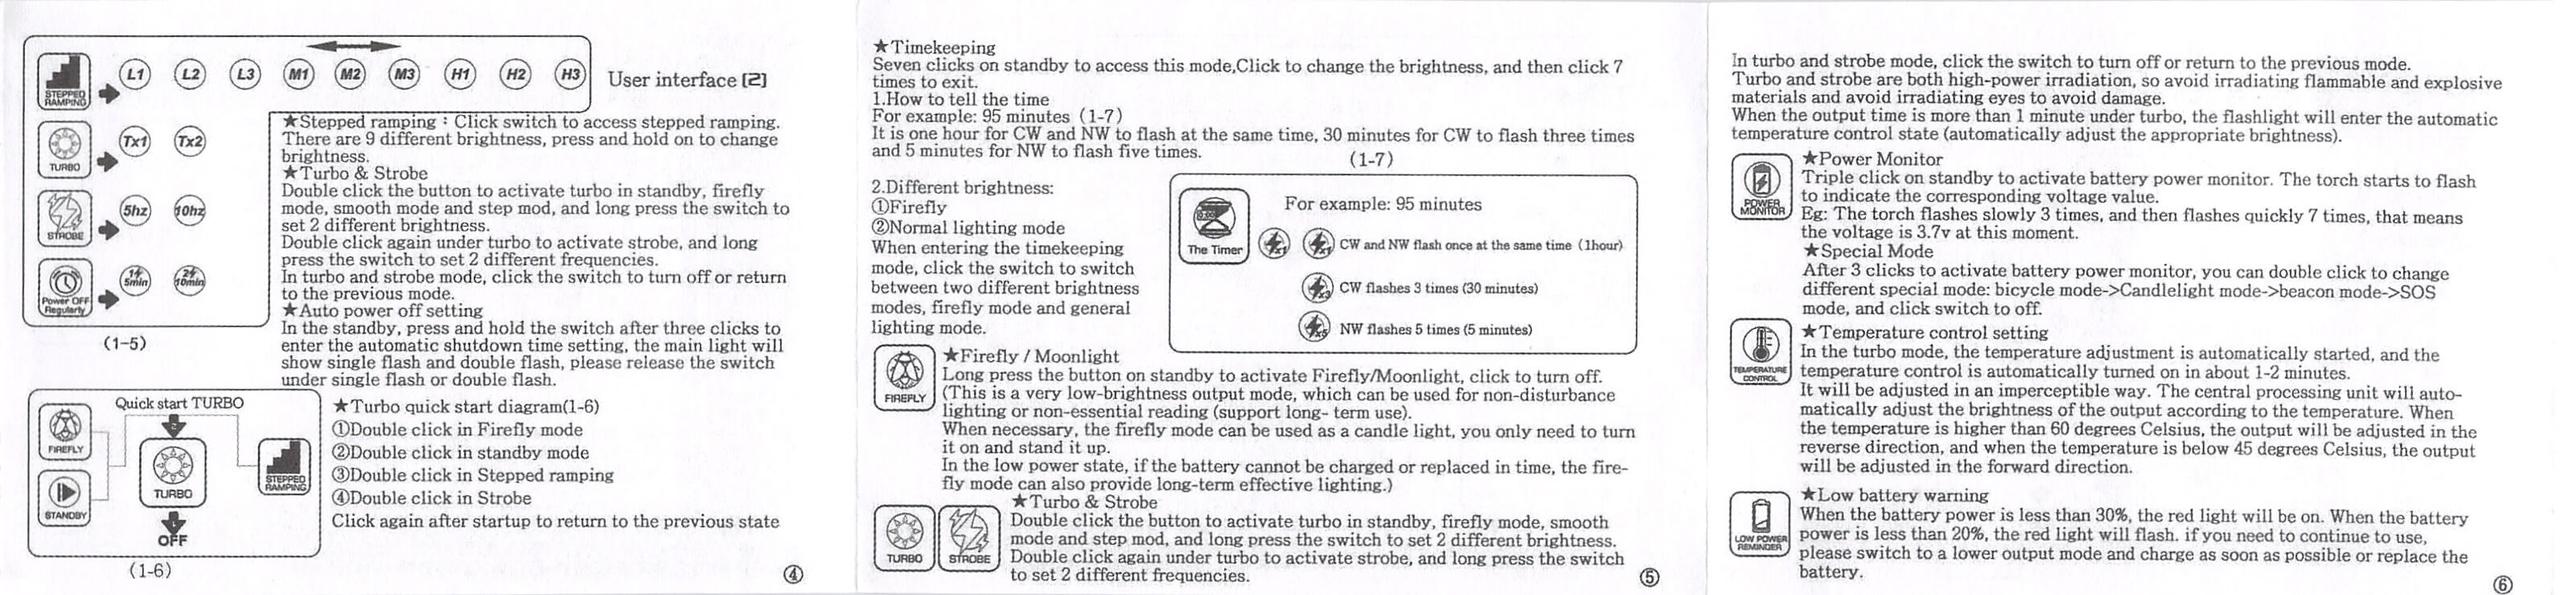
Here’s the full manual! You’ll need this for the user interface. I’ll need this for the user interface.
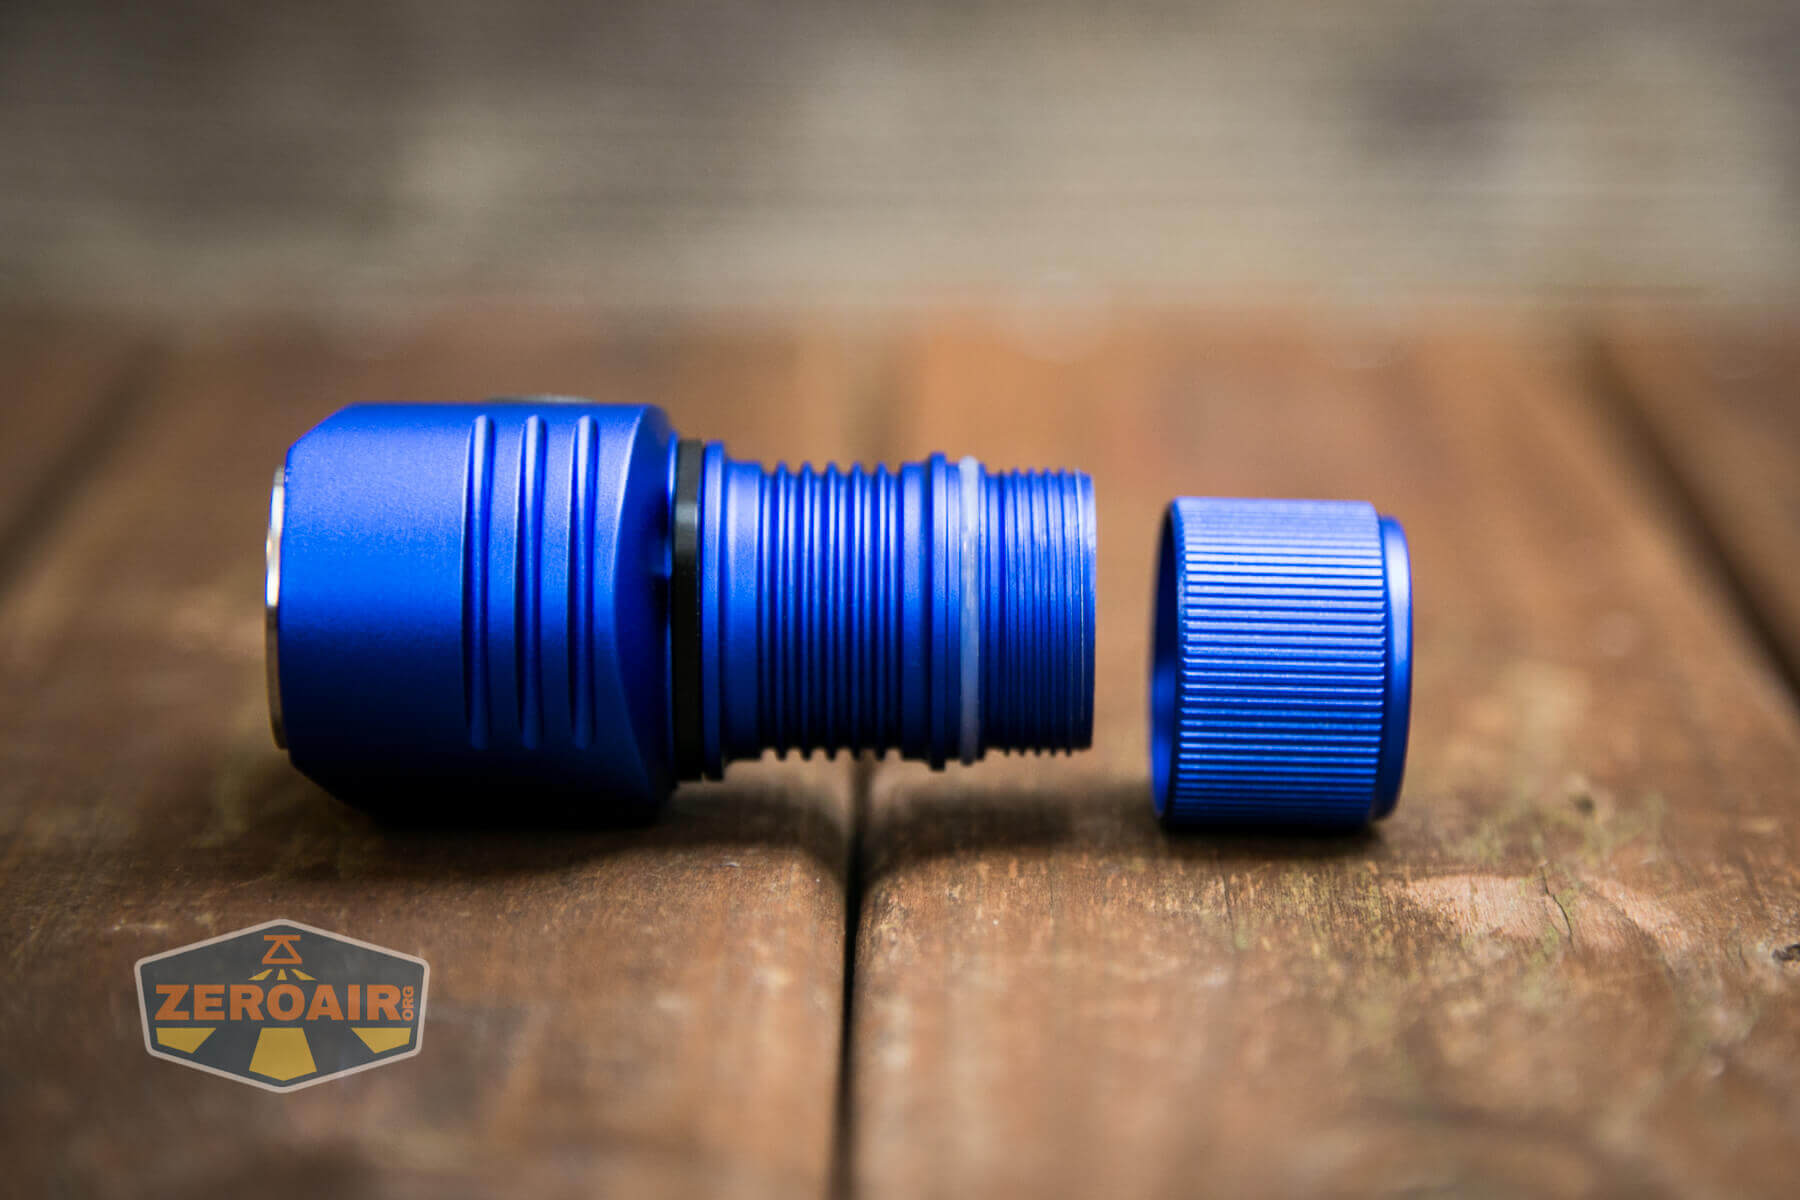
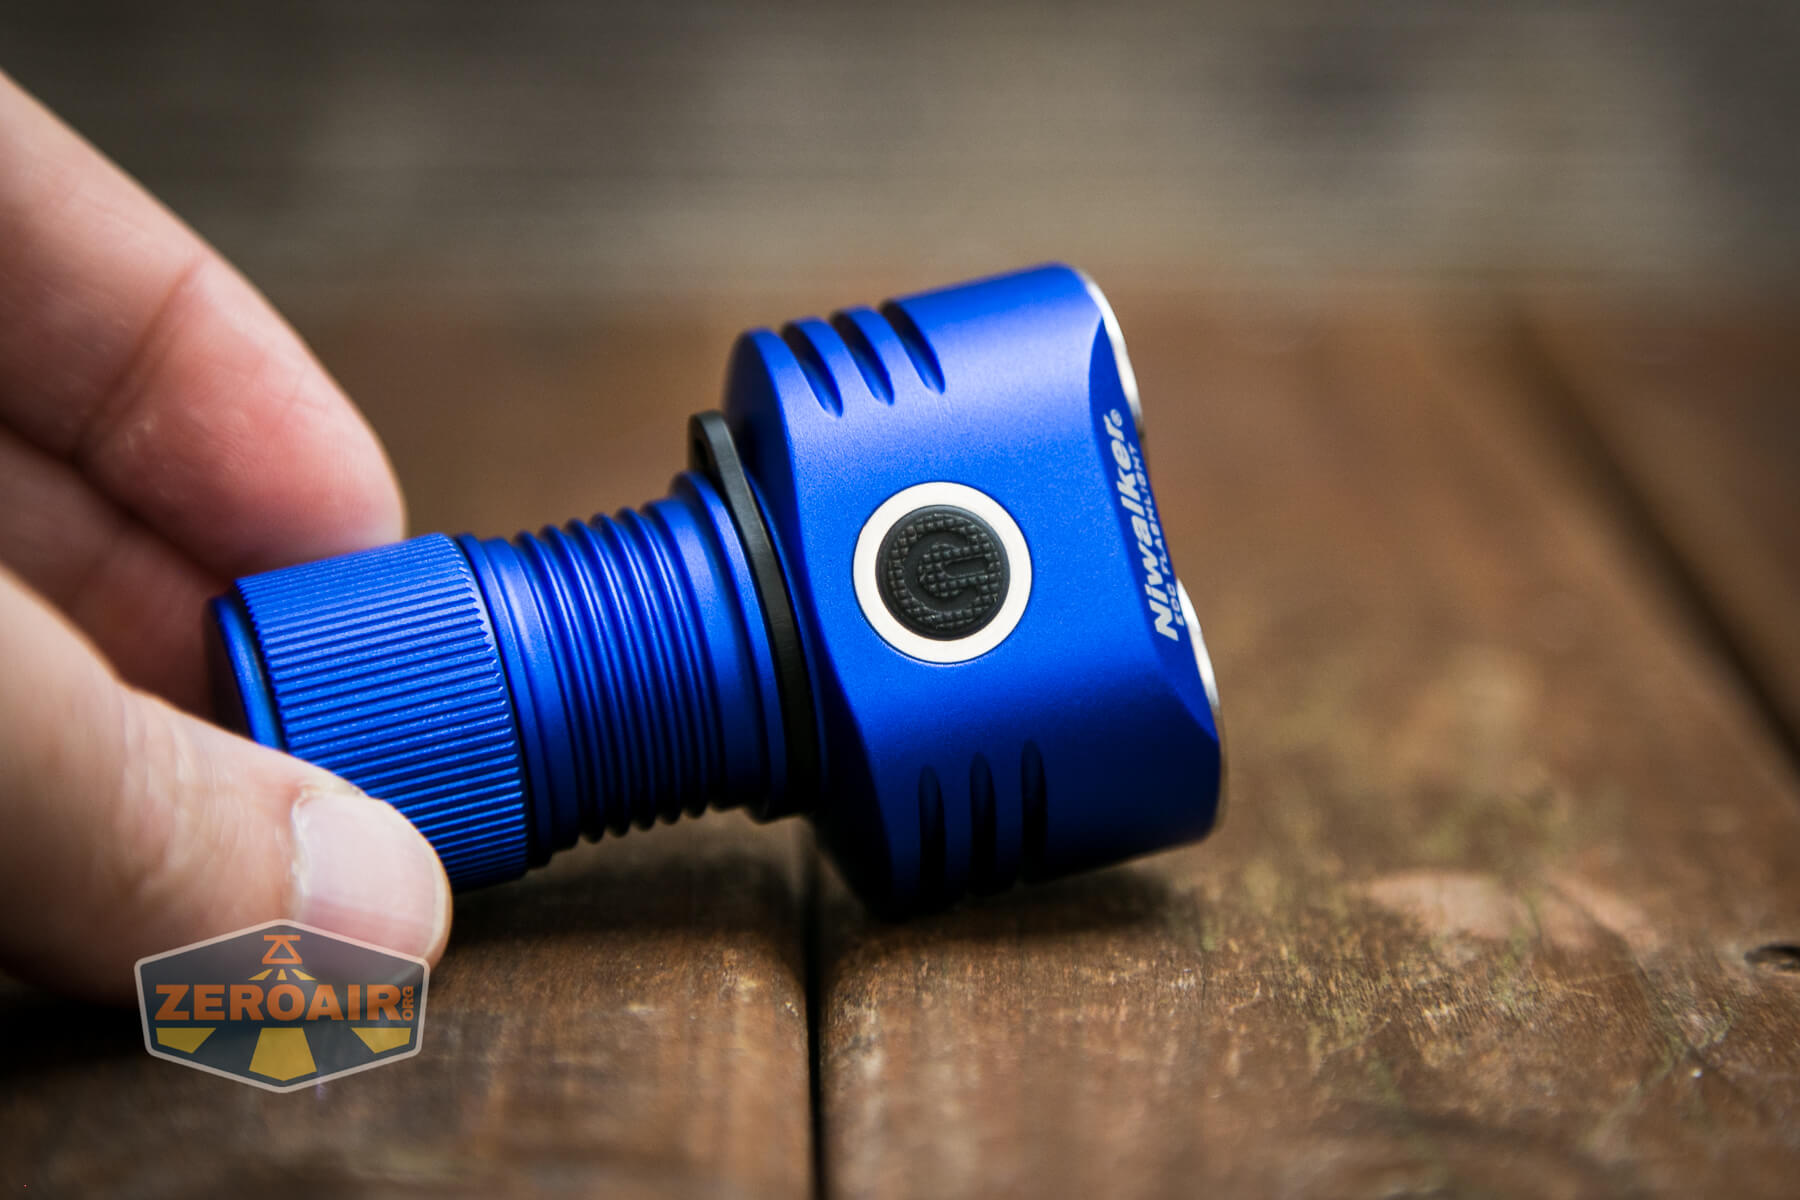
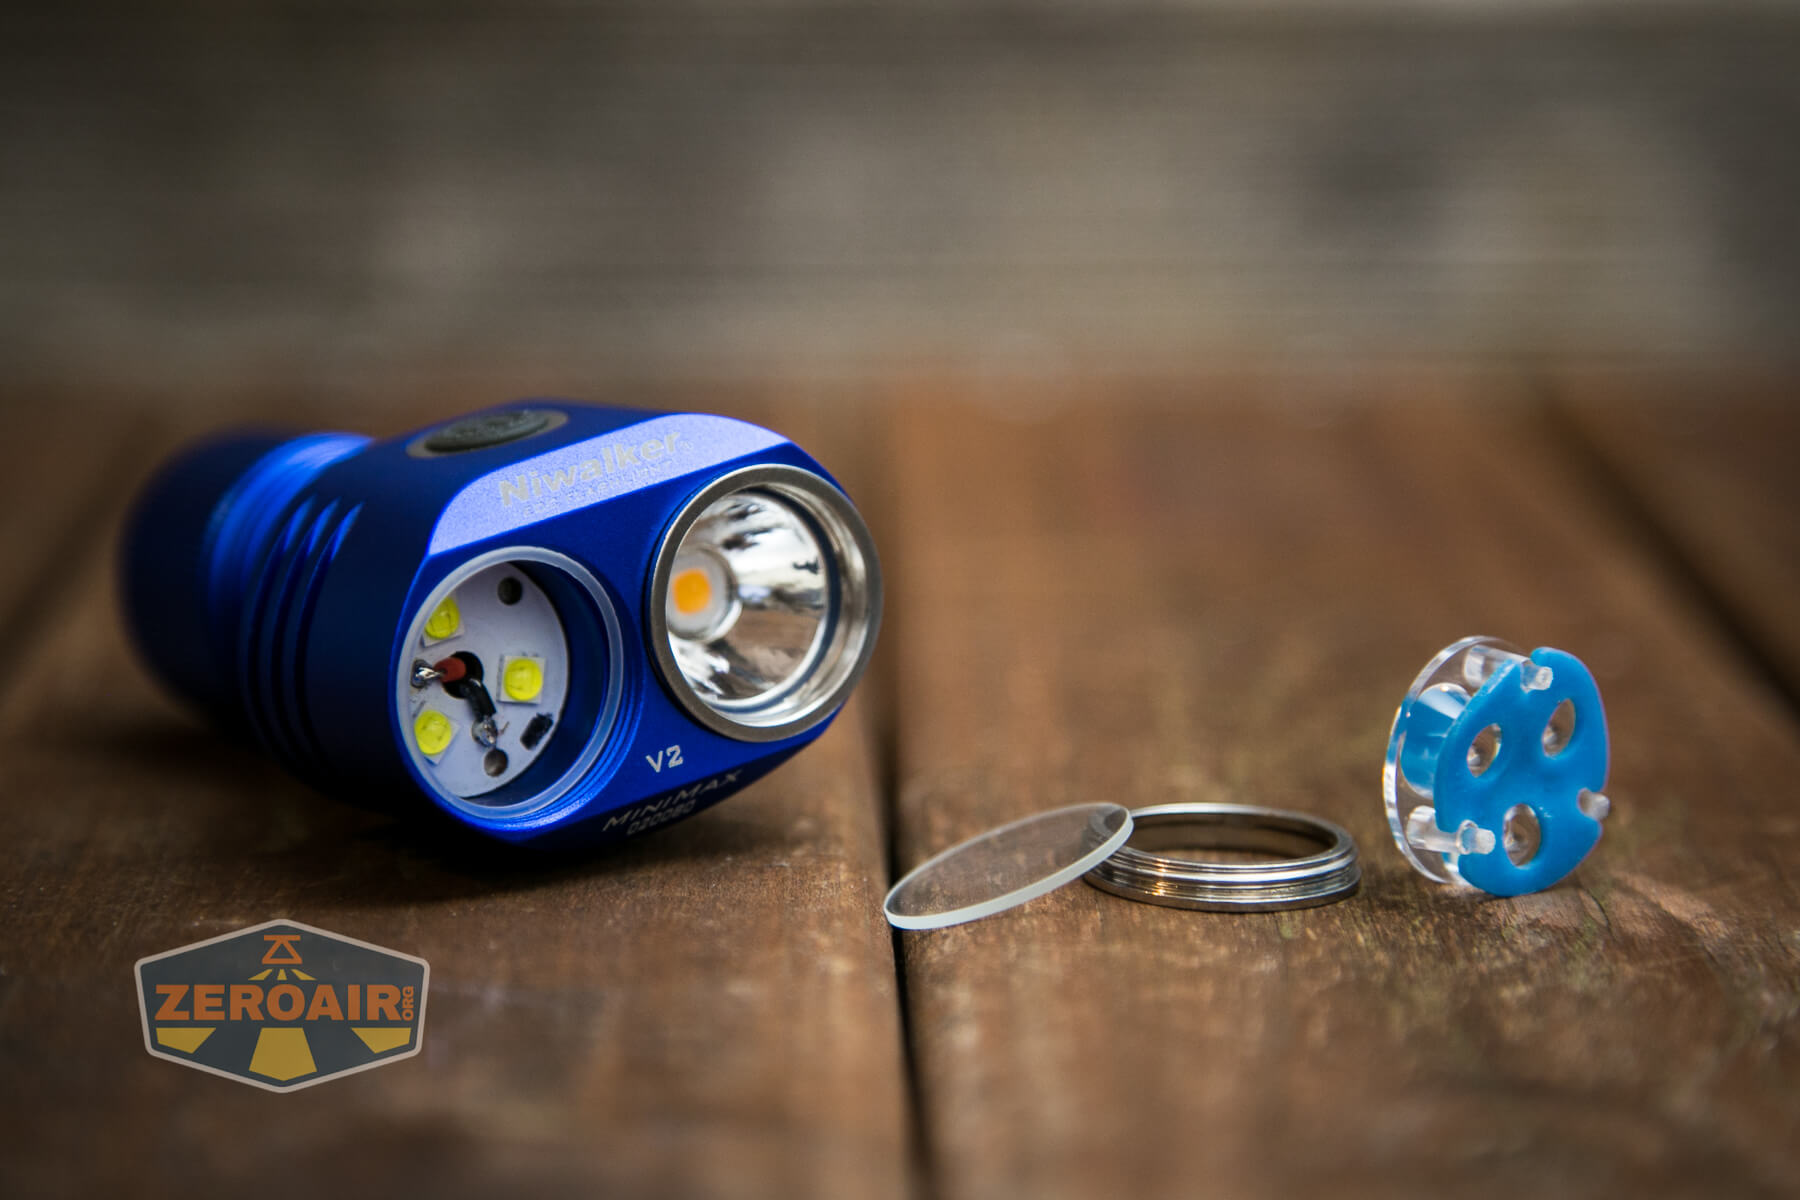
Build Quality and Disassembly
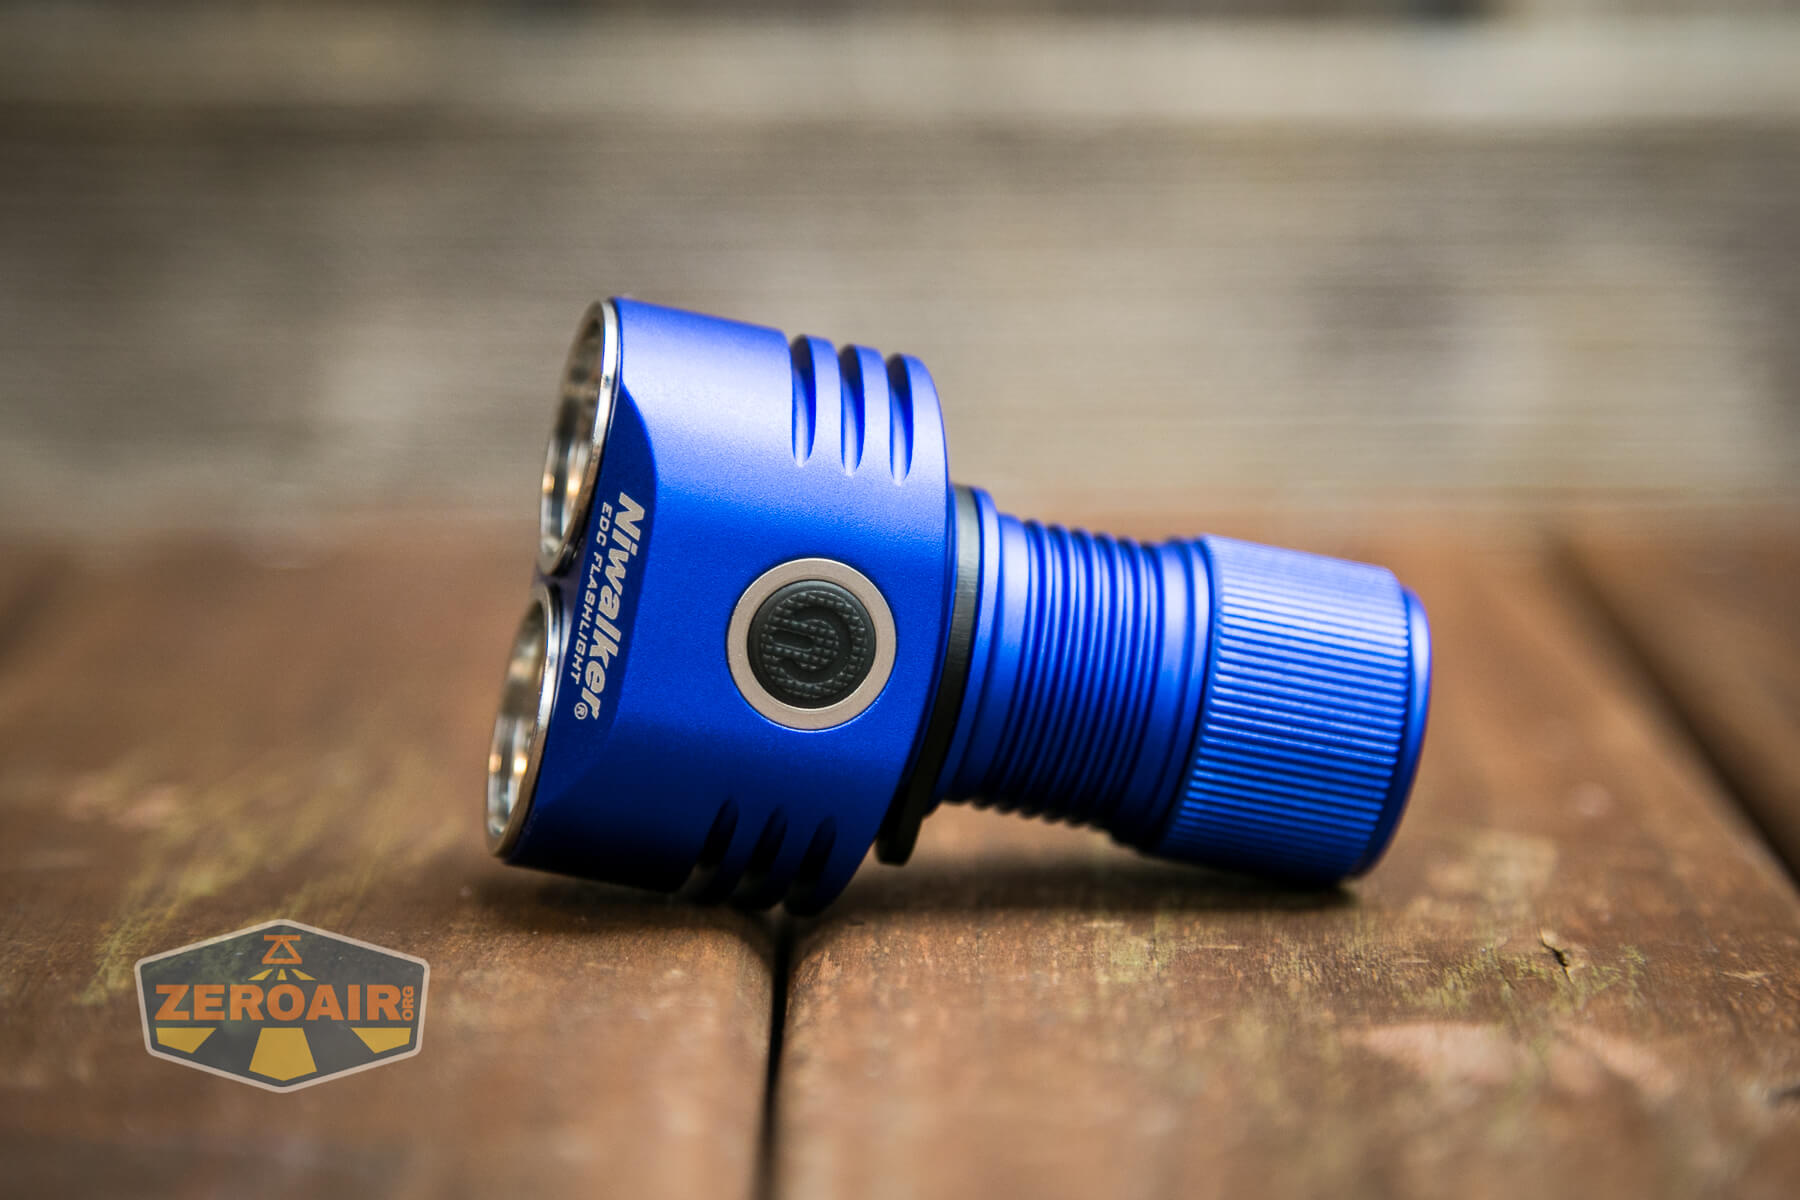
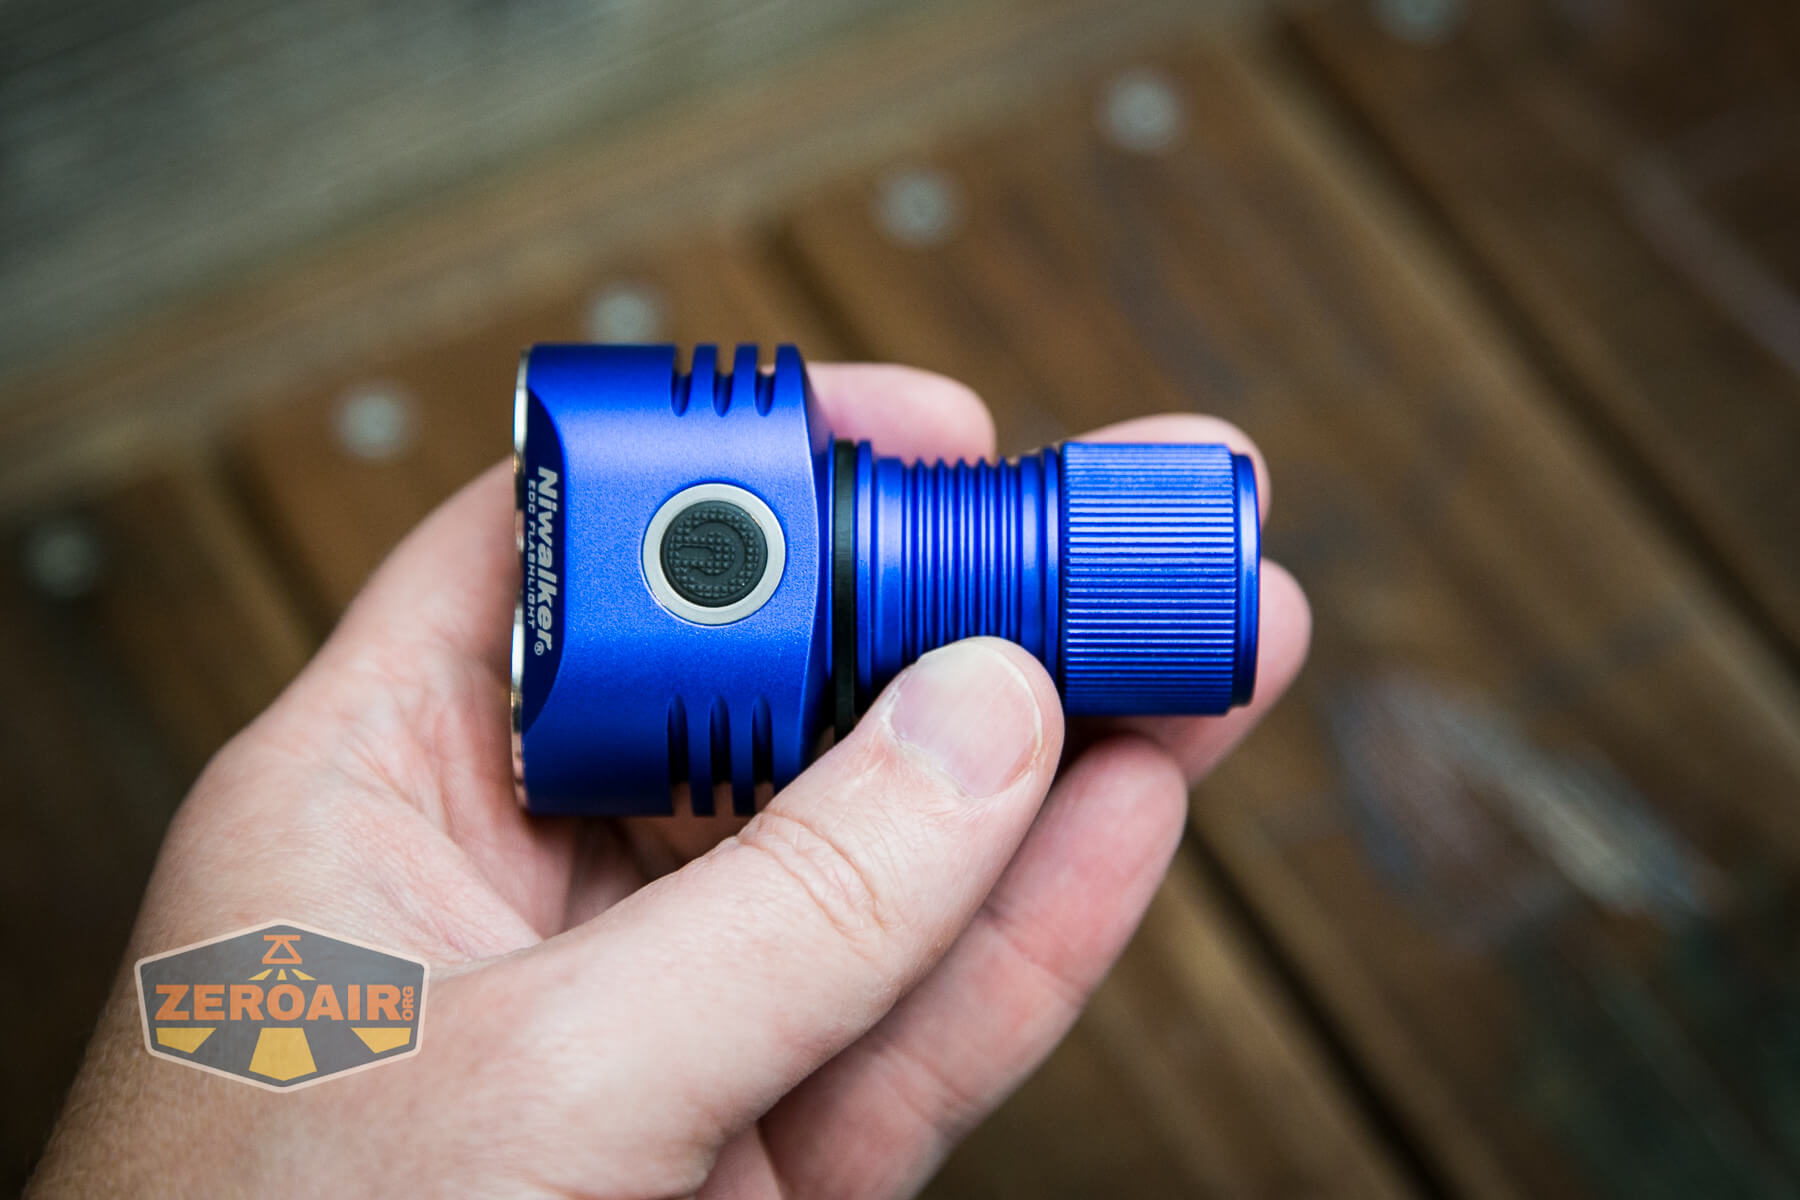
What wasn’t immediately evident to me from photos of the Niwalker ET Mini V2 flashlight was that the head actually has some thickness in the…. “between switch and charge cover” area. That’s really probably a good thing since that’s more thermal mass. It does mean that the head isn’t “flat” though.
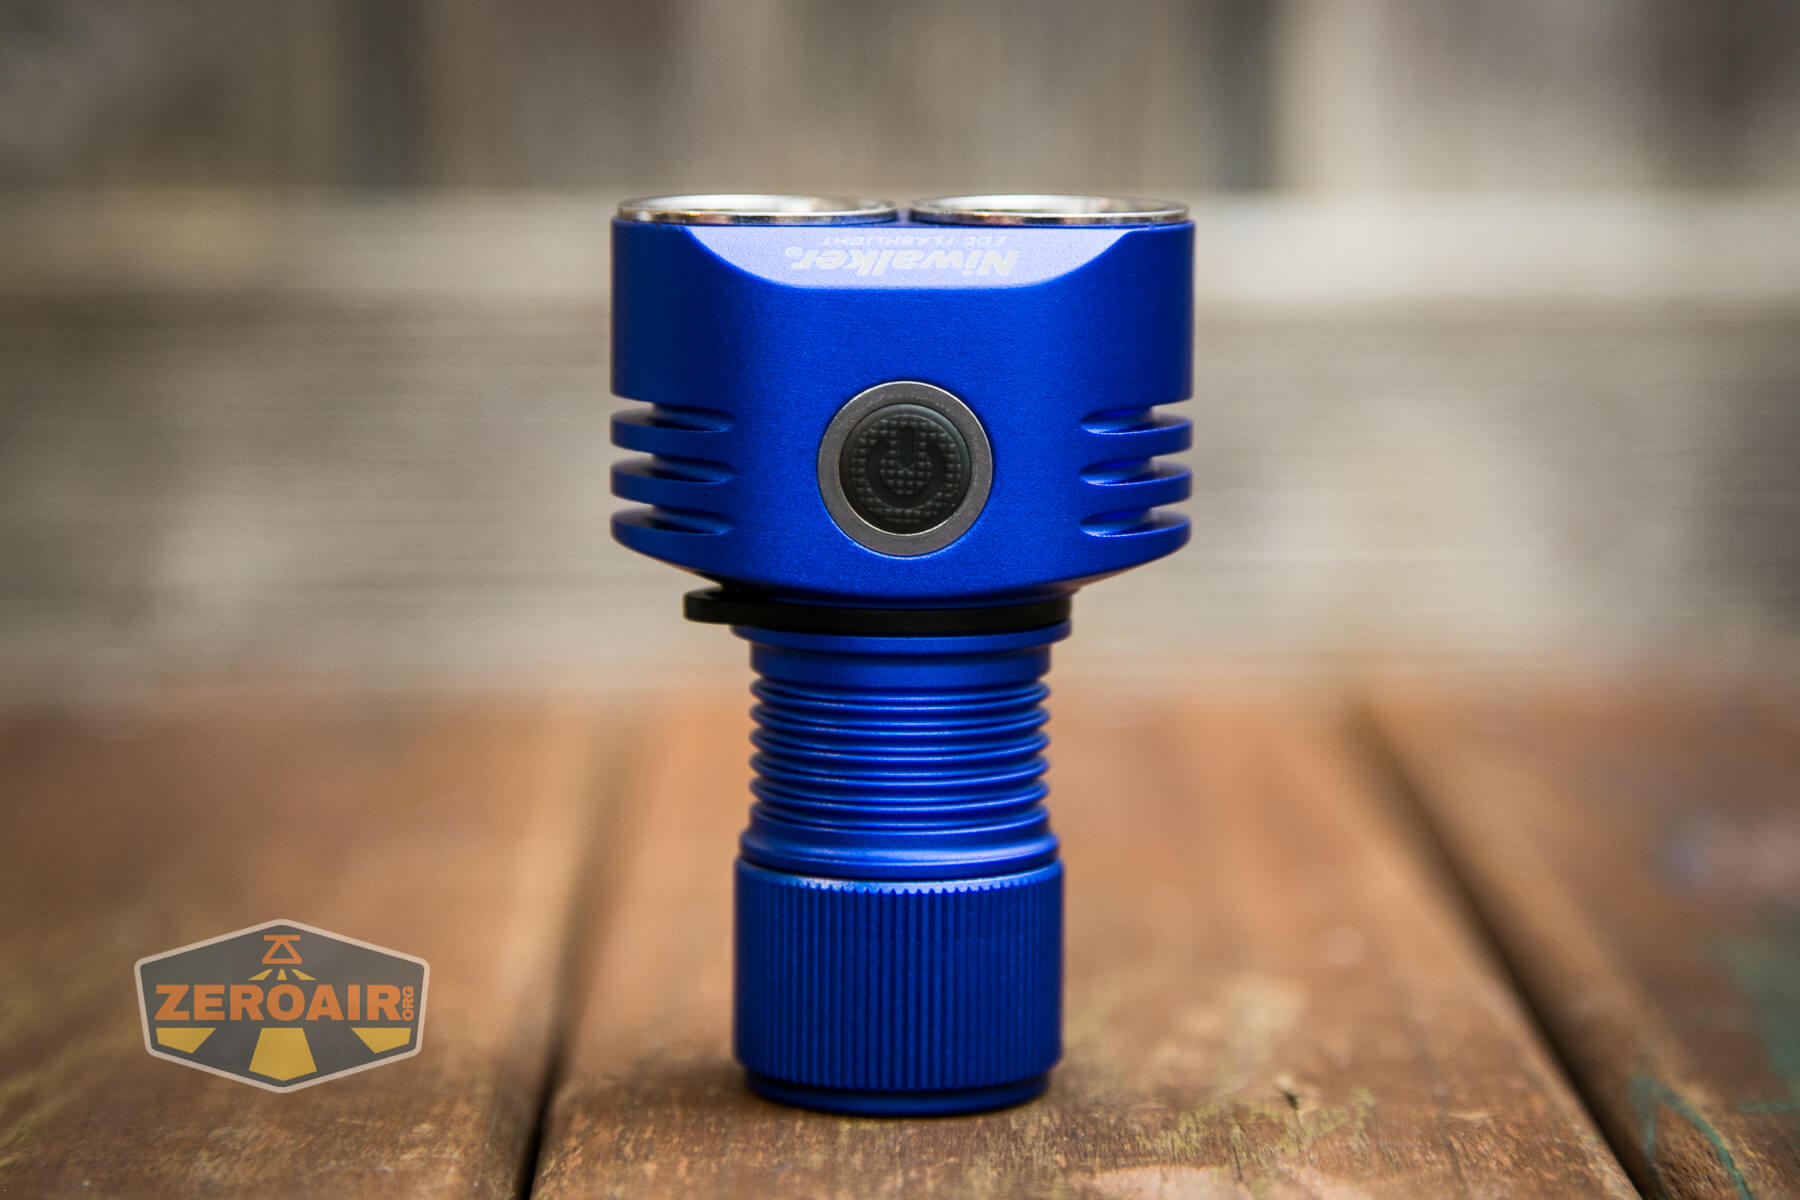
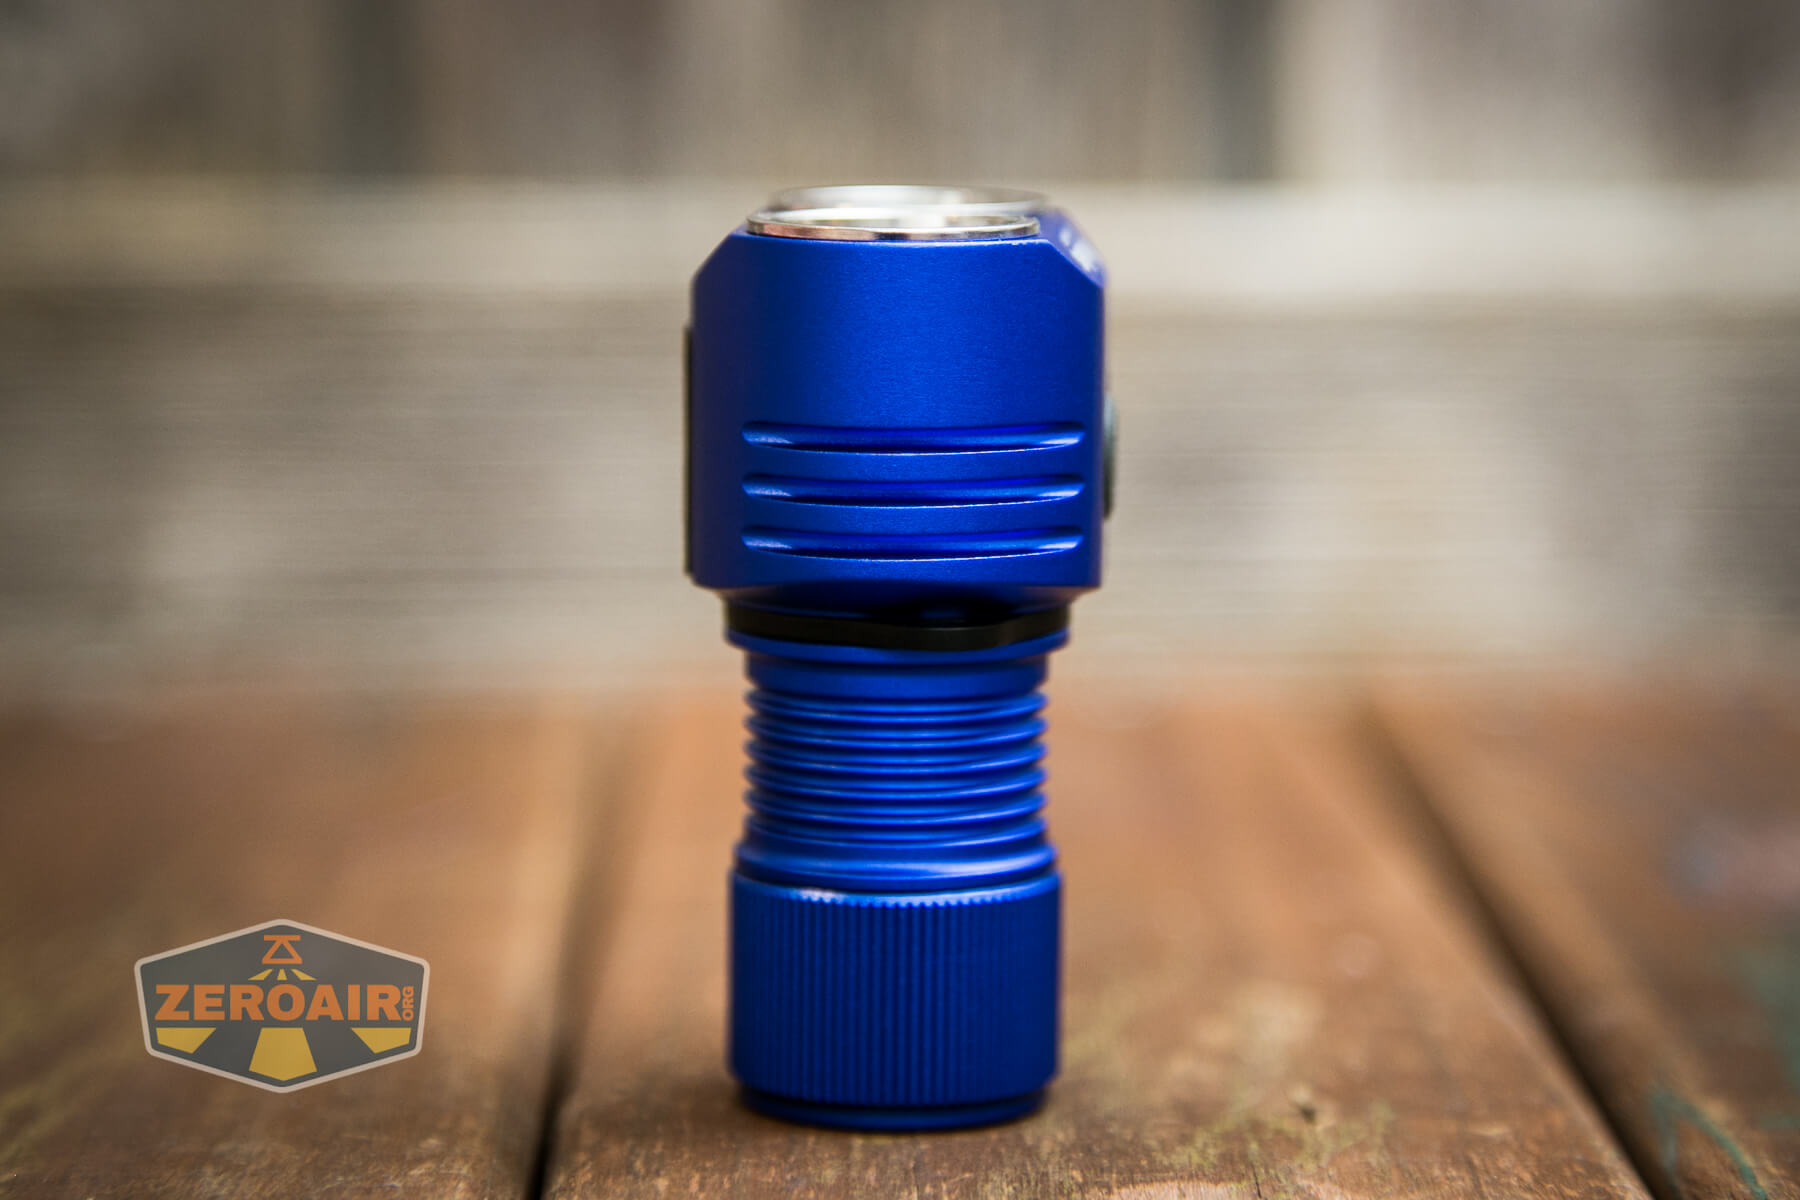
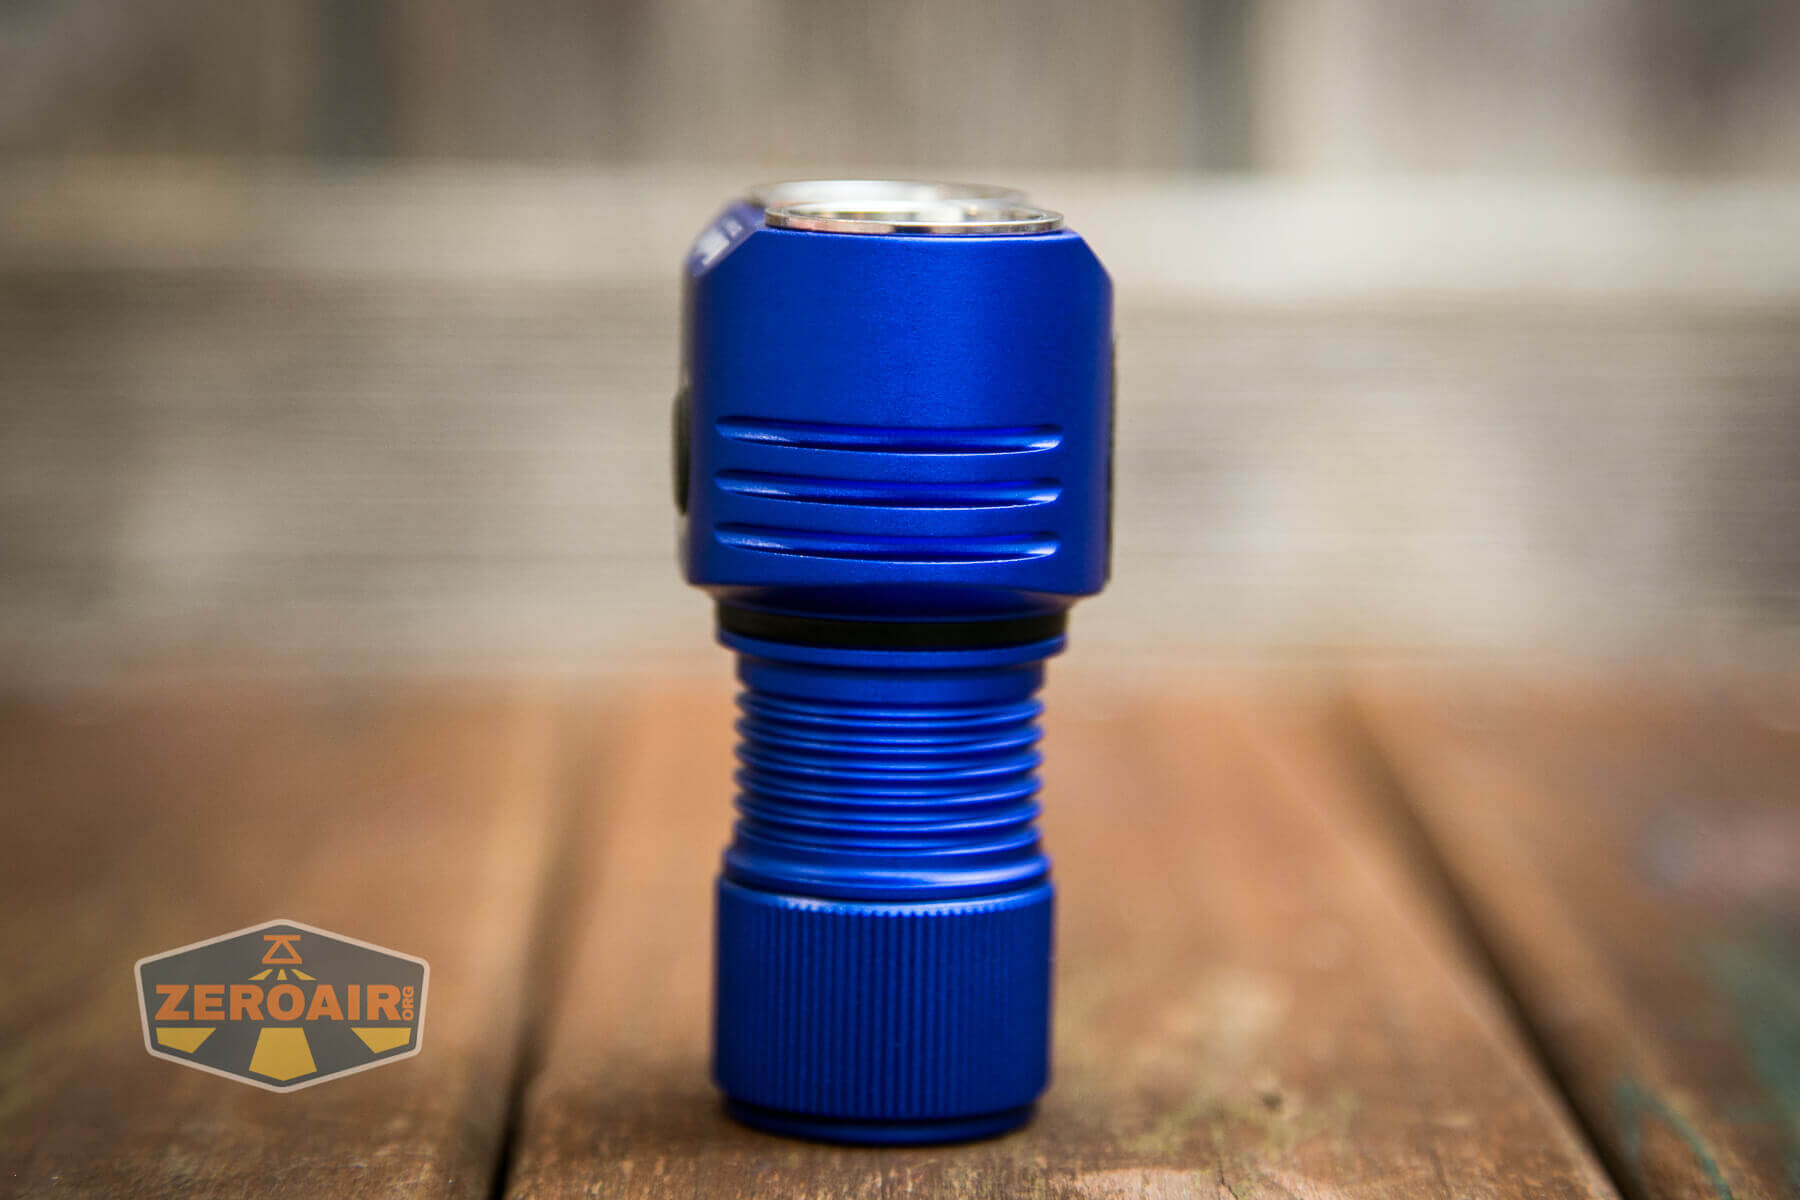
The build quality is great! Aside from the thickness in head mass, there are also cooling fins along the sides of the head.
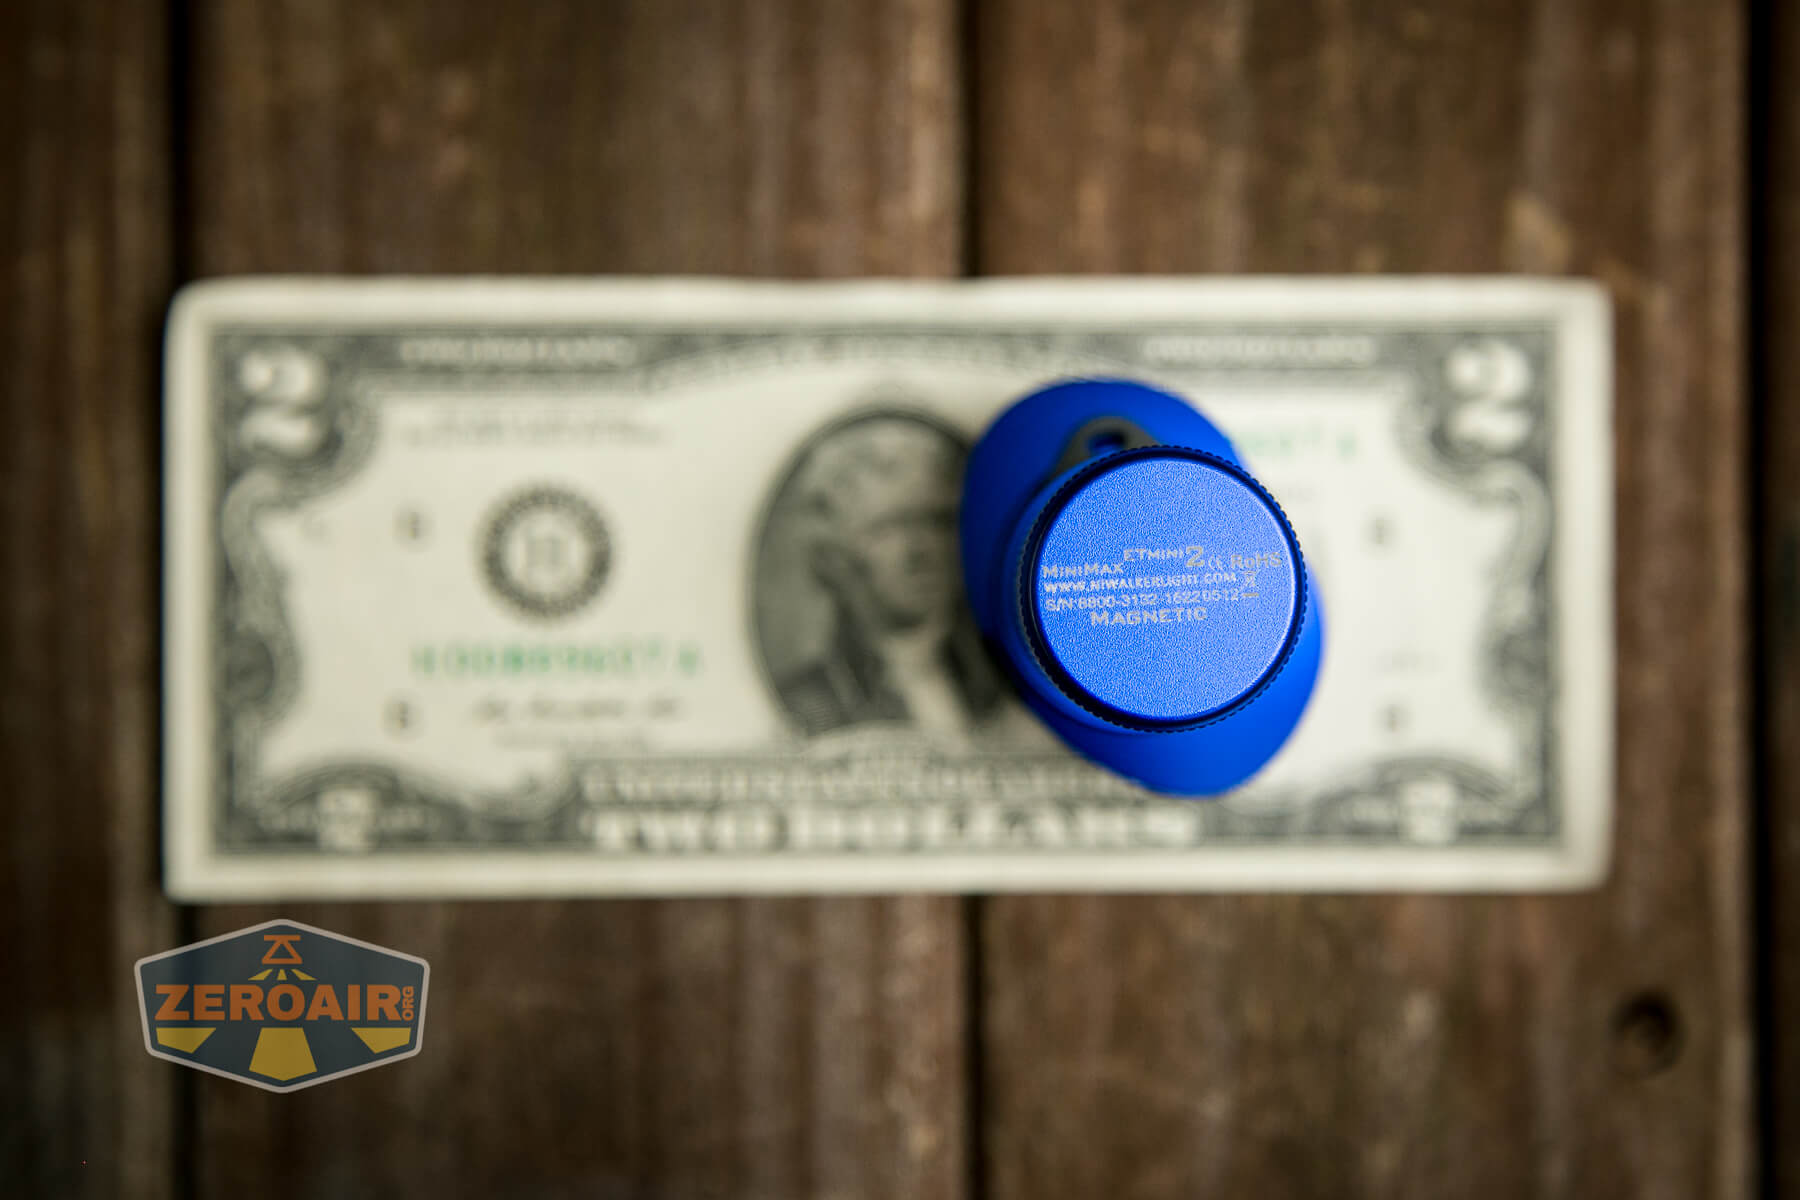
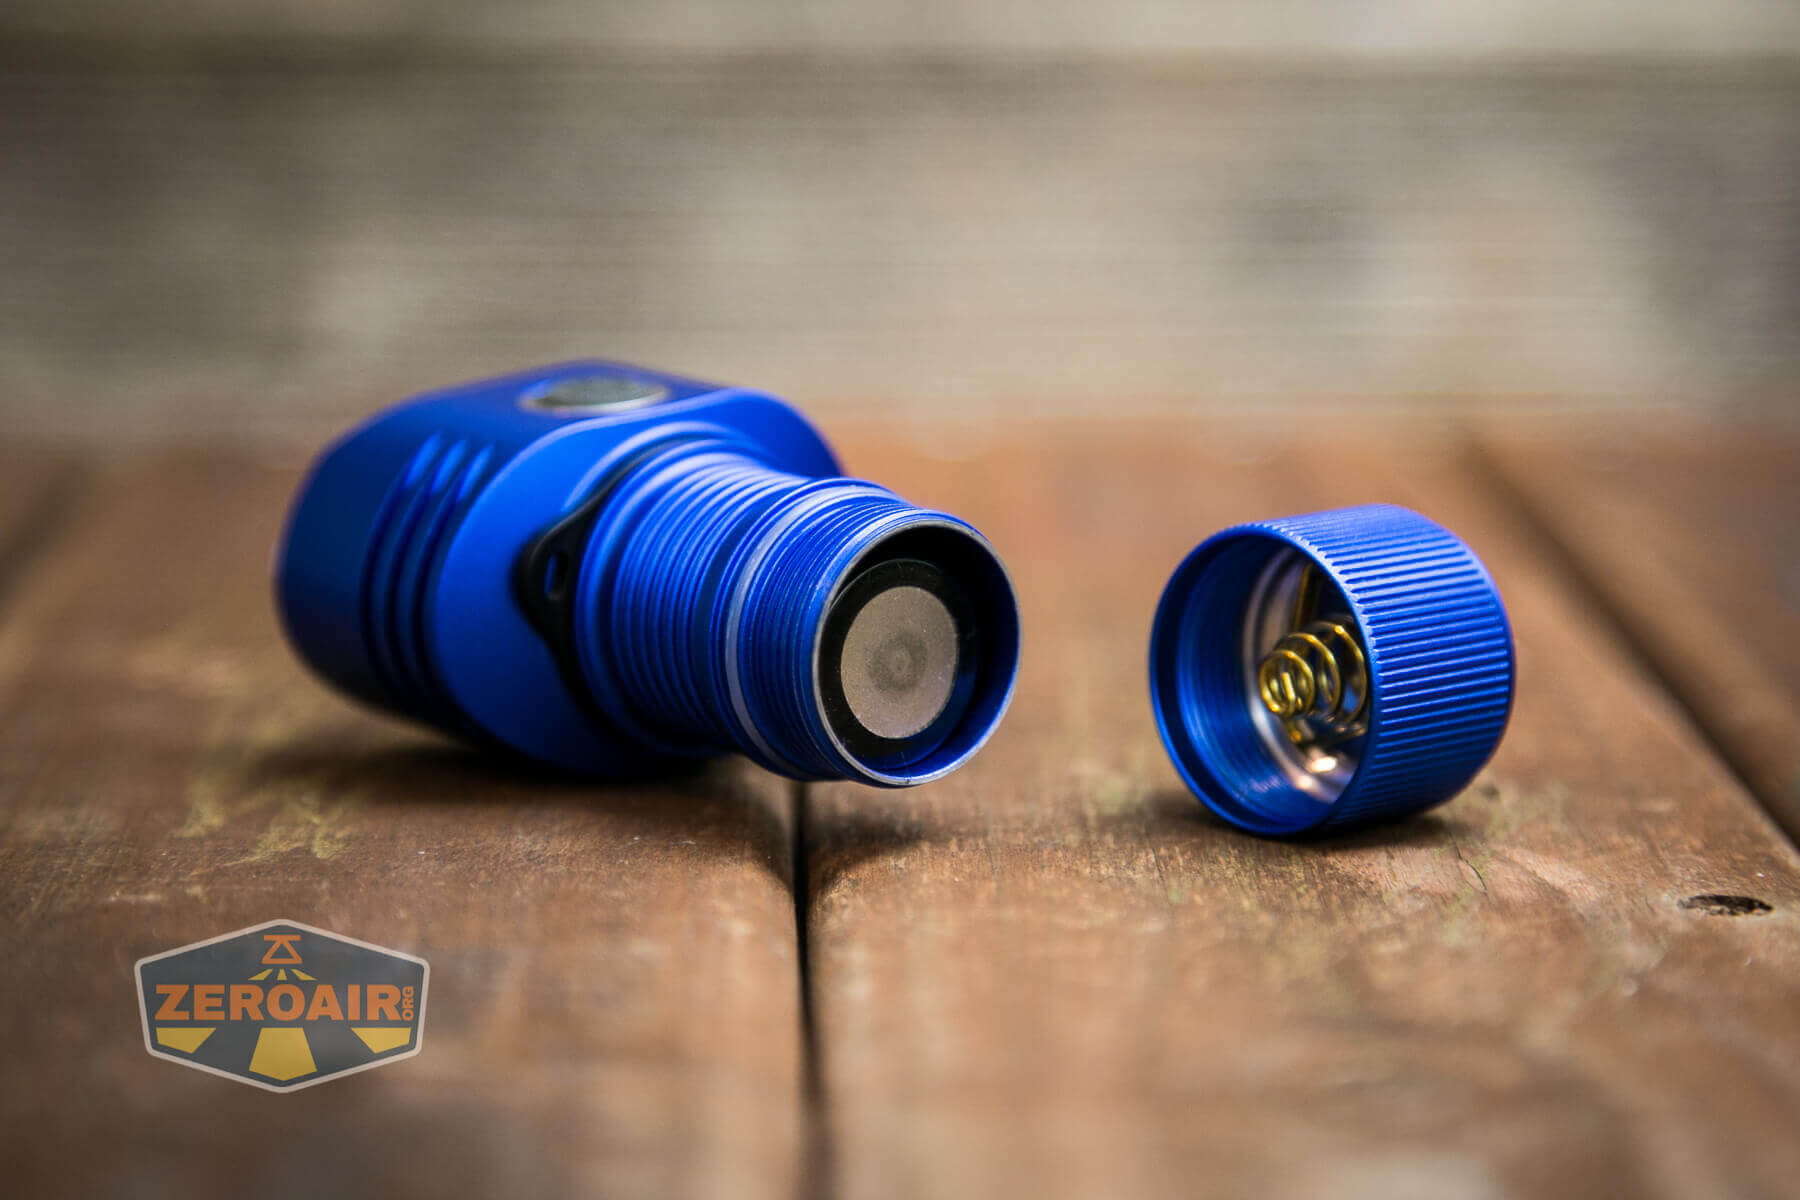
Only the tailcap was removable. You might wonder how this light (and other Niwalkers, for that matter) has longer-cell support? It’s with an extension tube, which screws into that gap seen below. It’s a clever solution, and one I beg for from other makers. Unfortunately, the Niwalker ET Mini V2 Flashlight does not ship with this extension.
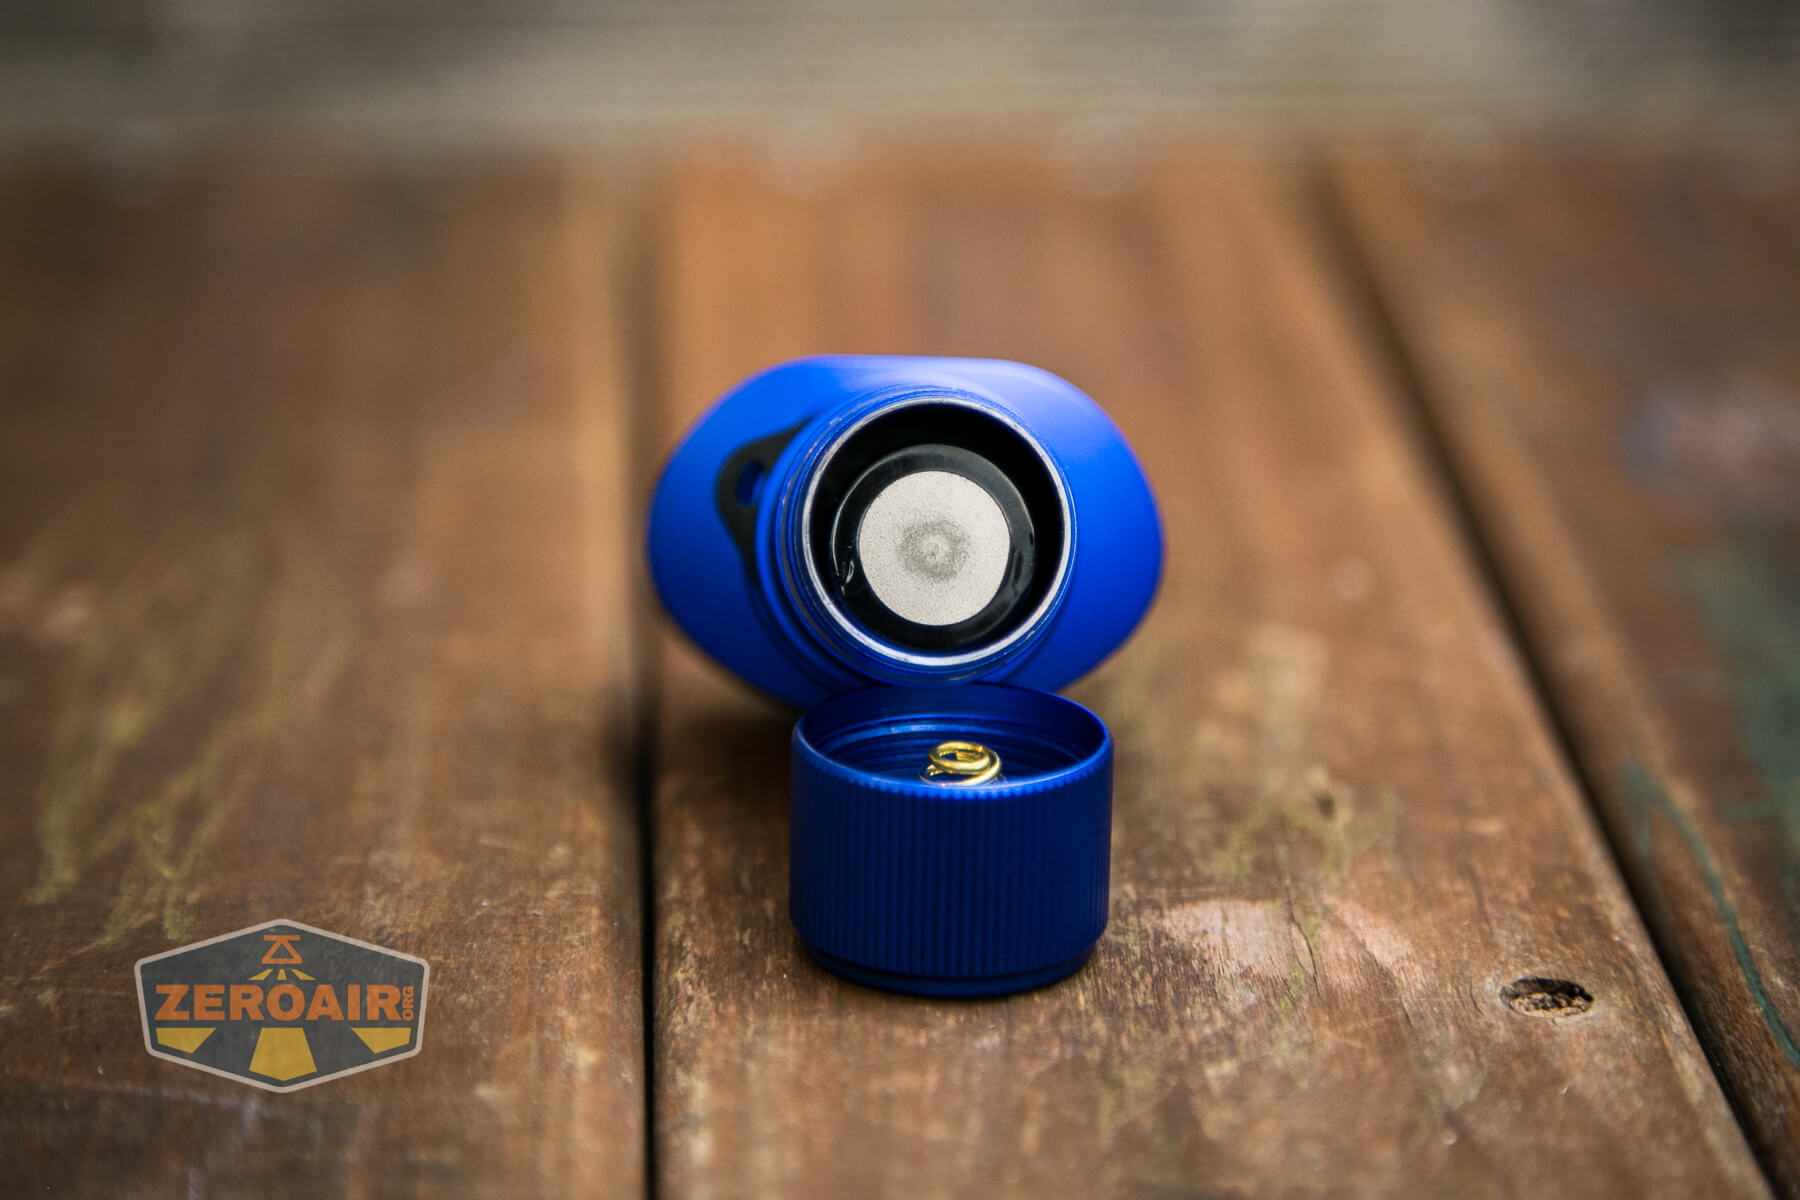
Inside the cell tube, you can see just a beefy brass button. The tailcap has a spring and magnet, too.
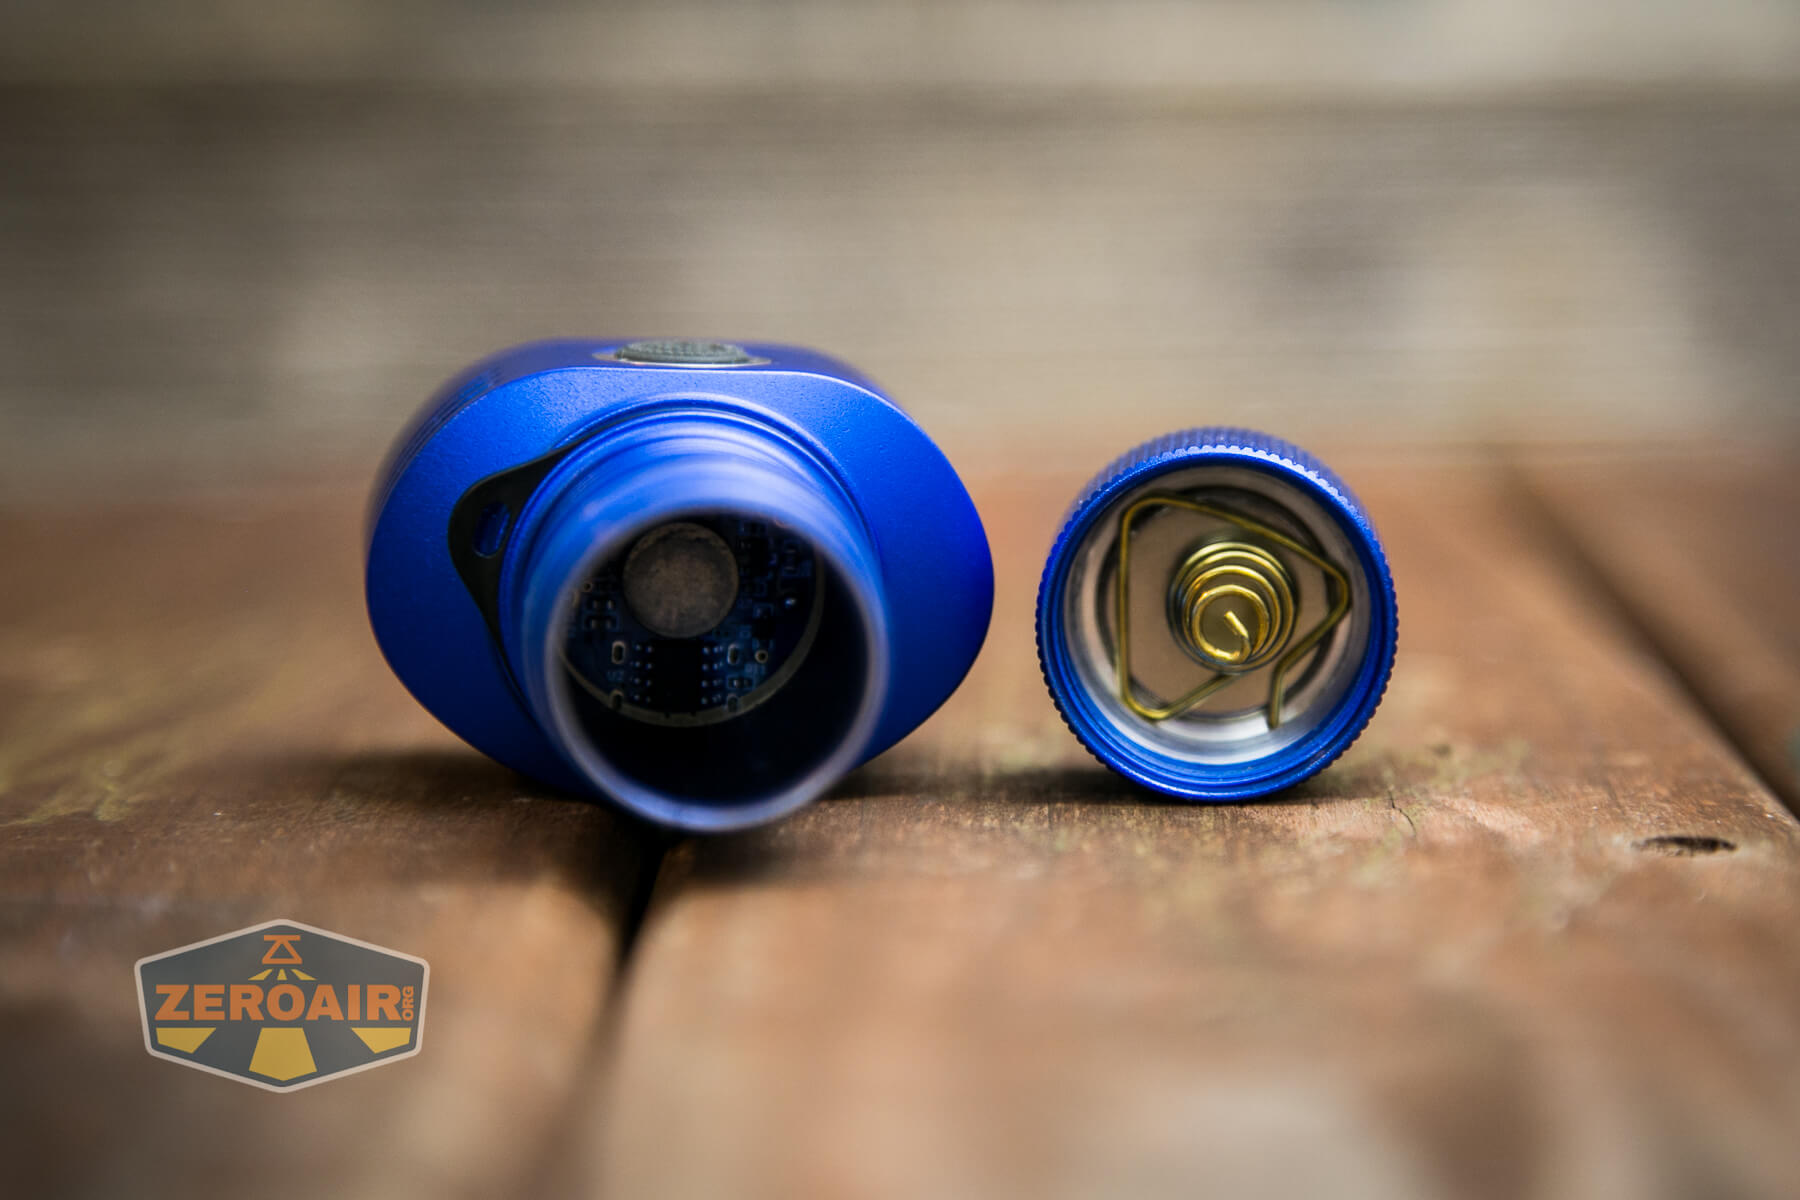
As I said above, only the tailcap is removable. This cap has ample grip, with ridges along the full length of the tailcap. (I approve.)
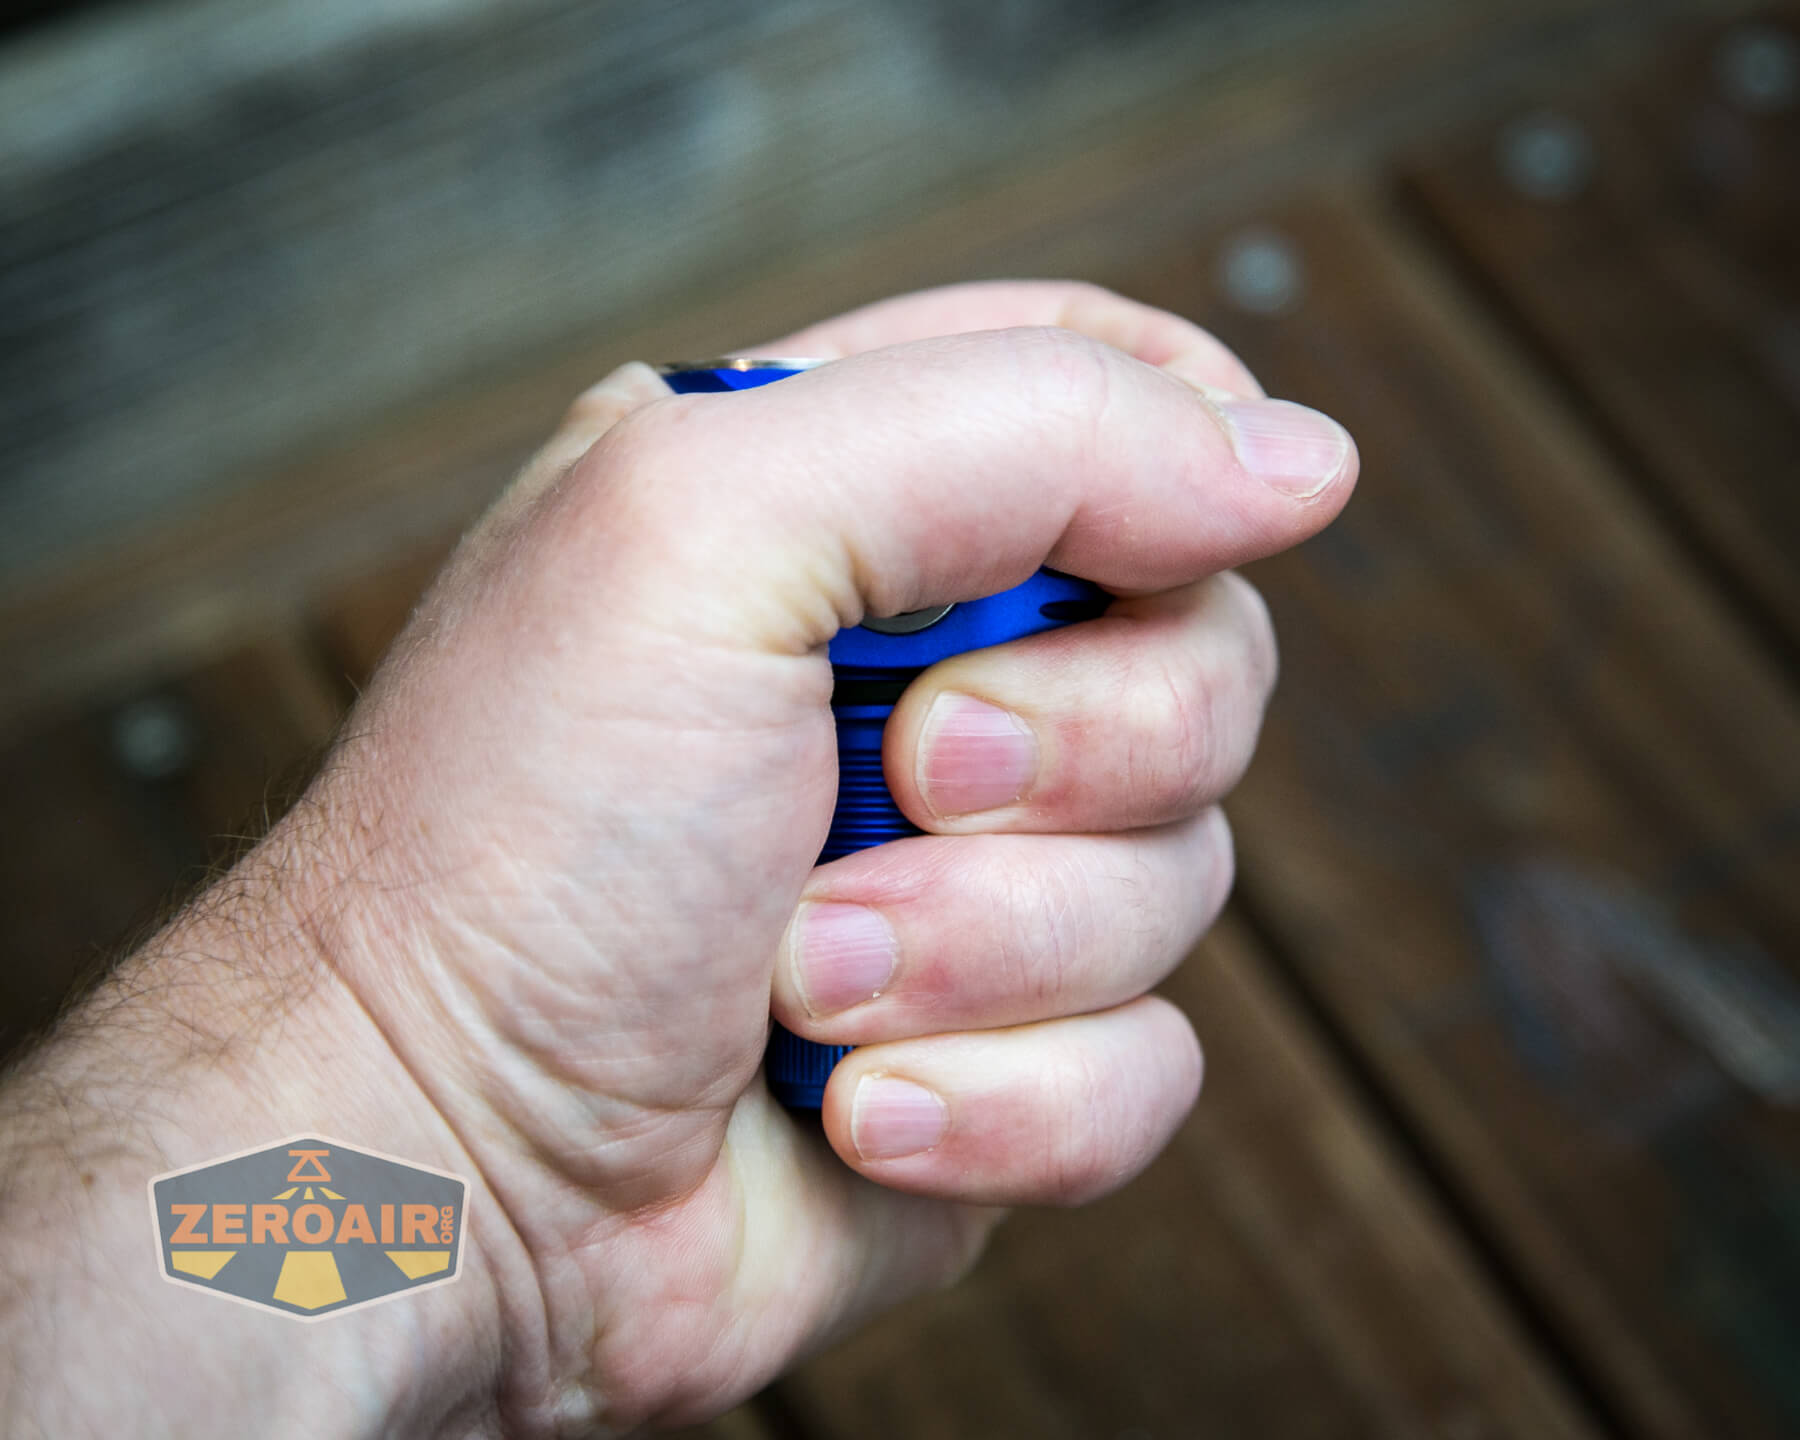
Size and Comps
Dimension: 462671mm/ 1.812.79 inches
Weight: Approximately 102g/3.5oz without battery
If the flashlight will headstand, I’ll try to show it here. If the flashlight will tailstand, I usually show that here, too.
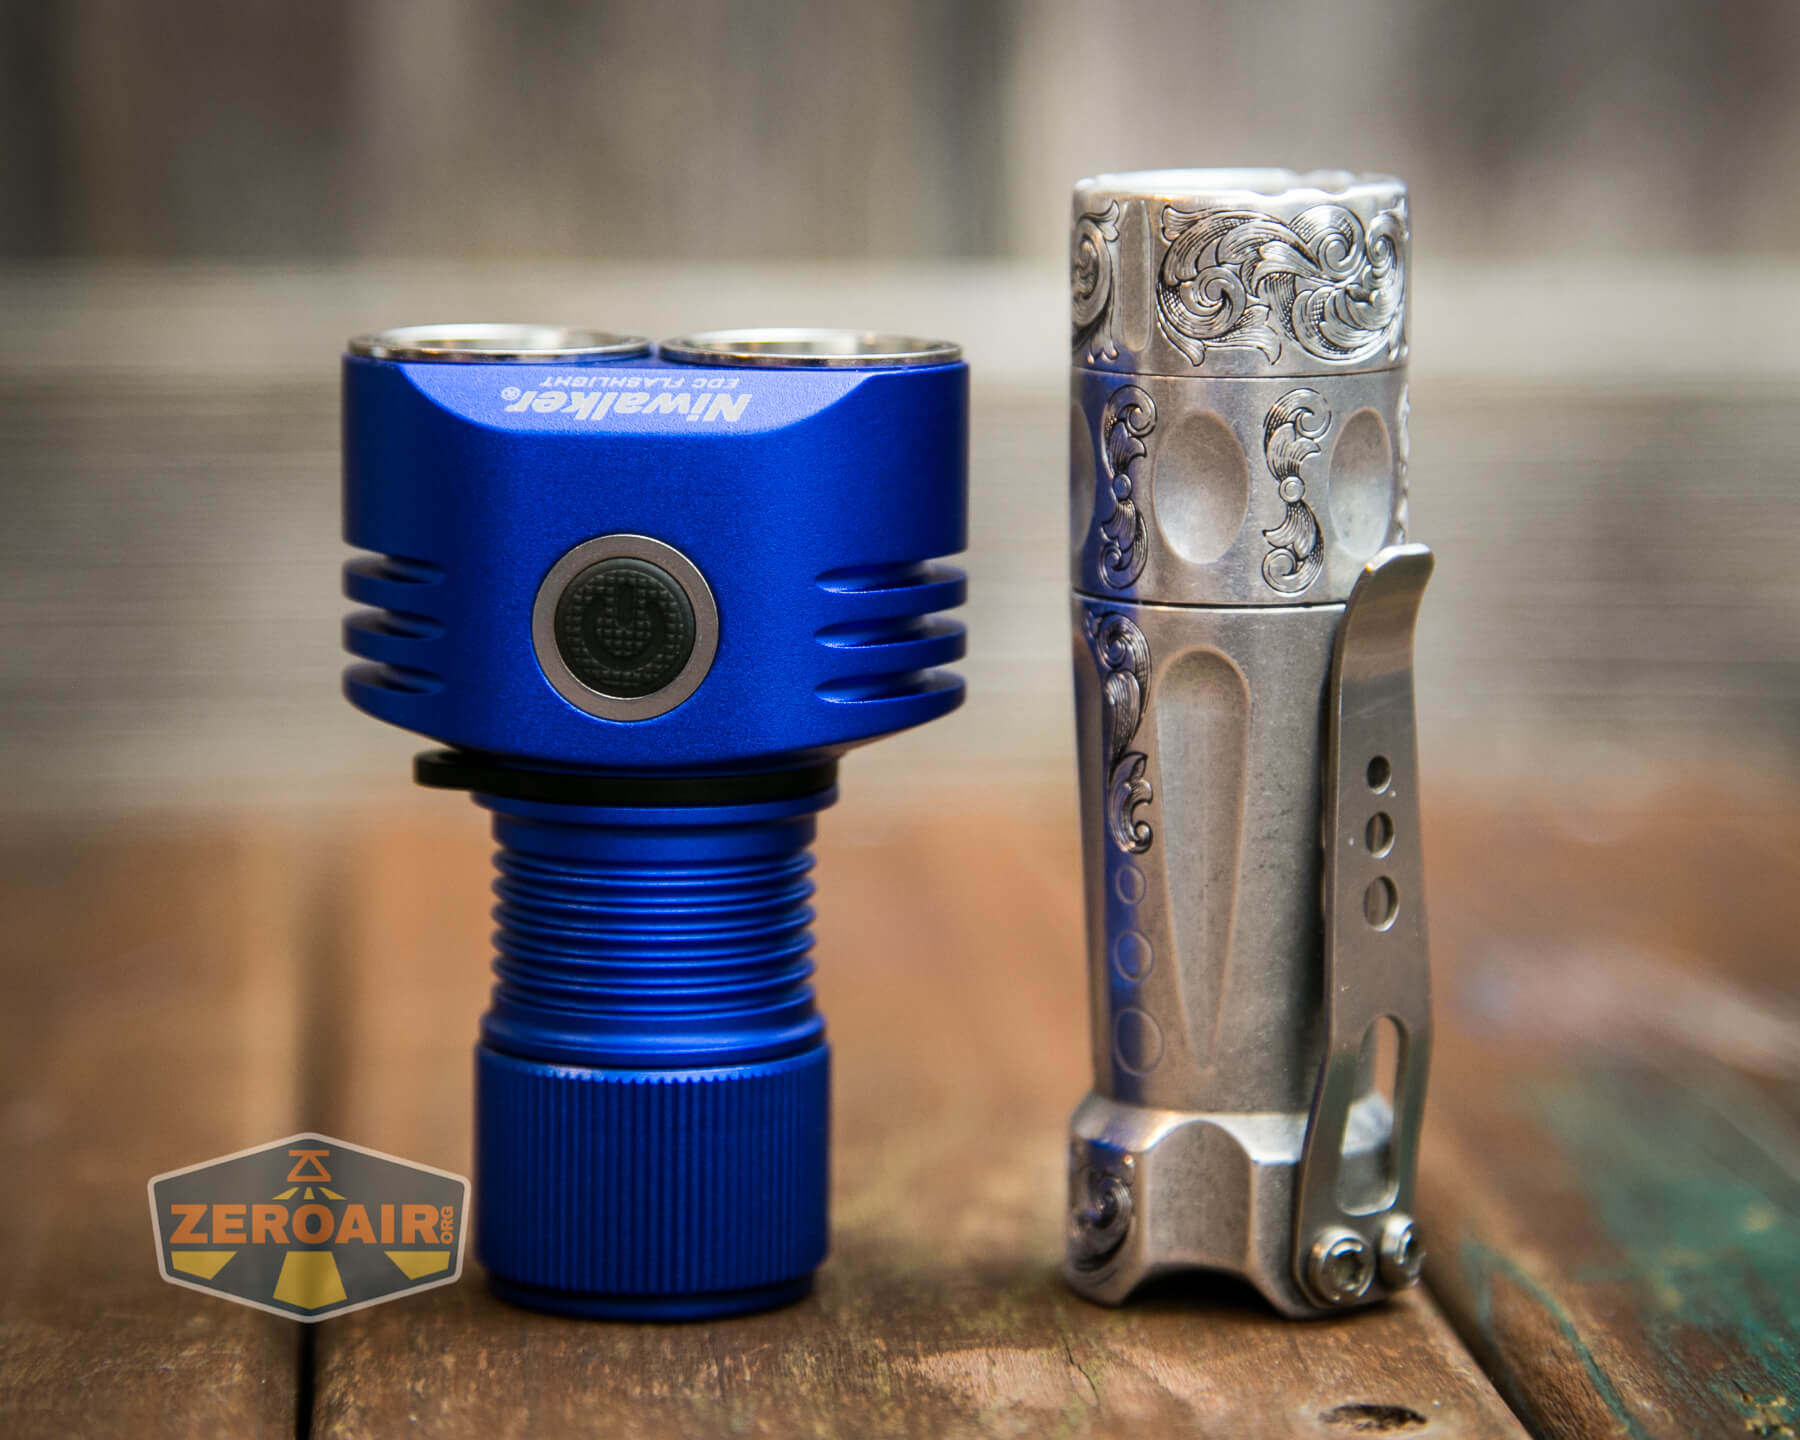
Here’s the test light with the venerable Convoy S2+. Mine is a custom “baked” edition Nichia 219b triple. A very nice 18650 light!
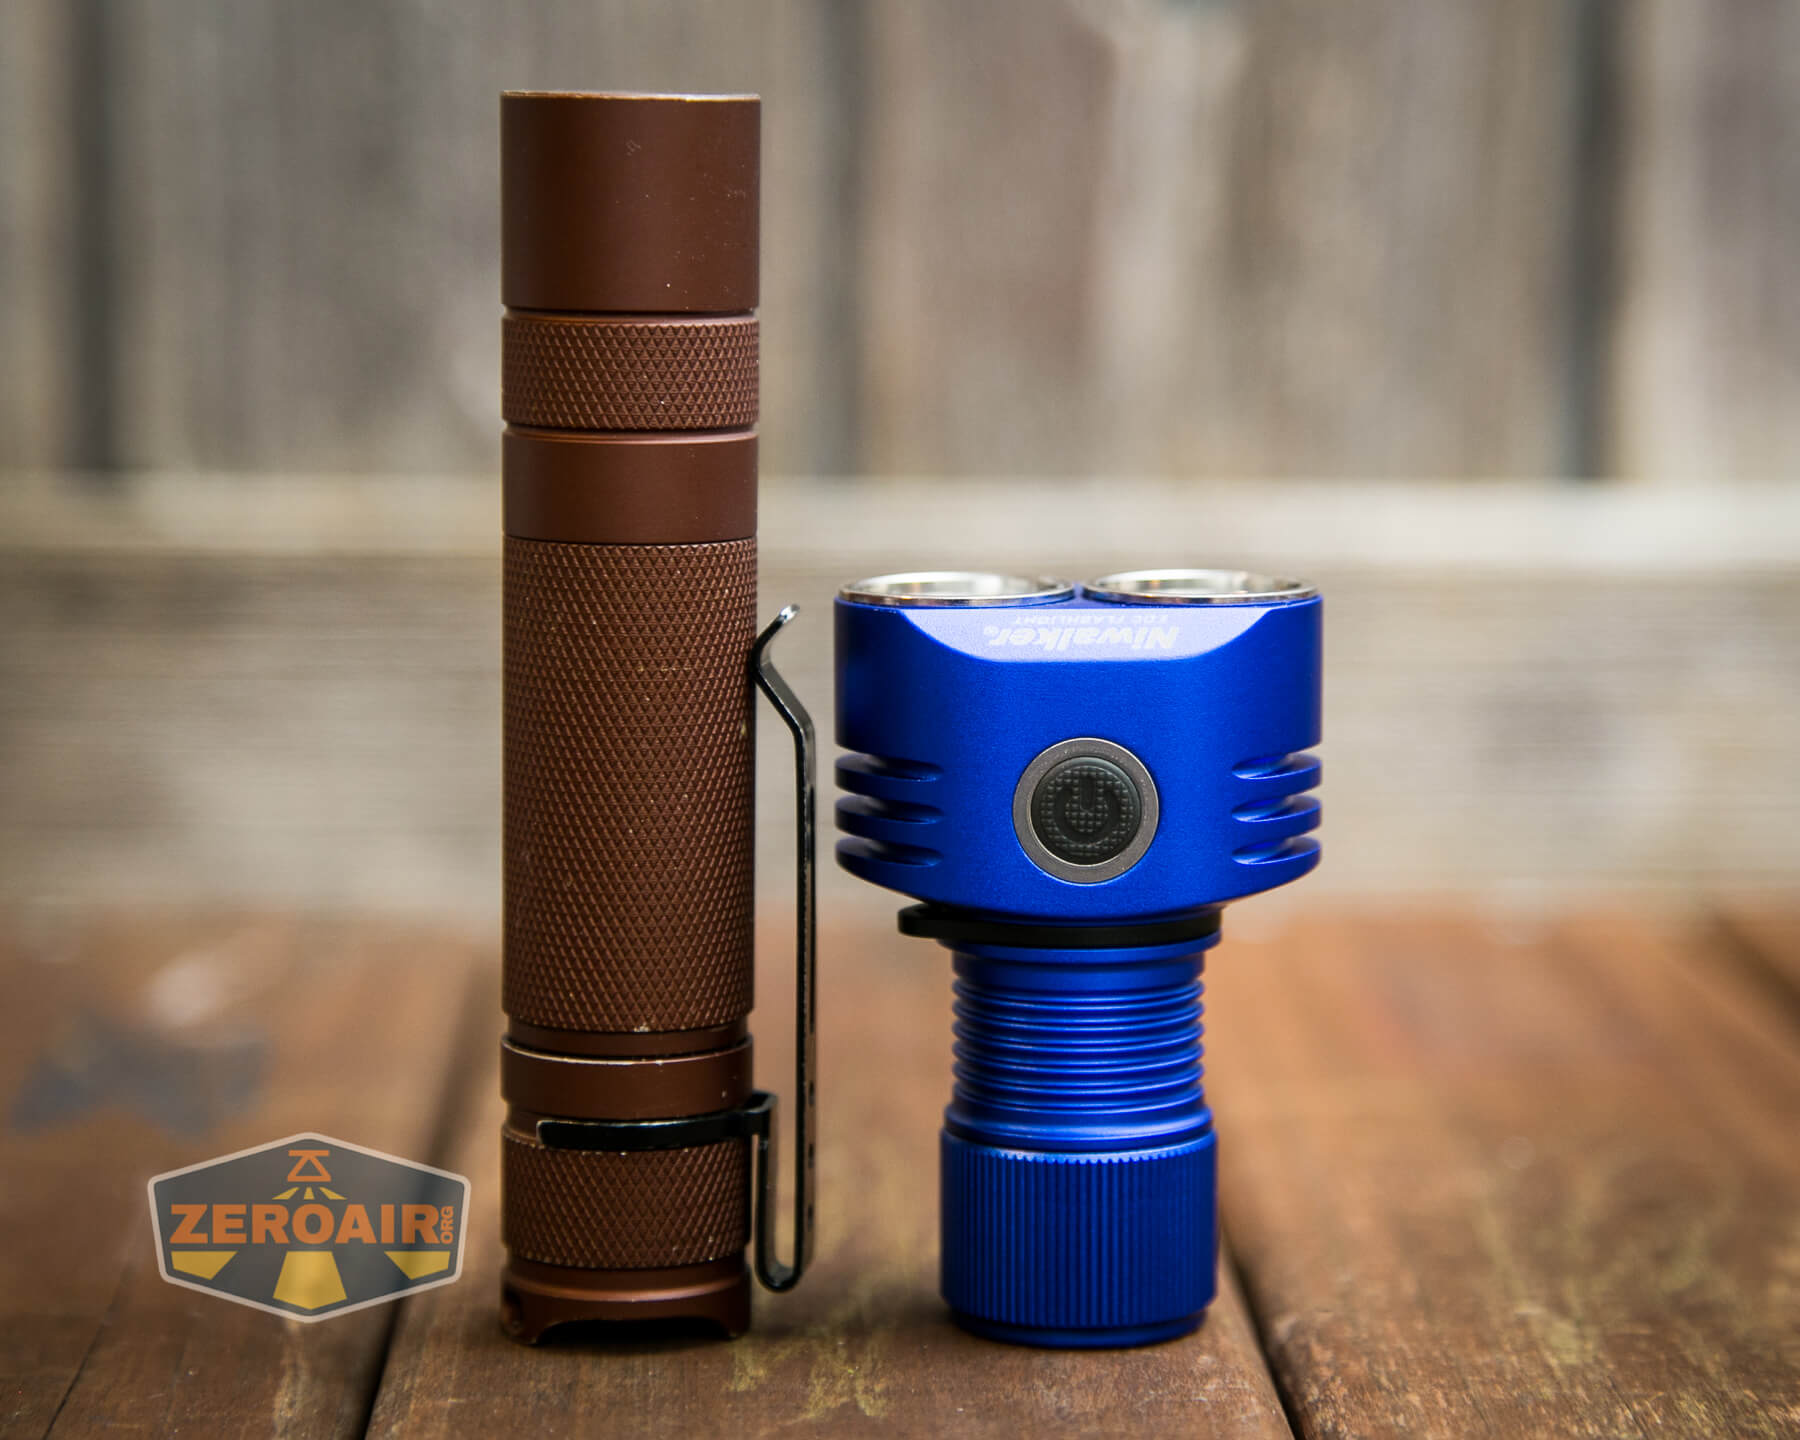
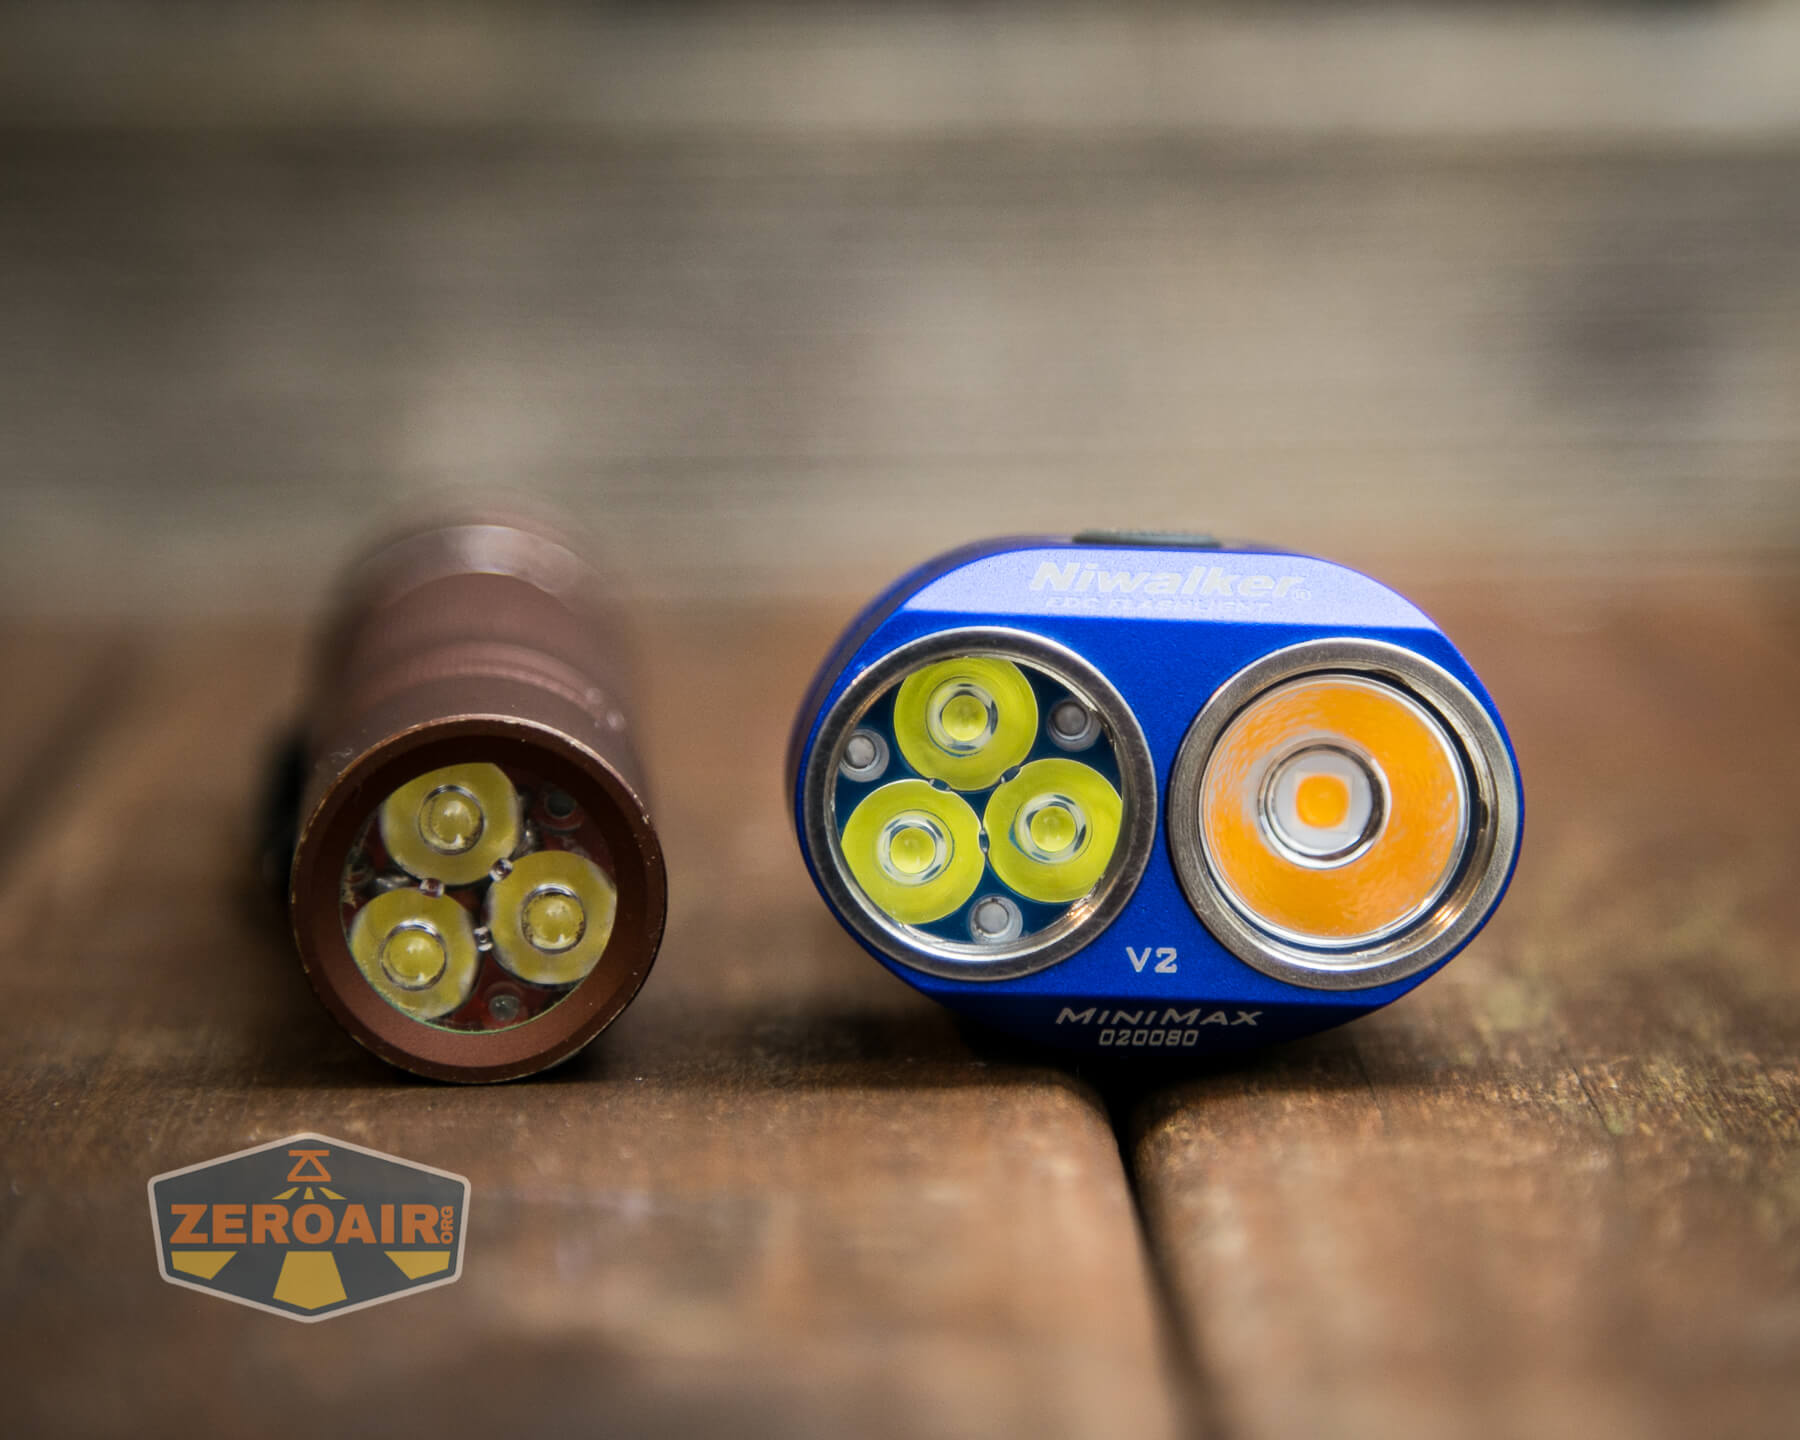
And here’s the light beside my custom-engraved TorchLAB BOSS 35, an 18350 light. I reviewed the aluminum version of that light in both 35 and 70 formats.
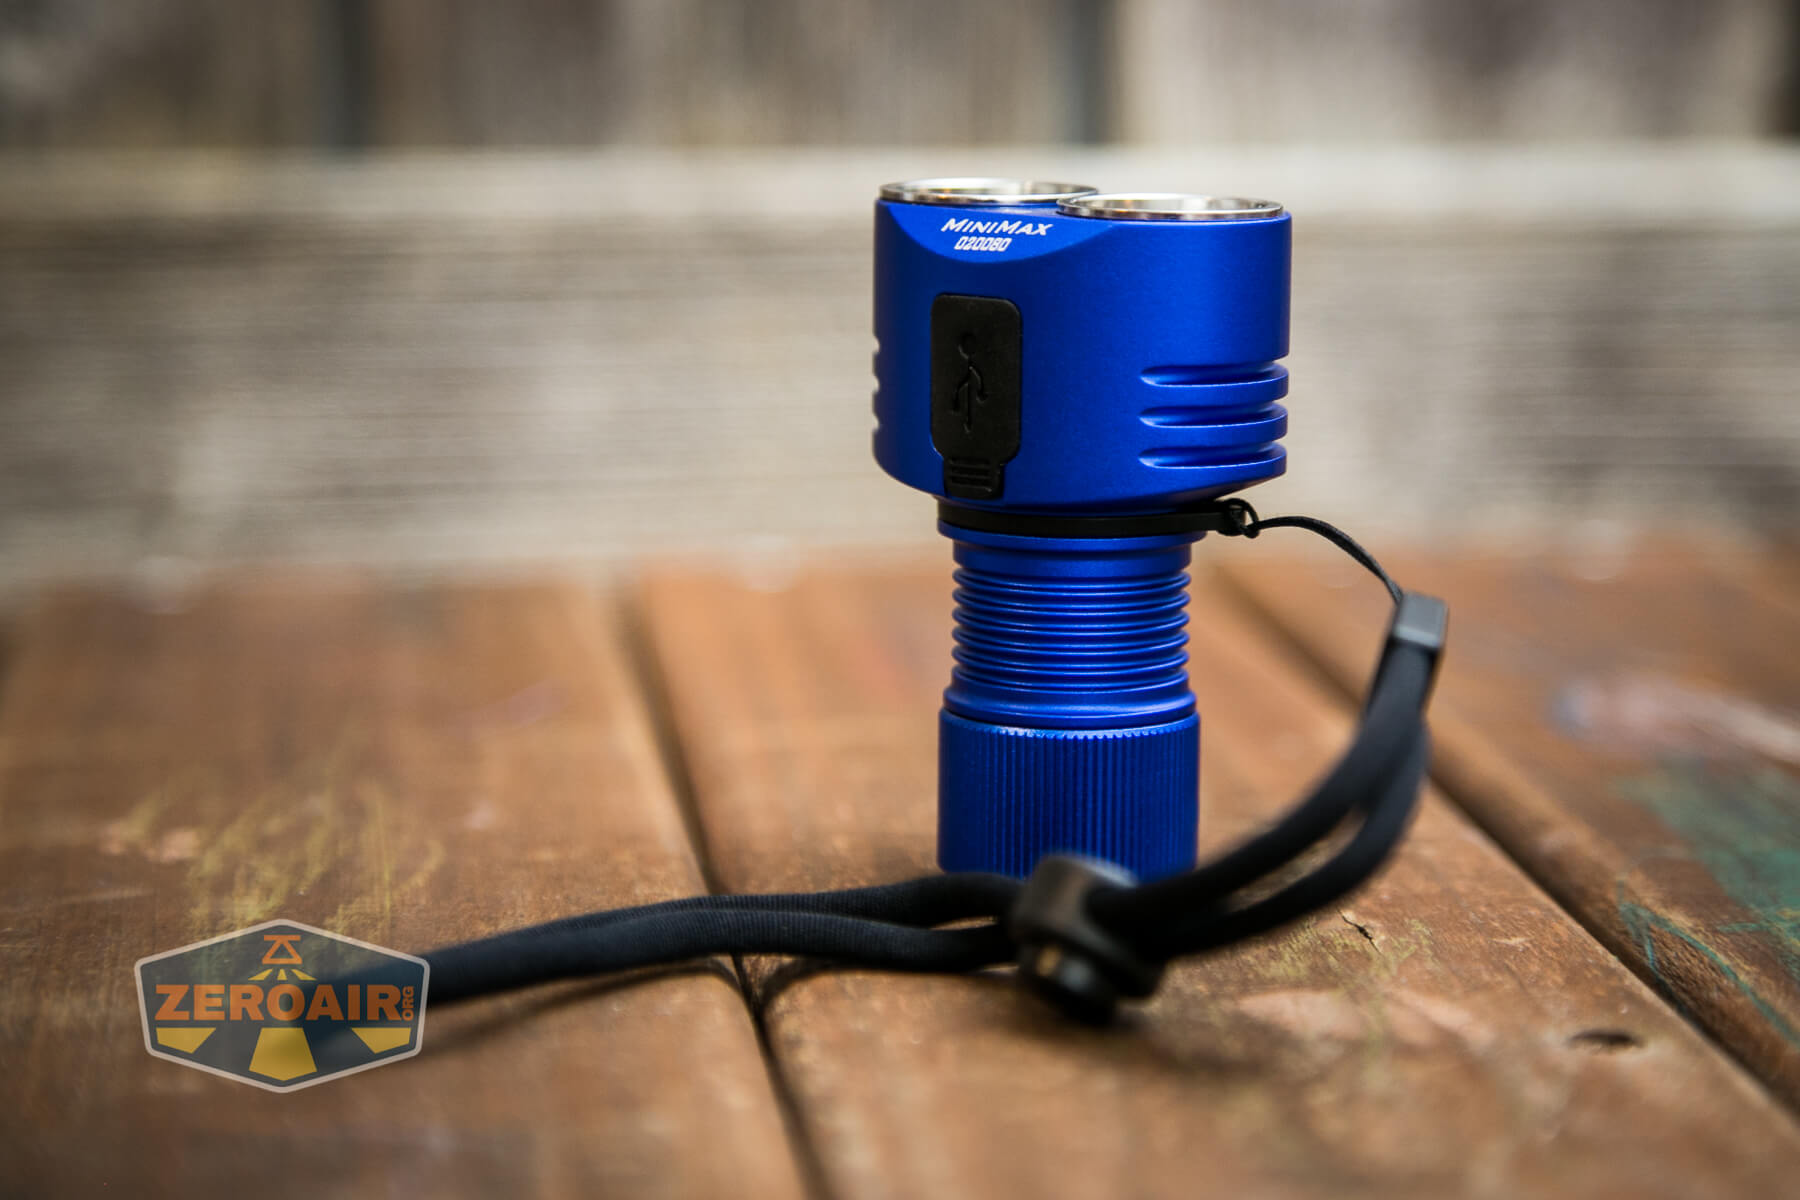
Retention and Carry
A lanyard is included for retaining the Niwalker ET Mini V2 Flashlight. This lanyard attaches to a collar ring around the midsection. Surprisingly, I didn’t find this ring to be willing to rotate very much (any), but I have a feeling you could convince it if you wish.
The only other option is the tailcap magnet. This magnet is plenty strong and can hold the light securely.
There is no pocket clip! You might think, well, duh, but I think this light is quite pocketable, actually. And possibly the longer body might have a clip – other lights in the ET series by Niwalker indicate a clip is possible for the longer bodies. But not for the shorty. And not included.
Power and Runtime
The shorty tube that’s included houses a single lithium-ion cell. Included with the purchase is a 900mAh 18350 cell.
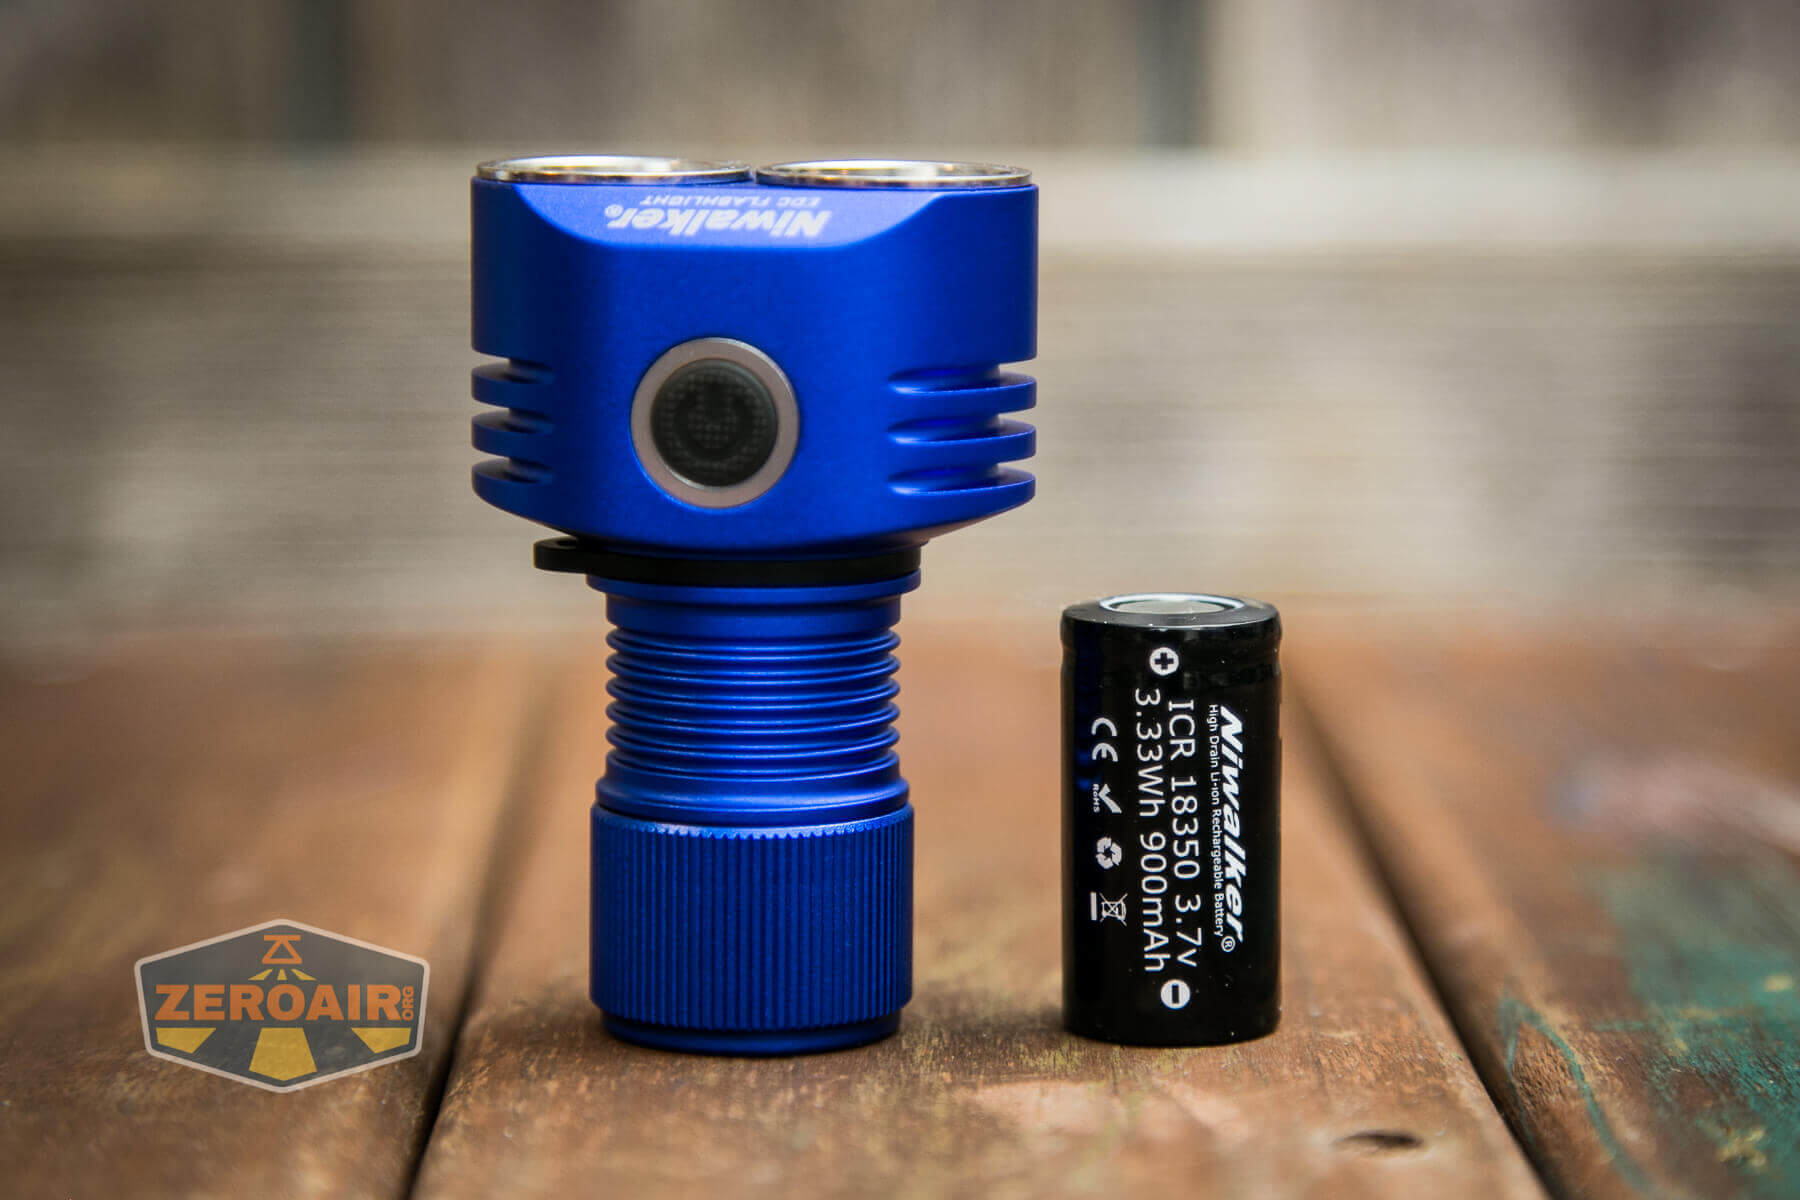
You might note that this light is described in some literature as an 18350/20350 light. That seems very accurate… this included 18350, practically swims in the cell tube. So ideally, the light would ship with a 20350 and the extension tube for running a 20700 cell, too. That would be fantastic!
The cell fits into the light in the usual way: positive terminal toward the head.
I tested a 21700 for fit, and it would not. But a 20700 cell does in fact fit. So a 20350 cell would likely be a perfectly snug fit here, while the 18350 swims a bit.
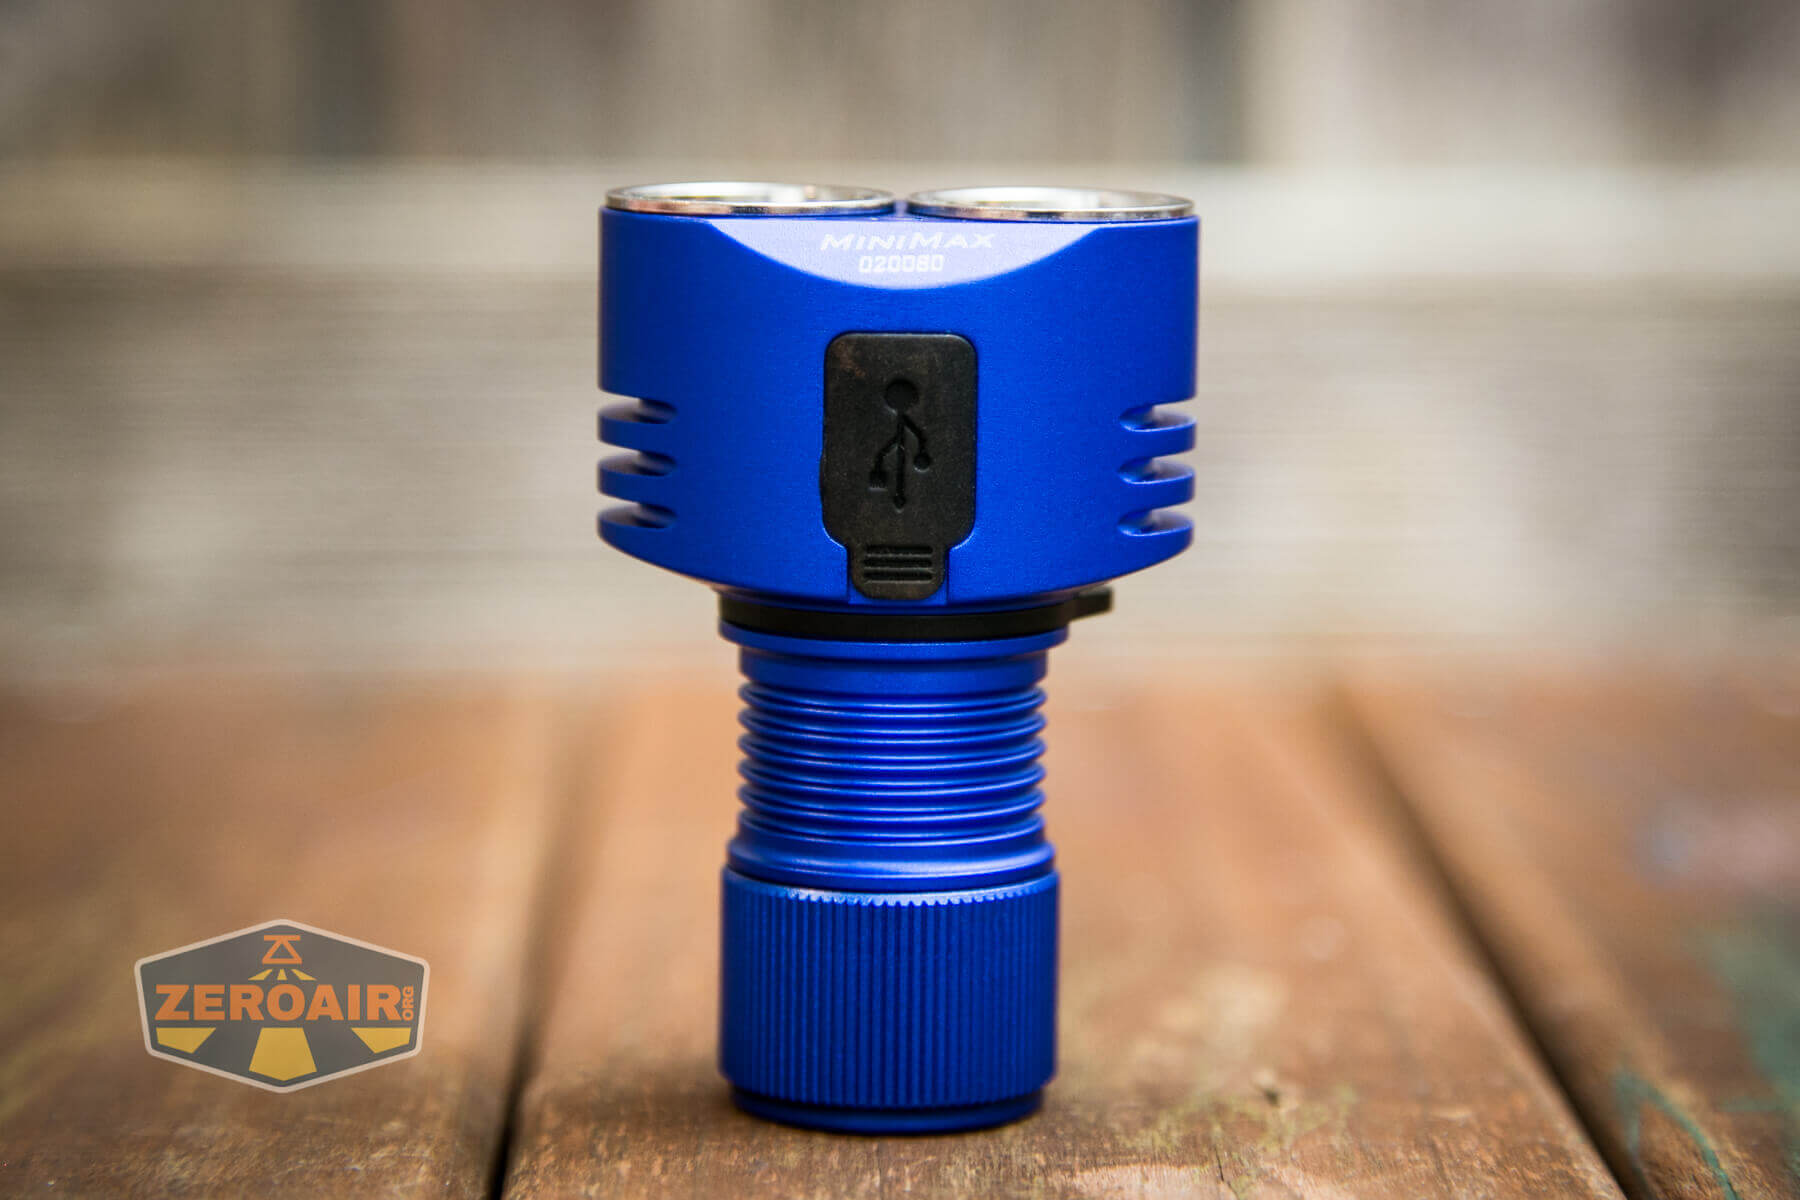
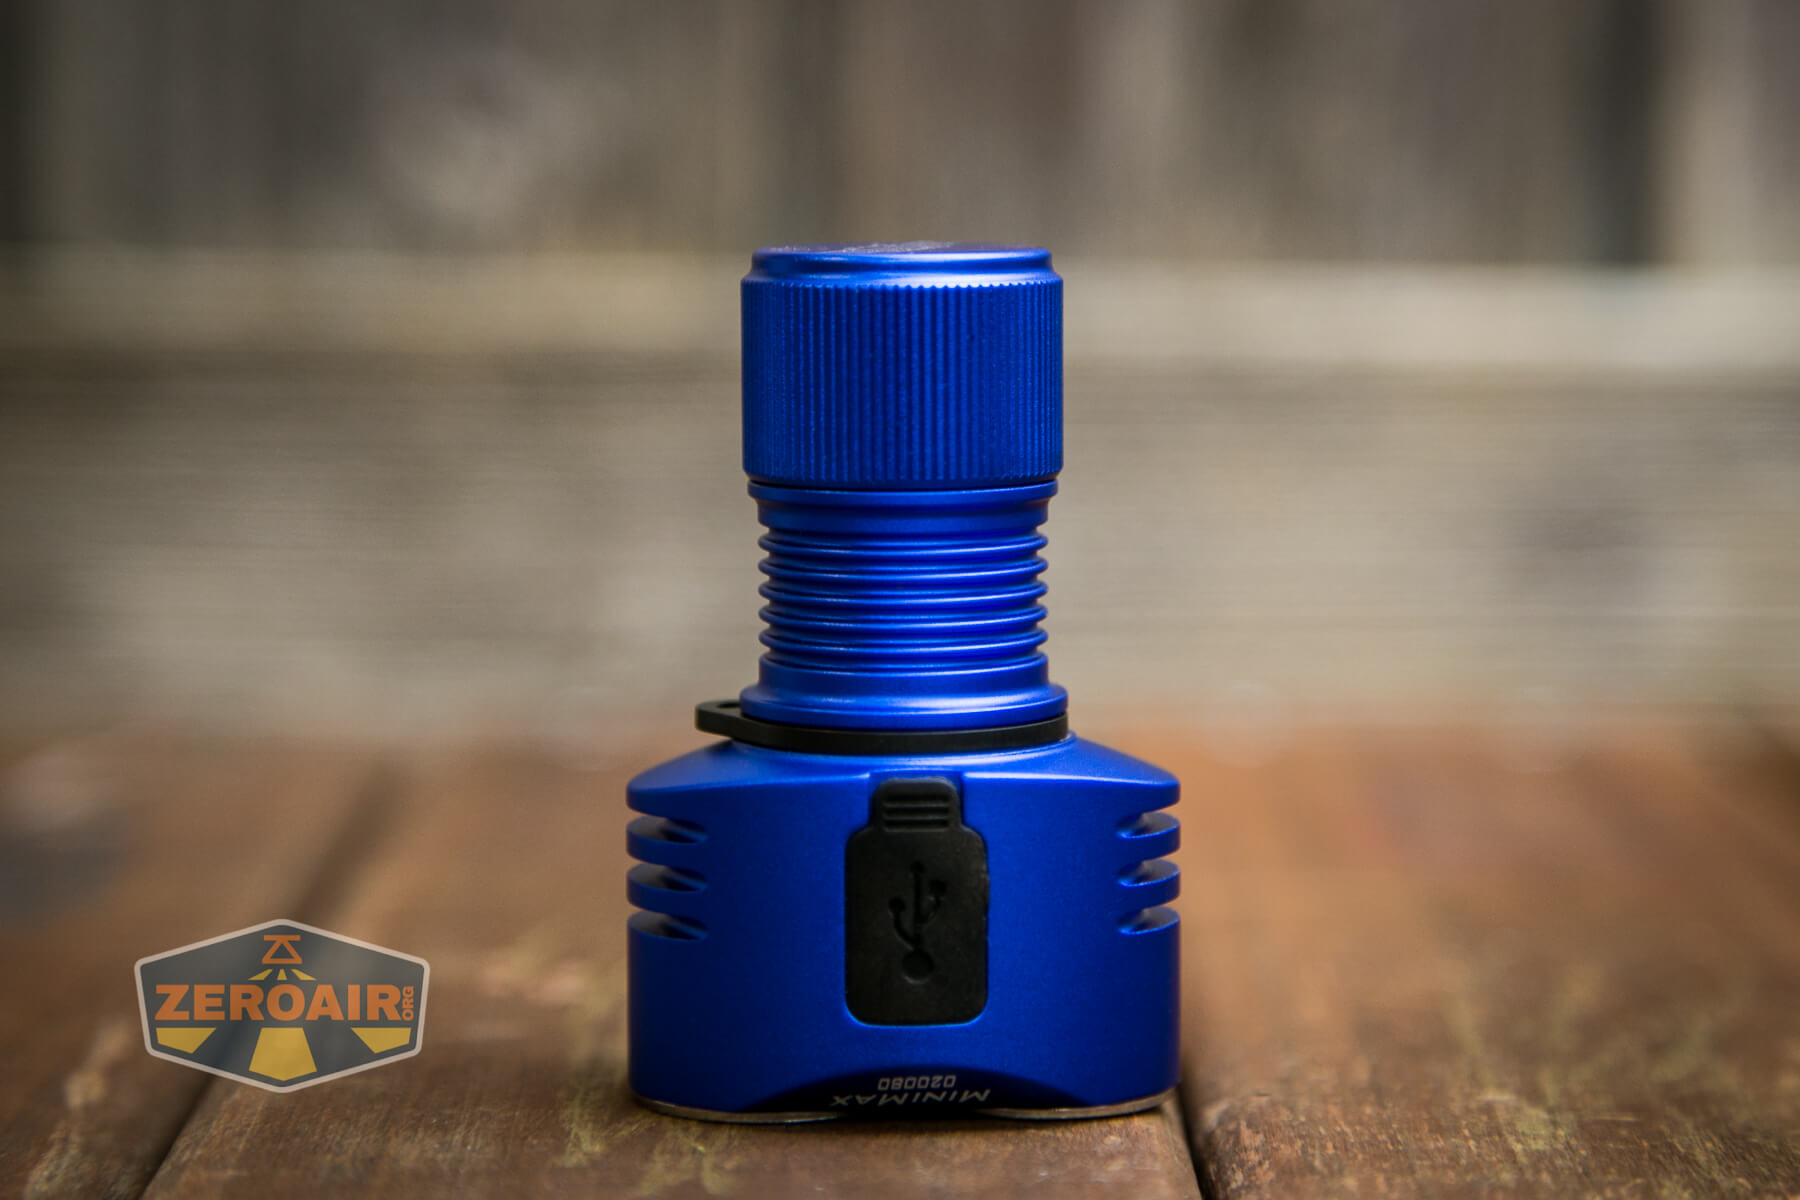
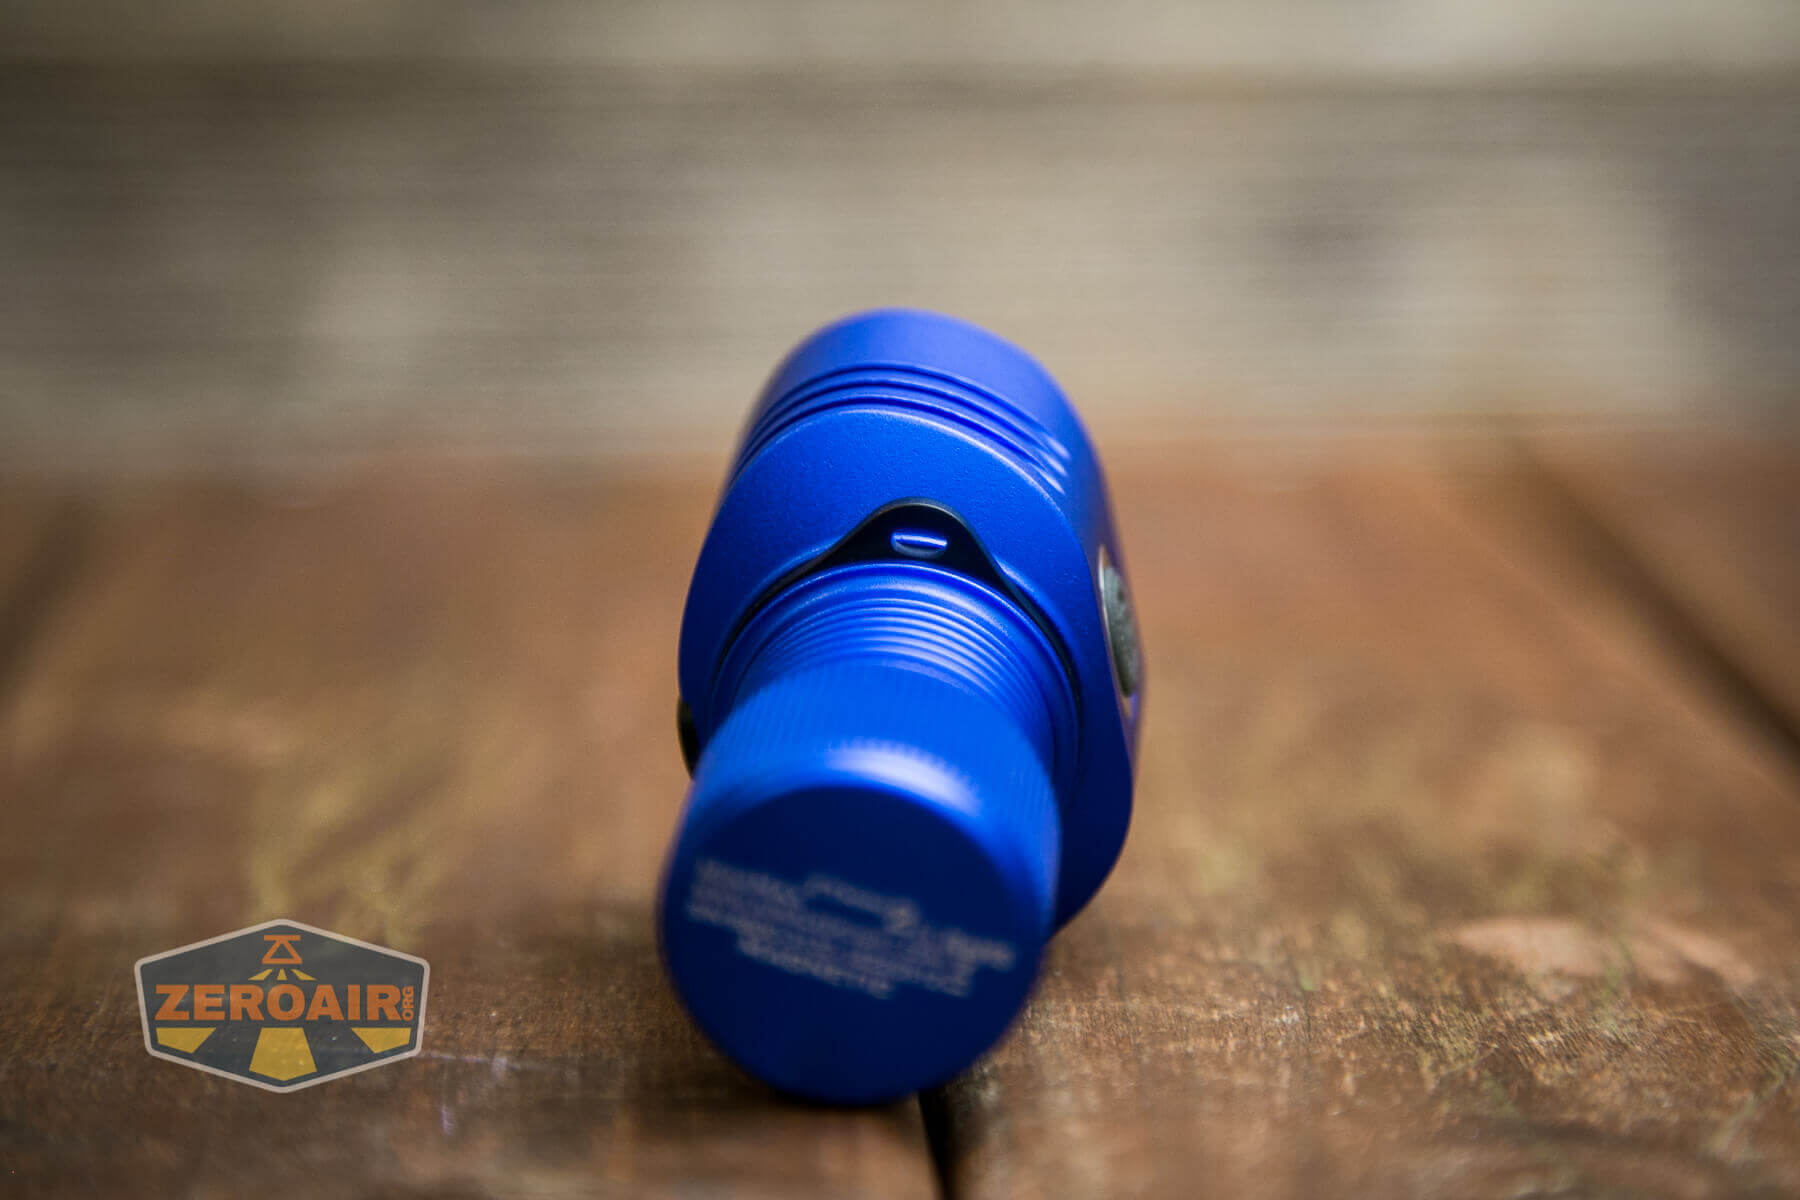
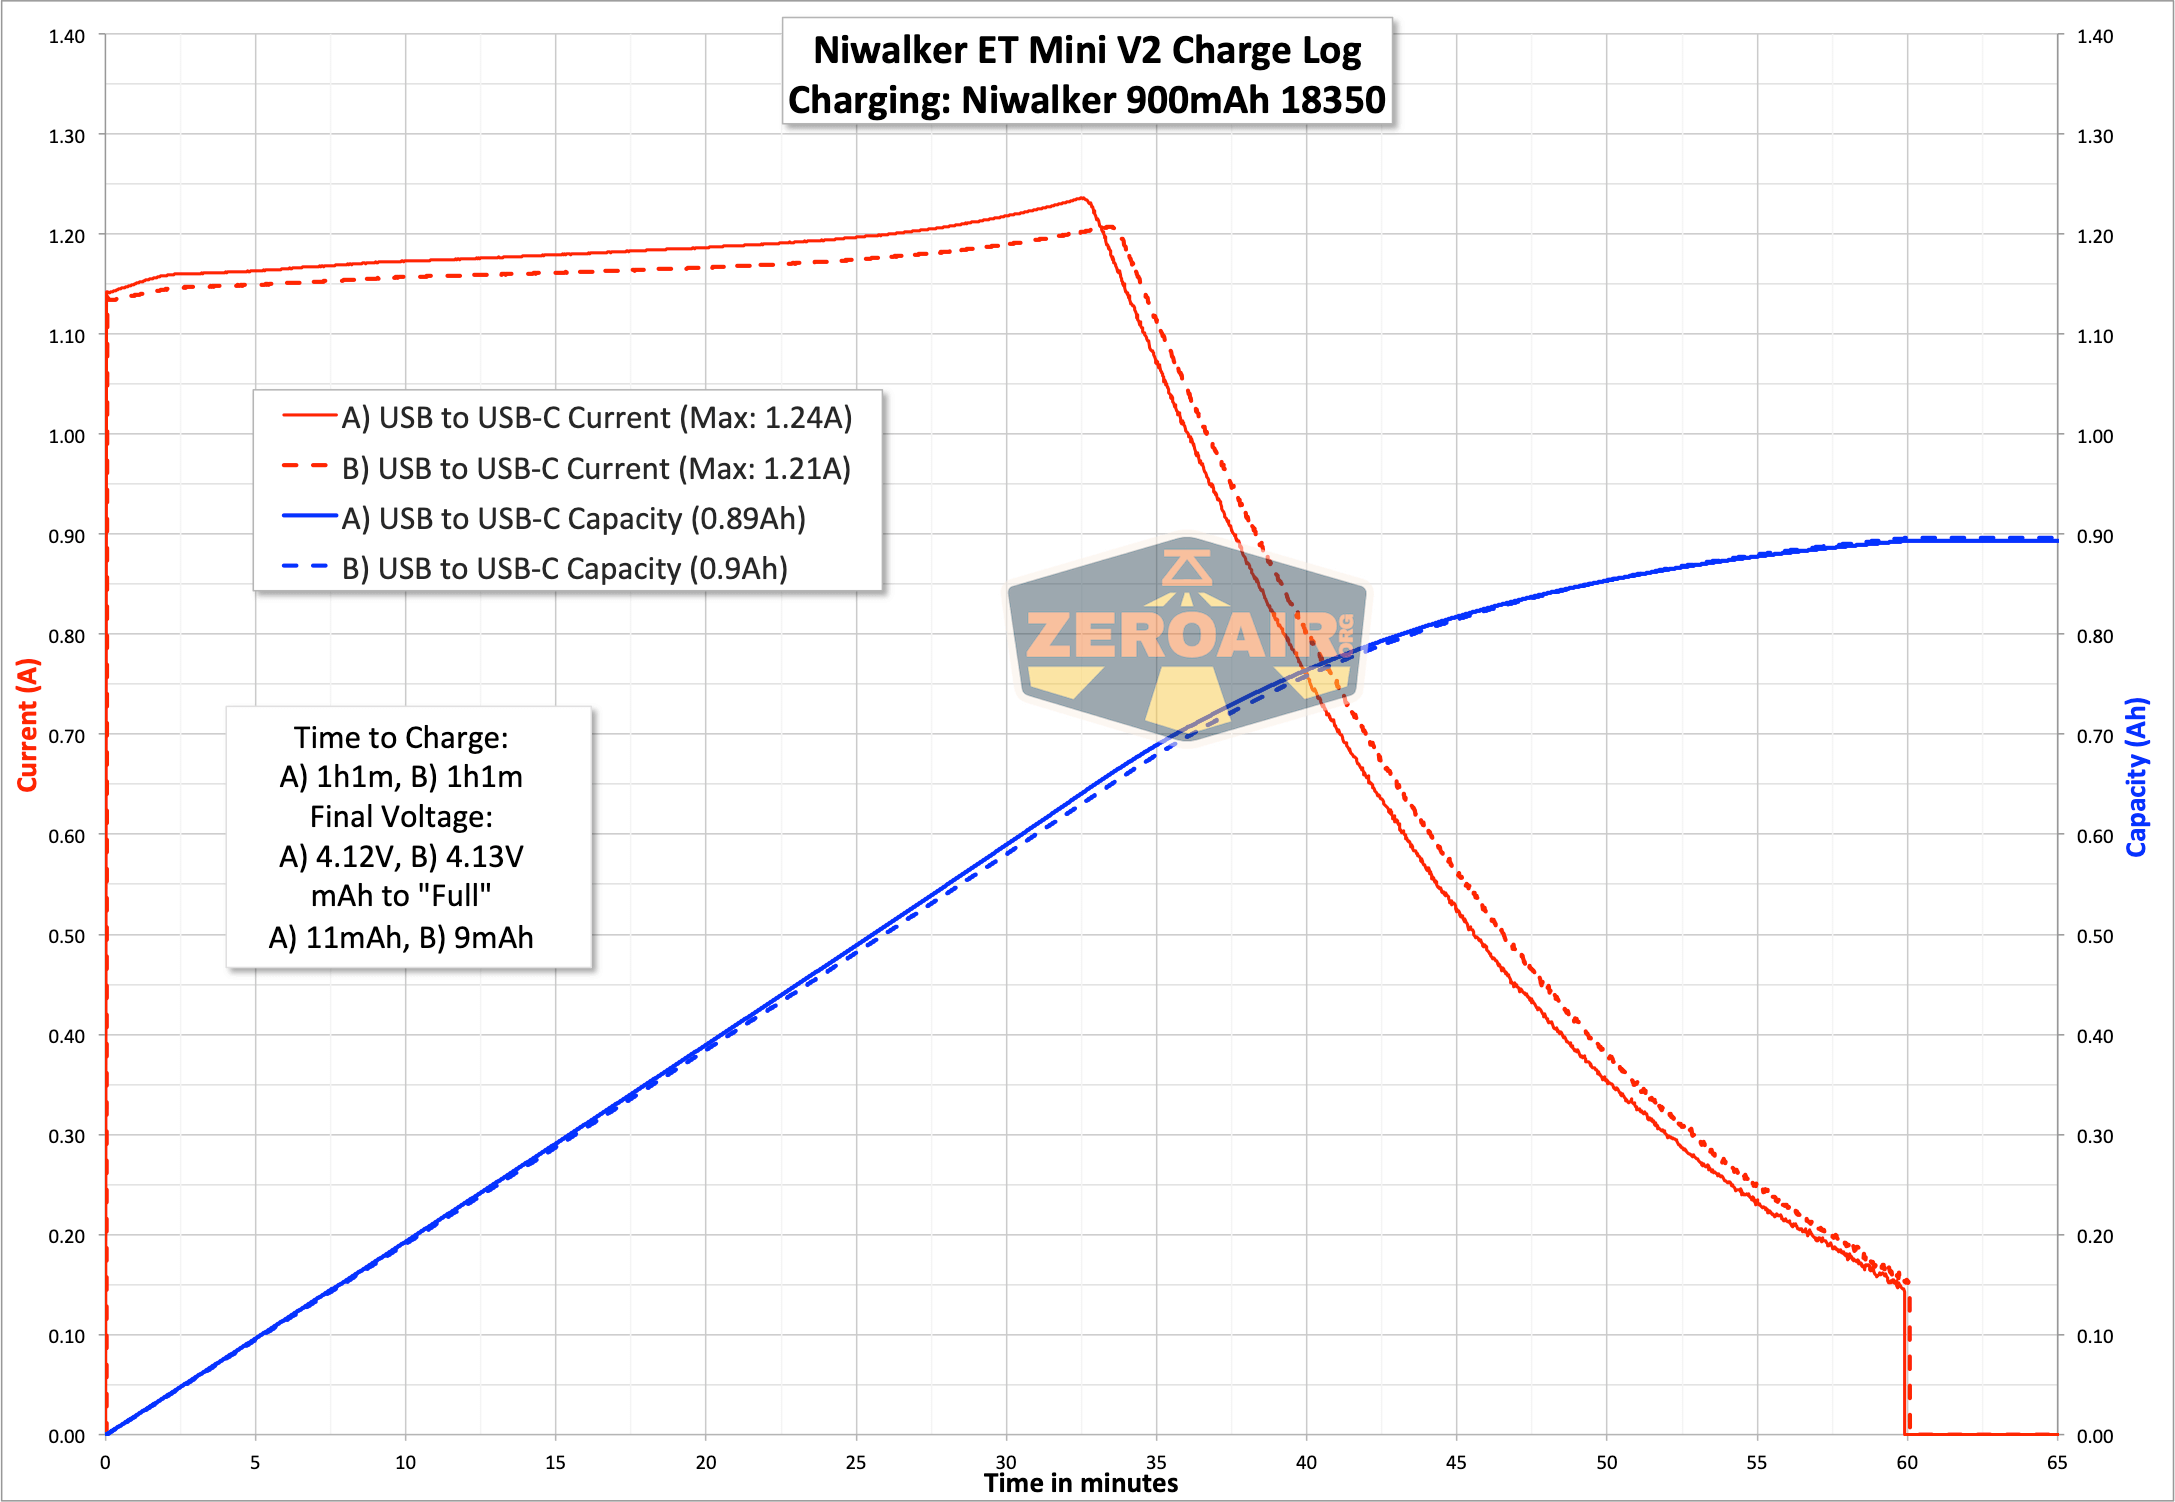
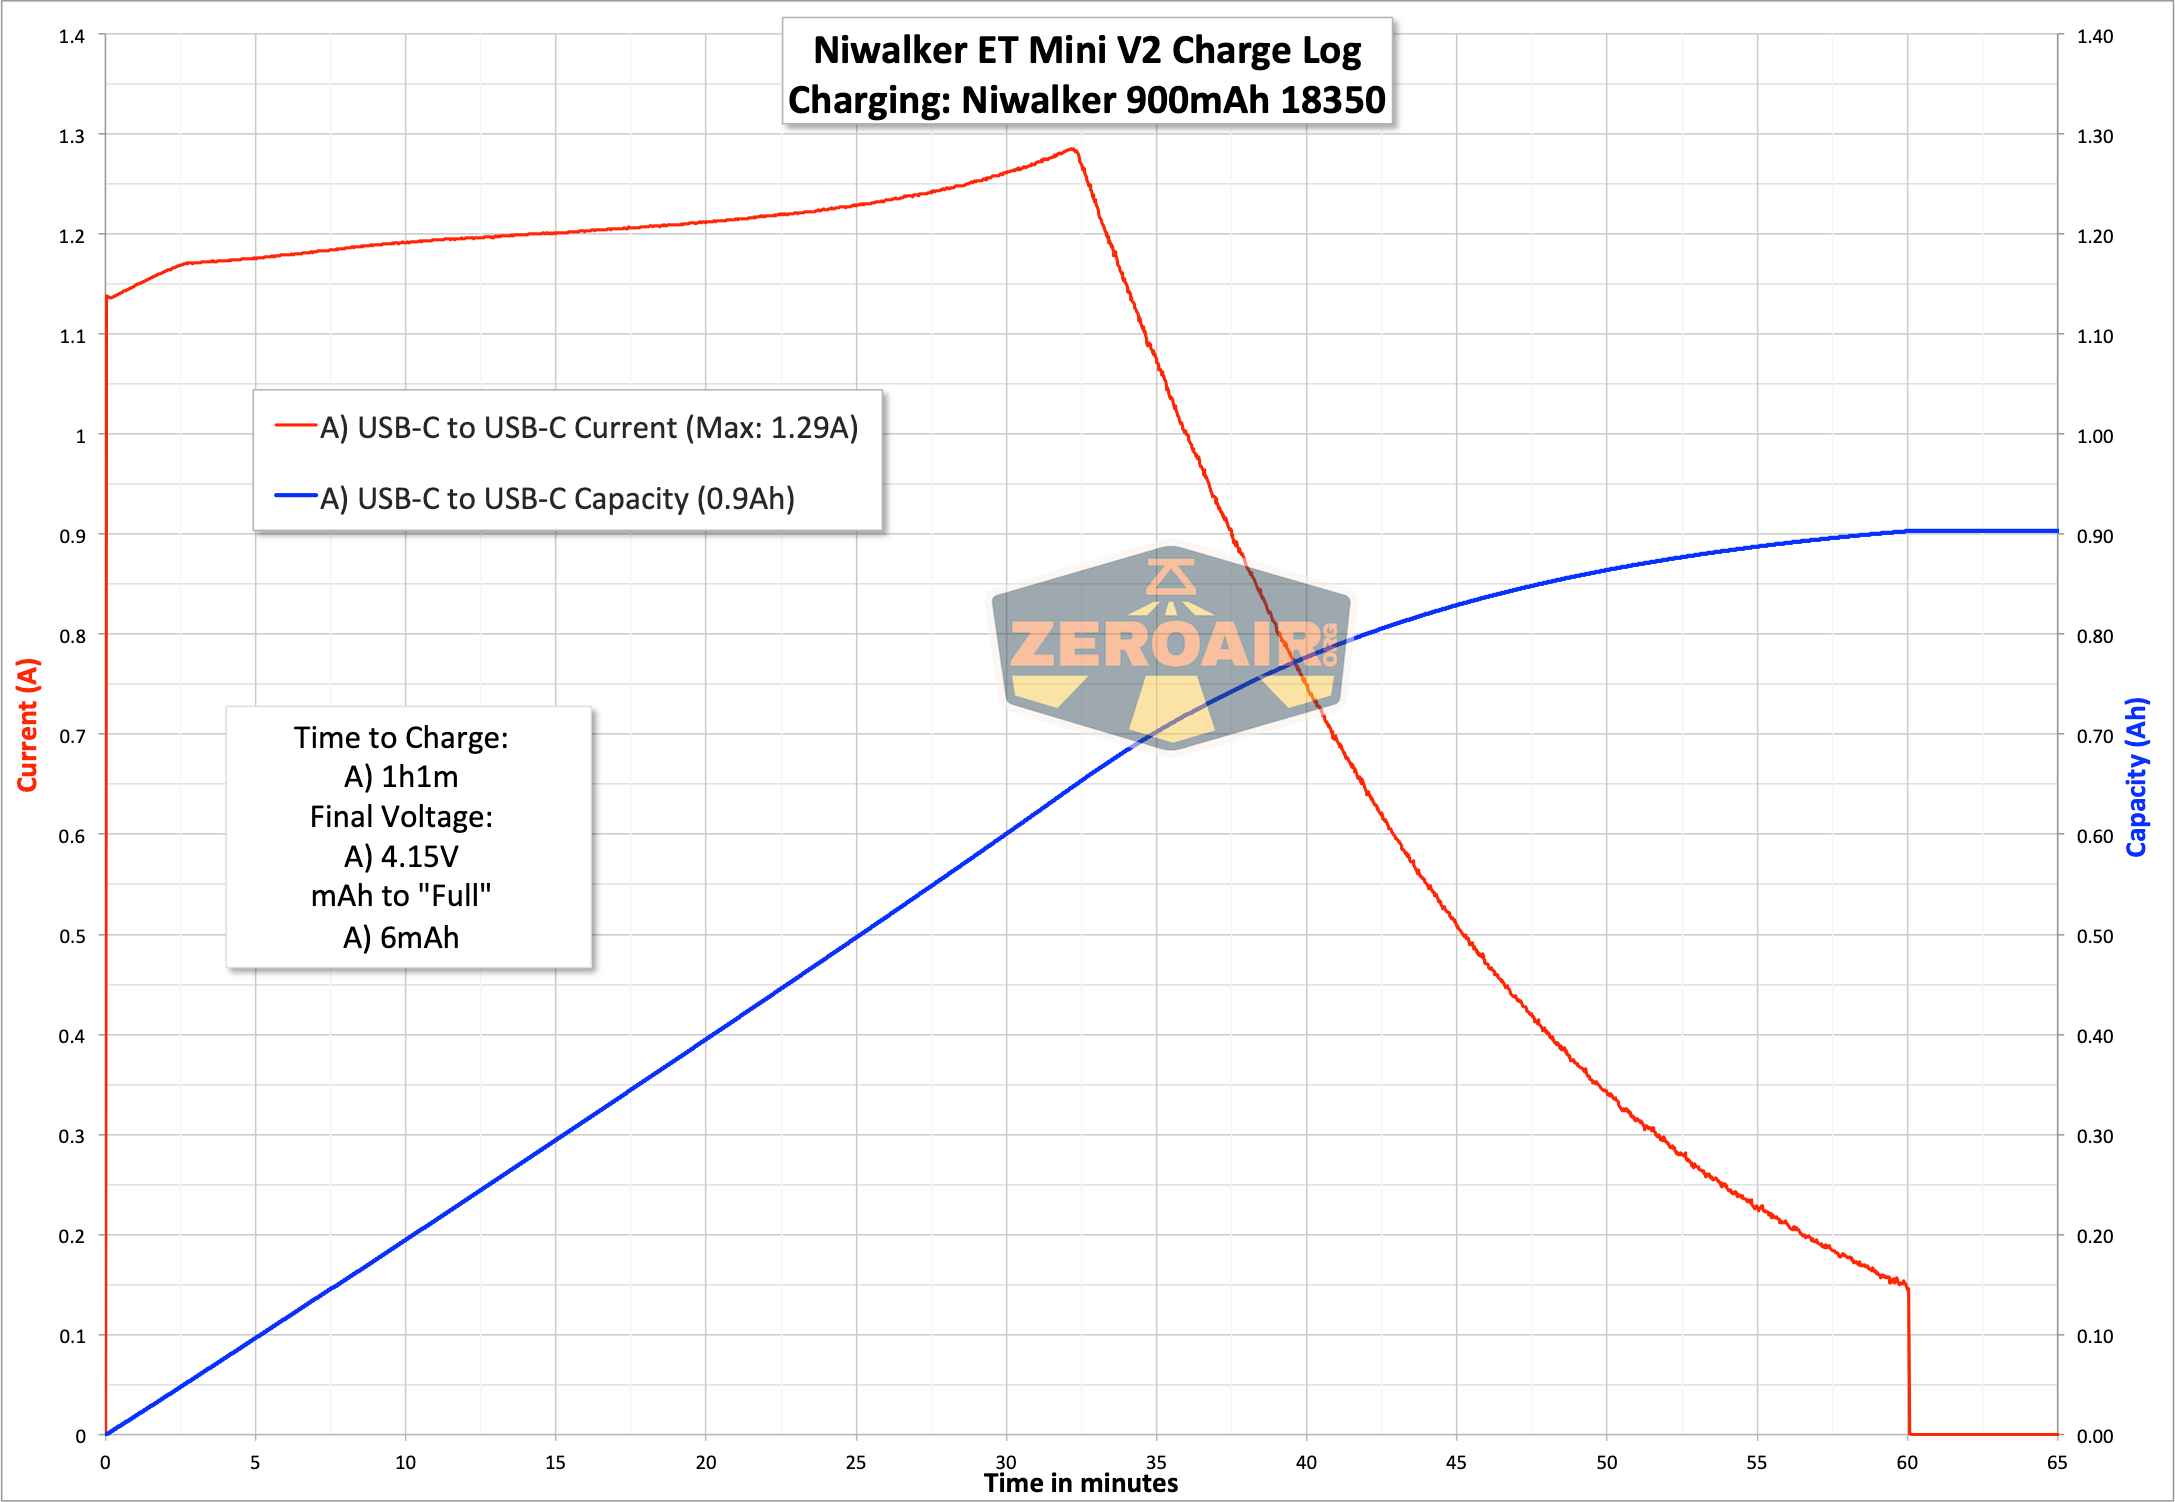
Charging
Charging is by way of USB-C. There’s a USB-C port in the head, on the opposite side of the switch. The charge port cover is very snug and not difficult to press in or remove.
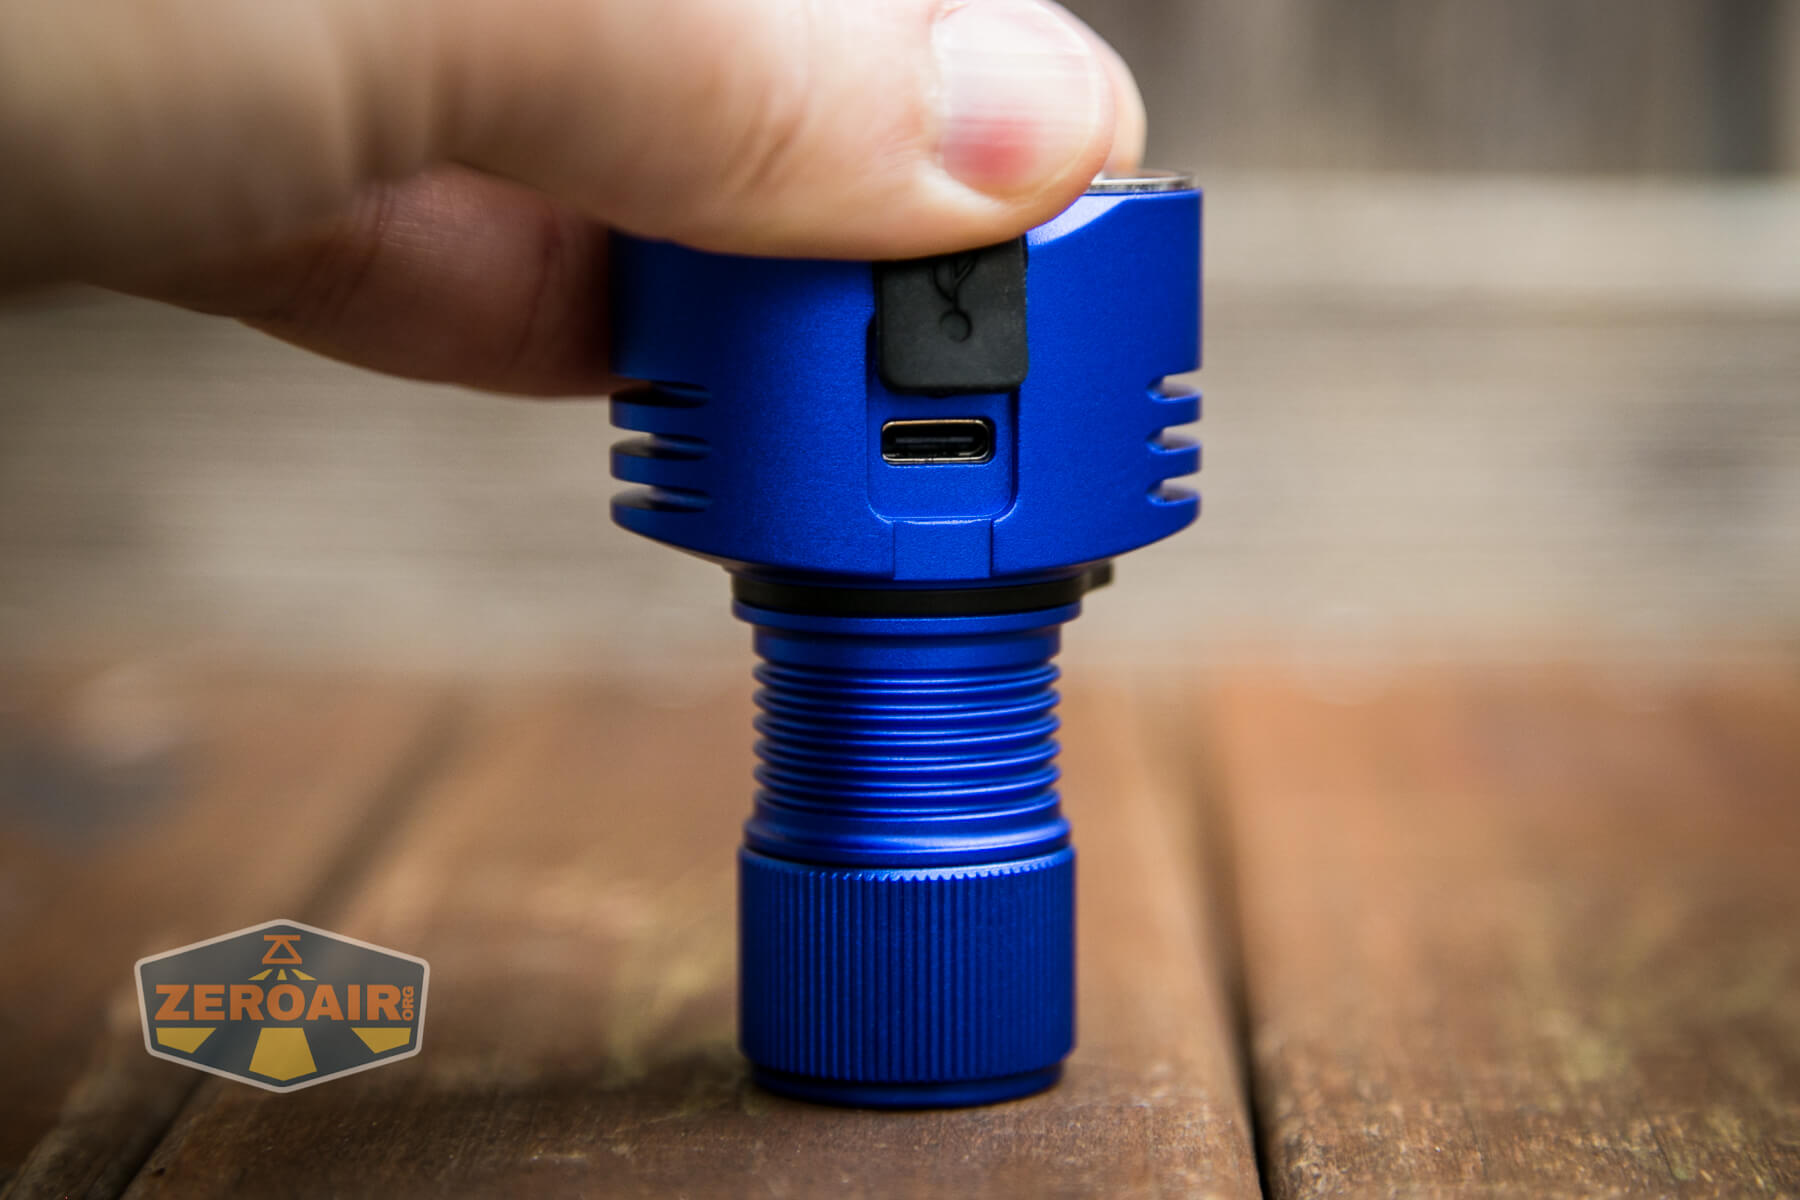
An appropriate cable is included: USB to USB-C.
Here’s a charge graph from USB to USB-C. Charging looks good.
And here’s a charge graph from USB-C to USB-C. C to C works fine, too.
Modes and Currents
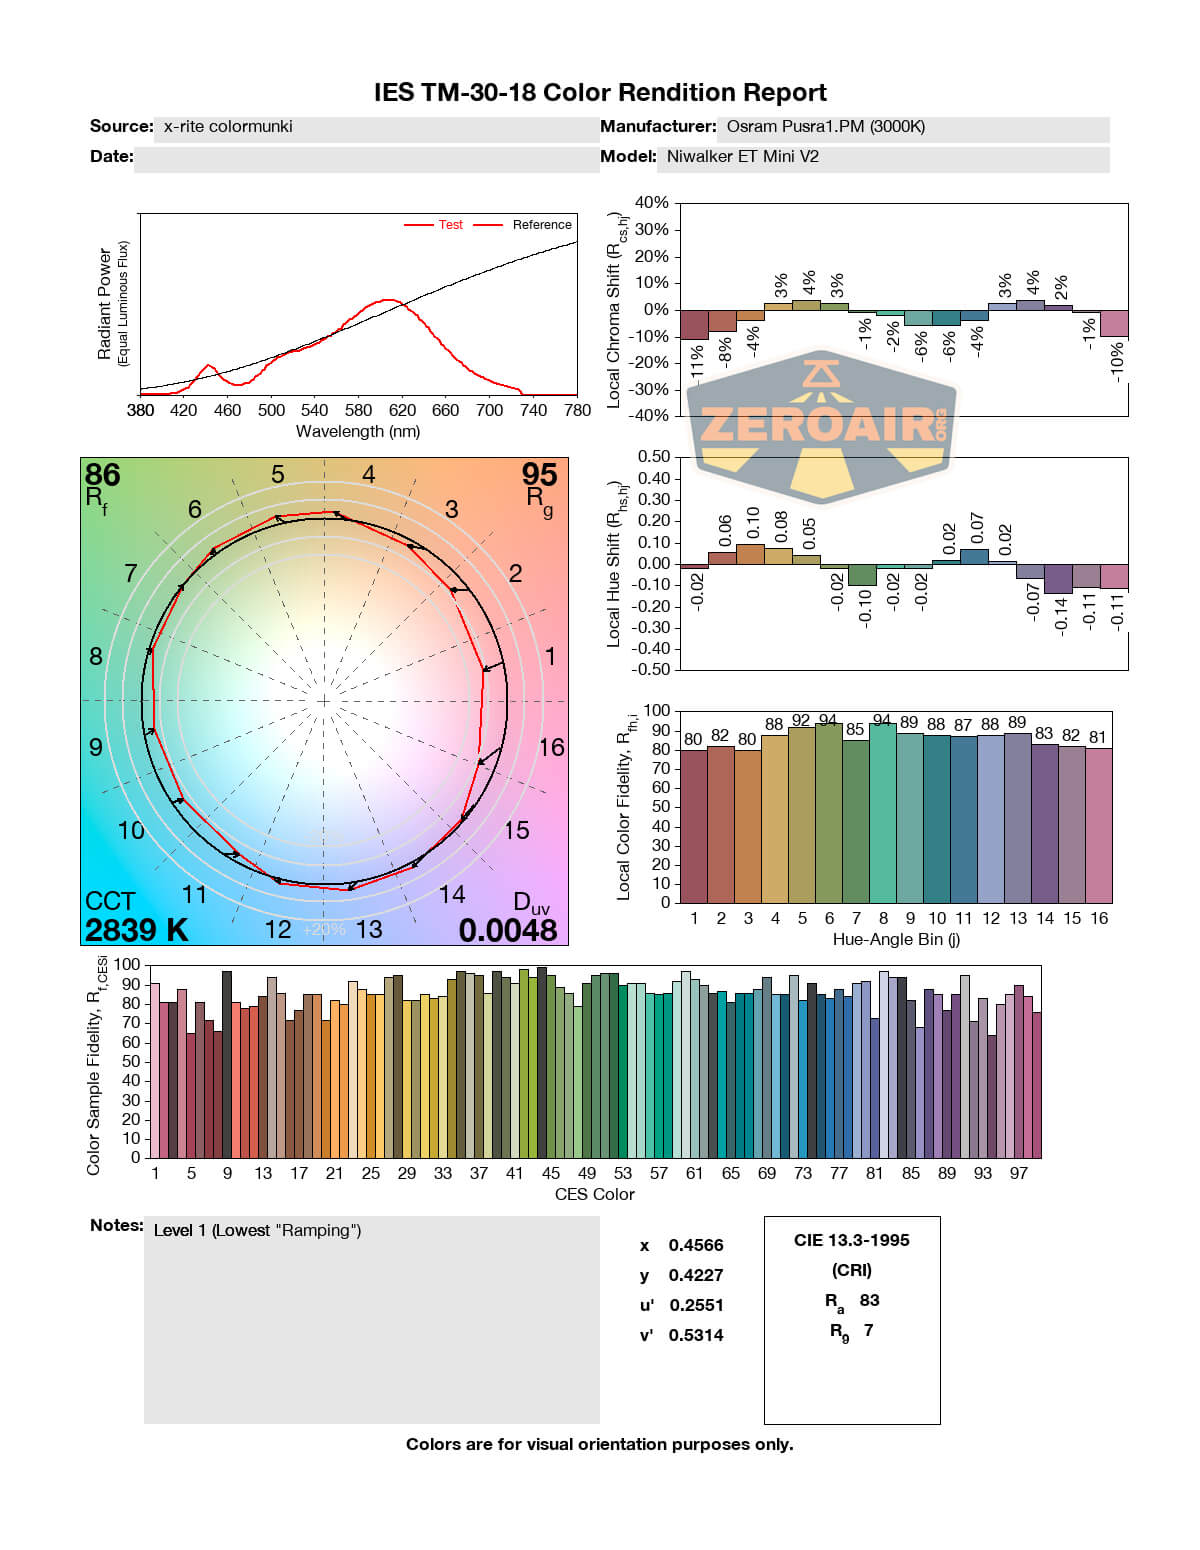
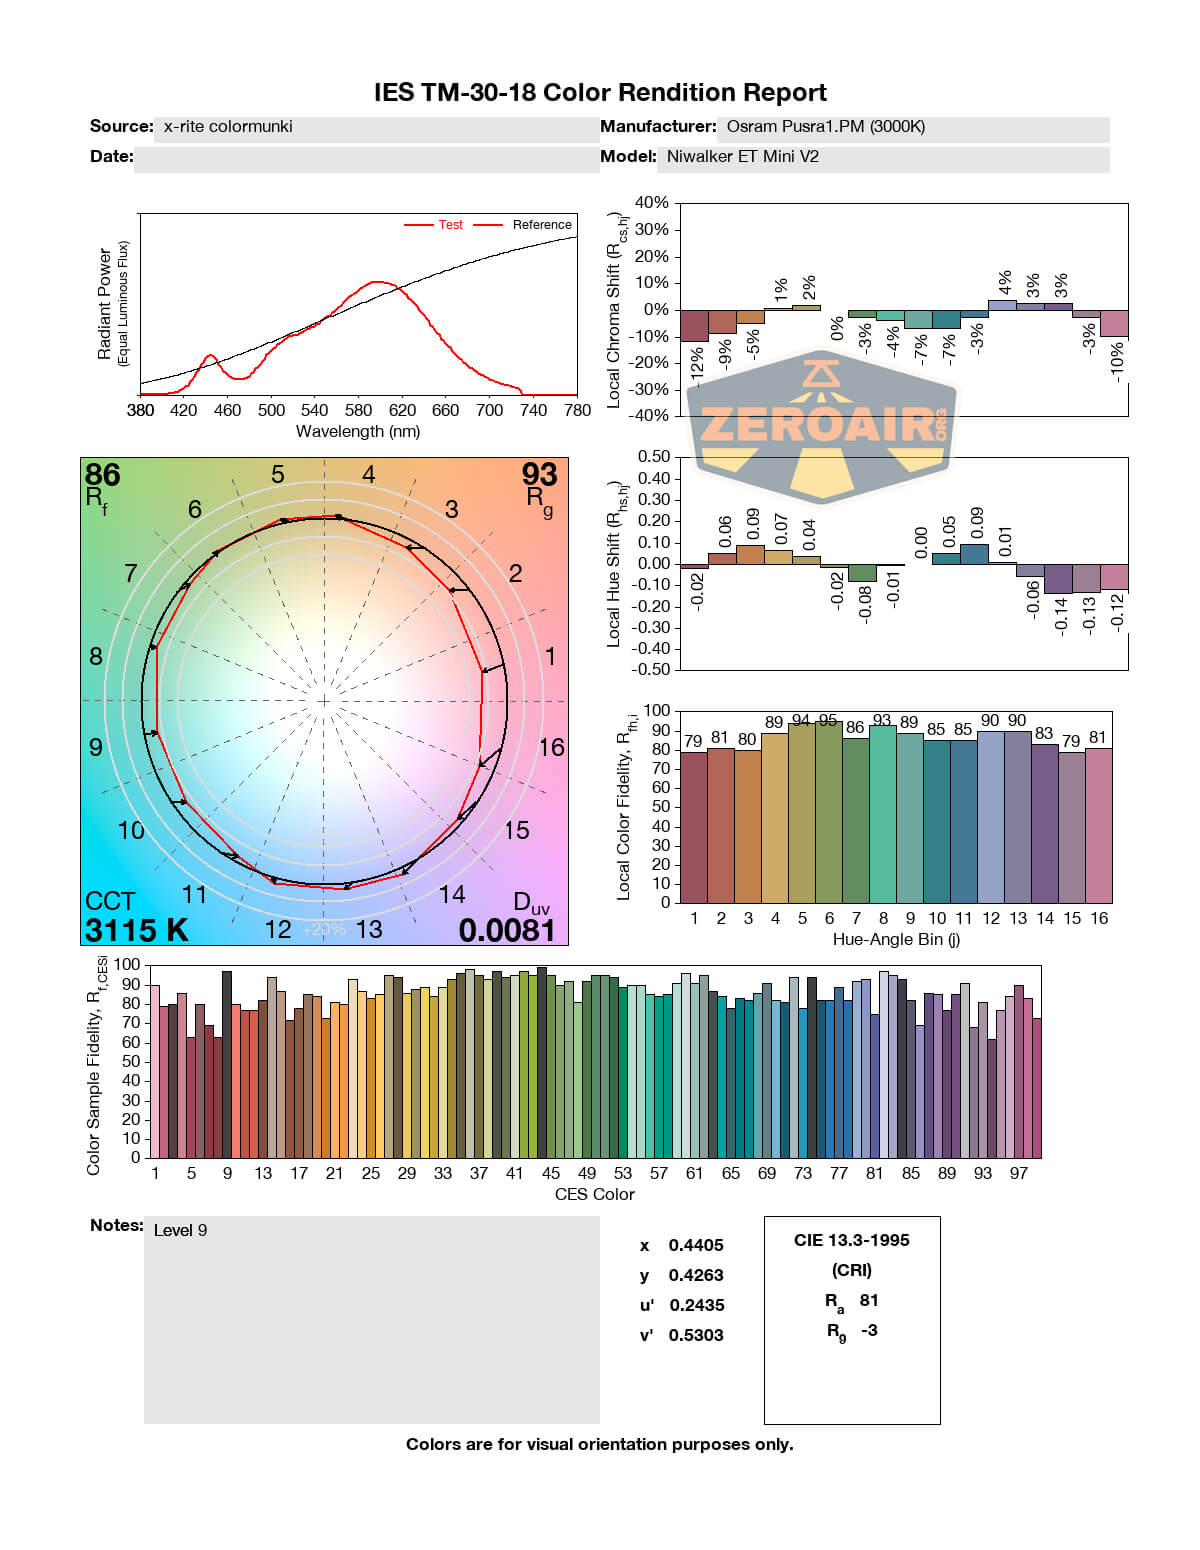
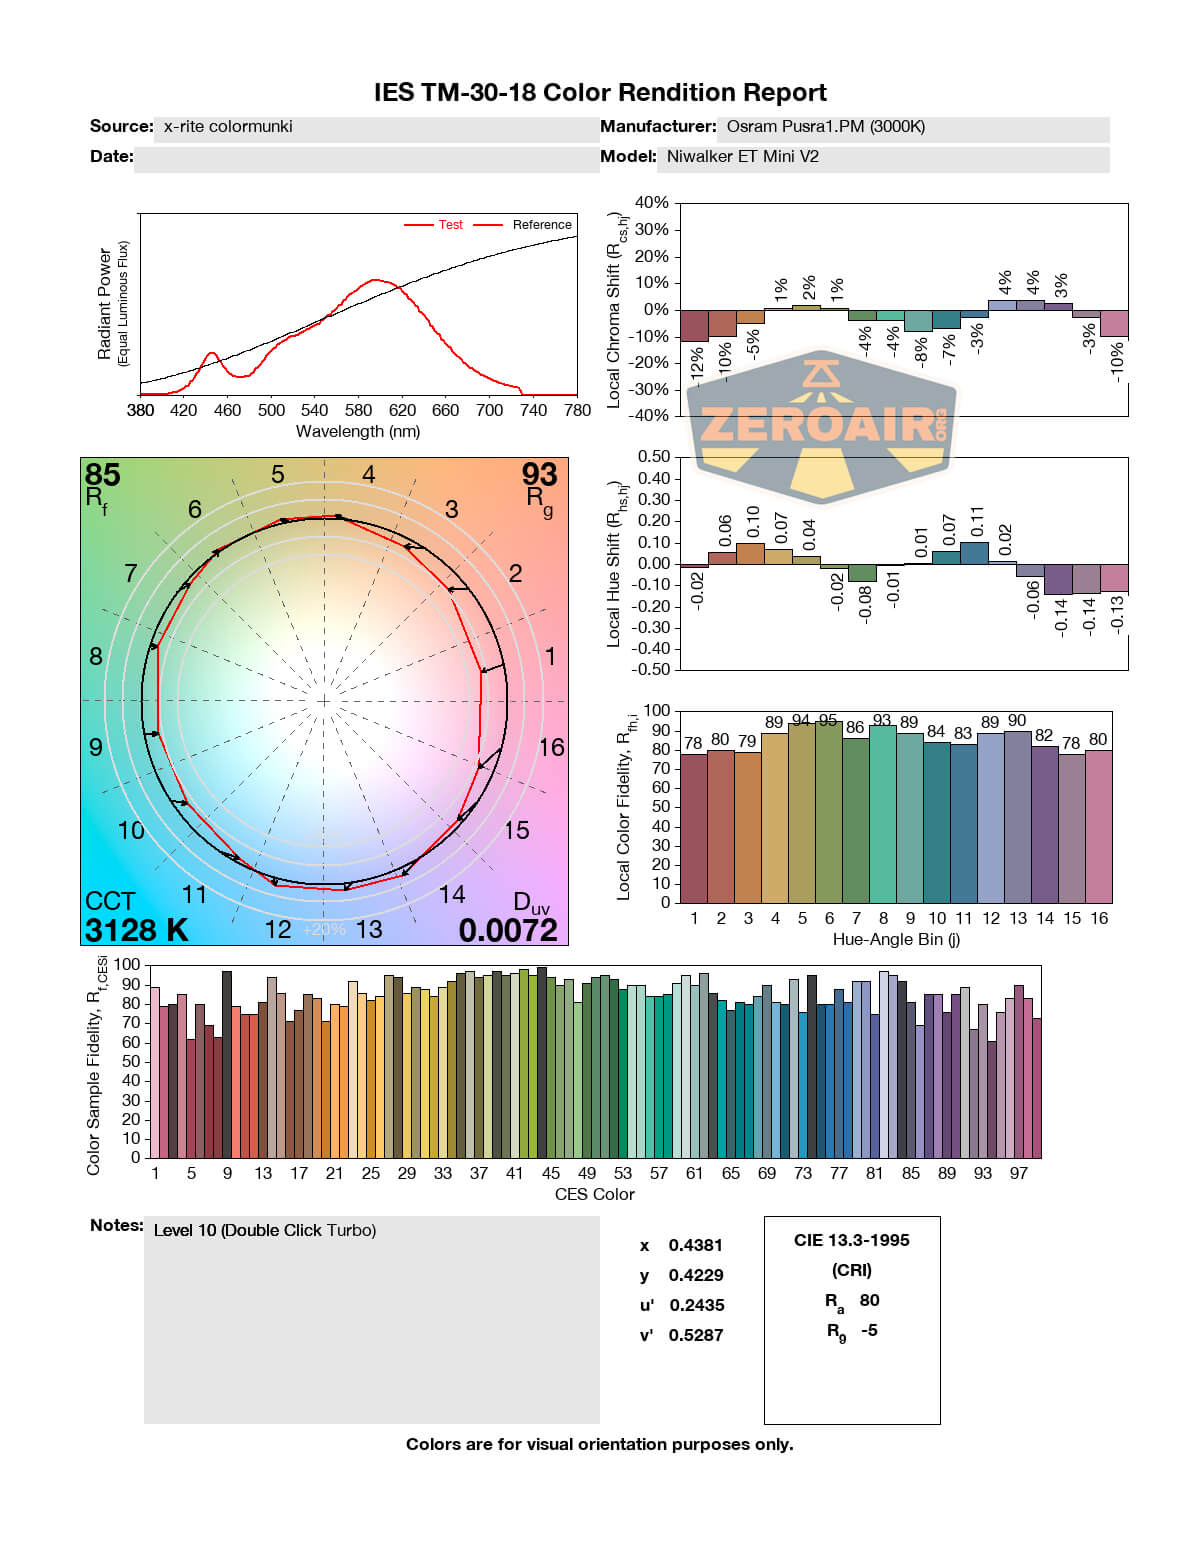
3000K only:
| Mode | Mode Claimed Output (lm) | Claimed Runtime | Measured Lumens | Tailcap Amps |
|---|---|---|---|---|
| Turbo | – | – | 1.60 | |
| 9 | 655 | 100m | 0.82 | |
| 8 | 415 | 150m | 0.56 | |
| 7 | 285 | 4.4h | 0.32 | |
| 6 | 166 | 8.1h | 0.20 | |
| 5 | 138 | 12h | 0.15 | |
| 4 | 95 | 17h | 0.12 | |
| 3 | 50 | 26h | 0.10 | |
| 2 | 21 | 2d | 0.08 | |
| 1 | 10 | 5d | 0.05 | |
| Firefly | 0.1 | 30d | 8.84mA |
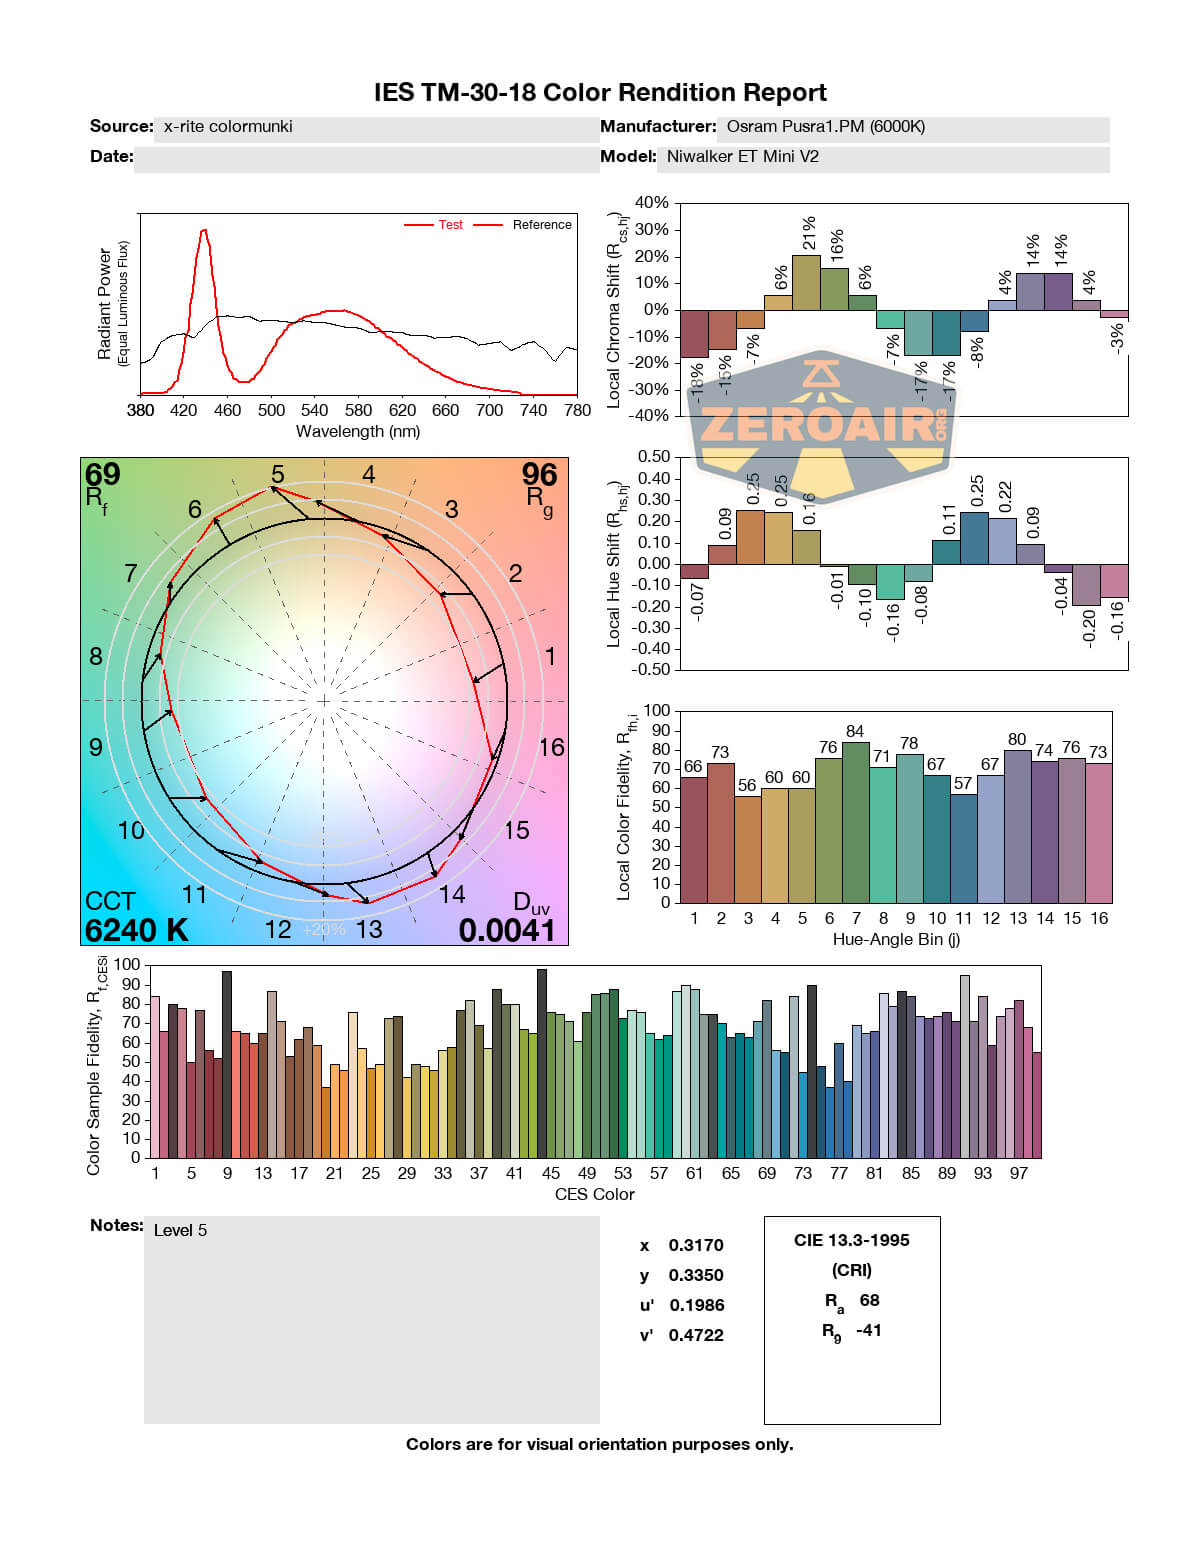
6000K only:
| Mode | Mode Claimed Output (lm) | Claimed Runtime | Measured Lumens | Tailcap Amps |
|---|---|---|---|---|
| Turbo | – | – | 1590 | 4.72 |
| 9 | 1314 | 60m | 1024 | 2.01 |
| 8 | 799 | 95m | 1.03 | |
| 7 | 453 | 4h | 0.45 | |
| 6 | 249 | 8h | 0.22 | |
| 5 | 181 | 11h | 0.17 | |
| 4 | 115 | 16h | 0.13 | |
| 3 | 65 | 26h | 0.11 | |
| 2 | 33 | 2d | 0.10 | |
| 1 | 15 | 4.9d | 0.05 | |
| Firefly | 0.1 | 30d | 8.84mA |
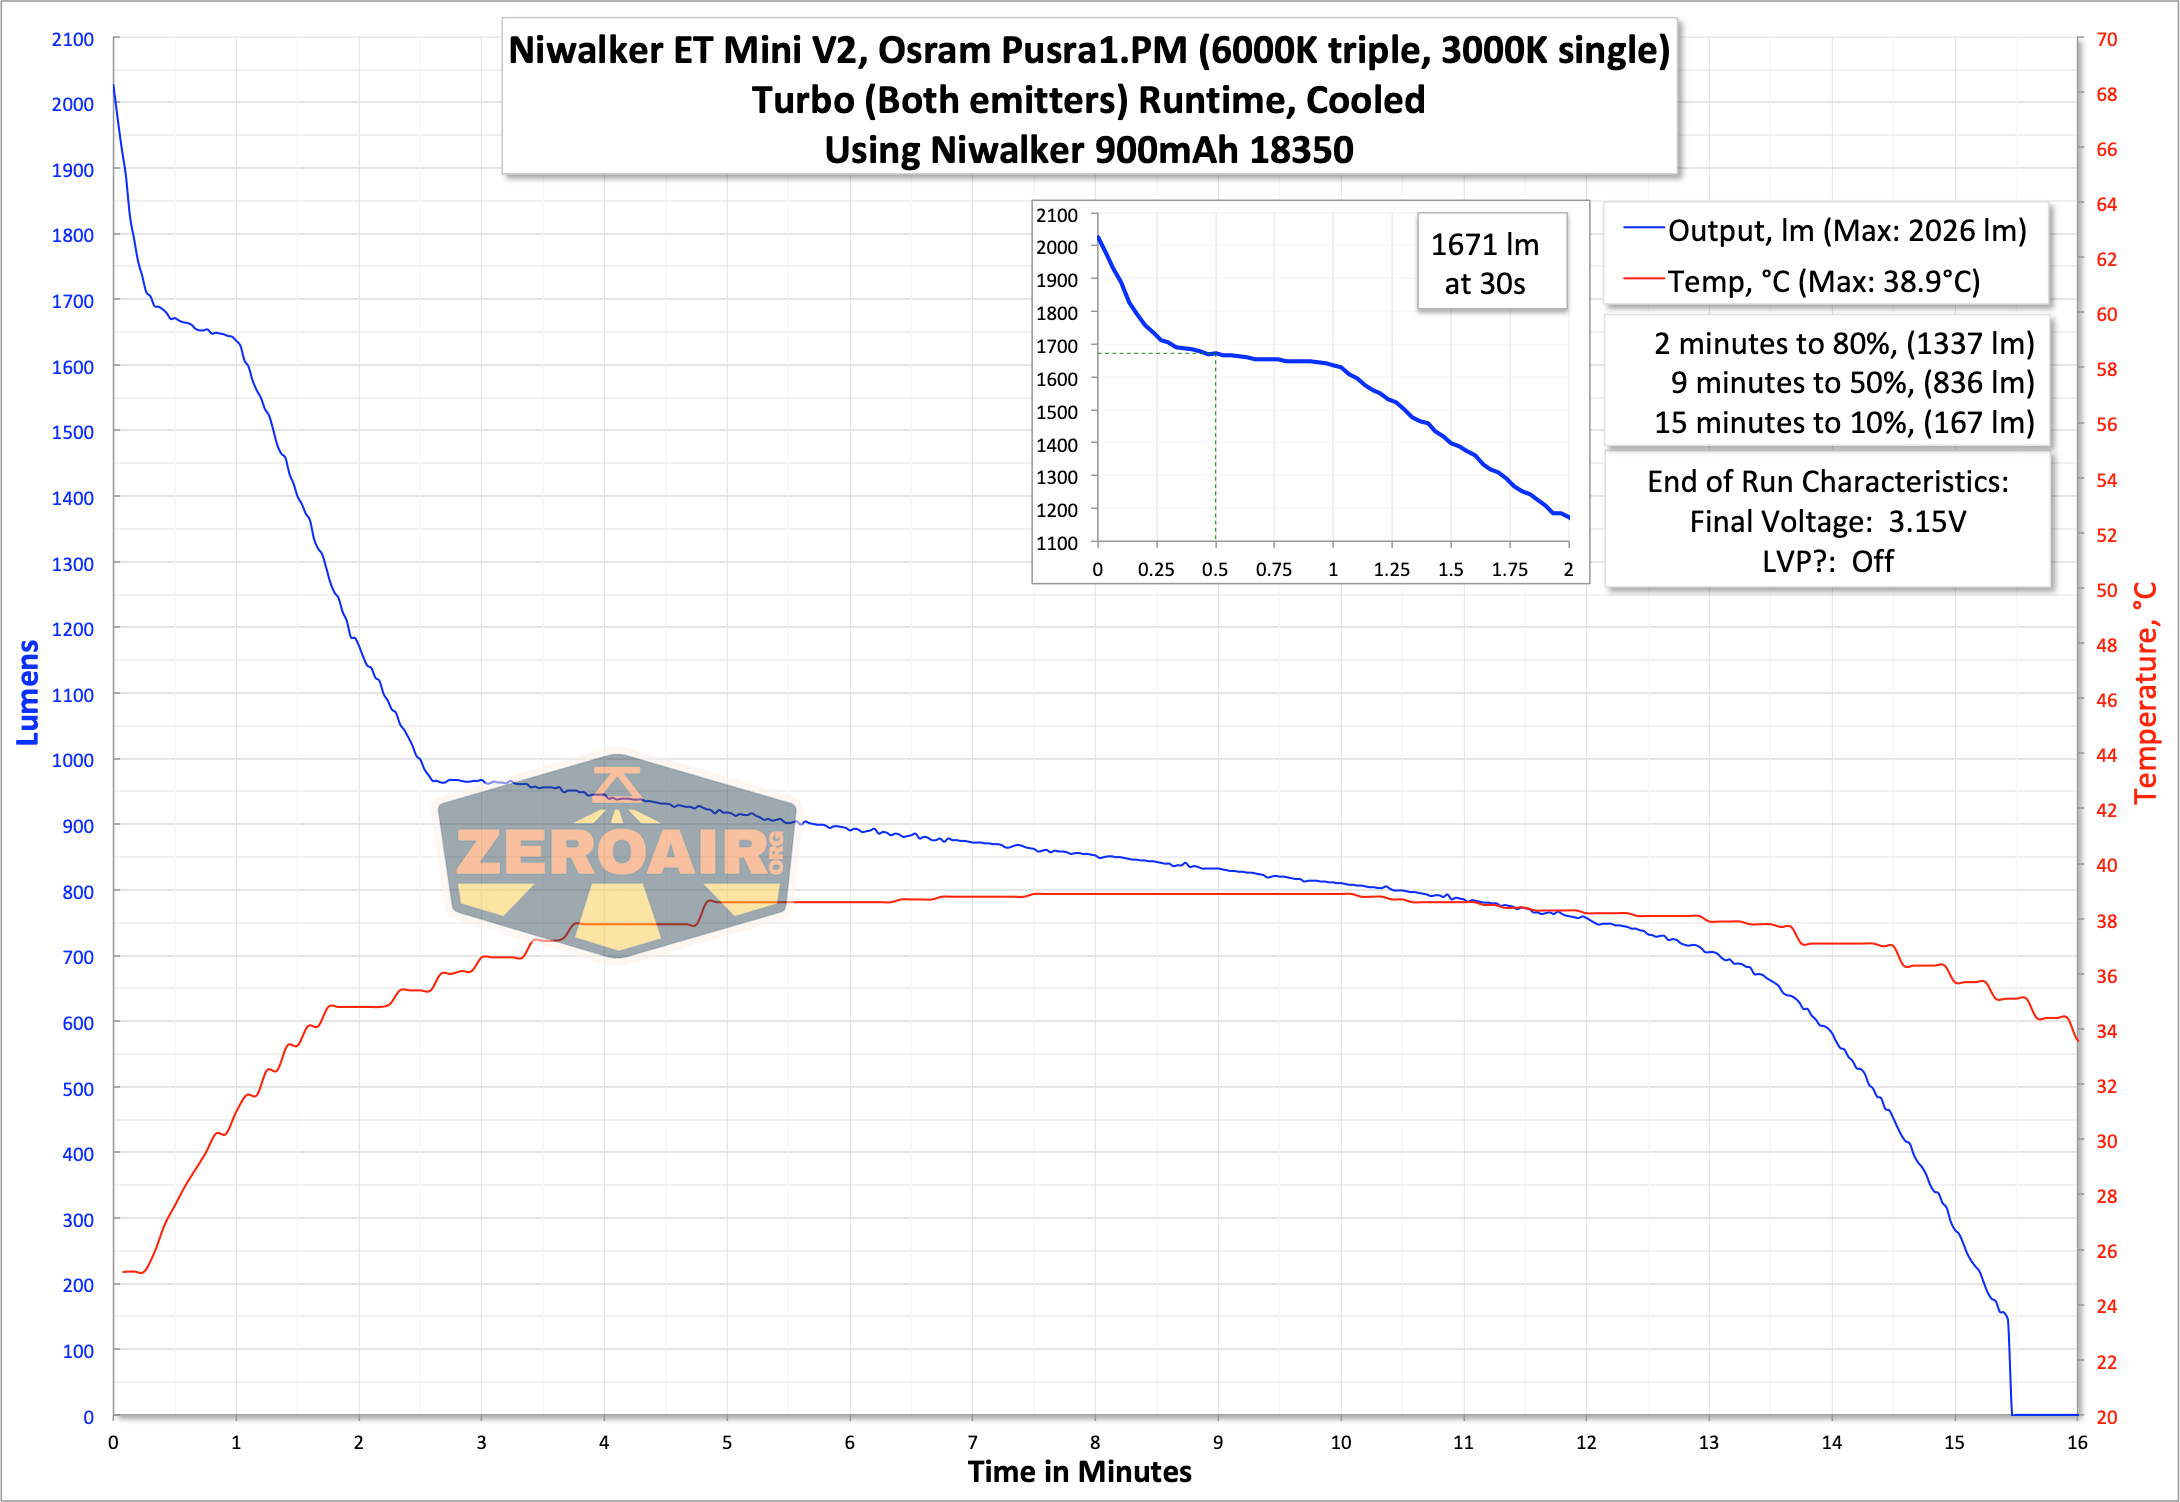
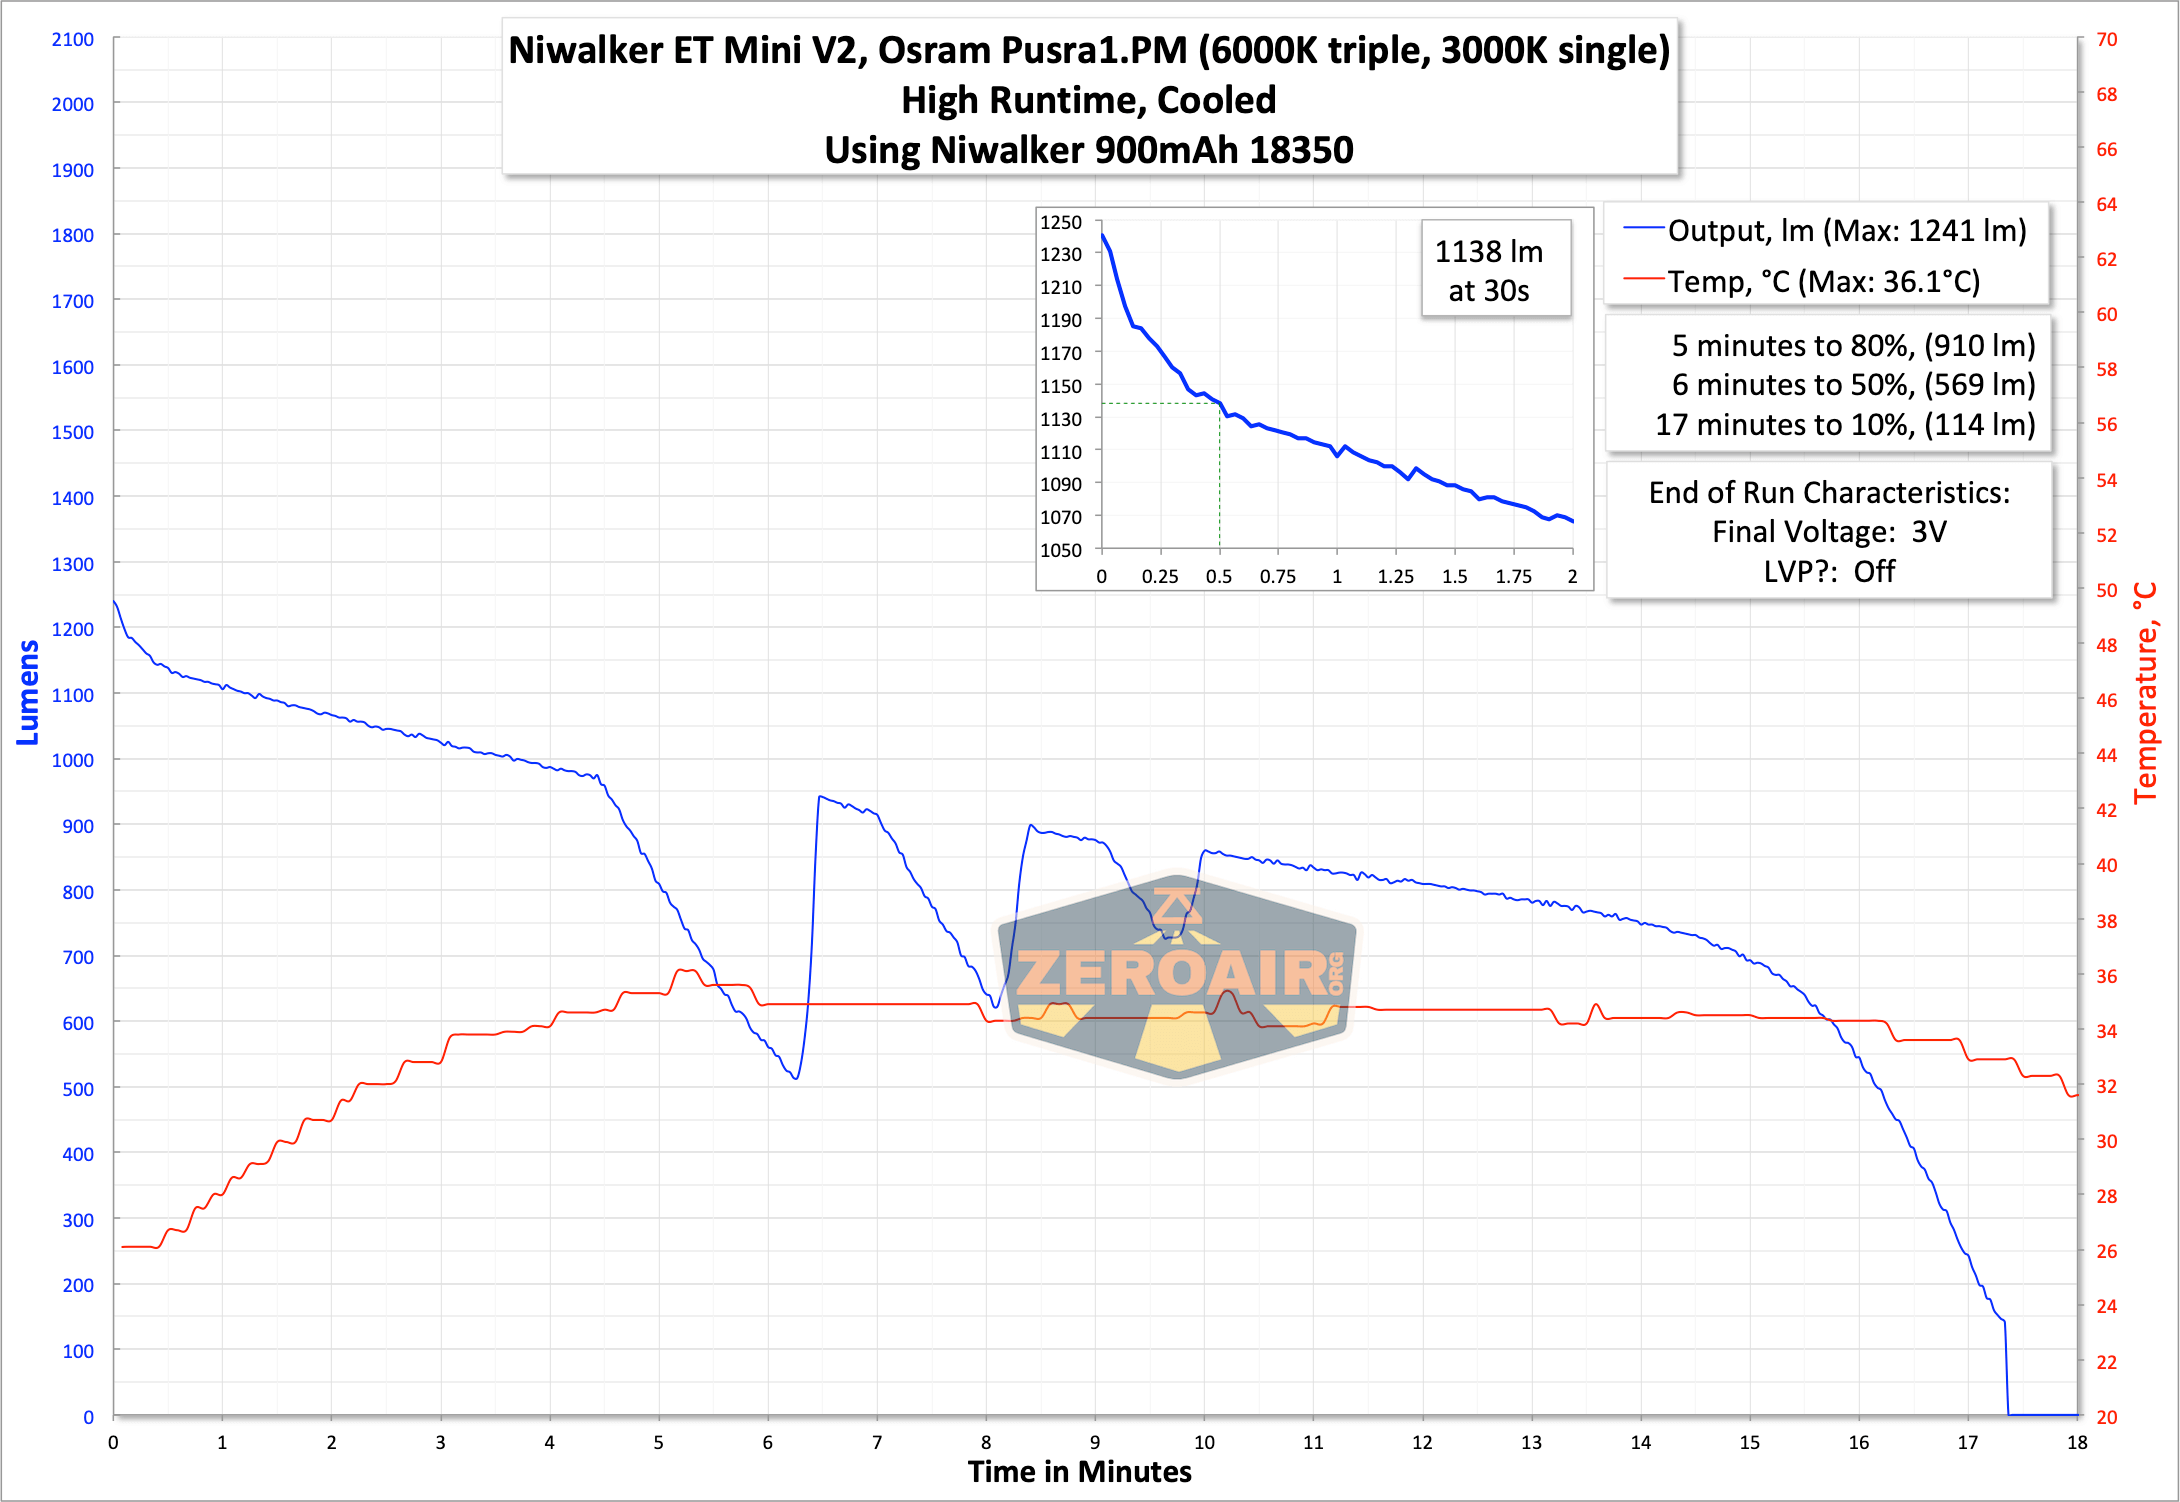
Both:
| Mode | Mode Claimed Output (lm) | Claimed Runtime | Measured Lumens | Tailcap Amps |
|---|---|---|---|---|
| Turbo | 3050 | – | 1671 | 4.72 |
| 9 | 1788 | 55m | 1138 | 2.11 |
| 8 | 1005 | 66m | 1.06 | |
| 7 | 558 | 3.5h | 0.48 | |
| 6 | 330 | 6h | 0.23 | |
| 5 | 248 | 8h | 0.18 | |
| 4 | 155 | 12h | 0.13 | |
| 3 | 91 | 20h | 0.12 | |
| 2 | 49 | 1.2d | 0.11 | |
| 1 | 20 | 3.5d | 0.06 | |
| Firefly | 0.1 | 30d | 10.7mA |
The manual does not specify what capacity cell is intended for those runtimes, but I would imagine it’s probably a longer-than-35mm cell. For example, a high capacity 20700, or the like. I certainly don’t experience these runtimes with the included 900mAh 18350.
Pulse Width Modulation
Nearly every mode for all emitter options has PWM. It’s fairly fast, and to be honest, I wouldn’t have guessed it was even using PWM. So it’s not problematic.
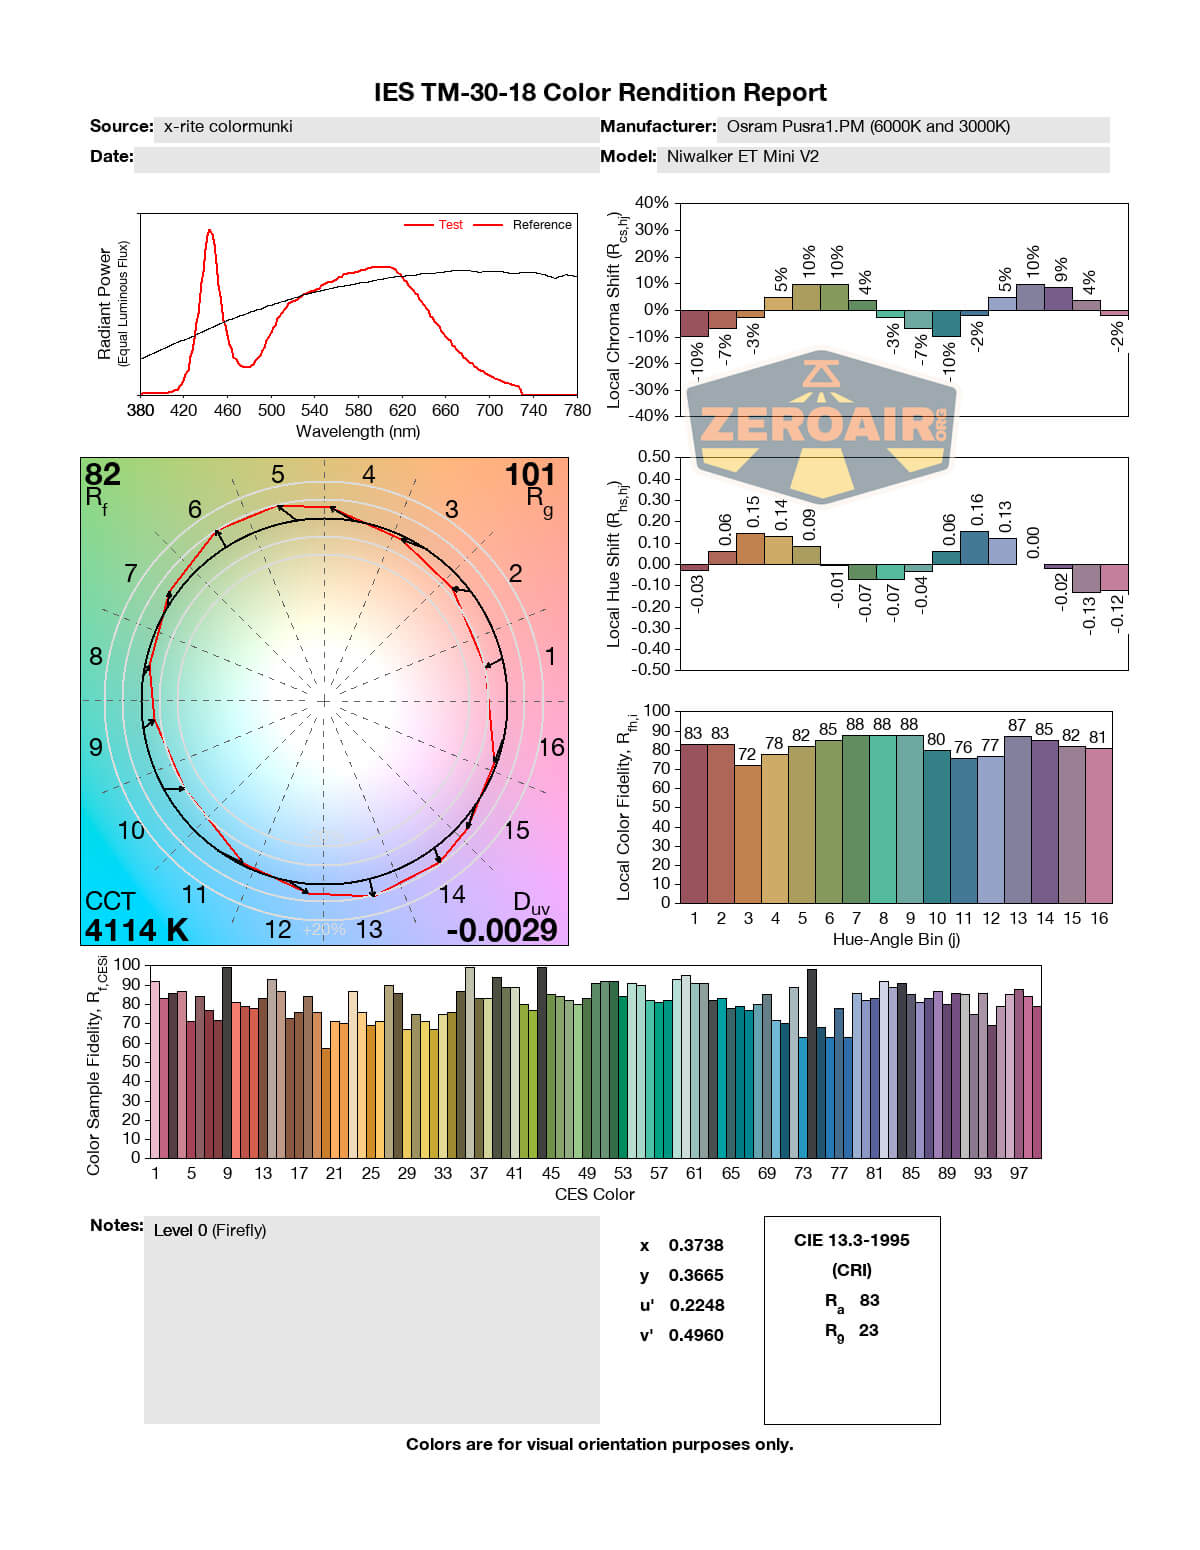
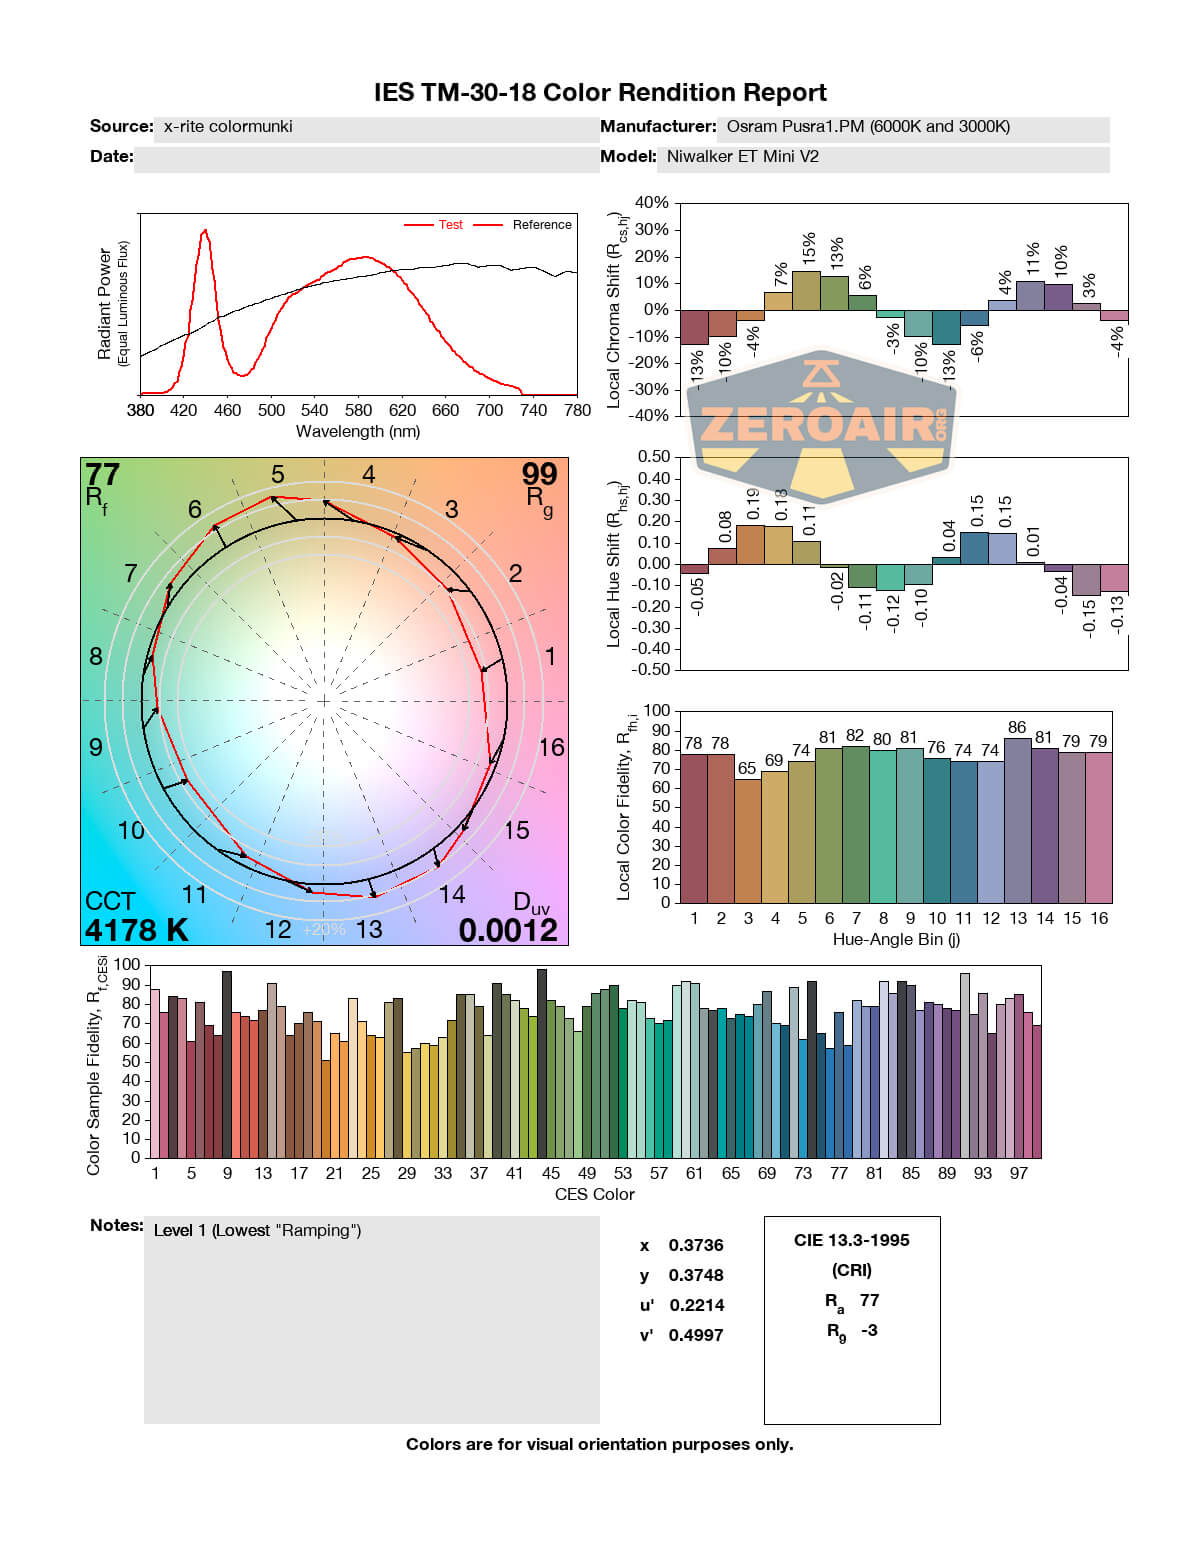
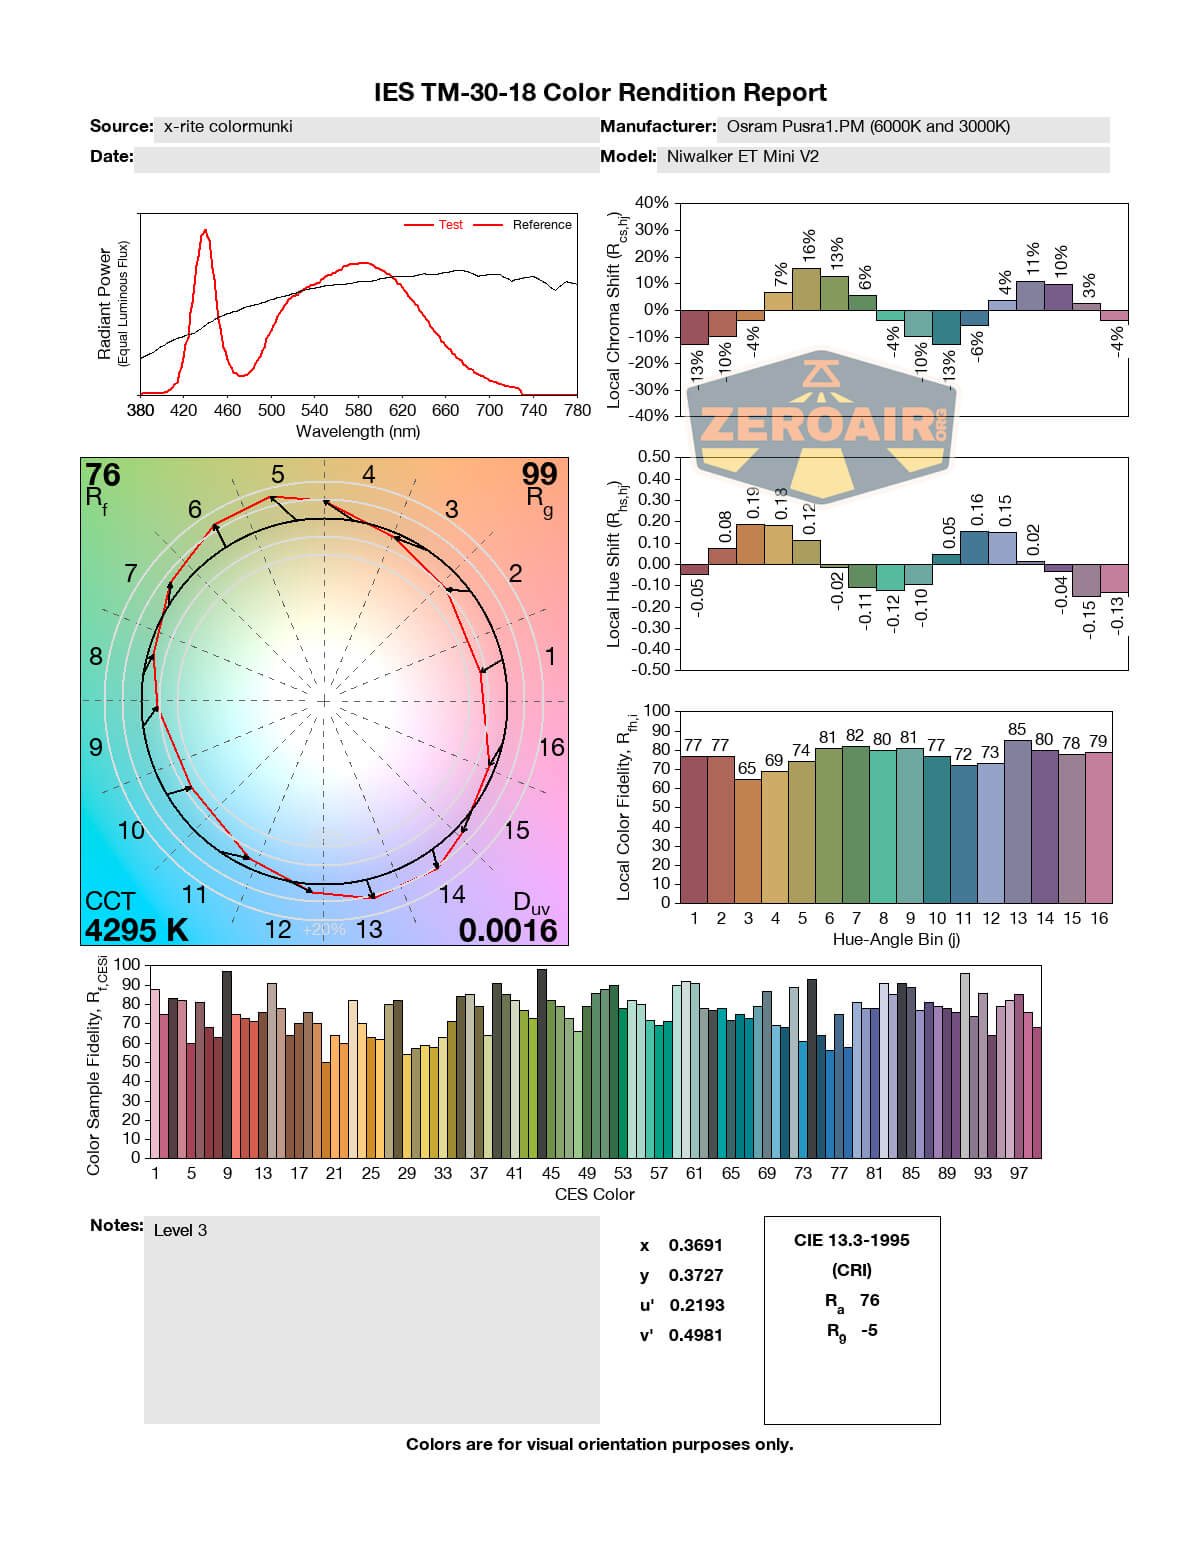
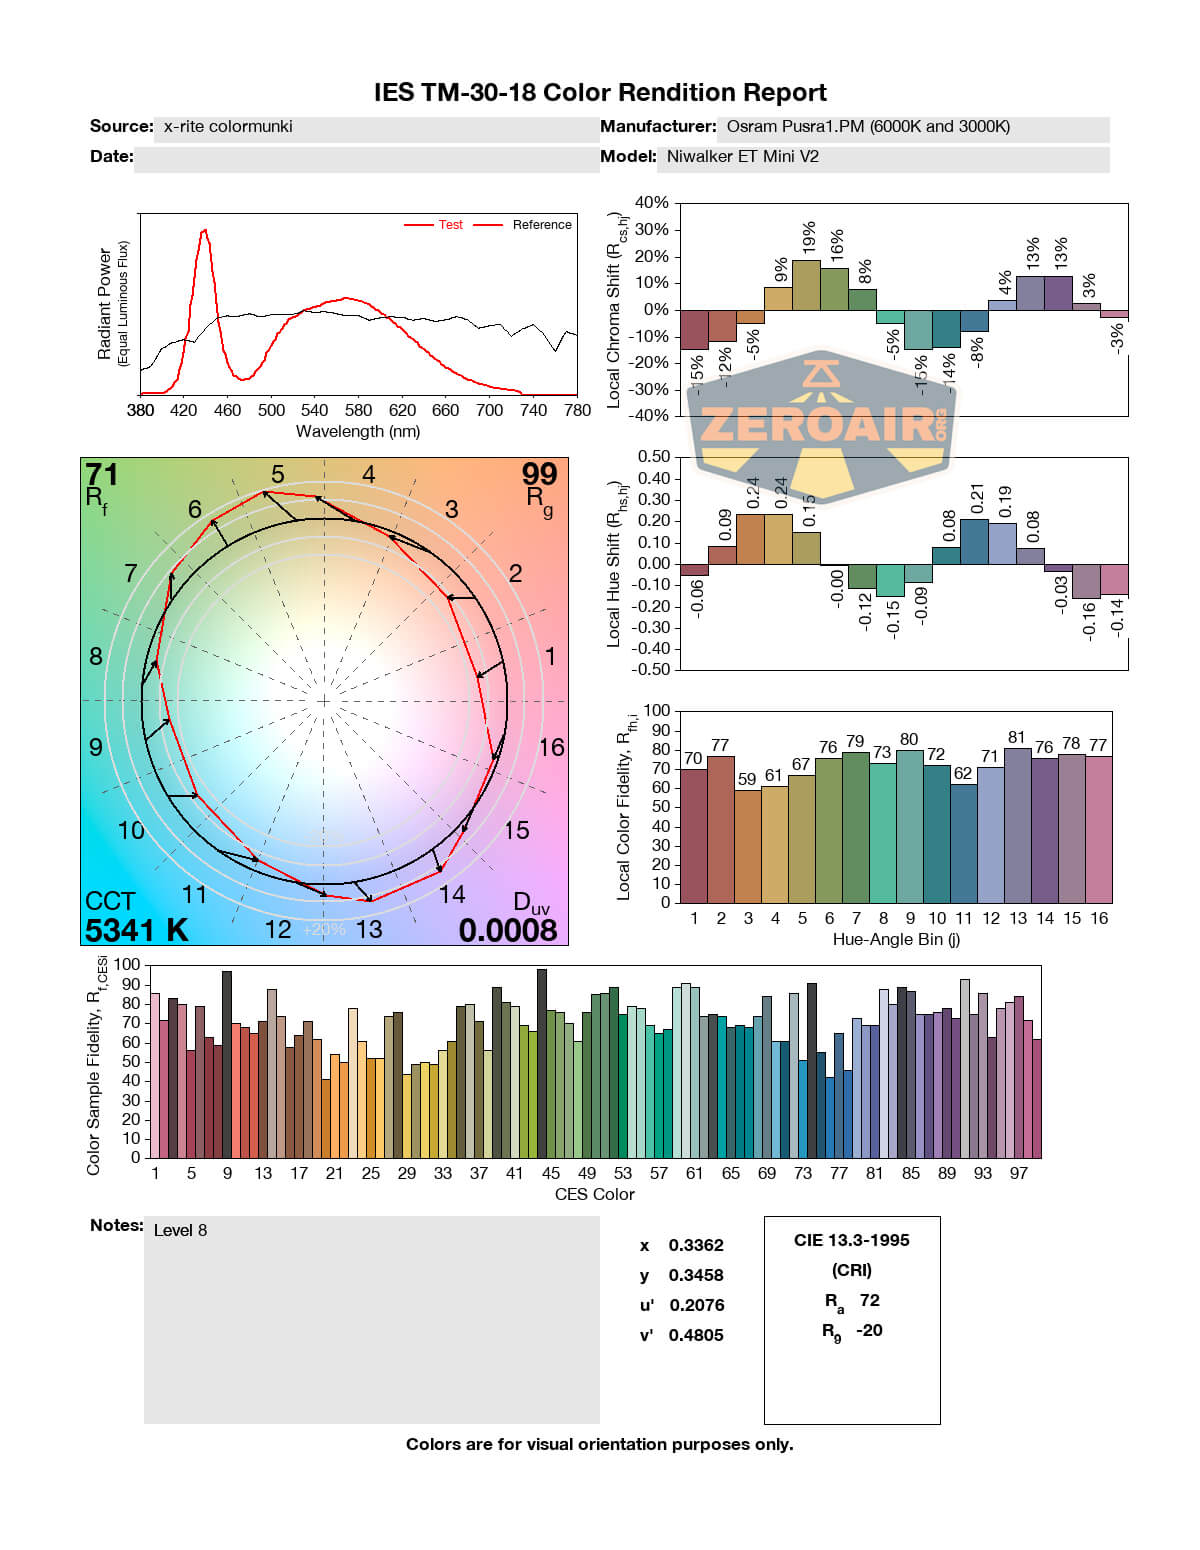
3000K:
 6000K:
 Both:
Both:
 Here you can see a “baseline” – a chart with almost no light hitting the sensor.
Then there’s the Ultrafire WF-602C flashlight, which has some of the worst PWM I’ve seen. It’s so bad that I used a post about it to explain PWM! Here are multiple timescales (10ms, 5ms, 2ms, 1ms, 0.5ms, 0.2ms) to make comparing this “worst” PWM light to the test light easier. That post also explains why I didn’t test the WF-602C at the usual 50us scale.
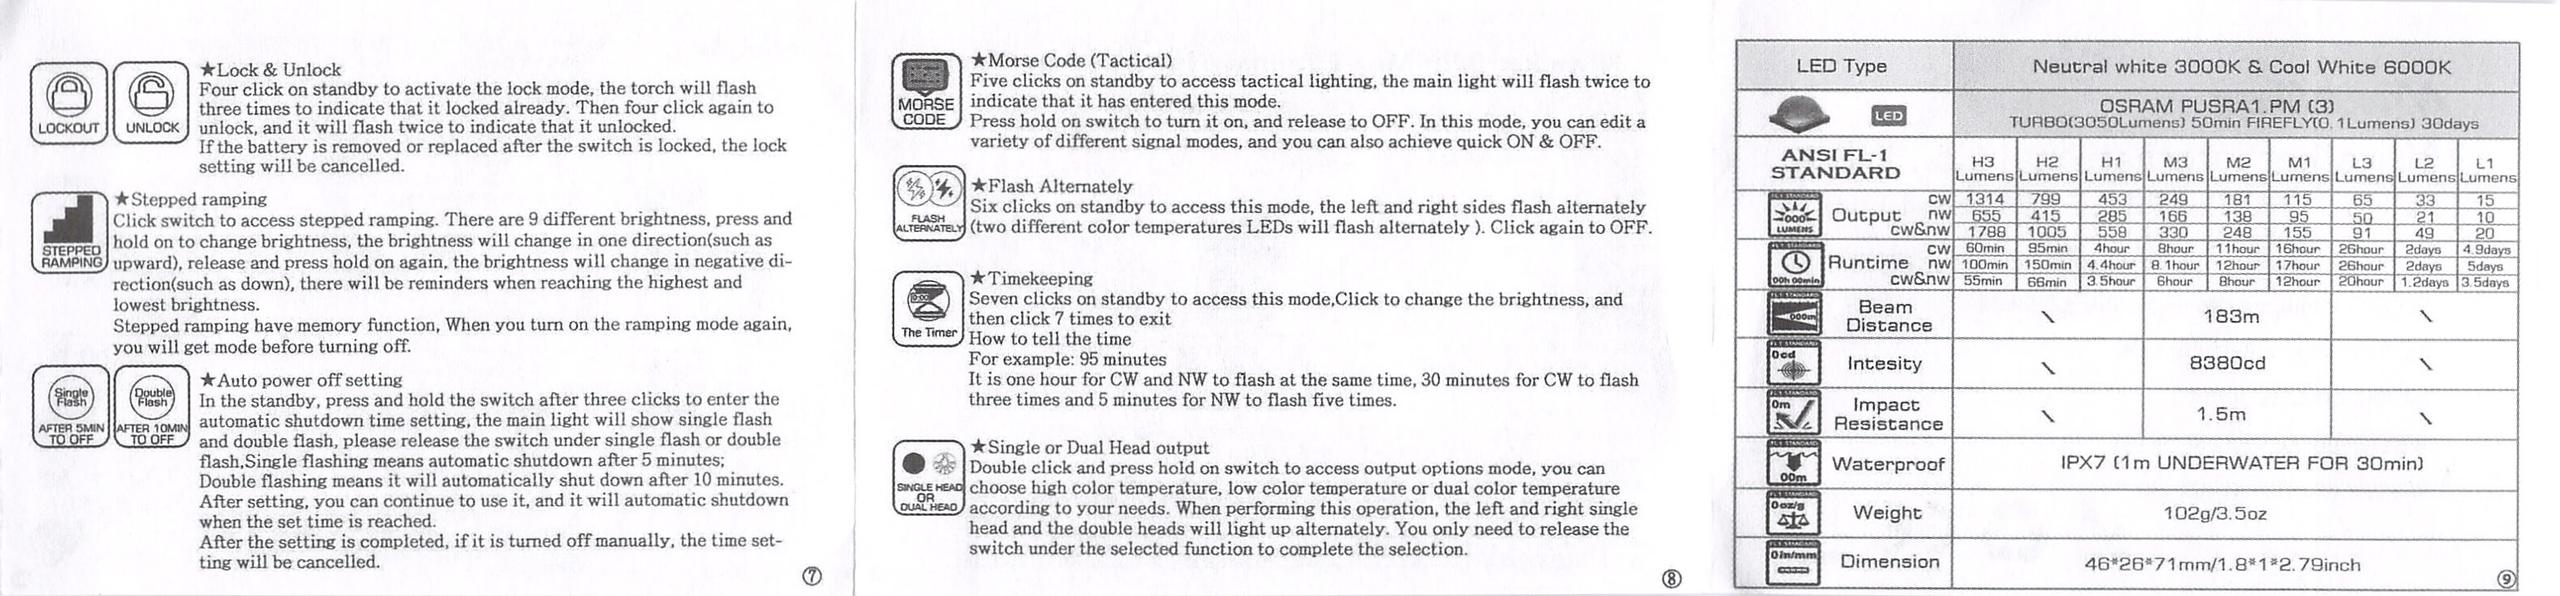
User Interface and Operation
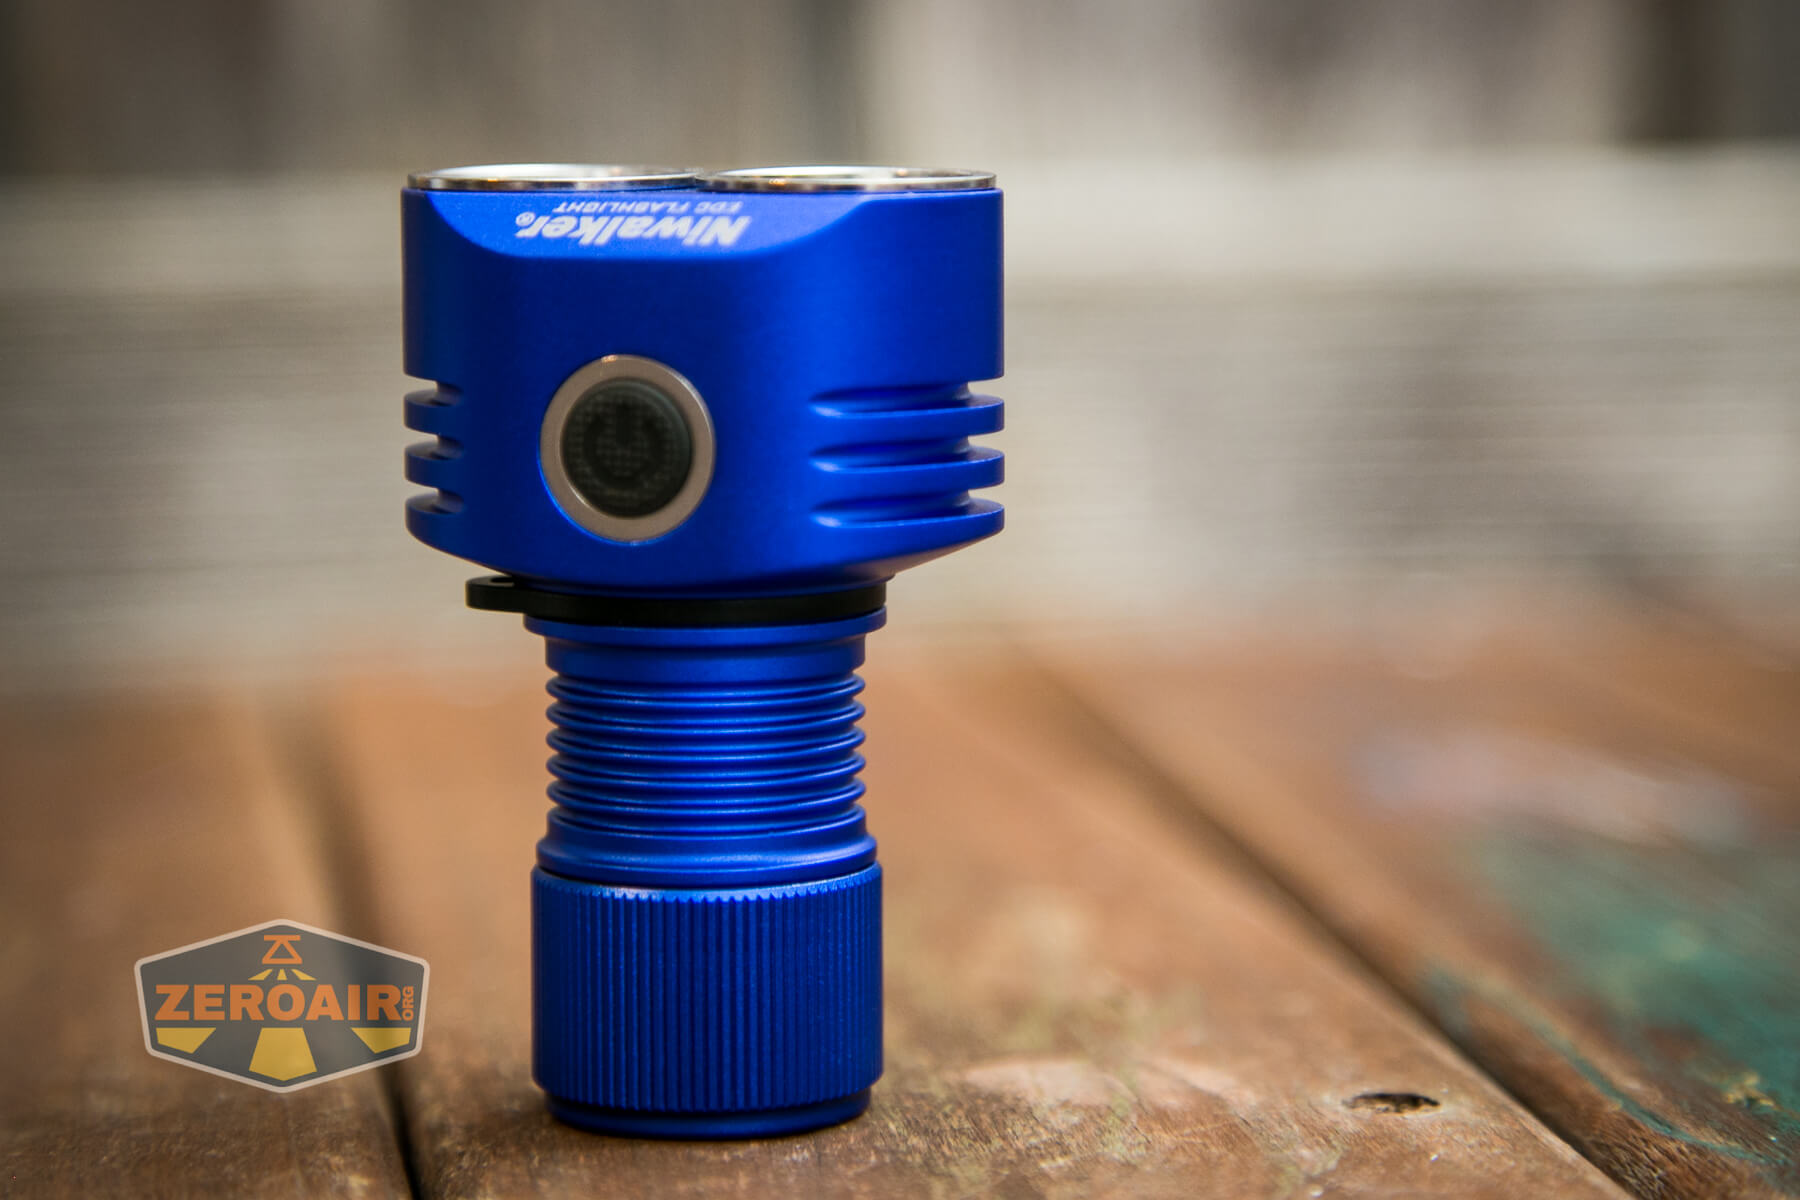
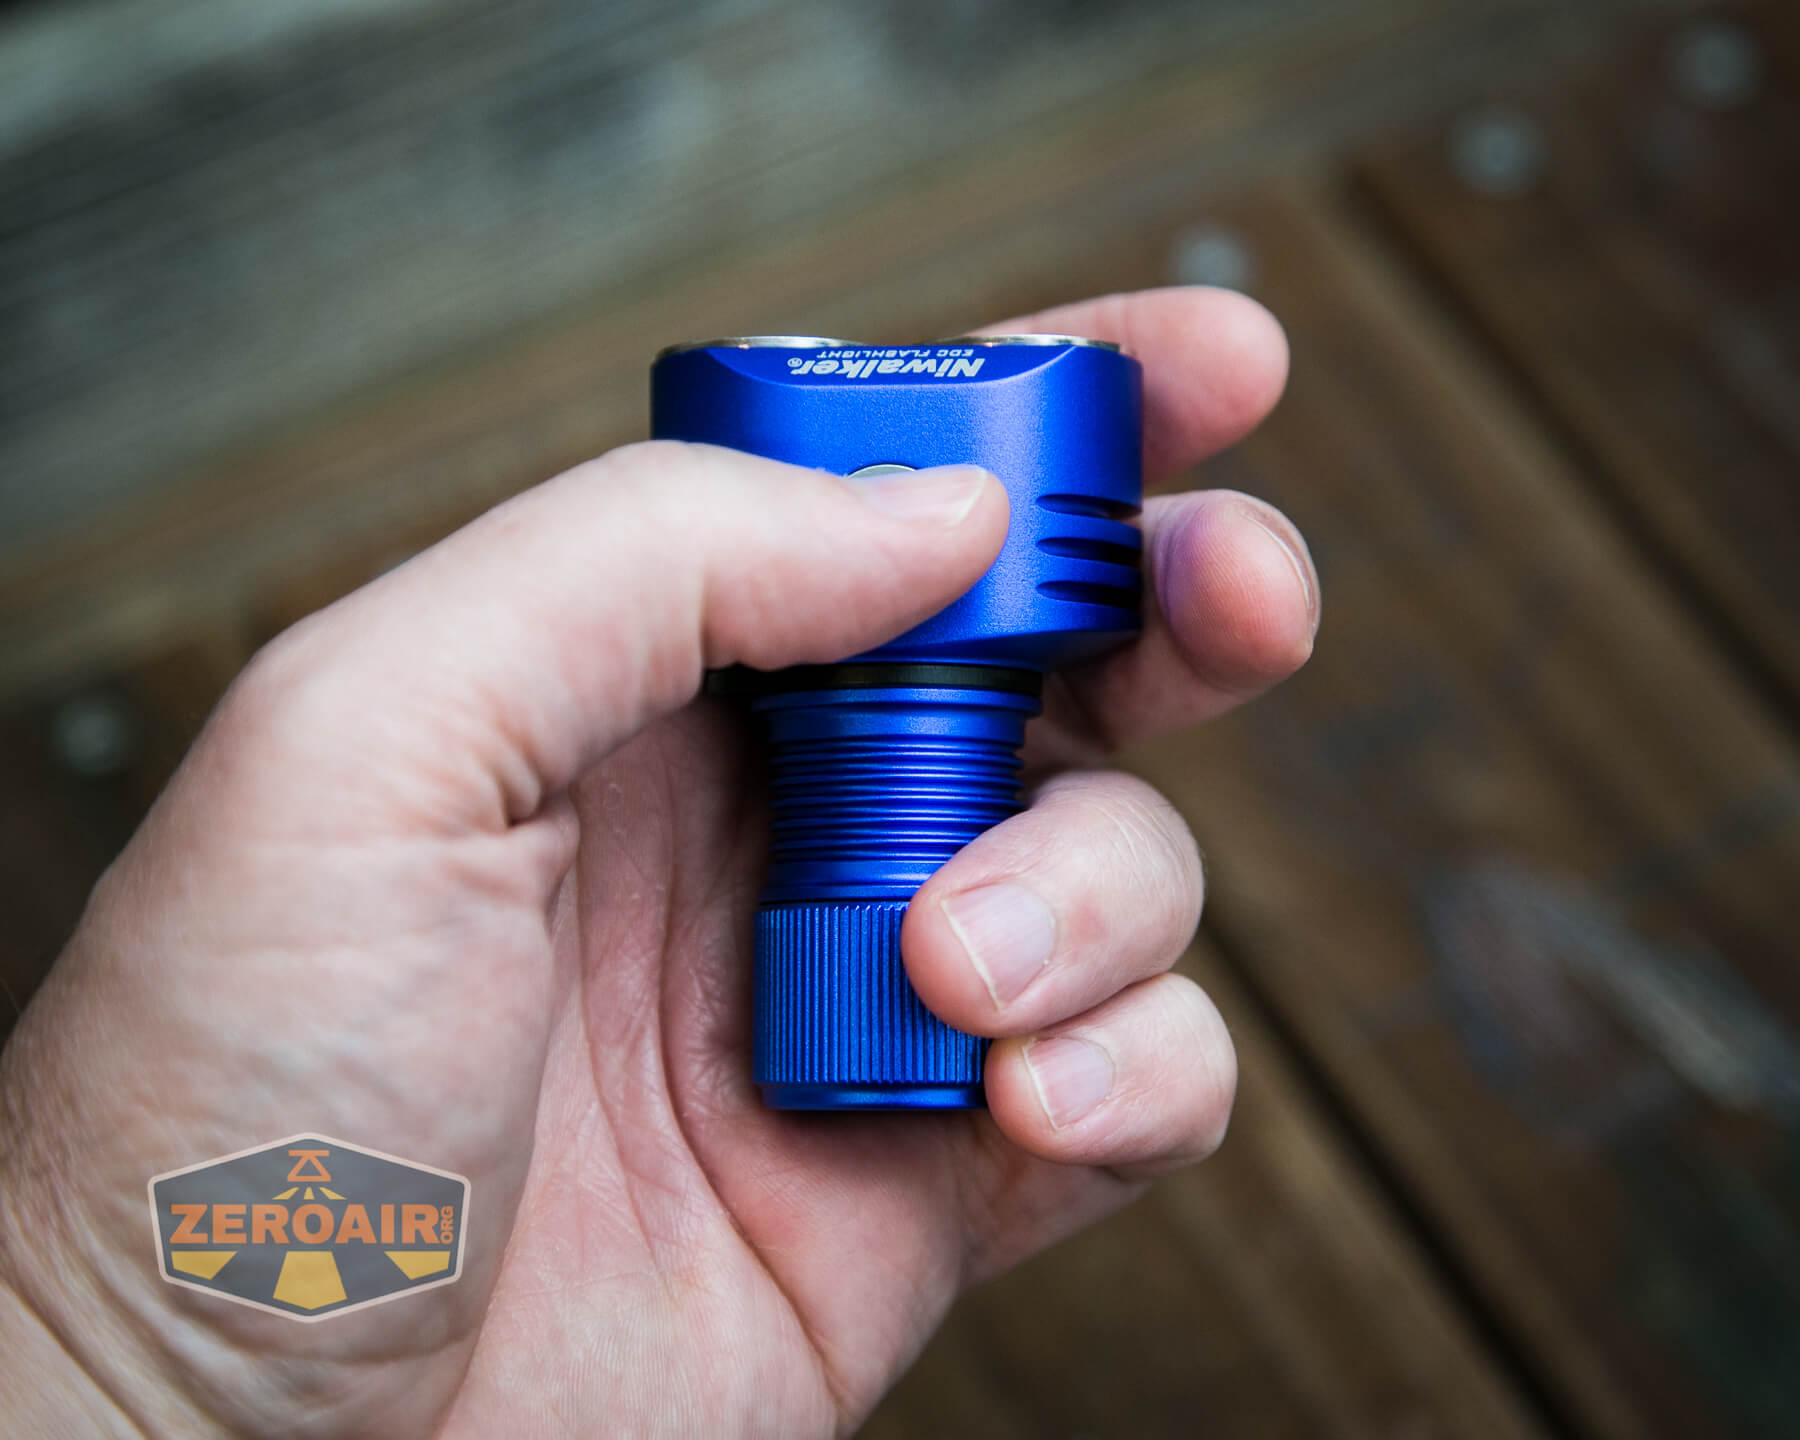
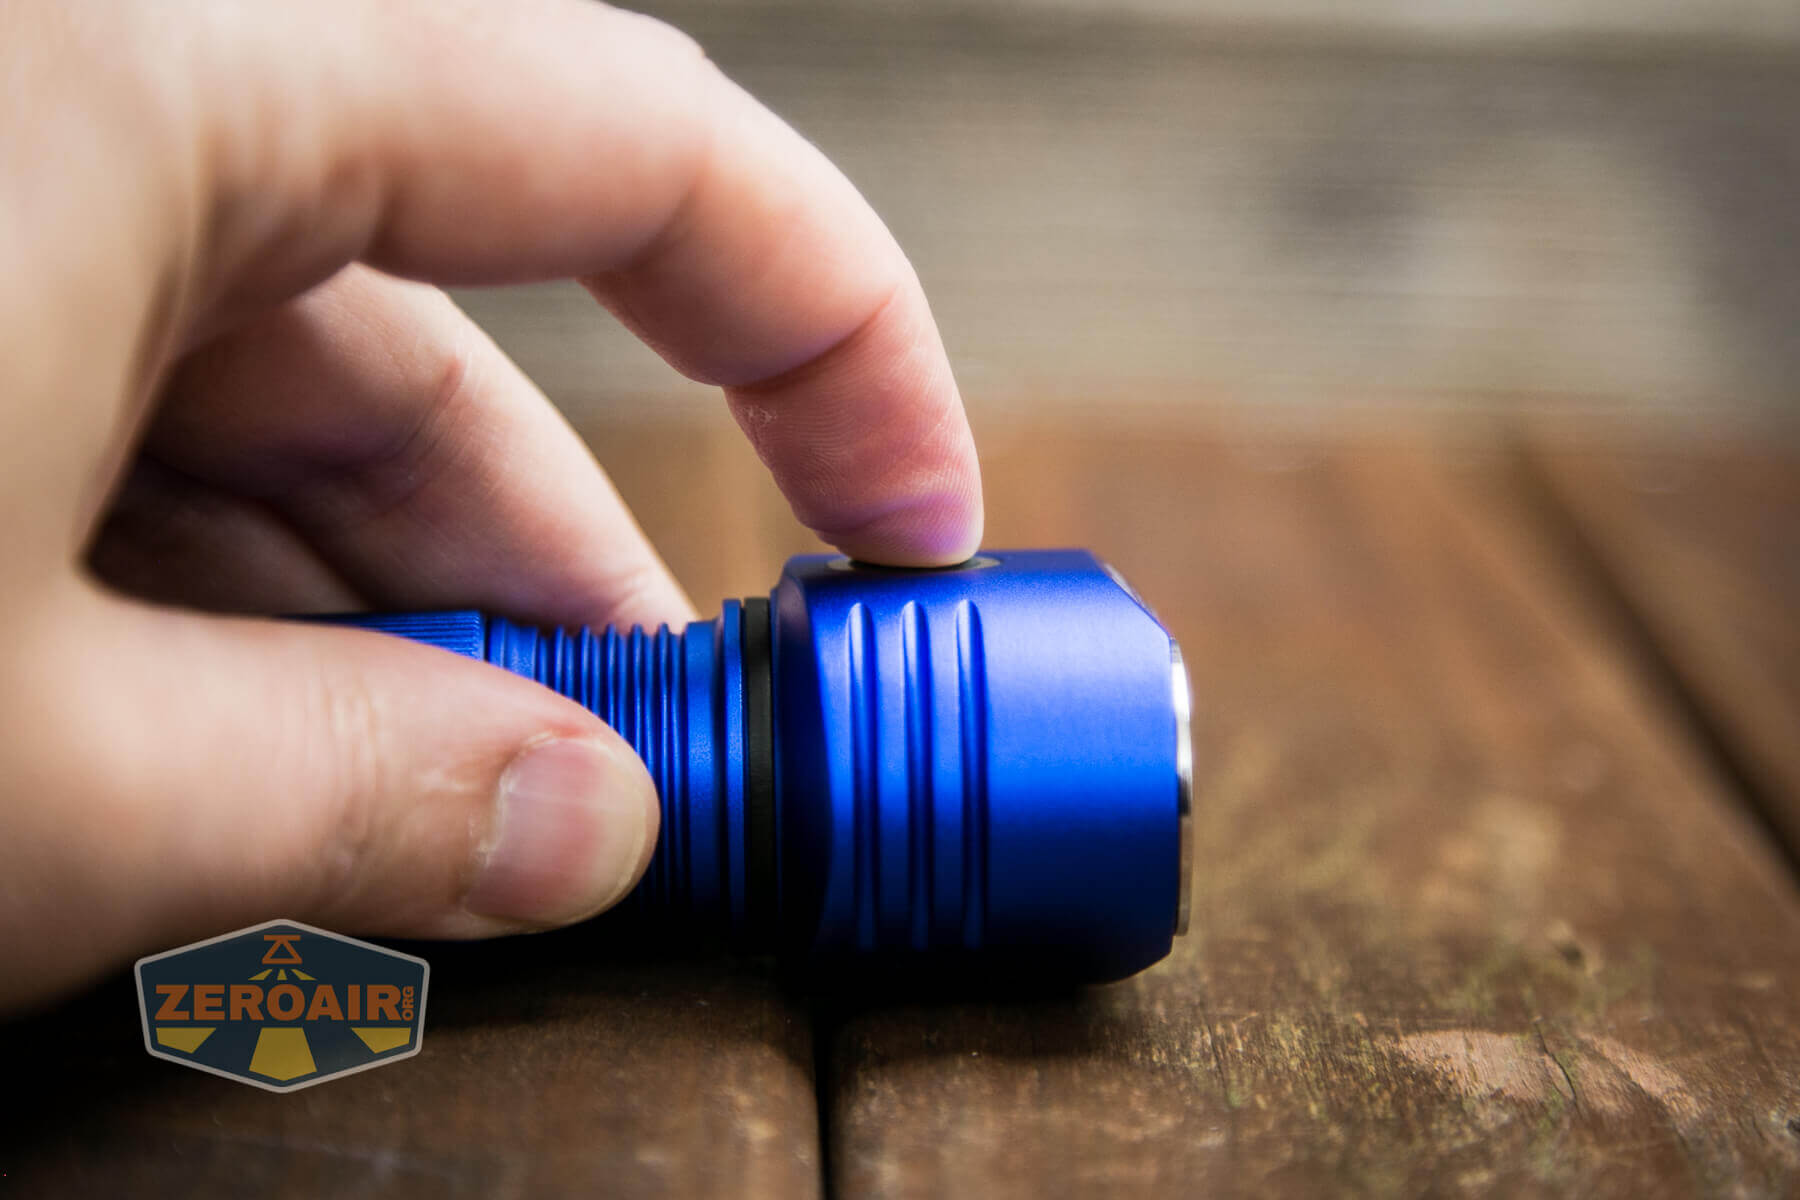
The switch used here on the ET Mini V2 is an electronic switch. The switch is round and textured – it’s this texture that will help differentiate it from the charge port cover on the other side of the head.
It’s a quiet switch, with very low action. The switch is also backlit. The light can be somewhat faint, though. It seems to be an always-indicating switch (when the light is on). I’m not sure the manual overs all the indicating options, because the switch seems to indicate blue when the cell power is “acceptable.” The manual covers these specifically: When power is low (<30%), the switch will be red. When the power is <20%, the switch will flash red.
I think the diagram included in the manual is a bit confusing. Here’s a blow-up of that:
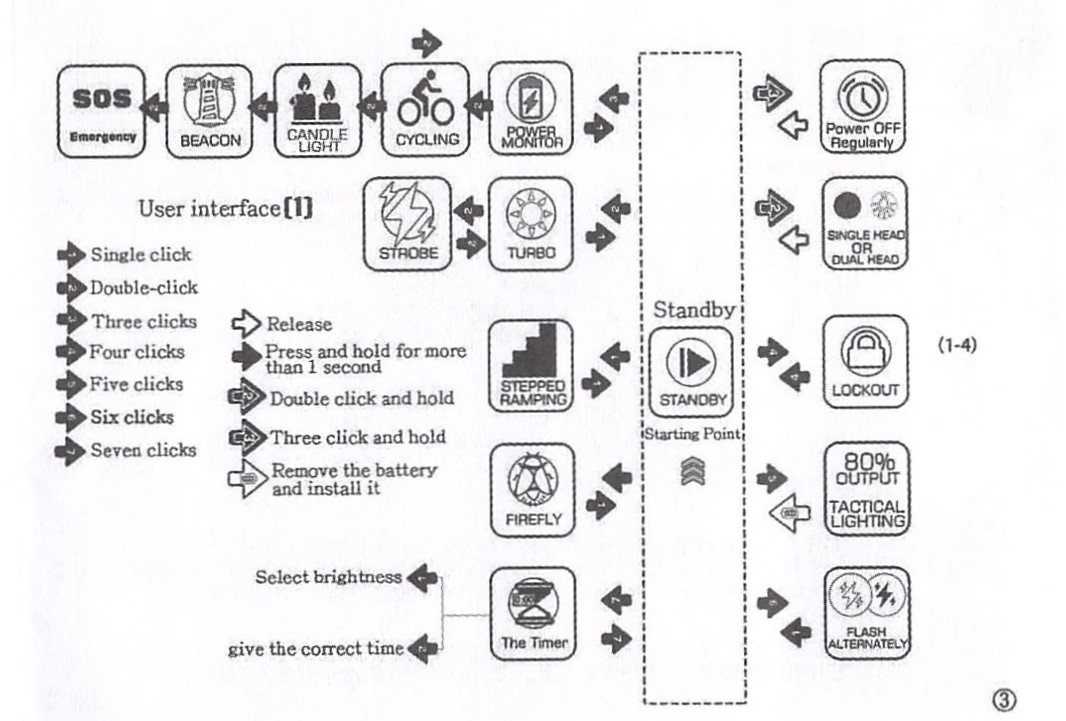
In person, it’s quite a bit harder to read than it is here. In fact, I scanned the manual just so I could zoom in and read these tiny numbers! I’ll note that while there are three emitter settings (3000K only, 6000K only, or both), they’re all controlled exactly the same way. Thus, the table will cover just one, and that should suffice for all 3 emitter settings.
Furthermore, the graphic above describes “off” as “Standby” and “starting point.” This annoys me just a little bit. It’s never clear in the manual what the difference is between “Power OFF Regularly” and “Standby.” I want this to be clearer!
One more point: The manual (graphic, above) allows clicks and clicks + hold. The click option is fairly clear. The “click + hold” is less clear. For example, “Double Click and hold” is really three clicks, on which the downstroke of the third click is held. So click/release, click/release, click/hold. It’s an important distinction because there are many click/hold scenarios doing different things.
Here’s that user interface table! I’m sort of writing the table from my experience using the light, and what I needed to know most will be toward the top.
| State | Action | Result |
|---|---|---|
| Standby | Click | On (Mode Memory, one of the 9 “Stepped ramping” modes |
| Any | Double Click | Turbo |
| Standby | Hold | Firefly (Lower than 9 stepped ramping modes) |
| On (Except Turbo) | Click | Standby |
| Standby | “Double click and hold” (click/release, click/release, click/hold) | Switch between Single, triple, or both heads (on release, the light goes to Standby) |
| Standby | “Three click and hold” (click/release, click/release, click/release, click/hold) | “Power OFF regularly” (though, to be sure, I am not clear what the “OFF” state means exactly) |
| Standby | Four clicks | Lockout (three blinks to confirm) |
| Lockout | Four clicks | Standby (three blinks to confirm) |
| Lockout | Click | One blink to confirm Lockout |
| Standby | Five clicks | “80% output Tactical Lighting” ^ |
| 80% output Tactical Lighting Mode Group | Click | 80% output on the already selected emitters |
| 80% output Tactical Lighting Mode Group | Remove and reinsert cell | Standby (ie: Exit 80% Tactical Group) |
| Standby | Six clicks | Emitters flash alternatively (6000k then 3000K, three quick flashes each) |
| Turbo | Double Click | Strobe |
| Strobe | Double Click | Turbo |
| Turbo | Click^^ | Previous mode |
| Standby | Triple Click | Power Monitor` |
| Power Monitor | Double Click | Cycling mode (A blinking mode where the “off blink” is high output) (Ie there is no off state in the blinks) |
| Cycling | Double Click | Candle (A fade from bright to dim on the selected emitters – very much not like other candle modes you may know!) |
| Candle | Double Click | Beacon |
| Beacon | Double Click | SOS |
| SOS | Double Click | Power Monitor (ie: back to the start of this accessory group) |
| Stepped Ramping | Hold | Mode advance through the 9 stepped modes^^^ |
| Standby | Click 7x | “The Timer”† |
| The Timer | Click | Iterate brightness selection (Firefly or Low) |
| The Timer | Double Click | “Give the correct time” (timer programming)§ |
| Standby | Click 3x, then click/hold | Set Auto/Timed off‡ |
^ 80% output Tactical Lighting is a special mode that is only 80% output and only momentary. This mode remembers which emitters were activated, so it can be 80% of any of the three options, but you need to make that selection before entering this mode.
^^ This single click from Turbo is the only instance I can find where a single click doesn’t turn the light off. It’s a little bit of discontinuity in the user interface, which I don’t care for at all. The manual even says that one click from Turbo will take the light back to Standby (which is essentially “off”).
` Power monitor blinks the ones voltage, then pauses, then blinks the tenths voltage. For example, four “grouped” blinks followed by two “grouped” blinks is 4.2V. All the modes following (and including) the Power Monitor option use whatever emitter selection is already active.
^^^ Usually, holding in the “Stepped Ramping” mode increases the output. Sometimes holding the switch decreases the output. This is point of contention number 2 about the UI. It’s not always clear exactly which direction you’ll be heading when you hold, and this ambiguity leads to frustration. Most of the time, the direction iterates. For example, if you increase the output and then release the switch, the next hold session will decrease the output. But if you hold again nearly immediately after releasing (but slower than an actual double click) the direction will continue as it was before. This could be improved. I note that “click + click/hold” is not being used in the user interface – this would be a perfect use for decreasing the output, and “hold” can always be for increasing. (This is one thing I love about Anduril, actually. I’d like to see it here too.) I’ll add that when the lowest or highest output level is reached, the emitter(s) blink a couple of times to indicate. They then stop; you can’t go up and down in the same click action.
† “The Timer” is quite an interesting feature. An overview: You can pick an output level on whatever emitters are active, and then set an actual timer for the light to shut off! Specifically, you can pick between two output levels: Firefly or “low” (ish).
§ Setting the timer: The manual is unclear on how to actually set the timer. It appears to be a double click, but…
‡ Auto-off timer: While holding, the selected emitters will flash once, then (after a while) twice. Release immediately after 1 blink for a 5-minute timed off, or after the double blink for a 10-minute timed off. The light will still work during this timer.
LED and Beam
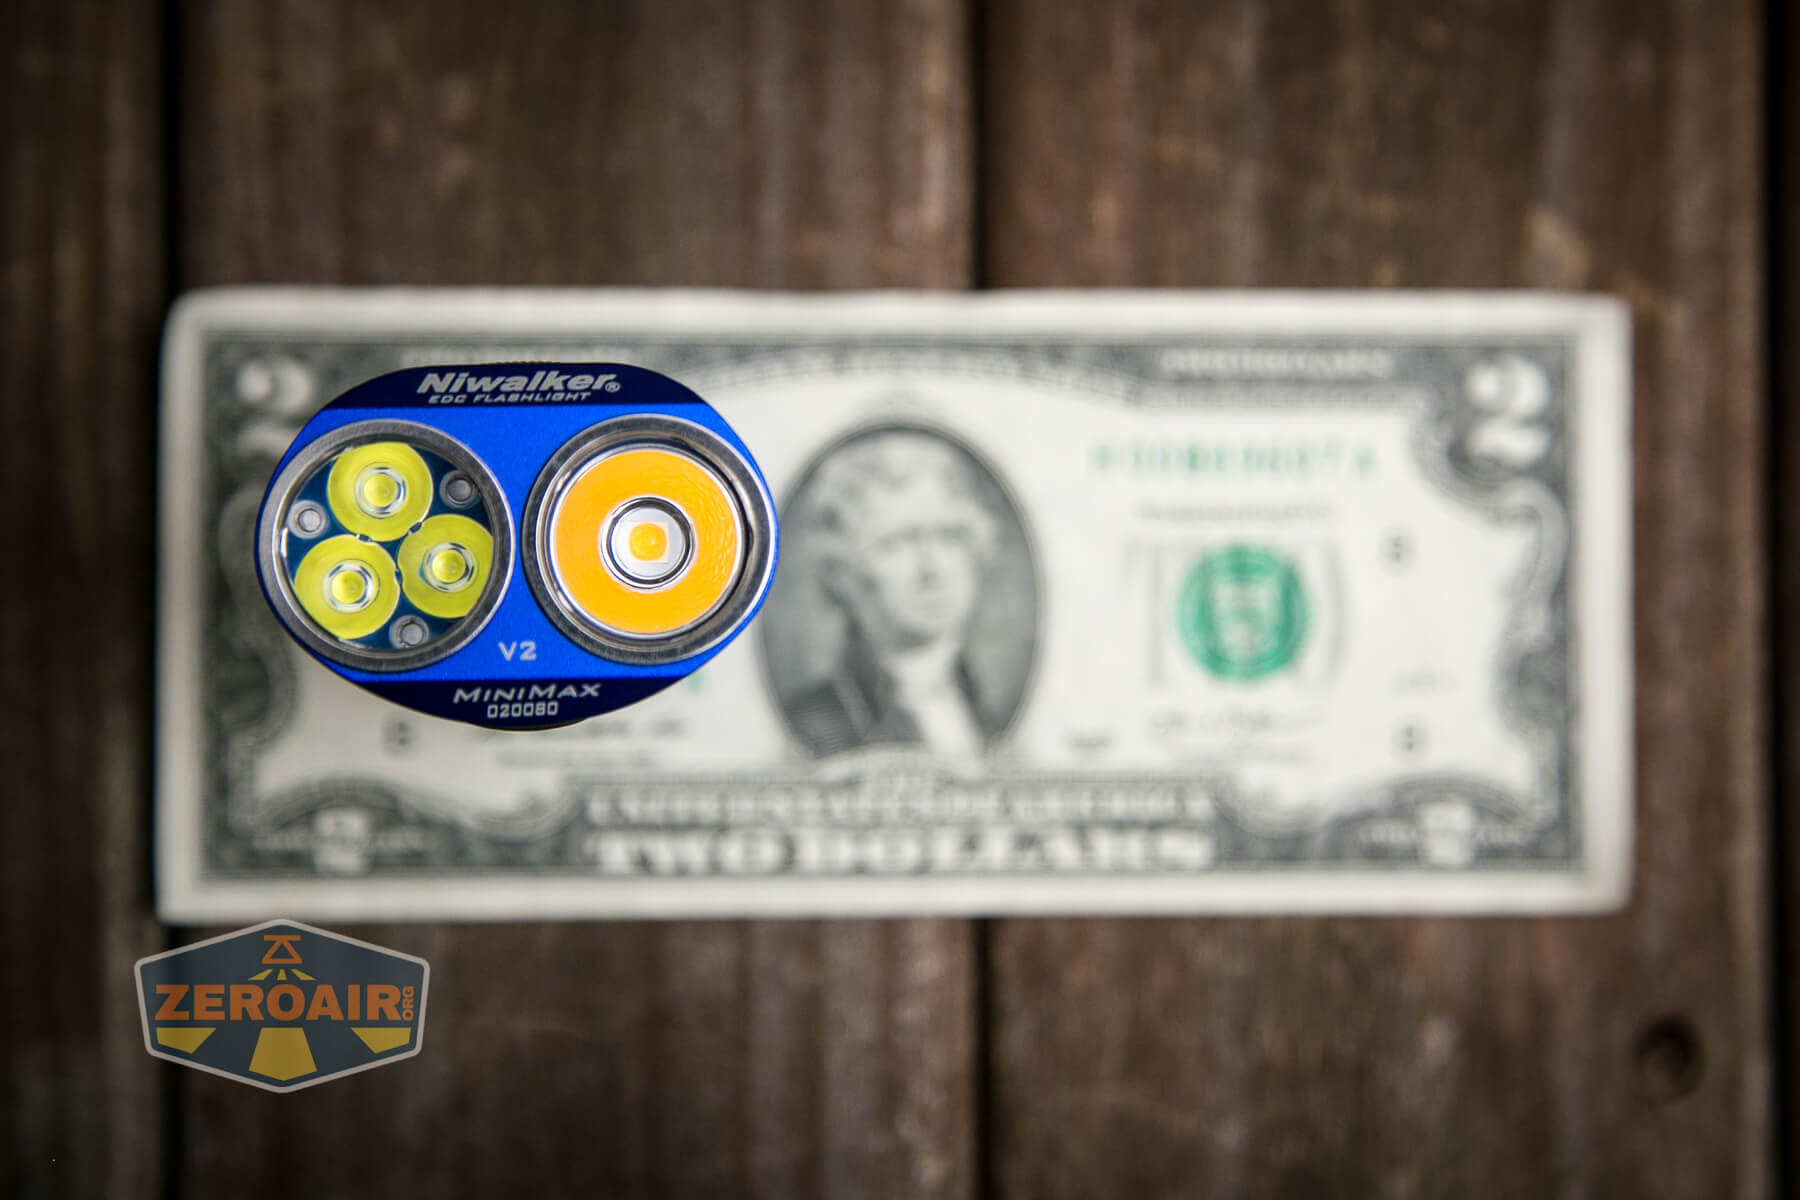
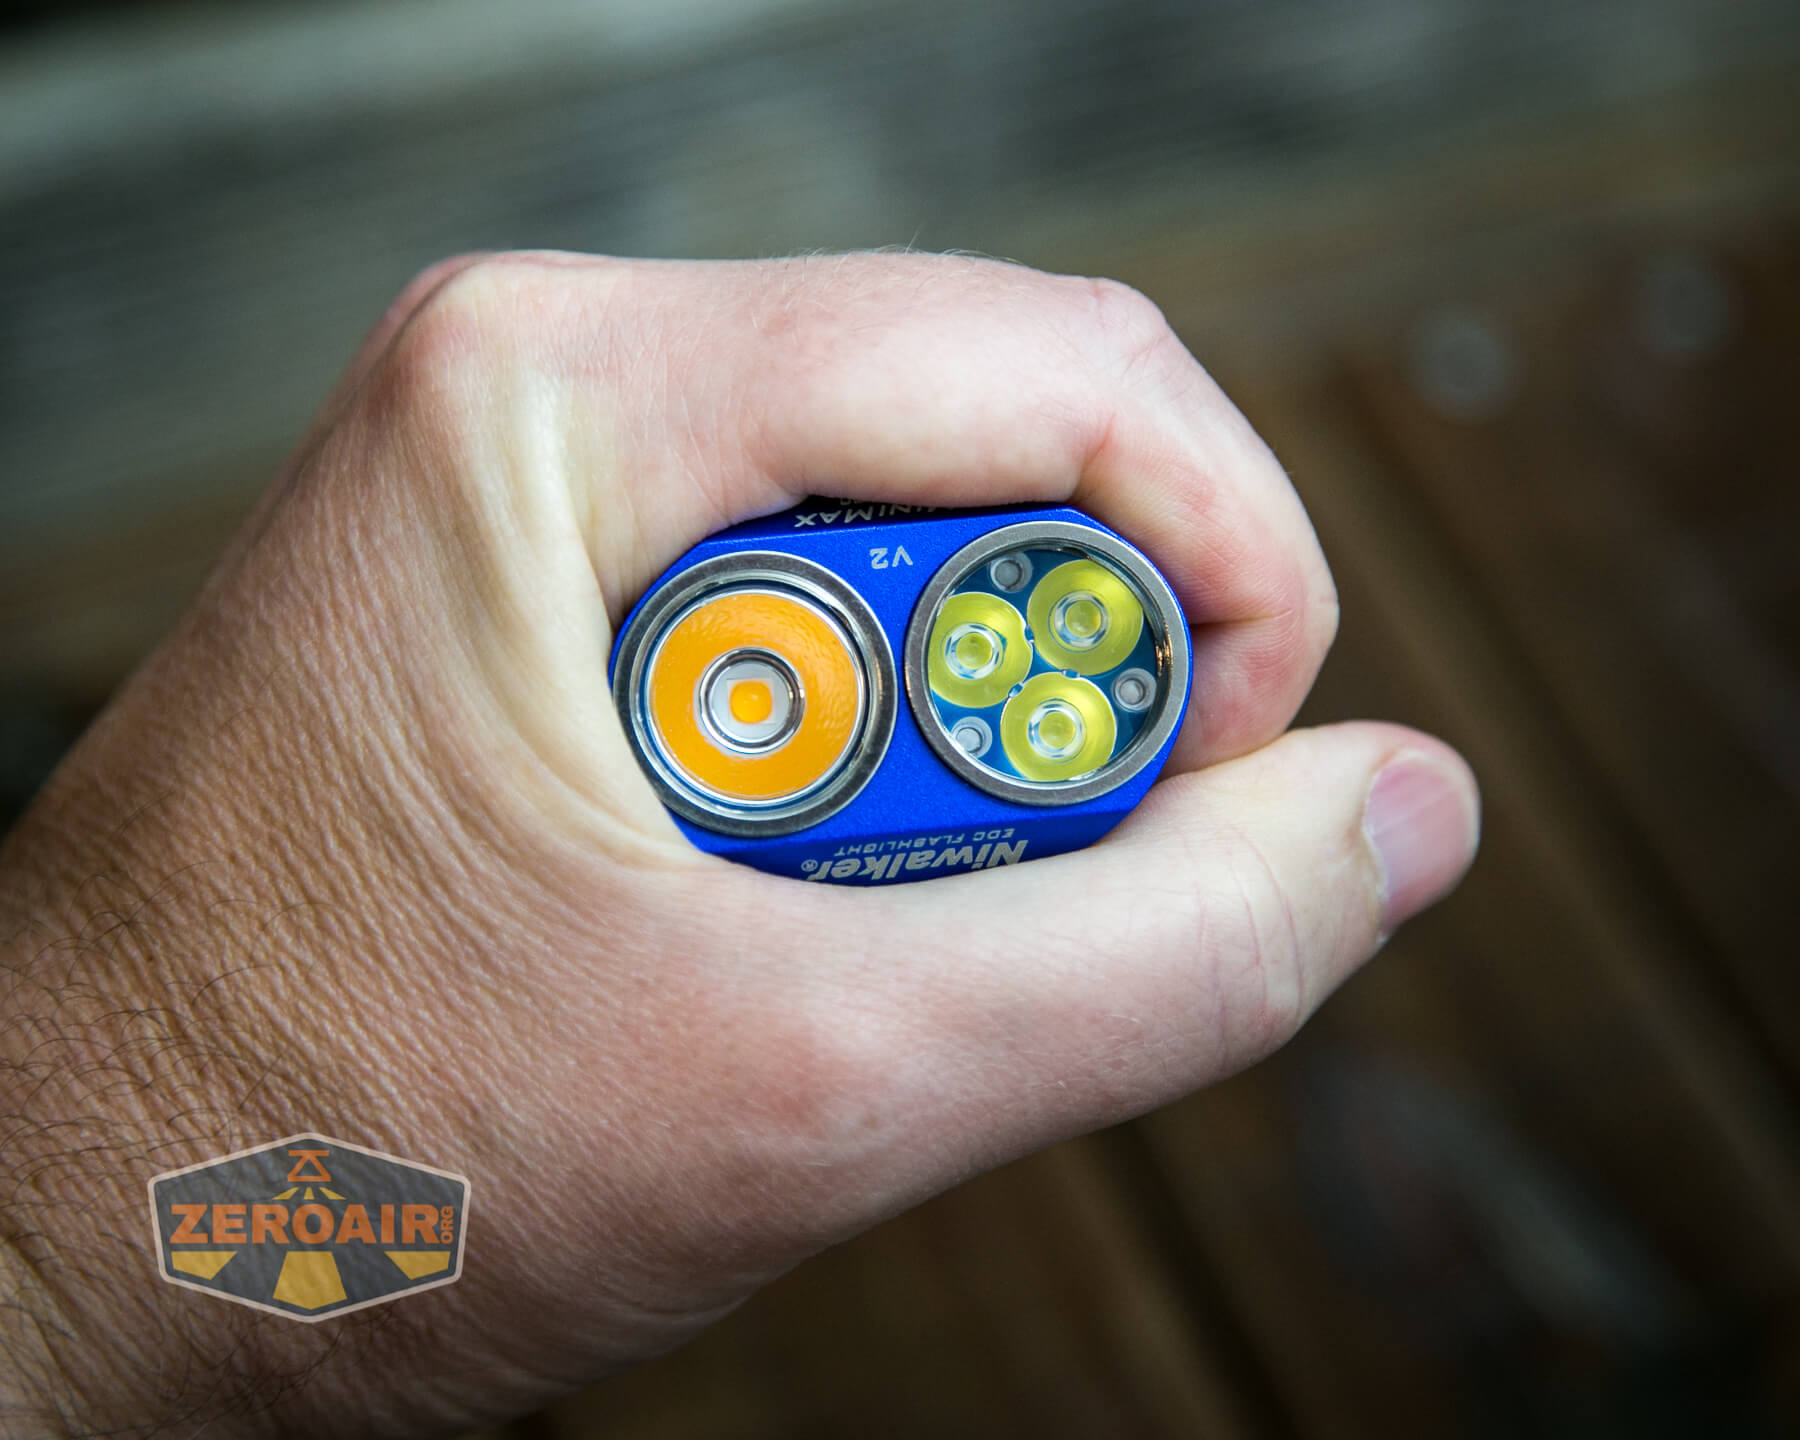
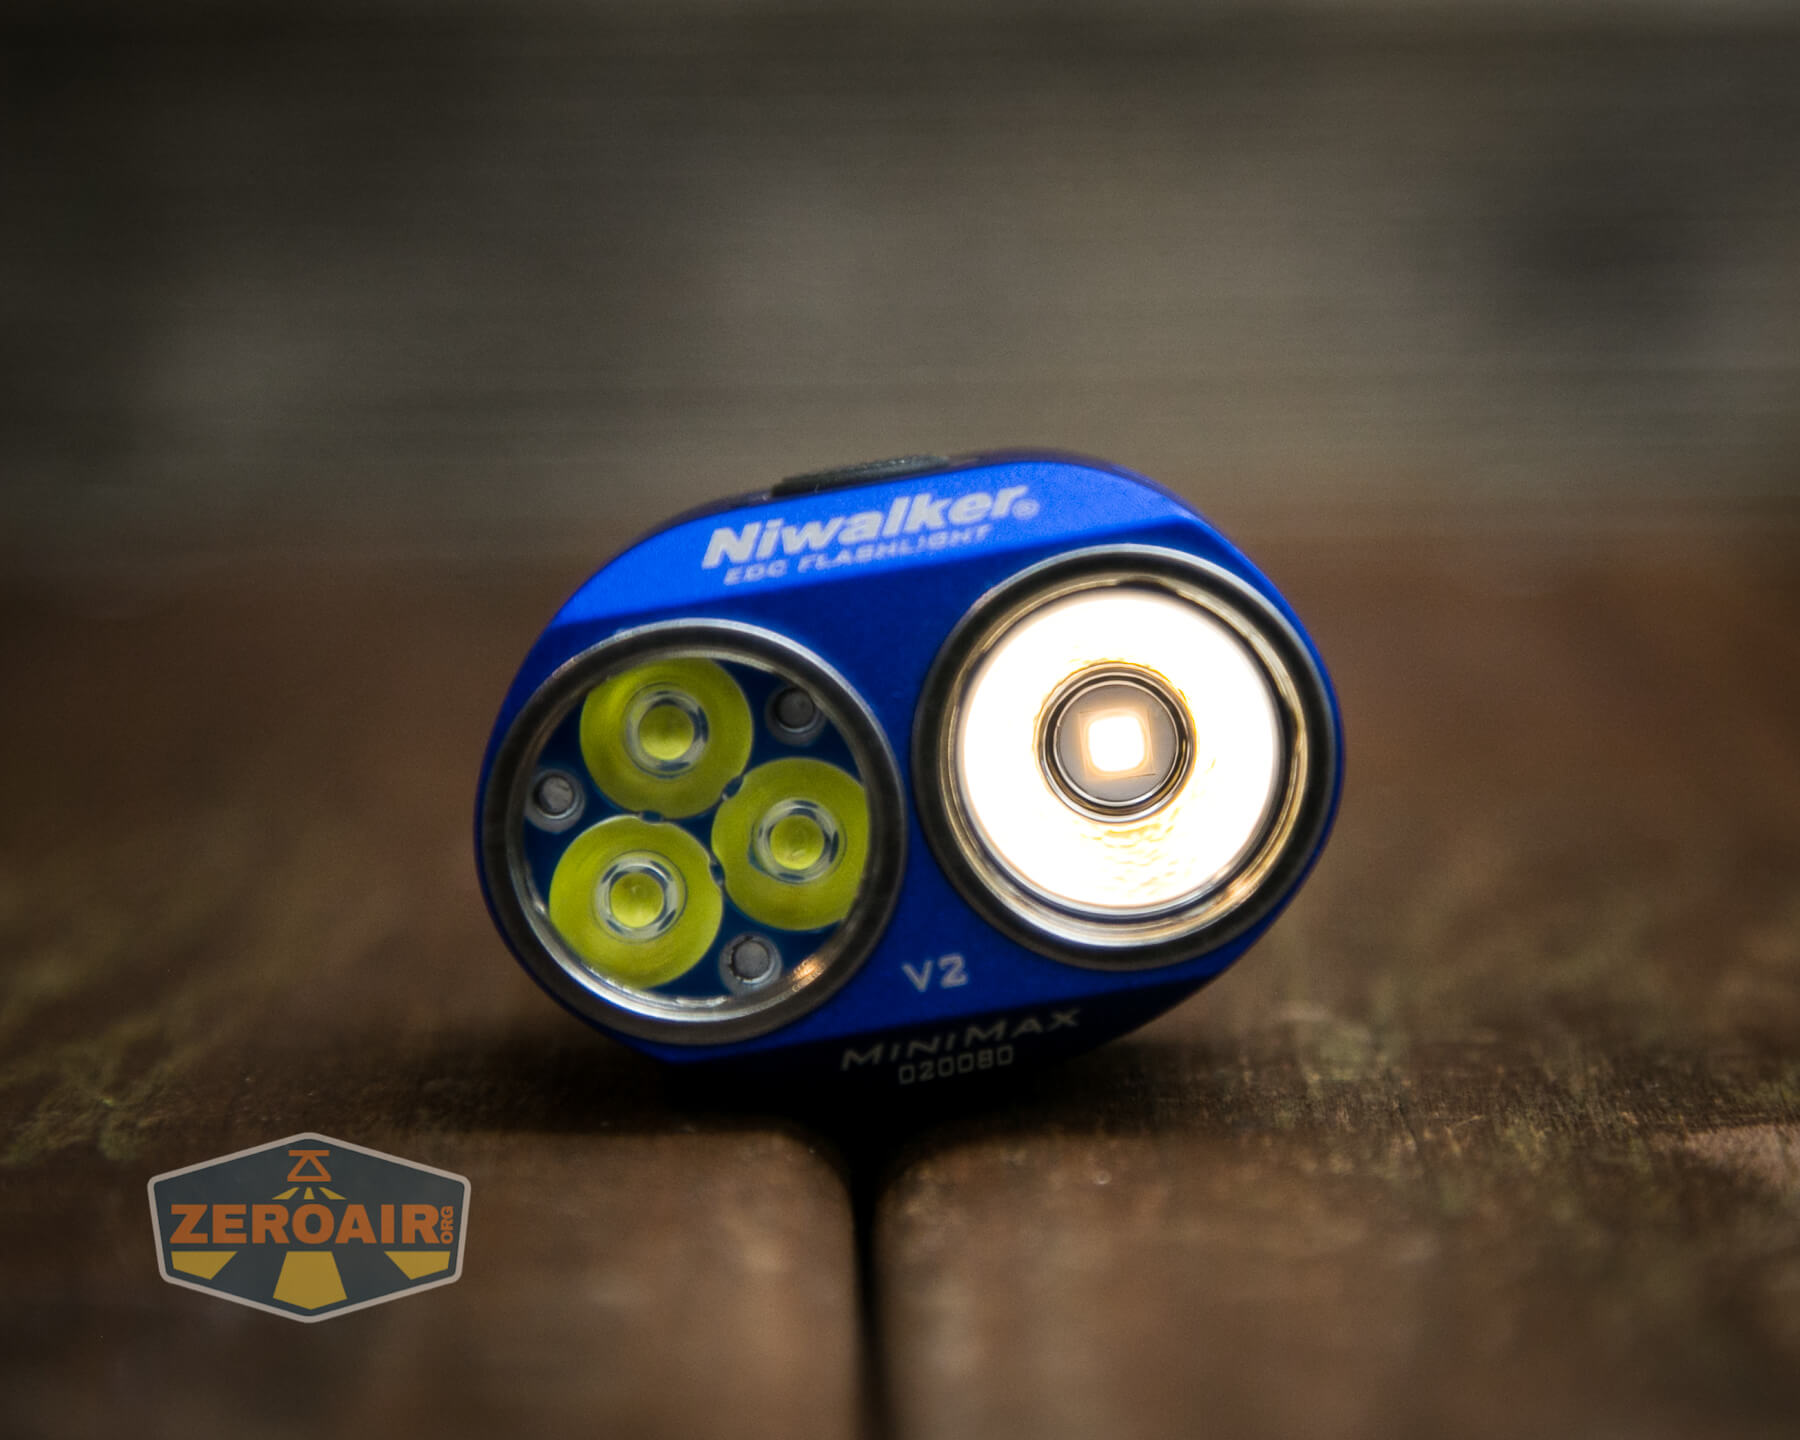
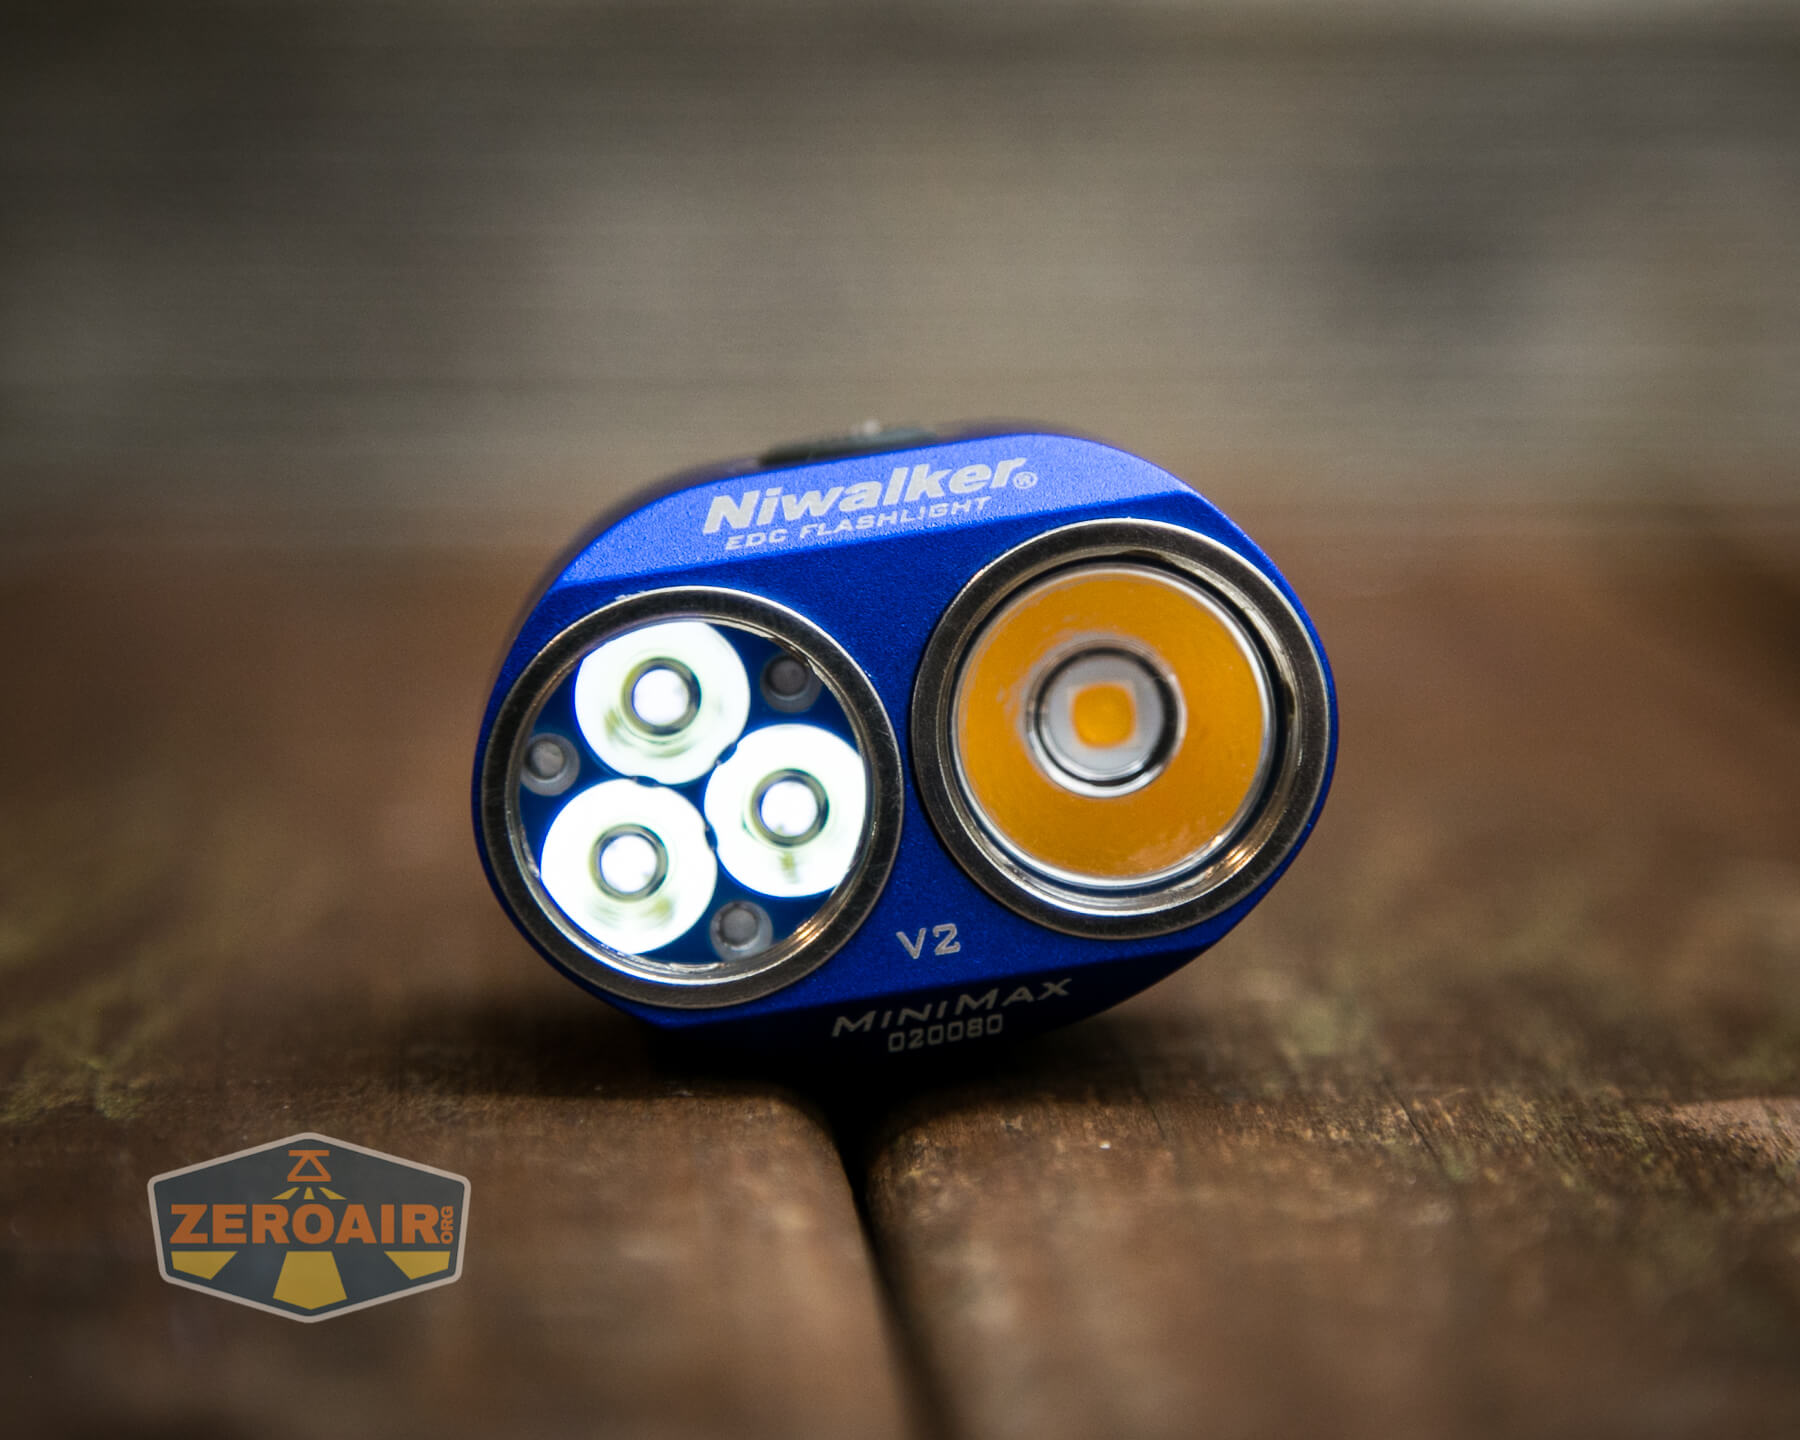
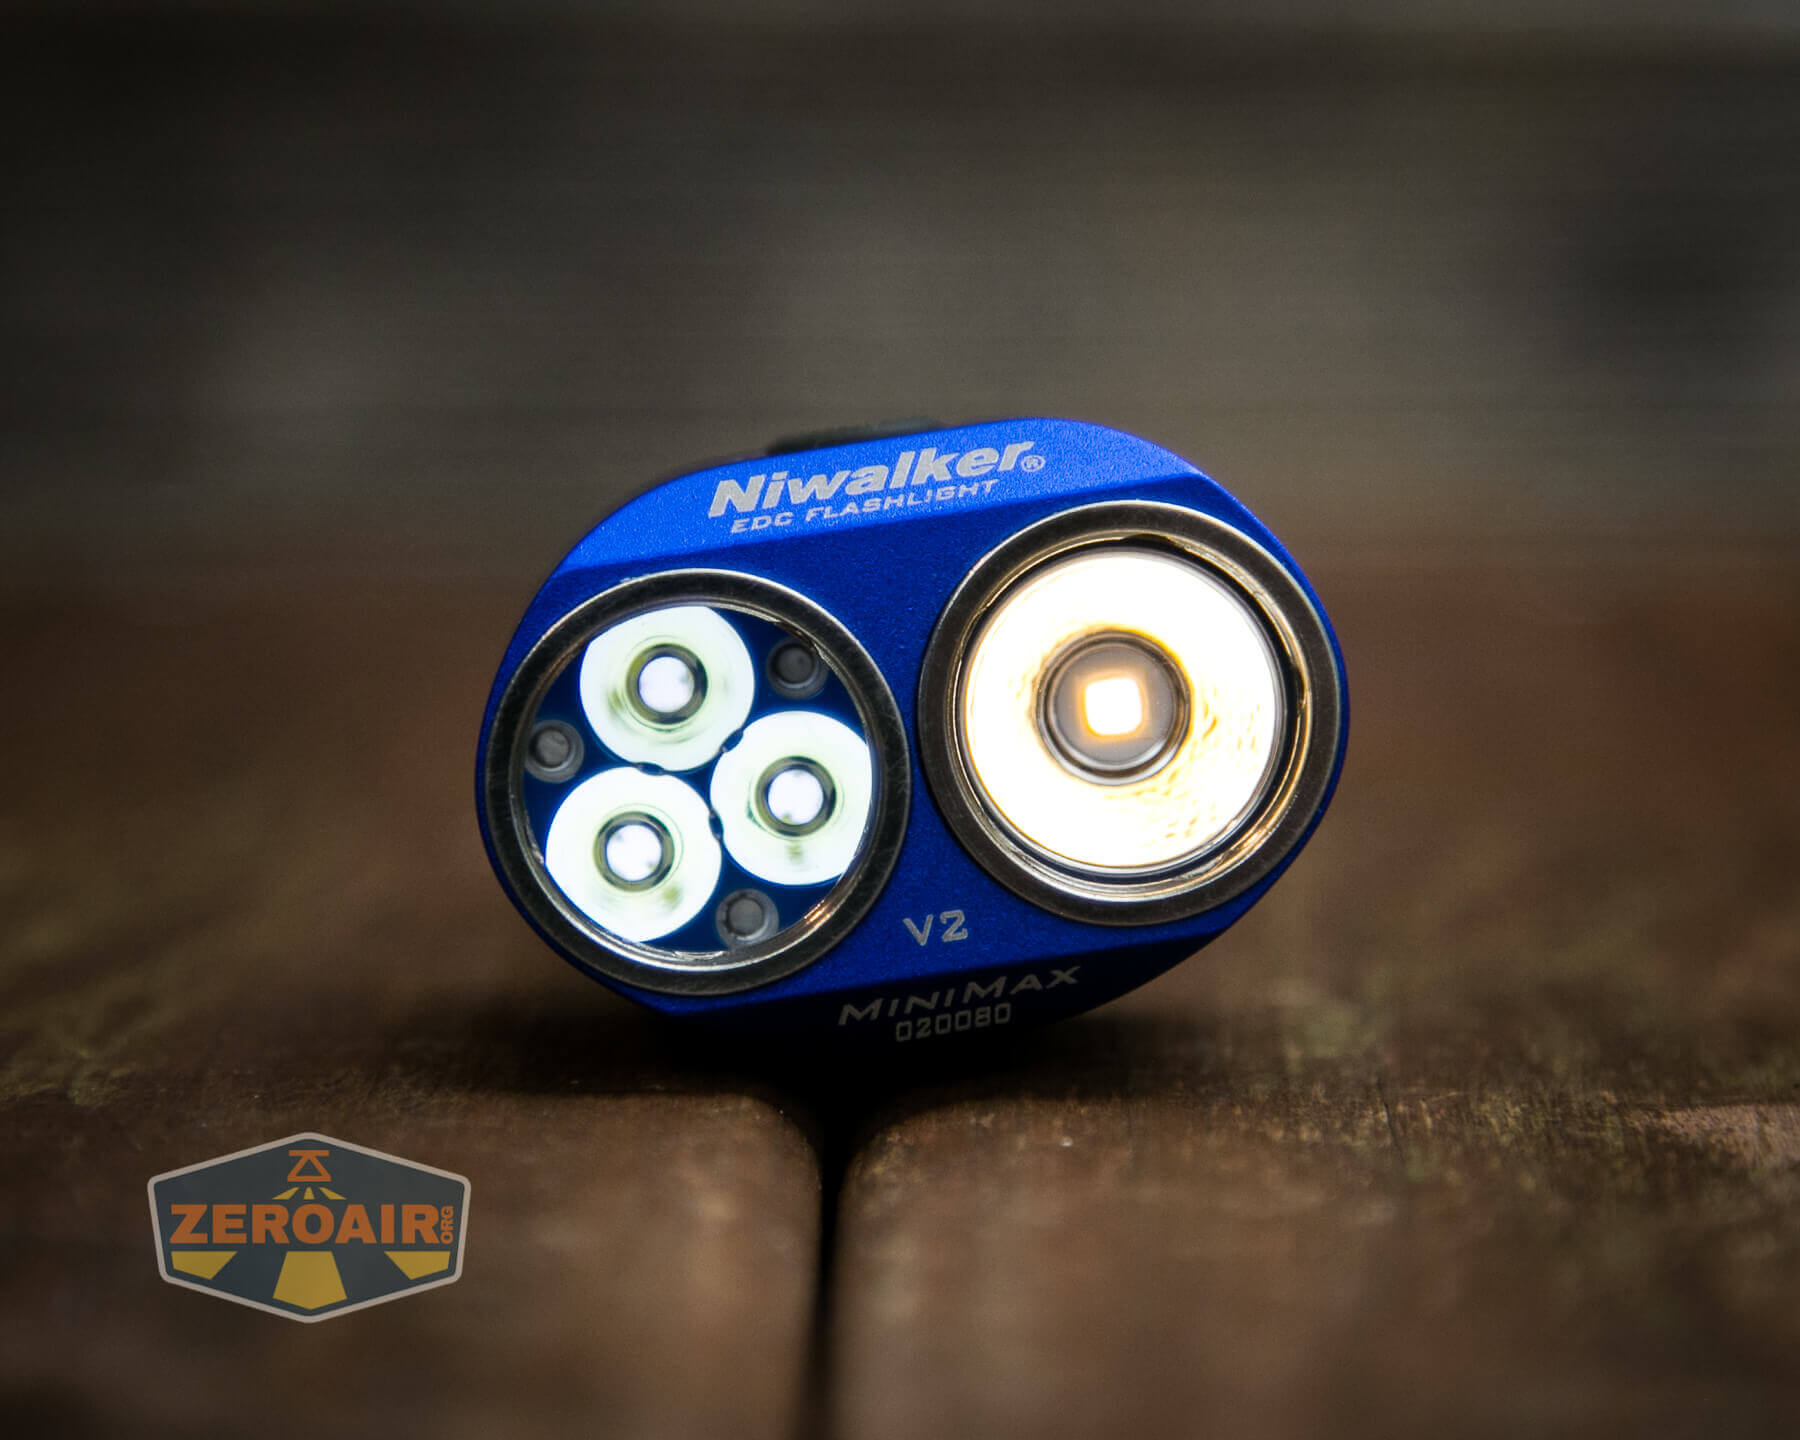
Two emitters are seen below. They’re all Osram emitters, though, just different CCT options. Left below is a triple emitter Osram Pusra1.PM in 6000K. This has what I believe to be a standard Carclo optic. To the right is a single emitter Osram Pusra1.PM in 3000K. This emitter has a shallow reflector.
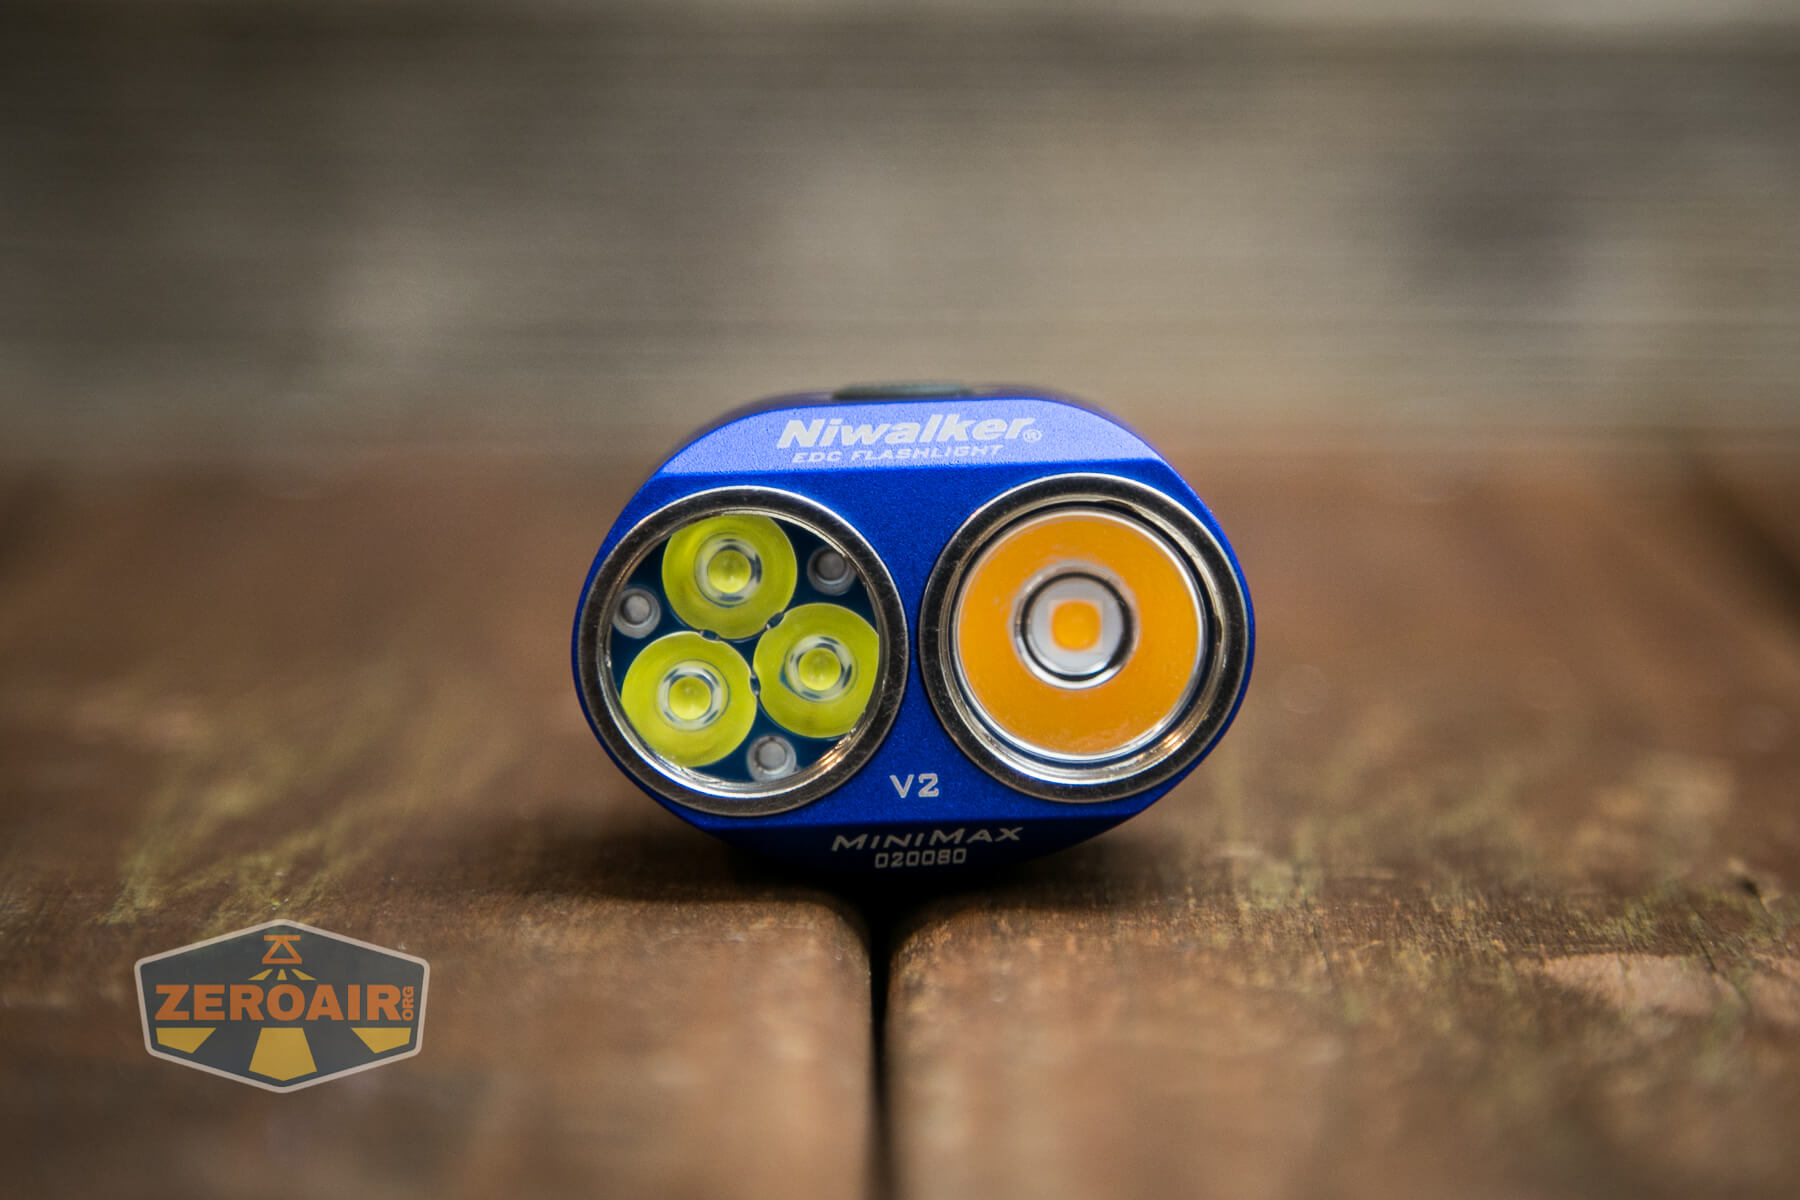
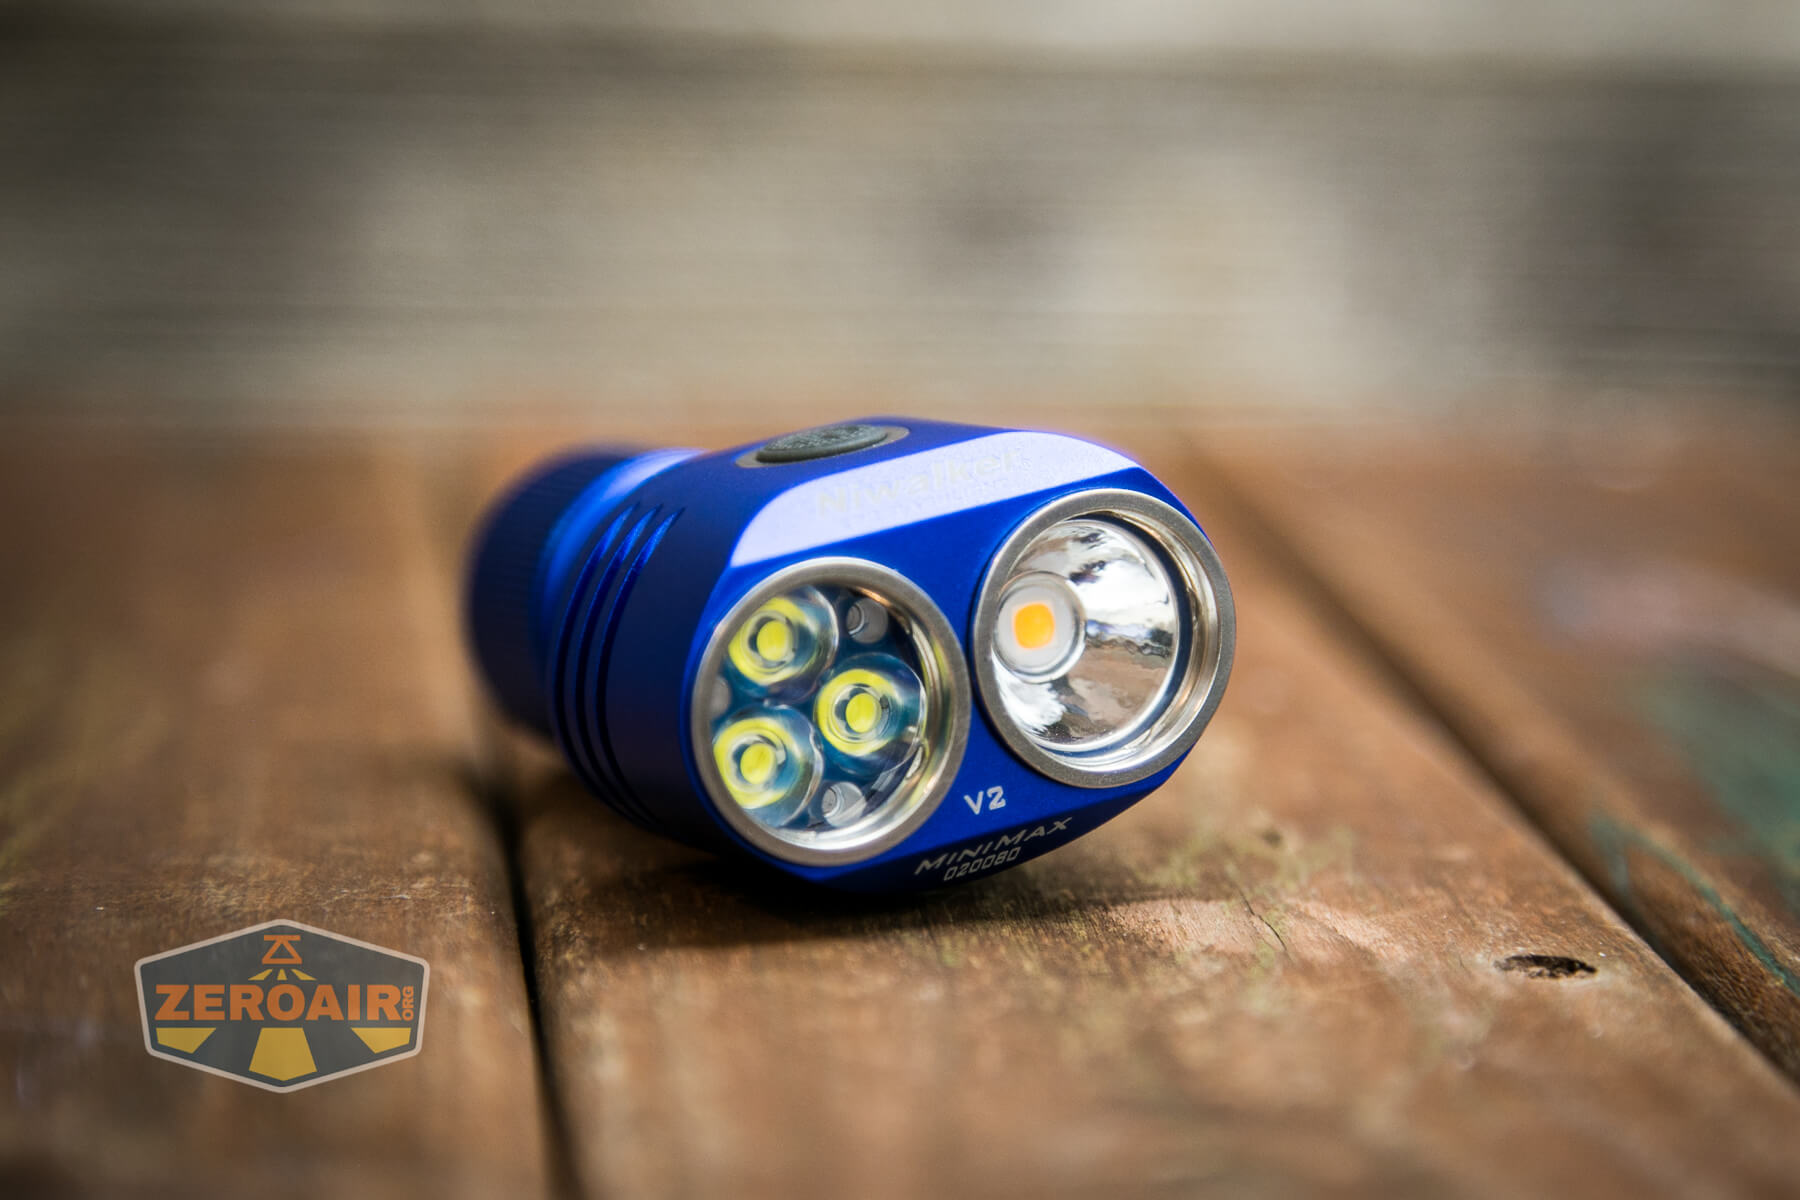
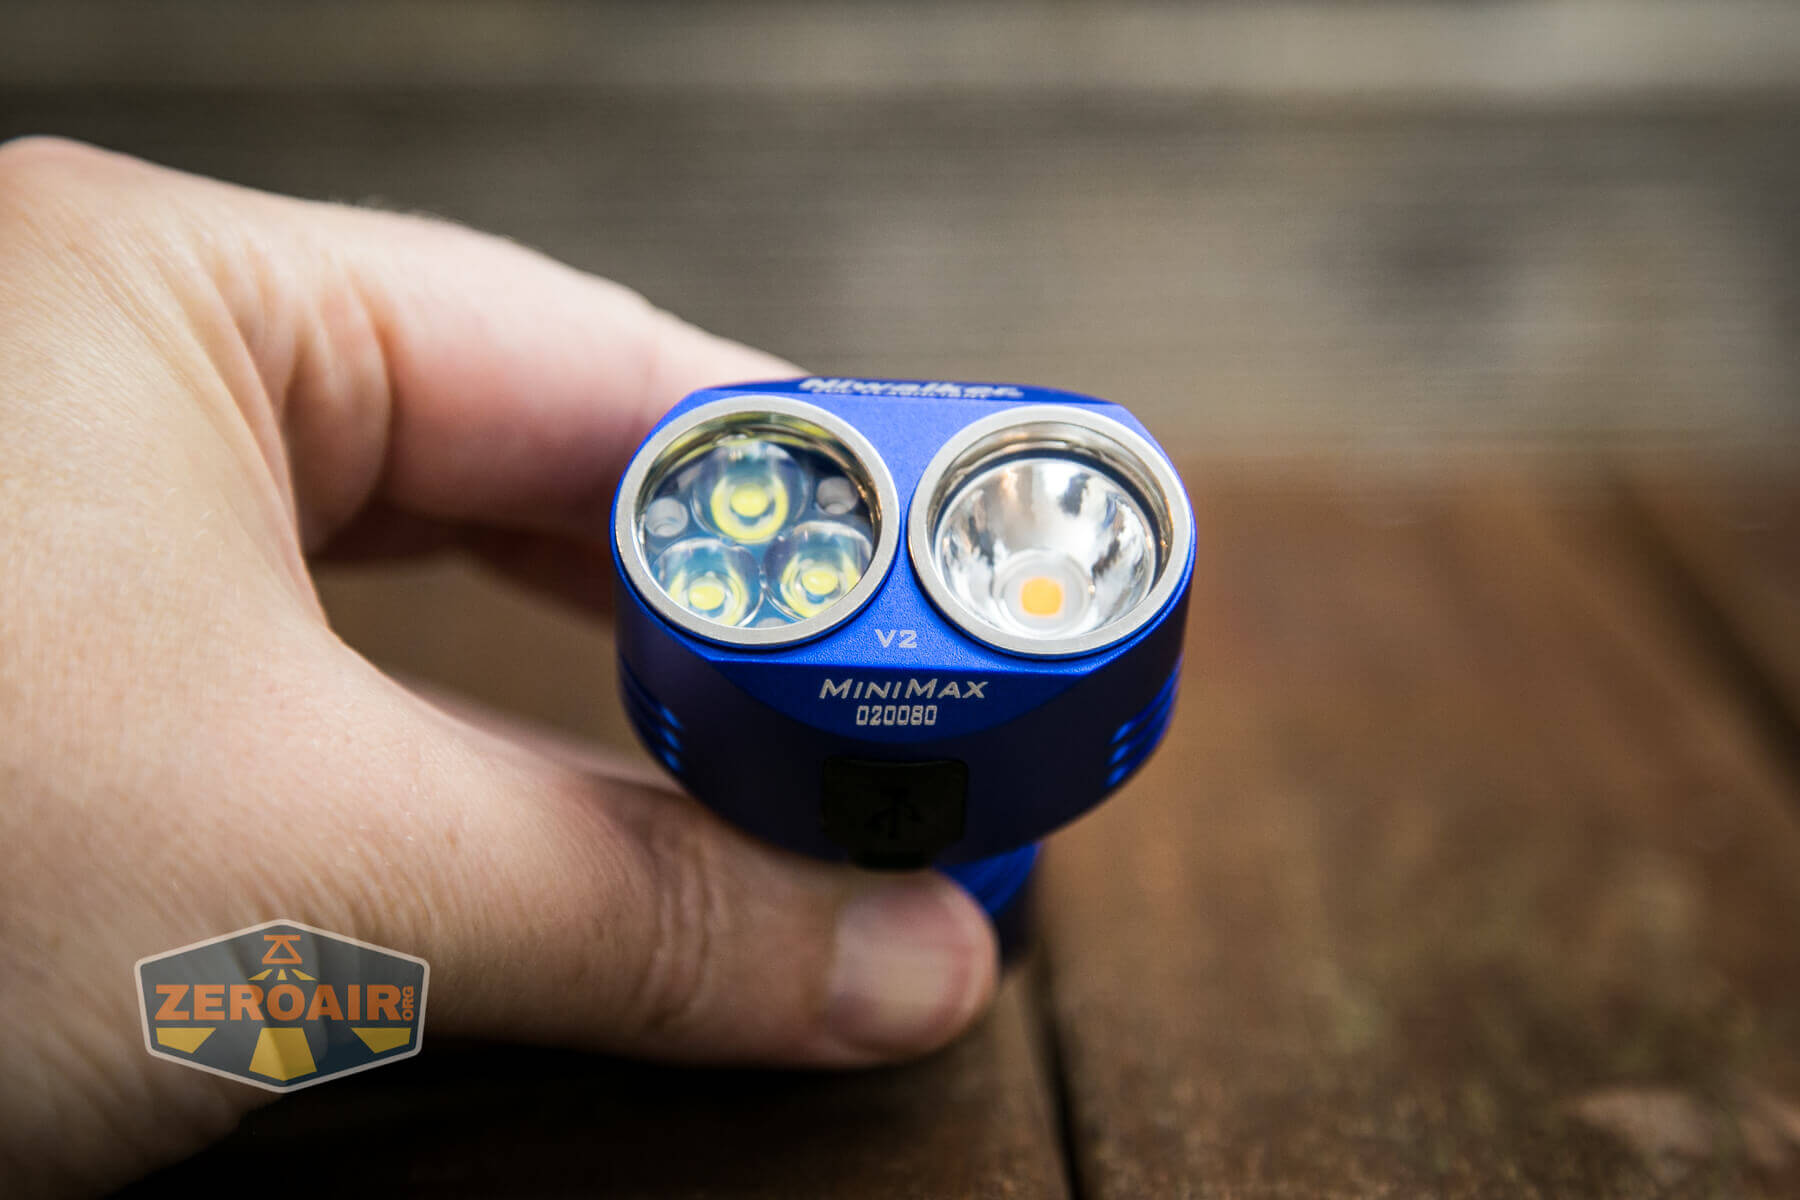
These are a couple of interesting emitter choices. Of course, I’d rather have something warmer than 6000K, but disregarding that, it’s a nice setup still. The triple provides high output. The single provides a nice, tight hotspot.
I am no expert on swaps, but these stainless bezels do unscrew. So if you can do swaps, it’s probably possible here as well. Nice to note that the optic side has both a lens (to protect the soft plastic optic) and a blue glow gasket! It’s actually quite glowy, too.
I’ve tried to be fairly consistent with mentioning the 3000K first, then the 6000K, and finally both. That’s what you’ll see below in the data, too.
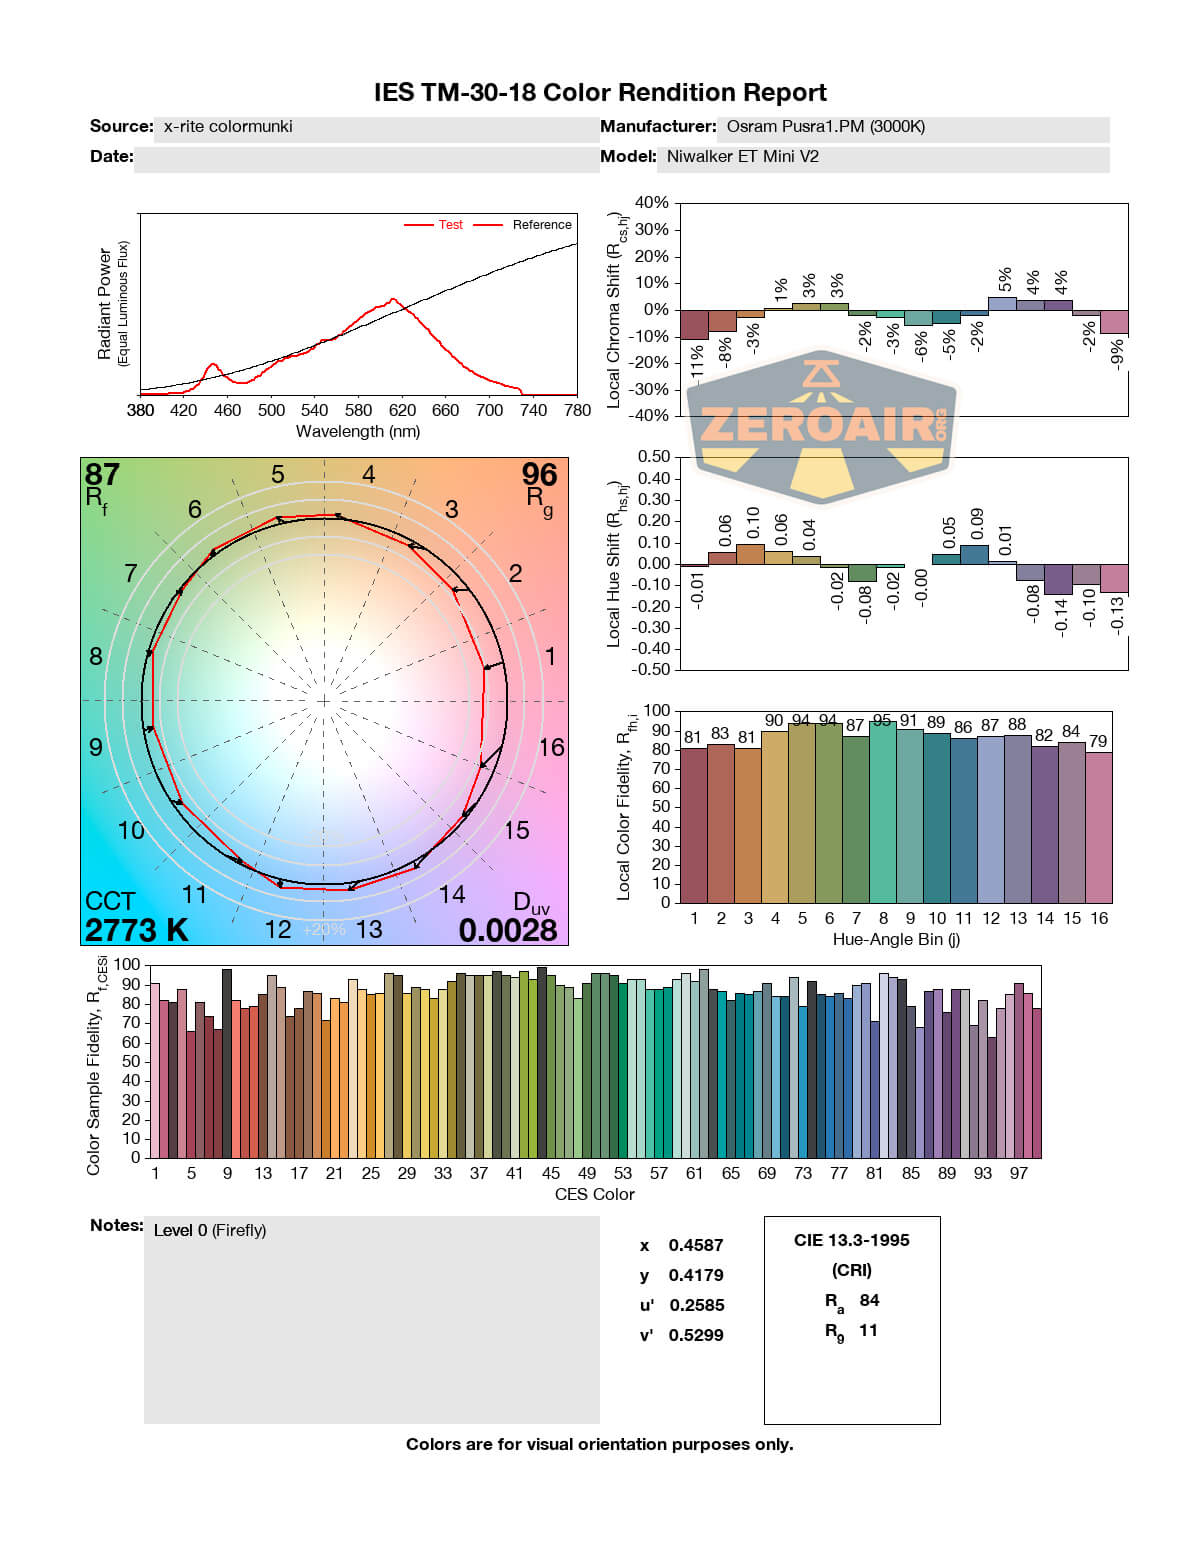
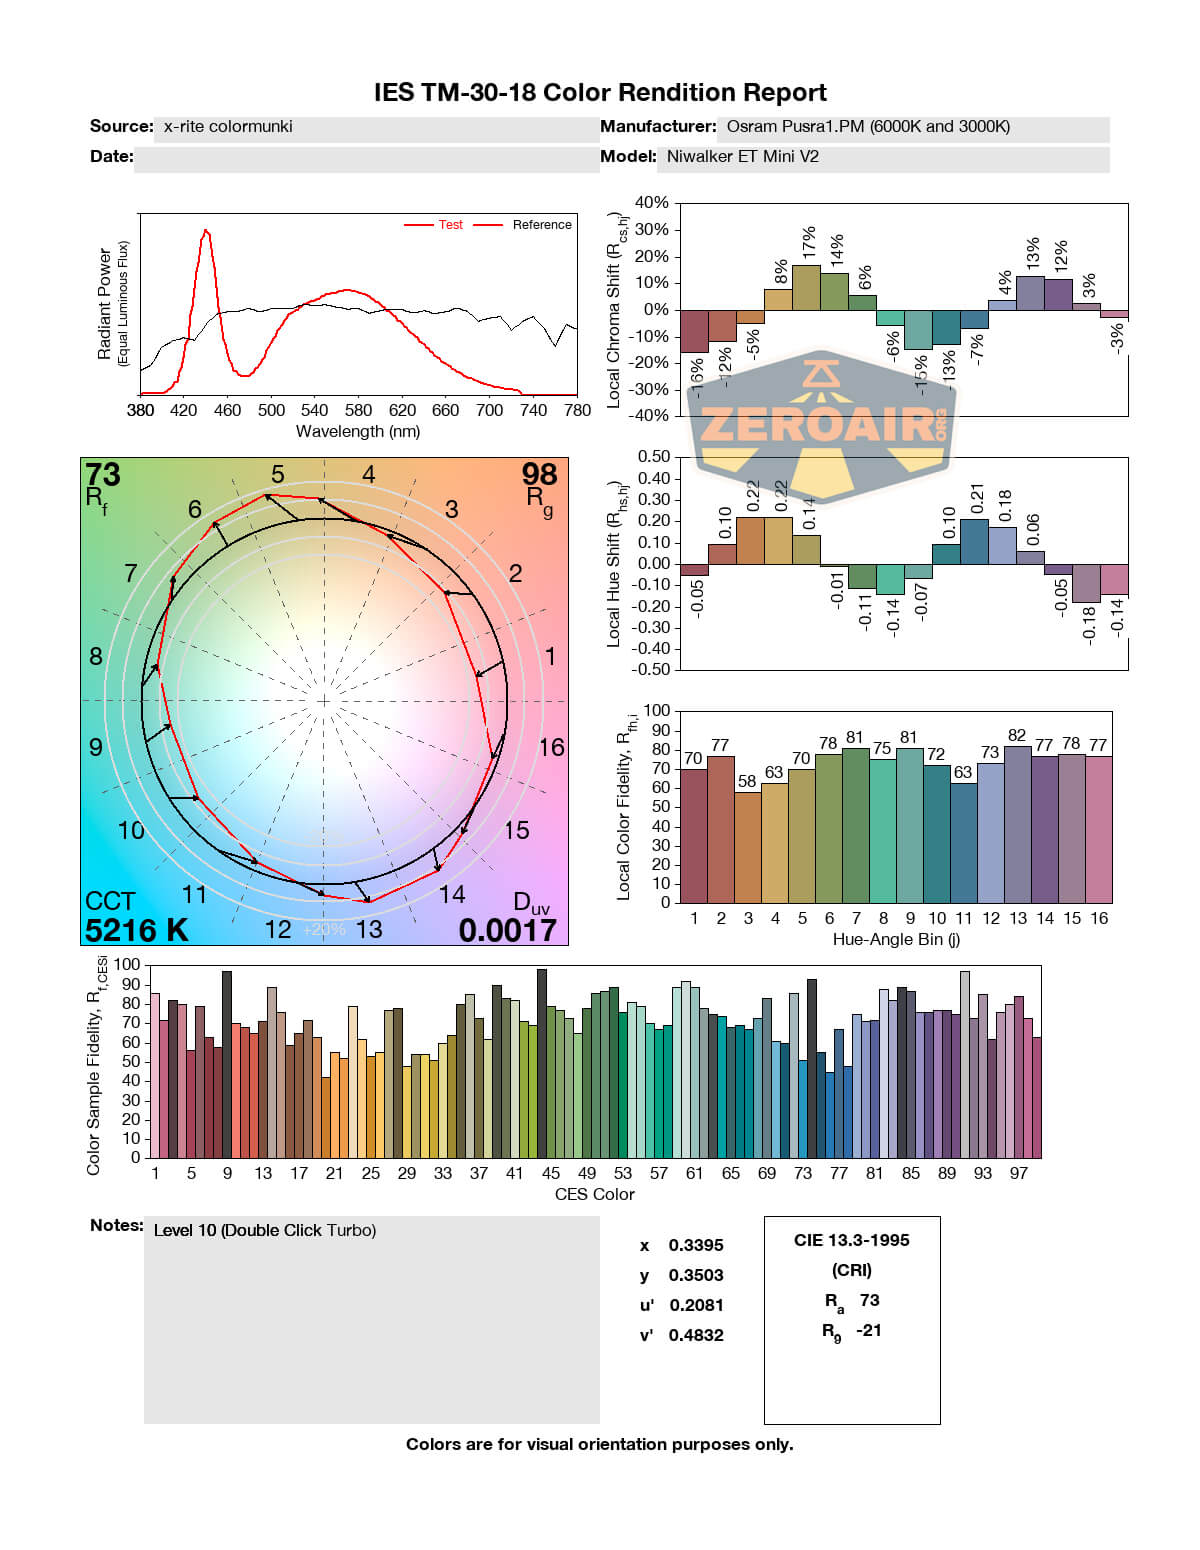
LED Color Report (CRI and CCT)
3000K:


6000K:


Both:


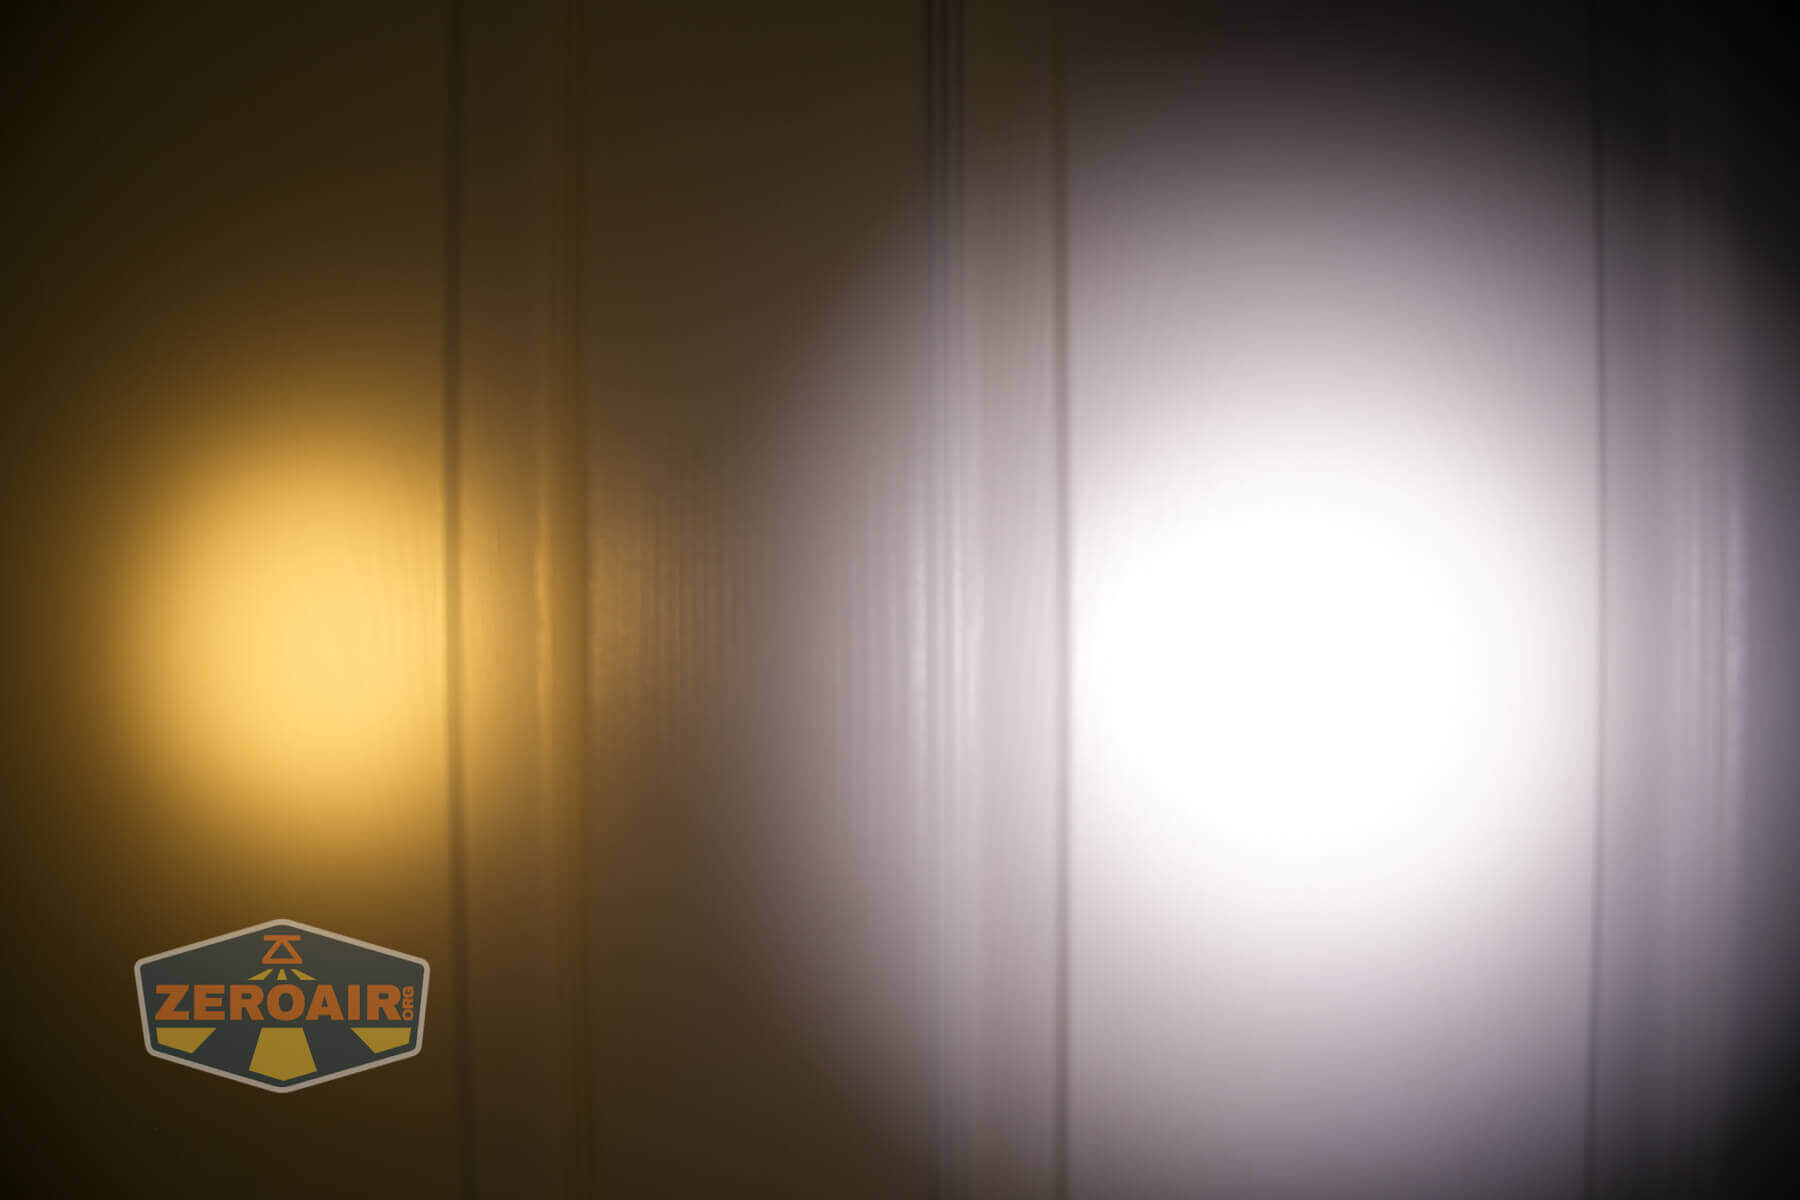
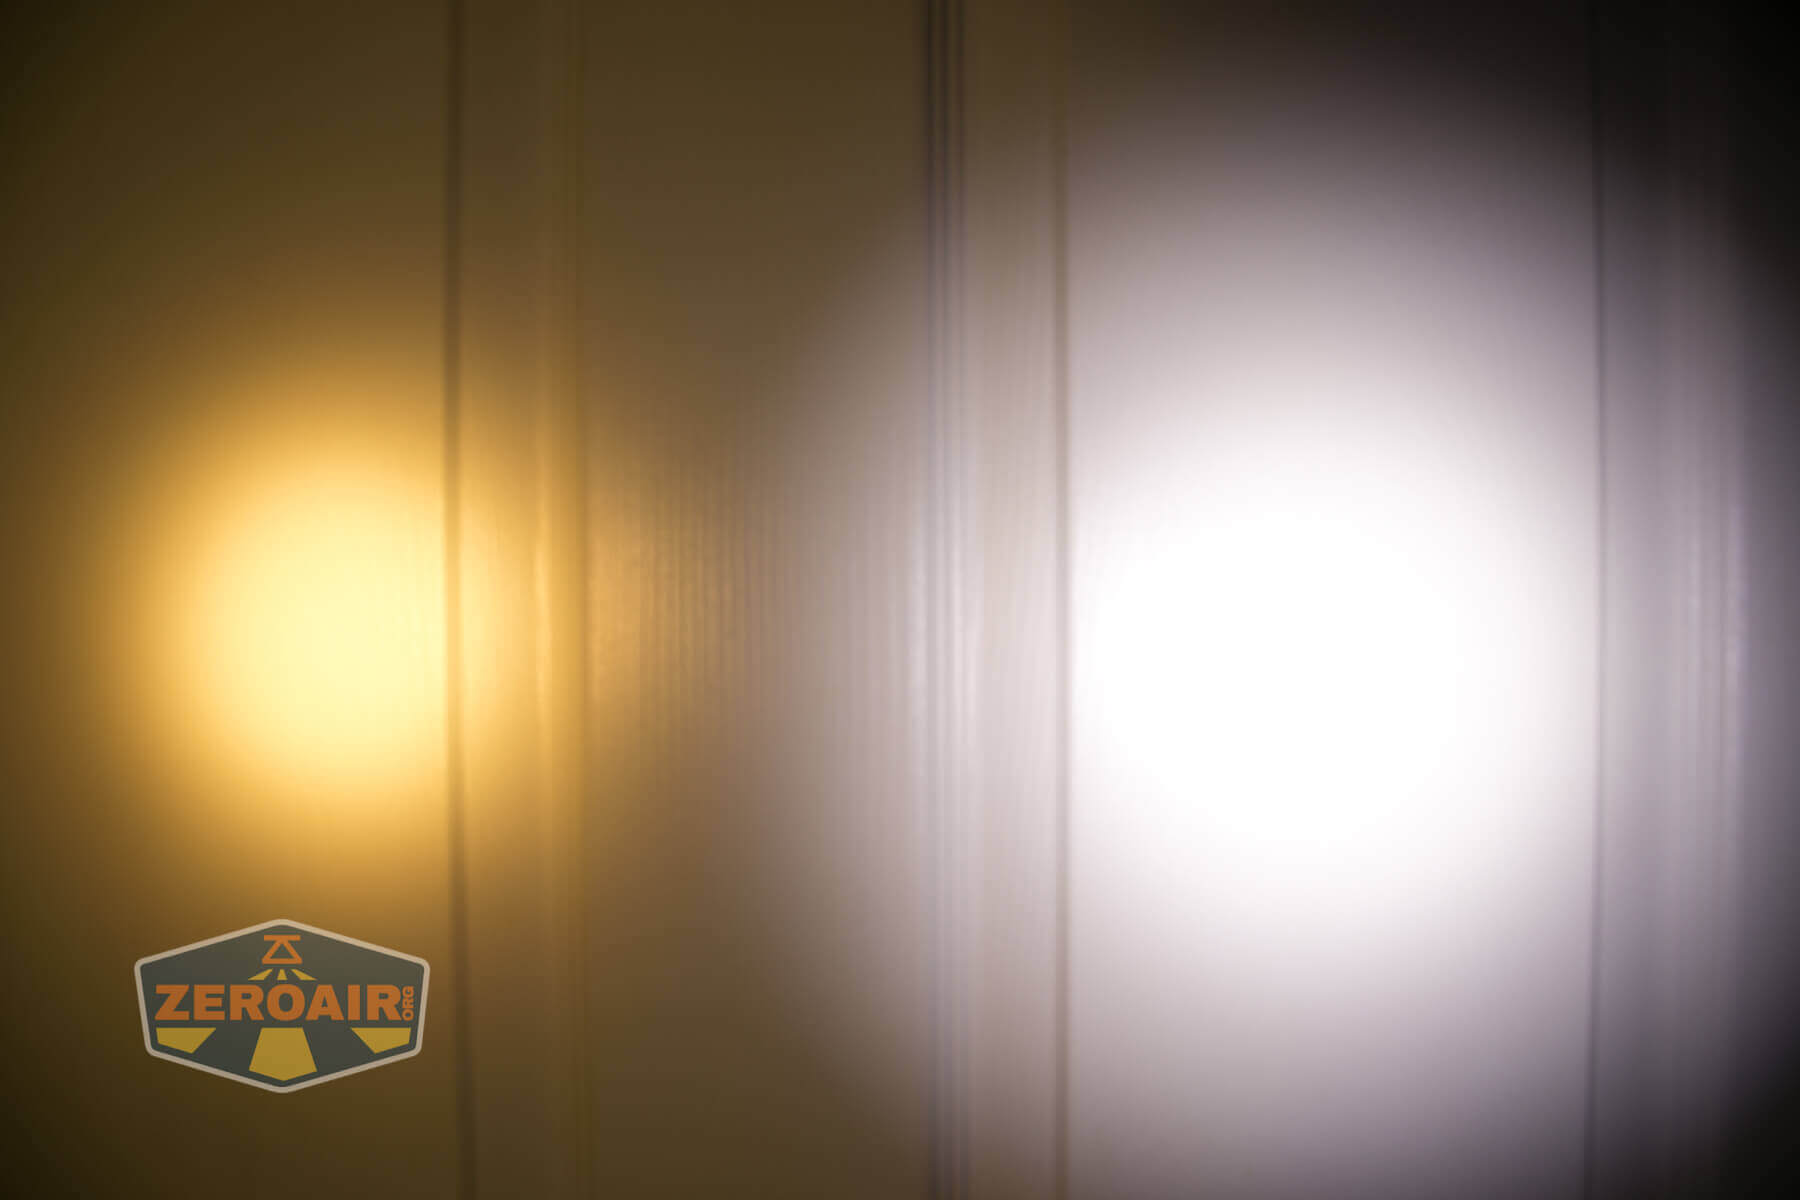
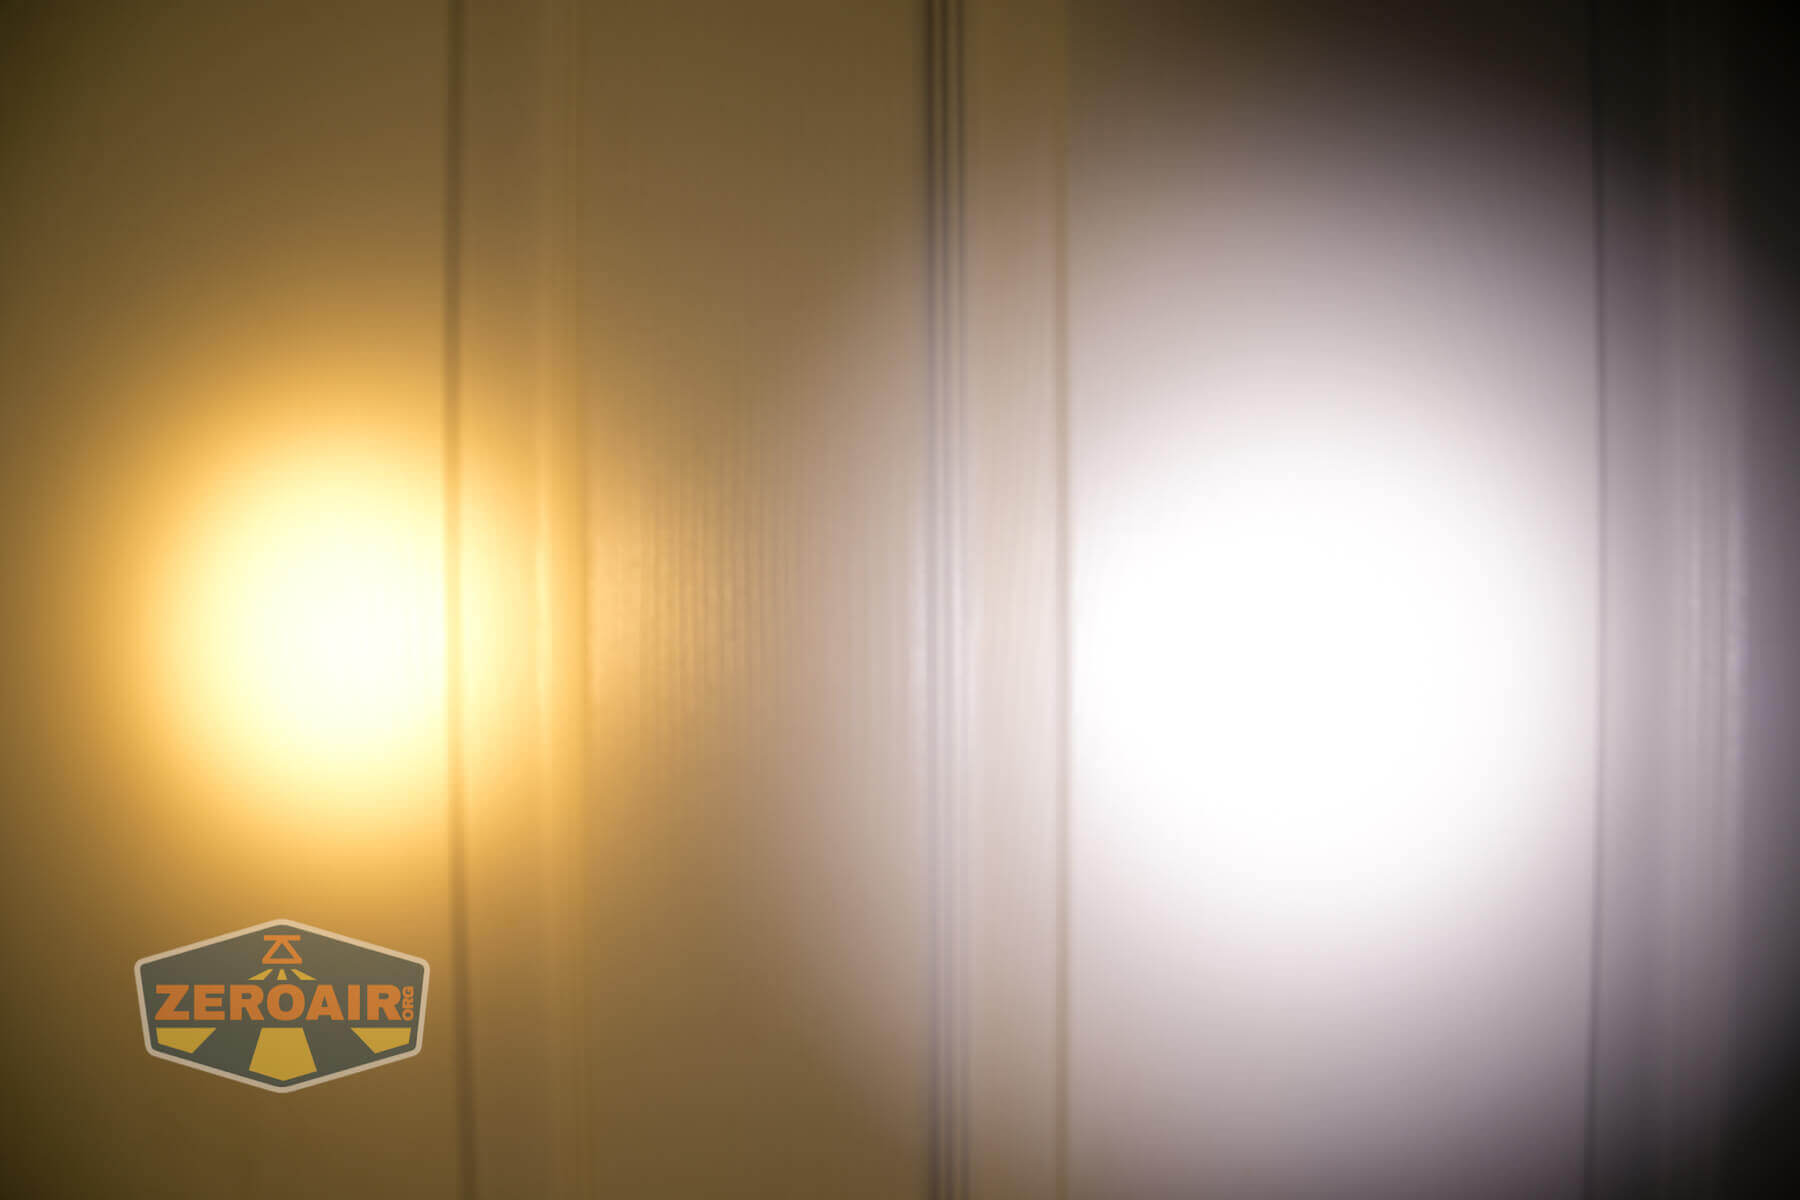
Beamshots
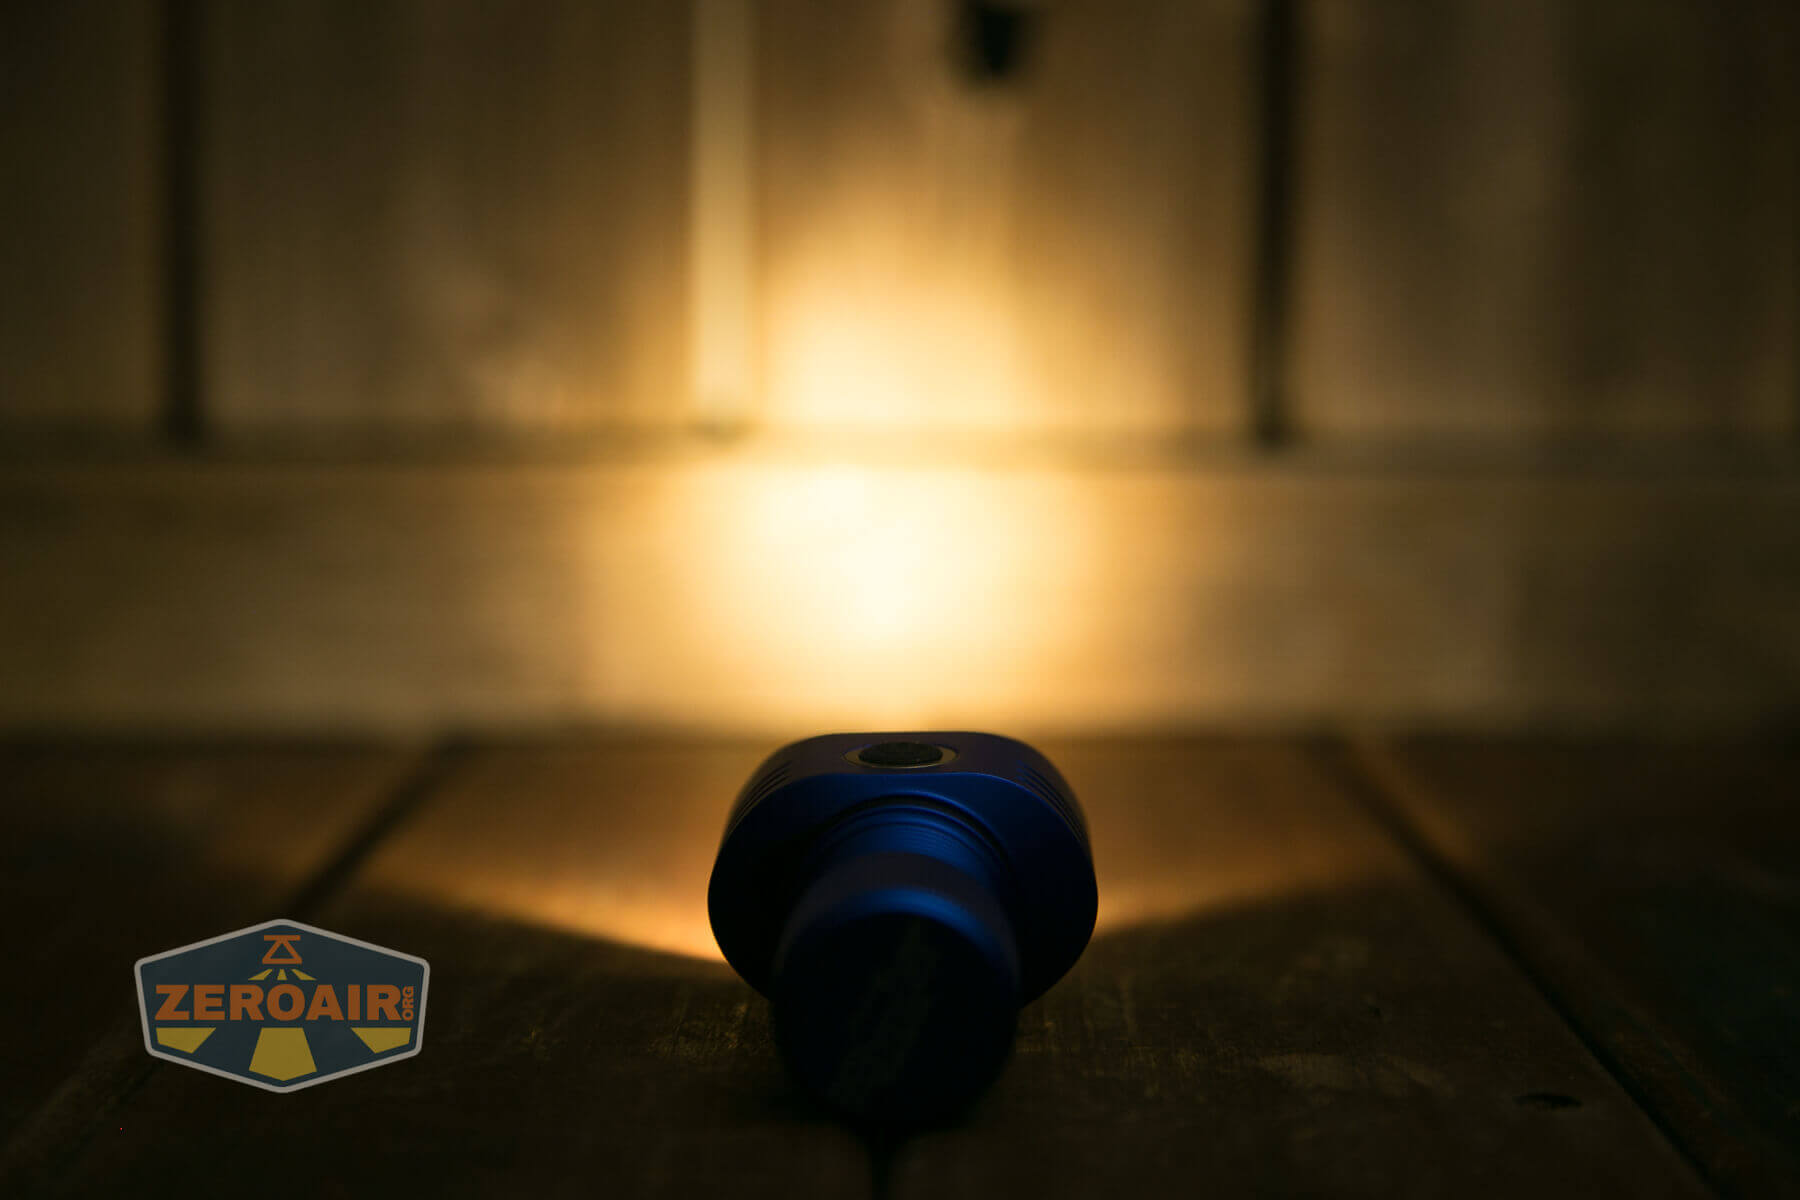
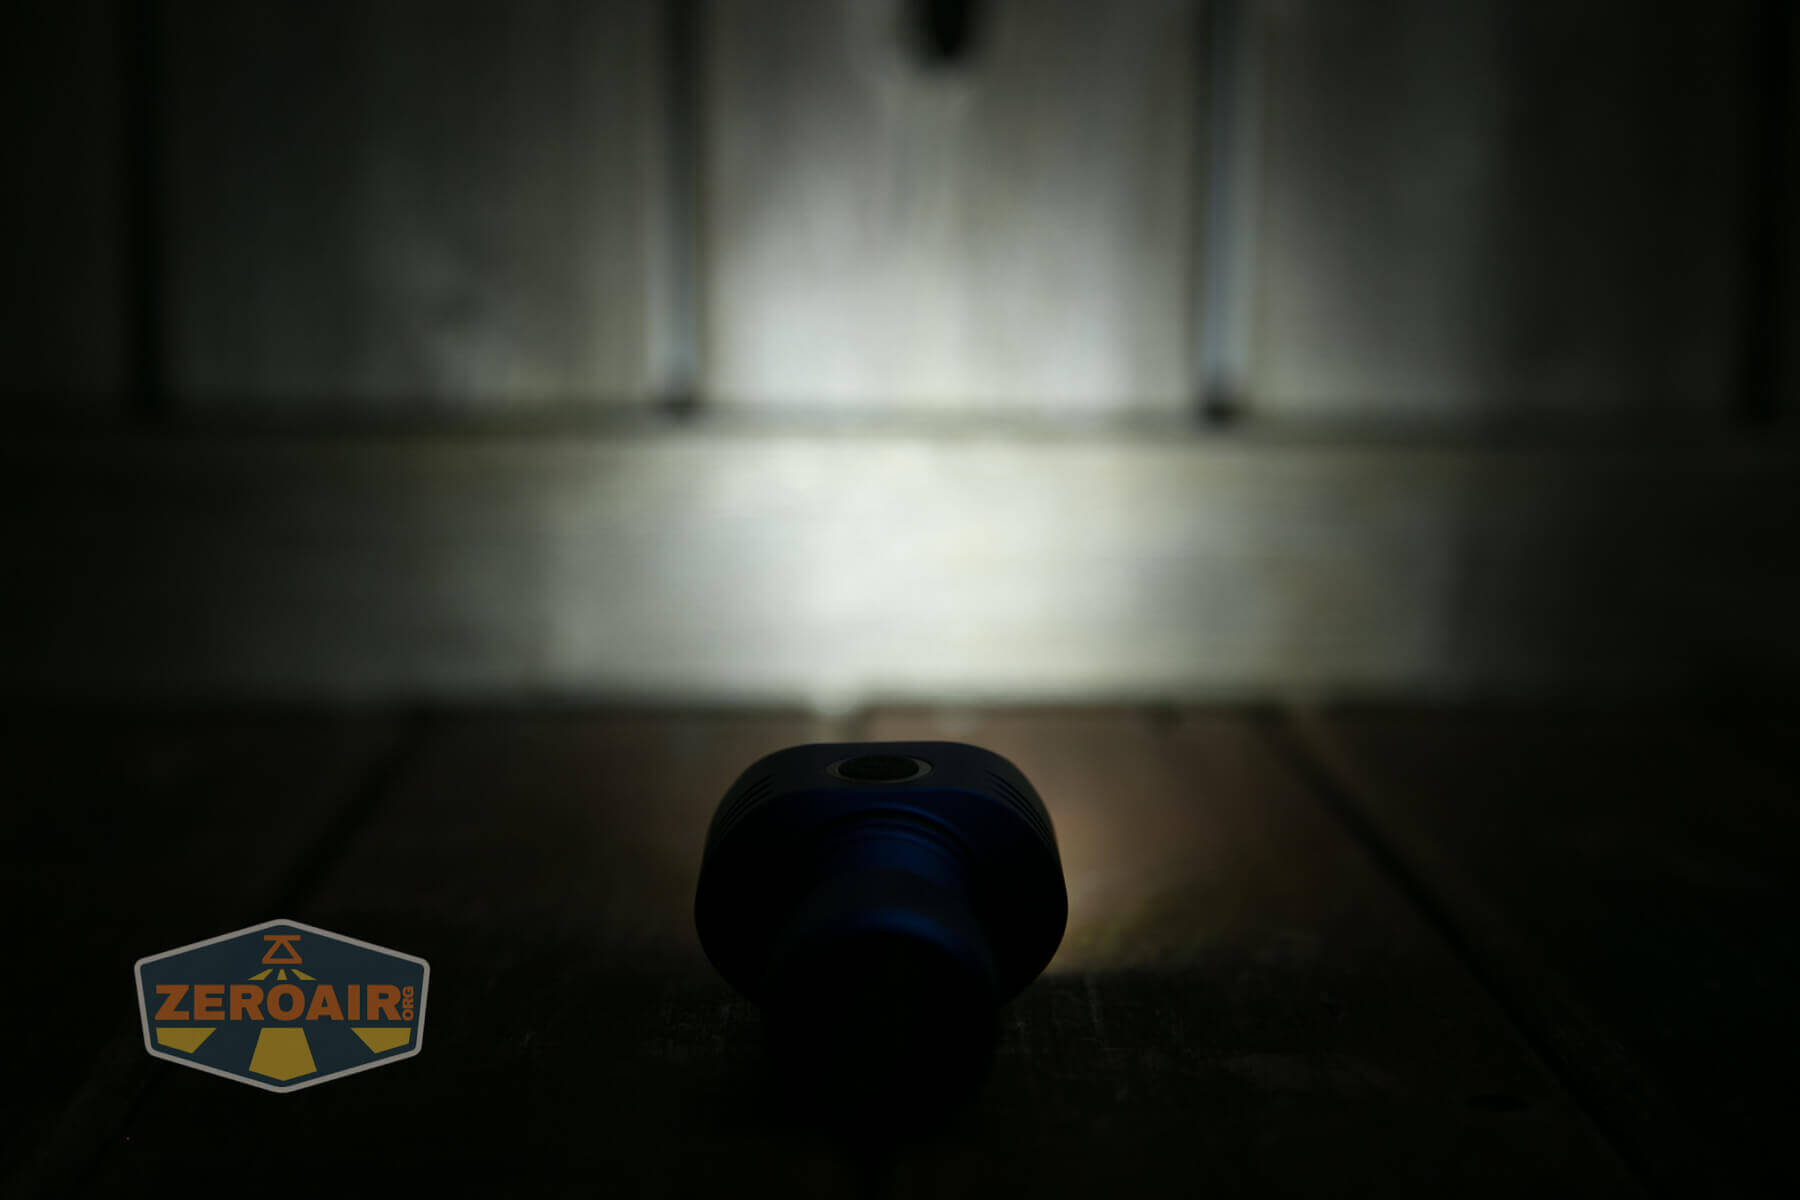
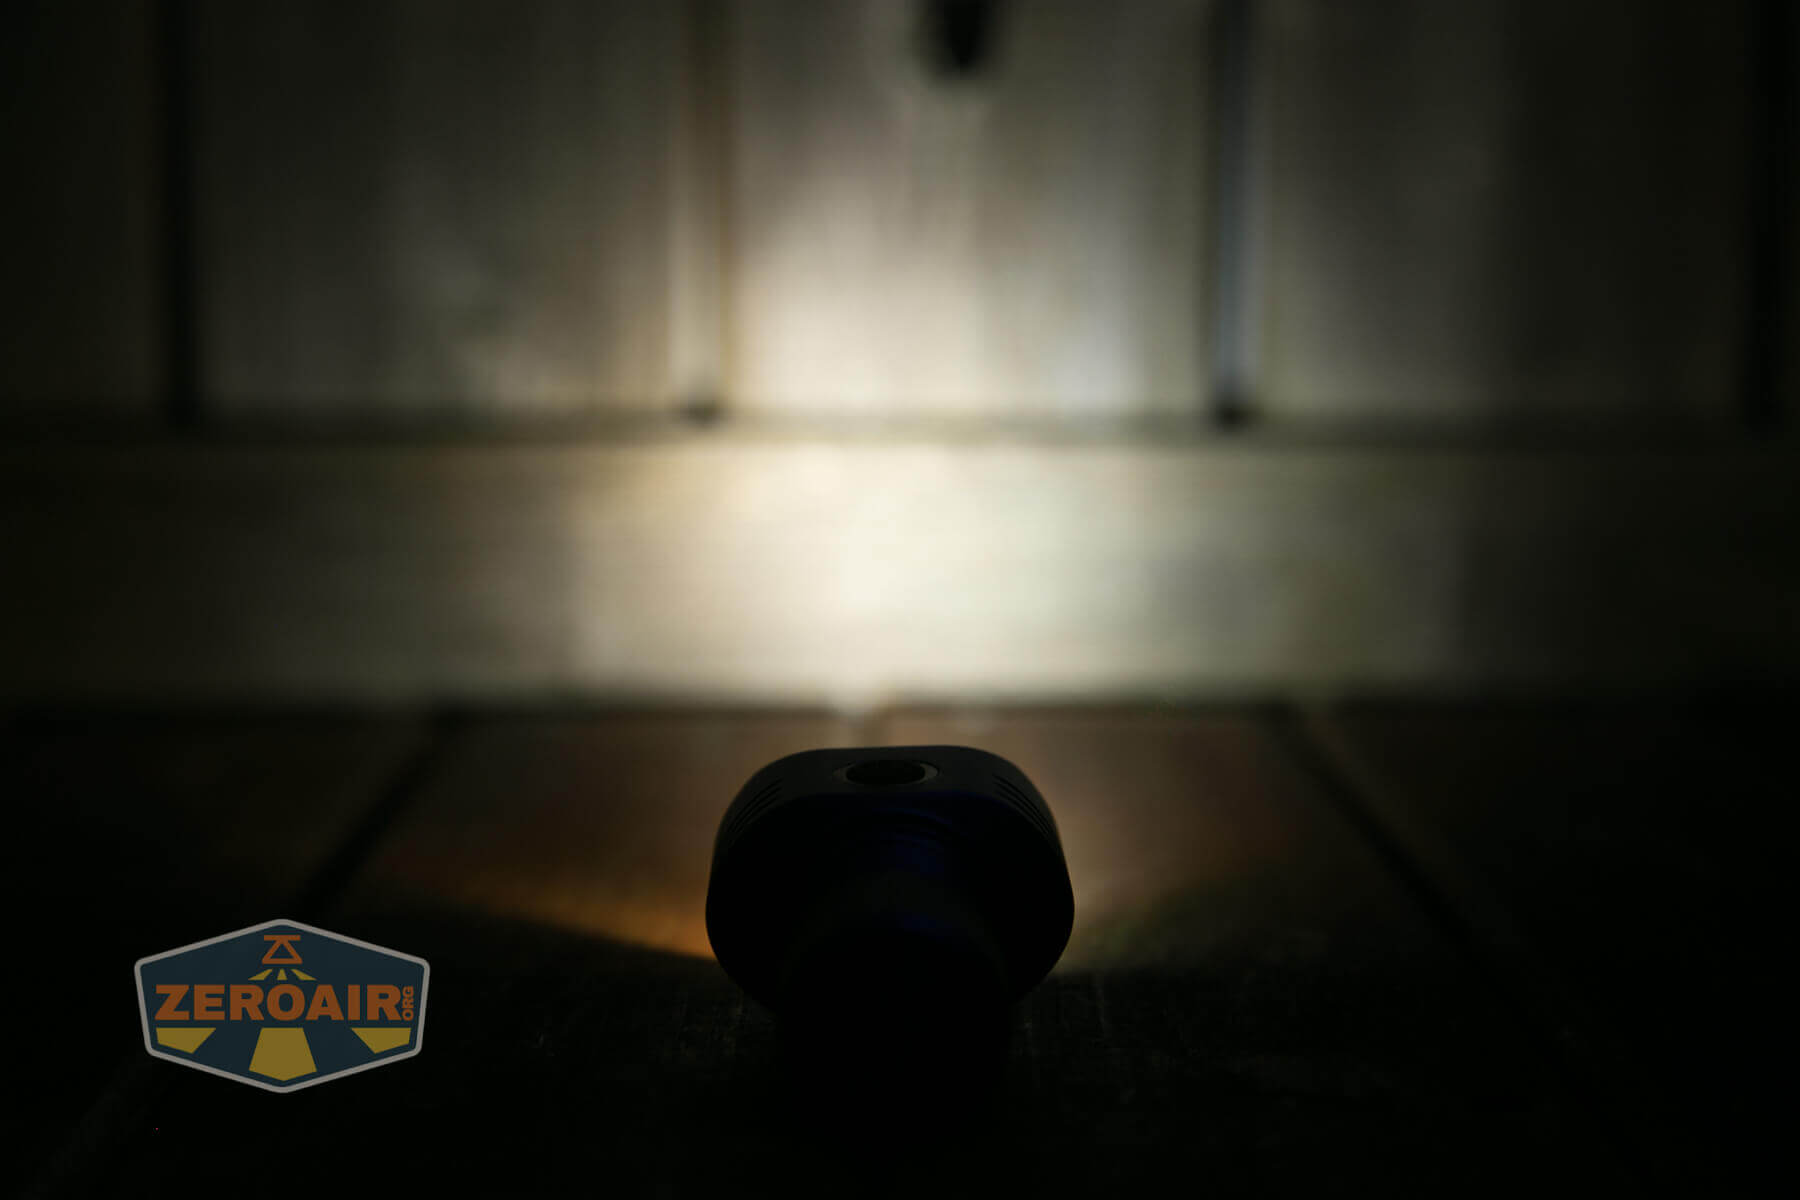
These beamshots always have the following settings: f8, ISO100, 0.3s shutter, and manual 5000K exposure. These photos are taken at floor level, and the beam hits the ceiling around 9 feet away.
3000K:


6000K:


Both:


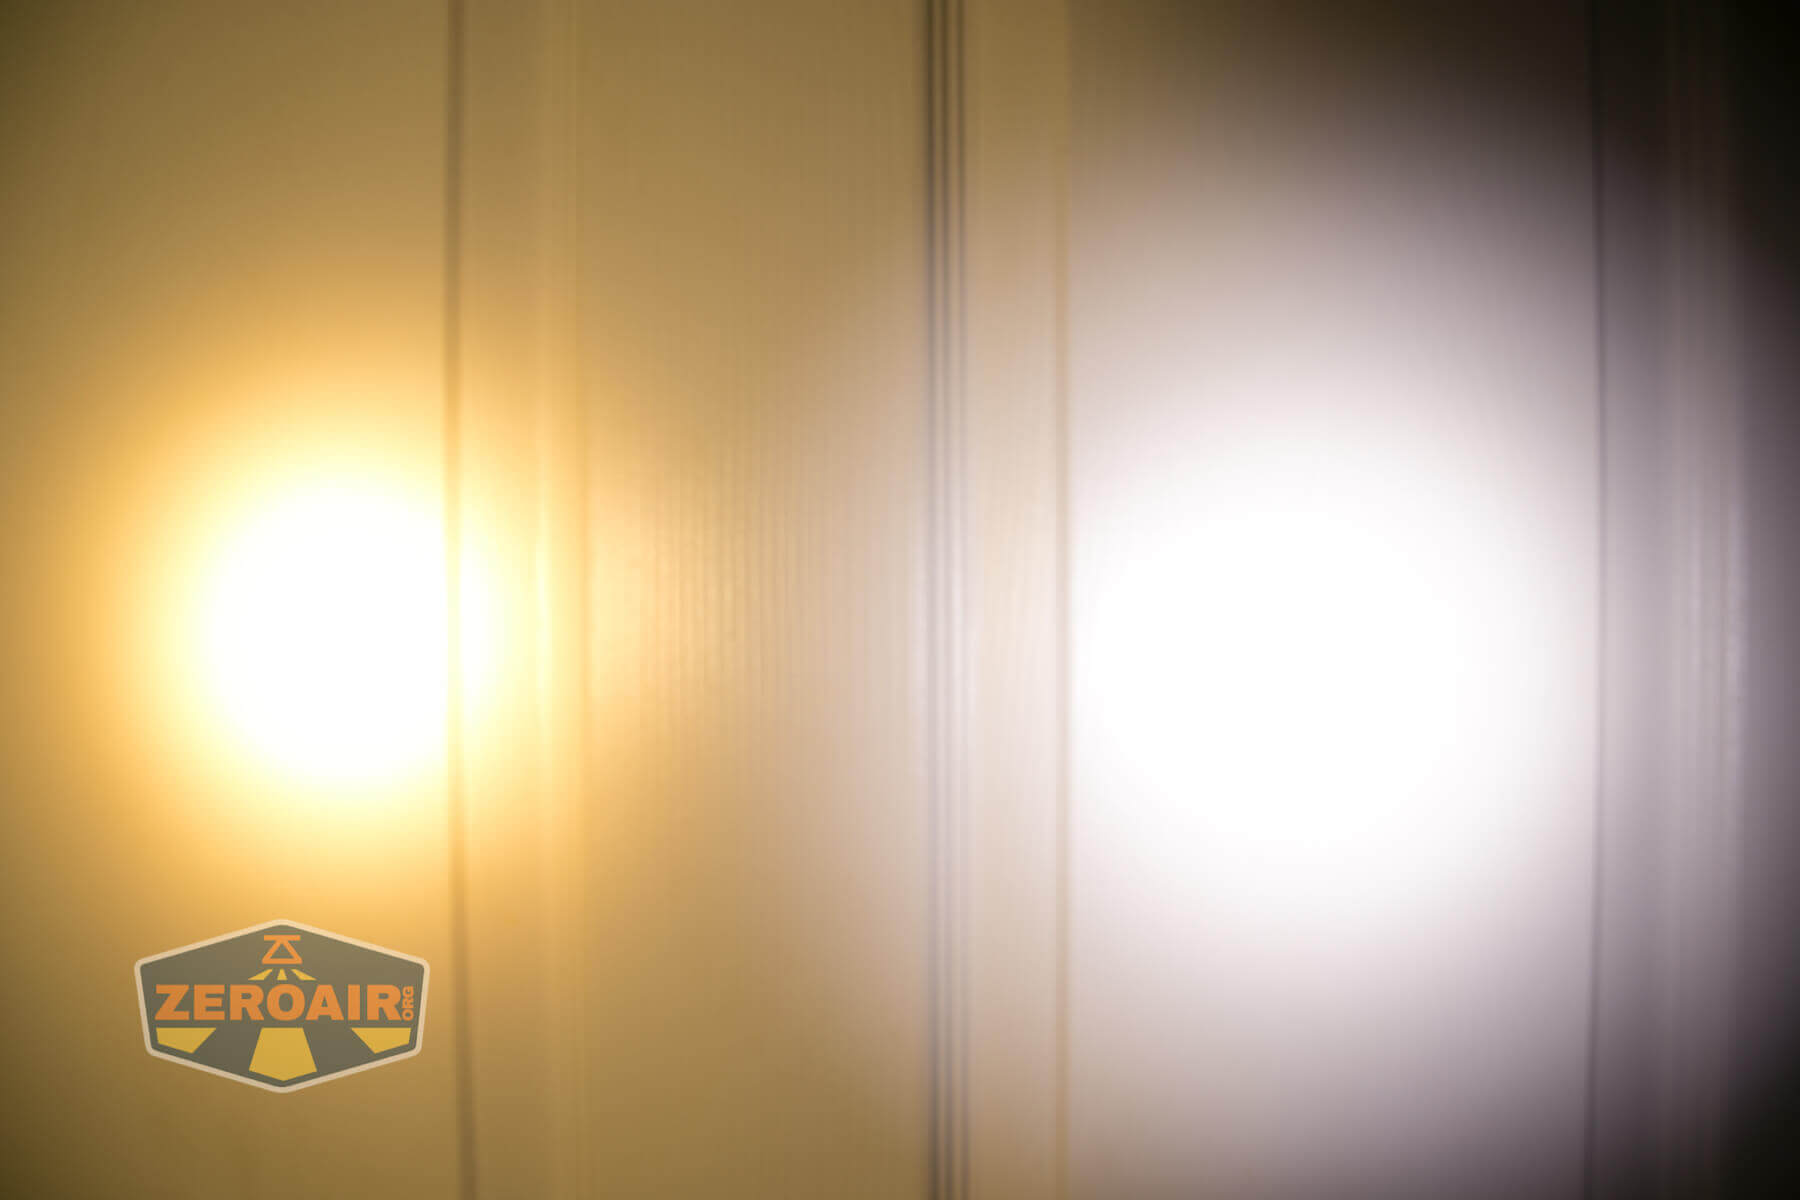
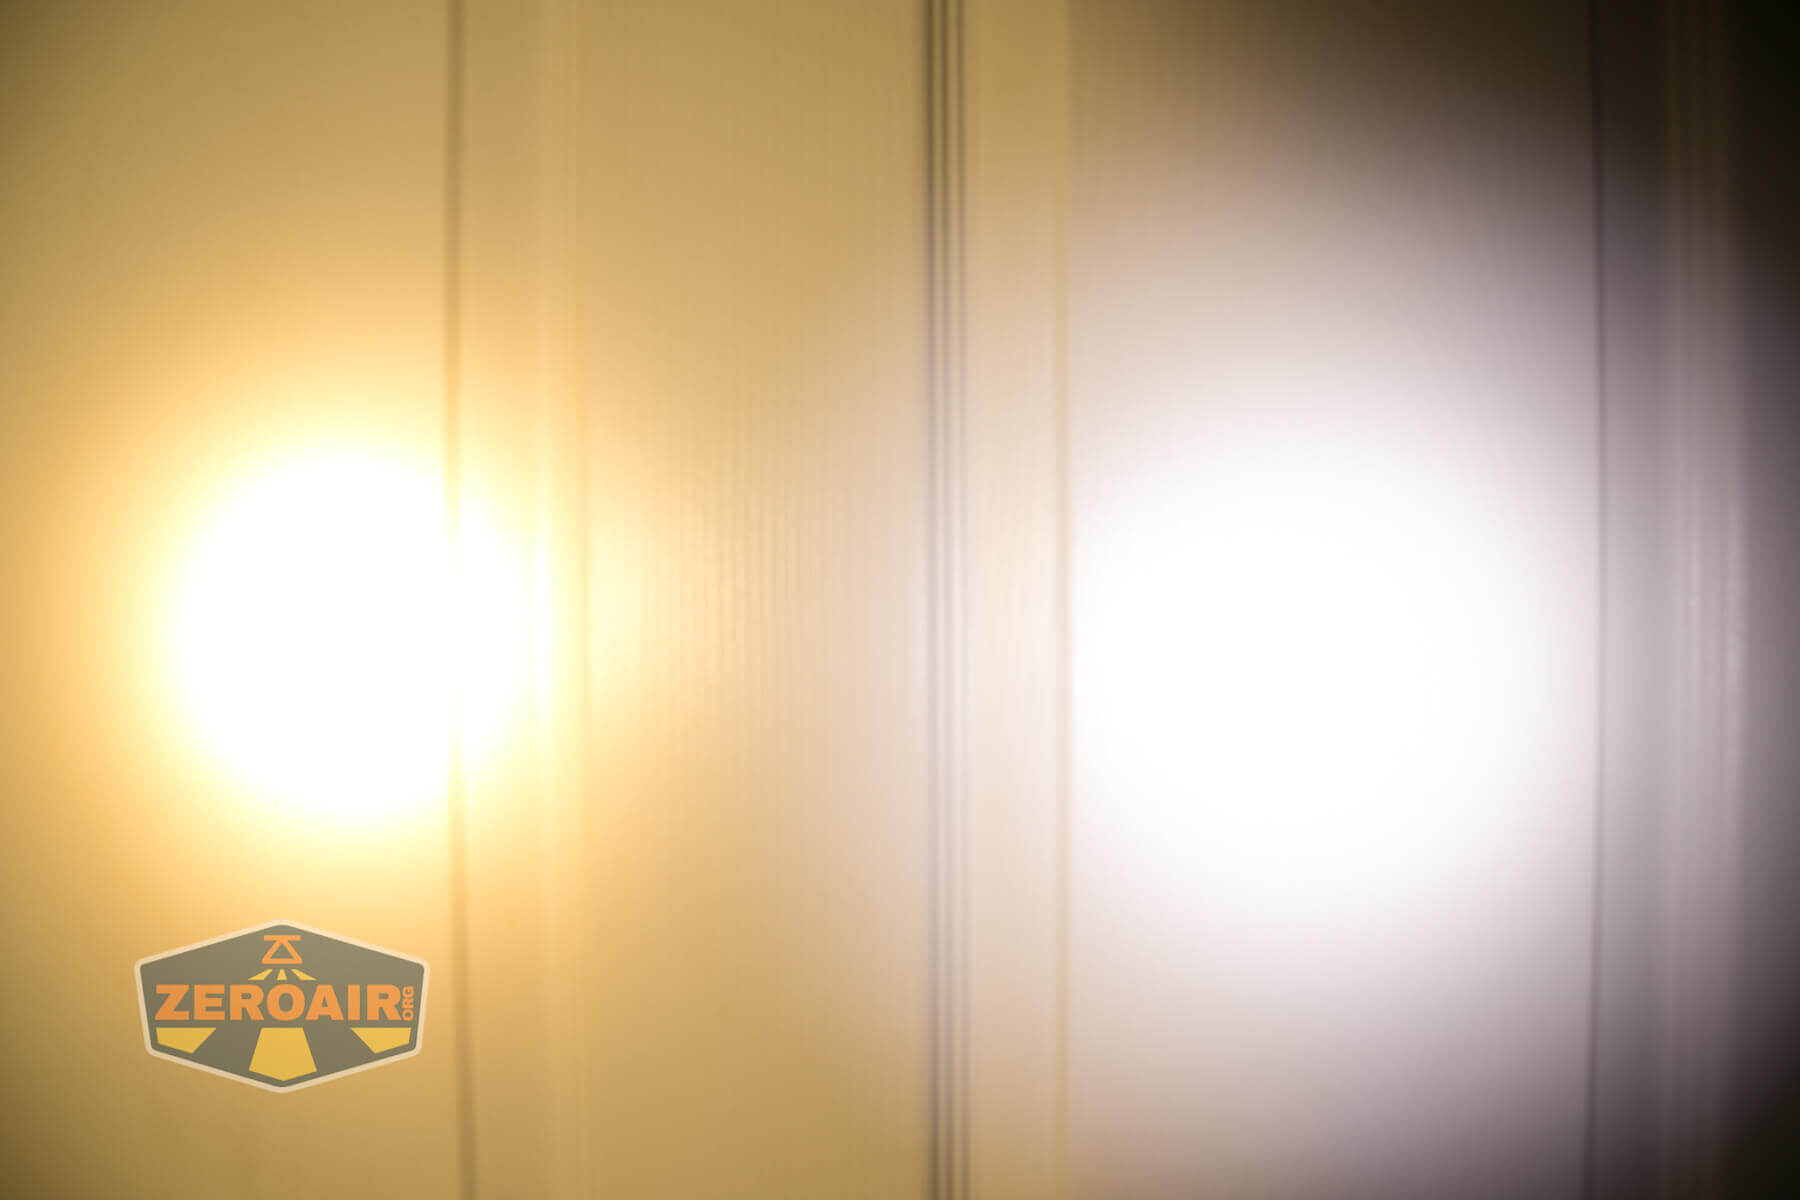
Tint vs BLF-348 (KillzoneFlashlights.com 219b version) (affiliate link)
I keep the test flashlight on the left and the BLF-348 reference flashlight on the right.
3000K:


6000K:


Both:


I compare everything to the KillzoneFlashlights.com 219b BLF-348 because it’s inexpensive and has the best tint!
Conclusion
What I like
- 3000K output single emitter with reflector
- USB-C Charging works great
- Has an extension tube for a 20700 cell.
- Great output levels
- Access to Firefly from off
- Turbo access from off
- Interesting timers (5/10/User set options)
- Orange version is available! (but that’s not what I was sent 🙁 )
What I don’t like
- Strangely, it doesn’t seem to have LVP with either head, but does with both heads
- Quirky user interface in some specific places: can’t turn off from Turbo. Ramping direction can be confusing and unplannable. Timer setup is confusing.
- 6000K triple (5000K would be much better)
- The extension tube for the 20700 cell is not included.
- Cell tube sized for 21700 is much preferred! (and a little sleeve to keep the 18350 from swimming)
- Output doesn’t hit the claims (or the tables aren’t really written clearly enough to make a good comp
- Low CRI
Parting Shot
Notes
- This content originally appeared at zeroair.org. Please visit there for the best experience!
- Please use my Amazon.com referral link to help support zeroair.org!
- Please support me on Patreon! I deeply appreciate your support!
Discover more from ZeroAir Reviews
Subscribe to get the latest posts sent to your email.