
TorchLAB Future BOSS with MOFF Flashlight Review
The TorchLAB Future BOSS has an all-new MOFF switch! This is a completely new switch, offering unusual and great features. Namely, speed!!
Official Specs and Features
Here’s a link to the TorchLAB Future BOSS with MOFF product page.
Versions
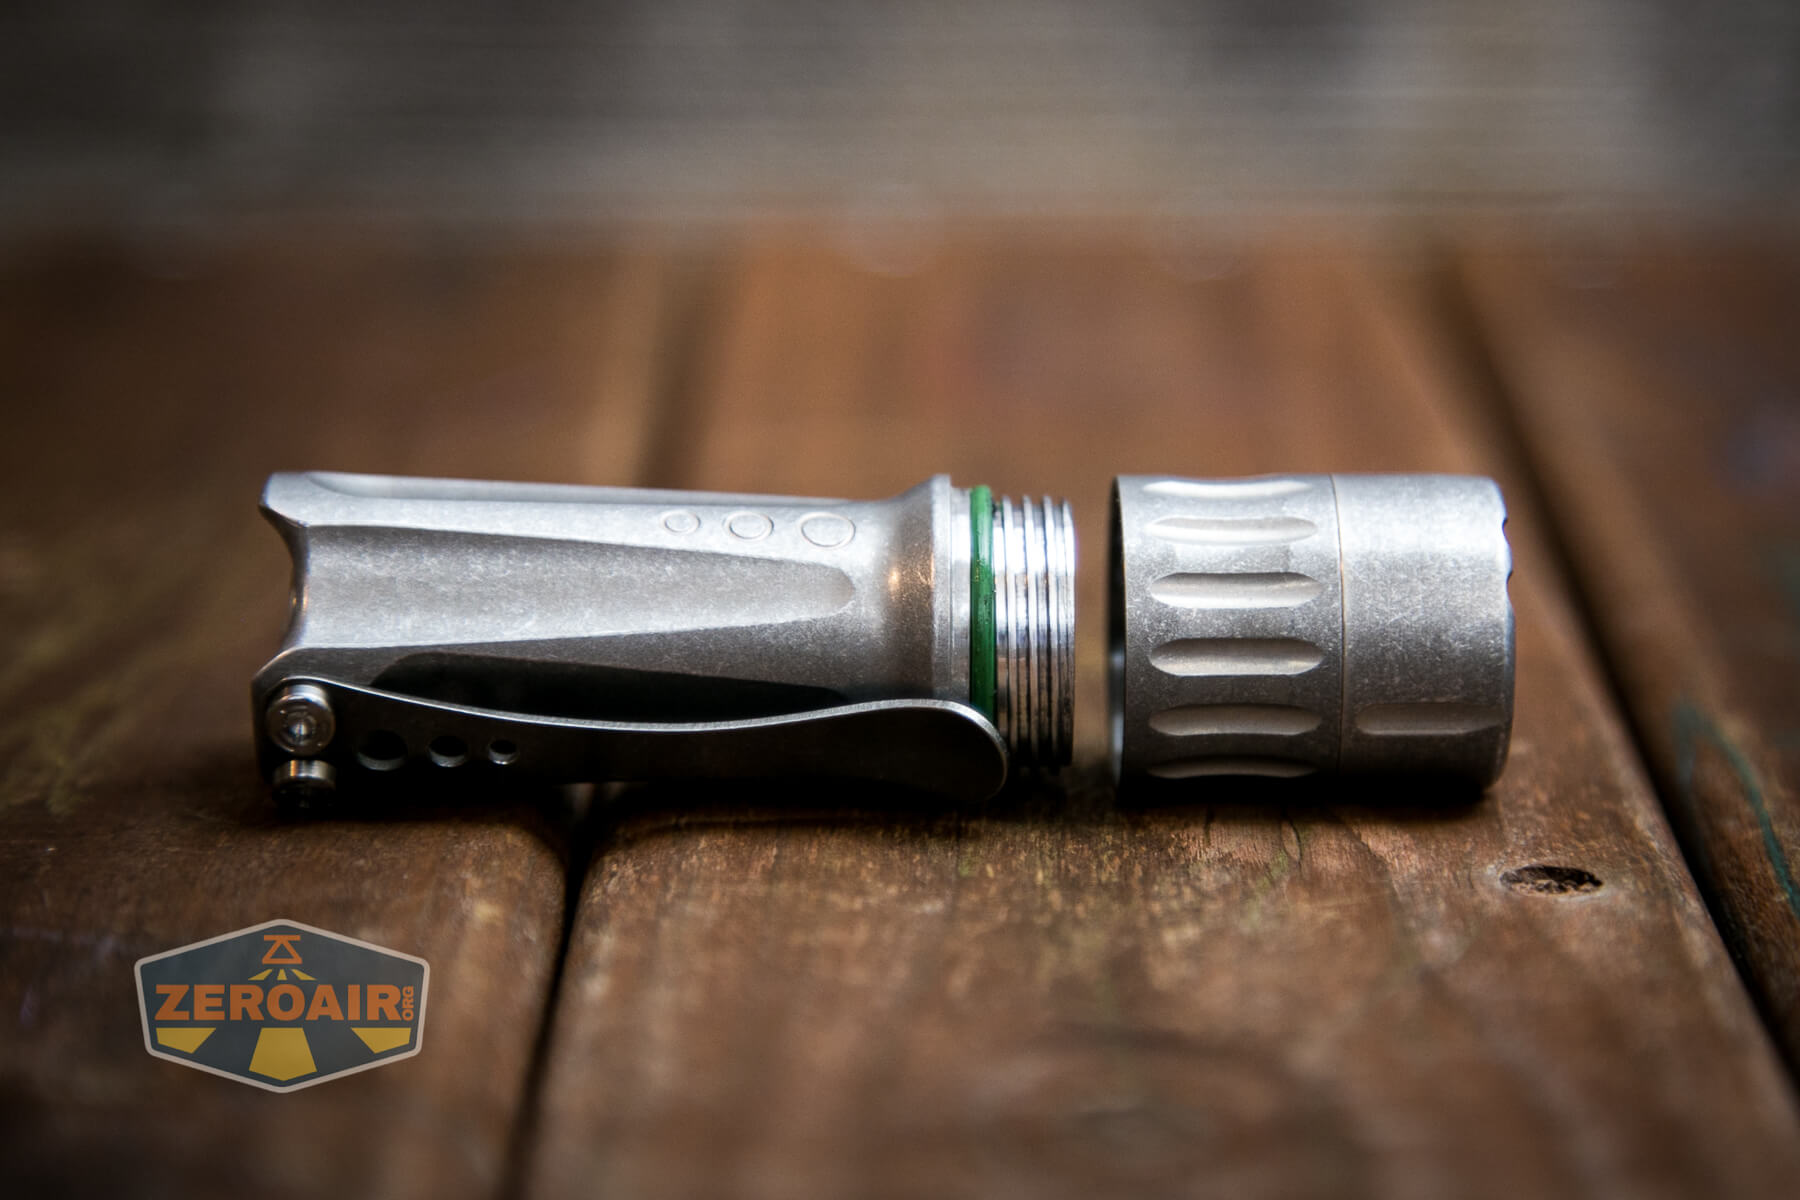
I’m going to call this “just one version” for now. As with other BOSS lights, we typically see other metal options for the body, among other possibilities. But for now, the only Future BOSS is this aluminum version. There are some options though. This Future BOSS is available with both the standard McClicky body and the main point of this post, the MOFF body.
Also available are a few emitter options. There are Cree XP-L HI (4000K) and Nichia 219b option (4000K). The Cree option can have a red or amber secondary emitter; Nichia is available only with amber.
Price
It’s possible to build the light out with a few price options. The head alone is $308 regardless of emitter or secondary emitter choice. The McClicky body adds $165. The MOFF body adds $249. On the full light purchase page, you can select either body, but not both.
Future BOSS Clicky: $473
Future BOSS MOFF: $557
Short Review of the TorchLAB Future BOSS with MOFF
I love metal switches. I’ve loved metal switches for as long as I can remember. The MOFF spoke to me the first time I saw it. Yes, I positively love it. It should come as no surprise that I love the BOSS flashlight, and the Future BOSS is not all that functionally different from the Collector Vintage Forward Taper that I have already posted about.
Long Review
The Big Table
| TorchLAB Future BOSS with MOFF Flashlight | |
|---|---|
| Emitter: | Cree XP-L HI (4000K Triple) |
| Price in USD at publication time: | $557.00 |
| Cell: | 1×18350 |
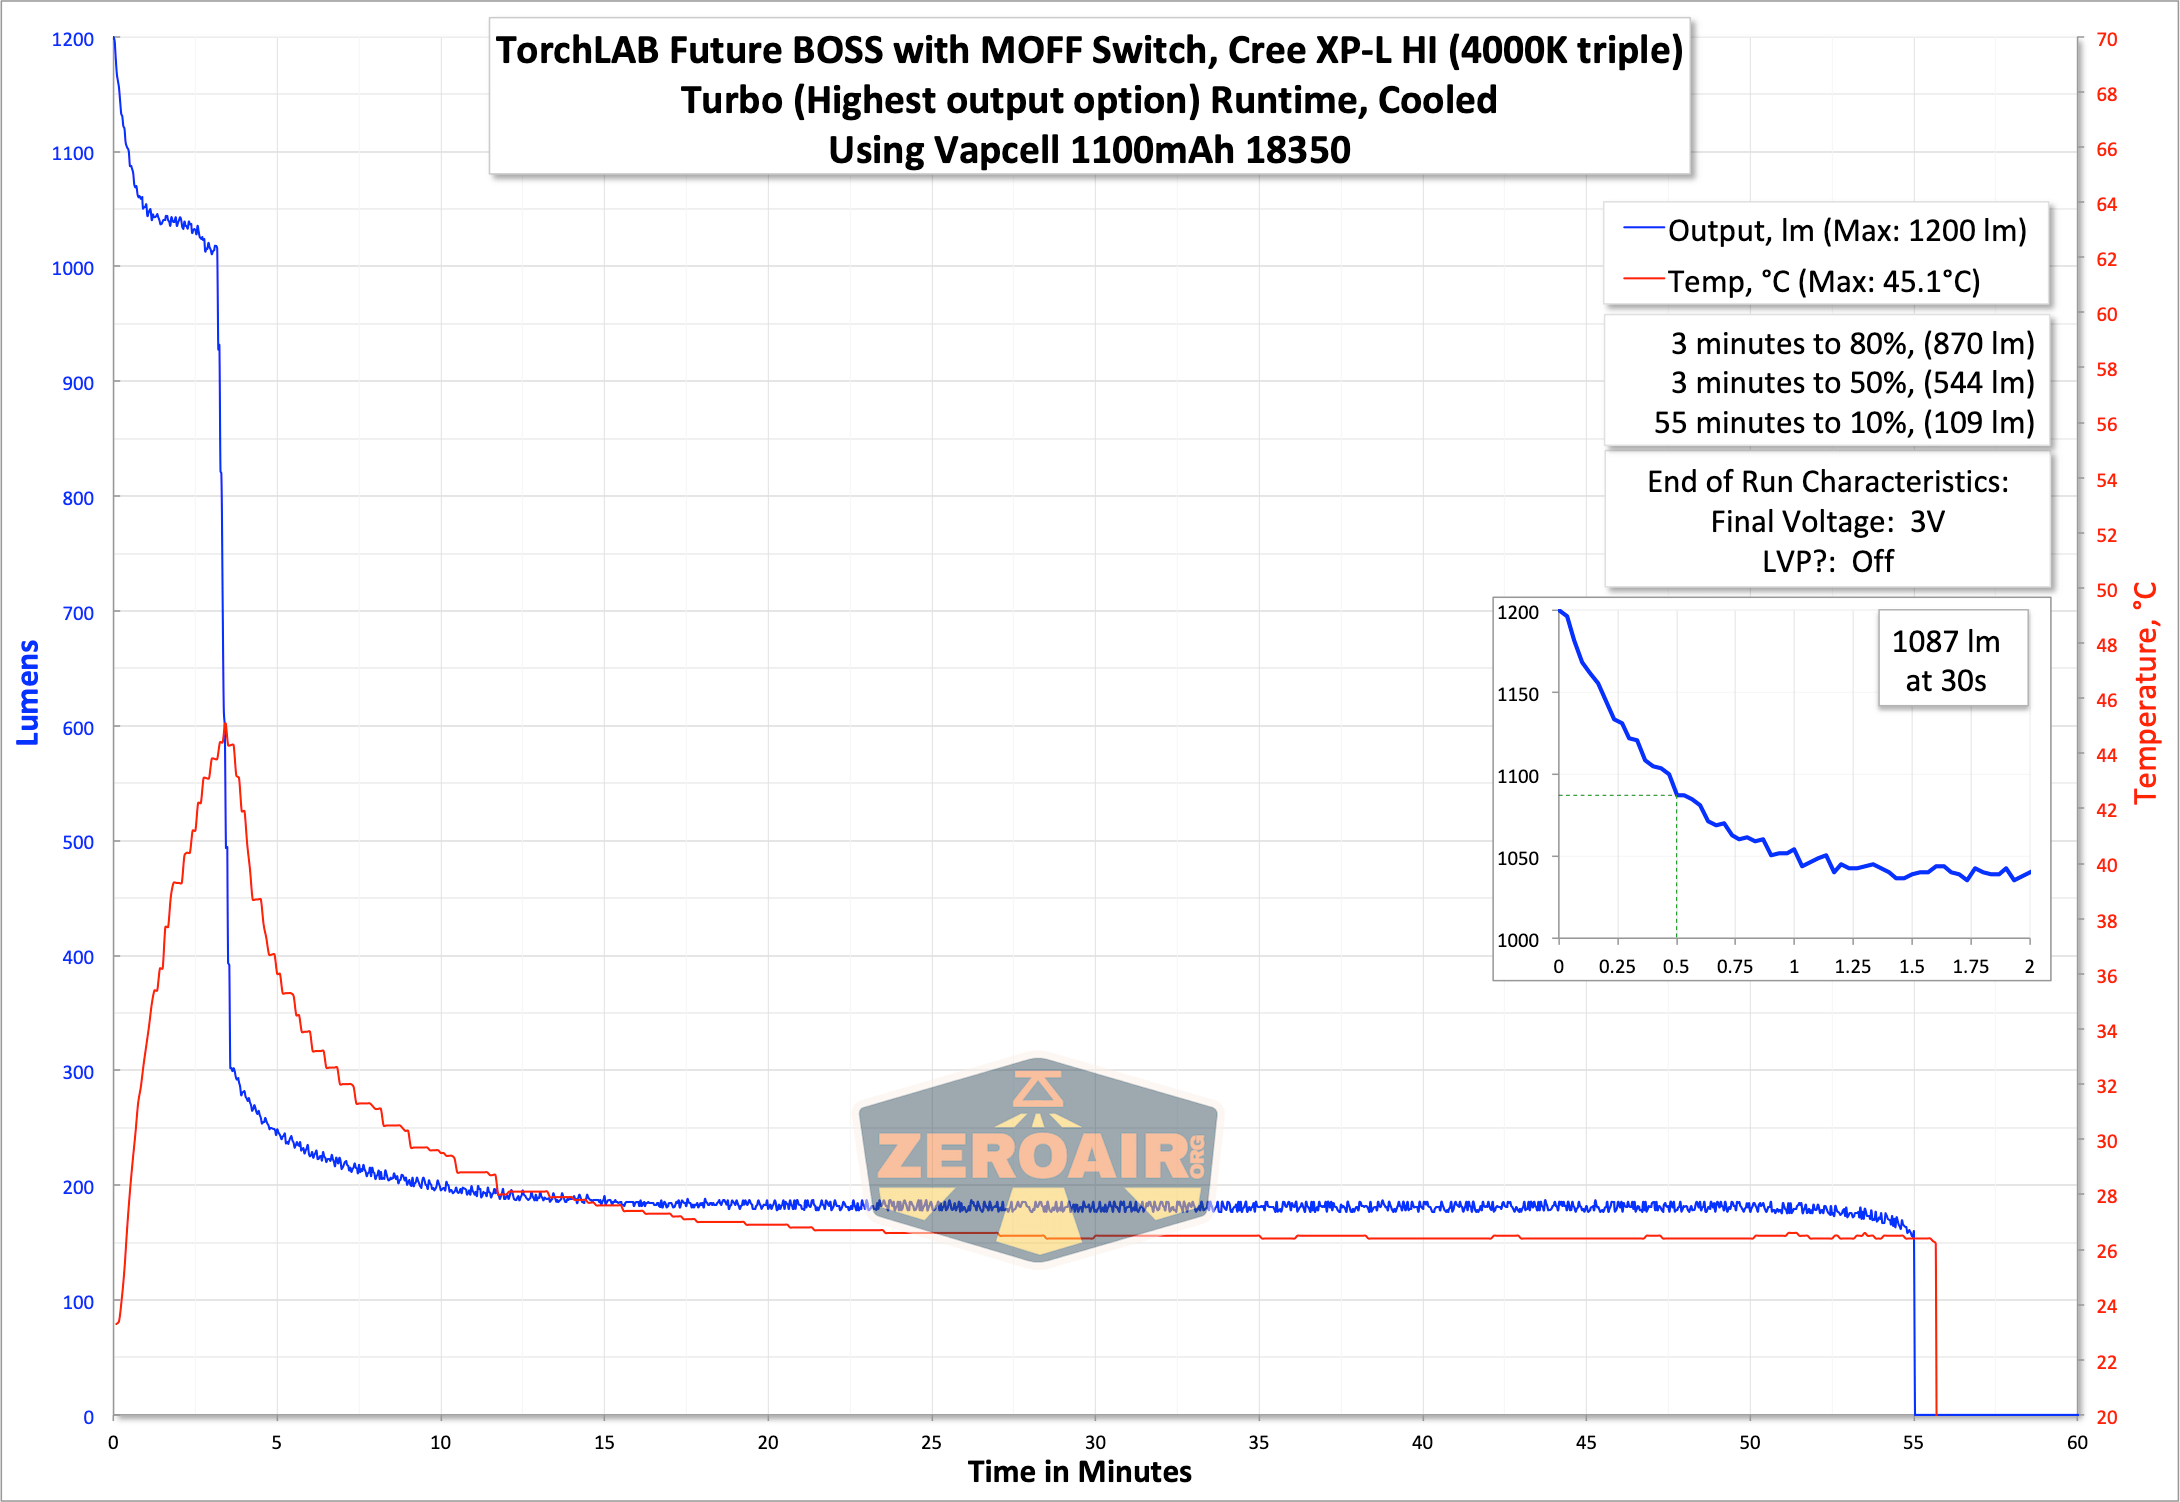
| Highest Output Level Runtime Graph | |
| LVP? | Yes, if programmed |
| Switch Type: | MOFF |
| On-Board Charging? | No |
| Claimed Lumens (lm) | – |
| Measured Lumens (at 30s) | 1087 |
| Candela per Lumen | 6.2 |
| Claimed Throw (m) | – |
| Candela (Calculated) in cd (at 30s) | 599lux @ 3.608m = 7798cd |
| Throw (Calculated) (m) | 176.6 |
| Item provided for review by: | Oveready |
| All my TorchLAB reviews! | |
^ Measurement disclaimer: Testing flashlights is my hobby. I use hobbyist-level equipment for testing, including some I made myself. Try not to get buried in the details of manufacturer specifications versus measurements recorded here; A certain amount of difference (say, 10 or 15%) is perfectly reasonable.
What’s Included
- TorchLAB Future BOSS Head
- TorchLAB MOFF Switch Body
- (aka the “TorchLAB Future BOSS with MOFF”)
Package and Manual
Unlike the Collector Vintage BOSS, the Future BOSS does not ship in any special packaging. It ships in traditional BOSS packaging, which is a Priority mailer, with the flashlight inside a protective bit of padding (specifically pipe insulation).
The Lux-RC driver (371 v2.0) has a manual that covers a BUNCH of information. I have a page fully dedicated to that. Please go see the manual there:
Technically this driver is exactly the same as the Collector Vintage. It works largely the same way. Specifically, though, the MOFF switch is different, and you’ll probably want to continue reading to see how, and how to use the MOFF.
I also have a whole section on the Manual below.
Build Quality and Disassembly

I’m trying to think of a BOSS flashlight that I don’t like the look of.
Now I’m trying to think of a BOSS flashlight that isn’t impeccably built.
Both counts, I can’t think of any. I love all BOSS lights. They all just look perfect to me. And the build quality is of the charts!
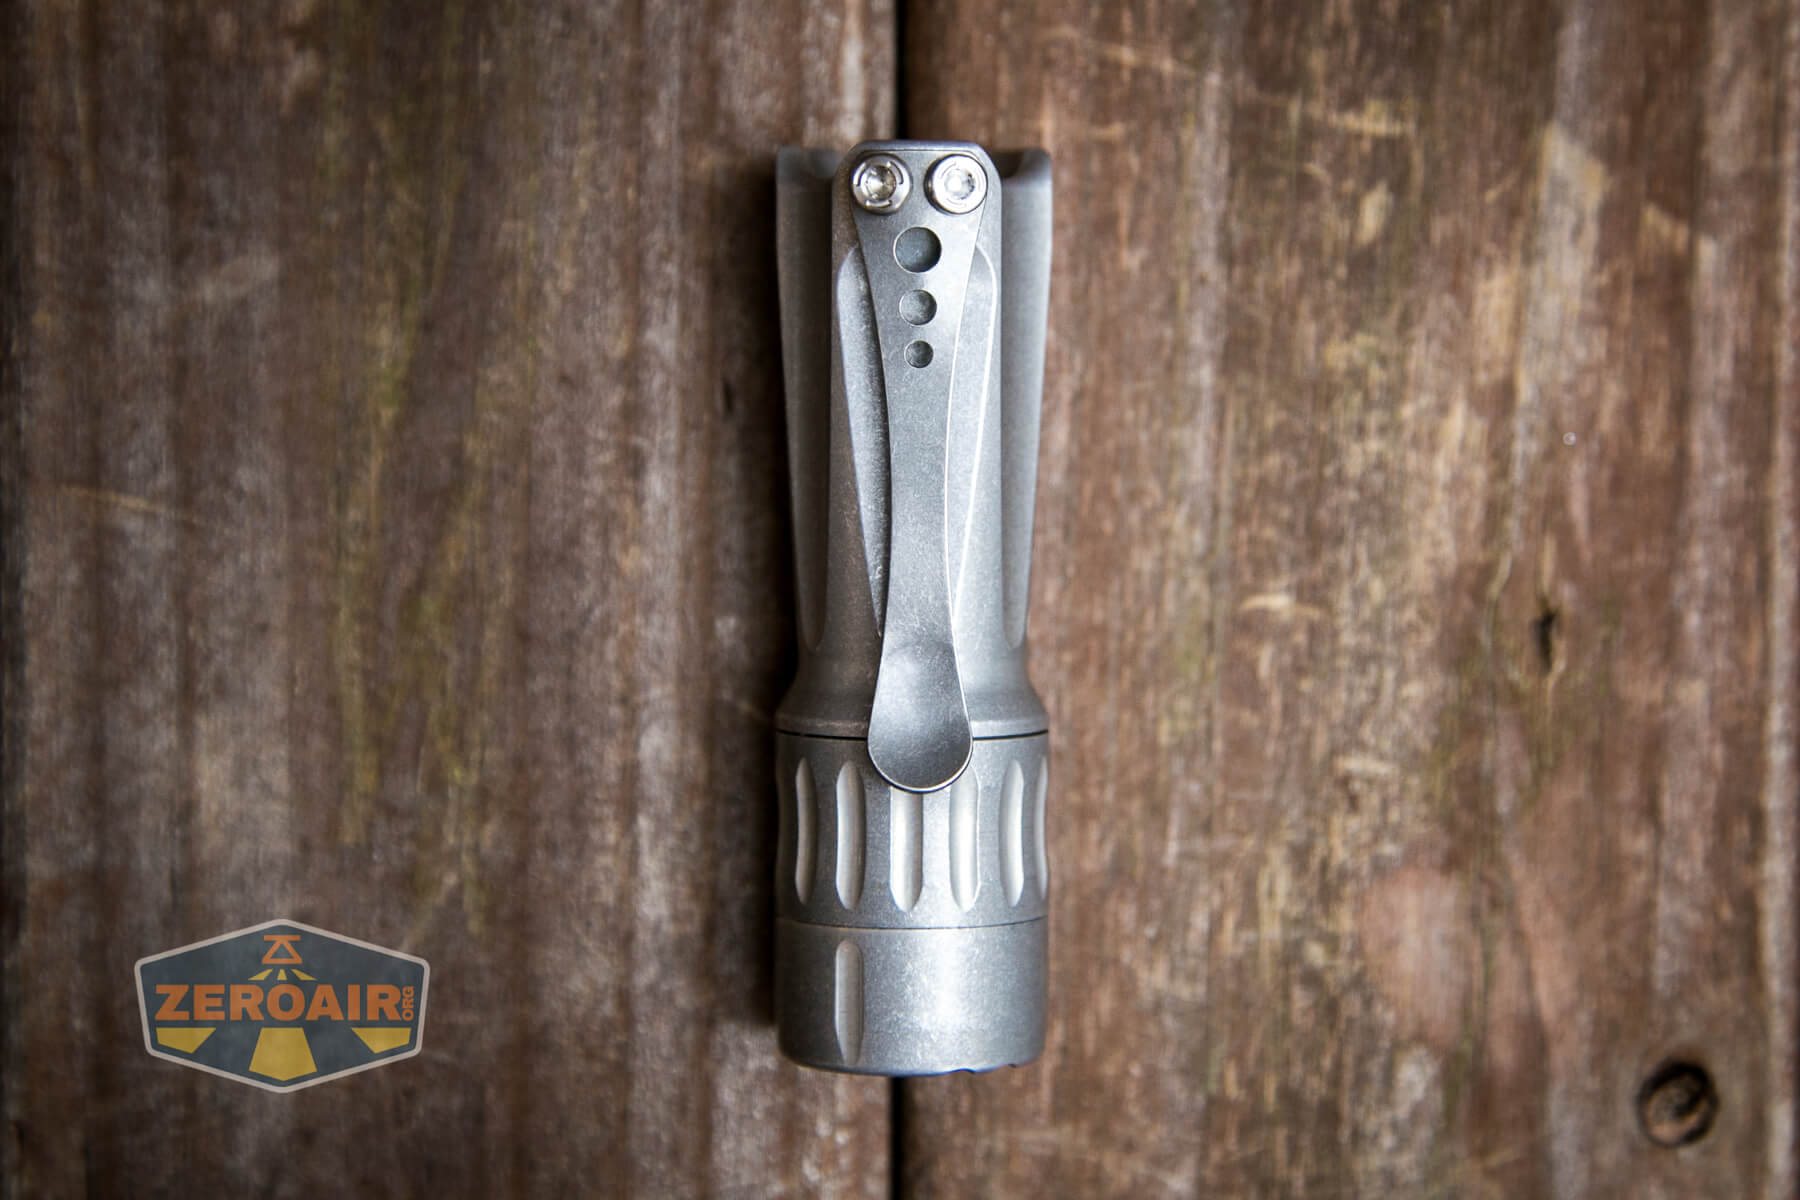
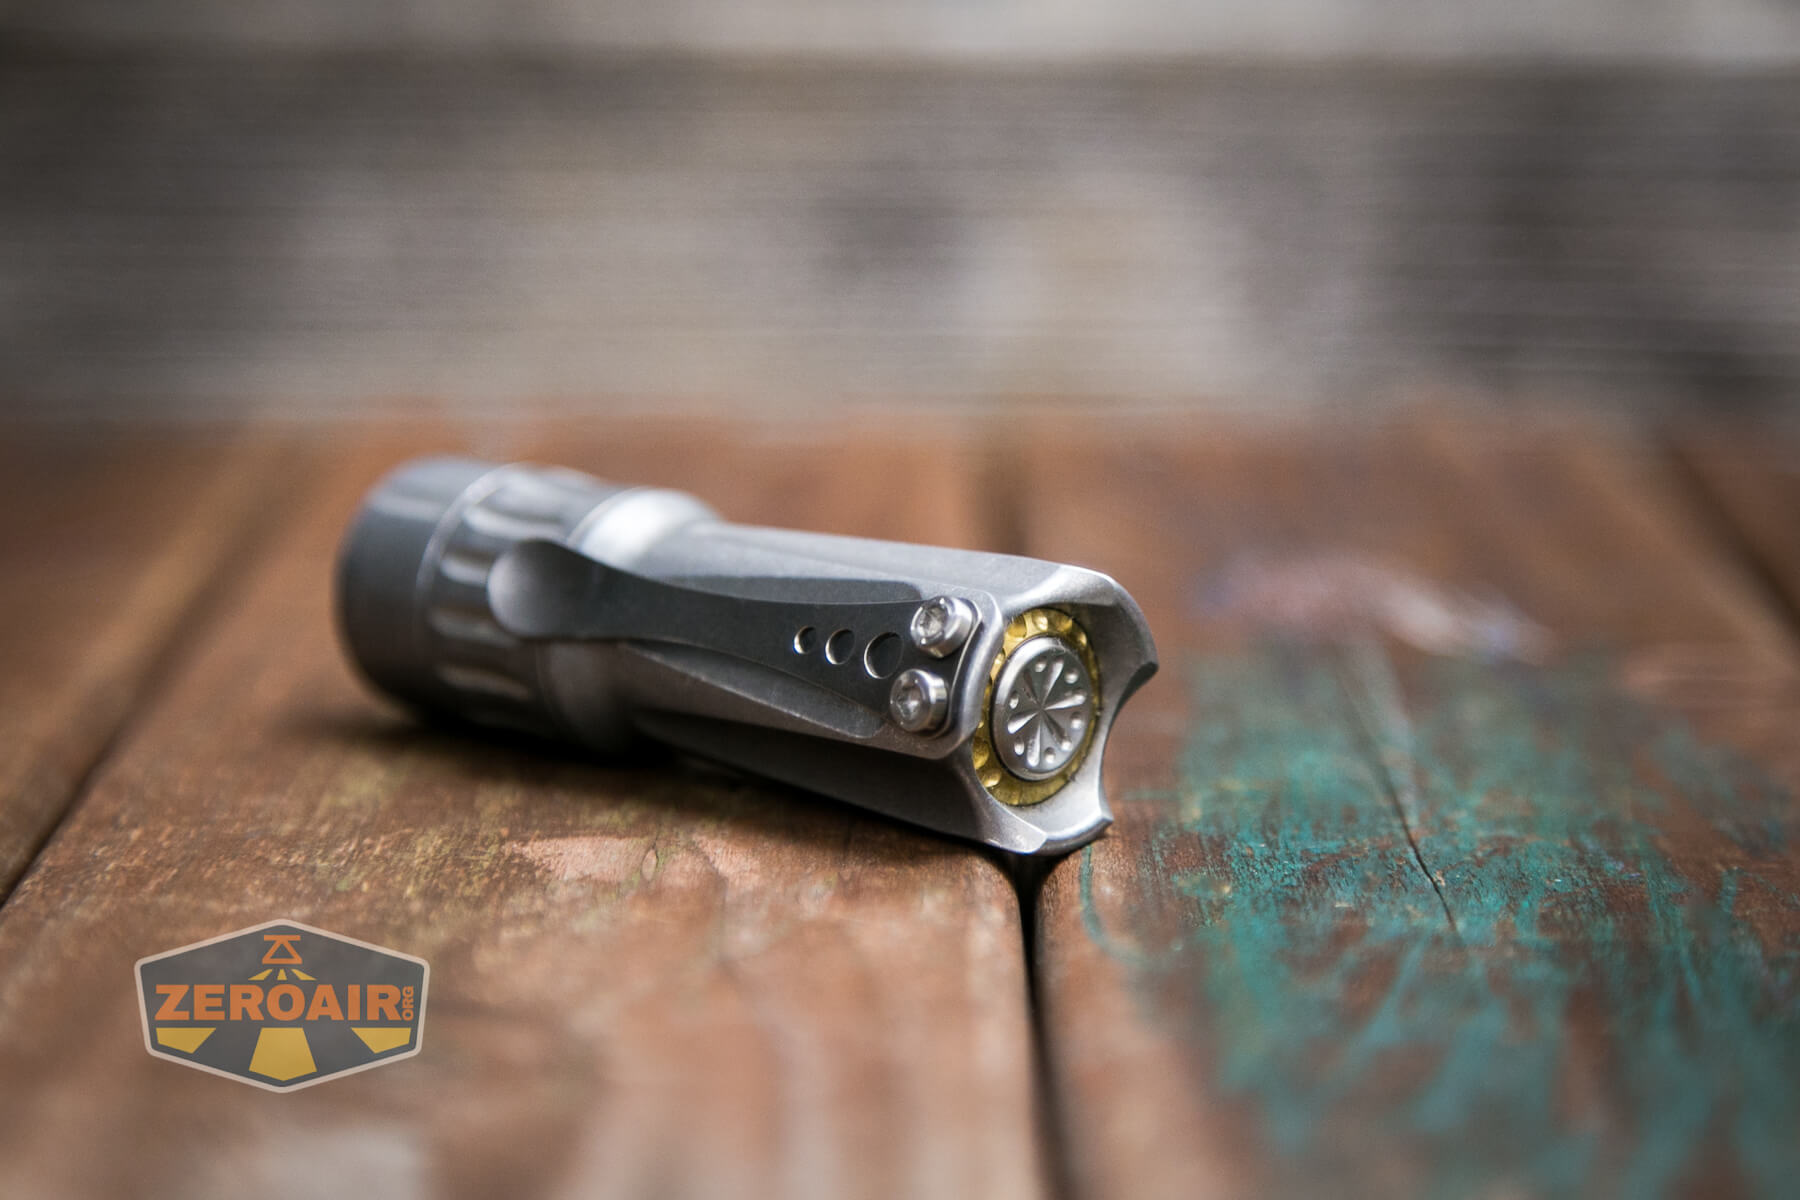
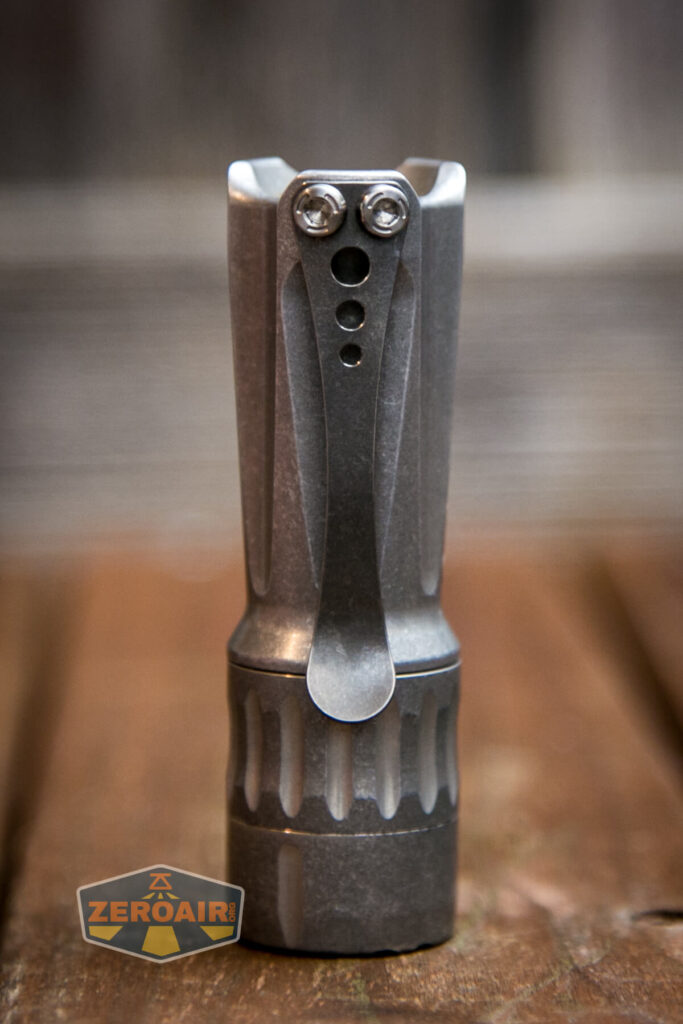
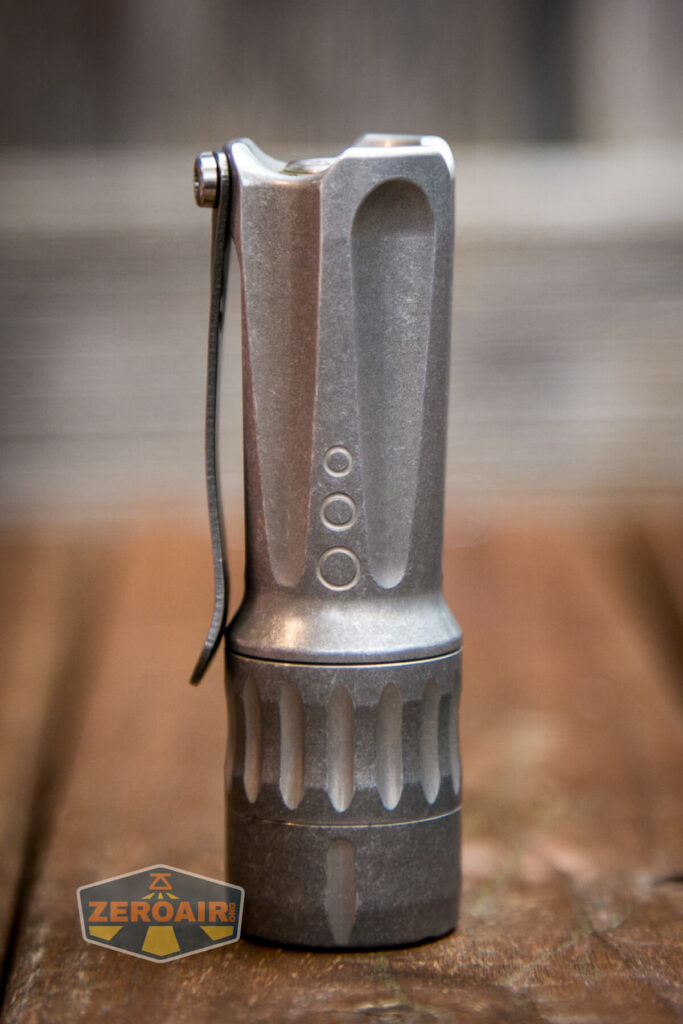
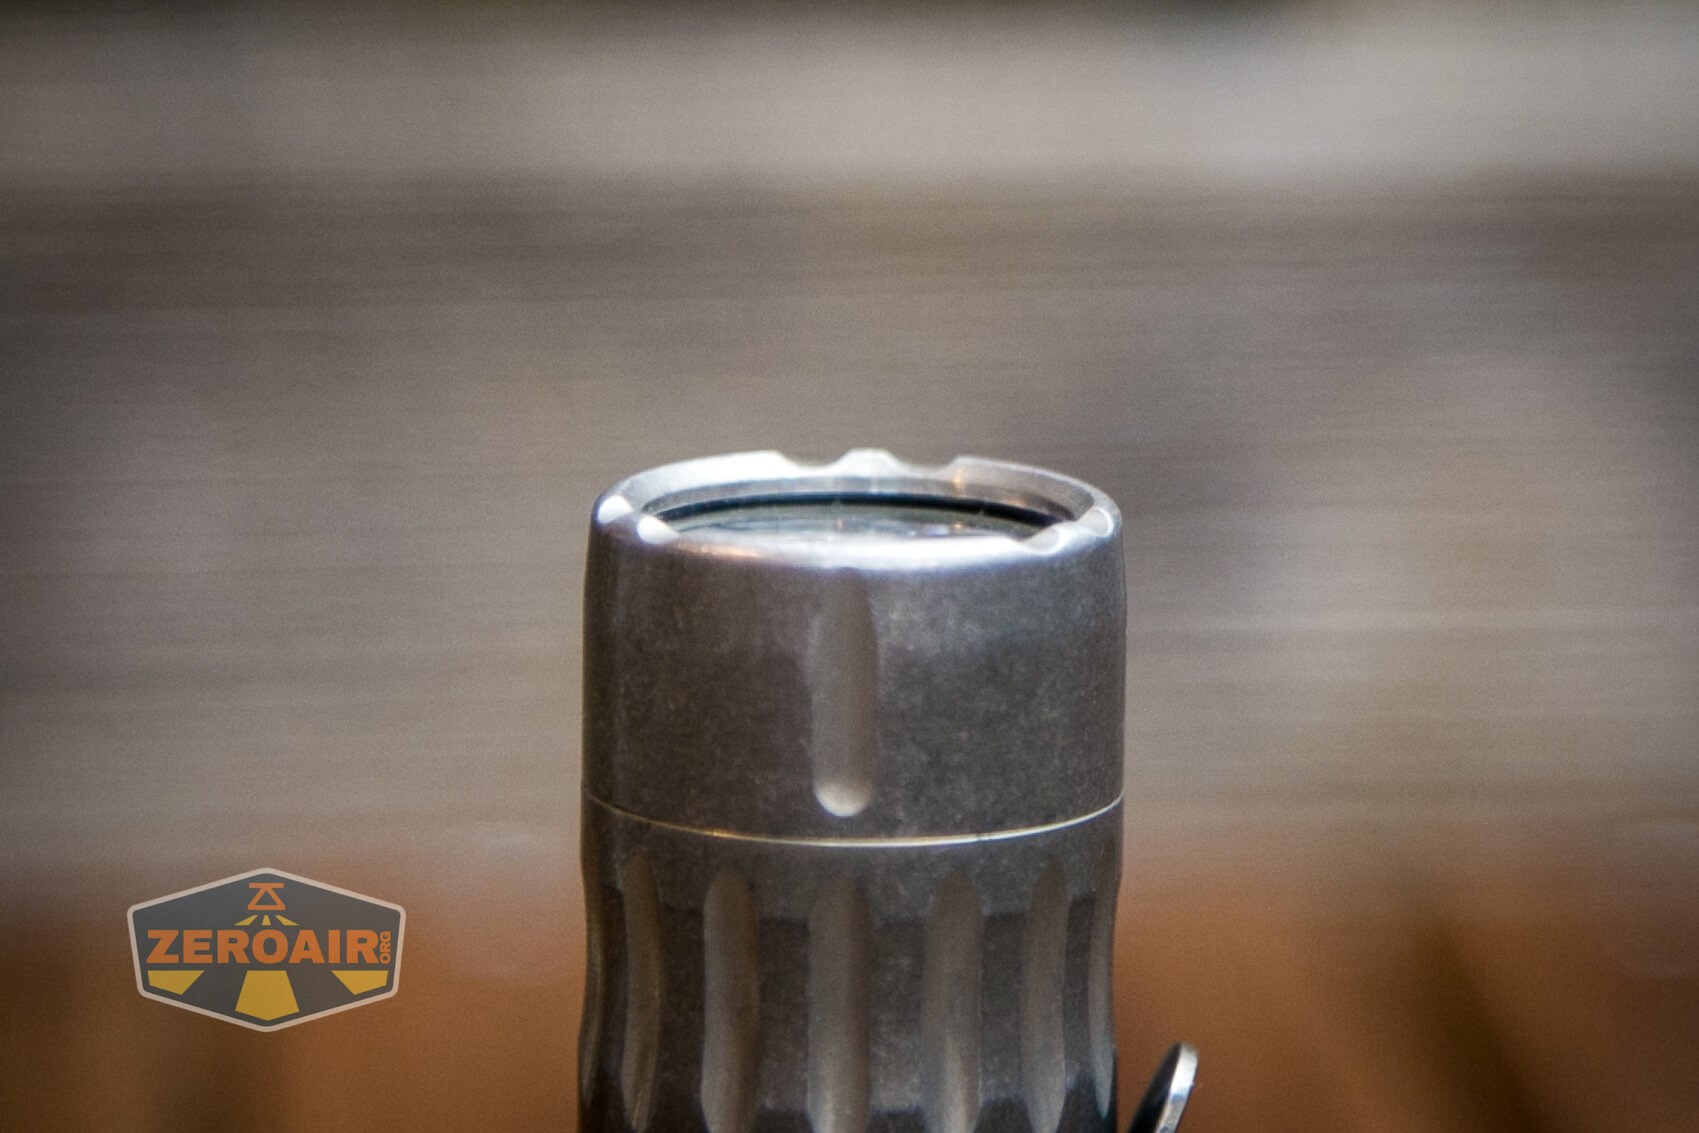
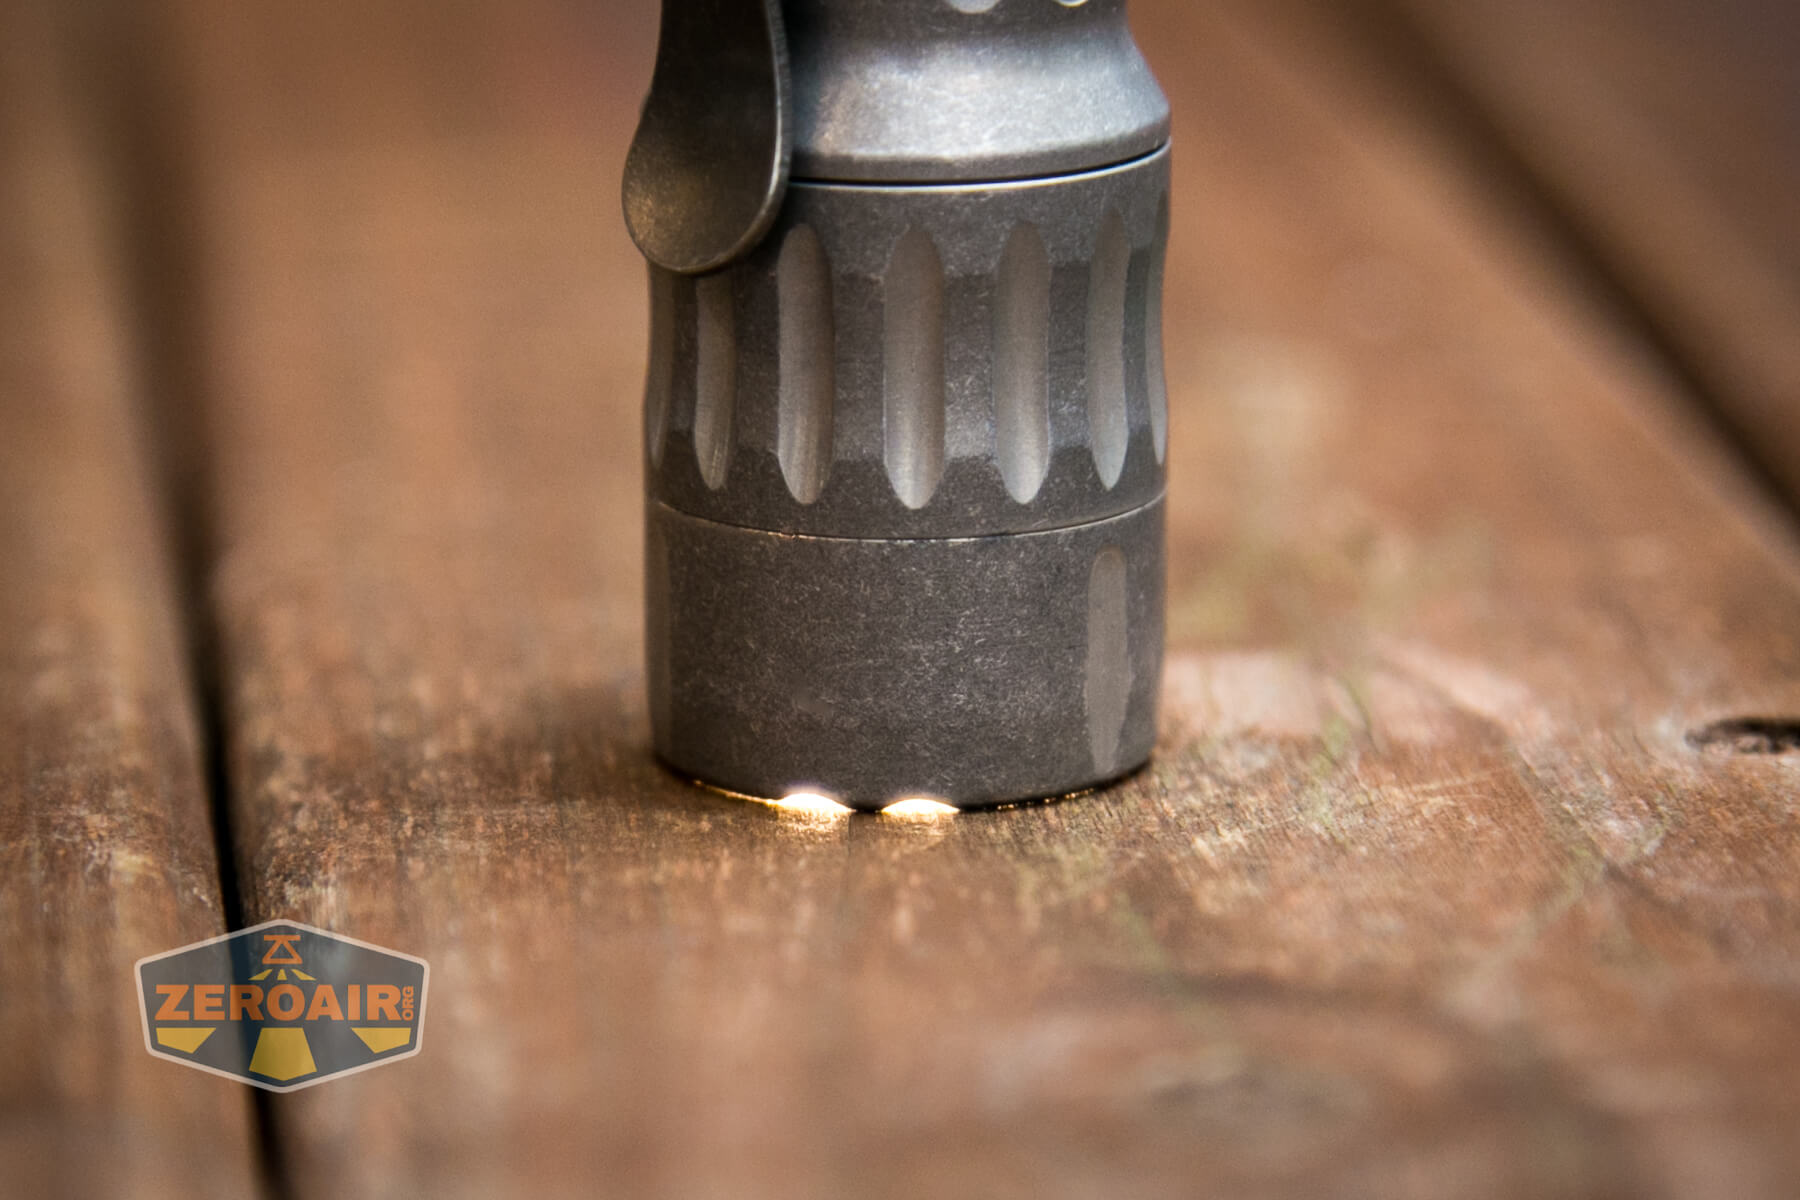
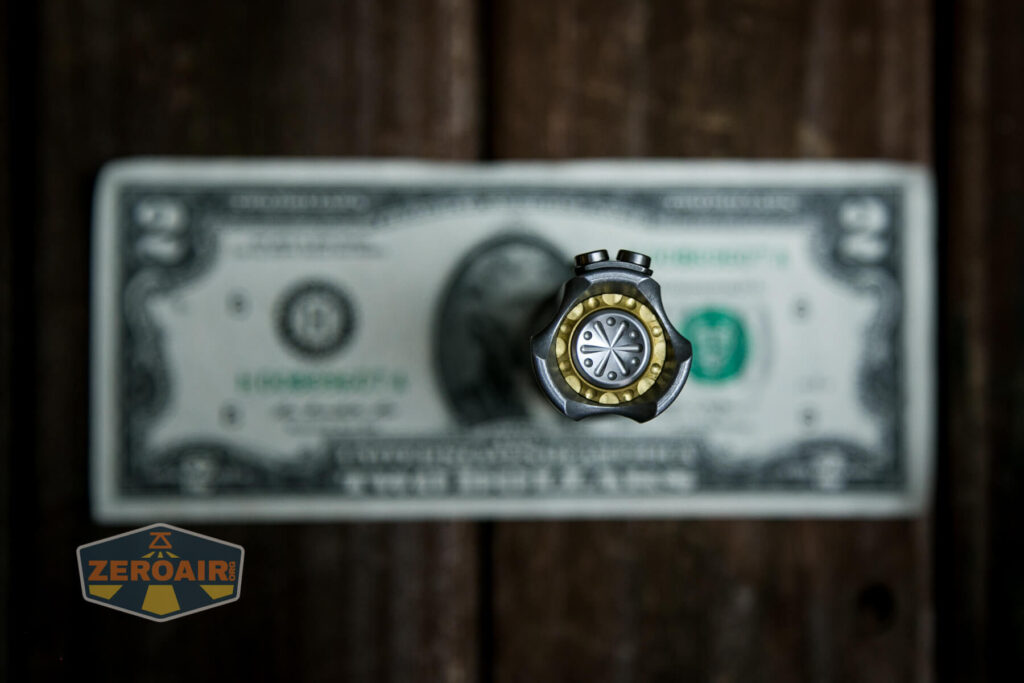
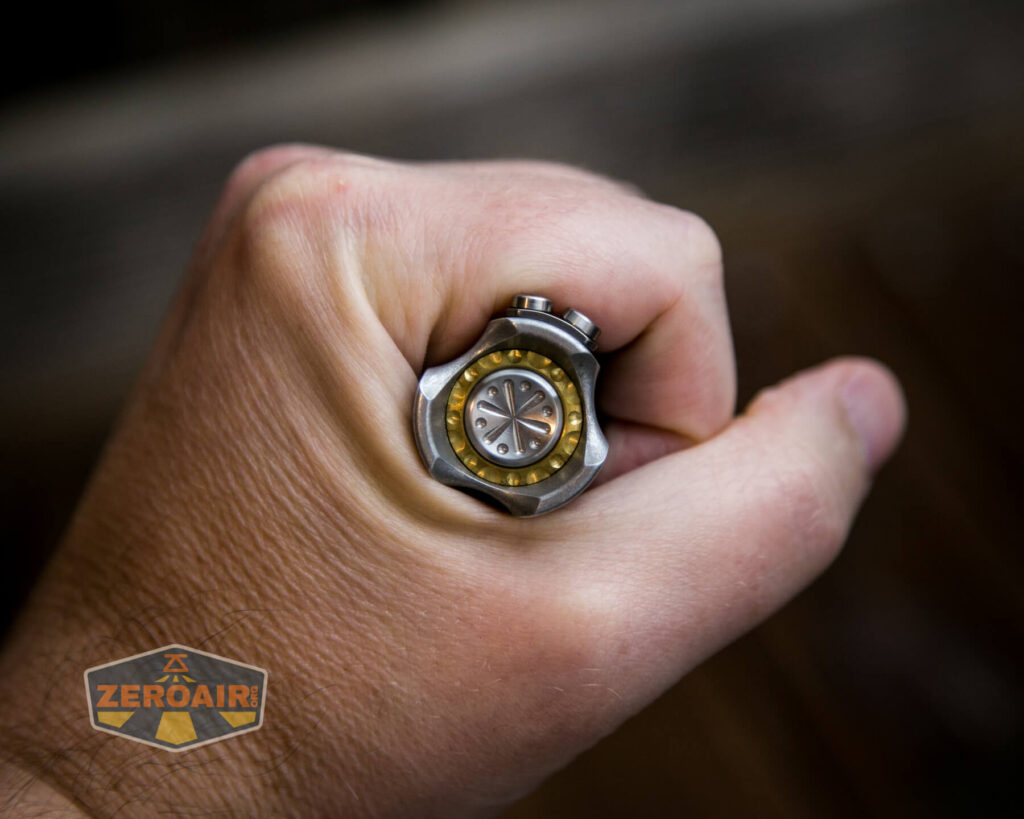
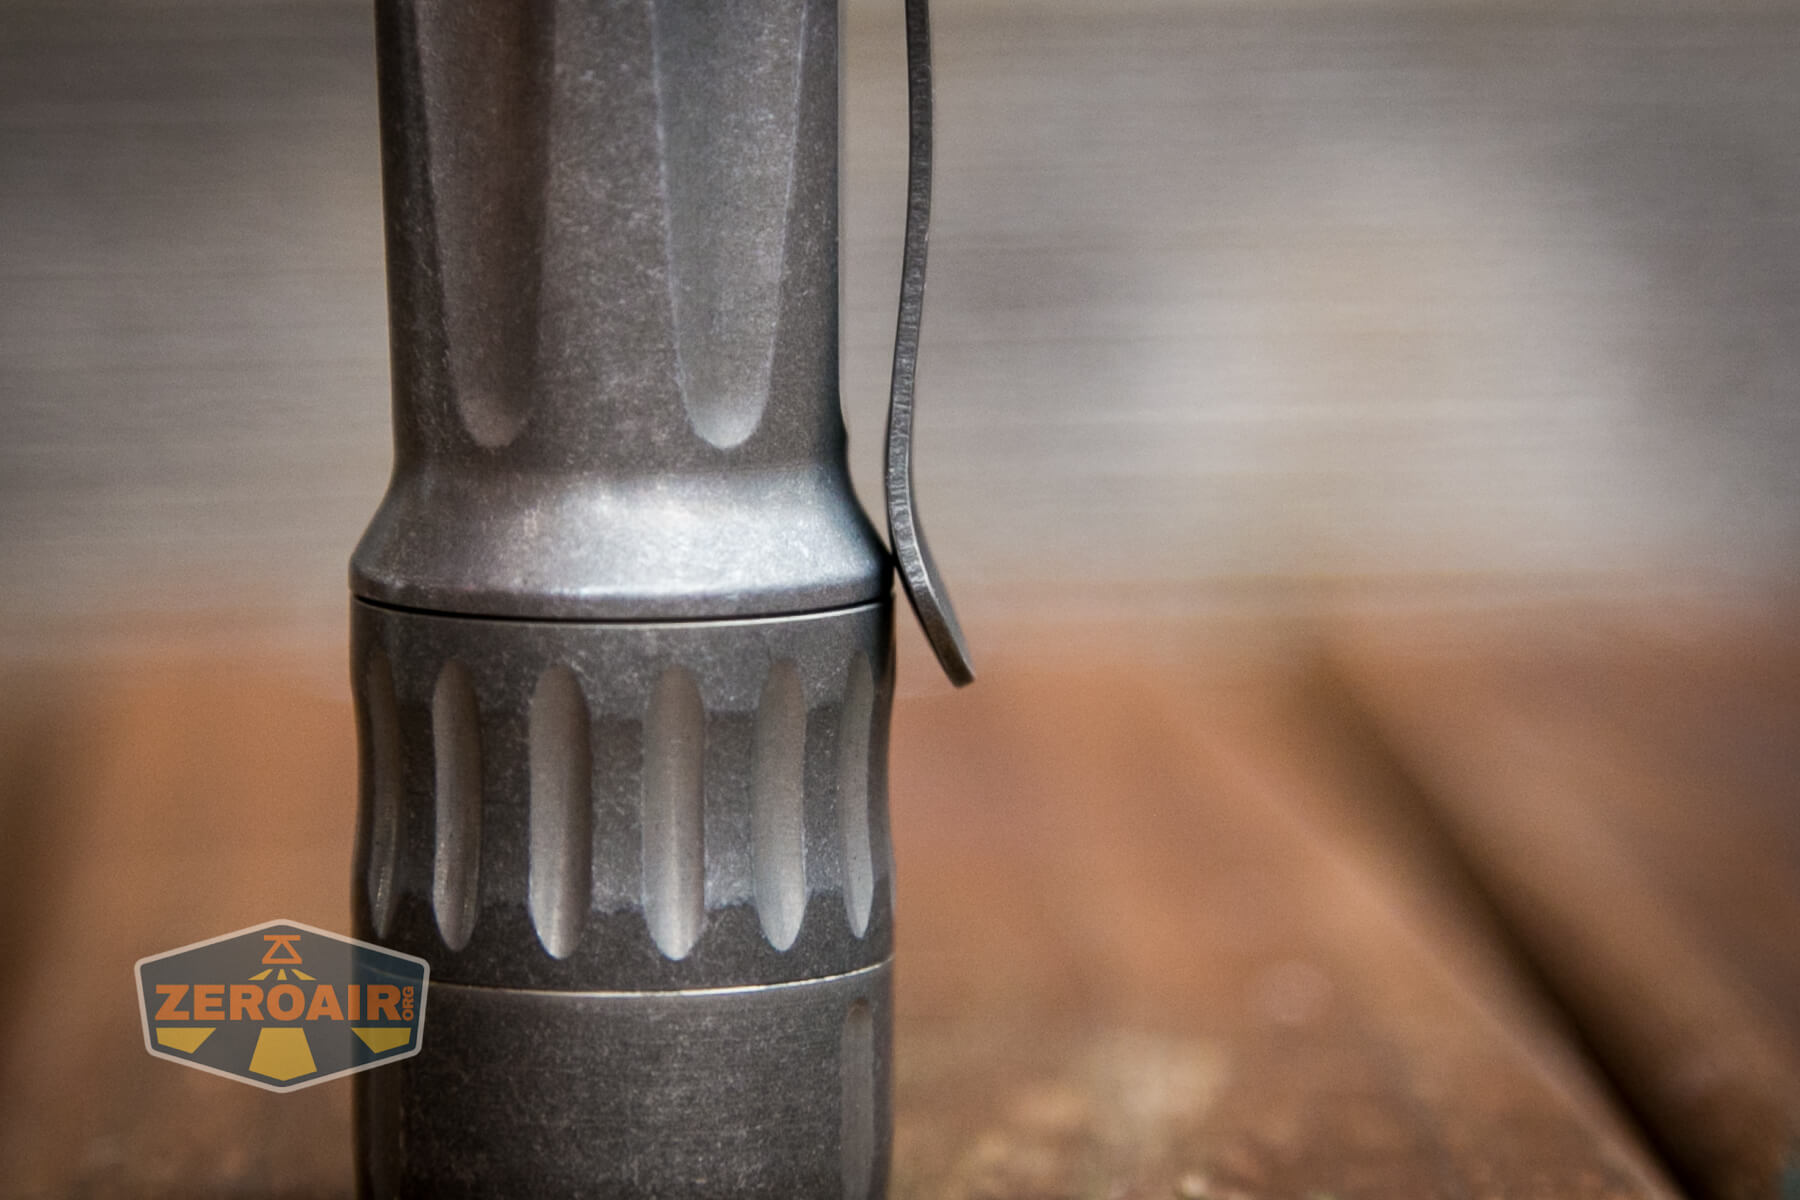
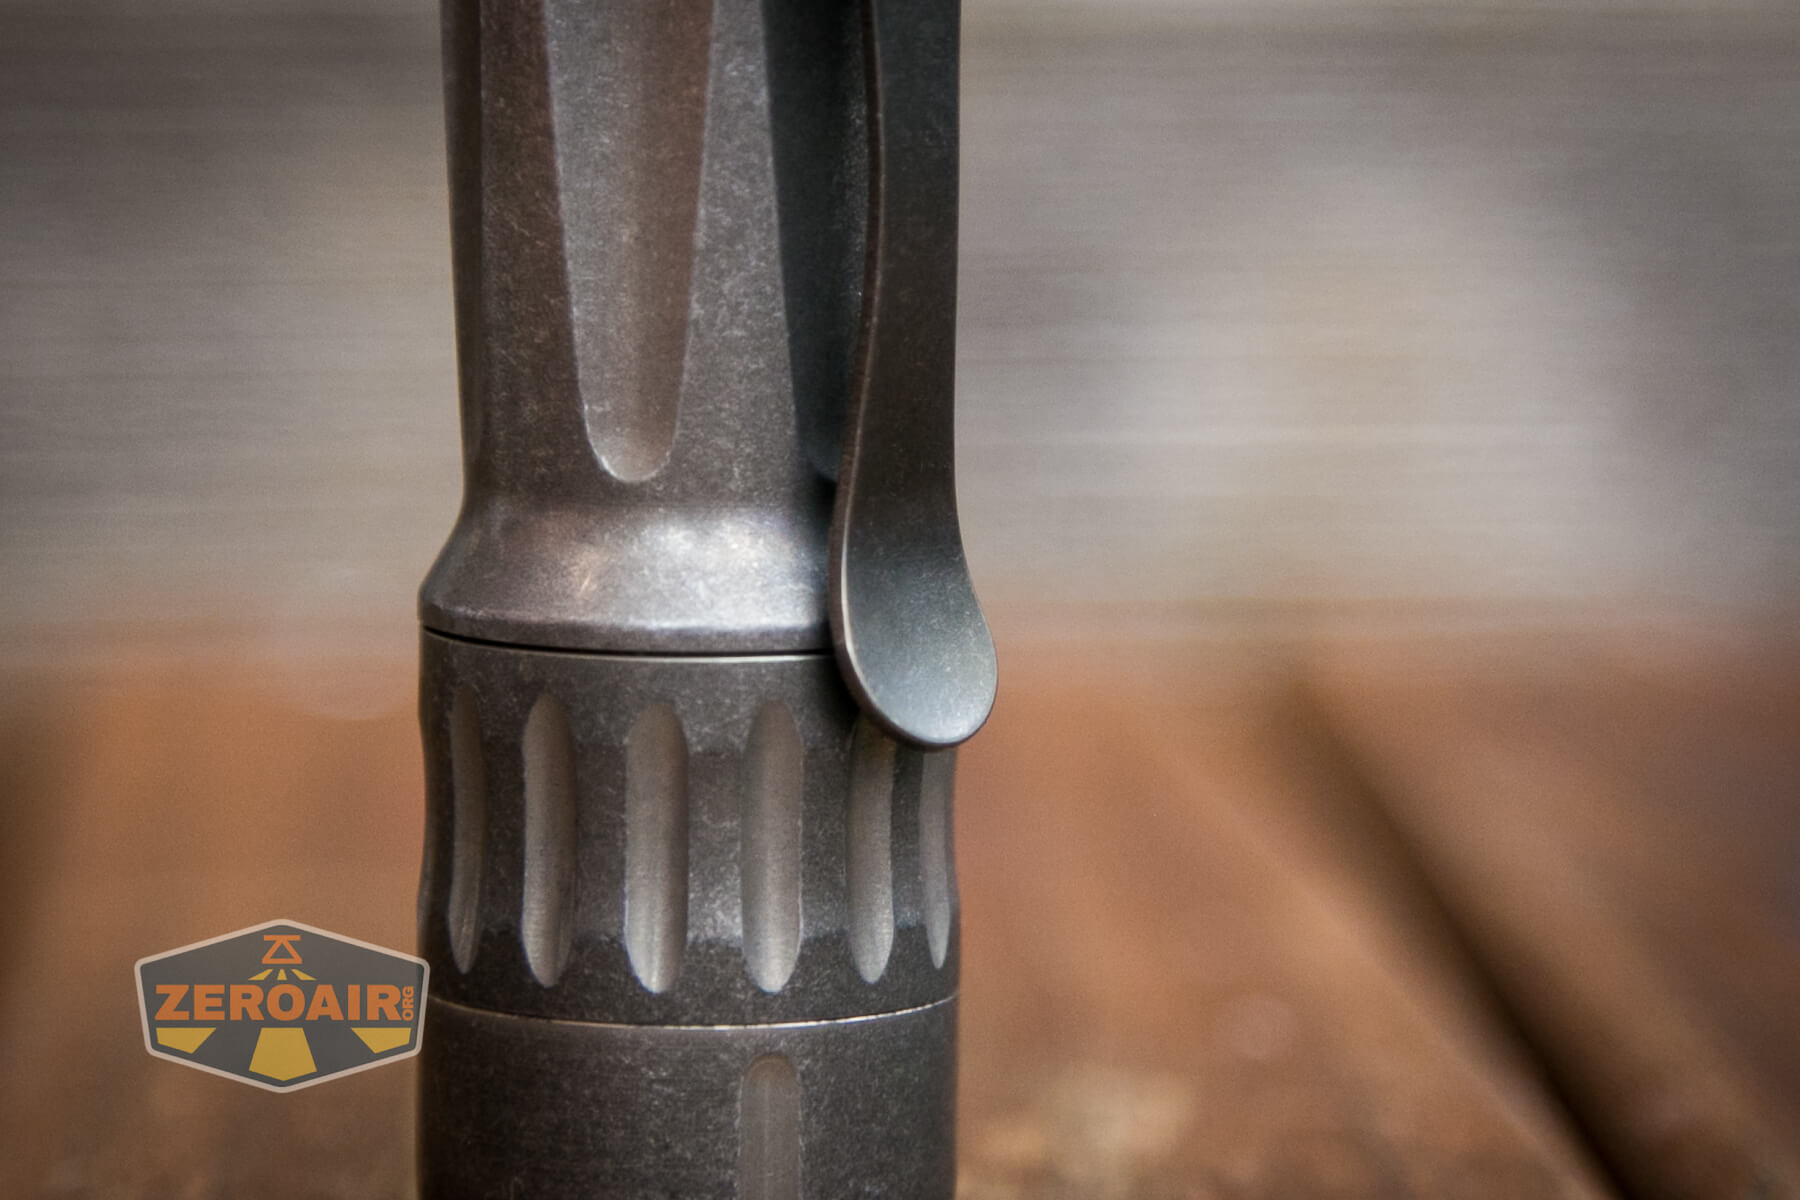
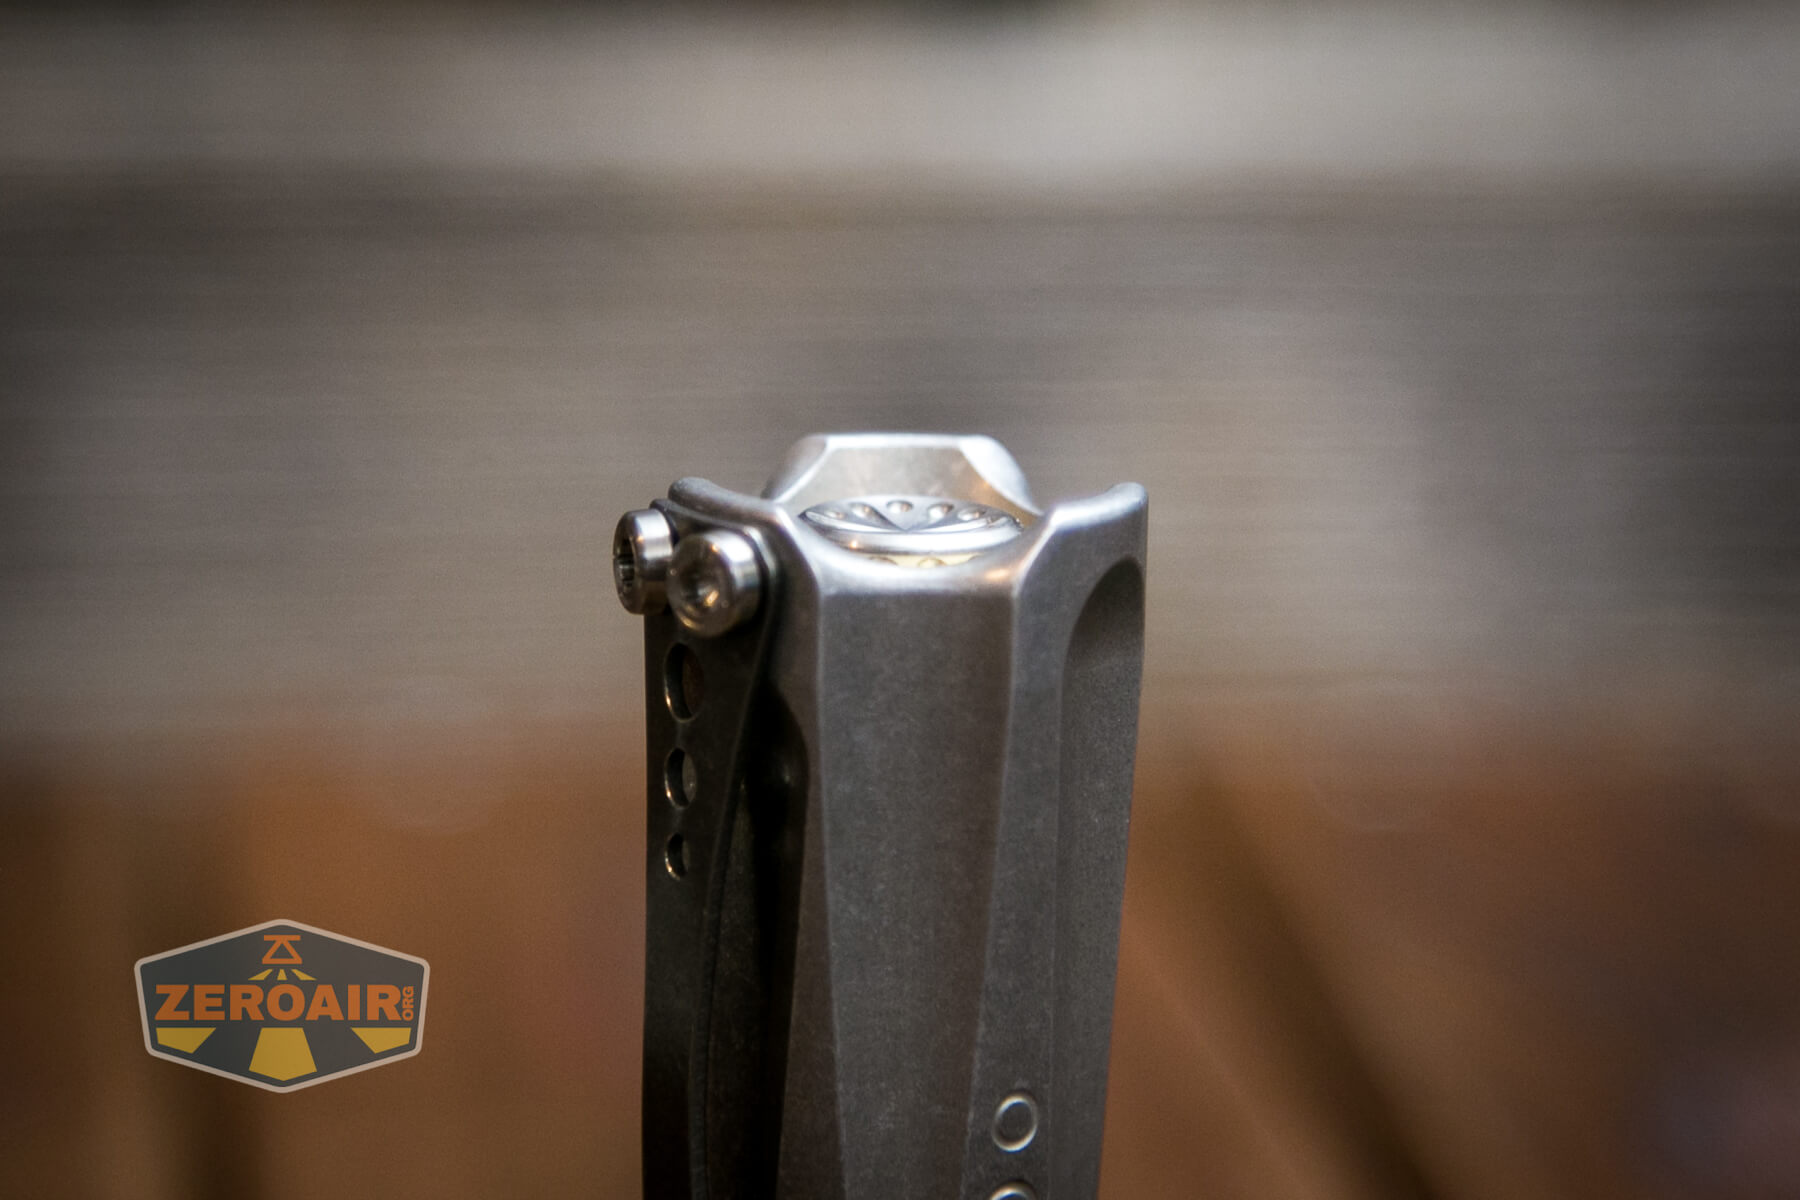
Now I’m trying to think of a BOSS that looks better than this Future BOSS with MOFF. Let’s jump into the MOFF since you can see it below… MOFF is an entirely new type of mechanical switch. The name stands for momentary off, which also describes how the switch works. I’ll cover that more in the User Interface section, but we can talk about the mechanics here.
First, let’s talk about the common types of mechanical switches before MOFF arrived. There were two: forward clicky and reverse clicky. Non-MOFF BOSS flashlights all use forward clicky- specifically McClicky – switches. The MechForce Mechtorch uses a reverse clicky.
These switches are both normally off. When the light is not in an on state, it’s because the (forward or reverse) mechanical switch is making an open circuit, and the driver does not have power. That’s really enough information for us to plow on with MOFF information. But just to add it for a bit of completion: forward and reverse clicky switches differ importantly.
A forward clicky allows momentary output (the light will come on without actually clicking) but does not allow mode changes after being clicked on.
A reverse clicky does not allow momentary (the light will come on only after being fully clicked), but does allow mode changes after being clicked.
Again, both of those are normally off. What TorchLAB has introduced with Future BOSS is the MOFF, a physically new switch that is normally on. That is when the switch is in its “resting state”, the circuit is closed, and the driver has power. We’ll cover more of that later, but for now, just keep checking out the build quality of the Future BOSS!
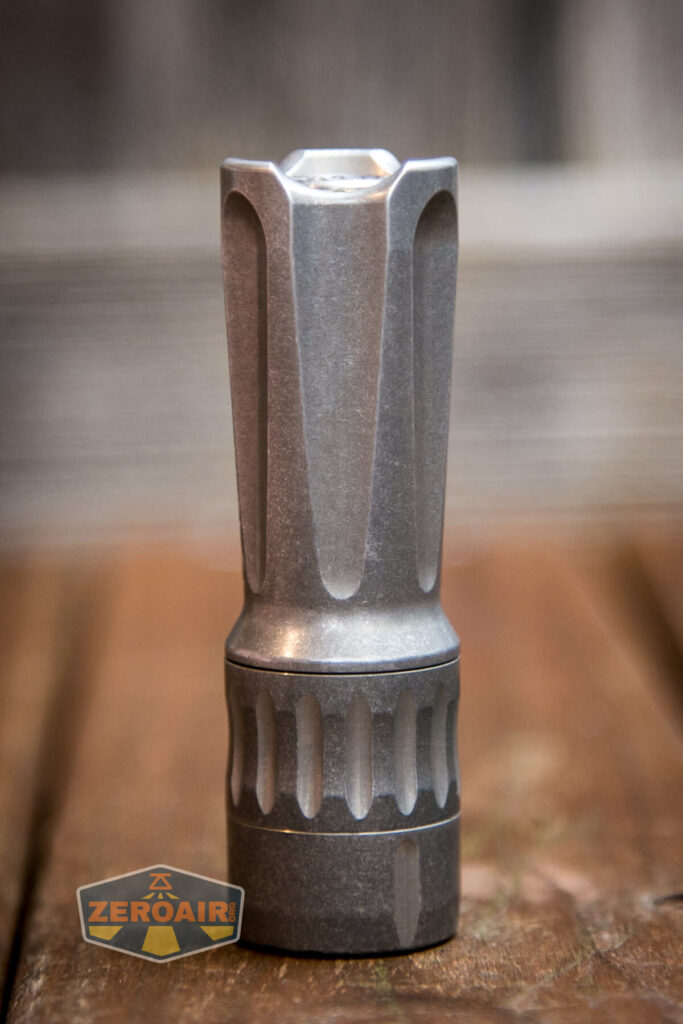
Only one side of the Future BOSS gets the TorchLAB logo. That’s not new; previous BOSS lights were this way, too. I do think the quality of logo (I’m not sure it’s technically a logo) is improving generation after generation.
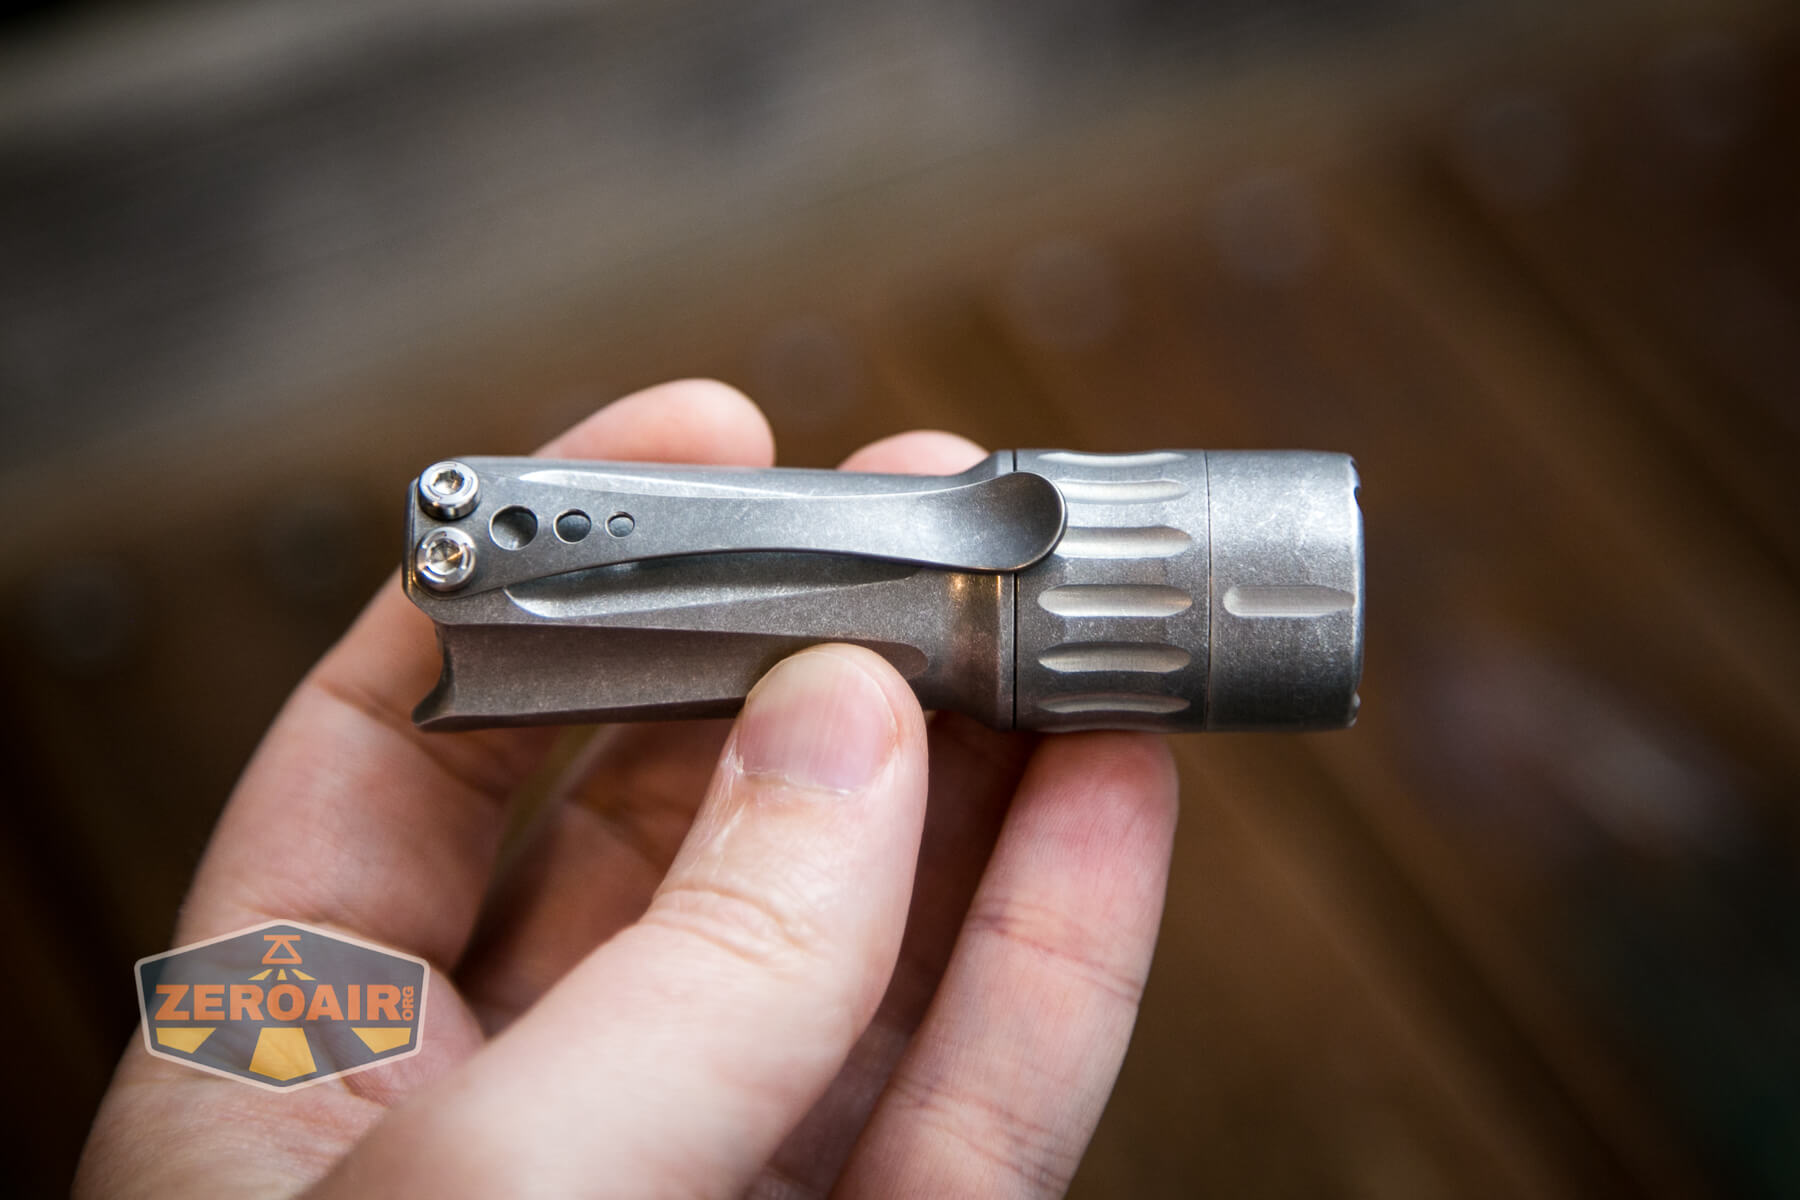
Also, a big difference in the Future BOSS and previous BOSS lights is the design on the head. While it seems to me to be aesthetic, it actually serves a smart purpose – that’s exactly where you need to grip in order to remove the head and swap cells. Unlike previous generation,s which often had design work in the head that “didn’t line up” with designs on the body, here the match seems perfect.
The bezel design seems the same as with previous versions.
And that’s awesome because the previous version was awesome.
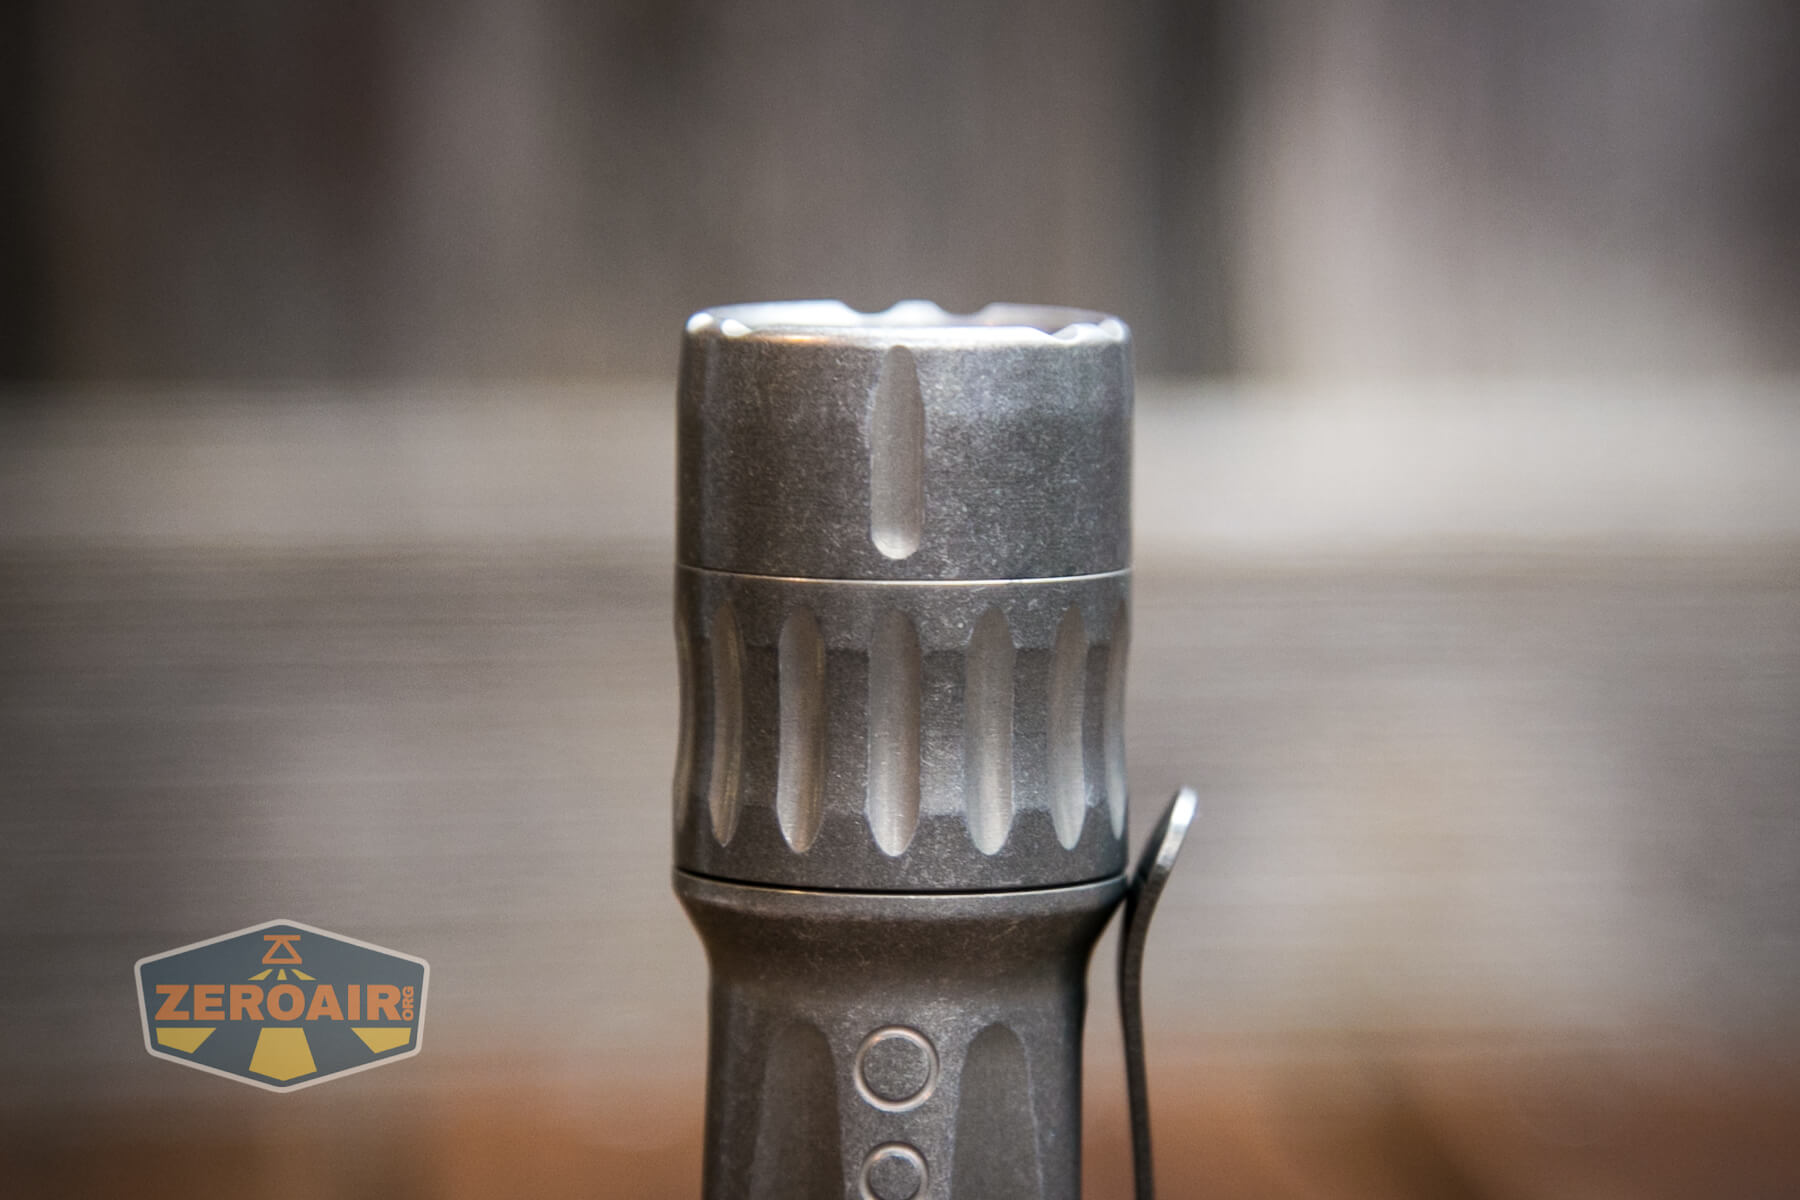
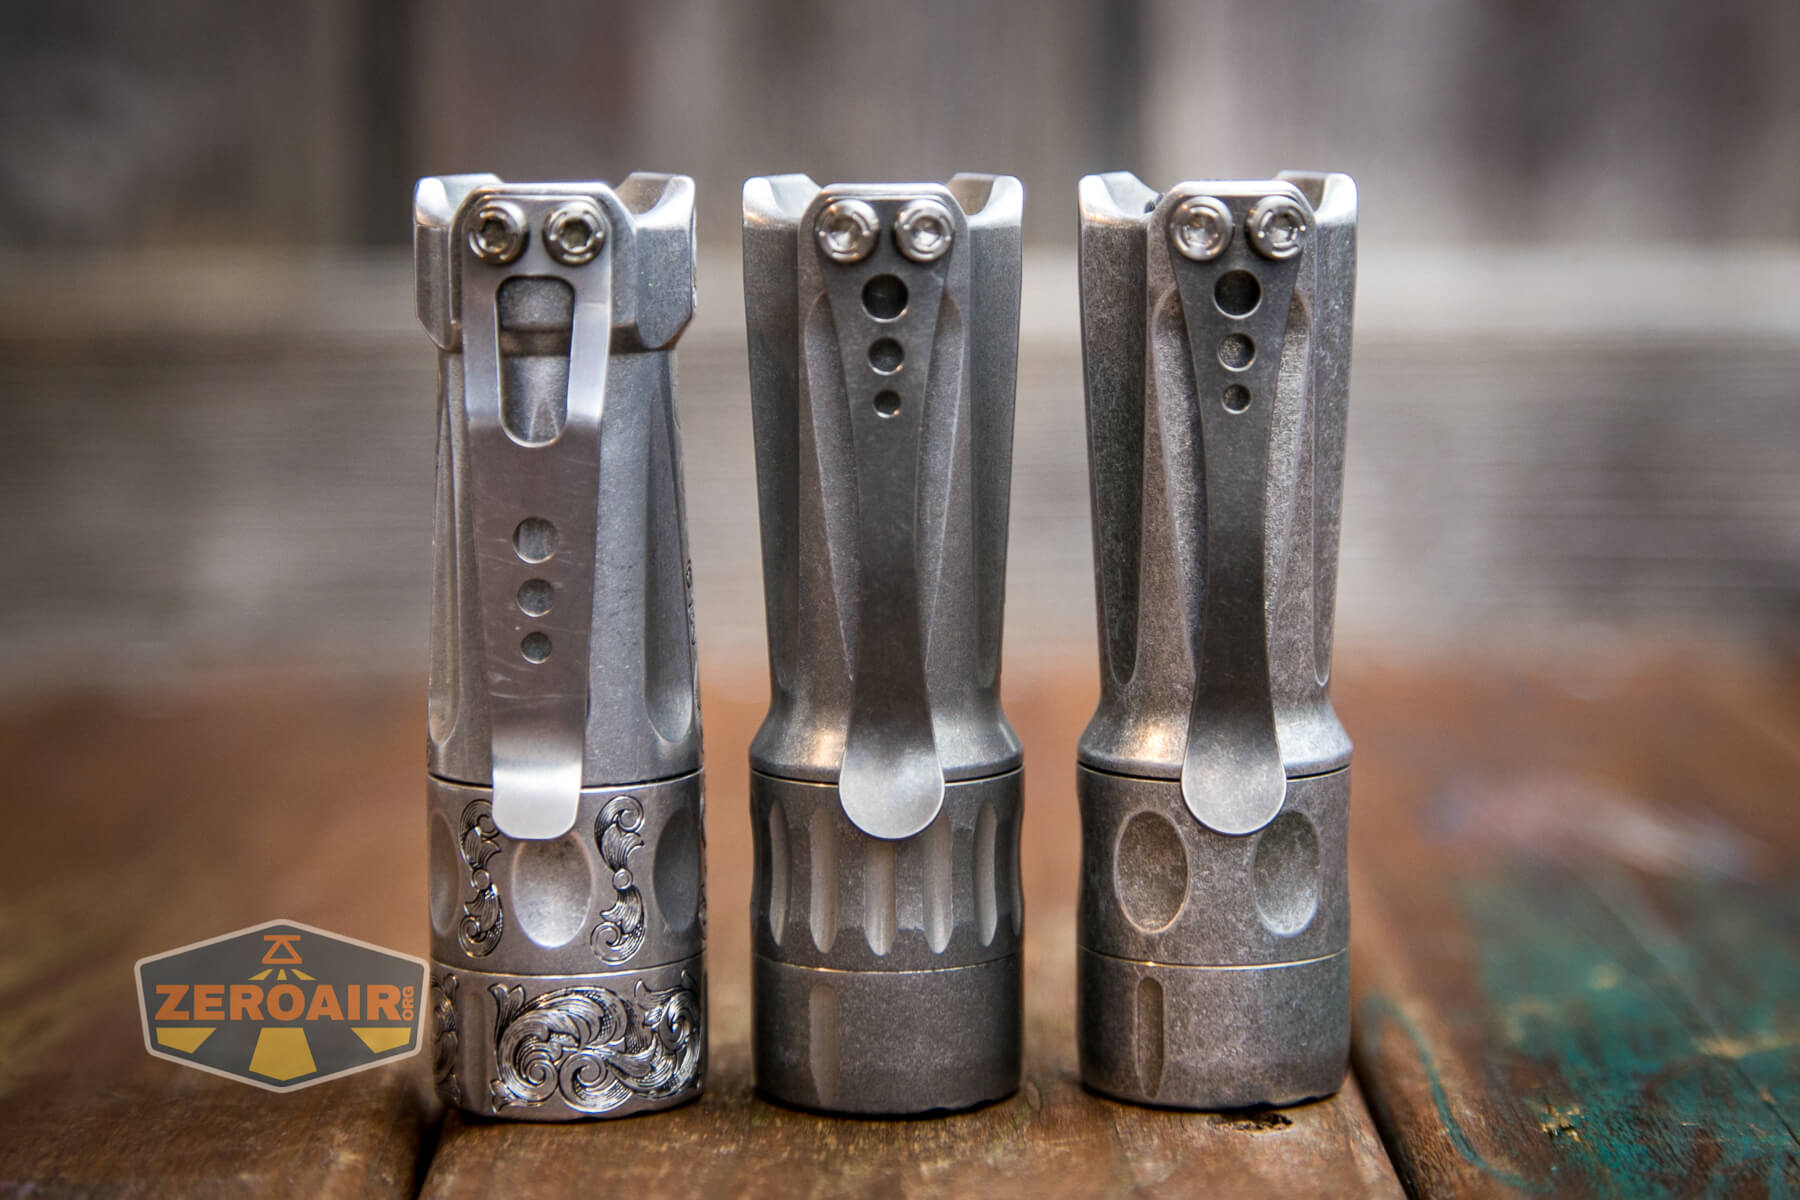
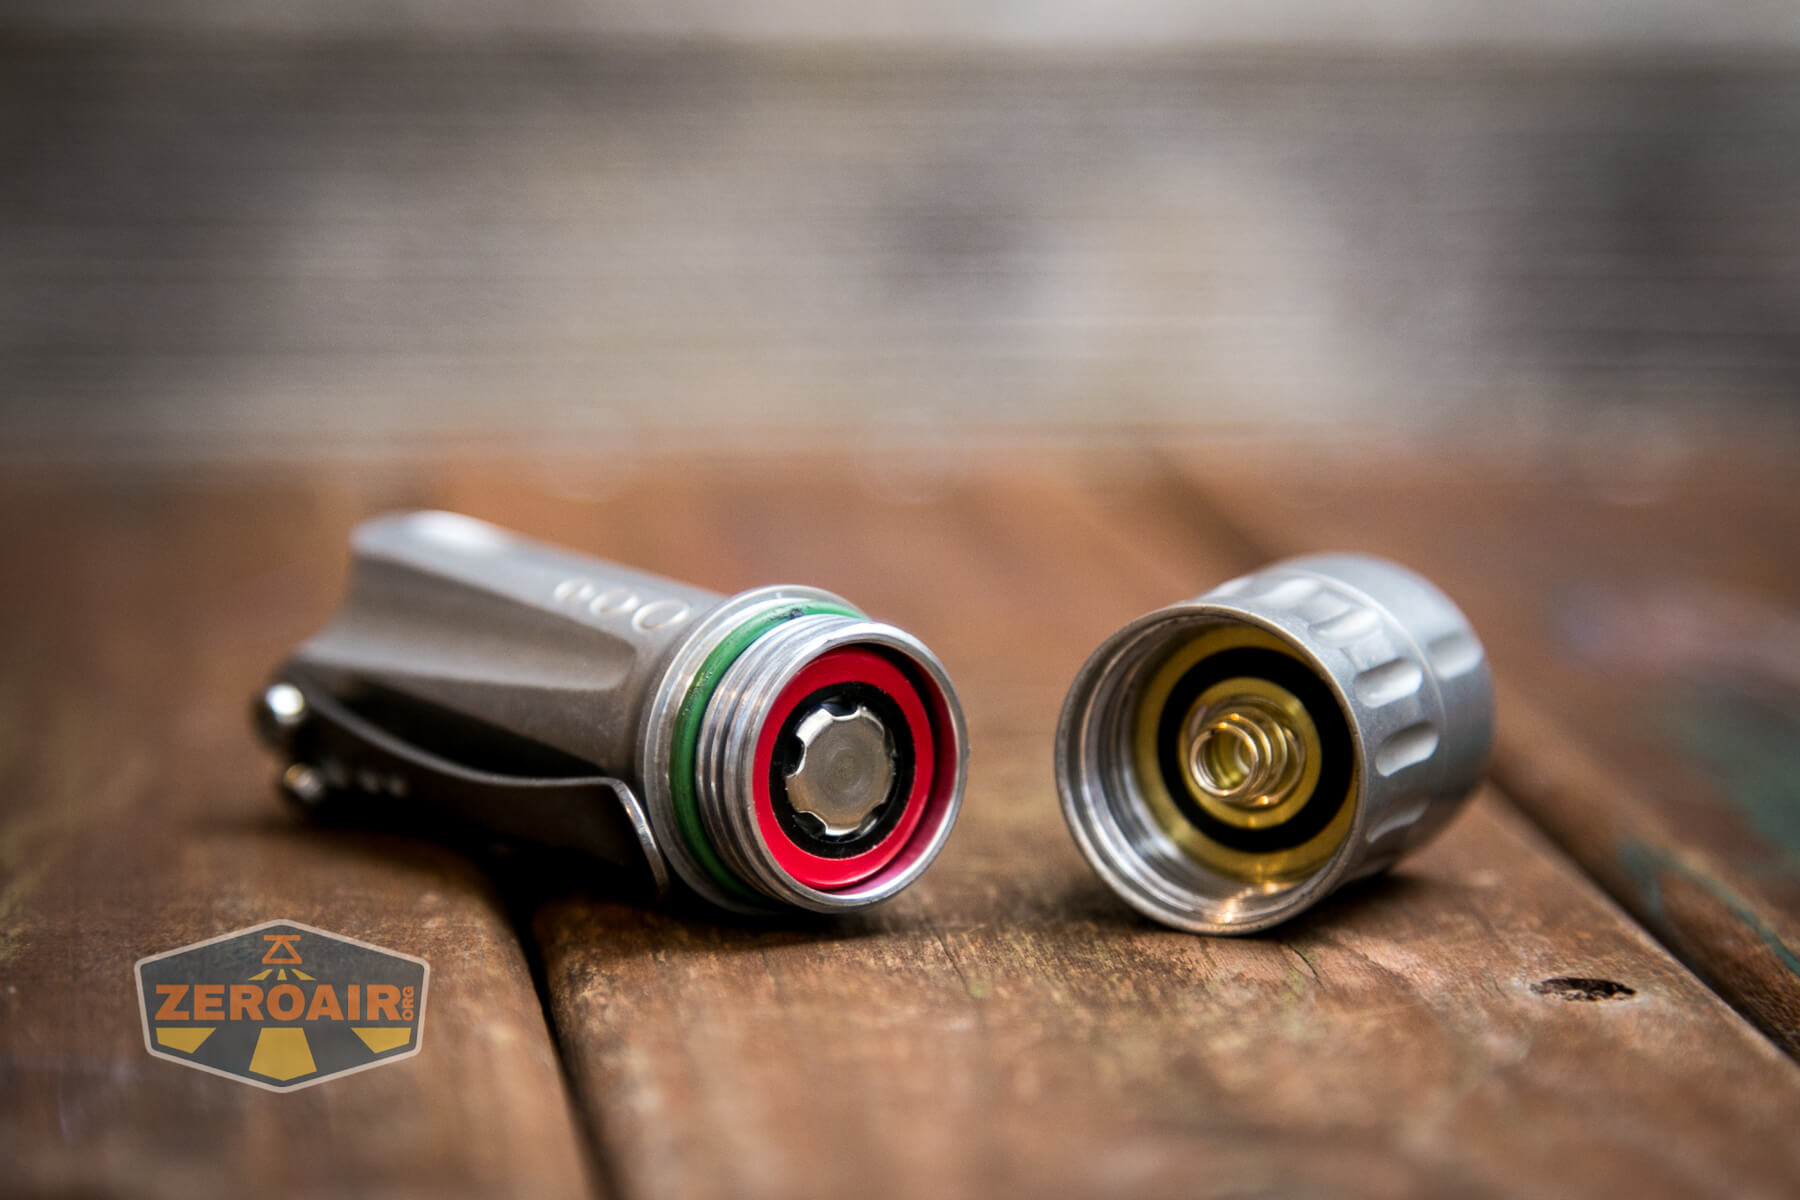
The body of the TorchLAB Future BOSS with MOFF is exactly as seen on the Forward Taper BOSS. That does mean that other BOSS parts are compatible and, in fact, interchangeable with these parts. This Future BOSS head will fit and work fine on old bodies (and clicky bodies,) and this body (with the MOFF) will work fine on old heads (but remember, if you aren’t holding down the switch, then the light will be on).
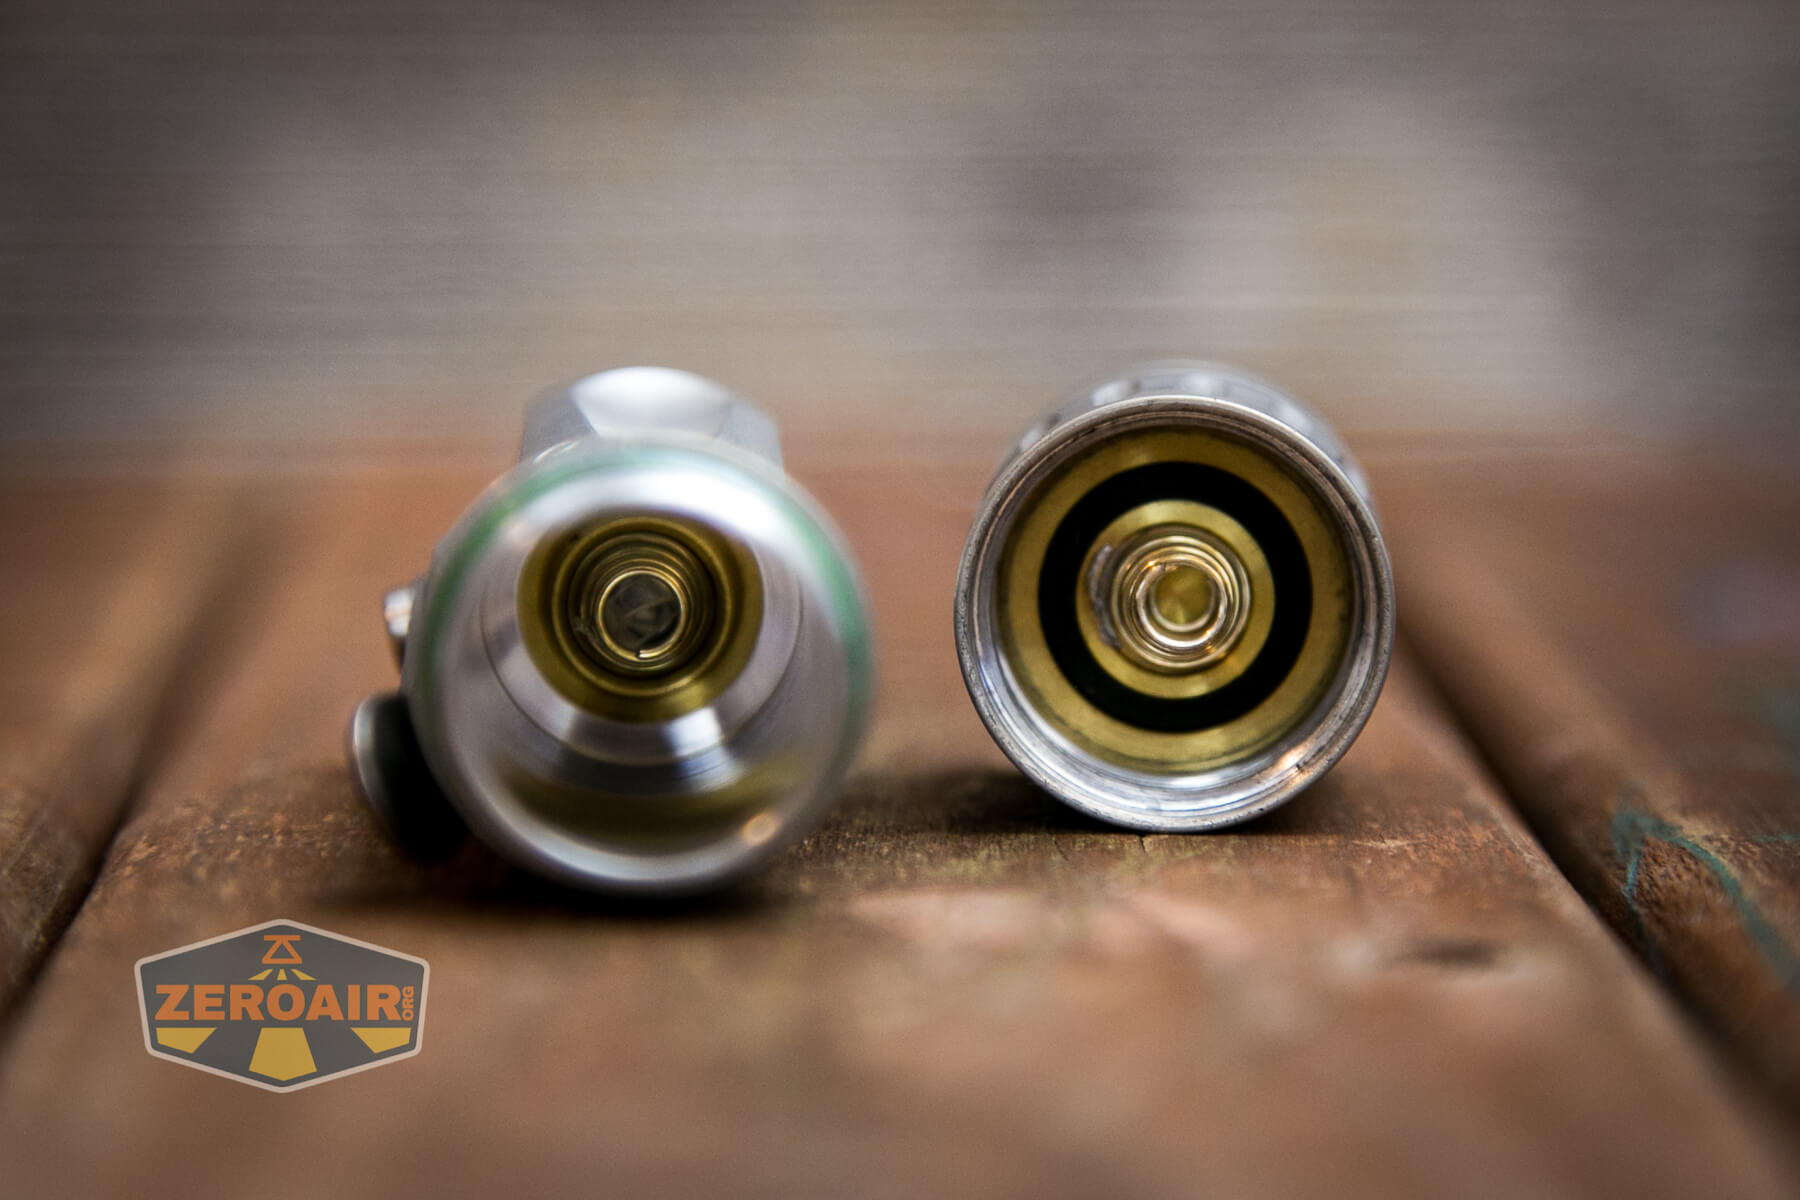
The head has a nice beefy spring. The tail has a nice beefy spring as well.
Size and Comps
Officially, the BOSS is 1″ x 3.3″. I am fairly sure those are RT BOSS dimensions, though. Here’s what I measure for the TorchLAB Future BOSS with MOFF.
Head diameter: 25.13mm
Thinnest body diameter: 21.21mm
Tail diameter (inclusive of pocket clip screws): 26.90
Length: 83.29mm
Clip Length: 56.63mm

If the flashlight will headstand, I’ll show it here (usually the third photo). If the flashlight will tailstand, I’ll show that here, too (usually the fourth photo).
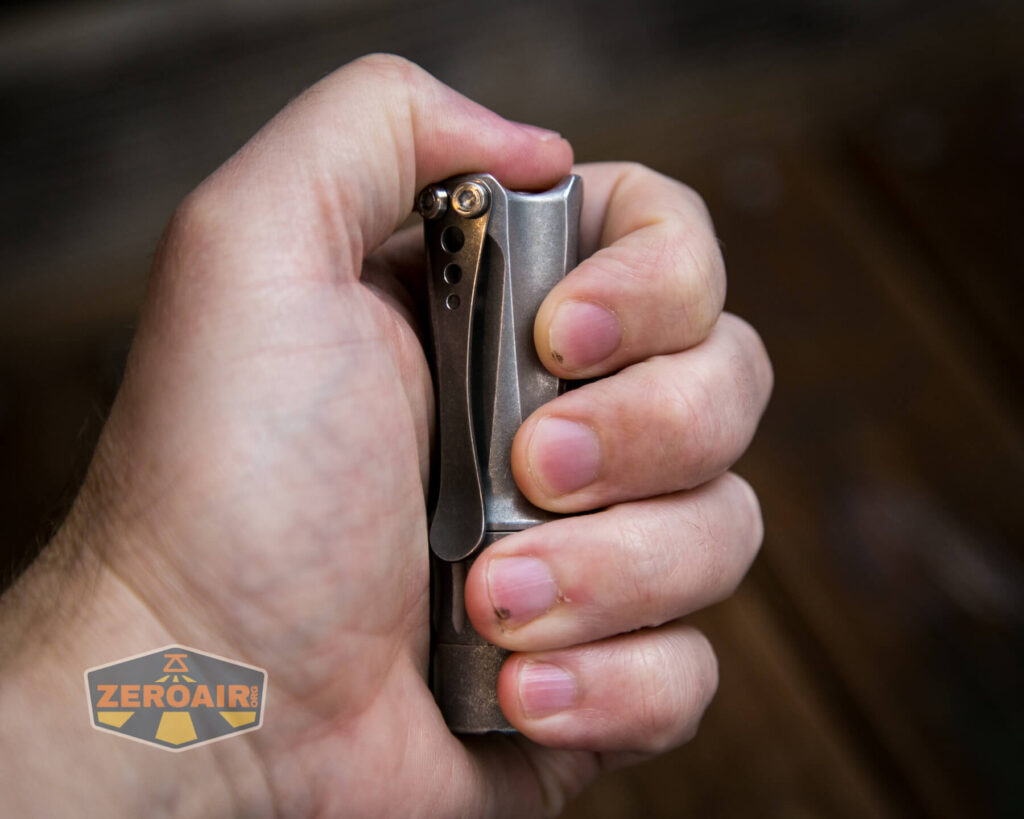
The BOSS lights are so right in hand. Say what you want about liking previous versions versus this version, but take this one on its own, and it’s absolutely a winner. Even if you like the RT BOSS better, the RT BOSS is so far above anything else that there’s plenty of space for the FT and Future BOSS to occupy and still be head and shoulders above anything else.
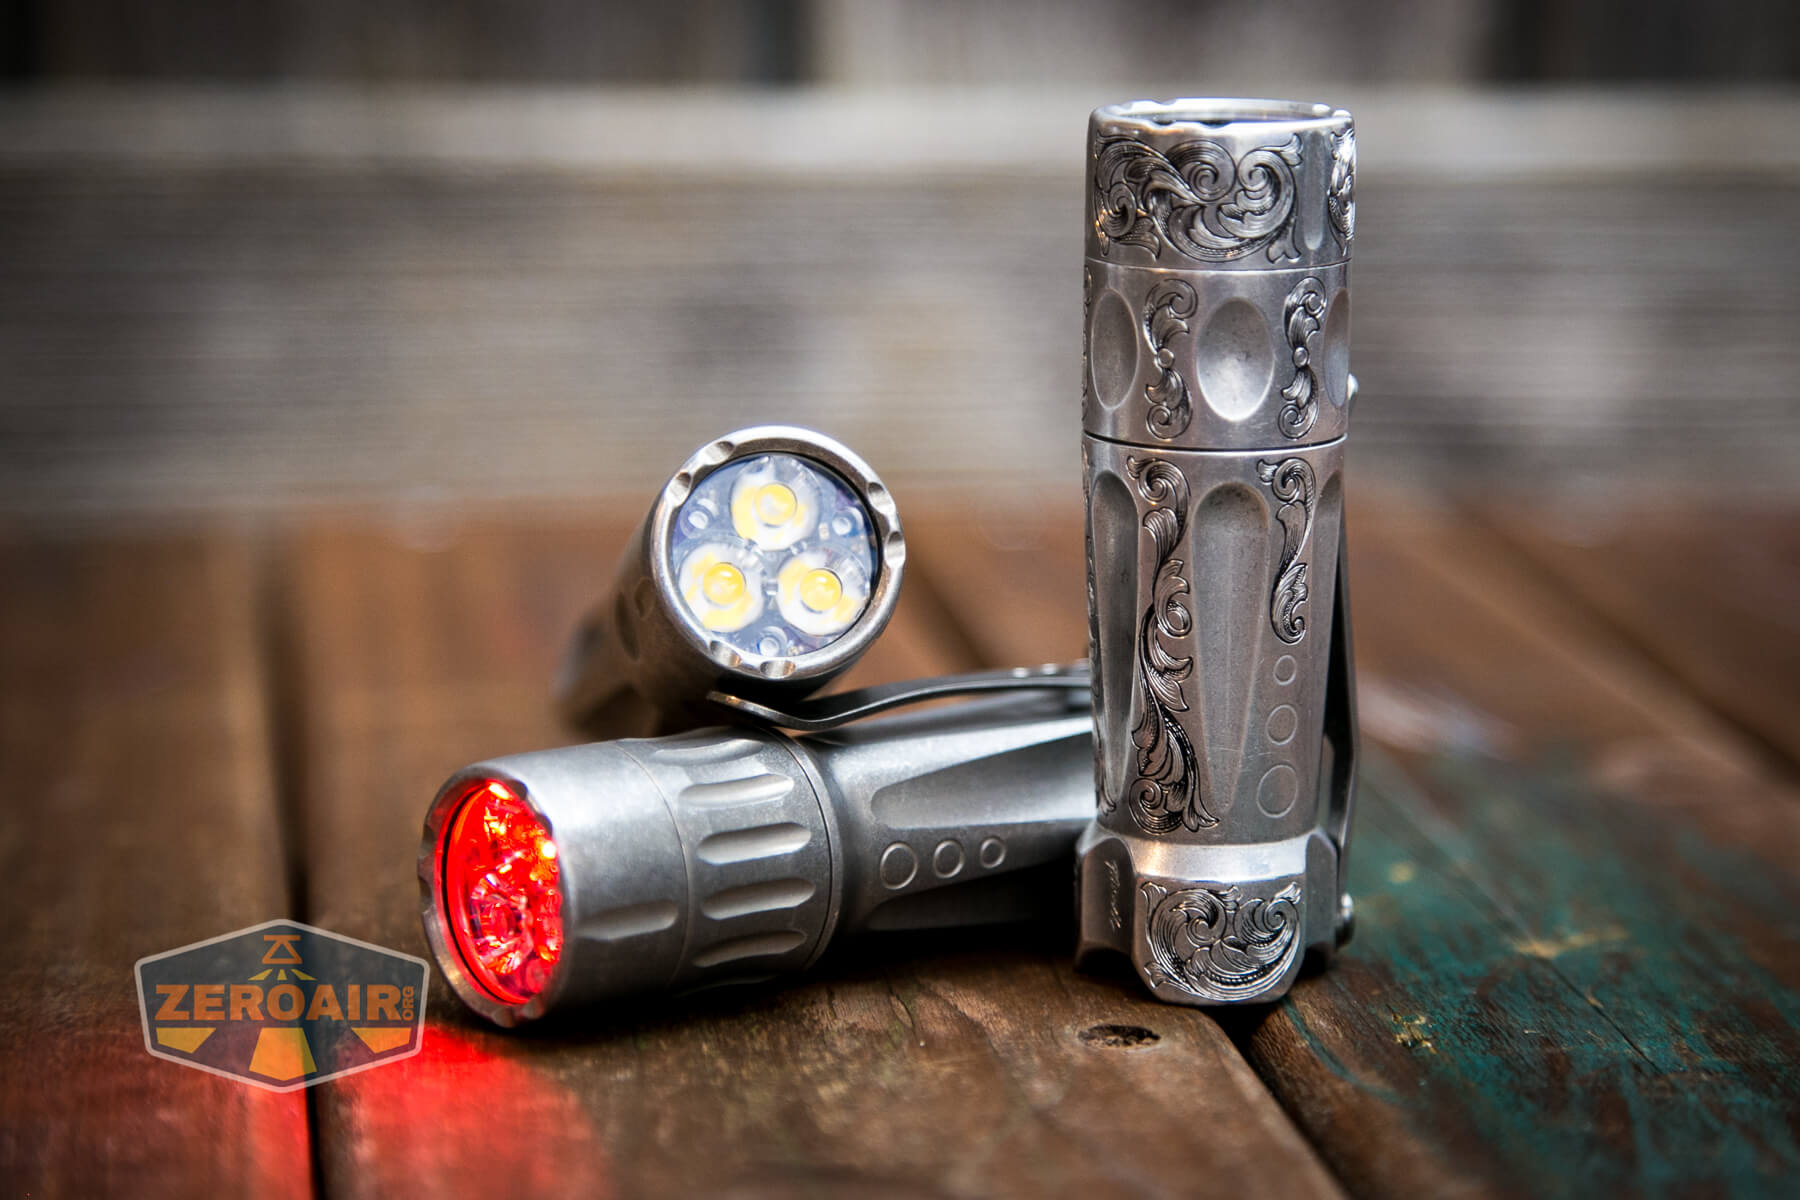
Here’s the test light with the venerable Convoy S2+. Mine is a custom “baked” edition Nichia 219b triple. A very nice 18650 light!
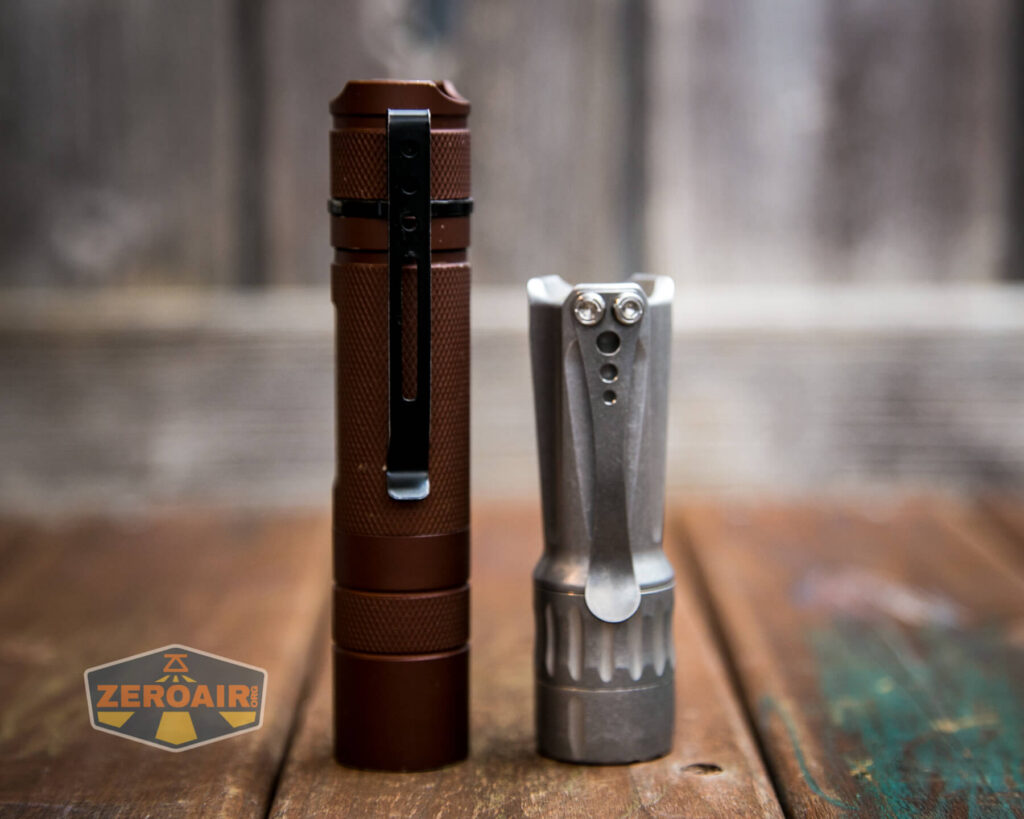

And here’s the TorchLAB Future BOSS with MOFF beside my custom-engraved TorchLAB BOSS 35, an 18350 light. I reviewed the aluminum version of that light in both 35 and 70 formats.
The size overall has really not changed.
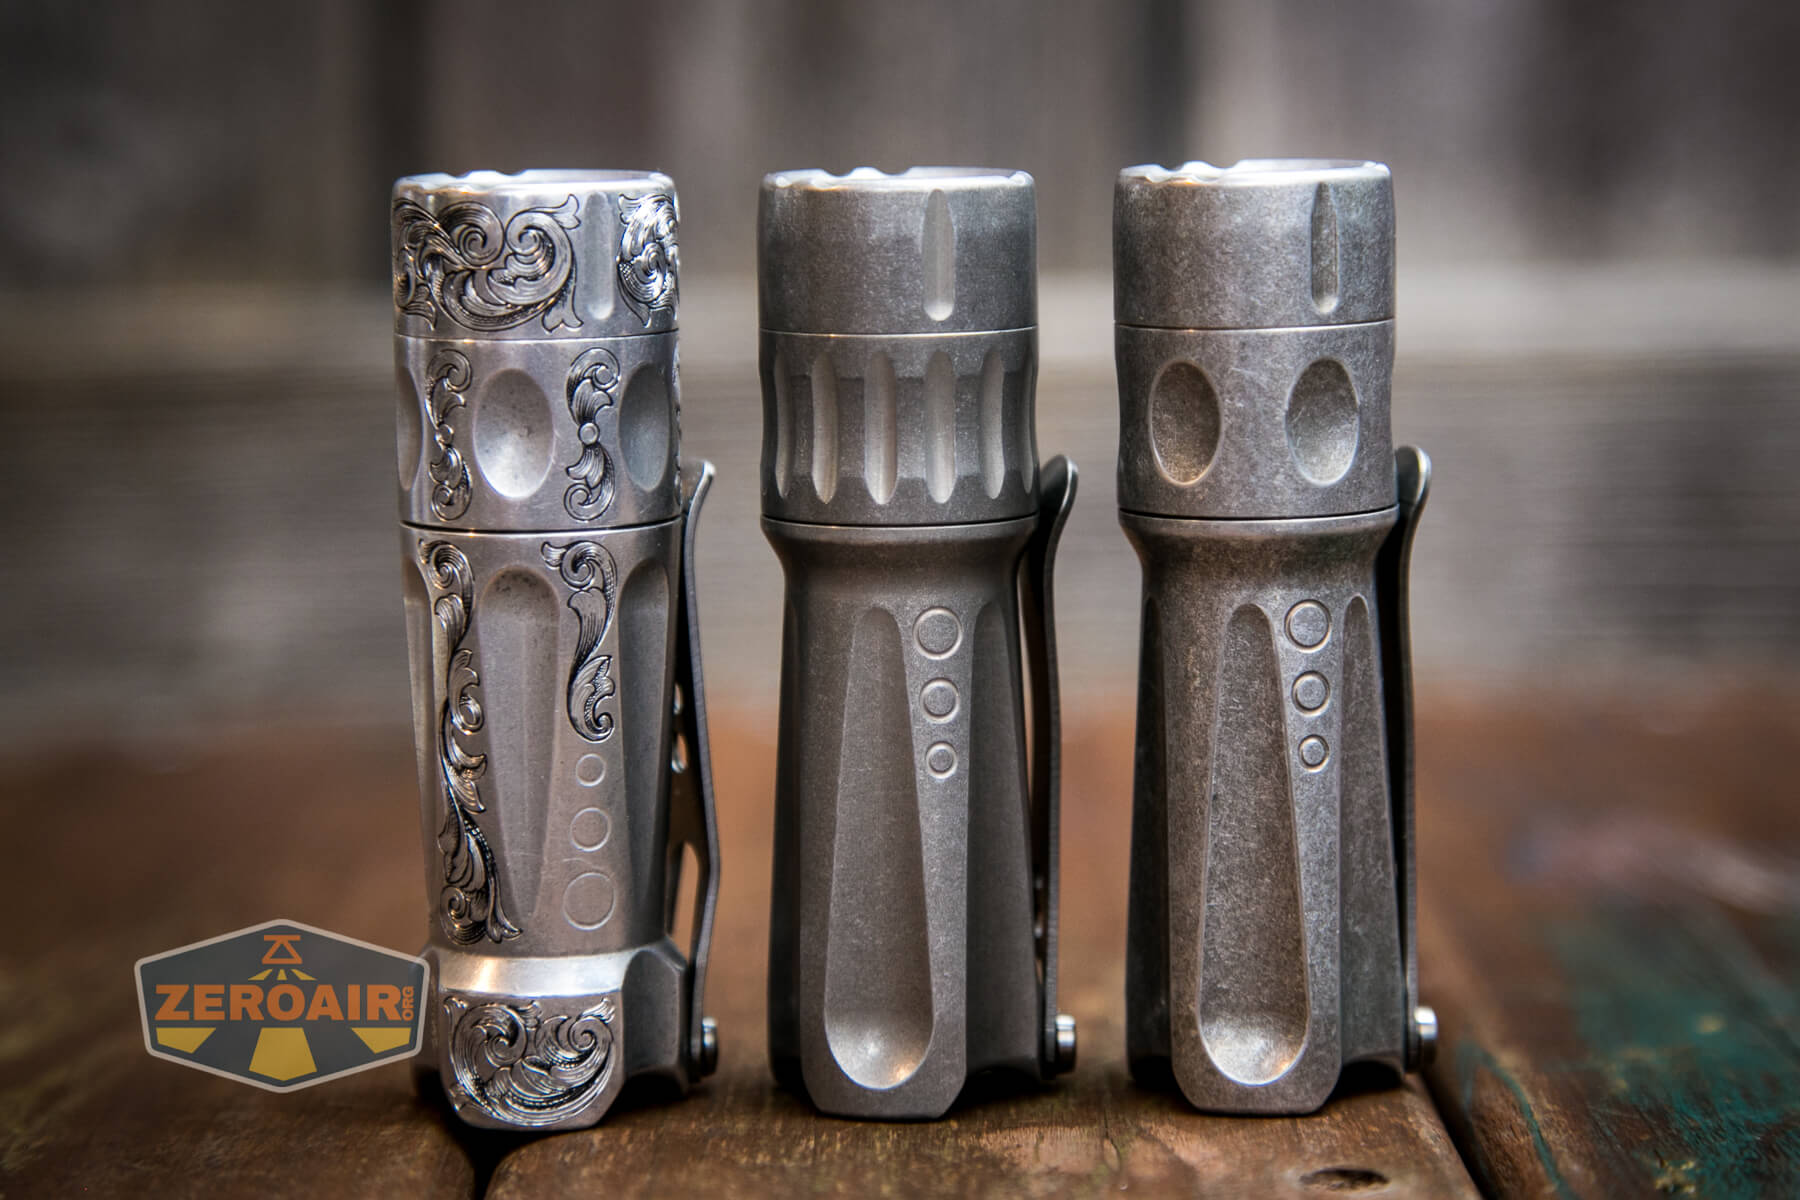
And noteworthily, the heads are interchangeable.
Retention and Carry
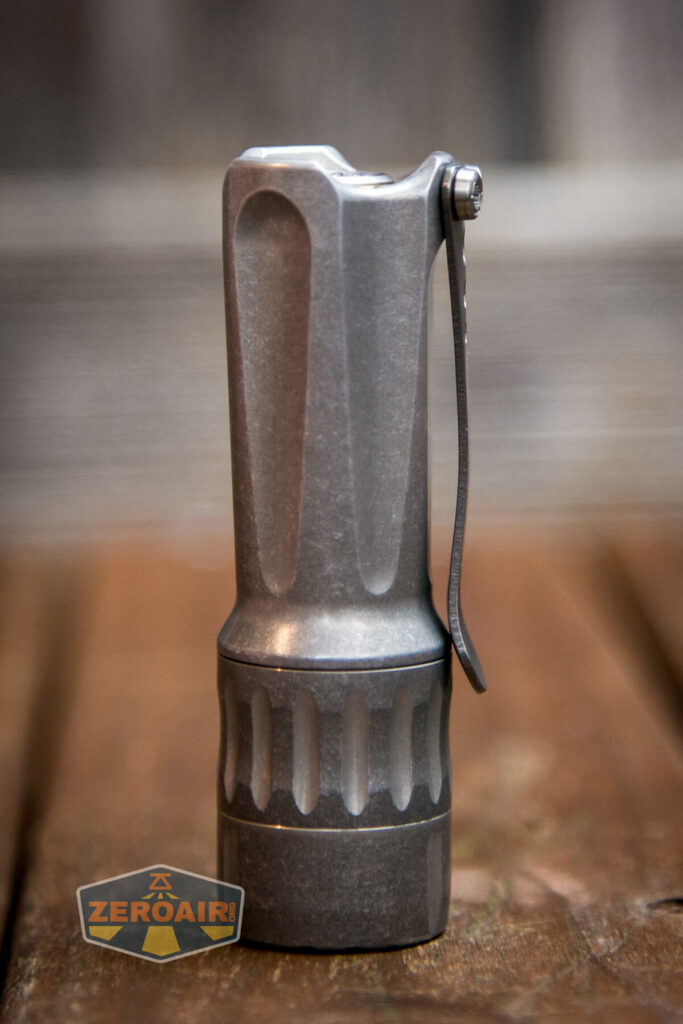
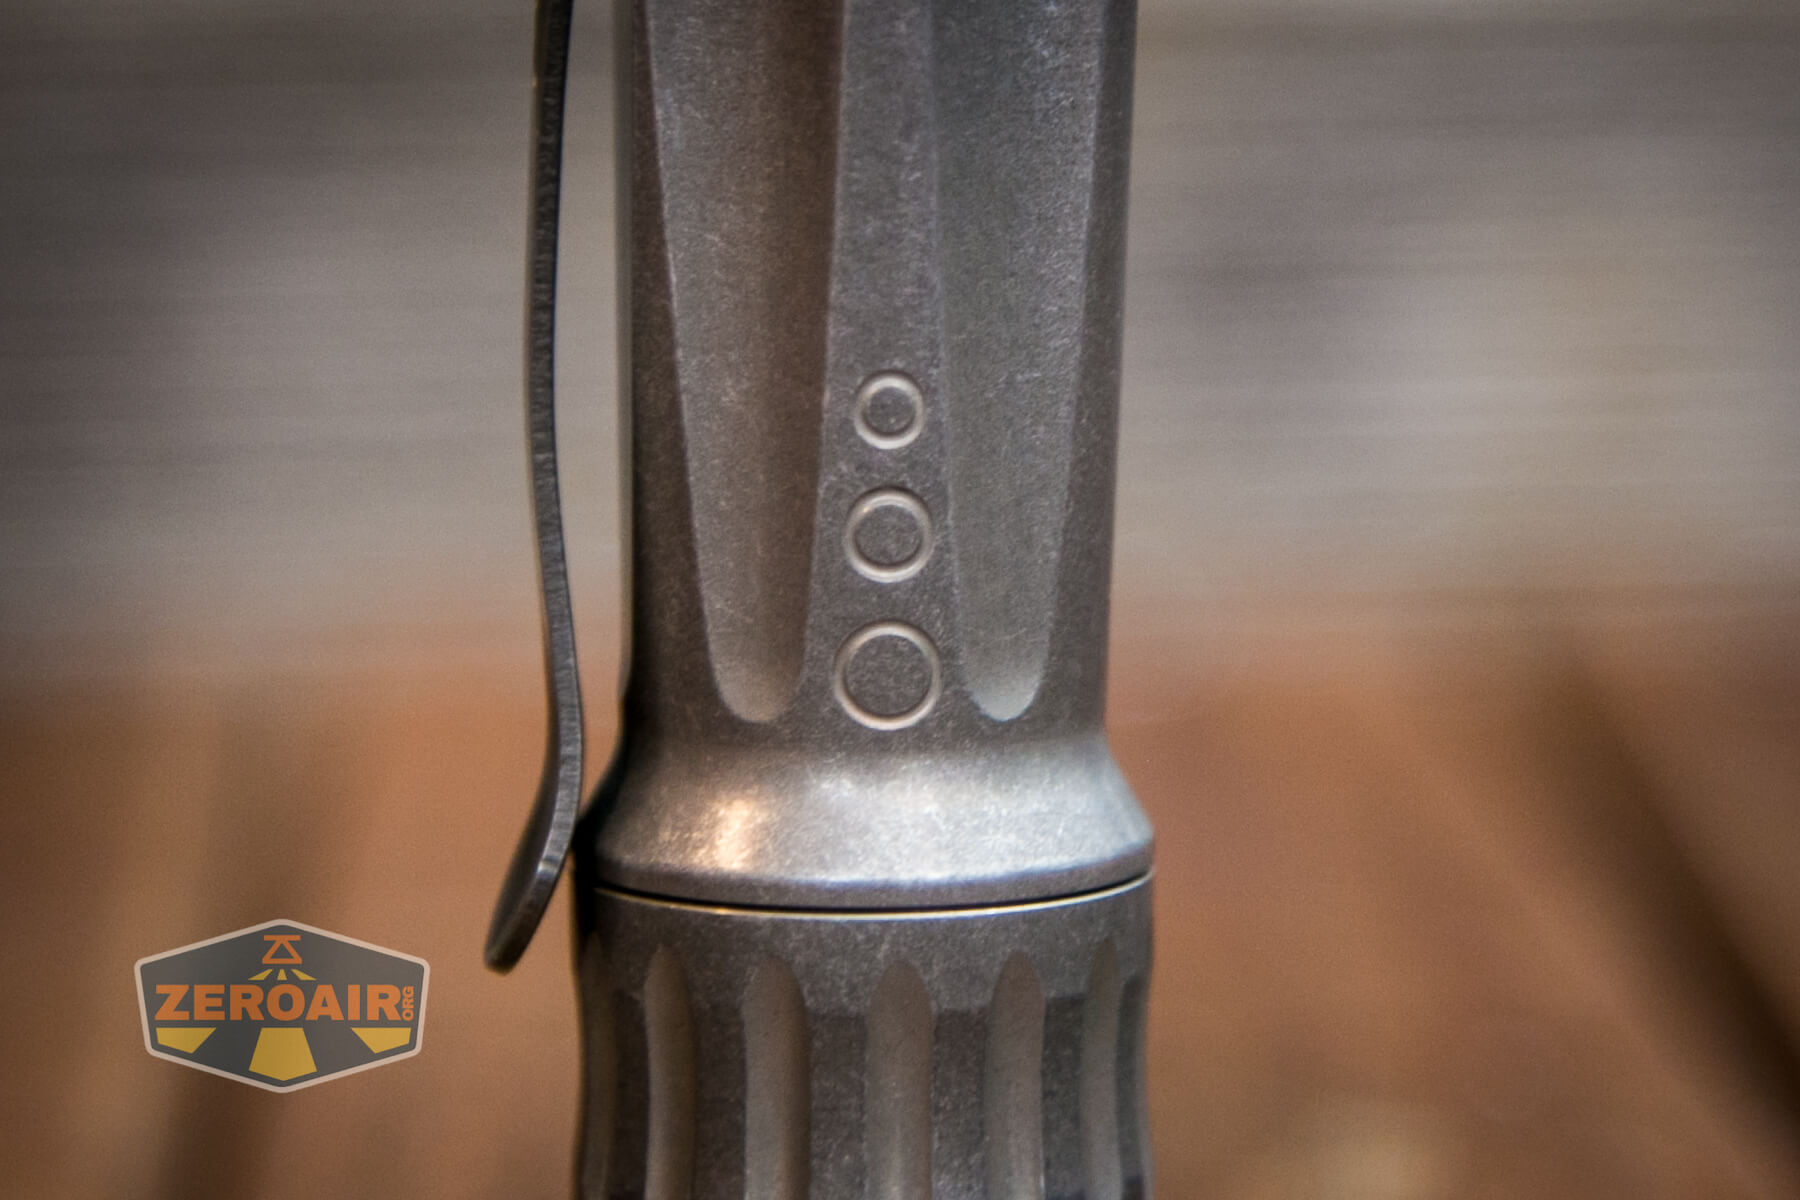
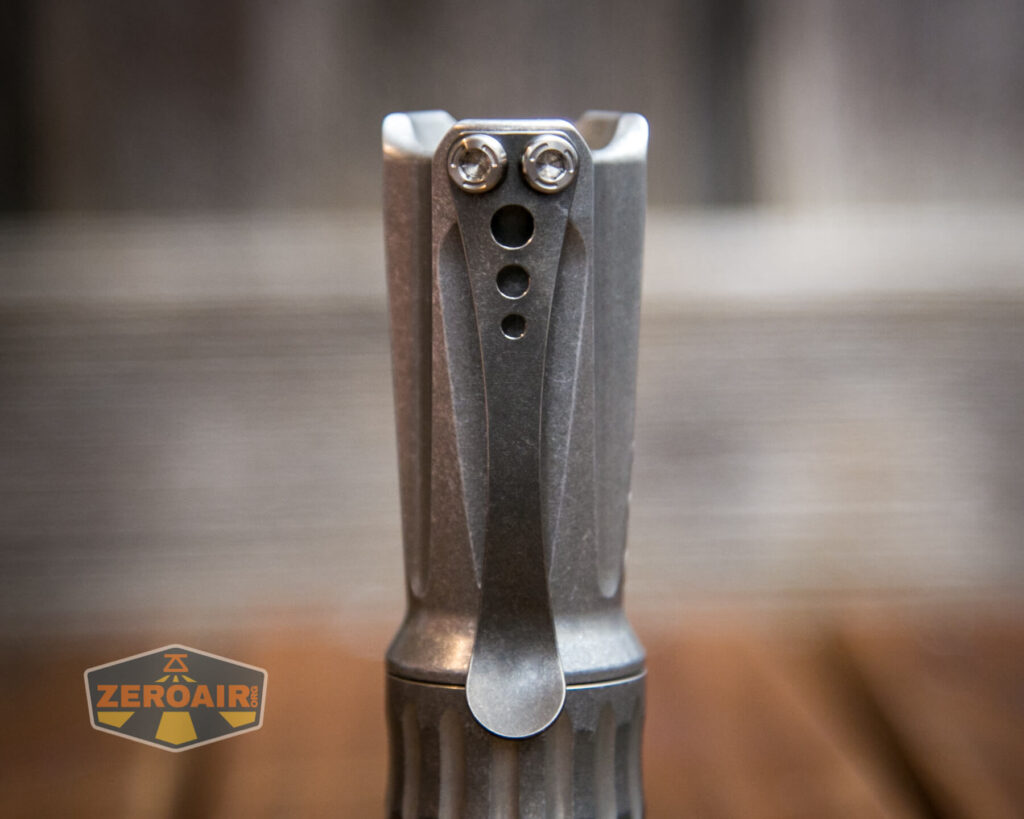
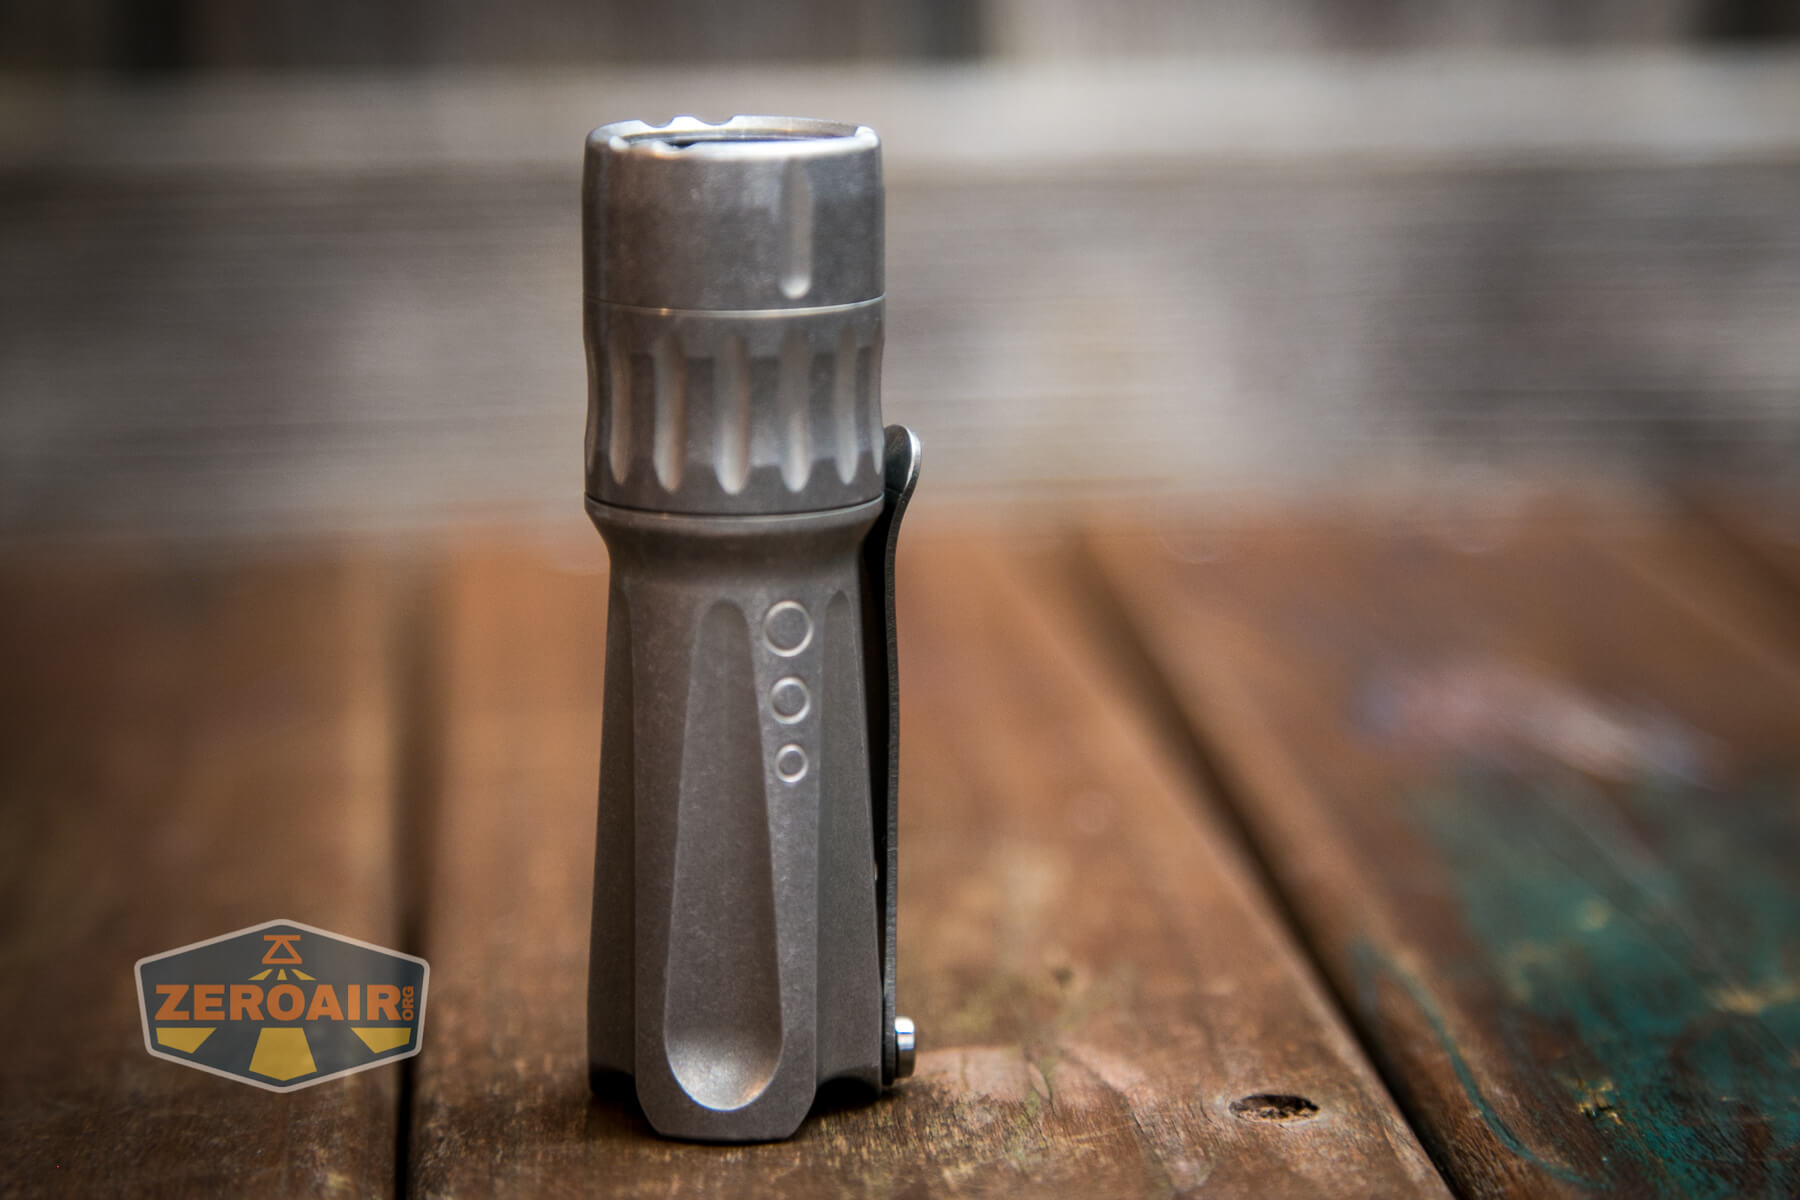
The Future BOSS from TorchLAB gets the new Speed Clip just like all the other new BOSS lights.

All these clips are titanium, and I believe they’re slightly thinner than the original clip (which is called the “Square Clip.”) The springiness is welcomed!! I have never called a clip “responsive” before, but it probably fits here. It works very well.
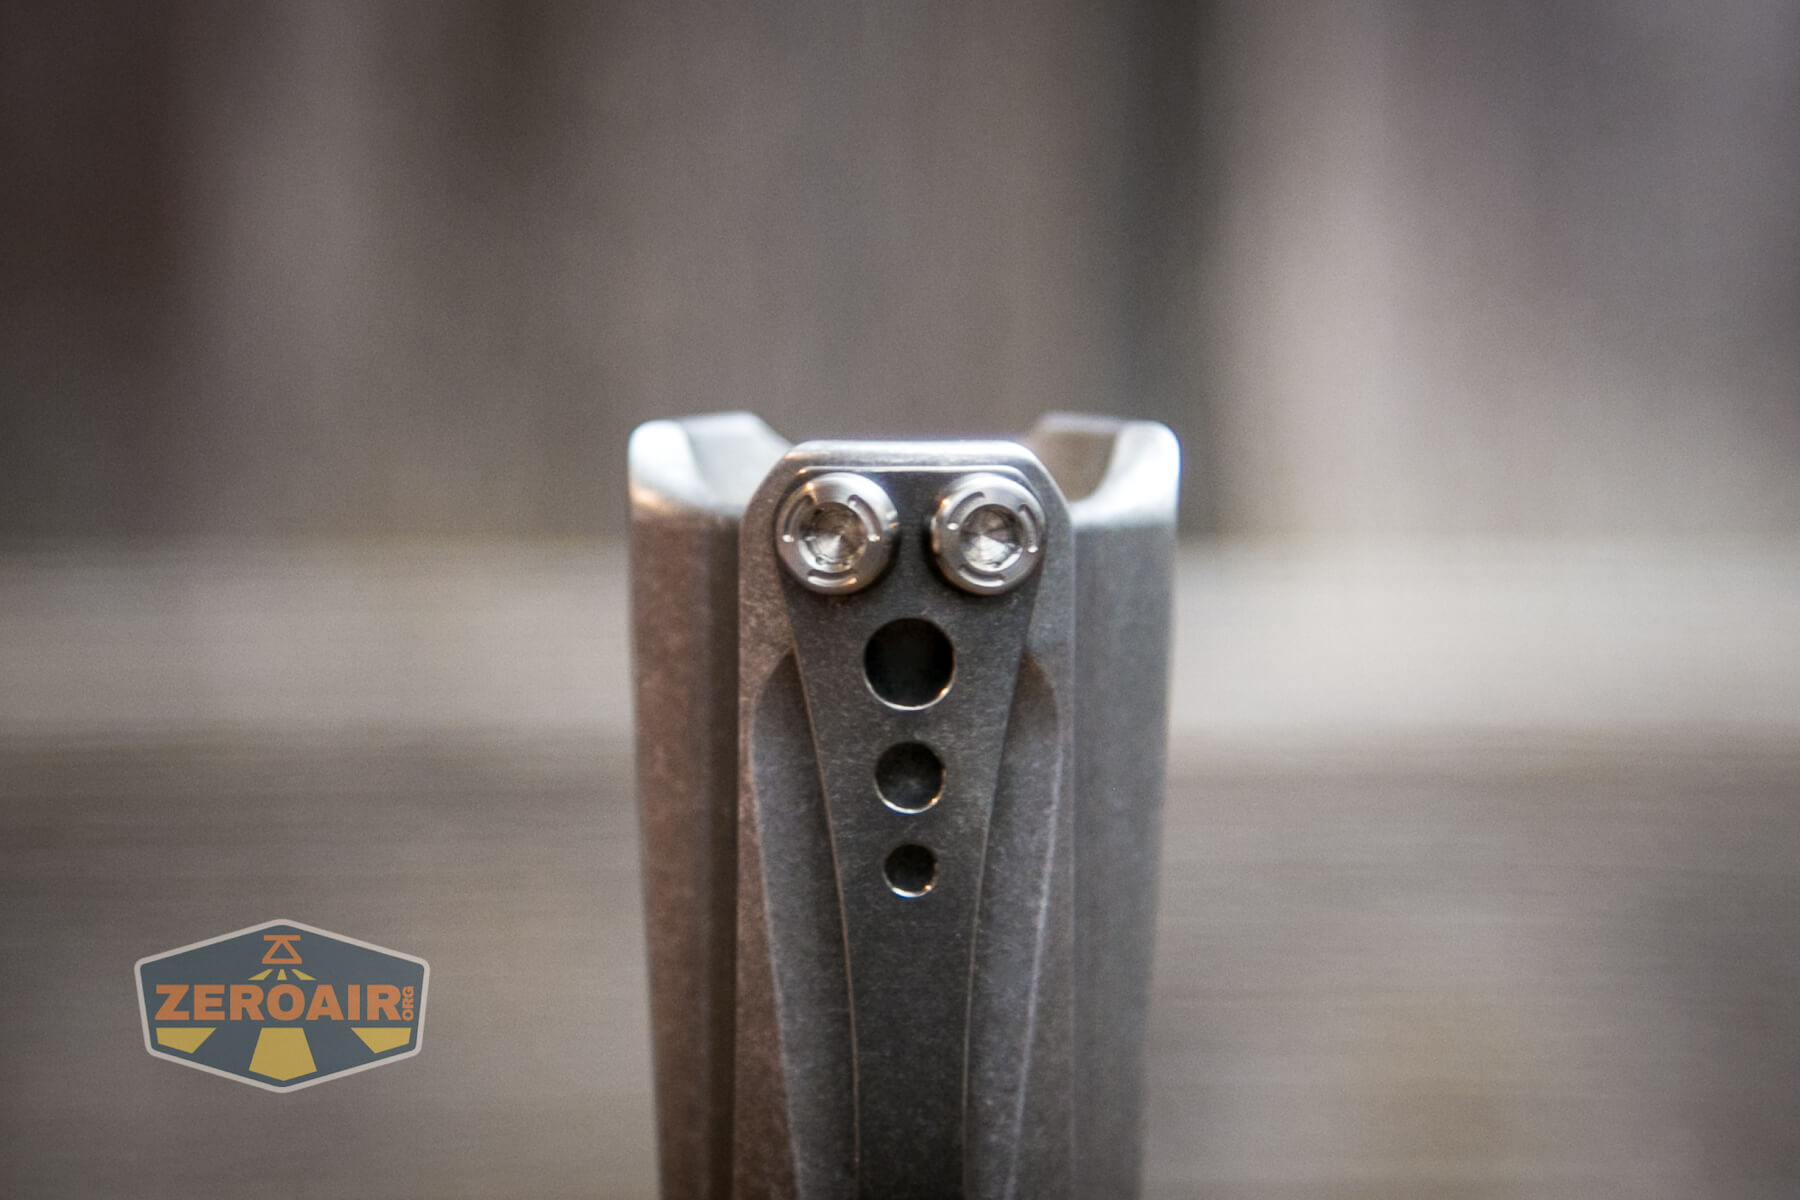
The screws included are titanium as well. The Torx size is T10. Those screw holes do not extend completely through the body, which displays the nice touches on these BOSS lights.
Also, note the unofficial three-hole logo from Oveready here.
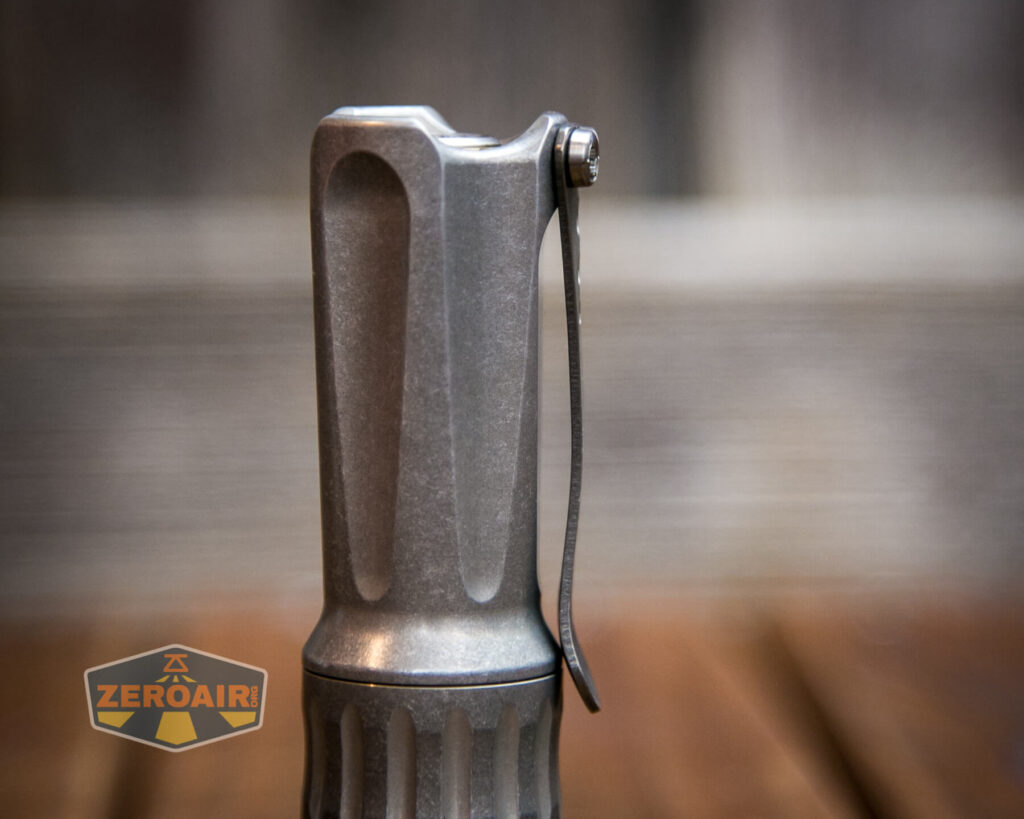
I positively love the Speed Clip. This is hands down the best pocket clip available in the market today. It’s specifically great for the BOSS too, as it hits in the perfect spot, with the perfect tension already applied.
As with other BOSS lights, there’s no knurling to grate your pocket material, either. No knurling is good or bad, depending on your perspective. But on the BOSS, I love it.
Not only does the clip land in the perfect place, but it also has a slight curve such that it’s not a line of touching, but a point of touching. This means easier manipulation from more angles. Essentially, what I call the “mouth” is bigger and accessible from more angles. It’s a great improvement.
I believe the hole spacing seen below to be standard “Steel Flame” hole spacing. You should have no trouble fitting your favorite skull clip to the Future BOSS.
Power and Runtime
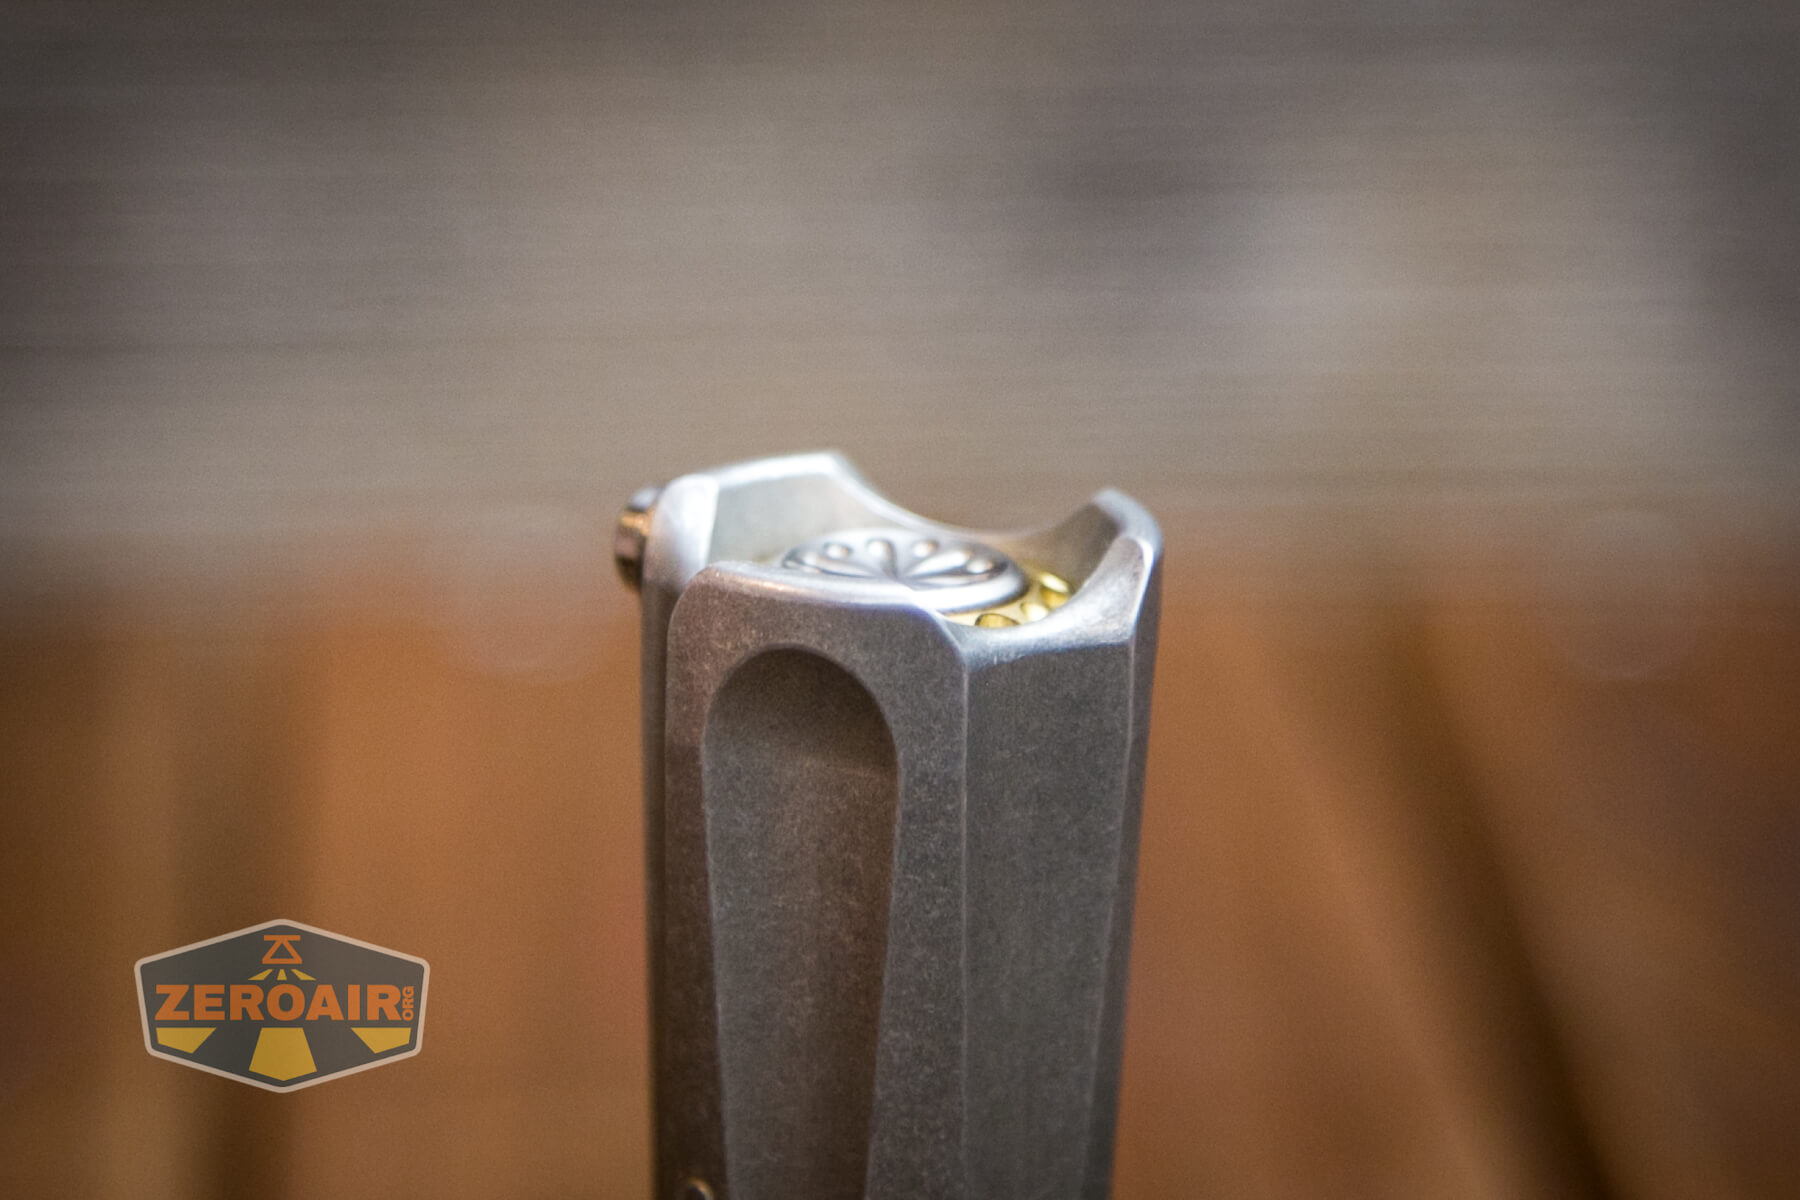
Power is provided for the Lux-RC engine in the Future BOSS by a single lithium-ion 18350 cell. A cell is not included in the package. I tested with various cells, including the Efest 800mAh 18350 cell you can see below.

The cell is installed in the usual way: positive terminal toward the head.
I would recommend using only flat top unprotected cells in the Future BOSS. The light would work with protected and/or button top cells, but you’re likely to compress the springs. And while once won’t cause any problems (probably), repeatedly using these longer cells can cause spring fatigue, and you’re more likely to run into issues. Also, dropping a light that has springs compressed in the way a long cell would in this light, almost certainly causes permanent spring damage!
This post really isn’t about “runtimes” – as with other BOSS tests. It’s hard to test them very well because there are so many possible settings. I did test the highest possible output, though, and here’s one runtime in that level. Compared to some other BOSS lights I have that have less efficient emitters, I call this a pretty good win in output.
Modes and Currents
The image demonstrates approximately the testing settings for most of the work I did on this light, including the runtime above. Despite having the light set to “Afterburner,” the emitters are never seeing more than 21W of power anyway.
| Mode | Mode Claimed Output (lm) | Claimed Runtime | Measured Lumens | Tailcap Amps |
|---|---|---|---|---|
| “Afterburning” (but limited!) | – | – | – | 4.22 |
| 17W | – | – | – | 4.22 |
| 8.8W | – | – | – | 2.26 |
| 2W | – | – | – | 0.44 |
| 270mW | – | – | – | 92mA |
| 25mW | – | – | – | 13.36mA |
| 5.8mW | – | – | – | 5.93mA |
| 1.5mW | – | – | – | 3.61mA |
The red locator, while in an active blink, uses around 6mA. While not blinking, the light consumes around 0.33mA.
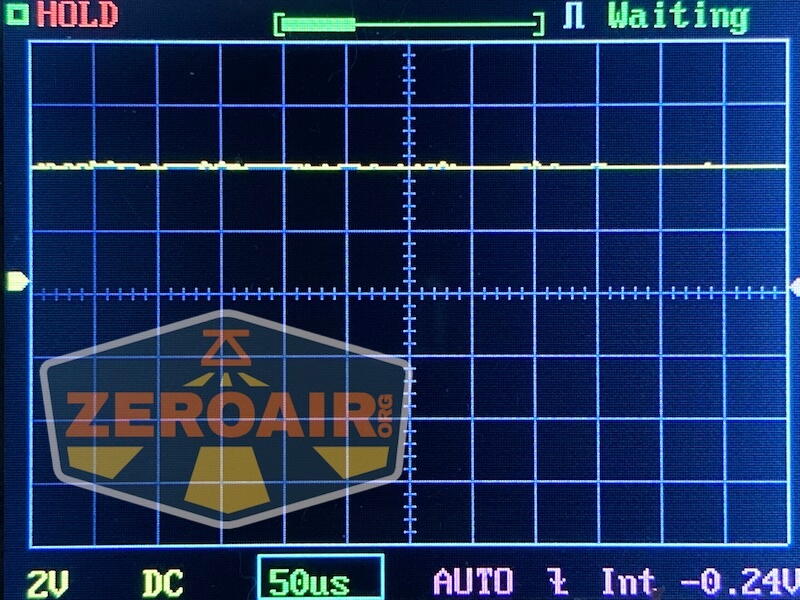
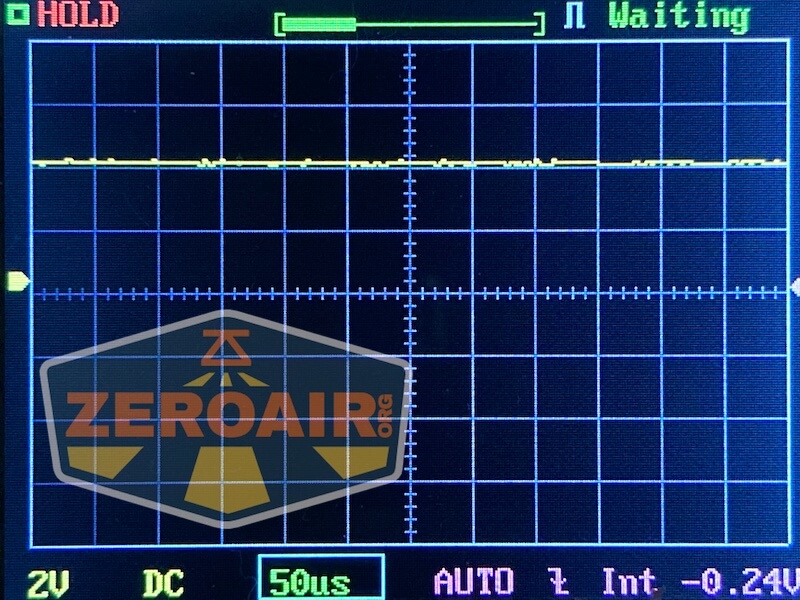
Pulse Width Modulation
One of the things claimed by Lux-RC about their driver is its constant current with NO PWM. I can confirm that the modes I tested do not have PWM. Here’s a sample:

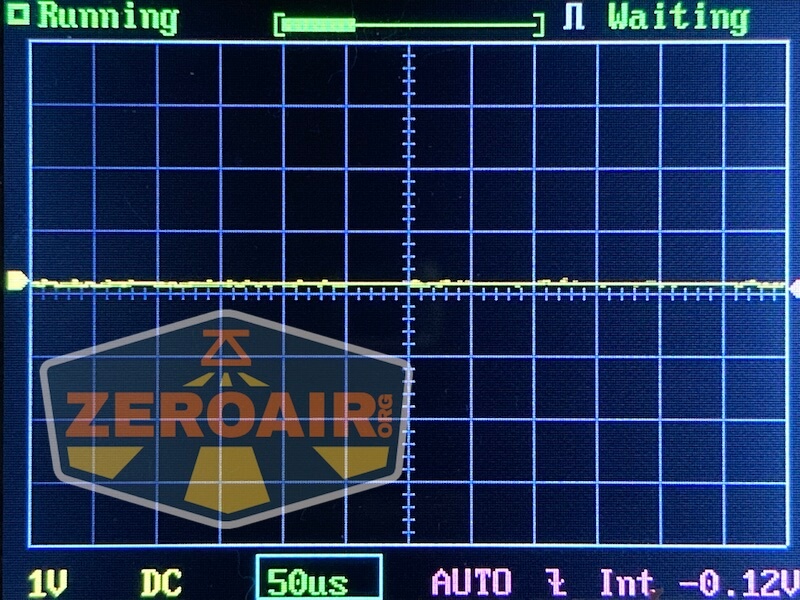
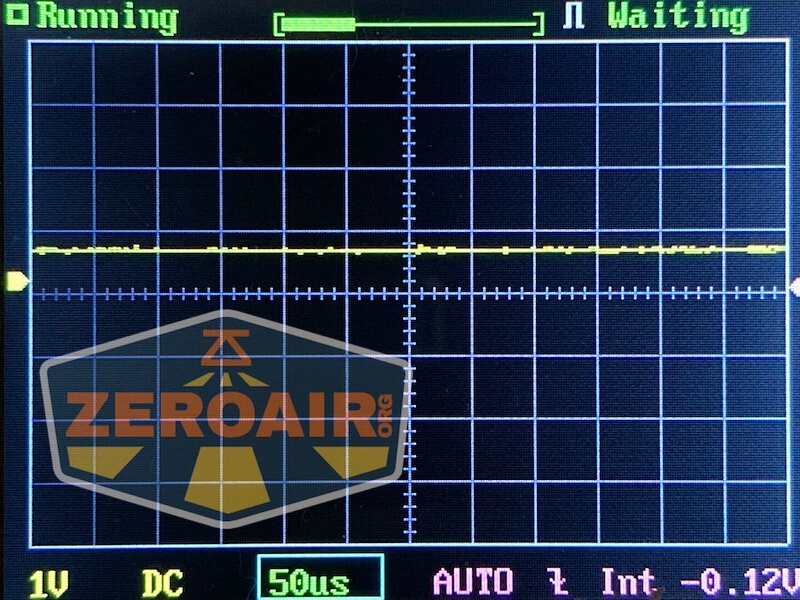


Here you can see a “baseline” – a chart with almost no light hitting the sensor.
Then there’s the Ultrafire WF-602C flashlight, which has some of the worst PWM I’ve seen. It’s so bad that I used a post about it to explain PWM! Here are multiple timescales (10ms, 5ms, 2ms, 1ms, 0.5ms, 0.2ms) to make comparing this “worst” PWM light to the test light easier. That post also explains why I didn’t test the WF-602C at the usual 50us scale.
User Interface and Operation
Here it is. The MOFF switch. To reiterate what’s been said above, this is a mechanical switch that differs from all the previously available mechanical switches in that it’s normally on. For the current revision of Future BOSS, “normally on” means that the locator beacon output is always active.

The action is extremely low. I would estimate the travel depth of the switch to be under 1mm. Well under 1mm, actually. The switch is clickable from anywhere on that center metal piece, but it works best when pressed directly in the center. I found it to be clickable on the edge, but sometimes not actually actuate the mechanism – i.e., no break in the circuit was registered.
All in all, I find myself having to be more deliberate with the MOFF than I ever was with a McClicky. The press weight seems greater, too.
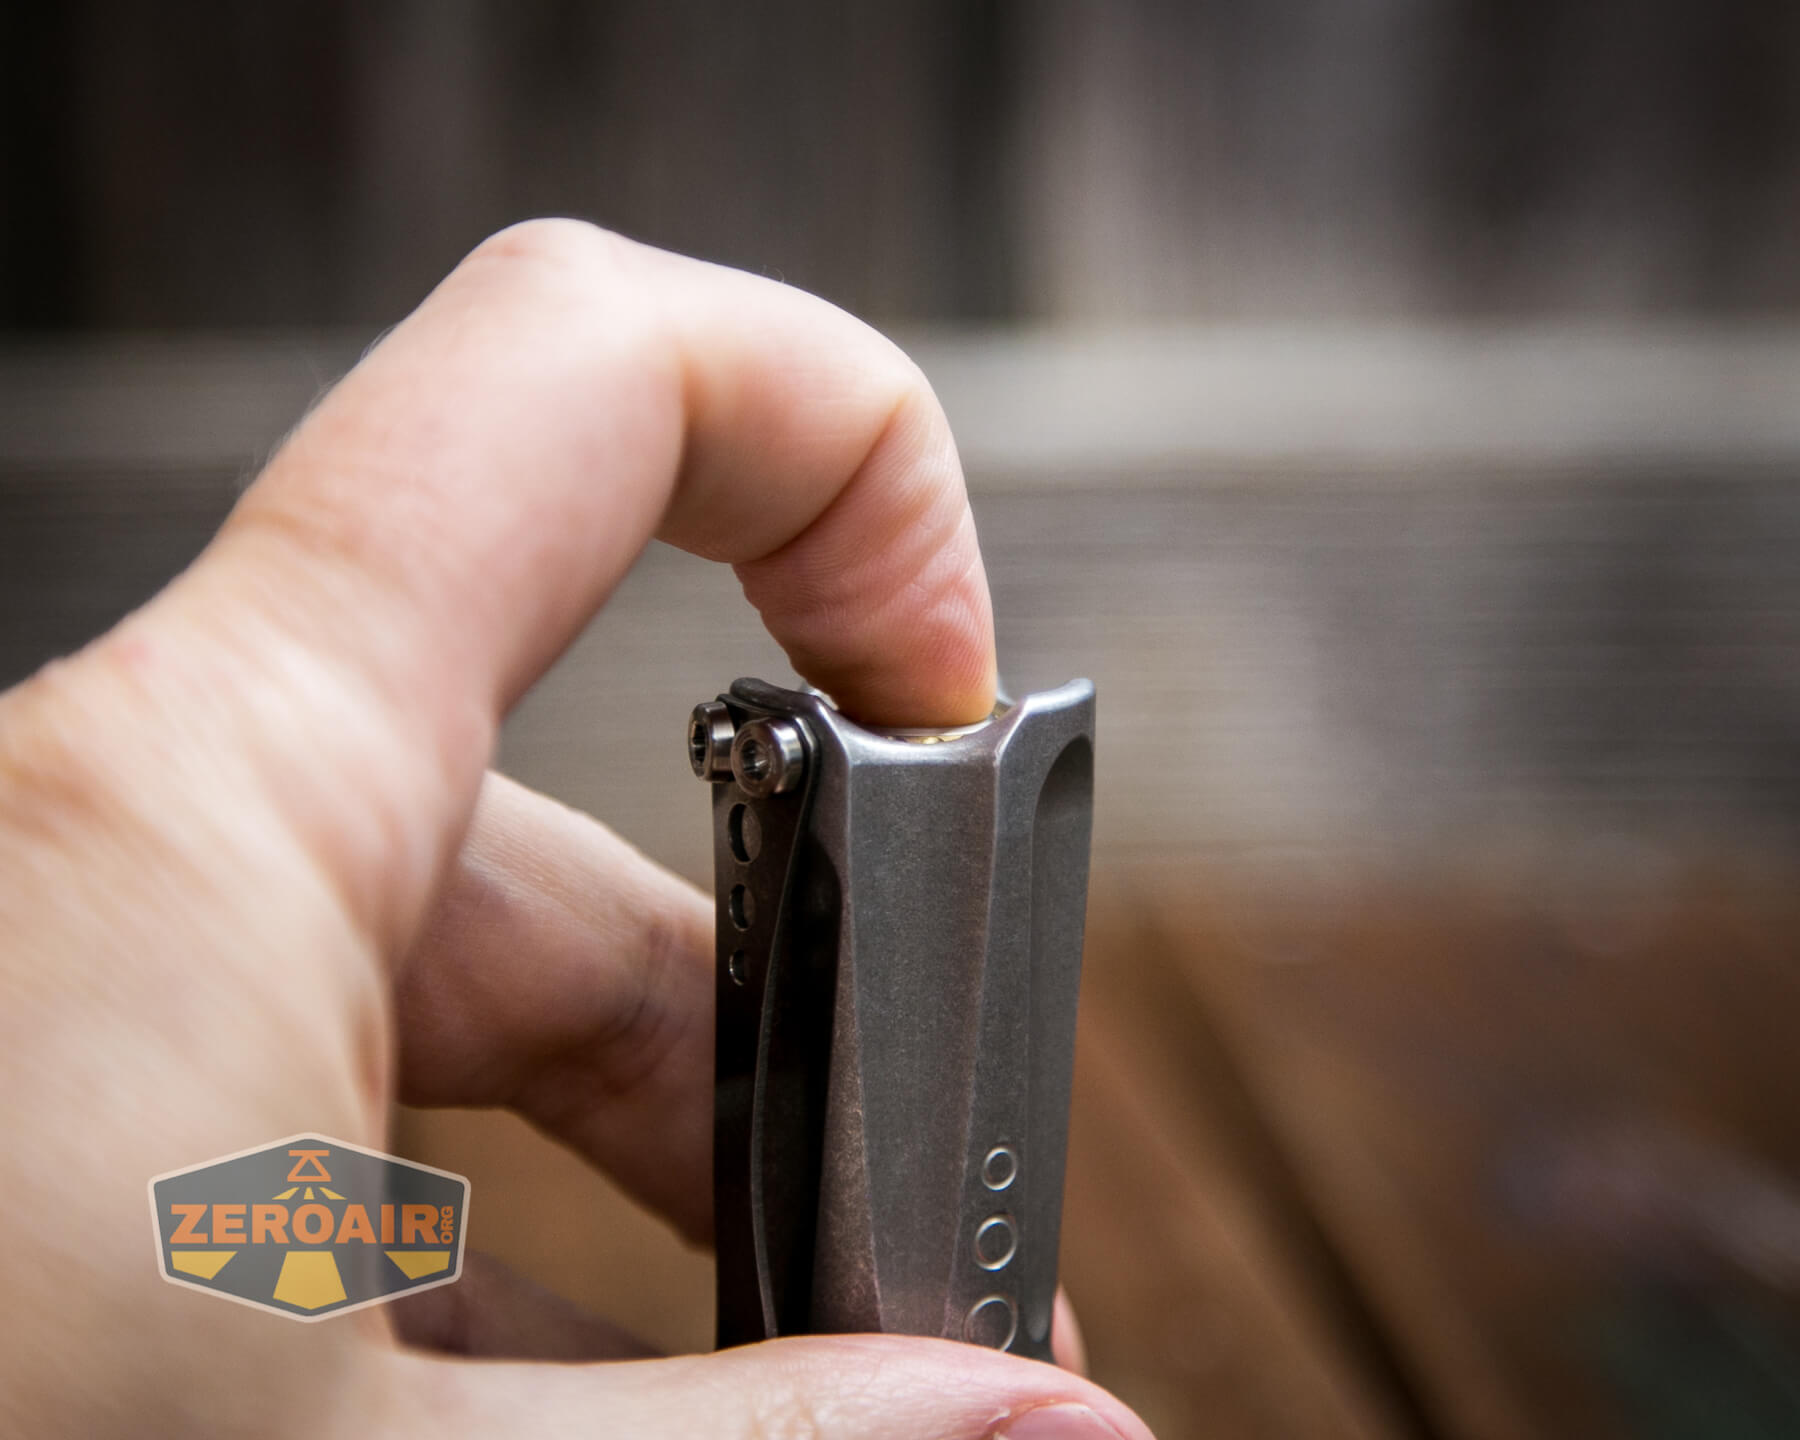
As you can see, the Forward Taper of the Future BOSS body (just like the other FT BOSS lights) allows easy access to the switch thanks to the tripod-like tail design.
Oveready Insider #78 says the following about MOFF:
MOFF offers mode change speeds faster than reverse clicky, without first having to turn the light on. Because the light is already on.
So the goal is speed and reliability – in fact, they also dub the MOFF the “Speed Switch.” I have no problem with any of that. With a properly programmed Lux-RC driver, you’d probably experience faster changes with the Speed Switch. Or at least faster access to the target, because the “light is already on.” At the end of the day, the MOFF is functionally so much like a reverse clicky that you’ll be looking for reverse clicky behavior (if you can get outside of the “BOSS being a McClicky light” mindset), and not finding it.
Speed Switch
TorchLAB calls the MOFF a “speed switch,” and I sort of just went with that without giving too much heed to it. “I never had any undue burden with forward clicky switches,” you’d hear me say. “Mode changes were already quick enough,” you’d hear me say.
But now I get it, and I can help you get it. And I don’t think I’ve heard TorchLAB or Oveready say it this way, so maybe you heard it here first. “Speed” has nothing to do with what the driver does with your input. The driver is the same as before. Speed has to do with a user being able to not worry with half-pressing to achieve a change. This is a minor difference, but it’s a difference. With both forward and reverse clicky switches, mode changes are achieved with a half-press. With the forward clicky, the mode changes are done with a half-press in momentary output, before the light is “really on.” With the reverse clicky, the mode changes are done after the light is already on, with a half-press.
But that’s not so with MOFF. With the MOFF switch, you can just bang bang bang on the switch and reliably change the mode without having to worry about the flashlight state and without having to mess with any half-presses.
Now whether that difference is worth the premium you’ll pay is a personal decision. I personally think the metal MOFF switch probably looks $84 better, regardless of its speediness.
V5.1 Triple engine with thermally-enhanced metal core PCB
By user request, I actually have a BOSS page, which has a pdf link to the manual, and all the manual pages as jpegs, for posterity.
TorchLAB describes the Future BOSS as having “Our New v5.1 Engine.” Based on how I read the serial page, the FT BOSS has the following:
LE Hardware:    371V2 RES-1295517 BLUE
LE Firmware:    371-372 V2.0.2 120121
LE Carry Sens:  CSX 180A
So this is a 371 v2.0 driver. Let’s cover a few facts about the driver’s physical hardware first.
The driver in all BOSS lights is made by Lux-RC. There are a number of revisions of both hardware and firmware. According to the Lux-RC presentation of drivers, this driver appears to be called the “371 v2.0.”
Just for some fun bit of information, here’s the list of Lux-RC part names and the Oveready counterpart. Some of those are in more than just BOSS lights – for example, there are 4.0 and 5.0 P60 drop-ins, as well as e-series 5.0 heads (which look just like BOSS heads).
| Lux-RC Name | Oveready Name |
|---|---|
| xx | 1.0 driver |
| xx | 2.0 driver |
| 332 | 3.0 |
| 333 | 3.1 |
| 334 | 4.0 |
| 371d | 5.0 |
| 371 v2.0 | 5.1 |
Again, as I said above, the BOSS FT does not have the Lux-RC 372 v2.0 hardware. (I consider that a good thing.) Many of the features are the same, but 372 v2.0 loses two-cell support.
Serial Number
Somewhere along the way (during 2019, actually), Lux-RC implemented a motion sensor on the MCPCB. Unlike the BOSS I got a firmware update on, this FT BOSS does ship with a motion sensor! One way to check if your BOSS has the motion sensor is to check your serial number, which will give you many details on your light.
Here are some of the details of my BOSS shown in this review.

How do you even check your serial? The Future BOSS Pin is 112. Note if you have an older BOSS, your pin is likely 222 (or 112 if you or someone before you changed it). Pins are the tap/click process you’ll need to do with the light in your hands. The MOFF process is a little different. Ok, it’s extremely different. You have to think about the state of the power to the driver in order for it to make sense. Here’s what the driver wants to see.
No power to driver.
Blip of power to driver.
No power to driver.
Blip of power.
No power to driver.
Two blips of power.
No power to driver.
Power to driver (and driver now responding because of PIN input).
But the MOFF switch means the driver always sees power! So first you have to “turn the light off” (break the circuit between the cell to the driver). You do that by depressing the switch. To turn the light off, you fully depress the switch. At this point, it’ll dawn on you, just like it did me. The “Taps” (which are referenced many times below) then are seen as the top of the stroke (in this MOFF case, the resting position). It’ll feel like you’re tapping on the ceiling with the MOFF, instead of tapping on the floor like you would with a McClicky.
Once you get that, then I bet you don’t have another problem programming the Future BOSS with MOFF.
The tap/click process is like this:
Depress the MOFF switch
Release switch [pause around 1 second] (aka “tap on the ceiling”)
Release switch [pause around 1 second]
Release switch twice [pause around 1 second]
Release
Here’s a video demonstrating the above scenario. I start with the light showing the locator beacon output. That blinks a few cycles, just so you can get the locator beacon timing (and see clearly when I’m clicking and when I’m not clicking.) Then I begin the tap/click process mentioned above. And finally, the light is placed tailstanding and begins to blink the serial number (starting with a “2”).
This technically enters programming mode, but if you leave the light in programming mode for a bit, the secondary emitter will begin blinking (instead of being steady). It’ll blink like this:
Blink blink pause
Blink pause
Blink blink blink blink blink blink blink blink blink blink pause
Blink blink blink blink blink pause
Longer pause, restart blinking serial.
It does this until the 5 or 6-digit serial is blinked out. Zeros are represented by ten binks!! In the example above, that serial is 2105 (which isn’t a real serial, just an example).
To ascertain if your 371d has the motion sensor, input your serial number here at Lux-RC, and look at the “LE Carry Sens:” section. On my BOSS lights without motion sensor, it says “NA.” If yours says anything else there, then you have the motion sensor. This BOSS, which does have the motion sensor, says: “LE Carry Sens: CSX 180A.” I don’t know what CSX 180A is, but all that matters is that it means I have the motion sensor.
Manual
Here’s the manual in its full glory.
Here’s a pdf link: LUXRC-371-372-V2-EN It’s a slim 688KB. In case you don’t want to mess with a pdf, here are images of the same manual.


That’s right, a nine-page manual! A whole bunch of that is more geared to the 372 driver, which is different hardware than I’m covering here. Technically, 371 v2.0 and 372 v2.0 have “identical firmware” (according to the manual), so practically everything you read in this review will also be useful knowledge for your TorchLAB BOSS 371 v2.0 firmware driver. There is one massive difference, however. The 372 v2.0 driver has compatibility with a maximum of one cell, whereas the 371 v2.0 will work with two cells as well as one. But BOSS lights aren’t available with 372, so 372 isn’t the scope of this discussion.
That manual is very good! There are some graphical things that I want to see written or described in other ways. It’s also good sometimes, for someone who didn’t make the product or write the code, to play with in detail. That’s where this post comes in. I’m not really saying anything that the manual doesn’t say. I’m just saying it in sentences, not graphics. Mostly.
You should know now that there are different ways to program different aspects of the 371 v2.0. Some parts are still programmed through the web-based interface and the optical sensor on the BOSS. This process is still very much like it has been in the past (with some enhancements you may never need). Other parts (“switches”) are programmed through a series of pin entries on the flashlight itself.
Here are a few things that Oveready recommends off the top, for MOFF.
Recommended v5.1 settings for MOFF
- PIN 331: zero mode locator beacon: on or off
- PIN 335: zero mode ON (five white flashes)
- PIN 337: double click OFF (seven red flashes)
- Load Fast Switch Timing profile via 222 pin
Pin 112 (can be manually changed to Pin 222): Optical programming
There’s a lot to programming the light optically. You can plan your modes at the Lux-RC webpage, then, through the magic of magic, optically enter that program into your light. Getting into the programming mode is just like checking the serial – see above for that. When your secondary emitter comes on very low, you’re ready to program.
The programming itself looks just like in the old video, which I’ve linked above. Build your program on lux-rc.com. Enter programming mode on your BOSS. Place BOSS facing the screen and wait for one full cycle (green screen to green screen). And your light is programmed! The very low output of the secondary emitter will shut off when programming is successful.
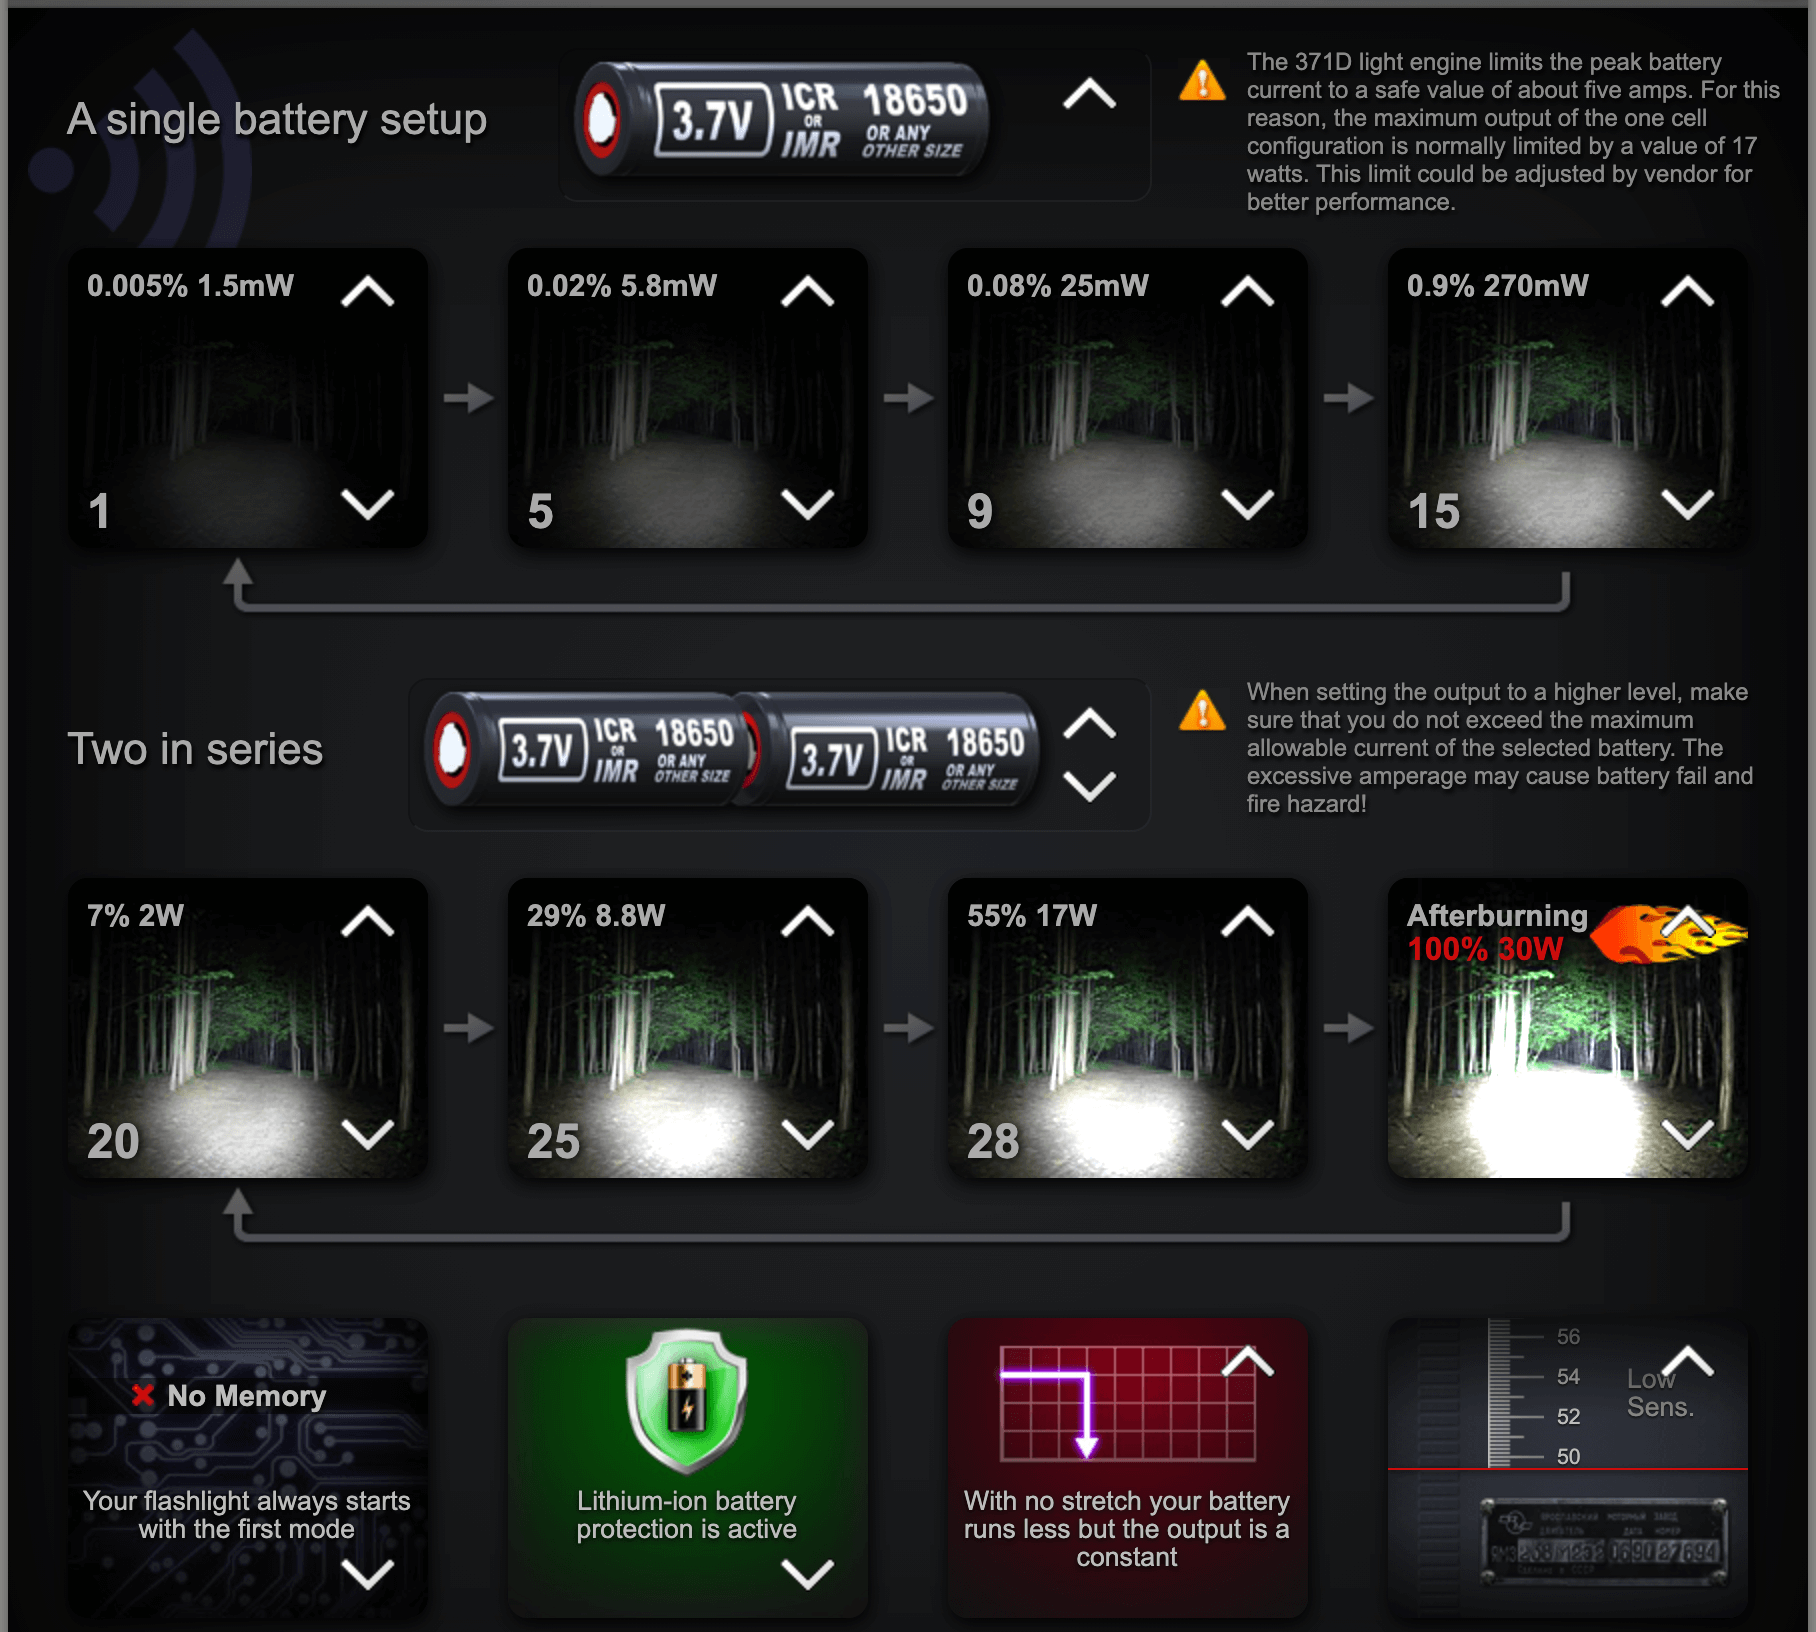
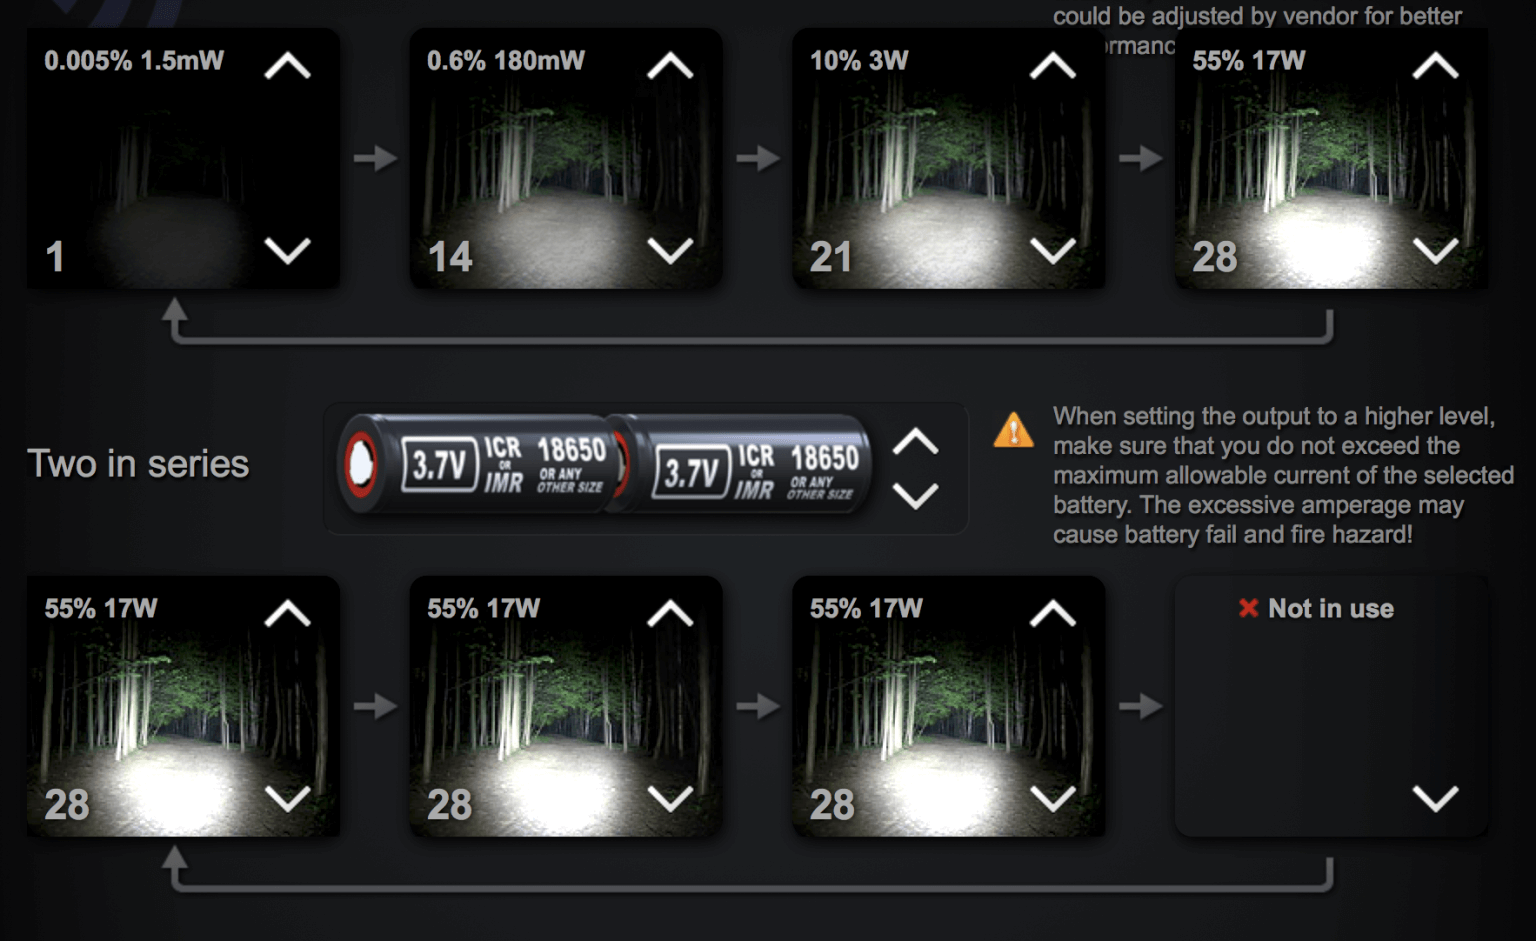
Here’s an example of the programming screen with both one cell and two cells in play. Broadly speaking, this is the test setup I used for the TorchLAB Future BOSS. Specifically speaking, not all these modes are applicable because, as you can see above, this particular BOSS with the Cree XP-L HI (4000K) emitters is limited to something like 21W. (Just to state it clearly, 21W means something like 21W/4.2V = 5A total, among 3 emitters. So 5A/3 emitters = around 1.6A to each emitter, max.) If we use a lithium-ion nominal voltage instead (and we probably should), then (21W/3.7V)/3emitters = around 1.9A per emitter. Either way, this is well within the safe limits of these emitters.

And the screen you see once you click the orange “Save and Program” button above:
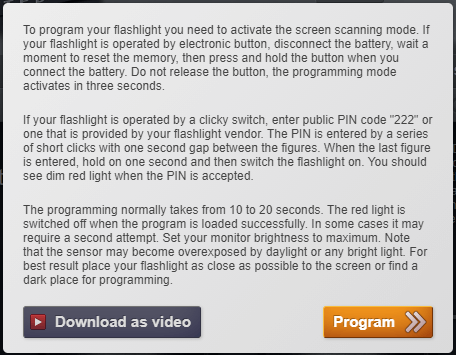
And finally, the green screen where you place your BOSS. When you see this screen, get your BOSS in front. Don’t wait. Also, don’t place your BOSS on the screen after this has switched to blinking.

And here’s a blink example of some random (but good) programming options. Flash/Seizure warning…
Pin Programming
Pin programming is a little different. Well, different from optical programming, but also will be similar to programming other drivers (like the H17f), since it requires a series of button clicks.
First off, here are all the pins, per the manual.
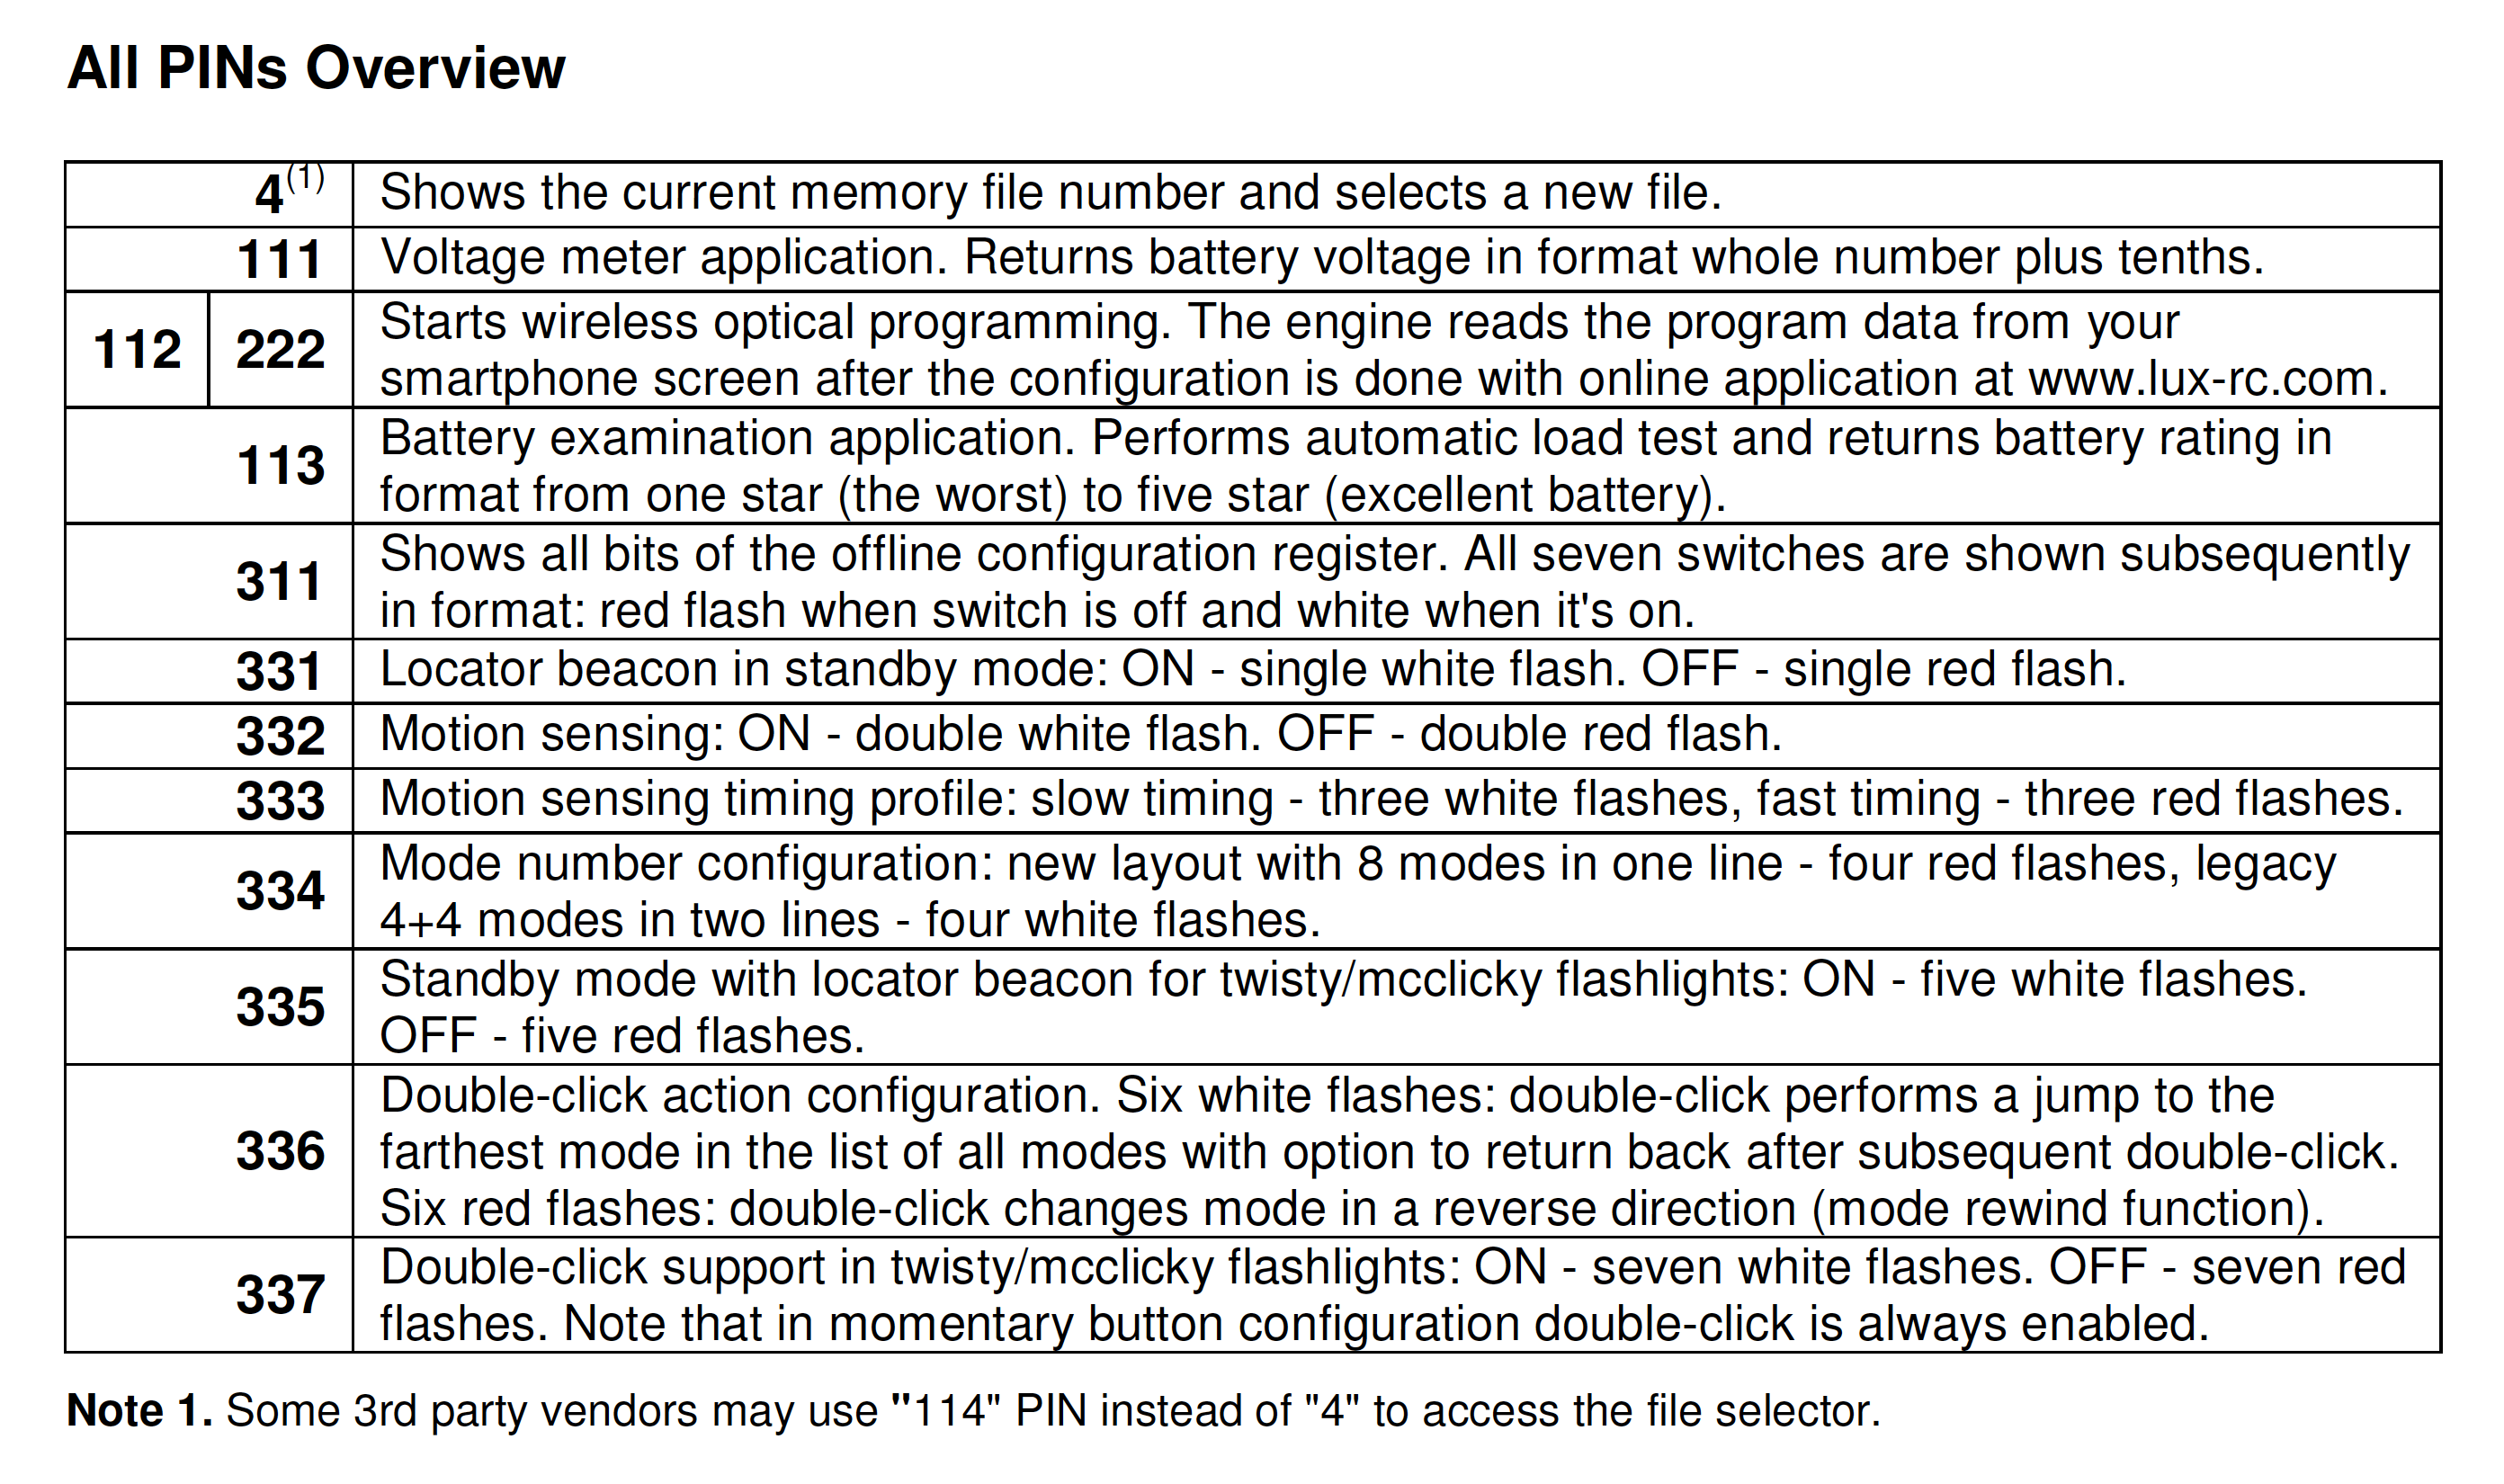
Pin 4: “Files”
One of the most discussed (and important) features of 371 v2.0 is the “Files.” I was nearly certain I’d seen this also called “Pages” (and I’m putting it here once just for search purposes), but as the manual refers to it as Files, and so I will too.
The four Files of the 371 v2.0 essentially make your BOSS into four flashlights. Every single parameter of each File can be configured completely independently from the other Files. So while the manual boasts “Up to 32 memory modes,” it’s really a max of 8 per file (which the manual is also clear about.)
Thus, we need to know how to switch between files! The pin is 4. The tap/click process for switching Files is like this, from an off state:
Depress the MOFF switch
Release switch, click and release switch, click and release switch, click and release switch,
Depress the MOFF switch for around 1 second
Release switch
At this point, the secondary emitter will begin blinking. First, it blinks out the count of the File you’re in. So if you’re in File #2, you’ll see two blinks. After this the cycle begins – in this case, it’d do 3 blinks, then a [longer] pause, then four blinks, and then back to 1 blink. The cycle will continue until you select a File.
To change Files, click the switch after the LED blinks the File you want. So you want File #1, then you click the switch after 1 has blinked fully.
“Page 3”
Oveready also has something called “Page 3.” This isn’t something separate or extra, but it’s one of the four pages that happen to ship pre-programmed specifically. Here are the specifics:
Such that 4 fast presses give you high, whatever you’re already on:
- mode 0 + 4 presses = high
- mode 1 + 4 presses = high
- mode 2 + 4 presses = high
- mode 3 + 4 presses = high
This is an important programming page because it sort of replicates the “double click to turbo” option. It works well (or “it works fine”) but it’s not some magic of driver programming. It’s accessing the 17W output (“high”) from any of the main modes with four clicks because high is literally four clicks from any other mode by taking up the appropriate number of slots. You could replicate this in another Page for red or some other output, by replacing the “28” window above with red or whatever mode you want “four click access” to.
There are a few notes from Oveready:
- Setting changes are made per page file. If you update only page 1, then later flip to page 3, page 3 won’t already have these changes.
- Repeating high is recommended for reliable ‘fast to high’ configurations (4-mode 1-cell example):
Other Programming
There are a ton of other programming options. I’ve covered them all elsewhere in a number of other BOSS pages. If you understood those, then you’ll understand the Future BOSS too, and I recommend you check those out.
TorchLAB BOSS FT Clicky Collector Vintage Brass 35 Flashlight Review
TorchLAB BOSS “5.1” – 371 v2.0 (by Lux-RC) Firmware Guide
TorchLAB BOSS page at zeroair.org
And just one more for good measure, which isn’t applicable here. I’m linking it just to rule it out as helpful for you:
TorchLAB BOSS Programmable Flashlight. This was my first BOSS, and the one later upgraded to 371 v2.0 (and covered by the link above.)
There’s plenty more to say about programming with the MOFF. Ultimately, while mechanically different, it’s still electronically the same. Once you get the physics of doing it, programming will come naturally. (And if not, you can always throw the Future BOSS head on your old McClicky body BOSS… but you didn’t hear that here.)
LED and Beam
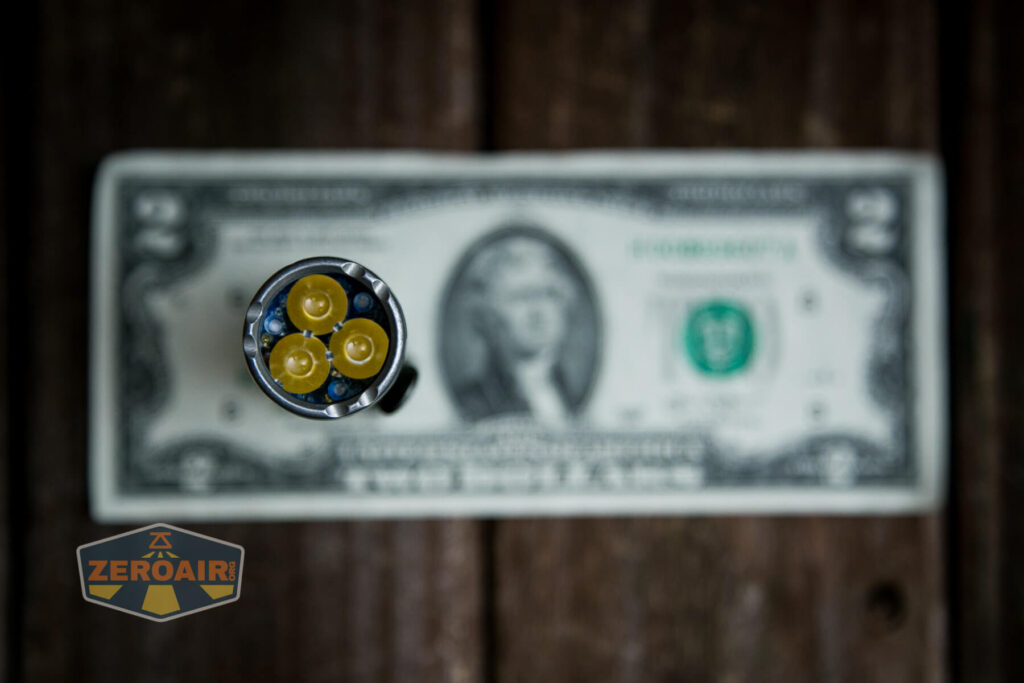
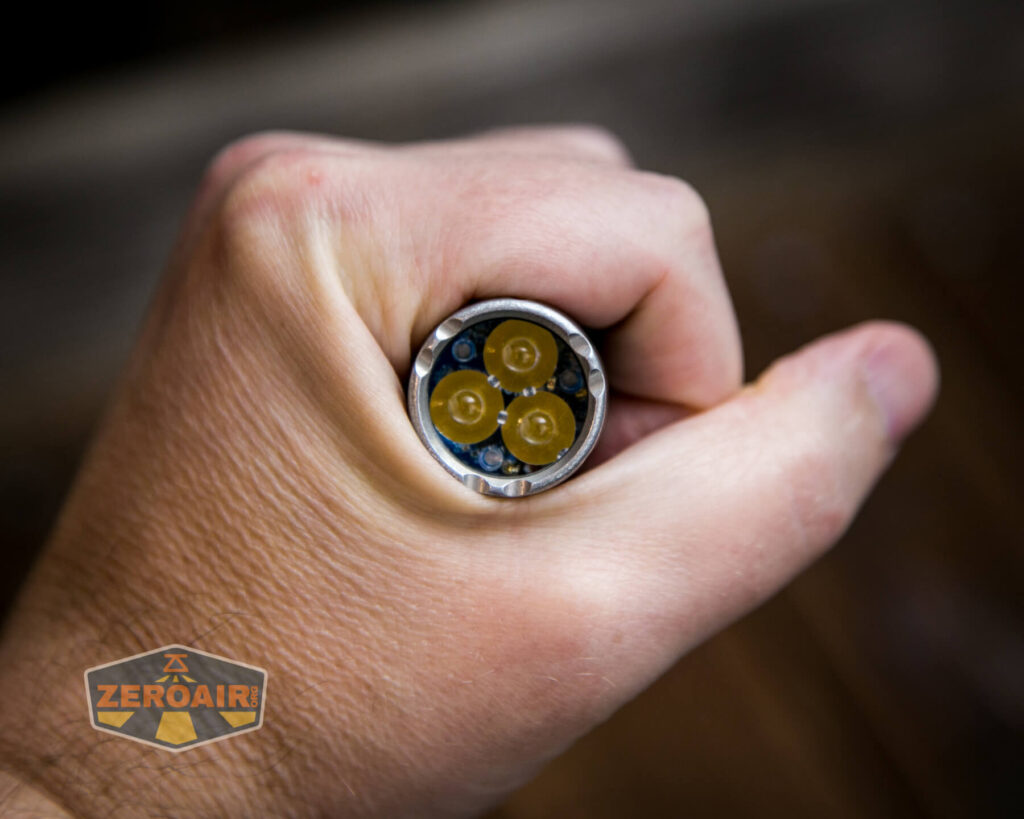
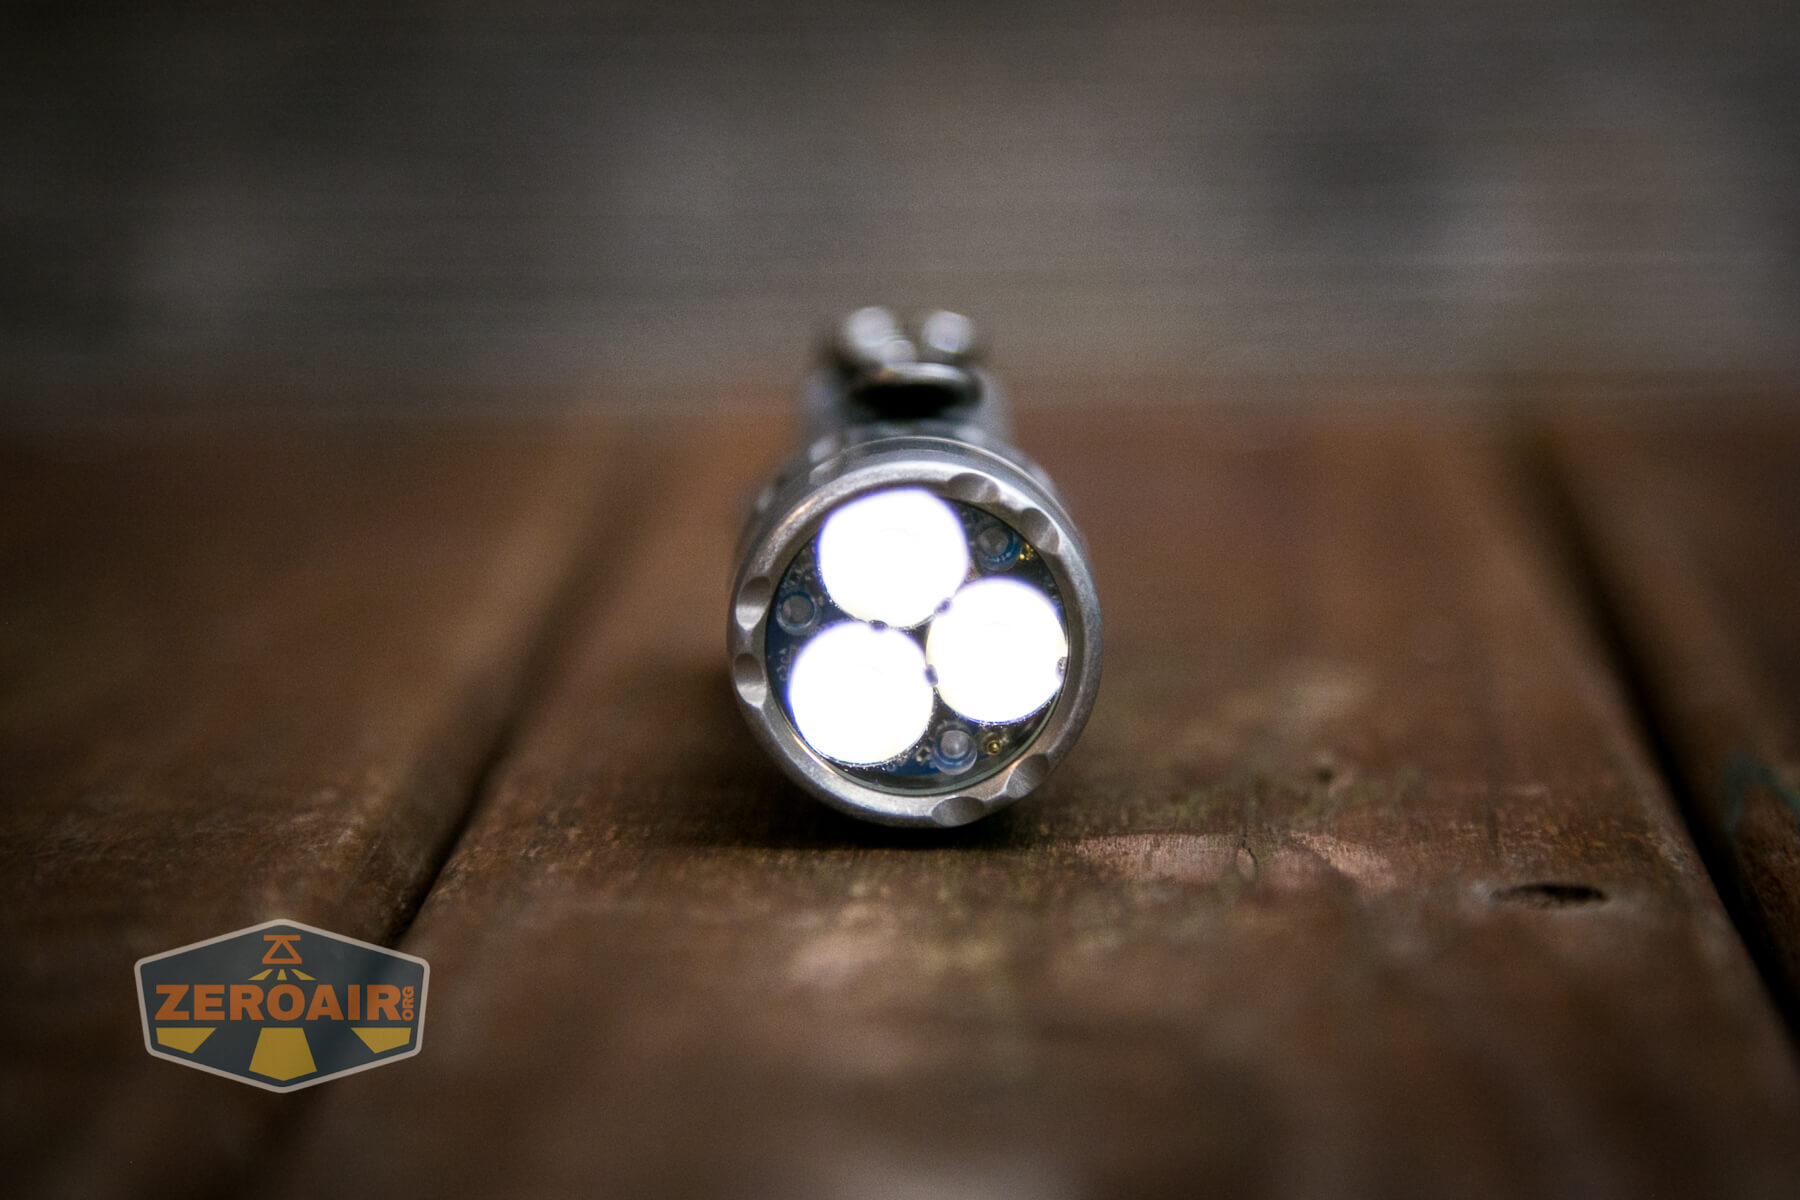
In this copy of the Future BOSS are three Cree XP-L HI emitters. These are 4000K emitters. Did you know that 4000K Cree XP-L HI emitters are this tester’s second-favorite emitters? I absolutely love these, and these are good copies, too.
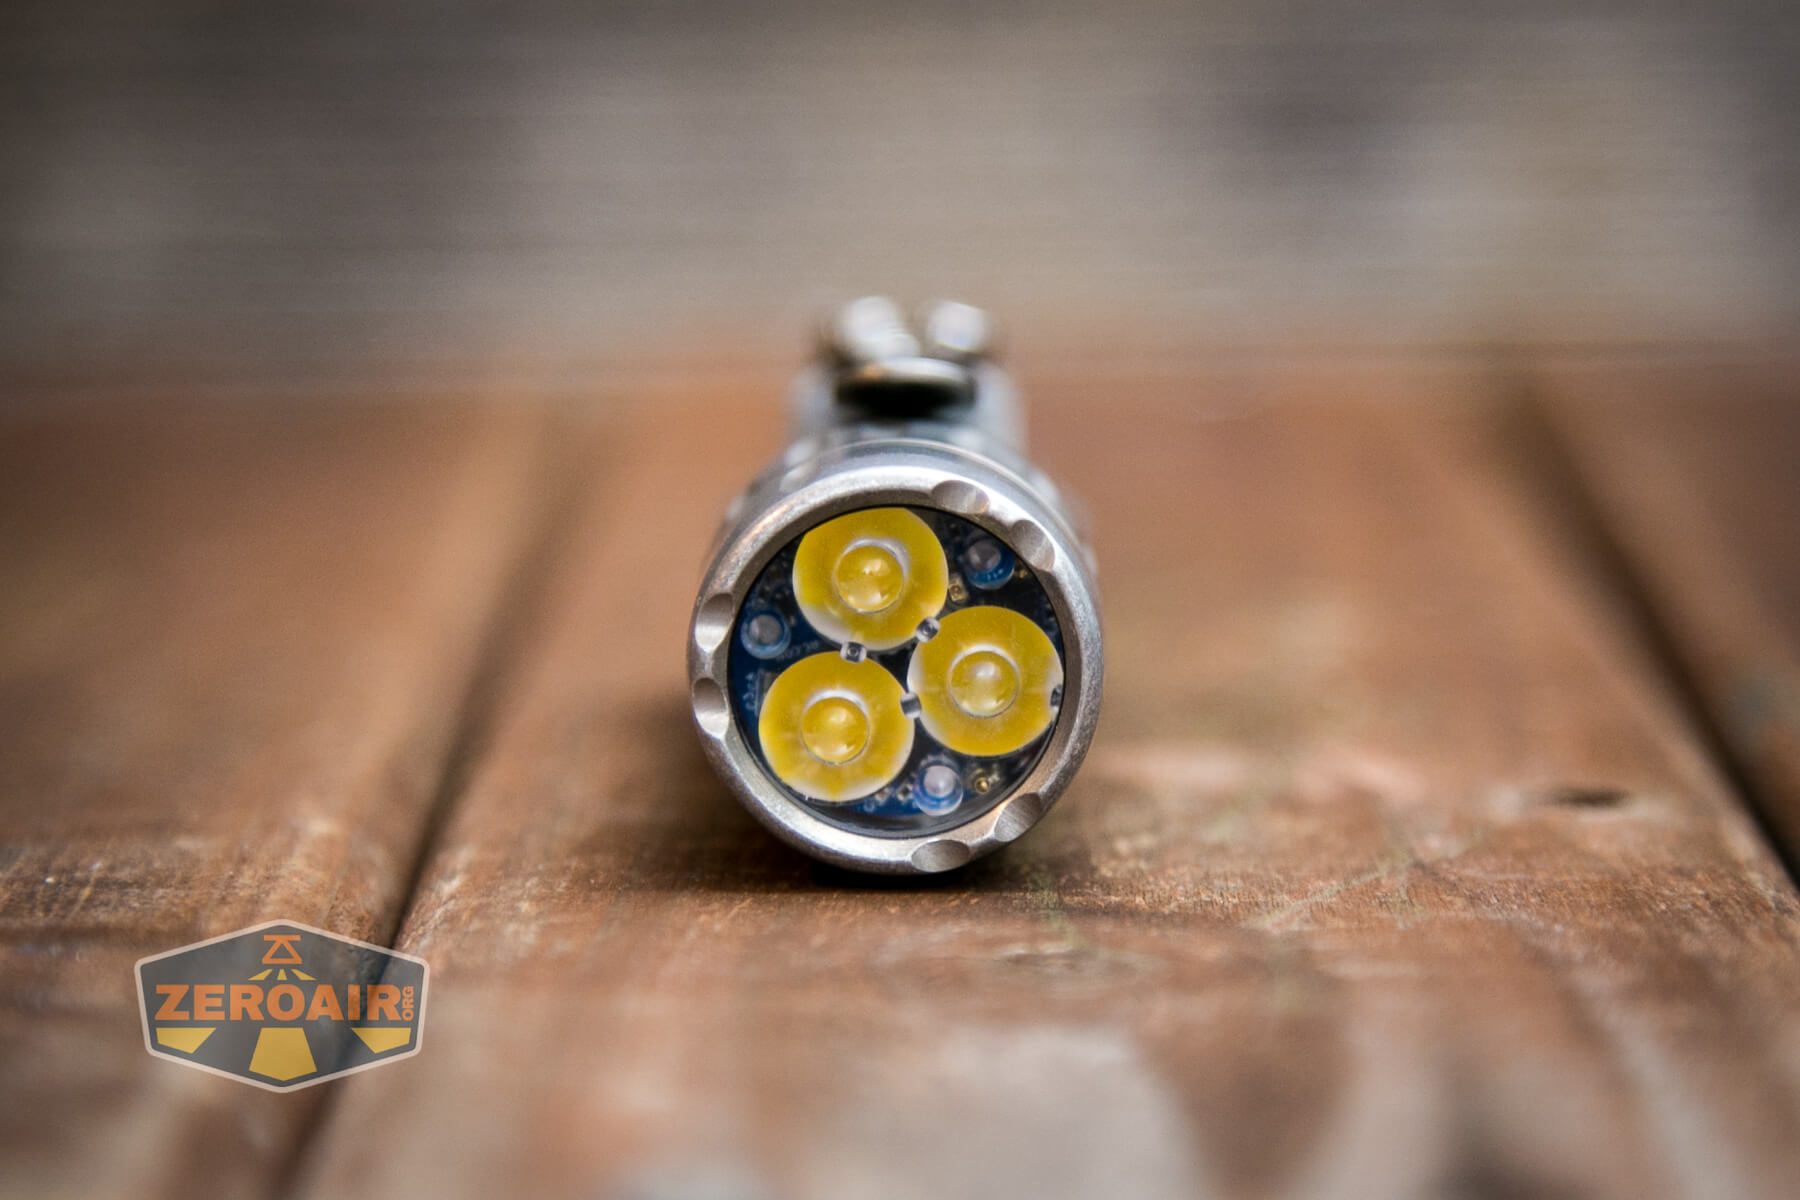
These emitters are behind a clear, narrow (standard) Carclo optic. Optics are cheap, and the BOSS has a completely standard optic; it’s easy to buy and try other optics. Floody, medium, and narrow are the other choices, and some or all of those are available as frosted. So there are plenty of choices, and the optic is very easy to change. Note that depending on how you ordered your BOSS, you may or may not need a special tool to unscrew the bezel. Some, for a short while, were shipped with the bezel tightened down so much that unscrewing them was effectively impossible. TorchLAB has designed a set of wrenches – very clever wrenches, might I add – that will allow very easy removal. I bought a set both for removing my bezel, and just to quell my curiosity on what Oveready had come up with. They work absolutely fantastically, and they’re very clever to boot. What’s more, they allow easy access with zero potential for damaging the finish on the light. That was important to me and was done well.
The bezel has slight intentions (three sets of two), which allow light to escape when headstanding.
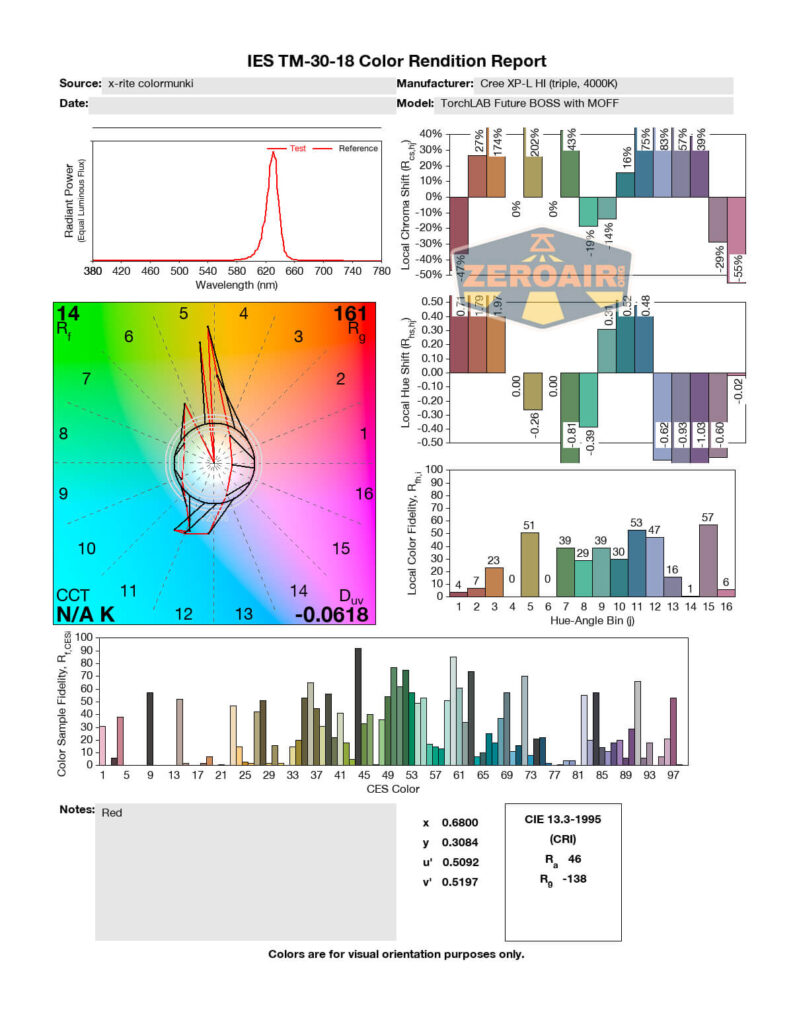
There’s also an option for the secondary emitter: red and amber can be had.
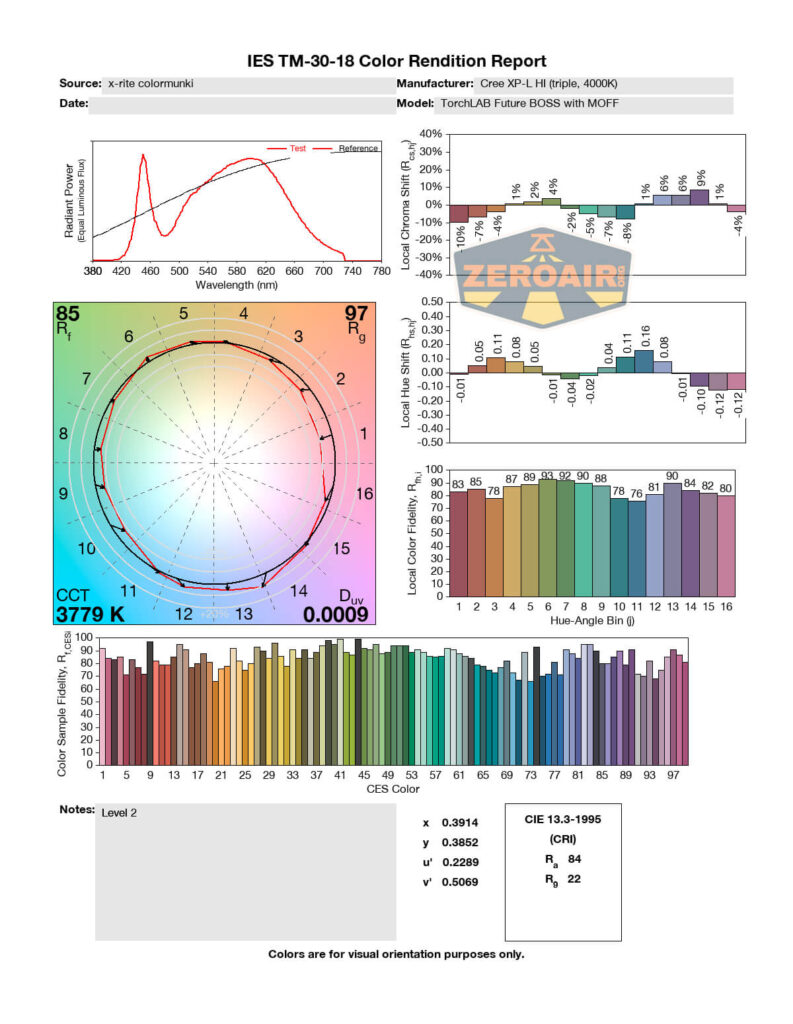
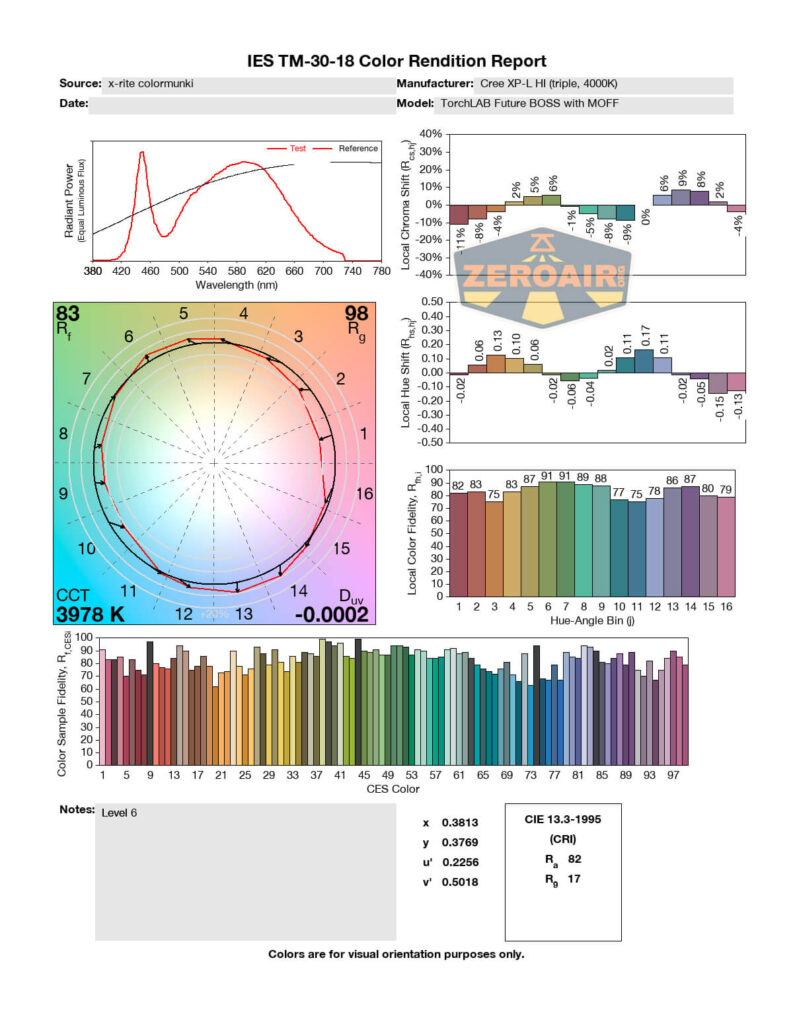
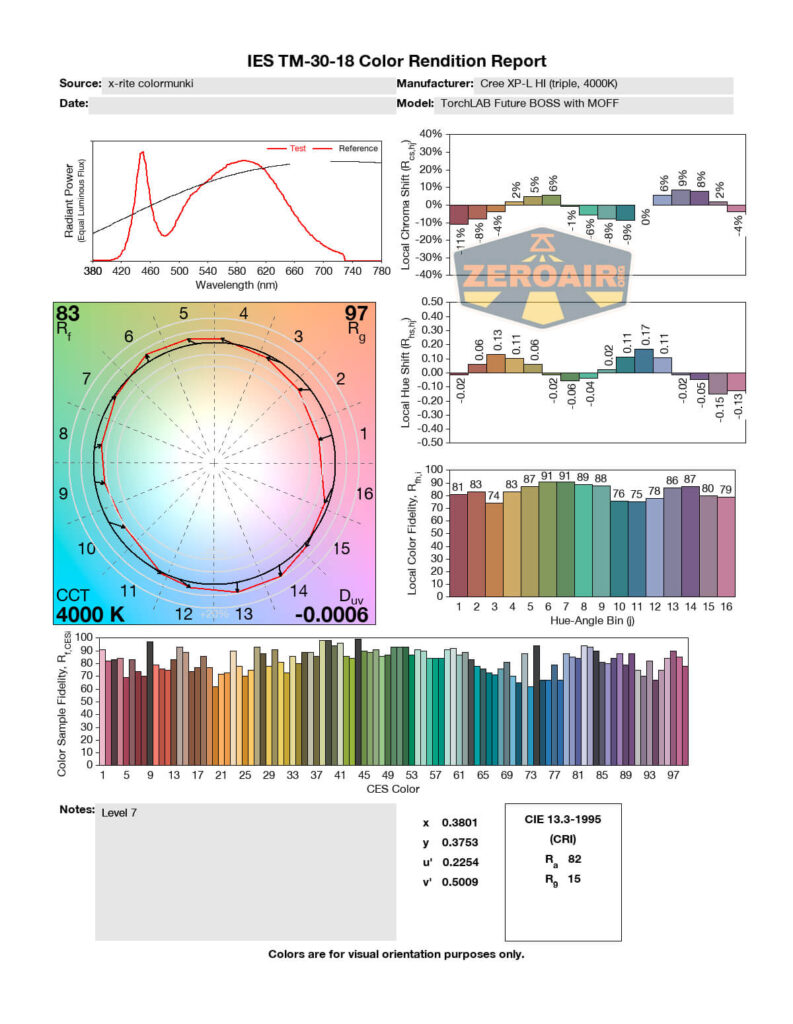
LED Color Report (CRI and CCT)
These emitters are stated as 4000K, and I’d say they’re very accurately binned on that. They’re middle-CRI, which might be a deal-breaker for you. It’s not really for m,e though. 82-84 suits my needs.
Note that the farthest right chart is actually the secondary emitter, which is red.


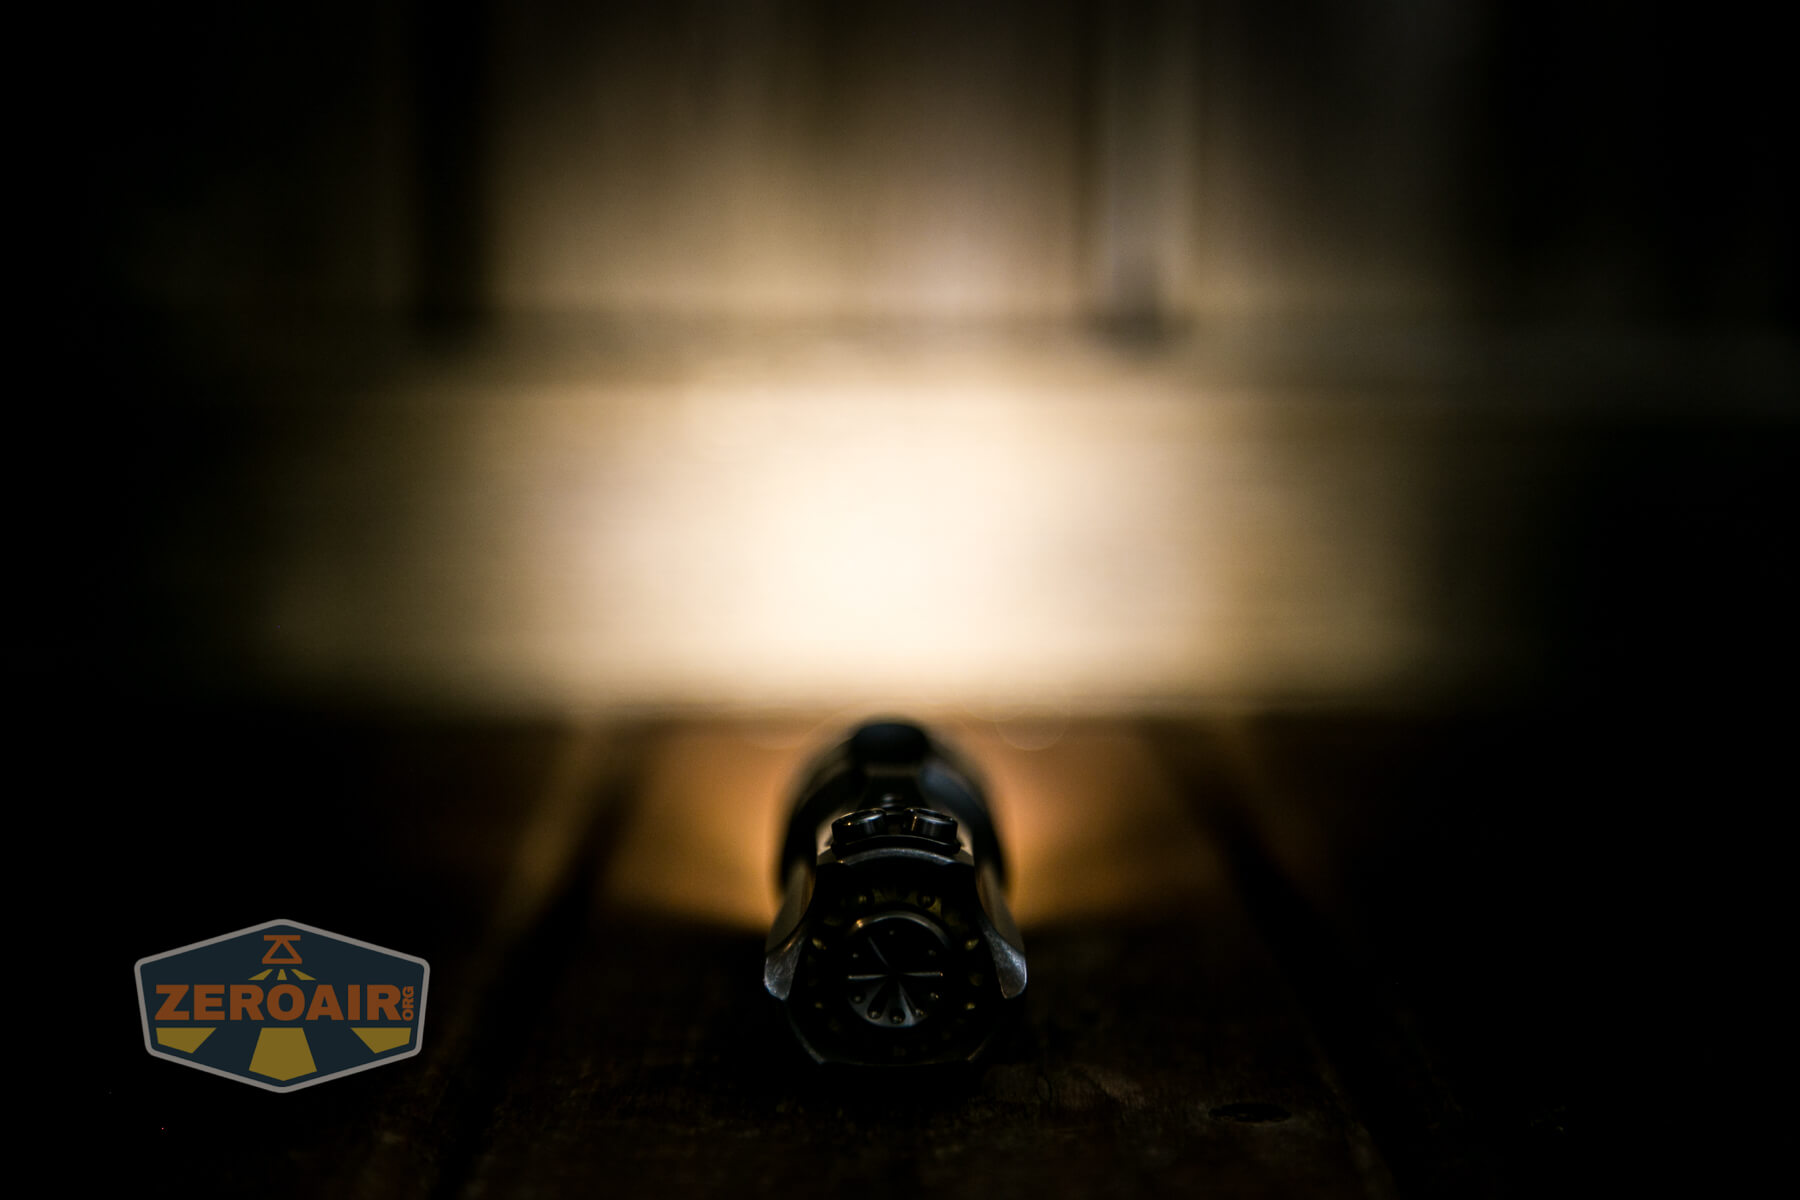
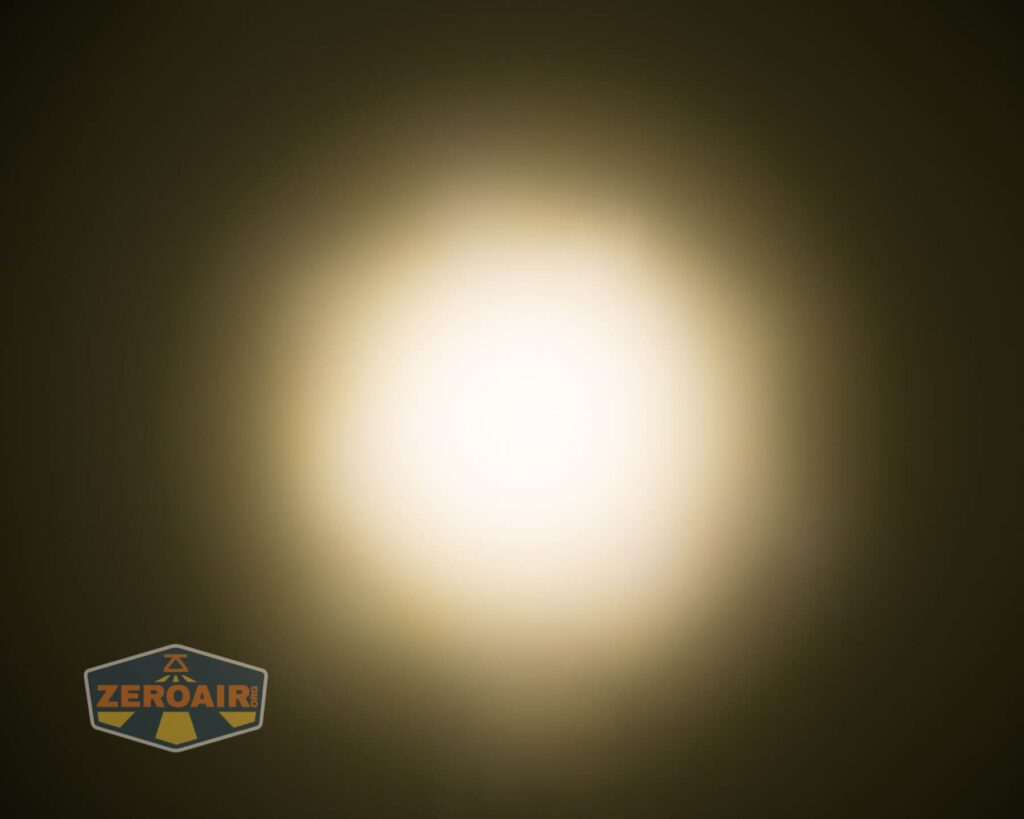
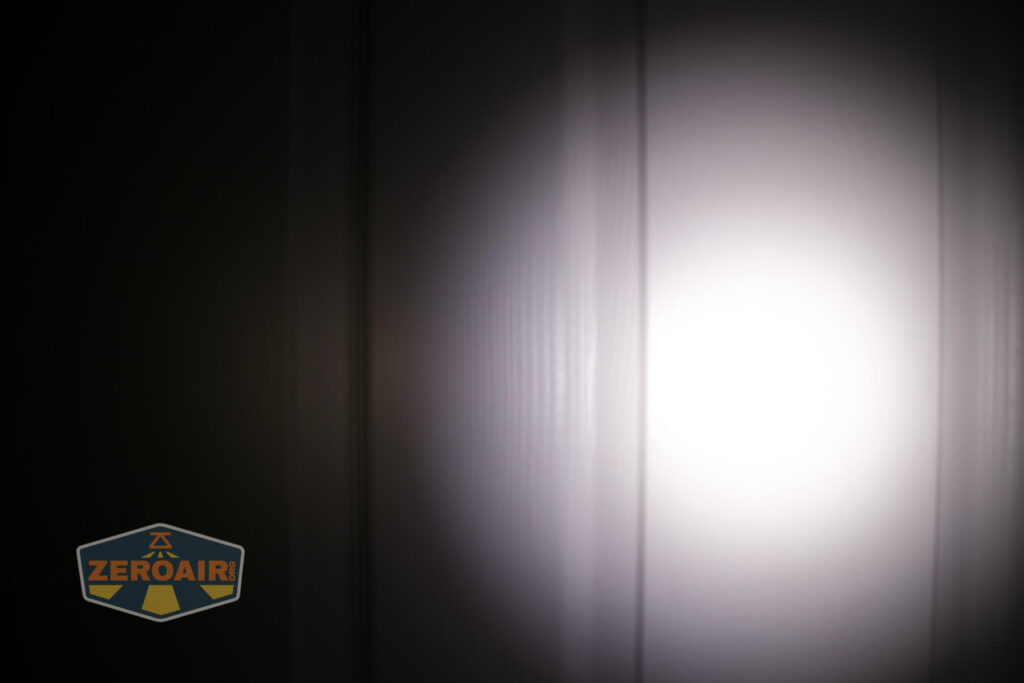
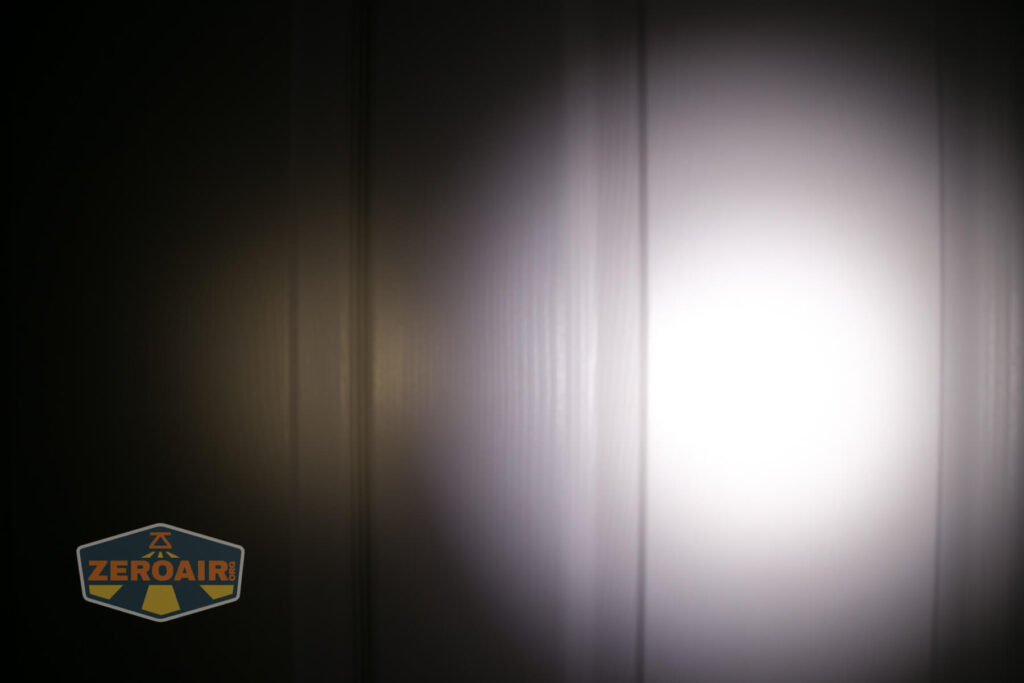
Beamshots
These beamshots always have the following settings: f8, ISO100, 0.3s shutter, and manual 5000K exposure. These photos are taken at floor level, and the beam hits the ceiling around 9 feet away.


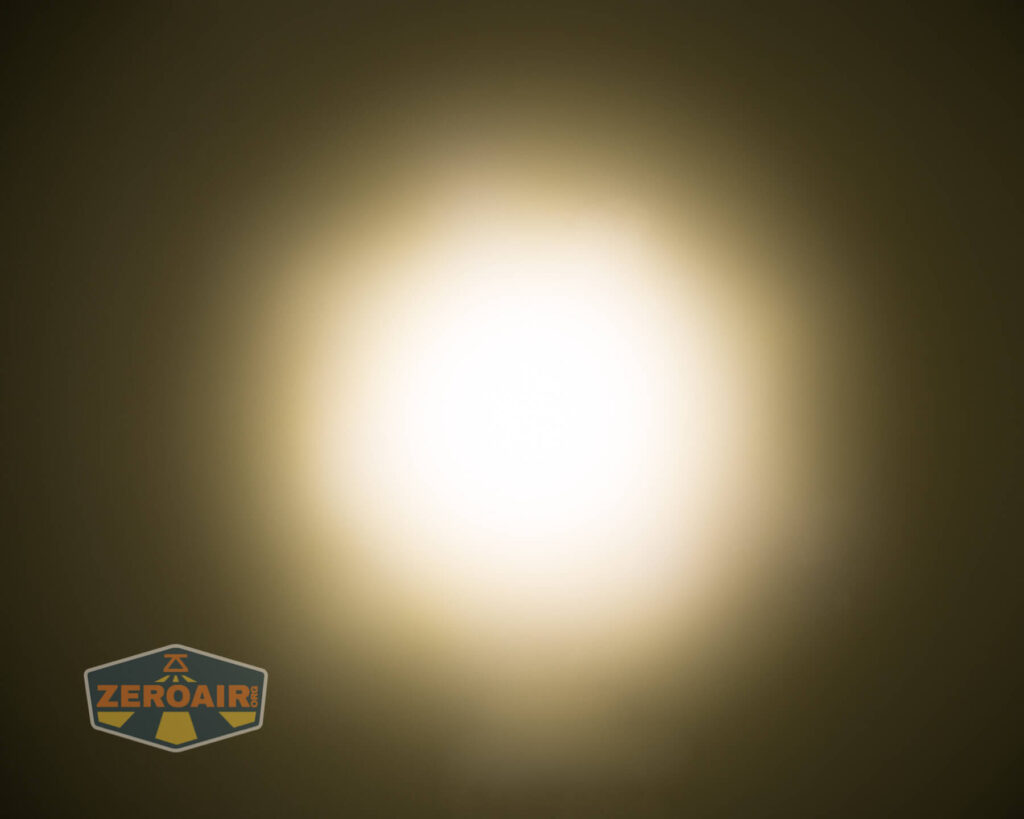
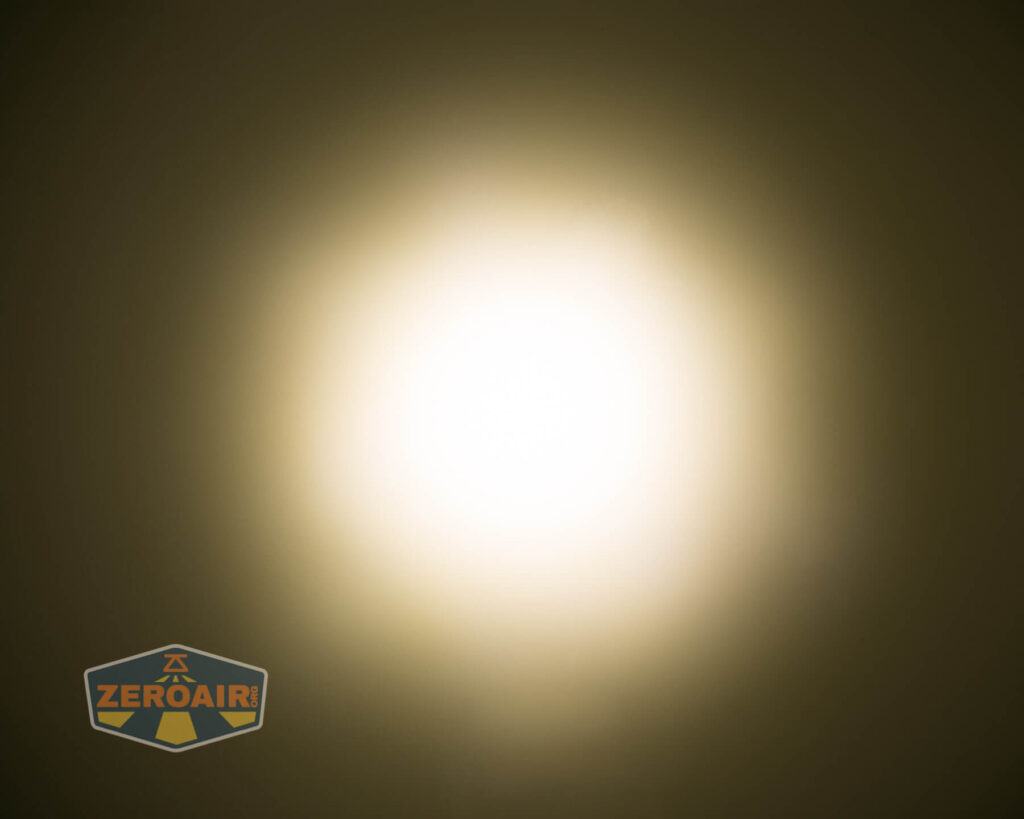

Tint vs BLF-348 (KillzoneFlashlights.com 219b version) (affiliate link)
I keep the test flashlight on the left and the BLF-348 reference flashlight on the right.
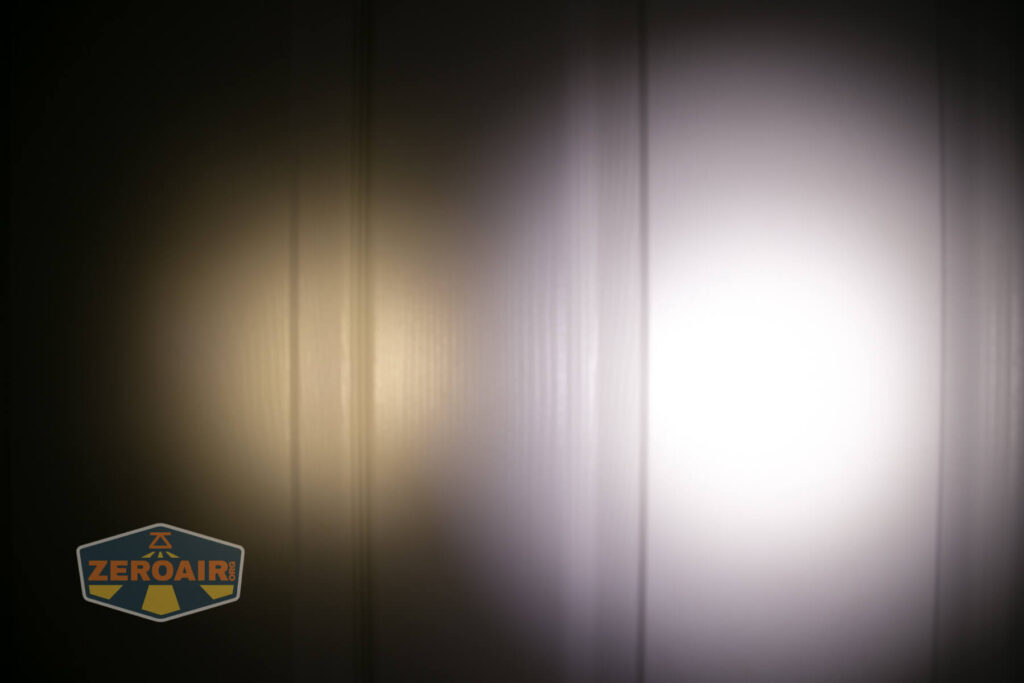
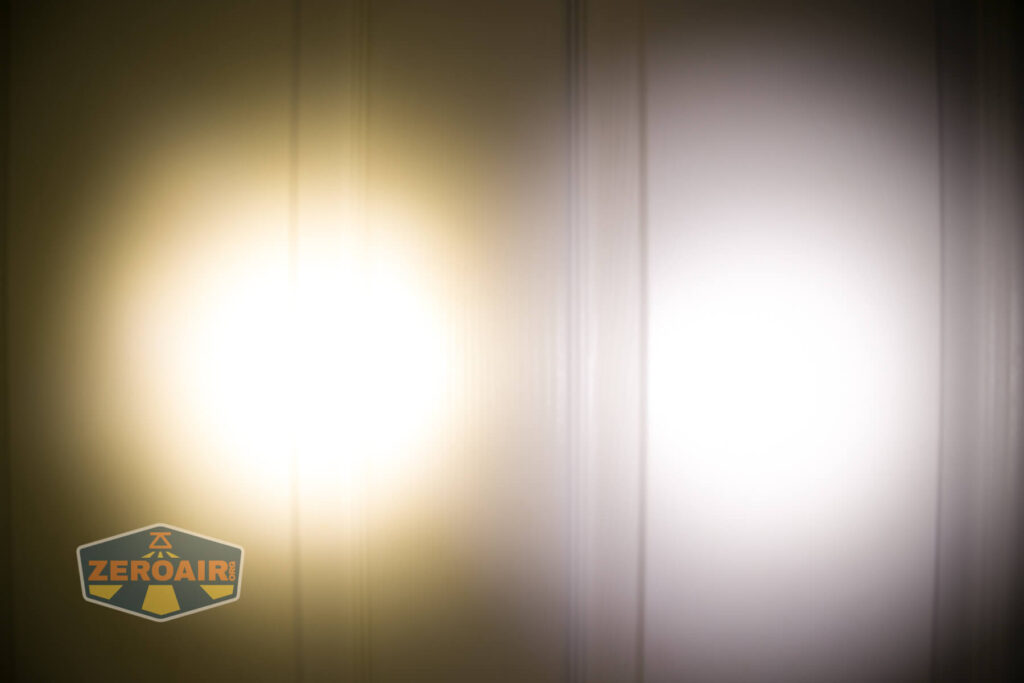
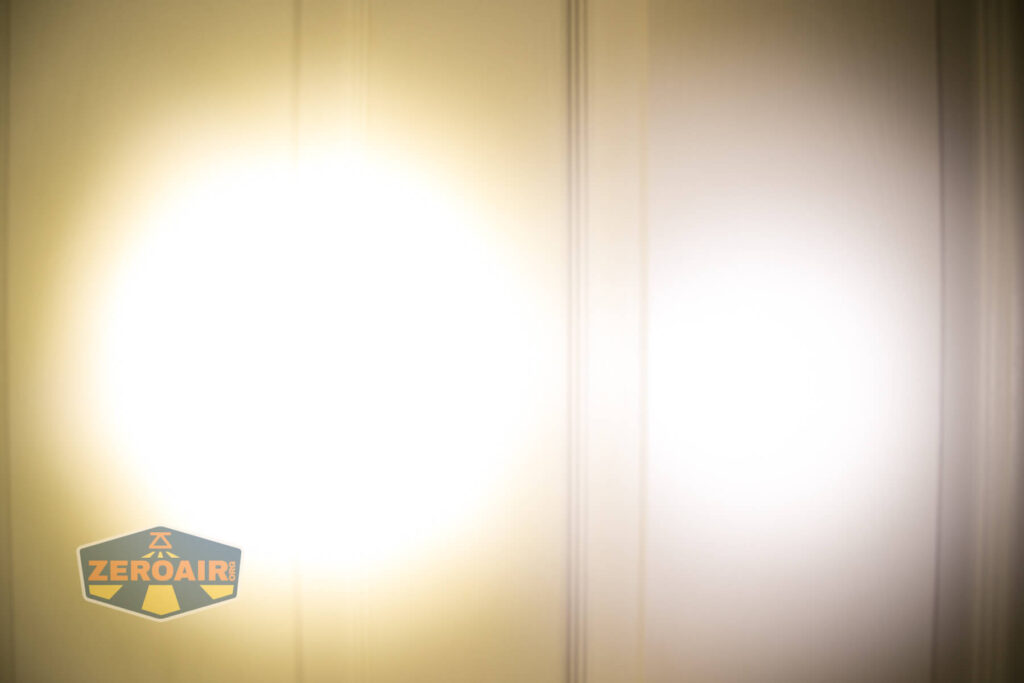
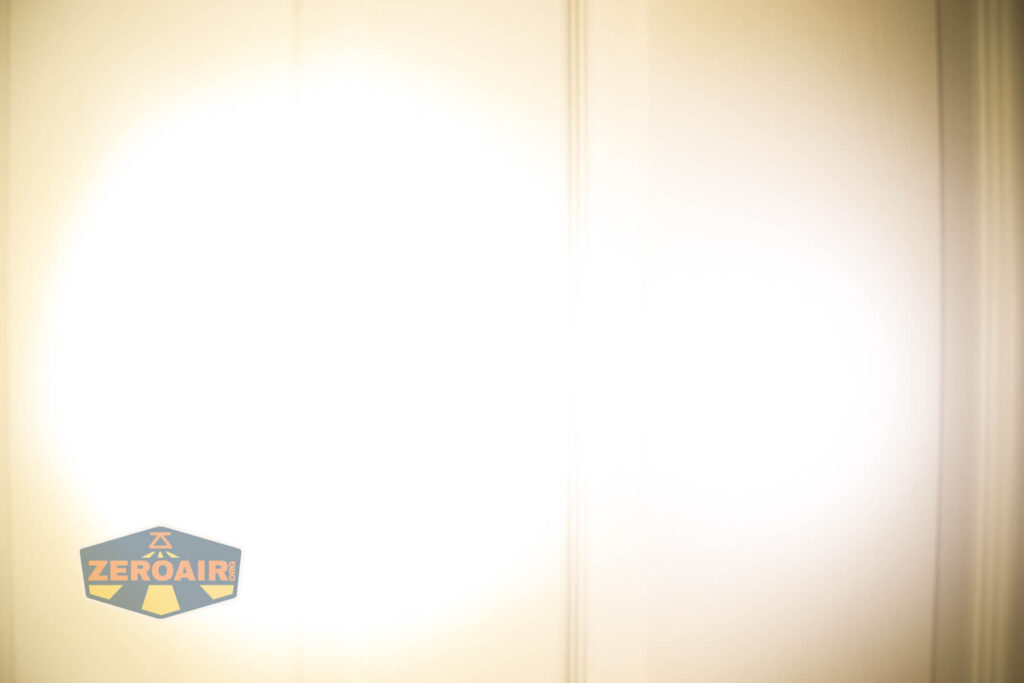
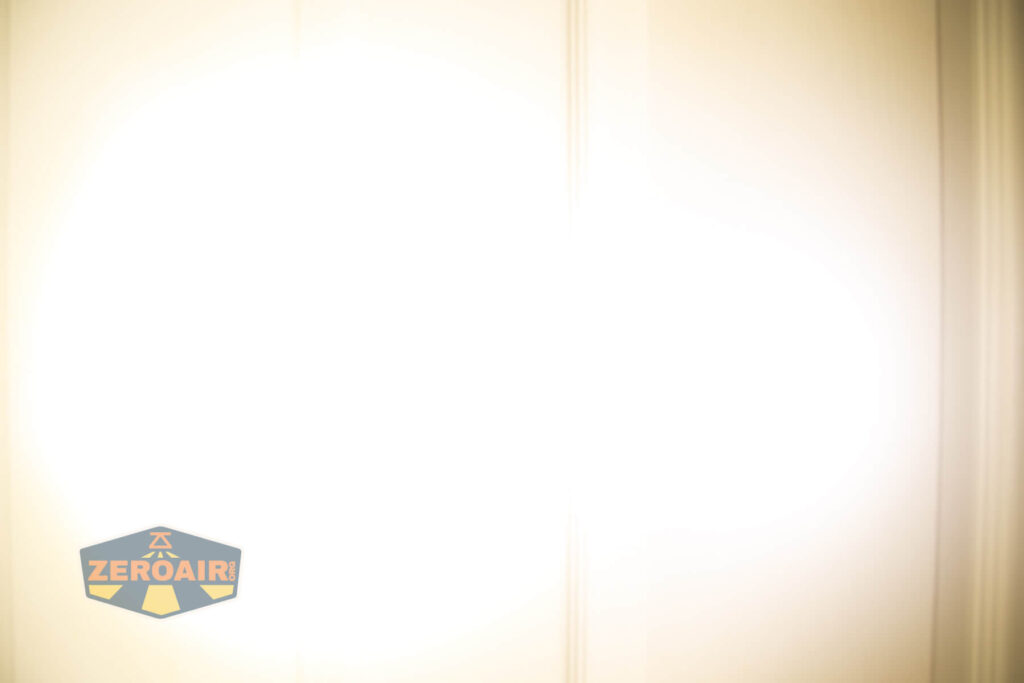

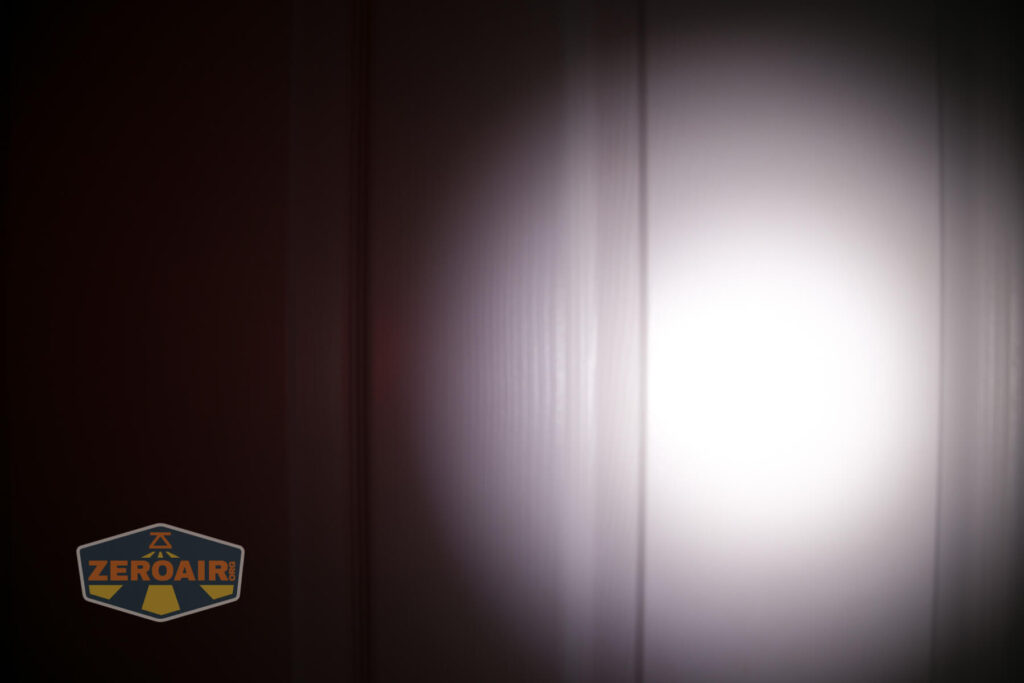
I compare everything to the KillzoneFlashlights.com 219b BLF-348 because it’s inexpensive and has the best tint!
Conclusion on the TorchLAB Future BOSS with MOFF
What I like
- Head design of Future BOSS
- Look of MOFF switch
- Full click for changing modes with MOFF
- I love these 4000K Cree XP-L HI emitters
- Optical programmability of the Lux-RC 371 v2.0 driver
- “Files” for “switching between flashlights” on the fly!
- Speed Clip is the best pocket clip on the market
What I don’t like
- Really takes a while to get comfortable with MOFF
- Cost – even without the MOFF, this isn’t an inexpensive flashlight
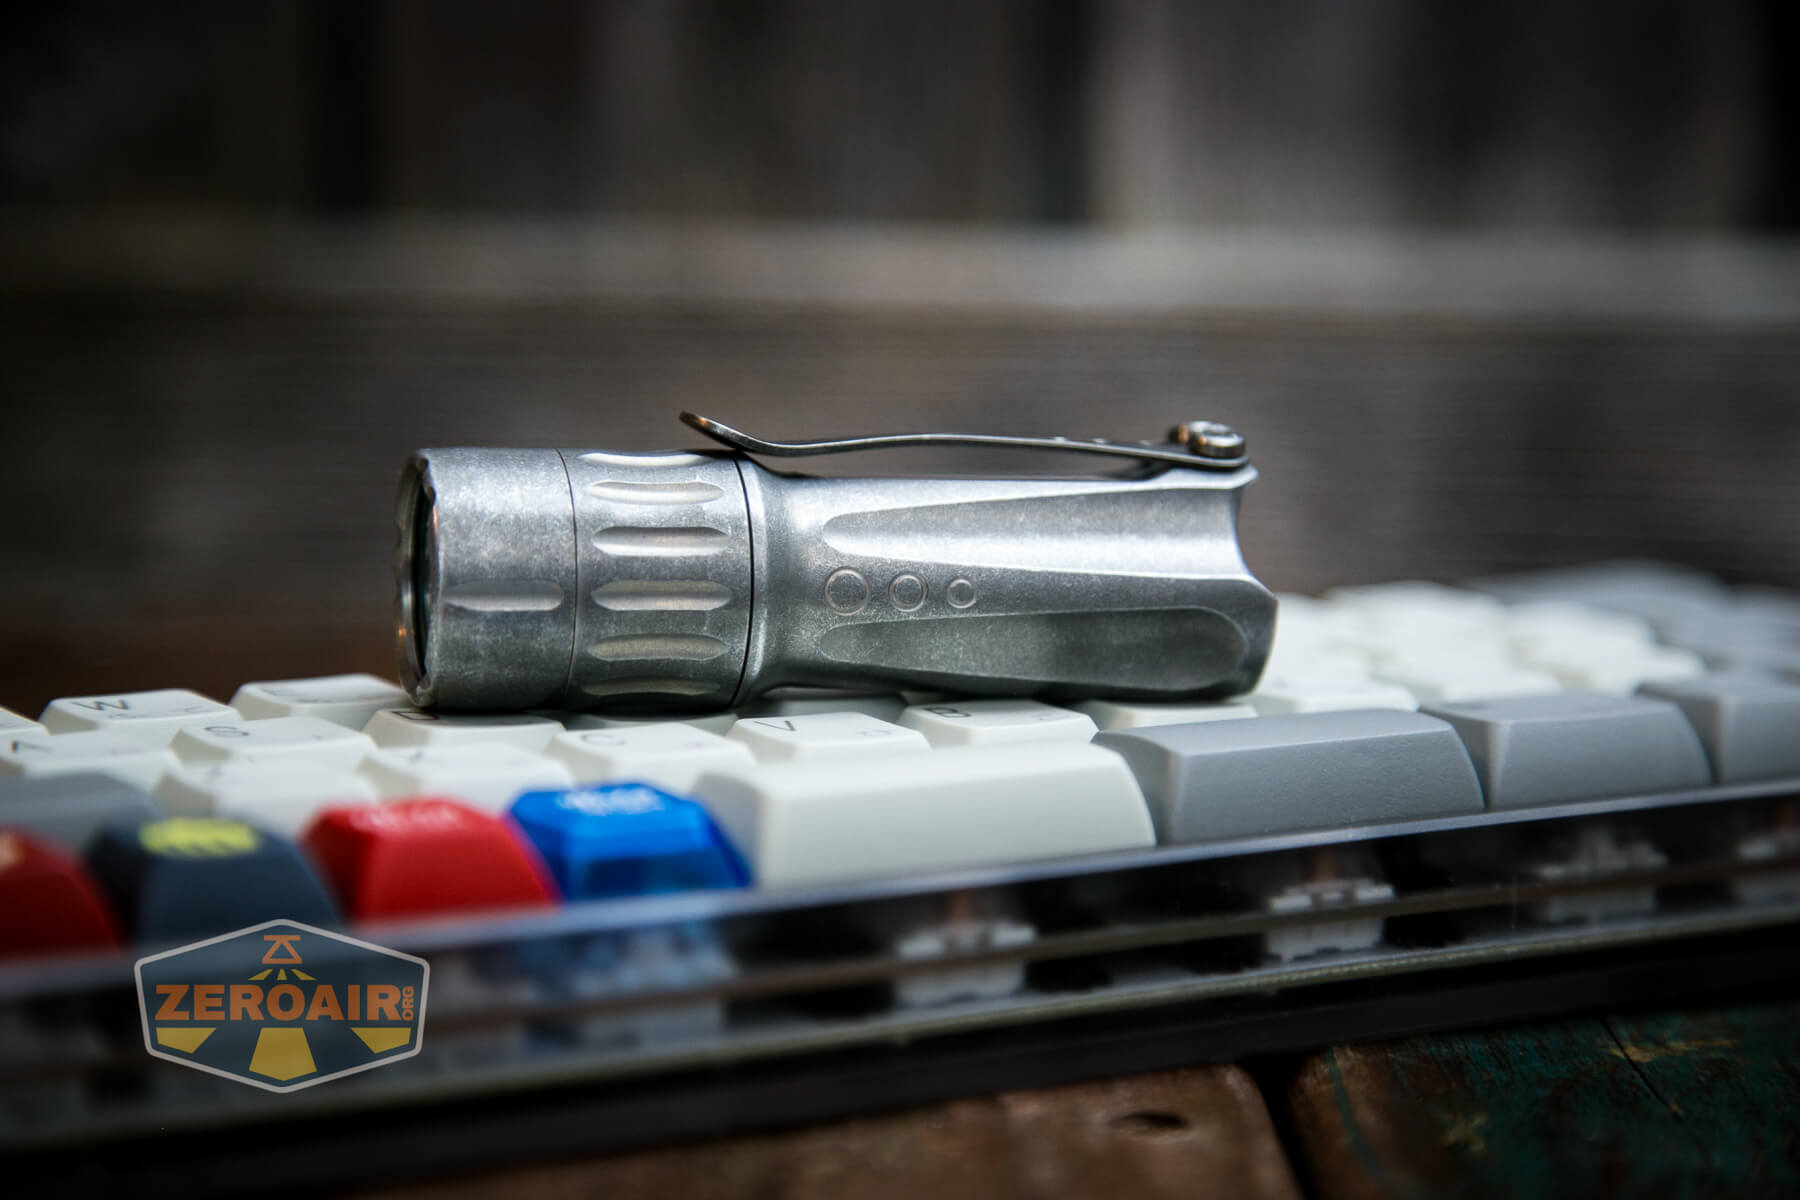
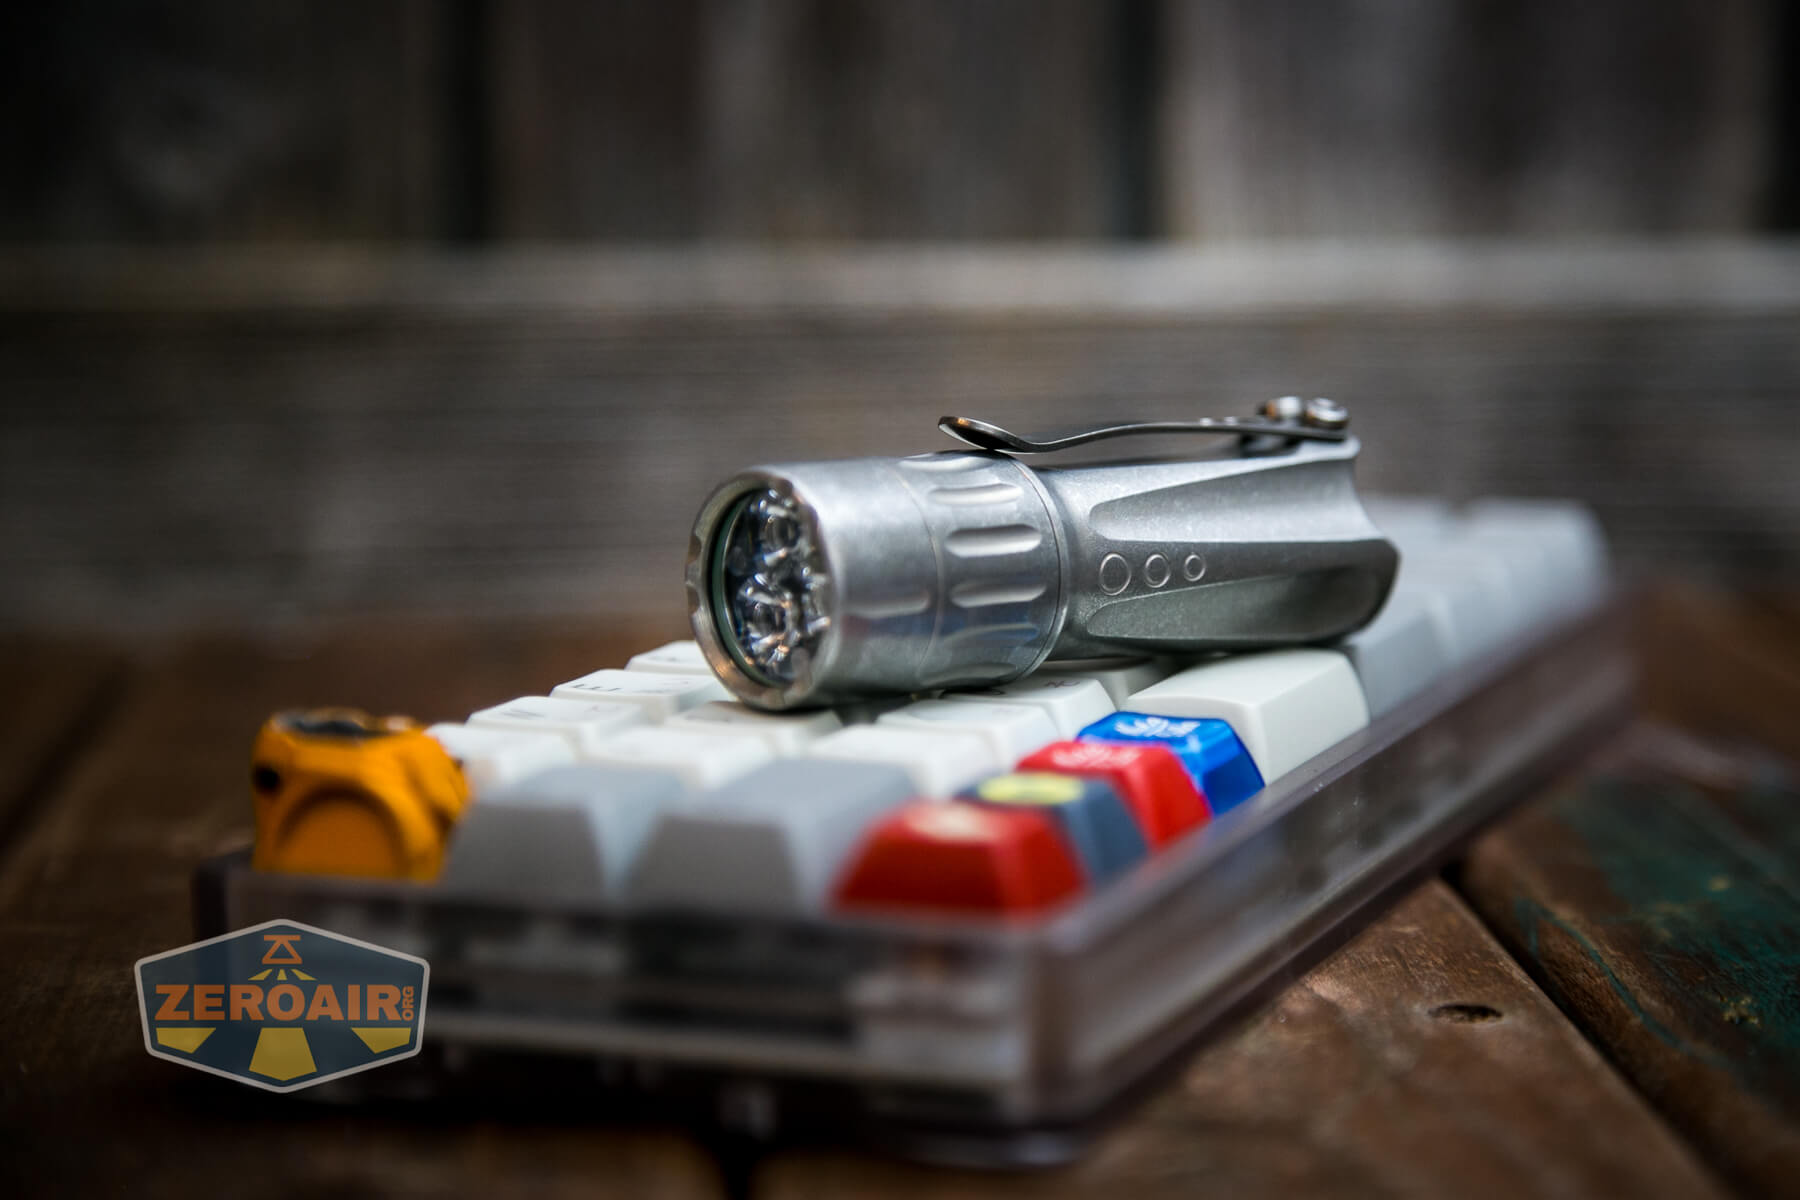
TorchLAB Future BOSS with MOFF Parting Shot(s)
More than one this time. I’m carried away by the TorchLAB Future BOSS MOFF flashlight!
That’s a sticker by photonphreaks first!
This keyboard is a TheVans Kumo, which I bought on Kickstarter. It’s a hot take on the TheVans Minivan. Both are excellent 40% keyboards!

Notes
- This content originally appeared at zeroair.org. Please visit there for the best experience!
- Please use my Amazon.com referral link to help support zeroair.org!
- Please support me on Patreon! I deeply appreciate your support!
Pingback: Holiday Flashlight Guide 2021 - You Should Buy These! - ZeroAir Reviews
Pingback: Goodbye 2021, Welcome 2022! - ZeroAir Reviews