
Olight Baton 3 Pro Max Flashlight Review
The Olight Baton 3 Pro Max is a flashlight in the Baton series, and advances cell size to 21700! It’s packed with new features, too! Read on!
Official Specs and Features
Here’s a referral link to the Olight Baton 3 Pro Max flashlight product page.
Versions

Three bodies are available – black and green, (both aluminum), and desert tan, a magnesium alloy (and much lighter than the other two!).
Three emitter temperatures are available, too. Cool white (seen here), neutral white, and warm white.
Price
The Olight Baton 3 Pro Max flashlight has an introductory price of $62.99, and is available now!
Short Review
I really appreciate the bump in size up to 21700. The Olight Baton 3 Pro Max flashlight still rides fine in a pocket, still has a great user interface, benefits from longer runtimes, and otherwise is a great addition to the Baton series. I’m particularly interested in the magnesium alloy version just for curiosity, but not because I ever found any Baton by Olight too heavy. I also greatly appreciate that NW and WW are available (despite not having one here for review.)
Long Review
The Big Table
| Olight Baton 3 Pro Max flashlight | |
|---|---|
| Emitter: | Cree XHP50.3 (Cool White) |
| Price in USD at publication time: | $62.99 |
| Cell: | 1×21700 (included) |
| Runtime Graphs | |
| LVP? | No (or “protected cell included”) |
| Switch Type: | E-Switch |
| Quiescent Current (mA): | ? |
| On-Board Charging? | Yes |
| Charge Port Type: | Proprietary Magnetic |
| Charge Graph | |
| Power off Charge Port | with cell: all modes without cell: no modes |
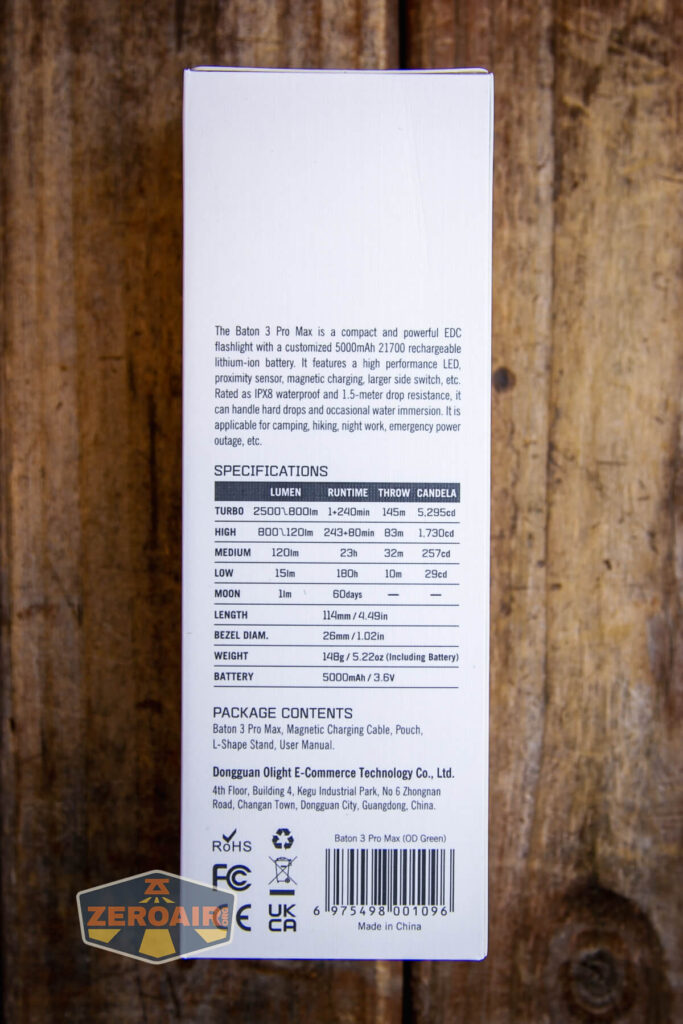
| Claimed Lumens (lm) | 2500 |
| Measured Lumens (at 30s) | 2159 (86.4% of claim)^ |
| Candela per Lumen | 3.3 |
| Claimed Throw (m) | 145 |
| Candela (Calculated) in cd (at 30s) | 226lux @ 5.555m = 6974cd |
| Throw (Calculated) (m) | 167.0 (115.2% of claim)^ |
| Claimed CCT | 6500 |
| Measured CCT Range (K) | 6300-7100 Kelvin |
| Item provided for review by: | Olight |
| All my Olight reviews! | |
^ Measurement disclaimer: Testing flashlights is my hobby. I use hobbyist-level equipment for testing, including some I made myself. Try not to get buried in the details of manufacturer specifications versus measurements recorded here; A certain amount of difference (say, 10 or 15%) is perfectly reasonable.
What’s Included

- Olight Baton 3 Pro Max flashlight
- Olight 5100mAh 21700 (customized, proprietary)
- Velvet Pouch
- Charge cable (USB to proprietary charge base)
- Manual(s)
- L-bracket for wall-mount
Package and Manual


Build Quality and Disassembly

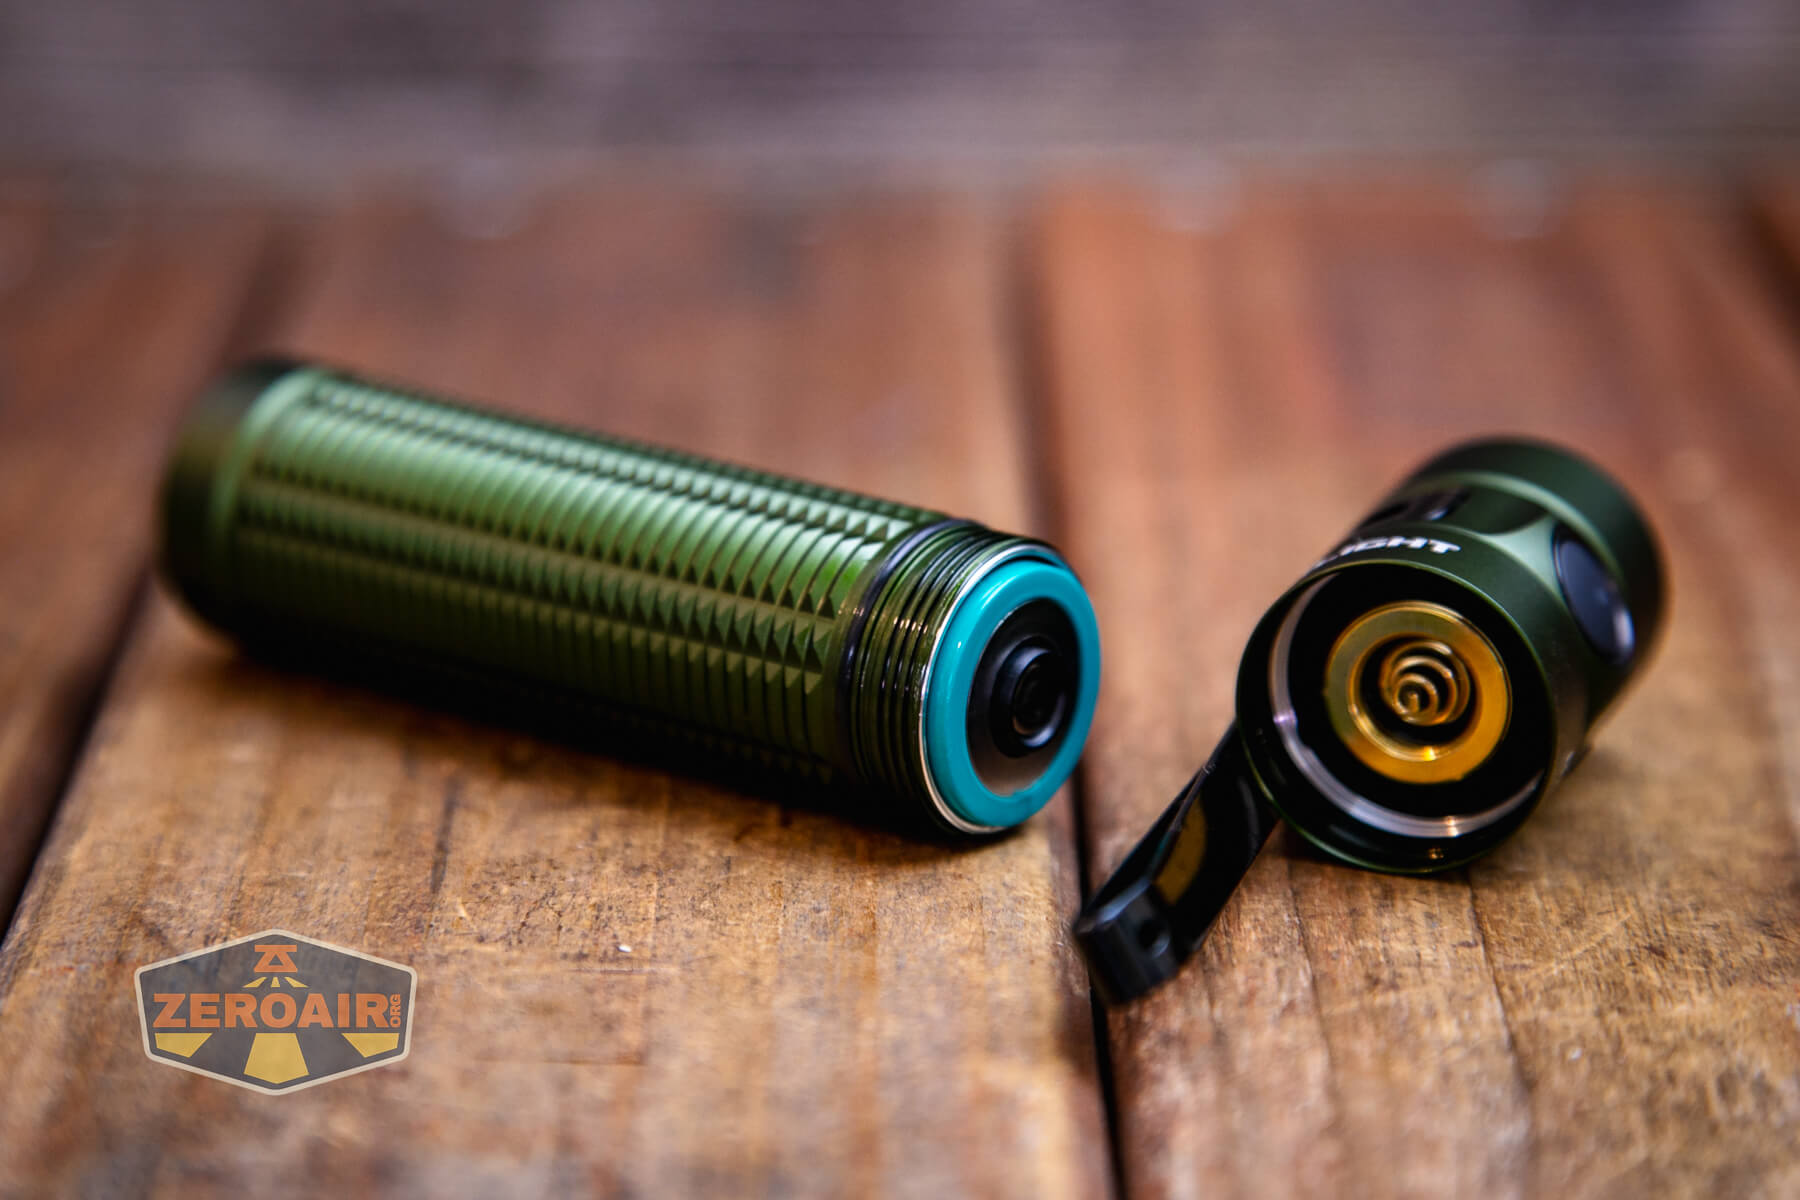
The Olight Baton 3 Pro Max flashlight is not all that much unlike the Baton 3 Pro. The obvious difference is that the Pro uses an 18650 and the Pro Max uses a 21700. That’s not the ONLY difference, though!


The threads are square-cut and adequately lubed. One thing, in particular, I like about the knurling is that it makes unscrewing the body very easy. There is no [removable] tailcap; to remove the cell, one must hold the head and unscrew the body.

There’s a spring on the head and tail. The tail spring(s?) are for electrical contact and aren’t in any way for impact resistance. The spring on the head is quite stiff, though, so it should provide a reasonable amount of impact resistance.

Size and Comps
Weight: Black / OD Green: 5.22 oz (148 g) (Including Battery); Desert Tan: 4.73 oz (134 g) (Including Battery)
Length: 4.49 in (114 mm)
Head Diameter: 1.02 in (26 mm)
Body Diameter: 1.02 in (26 mm)


If the flashlight will headstand, I’ll show it here (usually the third photo). If the flashlight will tailstand, I’ll also show that (usually in the fourth photo).


Here’s the test light with the venerable Convoy S2+. Mine’s a custom “baked” edition Nichia 219b triple. A very nice 18650 light.


Also above is the light beside my custom engraved TorchLAB BOSS 35, an 18350 light. I reviewed the aluminum version of that light in both 35 and 70 formats.
Here is the Baton Pro (left) alongside the Baton Pro Max. They’re very similar in look!


Retention and Carry
This light includes a pocket clip. The pocket clip has a specific place and orientation – just opposite the switch. This is a two-way clip, so technically could be carried bezel up or down, but the only reasonable way is really bezel up. Though the pocket clip is opposite the switch, I didn’t have any problems with accidental activation, and I didn’t tend to lock the light out.
The arms of this clip are much larger than in some older generations, too. This provides a very firm attachment!


The clip has a little hole, too, which is great for lanyard attachment. (Note: no lanyard is included.)

Olight provides this L-bracket with some 3-M adhesive so that you can store the light … in places. This is not a charging base, and a charging base can’t really be added to this. It’s simply a sticky metal bracket. I could do without this – I have plenty of metal around in the right places for this purpose, but if you really needed it somewhere very specific, I can see it being very useful.

Of course, the base of the Olight Baton 3 Pro Max flashlight is magnetic because of the way this light charges. But that magnetic base also serves as a great connection point for the Baton 3 Pro, too.


Finally, there’s a little velvet sleeping bag for when your Baton is so sleepy.

Power and Runtime
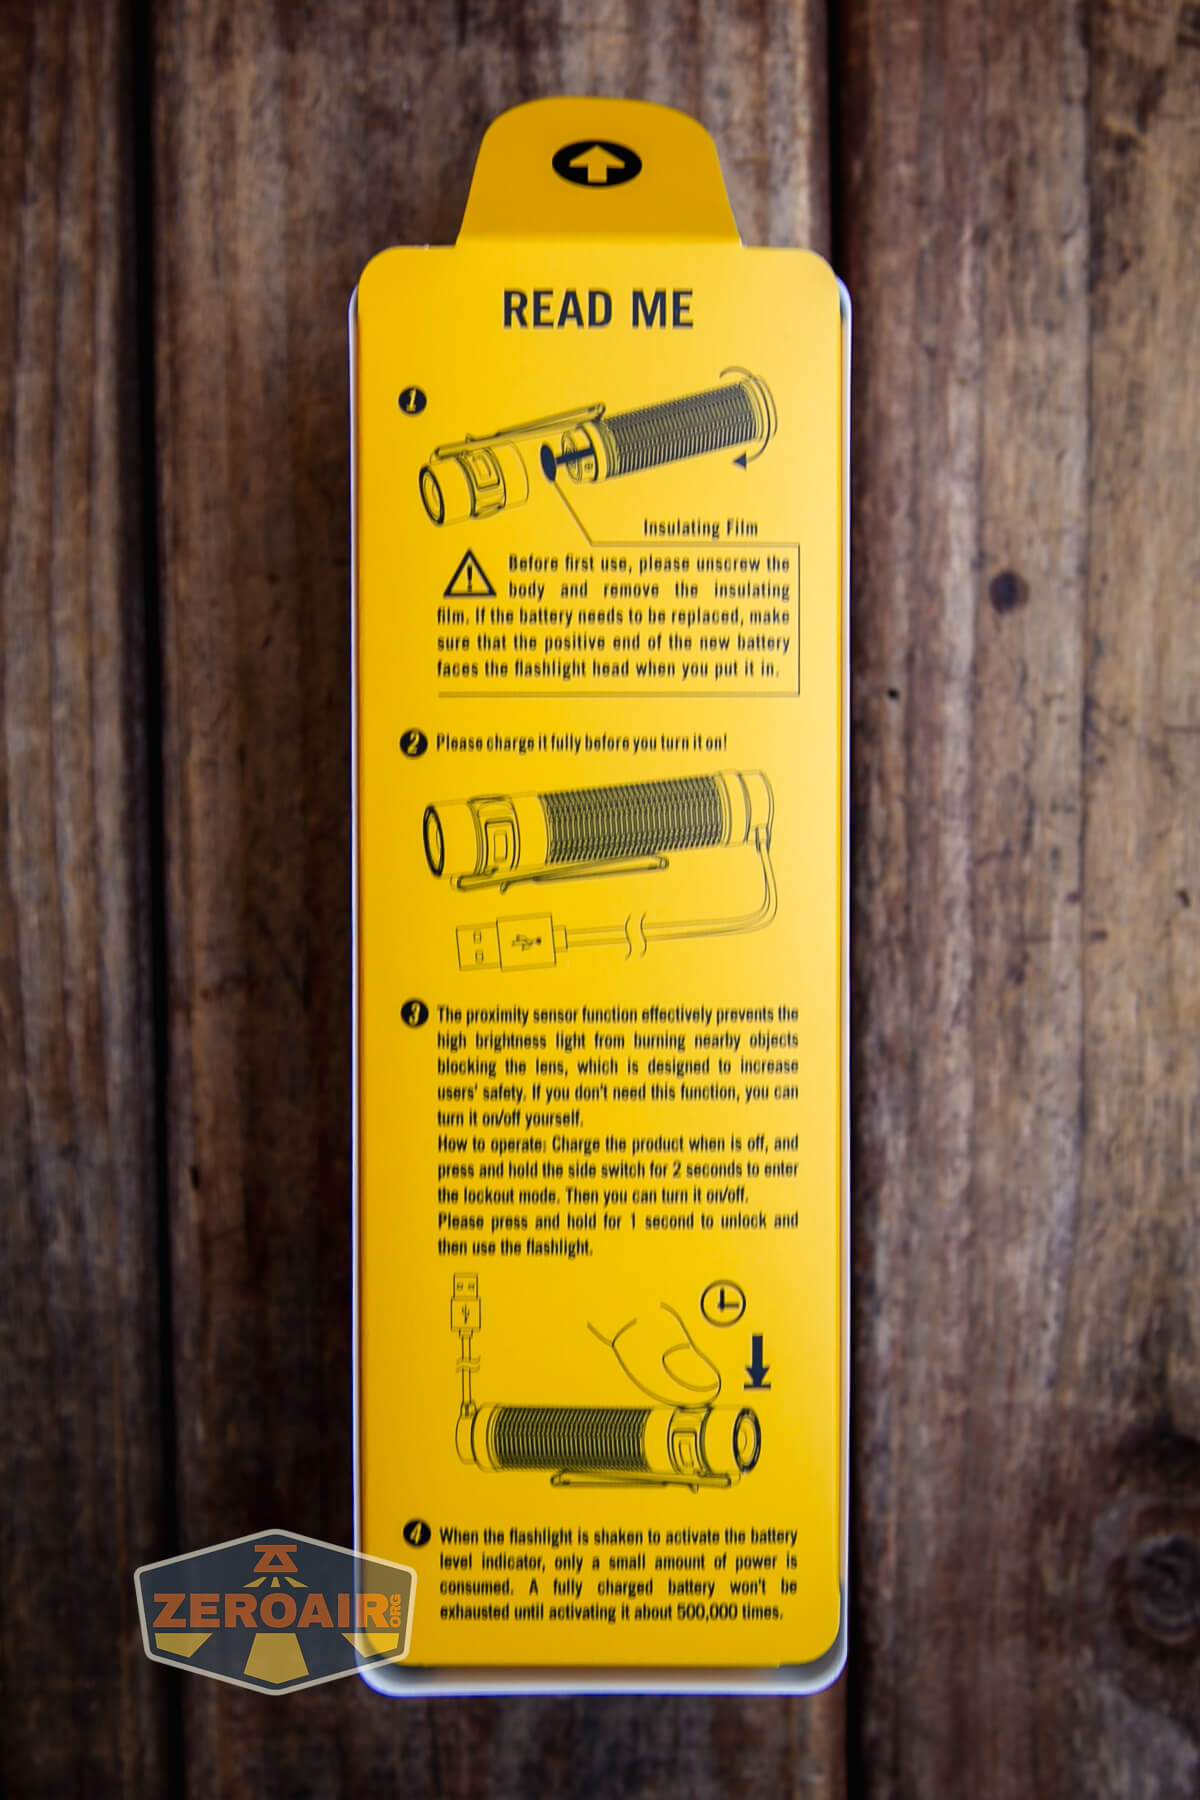
The Olight Baton 3 Pro Max flashlight includes a proprietary 21700. There are both positive and negative contacts on the positive end, (and only negative on the negative end). This facilitates onboard charging. These lights will not charge any type of cells except these specific Olight cells. 
Unlike the some other Batons, the cell on this Baton fits in the “normal” way – positive (button) toward the head. Despite that, 21700 button top 18650 cells will not work in this light.
Below you can see the runtime tests for the highest three levels. There is a sensor under the TIR optic that is intended to prevent pocket burns and things like that. While I find that to be less likely on this iteration of the Baton than on previous versions, it’s still possible. On the higher modes, the sensor will dim the output to the ~250 lumen range when there’s enough bounceback light. That’s something like the higher two or three modes and a distance of 8″-12″ or less… I didn’t really find this to get in the way of using the light, but I am pleased to say it’s possible to turn this sensor off during any session. More on that later. (Spoiler: double-clicking then double-clicking again disables the sensor until you turn the light off).


In every test, the Baton 3 Pro Max shut off when the cell voltage reads 0V. I don’t think the cell is zero volts, but more likely the protection has kicked in. Either way, charging resets it, and charging proceeds fine.
The switch does give an indication that the cell voltage is low.
Green: Cell voltage acceptable
Red: Cell voltage low
Red flashing: Cell voltage very low (stop using)
Charging
Like many other Olights, the Olight Baton 3 Pro Max flashlight uses Olight’s very common proprietary magnetic charging connector. The charging base on this light is just a charge base and doesn’t double as a two-stage switch as we see on a light like the Warrior Mini 2. This is an updated version though, and not metal on the back.


The charging base is the common Olight MCC, which can charge at 1A, 1.5A, or 2A.

Charging proceeds at well over 1A, and the 3200mAh cell is charged in around 4 hours. The charging base is red when charging, and green when not being used or the cell is “completely charged.” I noted in charge testing that the indicator on the charger would turn green before the trickle CV phase had stopped putting power into the cell.

I’m really not sure how long the light will go on “charging” at around 0.07A – that’s minimal, but when I let a charge cycle go overnight, it was still chugging along at 0.07A. (And that’s not simply the current used by the green light of the charger to indicate “complete” – that’s more like 0.0024A or something.) This residual charging doesn’t seem to be a problem, anyway (and doesn’t seem to overcharge the cell). I think the indicator turns green probably around that 205 minute mark (above).
Modes and Currents
| Mode | Mode Claimed Output (lm) | Claimed Runtime | Measured Lumens | Tailcap Amps |
|---|---|---|---|---|
| Turbo | 2500-800 | 1m-240m | 2159 | 6.70 |
| High | 800-120 | 243m-80m | 695 | 1.42 |
| [Stepdown output] | – | – | 330 | 0.59 |
| Medium | 120 | 23h | 107 | 0.18 |
| Low | 15 | 180h | 11 | 0.02 |
| Moon | 1 | 60d | 0.7 | ~ |
Pulse Width Modulation
Nothing really to mention here. None of the modes seem to be using PWM. That wave graph on the second to lowest mode is fun, though. The fourth photo below is the “stepdown” mode.


Here you can see a “baseline” – a chart with almost no light hitting the sensor. Then there’s the Ultrafire WF-602C flashlight, which has some of the worst PWM I’ve seen. It’s so bad that I used a post about it to explain PWM! Here are multiple timescales (10ms, 5ms, 2ms, 1ms, 0.5ms, 0.2ms) to make comparing this “worst” PWM light to the test light easier. That post also explains why I didn’t test the WF-602C at the usual 50us scale.
User Interface and Operation
The Olight Baton 3 Pro Max flashlight has an e-switch on the head end of the side of the body. The switch cover has a bit of texture and is proud enough that it’s easy to find. It’s also not so proud or soft that it will easily activate accidentally.As far as I can tell, this user interface is the same as previous Batons – the S2R Baton II, for example.

It’s an indicating switch, as I said above, too. It can indicate in green (seen below) and red. Also orange, as seen below.


The user interface is unchanged from the “historical version” of this light. Here’s a user interface table!
| State | Action | Result |
|---|---|---|
| Off | Click | On (mode memory)^ |
| On | Hold (release at desired mode) | Mode cycle (Moon, L, M, H) (no Turbo) |
| Off | Hold | Moonlight |
| Any | Double click | Turbo |
| Any | Triple click | Strobe |
| Strobe | Click | Off |
| Strobe | Hold | Previous Mode |
| Off | Long hold (past Moonlight) | Lockout |
| Lockout | Hold | Unlock to Moonlight |
| On | Click and Hold (quickly)^^ | Timer (Single blink: 3 minutes, Double blink: 9 minutes) |
| Timer | Click and Hold (quickly)^^ | Switch between 3- and 9-minute timers. |
| On, after proximity sensor has been triggered | Double Click | Disable the proximity sensor until the light is turned off |
| Off, while on charger | Long hold (>2s) | Lockout the light and iterate permanent disable of the proximity sensor |
^ Moon, Low, Medium, and High are memorized. Turbo is memorized as High.
^^ The manual states this as “Double click and hold” but I think “Click and hold” quickly. Any form of double click ends in Turbo or Strobe.
One more neat thing here is some sort of accelerometer that allows you to shake the light (or even picking up the light is maybe enough) to activate the battery sensor (details which were described above). This is neat!
LED and Beam
I’m not sure if Olight has stated it in the manual or product info but did officially state that this emitter is a Cree XHP50.3. It has a dome, too.

The emitter is coupled with a TIR and has a very floody beam shape.

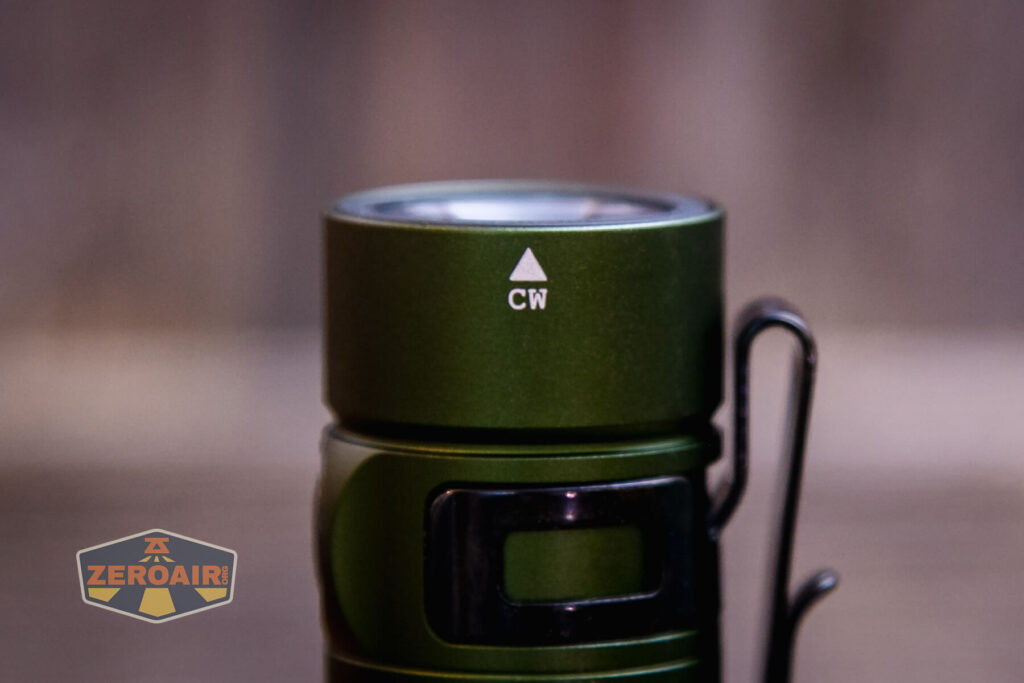
On the side of the head, as you can see below, the light is marked with “CW” and an arrow. On mine, this arrow in fact points to some text on the bezel that describes the emitter as 6500K. I guess this arrow always points to the corresponding CCT (as all three are labeled on the bezel) but I am not sure.


LED Color Report (CRI and CCT)
Around 6500K is approximately right for this emitter. The higher the output, the cooler it gets, though. Also the CRI is claimed to be 70, and that’s accurate too.


Beamshots
These beamshots always have the following settings: f8, ISO100, 0.3s shutter, and manual 5000K exposure. These photos are taken at floor level, and the beam hits the ceiling around 9 feet away.


Tint vs BLF-348 (KillzoneFlashlights.com 219b version) (affiliate link)
I keep the test flashlight on the left and the BLF-348 reference flashlight on the right.


I compare everything to the KillzoneFlashlights.com 219b BLF-348 because it’s inexpensive and has the best tint!
Conclusion
What I like
- Build quality is quite good
- The complete package includes charging and cell
- The user interface retains neat features from previous models, like the 3 or 9-minute timer
- Knurling makes for great in-hand feel and usage
- Pleased that both NW and WW are available!
- Timer feature is neat
- Proximity sensor can be disabled temporarily
- Shake’n Wake battery indicator sensor
What I don’t like
- Proprietary cells
- Low CRI
Notes
- This content originally appeared at zeroair.org. Please visit there for the best experience!
- For flashlight-related patches, stickers, and gear, head over to PhotonPhreaks.com!
- Please use my amazon.com referral link to help support zeroair.org!
- Please support me on Patreon! I deeply appreciate your support!
I had purchased the magnesium version earlier this month when they were on sale. Like you the reviewer, I found much I liked about the light including the larger battery and overall form factor. Unfortunately, the beam pattern is terrible compared to the mini warrior series. Very “bloody” to the point of being an almost naked LED in my opinion. All I could get was a “cool white” led as well which made CRI not so good. This combined with no tail switch capability the the mini warrior series caused me to send mine back. There are simply too many other competitors out there now who can hit the right recipe for me and at a lower cost. It’s a shame but I am hopeful Olight is watching and will also upgrade its mini warrior series to the 21700 platform soon.