
Imalent SR32 Flashlight Review
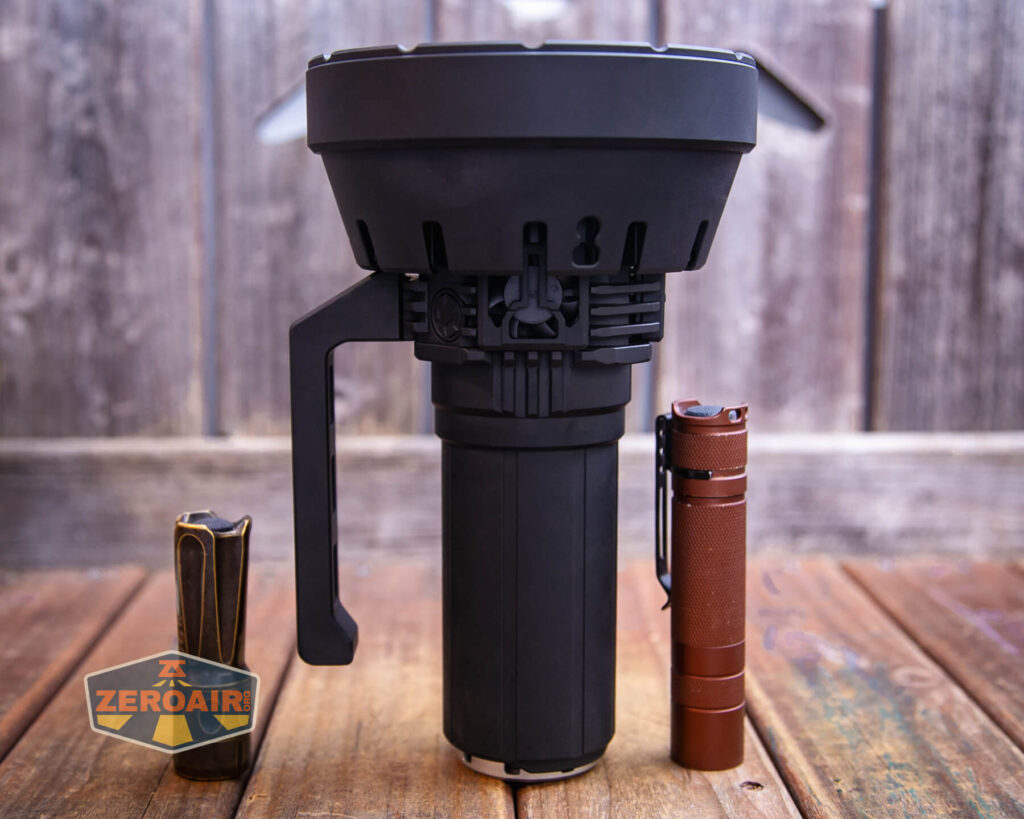
The Imalent SR32 is a flashlight that uses 32 Cree XHP50.3 HI (high intensity) emitters for high output and great throw. And Imalent switched to USB-C! Read on!
Official Specs and Features
Here’s a link to the Imalent SR32 flashlight product page.
Versions
There’s just one version of the Imalent SR32 flashlight.
Price
MSRP and current selling price of the Imalent SR32 flashlight is $679.95.
Short Review
Let me start with my favorite point about the SR32: the SR32 uses USB-C for charging! That’s a huge advancement for Imalent lights and I’m so happy to see it here. But not just that – the USB-C port supports fast charging (20V!) and also can be used as a powerbank (also with PD!). Besides that huge improvement, the SR32 also boasts higher output – in fact, it’s the brightest flashlight ever! Another point to make here is something you can read more about later, but the output is fairly neutral (and not incredibly cool white). That’s great too! All told, the Imalent SR32 flashlight is a big improvement over previous iterations, as well as just being awesome in general.
Long Review
The Big Table
| Imalent SR32 Flashlight | |
|---|---|
| Emitter: | Cree XHP50.3 HI (32) |
| Price in USD at publication time: | $679.95 |
| Cell: | Internal |
| Runtime Graphs | |
| LVP? | Yes |
| Switch Type: | E-Switch |
| Quiescent Current (mA): | ? |
| On-Board Charging? | Yes |
| Charge Port Type: | USB-C |
| Charge Graph | |
| Power off Charge Port | |
| Claimed Lumens (lm) | 120000 |
| Candela per Lumen | 11.36 |
| Claimed Throw (m) | 2080 |
| Candela (Calculated) in cd (at 30s) | 26600lux @ 5.899m = 925632cd |
| Throw (Calculated) (m) | 1924.2 (92.5% of claim)^ |
| Claimed CCT | – |
| Measured CCT Range (K) | 5500-6000 Kelvin |
| Item provided for review by: | Imalent |
| All my Imalent reviews! | |
^ Measurement disclaimer: Testing flashlights is my hobby. I use hobbyist-level equipment for testing, including some I made myself. Try not to get buried in the details of manufacturer specifications versus measurements recorded here; A certain amount of difference (say, 10 or 15%) is perfectly reasonable.
What’s Included

- Imalent SR32 flashlight
- Shoulder strap
- Charge cable (USB-C to USB-C)
- Spare o-rings (4 – 2 types)
- Allen/HEX drivers (2)
- Replacement screws (2)
- Wall wart (Wall plug to USB-C x2, USB x2)
- Manual
Package and Manual

This light ships in a box, but inside the box is this case. It’s a nice case, and will make for great storage and protection of the Imalent SR32 flashlight.

I think this is a step better than the carry case of the MS18W (which I have reviewed). It feels higher quality.


Build Quality and Disassembly

This is a big light! Not just big and weighty, but also – check out how huge the head is. A lot of room is required for housing 32 emitters.


It’s quite fantastic to view. There are three fans, and they seem to suck air in one side and over what’s essentially a radiator (which you can sort of see above) and blow the hot air out the other side.
Imalent carries on the tradition of having this metal (probably stainless) screw-down cover over the tail end of their bigger lights. I like it – it’s robust, replaceable, and also adds functionality. Specifically, it helps hold the charge port cover in place as well as offering shoulder strap attachment points.

There’s minimal printing on the SR32, but that does include this HOT label on the bezel. The light does get hot!

I didn’t take the light apart much. You’ll have to take the battery pack off the light at least once because the shipping separator must be removed for using the light. After that, you may never even have to remove the battery. It takes a lot of turns to get the battery out of the head. Also, the seal is pretty snug, so there’s a bit of a seal, too.

Size and Comps
Product Size: 138mm (head diameter) x 56mm (body diameter) x 225mm (length)
Net weight: 2166g (battery included)


If the flashlight will headstand, I’ll show it here (usually the third photo). If the flashlight will tailstand, I’ll also show that (usually in the fourth photo).

It’s not a small light and there’s no super great way to show it at arm’s length distance. However, despite being big, it does seem quite manageable. At least in a “look how many lumens I’m getting” to “how big this light is” ratio way, it’s manageable.

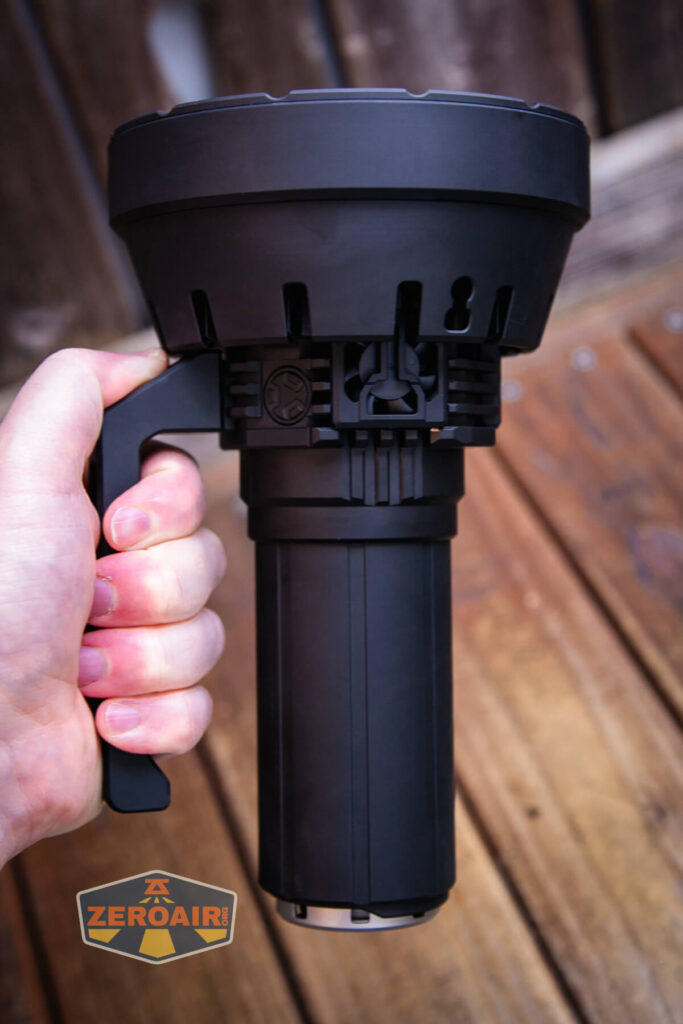

Here’s the test light with the venerable Convoy S2+. Mine’s a custom “baked” edition Nichia 219b triple. A very nice 18650 light.

Also above is the light beside my custom-engraved TorchLAB BOSS 35, an 18350 light. I reviewed the aluminum version of that light in both 35 and 70 formats. I also reviewed that specific edition, the “Oveready BOSS FT Collector Vintage Brass” 35. I love it!
Retention and Carry
Only one means for carrying the Imalent SR32 flashlight is intended. That’s the shoulder strap, which attaches to two specific points on the light. First is this loop in the head.

The other loop is in this removable tailcap. The tailcap must be removed for charging, too, which is important.

The included shoulder strap isn’t a cheap or trivial piece of equipment. It’s very sturdy.

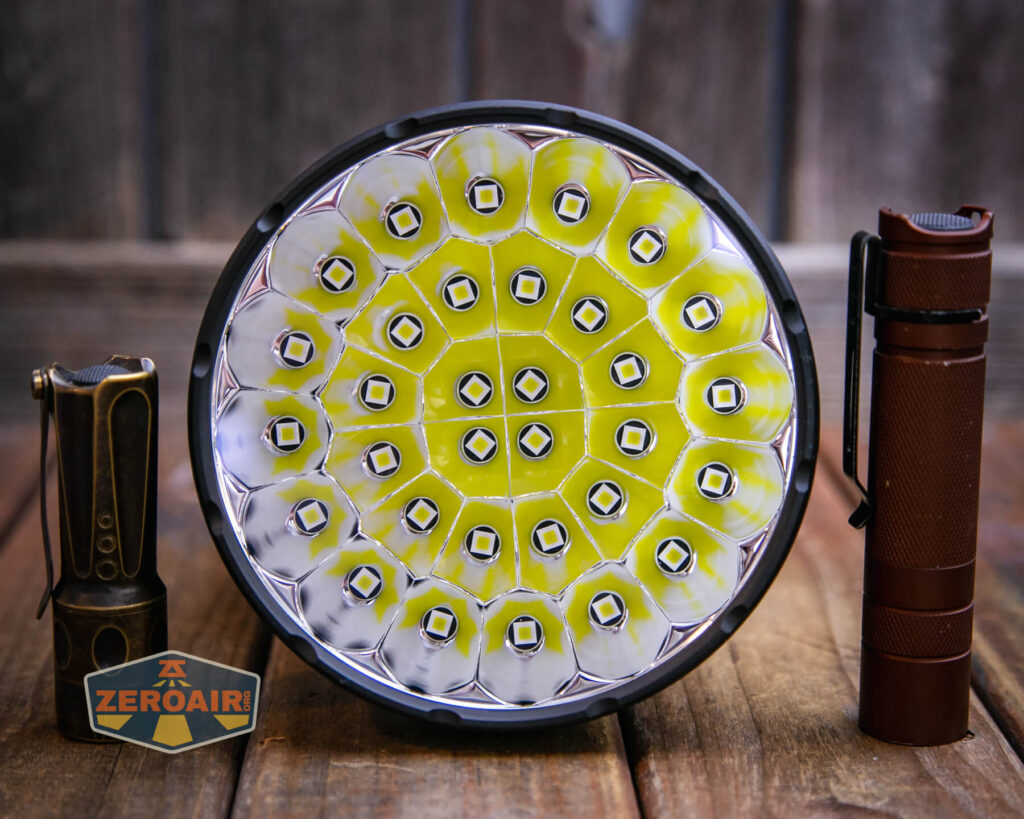
Also included is a handle. The handle is removable – there are just two machine screws holding it in place. A tool is included for removing those, too. The handle is not a dumb handle – it has electronics! There’s an e-switch on the side. When holding the light in your right hand, the switch is on your right thumb.

The handle is a big improvement over what was offered on the MS18W. One of my wishes was for that light to have a handle… and now we have it on the SR32. The SR32 seems better in every way!
Power and Runtime
A battery pack powers the Imalent SR32 flashlight. This is included with the purchase. I believe it’s probably like the MRB217B from other big Imalents: an 8×21700 3.6v 92.2Wh battery pack. The “3.6V” shown on the tailcap does not indicate the battery pack voltage. I think that just means that the 8 individual 21700 cells are 3.6V (duh, right?). I believe this is a 4s2p setup, which accounts for the charged voltage of around 16V.
I don’t see this battery pack available on Imalent’s site yet, but I expect they’ll offer it.
Below are a number of runtime tests. My calibrated setup is not calibrated for a light with a head this big, so I’ve accepted Imalent’s claim and made the graphs according to their claim. This is not the ideal way, probably but to be perfectly honest, at such high outputs the difference in what you experience is probably minimal anyway. What’s more likely fact is that the stepdown claim to 25,000 lumens is probably more definitely accurate and I could have set the stepdown (say, 10 minutes into the highest three levels) to 25,000 lumens and let the top end fall where it may. That would actually pull the Turbo output up some in the graph below, as well as pulling High up fairly dramatically. The bigger picture is probably simply how the light works on these outputs, and the graphs demonstrate that adequately.

One fact you can pick up here as well as the graphs below is that when the light (output) shuts off, the fans also shut off. Measuring the temperature on the bezel of the SR32 wasn’t ideal – I couldn’t find a point that really represented how hot the light felt. It definitely gets hot. In fact, on Turbo, heat straight out the front can be felt probably 3 feet away. It’s pretty incredible. Once the light (and thus the fans) turn off, the heat does rise. This could be something to be mindful of. It’s possible to run the fans with the light off, too. When off, hold the switch for 3 seconds. (Though I did fail to test if this works when the light has shut off due to low battery power.)


This “Mid-Low” output 0f a claimed 9000 lumens is the highest output that doesn’t automatically turn on fans. You can see the light gets hot!! And also with this knowledge, infer what a good deal of work the fans do on higher modes.

The Imalent SR32 flashlight shuts off with low voltage protection.
Charging
A charge port is built into the battery pack. The charge port is covered by this screw-down metal ring. Removing that ring reveals a press-in rubber cover over a USB-C charging port. Again, congratulations to Imalent for moving to USB-C!


Beside the charging port is an indicator led. When charging, this indicator is red. When charging is complete, this indicator turns green.
A wall wart is included. It’s a “100W” power brick that plugs directly into the wall.

On the backside are four ports – two USB and two USB-C. These USB-C ports are different – one is “PD30W” and one is “PD100W.” Imalent recommends using the PD100W for charging the SR32. Either – in fact, any – of those will work but charging will be quickest (and it’s quick indeed!) with the 100W port.

An appropriate cable is included – it’s USB-C to USB-C. It’s a very nice cable, too.

Unfortunately on every test that ran at 20V the logging system crashed. I could never isolate any issue, but the issue was entirely with logging – charging with the provided wall wart in the recommended bay proceeded at 60W (20V) and was quick. Imalent claims 90 minutes and while I didn’t claim it, that feels about like what I experienced.
Here’s a charging log from some other wall wart at 9V. One interesting thing that I note here (below) as well as when using the Imalent charger is that charging doesn’t trickle off. It seems to be all CC and no CV phase. That’s maybe unusual but not at all “necessarily wrong.” The final charged voltage was around 16.8V, which makes sense for a 4s2P battery pack.

Powerbank
Another bonus we get thanks to the switch to USB-C charging is that this USB-C port can be used for output too! It’s a very capable powerbank, being able to output over 3A at 5V for hours. It’s even better than just that, too – it can

The graph above is my “stress testing” of the system. Below is the same graph, but at a current I settled on that’s stressful enough but within the proper voltage output range. Once the output shuts off (around 360 minutes), it can come back on briefly, but after that, it’s off for good. This is around 12V, just like during runtimes.

Modes and Currents
Because of my calibration setup as well as my amperage testing setup, I’m not terribly comfortable reporting measured values here. So the table below is just manufacturer specifications.
| Mode | Mode Claimed Output (lm) | Claimed Runtime |
|---|---|---|
| Turbo | 120,000-25,000 | 45s+45m |
| High | 50,000-25,000 | 60s+50m |
| Mid-High | 25,000 | 55m |
| Mid-Low | 9,000 | 2h |
| Low | 4,500 | 4h25m |
| Low | 1,500 | 15h |
| Moonlight | 30 | 360h |
Pulse Width Modulation
Surprisingly, we see PWM on every single mode all the way up to and including Turbo, (with a possibly exception of “Mid-High.”) The PWM is fast and I can’t even notice it, so it’s nothing to worry about.
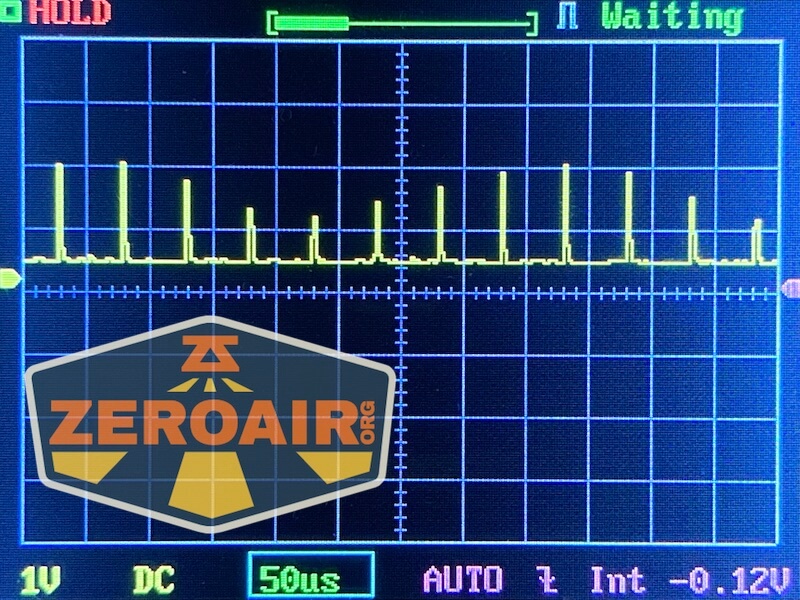


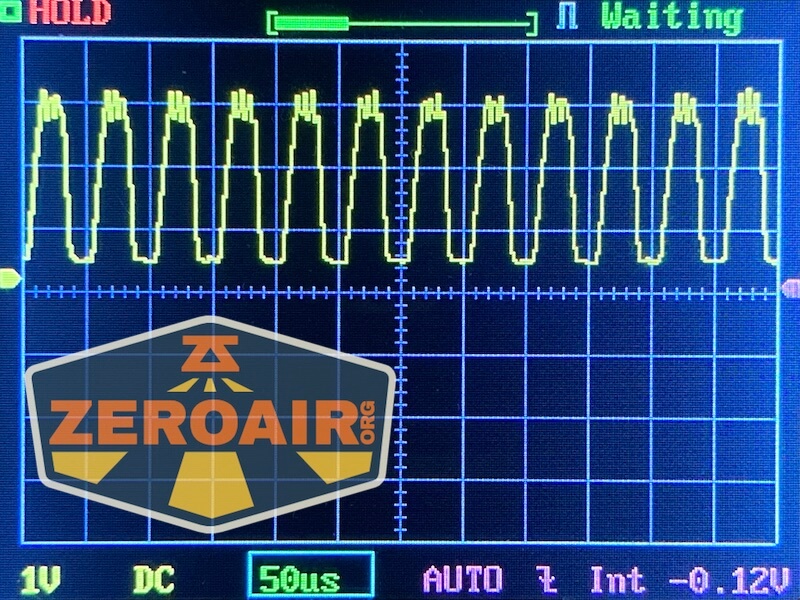

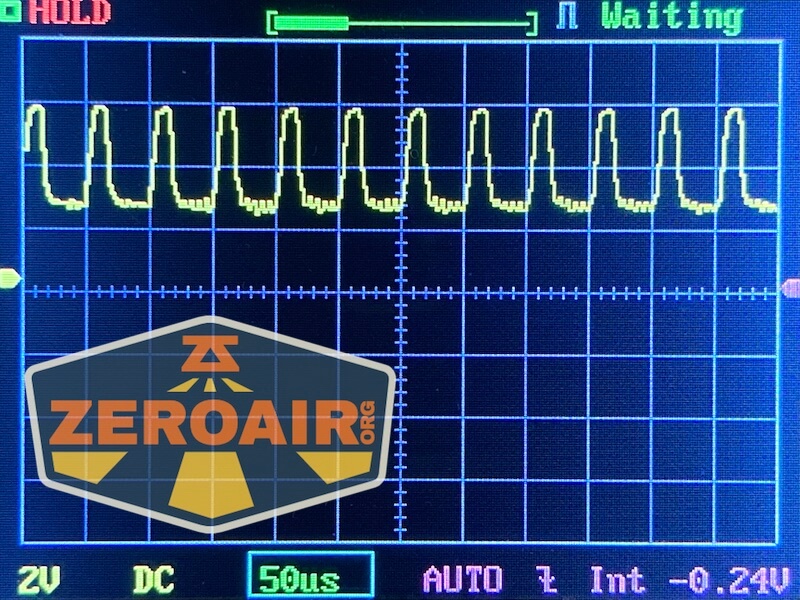

Here you can see a “baseline” – a chart with almost no light hitting the sensor. Then there’s the Ultrafire WF-602C flashlight, which has some of the worst PWM I’ve seen. It’s so bad that I used a post about it to explain PWM! Here are multiple timescales (10ms, 5ms, 2ms, 1ms, 0.5ms, 0.2ms) to make comparing this “worst” PWM light to the test light easier. That post also explains why I didn’t test the WF-602C at the usual 50us scale.
User Interface and Operation
I haven’t mentioned it til now (most of the comparisons here are to the MS18W only), but the SR32 is most like the SR16. That includes not just the emitter array and massive output, but also the user interface and e-switch handle. I reviewed the Imalent SR16 a while back.
There are two switches on the Imalent SR32 flashlight. Surprise! They are both e-switches and very much like many other similar Imalent flashlights. First is the head e-switch. The switch is “textured” and has a nice positive clicky action.

The action is very low. This switch can be rotated too. Not that you’d ever need to or that it serves any purpose to do that, but you might find it rotating under your finger, and be surprised by it. It doesn’t hurt anything, though (and it doesn’t unscrew).

Next up is this e-switch on the handle. Functionally, it’s exactly the same as that other switch. When the light is held in your right hand, the switch falls in the perfect spot to be hit with the inside of the right thumb. It really is set up perfectly.
The flip side is that it might not be perfect for lefties, but with the right grip, the switch is about right for left index finger usage.

Here’s a user interface table!
| State | Action | Result |
|---|---|---|
| Off | Click | On (Mode Memory (excluding Turbo/Strobe) |
| On | Click | Off |
| On | Hold | Mode cycle (lower to higher order) |
| Off | Triple Click | Battery check (Battery voltage is displayed on OLED screen)^ |
| Any | Double Click | Turbo |
| Turbo | Double Click | Strobe |
| Off | Hold 3s | Manually turn on (or off) the cooling fans |
| Off | Click 4x | Iterate Lock (indicated by switch indicator light blinking a few times) |
^ This is a change from what I have written for the SR16. It’s a change I don’t like because it means there’s no shortcut to low! I’ll check the SR16 to confirm I have that text right.
LED and Beam
The Imalent SR32 flashlight are Cree XHP50.3 HI emitters, and there are thirty-two of them.

It’s really a huge amount of emitters. Just massive. I think Imalent really does this type of emitter array right, though. Makes for great photos!

The lens seems to have AR coating.
Pleasantly, the bezel has a bit of a shape, so light escapes when headstanding. You won’t want to do this on anything other than Moonlight or Low, though, unless you like 32 emitter-shaped burn marks on your surface.


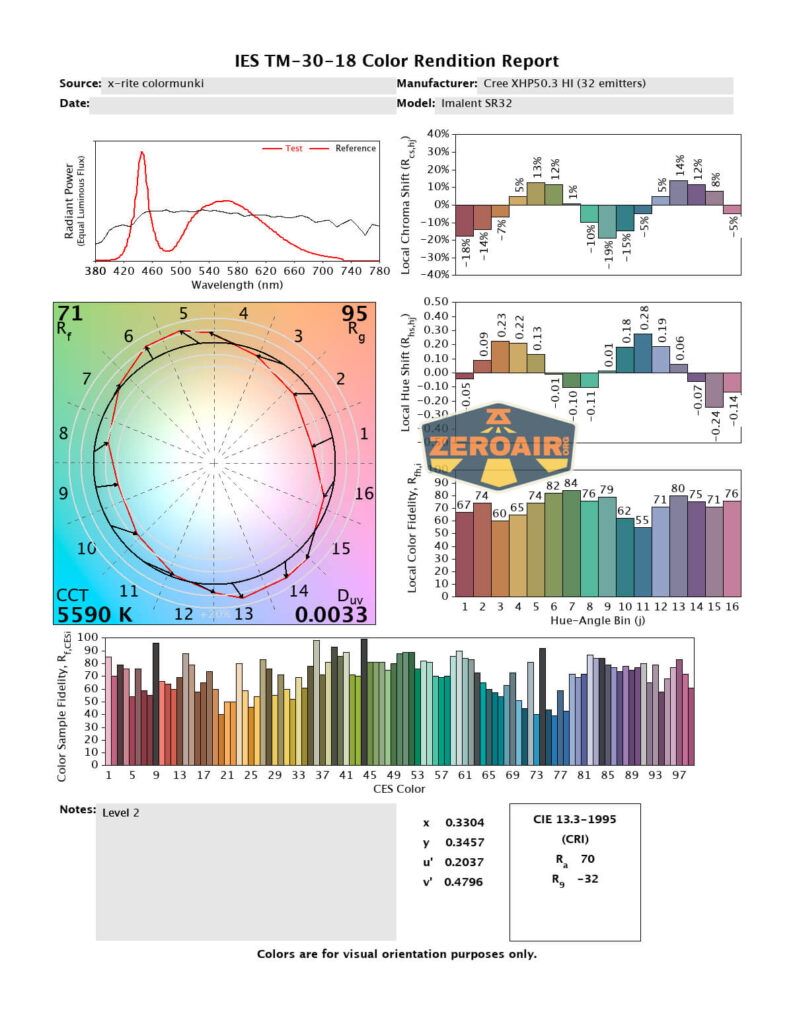
LED Color Report (CRI and CCT)
This light is so bright that on Turbo my sensor was saturated. But below, you can see the lowest 6 modes. I’m pleasantly surprised that the CCT here is in the neutral to cool range (and not the cool to cold range). 5500K to under 6000K is absolutely acceptable! CRI is low at around 70. That’s not a surprise, though.


Beamshots
These beamshots always have the following settings: f8, ISO100, 0.3s shutter, and manual 5000K exposure. These photos are taken at floor level, and the beam hits the ceiling around 9 feet away.


Tint vs BLF-348 (KillzoneFlashlights.com 219b version) (affiliate link)
I keep the test flashlight on the left and the BLF-348 reference flashlight on the right.
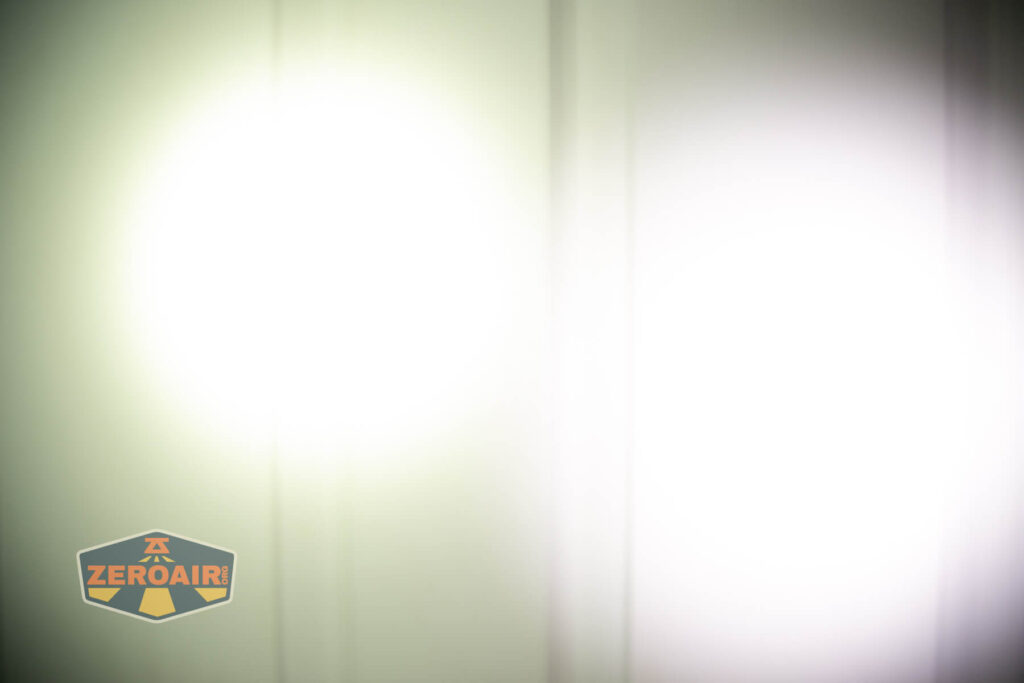


I compare everything to the KillzoneFlashlights.com 219b BLF-348 because it’s inexpensive and has the best tint!
Conclusion
What I like
- USB-C charging!!
- USB-C port can be used as powerbank
- Great handle!
- Massive output
- Simple (and Imalent-consistent) user interface
- Shortcut to low (triple click)
- Impressive throw
- Fans are built-in and not attached via a “heat shield”
- Fan control is automatic (but can be controlled manually, too!)
- Very high sustained output levels
What I don’t like
- Low CRI
- Light can get hot
- No direct access to lowest level
Notes
- This content originally appeared at zeroair.org. Please visit there for the best experience!
- For flashlight-related patches, stickers, and gear, head over to PhotonPhreaks.com!
- Please use my Amazon.com referral link to help support zeroair.org!
- Please support me on Patreon! I deeply appreciate your support!
Excelent break down of this flashlight. Where can I geta relacement charger?
I don’t know of a reason any USB-C charger wouldn’t work.