
Convoy S2+ B35AM Flashlight Review
The Convoy S2+ B35AM flashlight is a light you should own. It’s an 18350 or 18650 light with many emitter options. The Nichia B35AM excels with very high CRI!
Official Specs and Features
Here’s a link to the Convoy S2+ B35AM flashlight product page.
Versions
An “old version” of the Convoy S2+ exists. It has different threads from this current revision. Of the current revision (with better threads!) there are a ton of colors and emitters. There are even metal variants, including this Convoy S2+ B35AM flashlight flashlight in aluminum, brass, and copper. All sorts of emitter options are available, too!
There are a few driver options, too! This test covers specifically the “6V 2A boost 12 group” driver.
Price
I paid around $21 for the Convoy S2+ B35AM flashlight. Price can fluctuate a bit but it’ll be around $20. You should add a 18650 to the order. Grab the 18350 tube, too!
What’s Included

- Convoy S2+ B35AM flashlight
- Lanyard
- EVE 18650 (additional purchase)
I also added a separate purchase of this lighted switch. They don’t cost much (looks like around $2) and it’s a fun thing to add to the Convoy S2+ B35AM flashlight.

Package and Manual

The Convoy S2+ B35AM flashlight gets an old-style Convoy box. I’m not sure why that is. No manual, as with the other models.
Build Quality and Disassembly
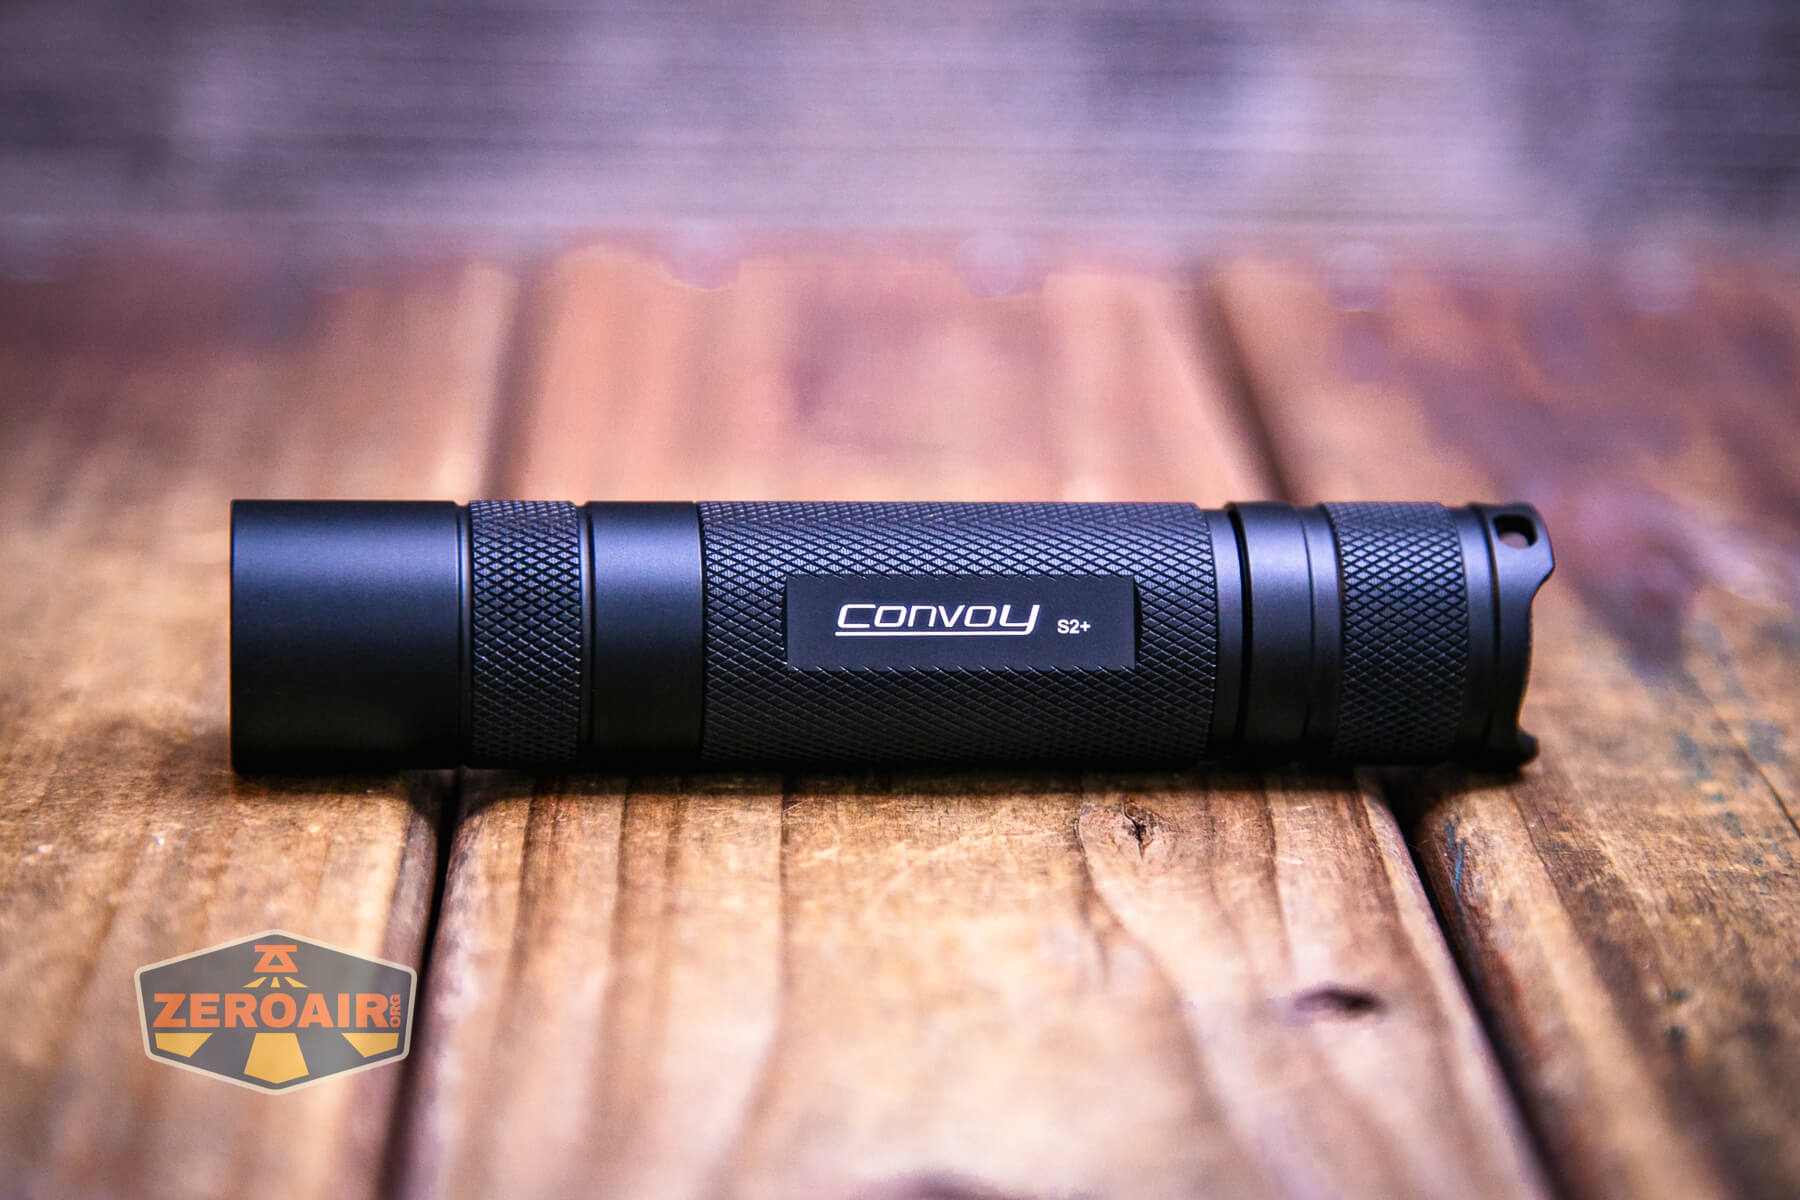
Convoy is very highly regarded by flashlight enthusiasts for having great build quality and low prices. This Convoy S2+ B35AM flashlight is no exception. I bought this version specifically to see the Nichia B35AM emitter. More on that down below, of course.
Yes, I’ve tested the Convoy S2+ before (a few times, actually) and even once in an orange color. Recently, I tested a personal favorite: brass! But if nothing else, maybe you’ll be interested in the B35AM testing. I would say that’s specifically why I am testing this whole light.


Both head and tail come off the light. The tail parts are held in place by a brass retaining ring.

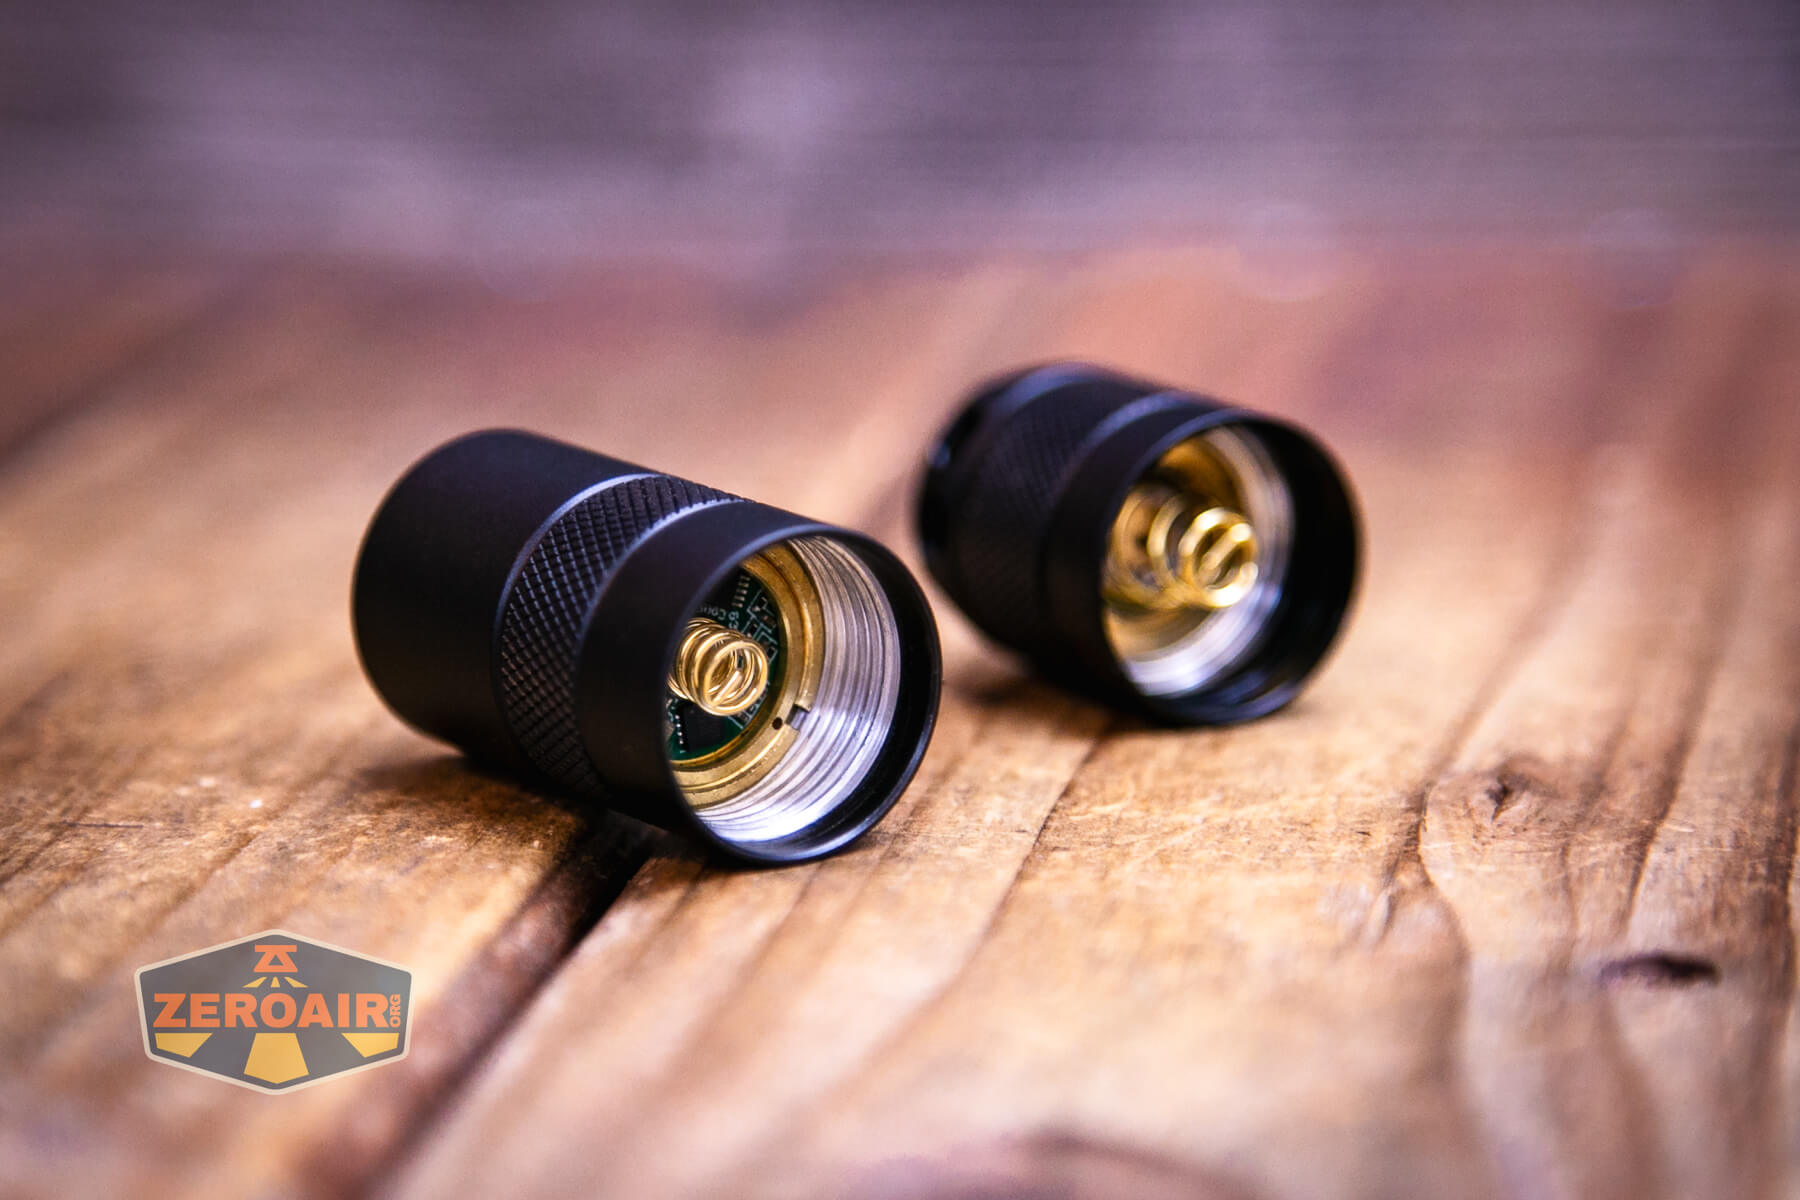
Both head and tail have big ol’ beefy springs.
The cell tube is fully removable. The head end (left) has unanodized threads. The tail end has anodized threads. This cell tube is reversible.

Size and Comps
Length: 118.9mm
Width: 24.1mm


If the flashlight will headstand, I’ll show it here. If the flashlight will tailstand, I’ll also show that here too!

Here’s the test light with the venerable Convoy S2+. The version below is a custom laser-engraved Convoy S2+ host by GadgetConnections.com. I did a full post on an engraved orange host right here! Or go straight to GadgetConnections.com to buy your Convoy S2+ now!

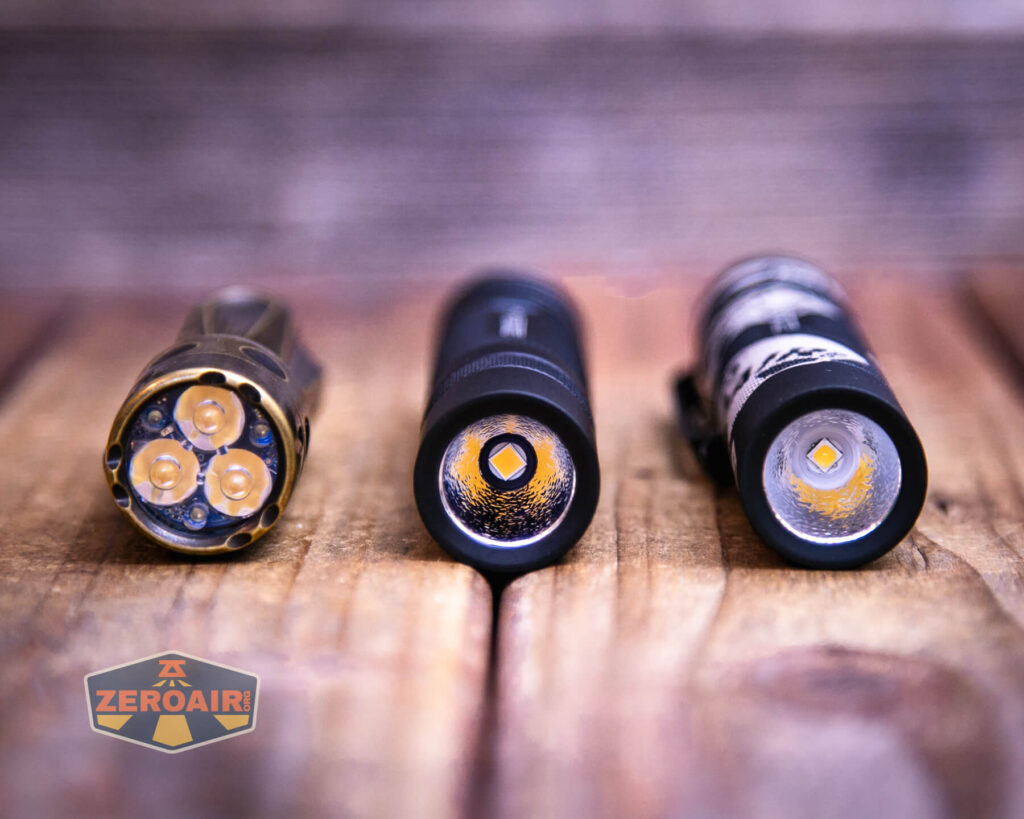
Also above is the light beside a TorchLAB BOSS 35, an 18350 light. I reviewed the aluminum version of that light in both 35 and 70 formats. I also reviewed that specific edition, the “Oveready BOSS FT Collector Vintage Brass” 35. I love it!
Retention and Carry
There are three main ways to carry the S2+. The first is a pocket clip, which requires a separate purchase. I happened to have a few on hand. You should be sure to buy one (or a few) with the light!

Two clip types are available. There’s a friction fit clip, as seen above. This can fit in a few places on the tail end of the light. All provide “fairly deep” carry. There’s also a screw-in pocket clip, which I do not prefer. That clip attaches through the lanyard holes on one side of the tailcap.

Included with this purchase is a lanyard. The lanyard fits through the same two holes on the tailcap where the clip can be installed. Note that the holes are only on one side of the tail, so the lanyard and screw clip can’t be used together unless actually attaching the lanyard to the clip. I don’t know if the clip will withstand that type of use, though (it’s fairly thin).

This lanyard is the “simple” variety, and that’s fine. I never use lanyards anyway!
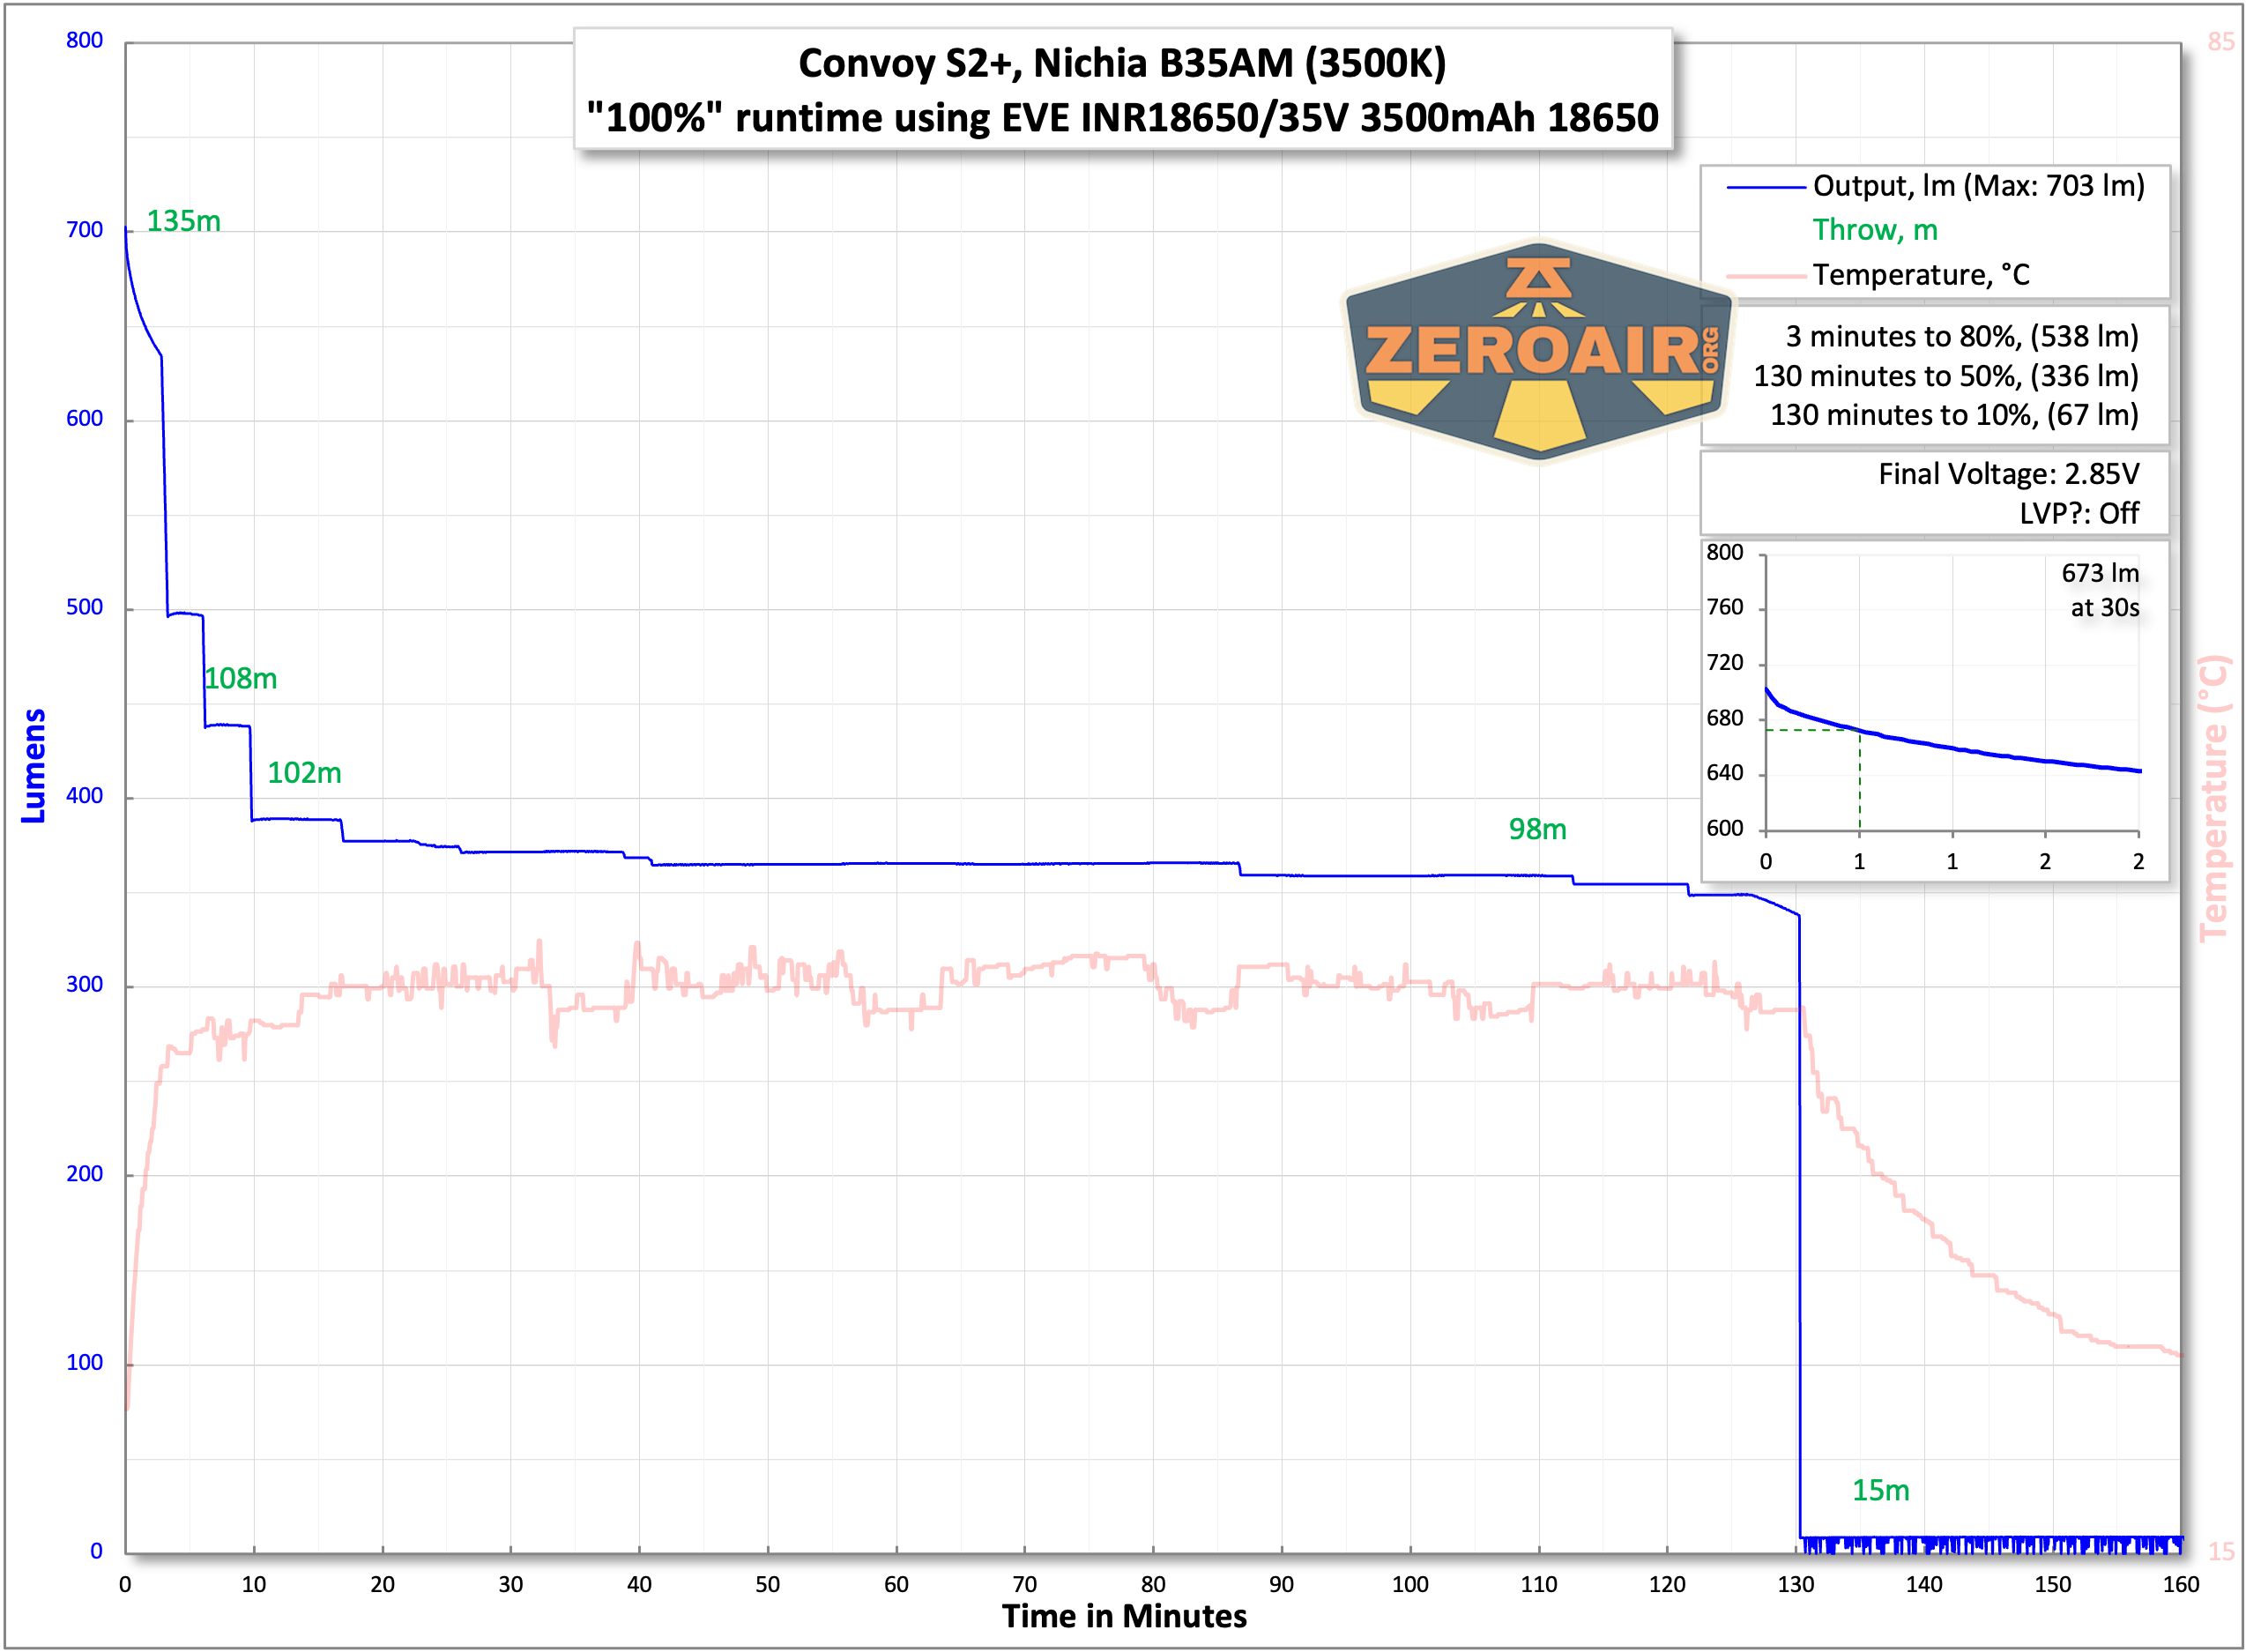
Power and Runtime
The Convoy S2+ is powered by a single lithium-ion cell. The default tube supports a single 18650 cell. The accessory tube supports a single 18350 cell. The long tube is not suitable for two 18350 cells!
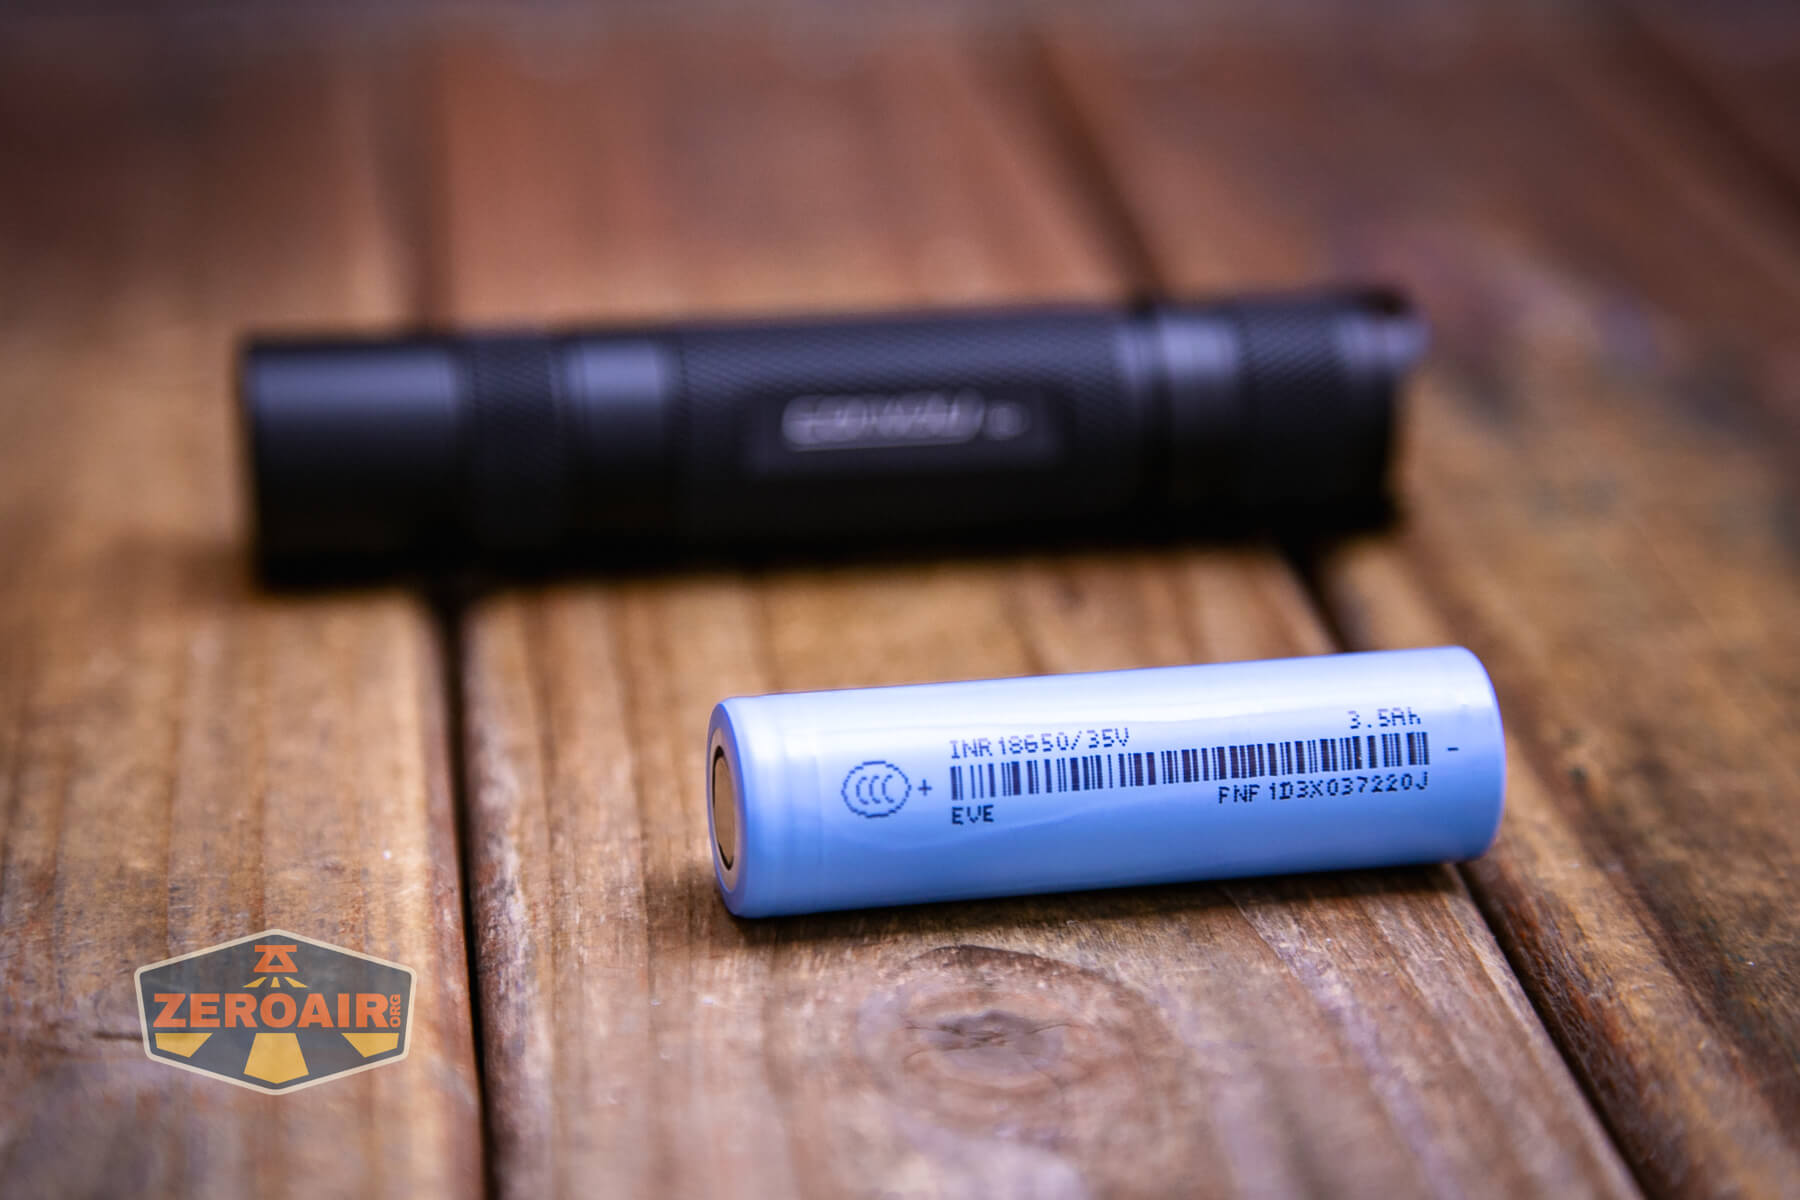
The cell goes into the light in the normal direction – positive end toward the head.

Here are a number of runtimes for the 18650 setup. The light does have low voltage protection. This performance is very typical of the Convoy S2+ 12-mode driver.
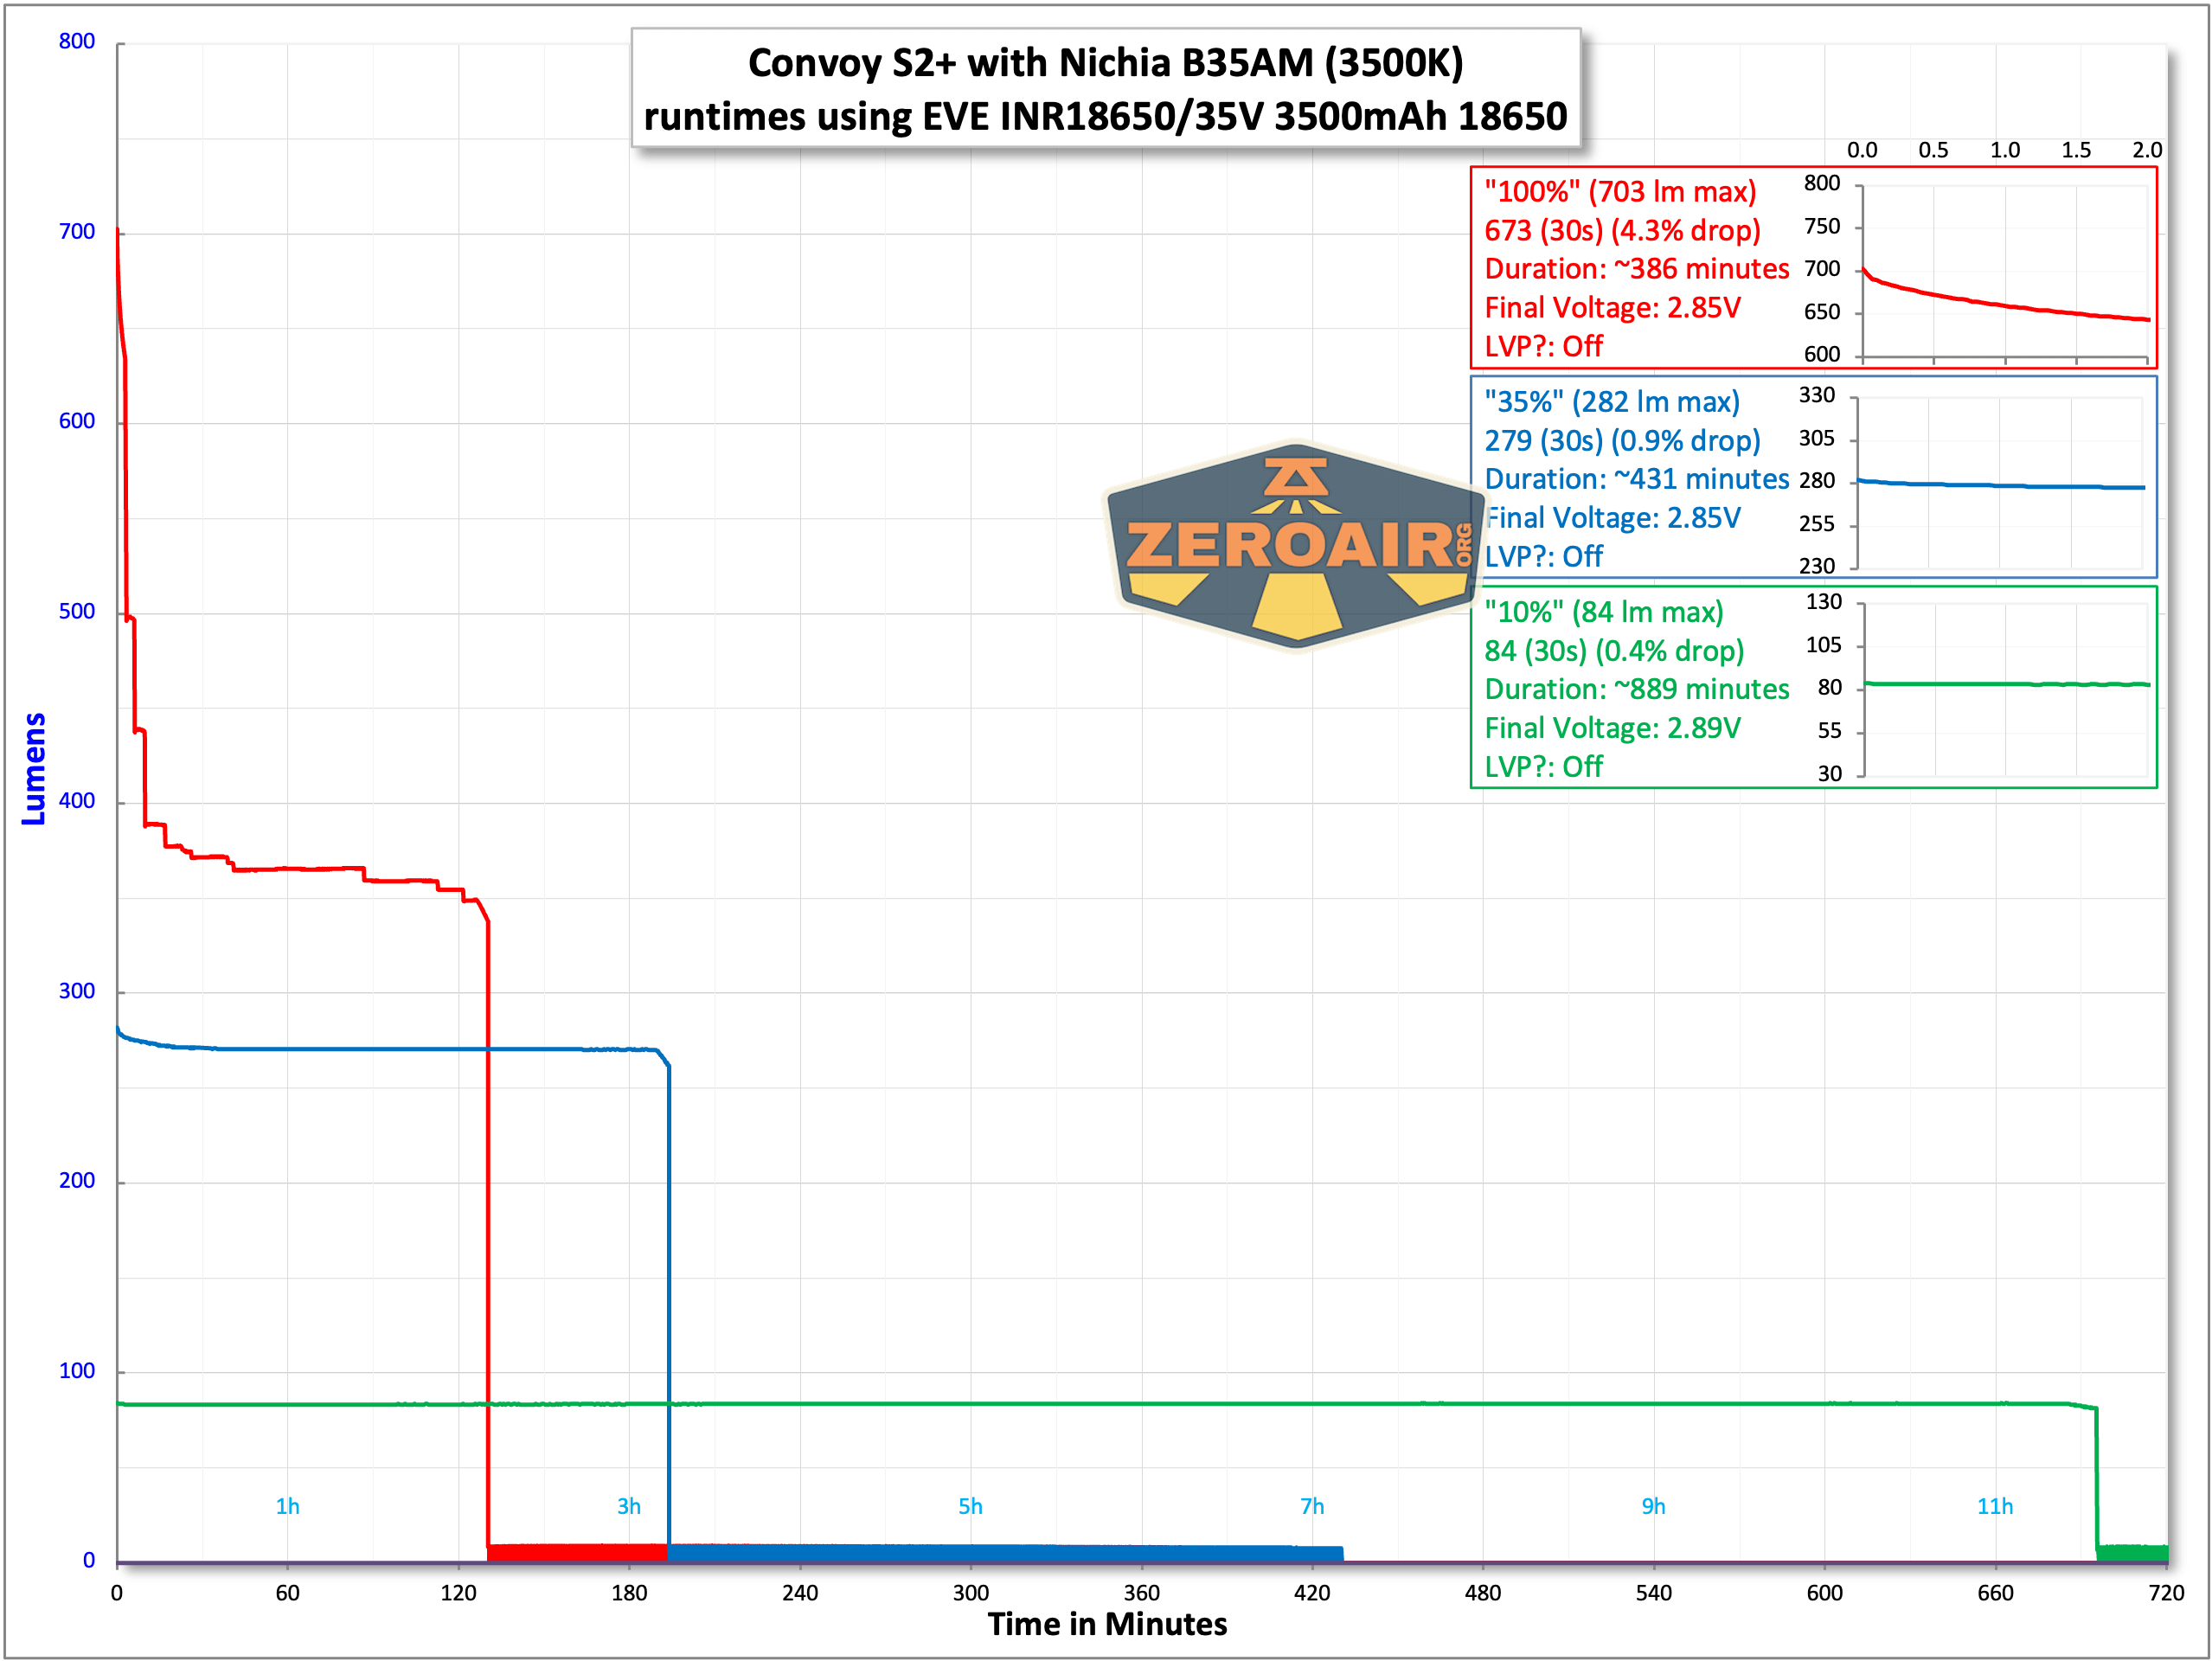


Modes and Currents
| Mode | Mode Claimed Output (lm) | Claimed Runtime | Measured Lumens | Tailcap Amps |
|---|---|---|---|---|
| 100% | – | – | 703 (0s) 673 (30s) |
2.60 |
| 35% | – | – | 282 (0s) 279 (30s) |
0.83 |
| 10% | – | – | 89 | 0.22 |
| 1% | – | – | 8.6 | 0.01 |
| 0.1% | – | – | 1.4 | [low] |
A quick note about this driver – it’s the 6V (which the Nichia B35AM requires) and 2A version. The tailcap amp measurement does peak at around 2.6A on 100% output. Since the input is at 4.2V, we can do the math about what current the emitter sees: 4.2V*2.6A = 10.92W. But since the driver does the magic to get 6V output for the emitter, 10.92W/6V= 1.82A, and that’s assuming the driver is perfectly efficient (which is unlikely). In the past, some Convoy lights with this emitter used a higher current driver, and the emitter might smoke (or burn up!). But that seems to be fixed in the purchase options. So check that you have a low current driver, but Simon seems to have the store set up correctly now anyway.
Pulse Width Modulation
This version of the S2+, unlike some previous versions, does not seem to use PWM!

Here you can see a “baseline” – a chart with almost no light hitting the sensor.
Then there’s the Ultrafire WF-602C flashlight, which has some of the worst PWM I’ve seen. It’s so bad that I used a post about it to explain PWM! Here are multiple timescales (10ms, 5ms, 2ms, 1ms, 0.5ms, 0.2ms) to make comparing this “worst” PWM light to the test light easier. That post also explains why I didn’t test the WF-602C at the usual 50us scale.
User Interface and Operation
There’s a single switch on the Convoy S2+ B35AM flashlight. This is a reverse mechanical clicky. A reverse clicky has the benefit of allowing mode changes while the light is on. But this also means that the switch does nothing until it is on – no momentary action whatsoever. This is the 12-mode group user interface. Other emitter options have a four-mode group but the Nichia B35AM seems to force the 6v 2A 12-mode driver.

You may recall that I prefer metal switches on my S2+ lights. That’s still true! This one is fine and a nice implementation, but metal switches do suit me better.
The action on these metal switches is fantastic. It’s like clicking a good Bic Clic Stic pen – just a rewarding action.

This driver is known as “Biscotti” and has a bunch of mode groups. Actually, this is reportedly not true Biscotti – that’s why I called it “Fauxcotti.” It’s nearly the same though. Mode memory can be turned on or off (yay!), and programming is easy! But there are simply too many possibilities for me to list the user interface in a table as I usually do. Here is Simon’s flow chart for the UI.
Here’s the official guide for the Biscotti firmware:
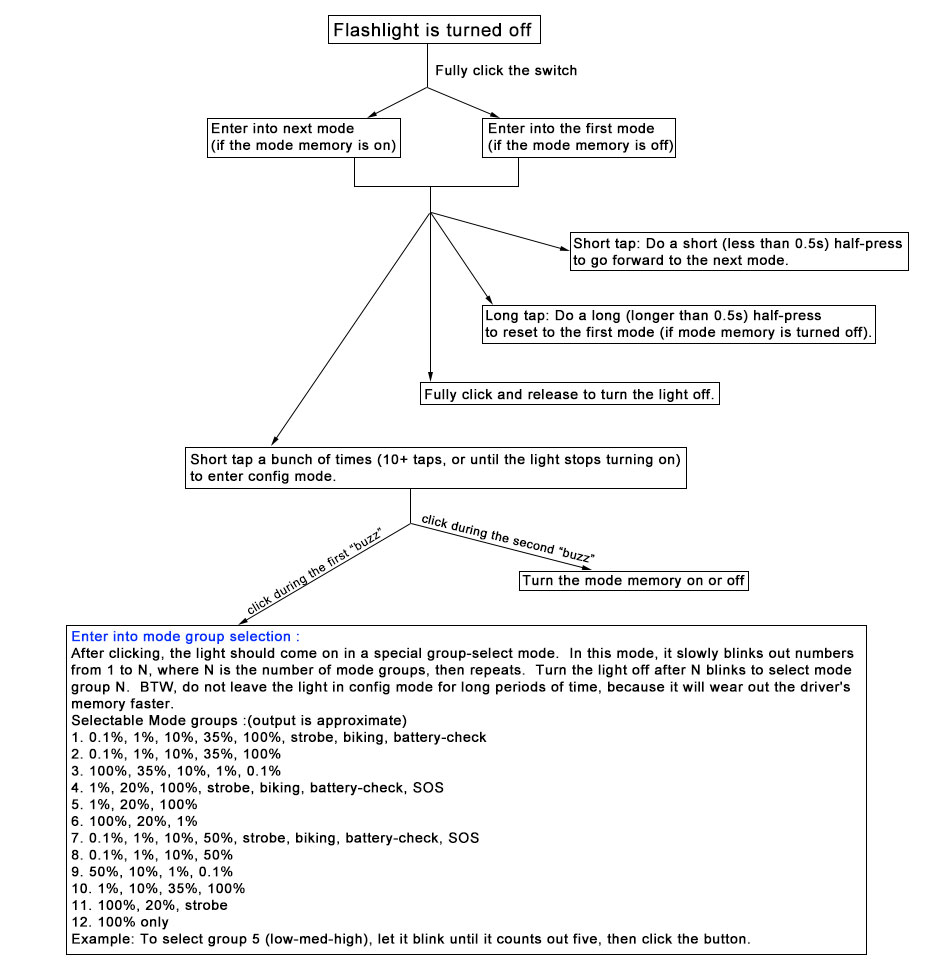
From the mode group selection above, the light ships in mode group 1. You’ll want to switch it to mode group 2 quickly of course. And I always turn off memory if possible (and it’s possible here!). I made a first pass at my flow chart, which you can see below.

It really seems like time for me to update this chart. Still functional, though!
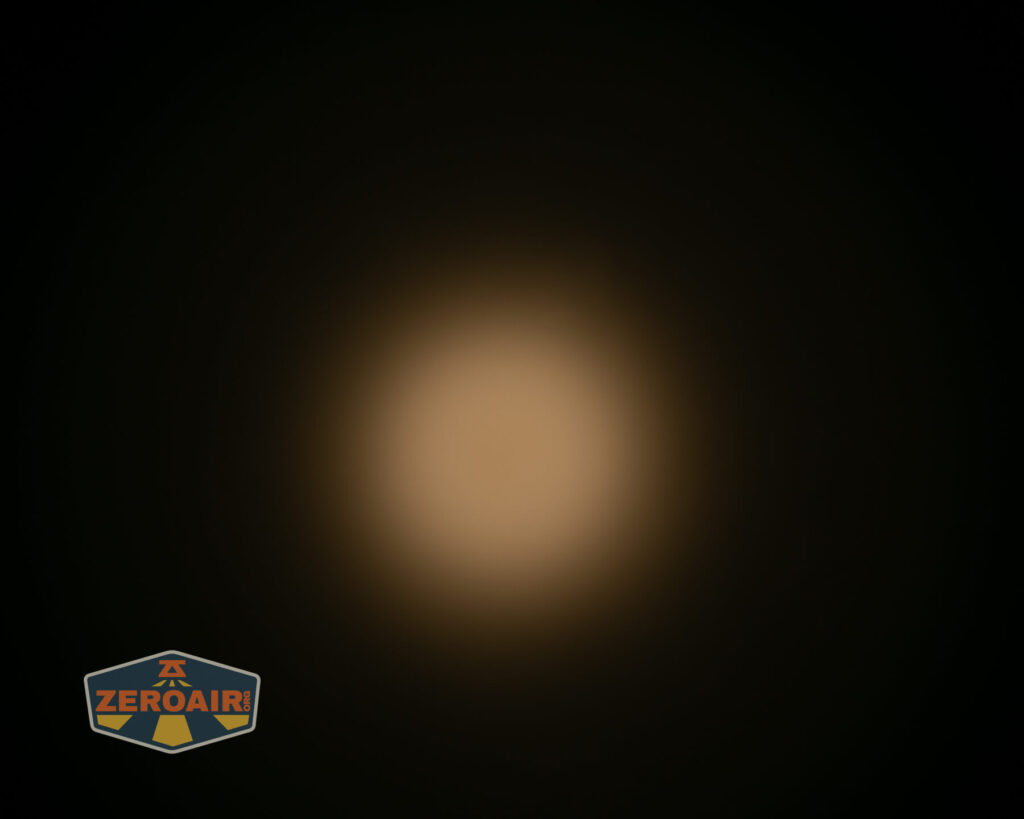
LED and Beam
And now we’ve made it to the whole point of this post. I just wanted to see how a Nichia B35AM emitter was in this Convoy S2+. It’s great. It’s fantastic. If you haven’t had a B35AM, this is a great way to experience it!
The reflector used with the B35AM is an orange peel – you’ll end up with a fairly floody beam.


LED Color Report (CRI and CCT)
Here’s the most important part of this whole review! How does the Nichia B35AM fare! Well, it’s very good. Even without clicking the images below, you can see how tight that red circle is to the black circle – that’s good, that’s the goal. The CRI is around 100, which means this is not just “High CRI” but “very high CRI.” In fact, a CRI of 100 is perfect. The scale does not go higher!
There are two points other than CRI here. First, the CCT is also fantastic. “Fantastic” is a matter of perspective – I happen to like 4000K-5000K just fine. This Convoy S2+ B35AM flashlight at 3500K clocks in well under 3500K even on the highest level. This is great! If that’s too warm for you, grab the cooler option. Here’s a reminder though: Just because you get a cooler (or warmer) CCT doesn’t mean the CRI will suffer! The CRI can still be just as good as this sample even over different CCTs.
The next point (other than CRI and CCT) is the dUV. If I were picking a downside (and also stating why this 3500K doesn’t match my 219b reference light almost exactly), it’d be that the dUV is only negative on the highest output. There will be a slight pinkness on 100%, but all other modes, since they have positive dUV, will not be pink at all. I think you can see this clearly in the beamshots below.
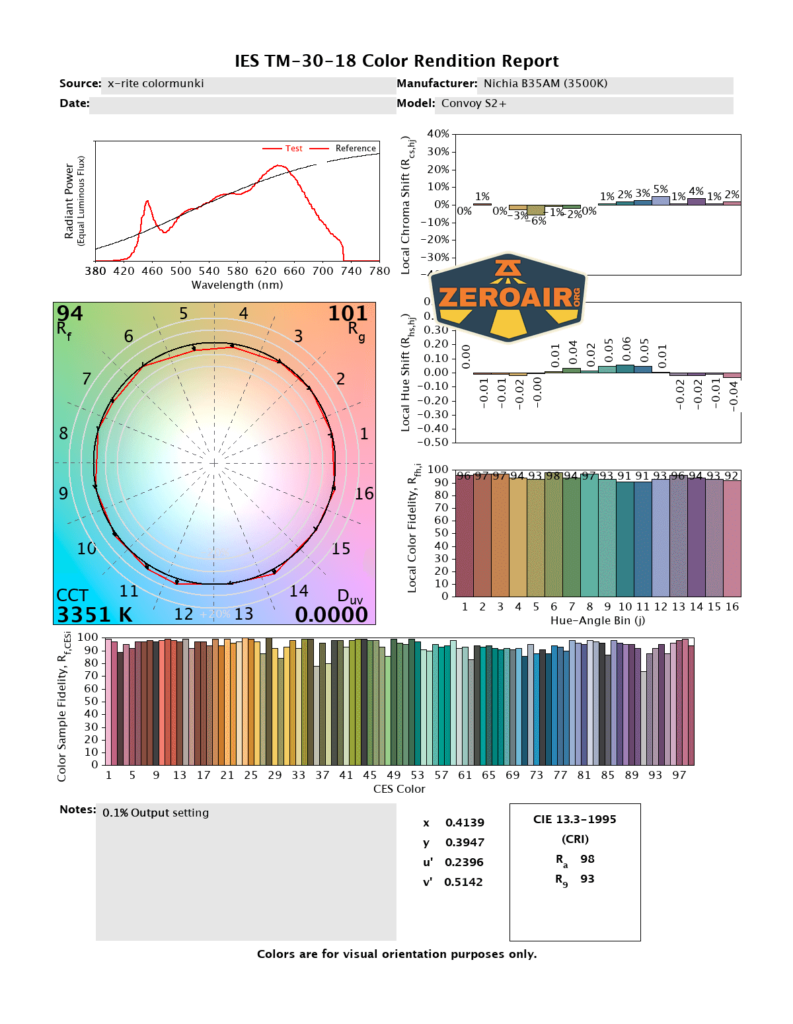


As a comparison, you might look at the 4500K version of the B35AM, which I tested in the S21A.
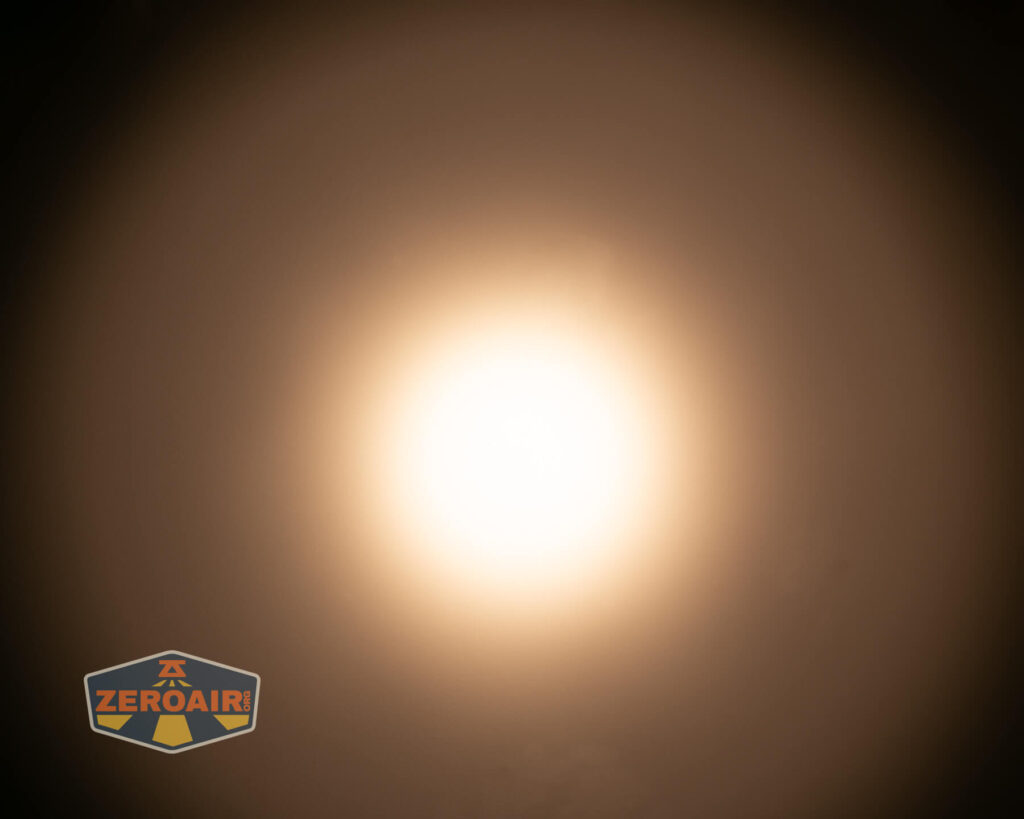
Beamshots
These beamshots always have the following settings: f8, ISO100, 0.3s shutter, and manual 5000K exposure. These photos are taken at floor level, and the beam hits the ceiling around 9 feet away. These beamshots are representative – this is mode group 2 (0.1%, 1%, 10%, 35%, 100%).


Tint vs BLF-348 (KillzoneFlashlights.com 219b version) (affiliate link)
I keep the test flashlight on the left and the BLF-348 reference flashlight on the right. These photos are taken around 18 inches from the door.


I compare everything to the KillzoneFlashlights.com 219b BLF-348 because it’s inexpensive and has the best tint!
Summary and Conclusion
I still and forever love an S2+. I can safely say it’s one of my favorite flashlights – even though I think it’s taken me a very long time (and many purchases) to actually realize that. It’s so good for so many things. I love this emitter and think for $20 you should try it in an S2+. Now someone figure out how to make a B35AM S2+ triple for me!
The Big Table
| Convoy S2+ B35AM flashlight | |
|---|---|
| Emitter: | Nichia B35AM |
| Price in USD at publication time: | $21.90 |
| Cell: | 1×18650 |
| Runtime Graphs | |
| LVP? | |
| Switch Type: | Mechanical |
| On-Board Charging? | No |
| Claimed Lumens (lm) | – |
| Measured Lumens (at 30s) | 673 |
| Candela per Lumen | 6.86 |
| Claimed Throw (m) | – |
| Candela (Calculated) in cd (at 30s) | 253lux @ 4.752m = 5713cd |
| Throw (Calculated) (m) | 151.2 |
| Claimed CCT | 3500 |
| Measured CCT Range (K) | 3300 Kelvin |
| Item provided for review by: | Me |
| All my Convoy reviews! | |
^ Measurement disclaimer: Testing flashlights is my hobby. I use hobbyist-level equipment for testing, including some I made myself. Try not to get buried in the details of manufacturer specifications versus measurements recorded here; A certain amount of difference (say, 10 or 15%) is perfectly reasonable.
What I like
- VERY high CRI
- Familiar user interface
- Great CCT (but you have options, too)
- Great build quality, and certainly at the price
- 18350 cell tube option
- Uses 2A driver, so you know the emitter can handle the max current.
What I don’t like
- Pocket clip isn’t included (or at least pushed – I always need a reminder to grab
onefive!)
Notes
- This content originally appeared at zeroair.org. Please visit there for the best experience!
- Please use my Amazon.com referral link to help support zeroair.org!
- Please support me on Patreon! I deeply appreciate your support!
Now, the question is, this or the SFT40 3000K? Better runtimes vs better throw.
Also, an observation about the 2.6A, that’s at the tailcap, but since this emitter is 6V wouldn’t it see about half the output?