FidgetHQ Aonic Flashlight Review
FidgetHQ, the maker of fidget toys, has released the FidgetHQ Aonic flashlight! It’s a triple emitter, 18650 or 18350 body light, seen here in aluminum.
Official Specs and Features
Here’s a link to the FidgetHQ Aonic Flashlight product page.
Versions
This light is full of versions (more correctly: options). First of all, there are two bodies: the 18650 size and the 18350 size. Then there are the metals – titanium, copper, and aluminum. Aluminum is made in two finishes: raw and bead blasted. Every option is also available with two emitter options: Nichia 219c and Cree XP-L HI 5000K.
The version seen here is raw aluminum (both bodies), with Nichia 219c.
Price
The price ranges all the way from $105 (18350 Raw aluminum with 219c) to $297 (18650 titanium with Cree XP-L HI).
Short Review
This is a new and interesting body, with an already well-loved user interface. Bistro is a versatile user interface, and I happen to love it. I also really like the clip (really, really like the clip). But at the end of the day, this is a new body style on a light that’s more or less been available for a while as a quad. It’s very nice (and quite an upgrade) that these are available in full copper and full titanium.
Long Review
The Big Table
| FidgetHQ Aonic | |
|---|---|
| Emitter: | Nichia 219c |
| Price in USD at publication time: | $200.00 (ish) |
| Cell: | 1×18650 |
| Turbo Runtime | High 2 Runtime |
| LVP? | No |
| Switch Type: | Mechanical |
| On-Board Charging? | No |
| Claimed Lumens (lm) | 2042 |
| Measured Lumens (at 30s) | 1330 (65.1% of claim)^ |
| Claimed Throw (m) | – |
| Candela (Calculated) in cd (at 30s) | 253lux @ 5.991m = 9081cd |
| Throw (Calculated) (m) | 190.6^ |
| All my FidgetHQ reviews! | |
^ Measurement disclaimer: Testing flashlights is my hobby. I use hobbyist-level equipment for testing, including some I made myself. Try not to get buried in the details of manufacturer specifications versus measurements recorded here; A certain amount of difference (say, 10 or 15%) is perfectly reasonable.
What’s Included

- Aonic Flashlight (whichever body you purchased) (one head, one tail, and either or both bodies)
- Lanyard
- Spare (white) rubber tail clicky boot)
- Spare o-rings (2)
- Manual
Package and Manual
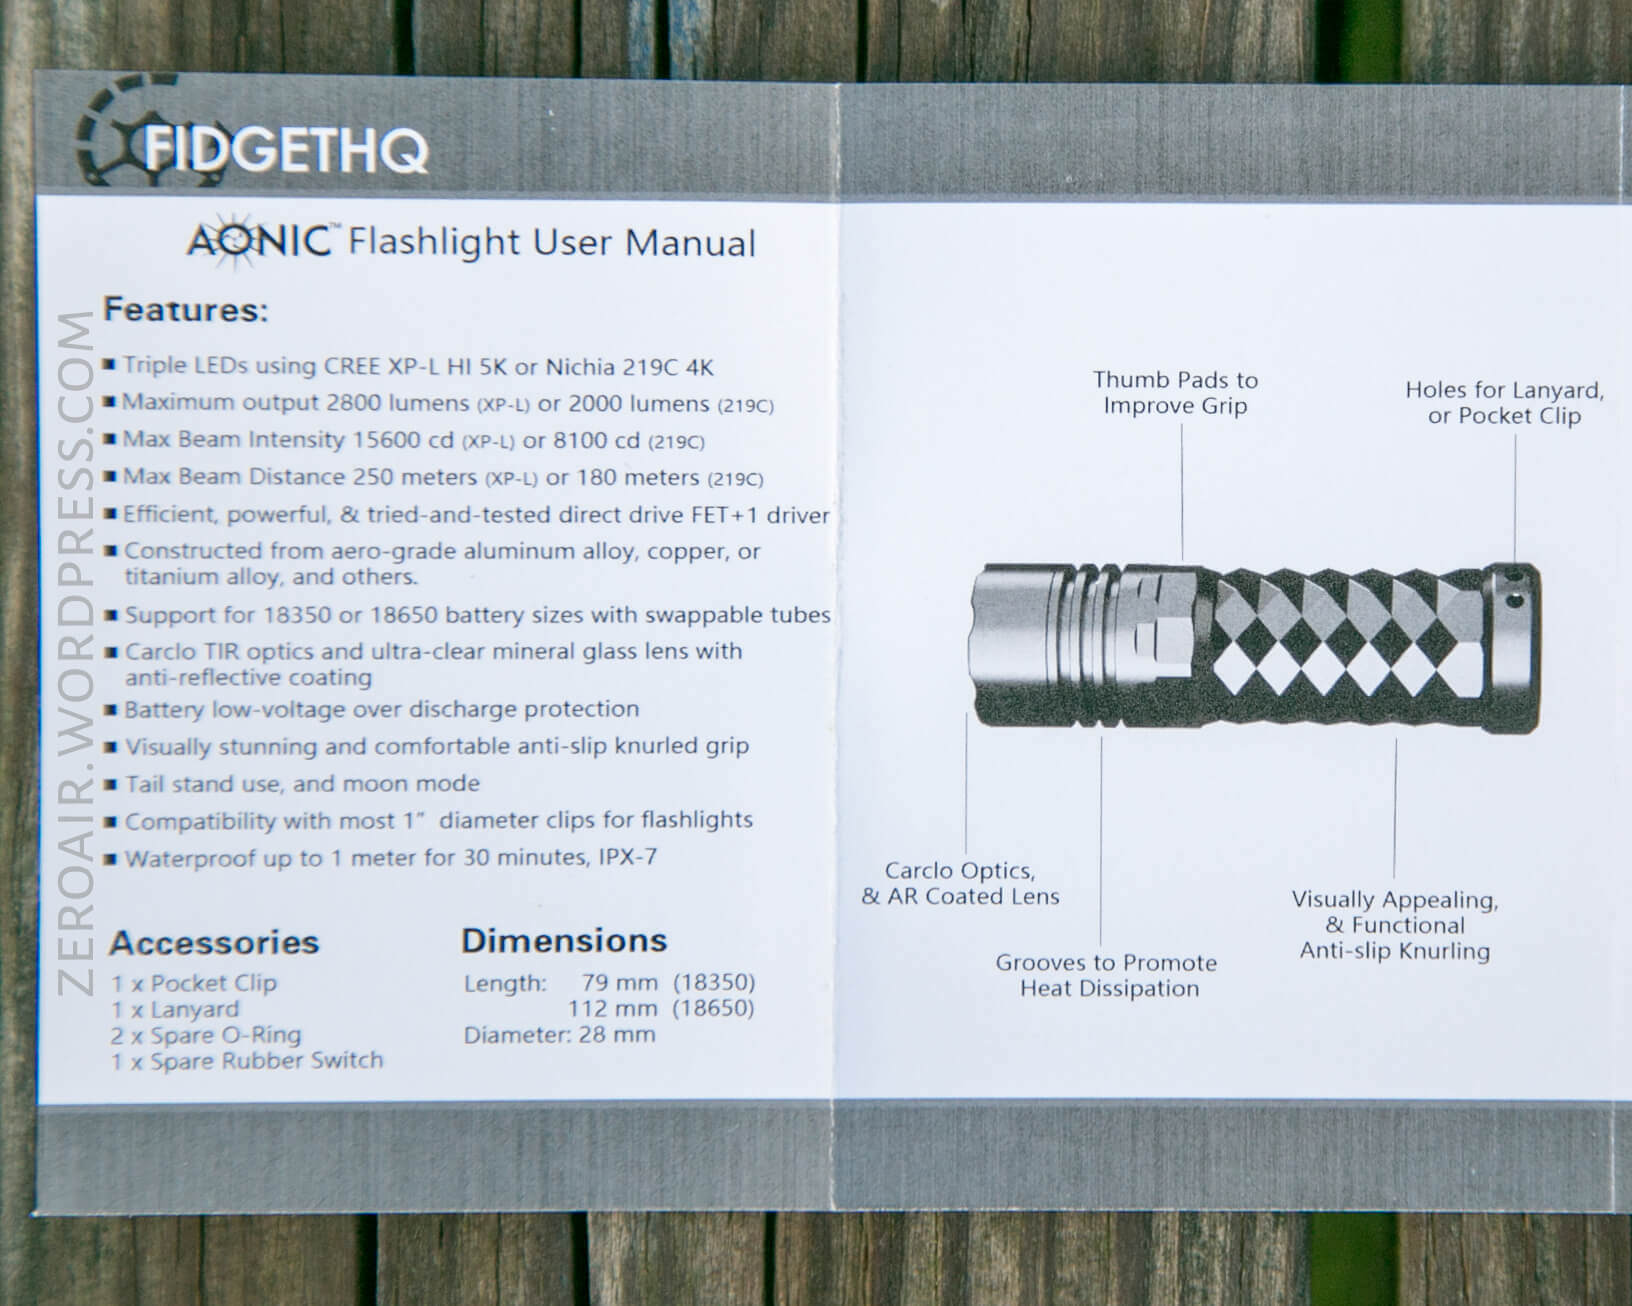
The Aonic ships in a sturdy cardboard slip-fit box. The top is embossed with a gold Aonic logo. The light’s specifications are indicated on the side of the box, with a printed sticker.


The light and goodies are held in place by some custom-cut foam.

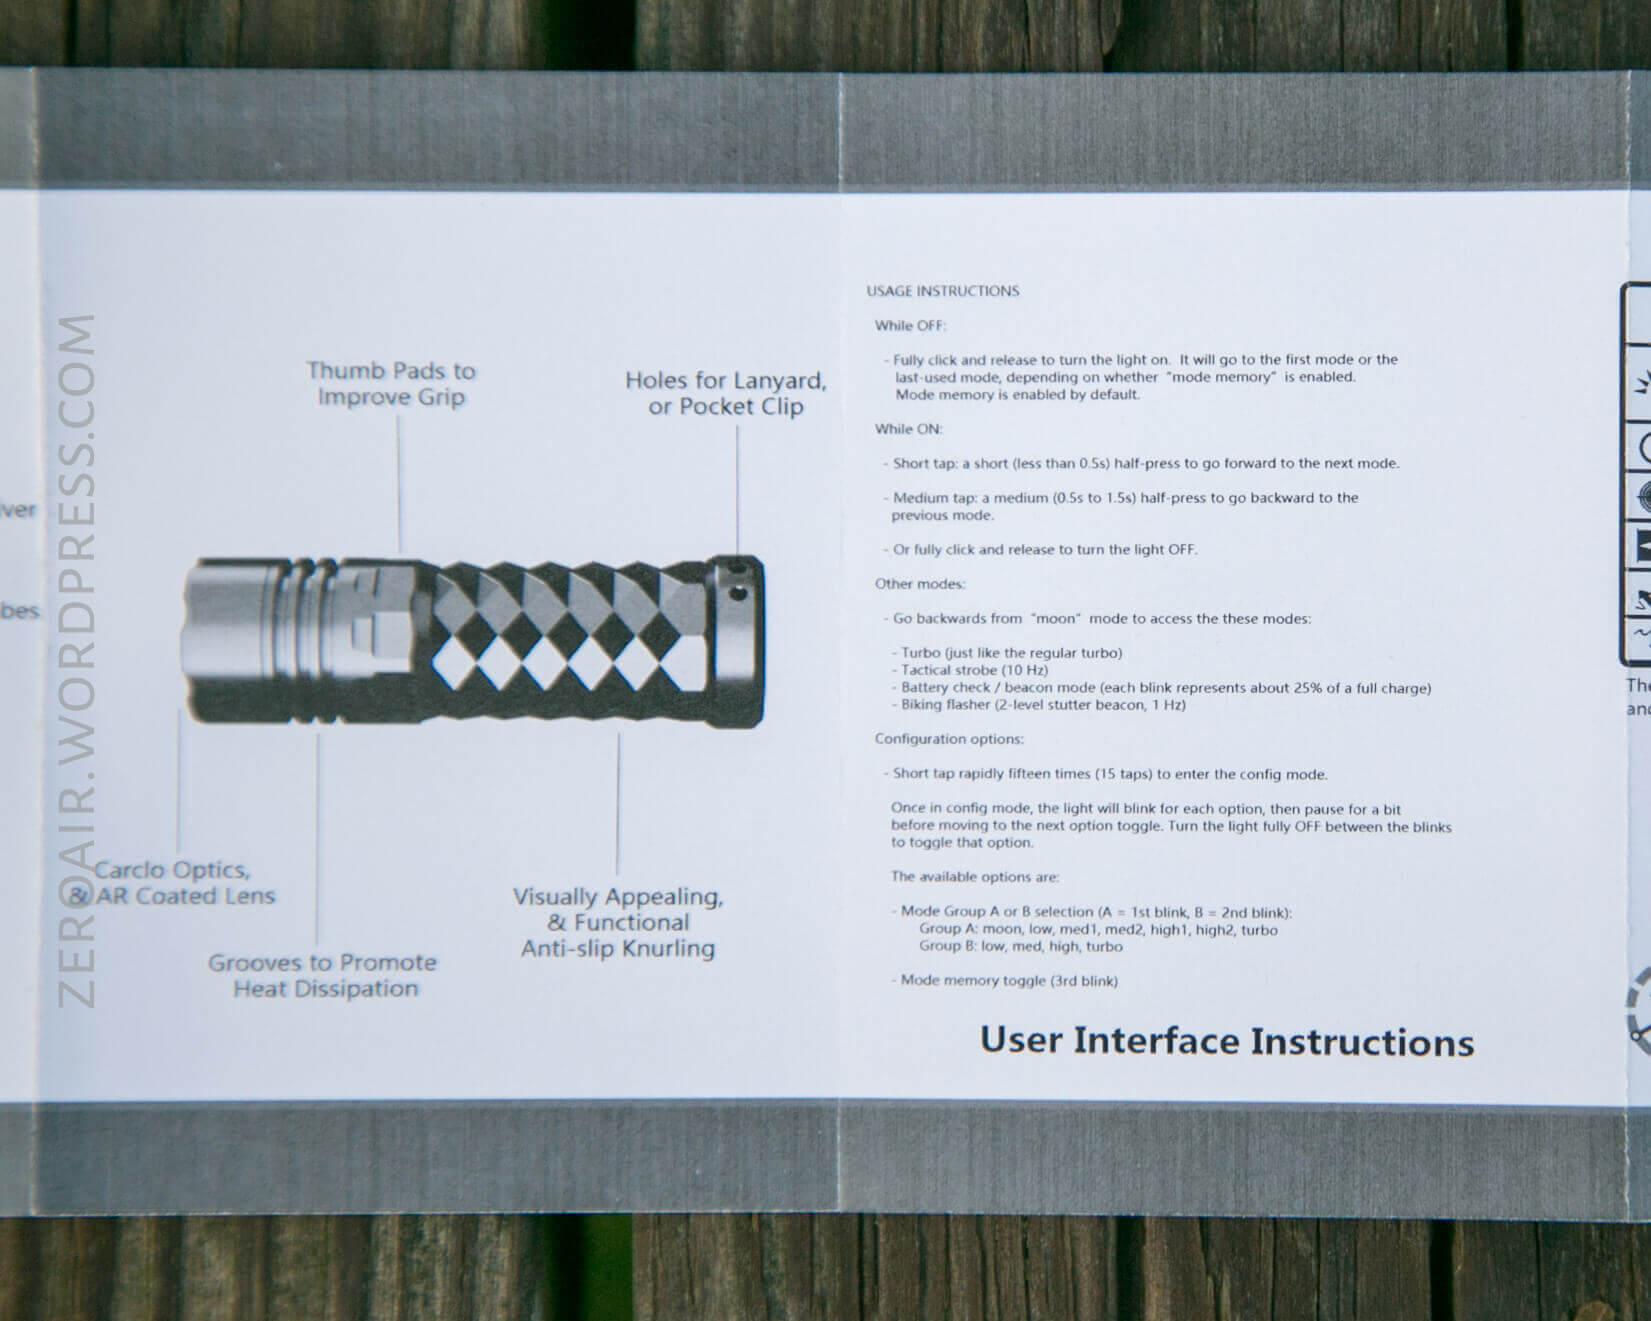
The manual gives a good description of specs, features, and UI. Surprisingly, it describes the user interface without using the popular Bistro/A6 user interface graph.

Build Quality and Disassembly
The body and parts of this aluminum version of the Aonic are unfinished. There is no anodizing. There is no stonewash. That alone is unusual.


The body has a diamond pattern, which is quite fetching. As for comfort in the hand, that’s up to the user. The worst that could be said is that the peaks are a bit sharp, but they’re not uncomfortable. They provide some – probably “enough” – grip.


And here are all the body parts, with both bodies included.

Both the head and tail have thick springs, and the tailspring is a double spring!

The body has a male and female end. The male end goes to the head.


The diamond/triangle pattern really catches the light in some instances!


The bezel unscrews easily, and the optic comes right out. This optic is a 10507 but would be easily interchangeable for any of the other Carclo 105xx series optics if you’d prefer a different beam profile.

The threads are triangle cut and fairly fine. I still like square-cut threads better, but I’ve been educated and now know that these (triangle) type threads probably transfer heat at least a little better. And on a light like this, with 3 Nichia 219c’s being driven at >4A on turbo, heat management is important.


Despite the fact that the tailcap will fit into the head properly, it’s not possible to connect two bodies and make one super-long light. Not only will this orientation not physically work (because of the threads), but this voltage scenario isn’t supported by the driver.

Size
Officially ~86mm (18350 edition) / ~118mm (18650) edition, and 68g and 188g without battery, respectively.


It’s very similar in size to the Convoy S2+. But different in an important way (for me, at least). The overall diameter is greater, and this allows the bezel to reveal more of the optic and emitters than on a Convoy S2+ triple. Does this change much? Not really. I still prefer it!


A couple of other comparisons, which aren’t really for “size” consideration…

Yes, the parts from the Aonic and the Astrolux S41 are interchangeable. I think a small subset of users might be jaded that the Aonic costs around $115, and the S41 is much less expensive (as low as $23, best I can recall). But I think those users might be missing the point that this light is available in metals that the S41 isn’t. The user interface of the S41 is slightly different, being the actual Bistro and not BLF A6 Bistro.
Another thing worth mentioning is that the faceted design of the Aonic is a harder process than rolling on knurling, as is done with the Astrolux. The faceted design takes much longer and is a more complex process, which, of course, adds to the cost of the light.

Retention
The included pocket clip arrives installed on the tailcap. It’s attached by two Allen screws. I happen to love this clip. It’s much more finished than many of the other pocket clips you see. The edges are not the least bit sharp. The mouth is plenty big for easily grabbing pockets. I could handle the clip being a shade thicker, but man, I love the finish of it.


When screwing the head onto the 18350, the clip rubs the head. It doesn’t scratch, but eventually there will be wear here. The clip doesn’t even touch the body on the 18650 version.
Power
There are two options with the Aonic. They require different body tubes. Both are seen in this review. The two cell options are Li-ion 18350 and 18650. There are springs on both ends of the light, so really any type of these two cells should work fine.
I measured the output with an 18650 to be above spec, at around 2200 lumens. Output with an 18350 was a little lower, at around 2000 lumens (which is still essentially within spec).
Here’s the runtime on Turbo (highest mode) with an LG HG2. There’s a pretty hefty stepdown, which is actually to the next highest mode. Note the temperature scale – the light gets hot. Very hot. Sixty degrees C is too hot to hold comfortably!

The High 2 (which is the second-highest mode) runtime is exactly like the Turbo, minus the turbo.

The output with the 18350 is lower, but still has the same profile. Turbo for a little while, then step down to the next highest mode. Then drain the cell.

According to my testing, the light does not have any LVP. Testing with my bench power, the light never really shuts off, but stops putting out light around 2.4V.
User Interface and Operation
There’s a single clicky, and it’s on the tail of the light. It’s a mechanical reverse clicky. It’s quite clicky. The rubber boot has ample grip and surprisingly sticks out over the end of the light by maybe 0.5mm – a very small amount. If you try to tailstand, there’s no problem whatsoever (with cells in), but sitting around armchair-quarterbacking, you’ll notice a little bit of rock.

Here’s basically the most useful way to visualize the UI. This is the BLF A6 UI, made by u/ToyKeeper. A fantastic UI, with plenty of options. In particular, I like the option to turn off Mode Memory. (The light ships with memory on). Another thing I love is that the light has a battery check option. Here are the details on what you see when you use batt check.
0 blinks: < 1% full (< 3.0V)
1 blink: 1% to 25% full (3.0V to 3.5V)
2 blinks: 25% to 50% full (3.5V to 3.8V)
3 blinks: 50% to 75% full (3.8V to 4.0V)
4 blinks: 75% to 100% full (4.0V to 4.2V)
5 blinks: > 100% full (> 4.2V)
Another thing I absolutely love about this user interface is the ability to go backward in the modes. Often, I am in a mode, and I think, “Is this enough light?” and progress to the next mode. The next mode is too much, so I might have to cycle through to get to the previous mode. Not with this ui! Just “medium press” (time, not pressure) to go back one mode.

No user interface table on this one. I think it’s a bit too complicated to make a good table.
Modes
These output numbers are with an LG HG2 cell. Numbers for the lower half of the modes are practically the same, with an 18350. The upper half of the modes, particularly Turbo, is much lower, at around 2000 lumens (startup), and dropping at the same rate seen with the 18650.
| Mode | Mode Claimed Output (lm) | Claimed Runtime | Measured Lumens | Tailcap Amps |
|---|---|---|---|---|
| Turbo | 2042 | 27m | 0s: 2376 30s: 2208 |
4.19 |
| High 2 | 1210 | 30m | 1340 | 1.84 |
| High 1 | 567 | 65m | 607 | 0.73 |
| Med 2 | 185 | 2.1h | 184 | 0.33 |
| Med 1 | 54 | 6.5h | 58 | 0.10 |
| Low | 6.2 | 1.4d | 10 | 0.01 |
| Moon | 0.3 | 3d | ~ | ~ |
LED and Beam
There are two choices, and they’re both excellent ones. First is the Cree XP-L HI 5000K. This will provide more output and likely run ever so slightly cooler (i.e., more efficient) than what I have, which is the Nichia 219c. I opted for 219c because I prefer the tint, but honestly, that version of XP-L is absolutely fantastic.
The optic is the Carclo 10507, a narrow spot plain TIR. The “plain” makes it look stunning inside the front of the light, and provides a relatively tight beam, though this is by no means a thrower.

Tint vs BLF-348 (KillzoneFlashlights.com 219b version) (affiliate link)
I keep the test flashlight on the left and the BLF-348 reference flashlight on the right.

Random Comparisons and Competitive Options
Here’s a relevantly filtered page on parametrek.com. Of course, the aforementioned Astrolux S41 will come up in that search. That’s a solid light, and if you ever see it for the low, low price of $23, it’s very hard to beat. That said, this one’s available in full copper and full titanium, so that’s a unique offering. Other, more expensive similar options are the BOSS combo, which is much more expensive, but offers full programming, and a forward clicky. Any of those three is a great choice.
Conclusion
What I like
- User interface is great
- The output with either emitter option is pleasant
- Hits the claimed output numbers
- The soft edges on the clip are great, and I would love to see this in other clips. Like those high-end skull, hard-edge clips. Or BOSS clips.
What I don’t like
- No LVP
- Raw aluminum strikes me as unfinished, not simply “raw.”
- Clip rubs on the 18350 version
Parting Shot

And a real parting shot:
That’s the head and tail, with a CR1220 sandwiched in between. Yes, it works! Runtime probably 10 seconds.


Notes
- The 18650 tube was provided by FidgetHQ for review. I was not paid to write this review. I purchased the 18350 and head (the expensive bits!) with my own money.
- This content originally appeared at zeroair.org. Please visit there for the best experience!
- Please use my Amazon.com referral link to help support zeroair.org!
- Please support me on Patreon! I deeply appreciate your support!
Discover more from ZeroAir Reviews
Subscribe to get the latest posts sent to your email.
Pingback: Custom ReyLight Gemini with Crescendo UI Flashlight Review – ZeroAir Reviews