
Frelux Synergy1 Flashlight Review
The Frelux Synergy1 isn’t a new flashlight. But it is still an interesting and unusual design, and worth thinking about. Read on for testing!
Official Specs and Features
Here’s a link to the Frelux Synergy1 flashlight product page.
Versions
There are so many versions of the Synergy! Even among the Synergy1 (often called just “S1”) there are (well “were”) many color options. There were a couple of clip options too. More importantly, now there are the Synergy2 and upcoming Synergy3. As far as I can tell, the Synergy3 will be most like the light you see in this review, with a few important and relevant updates.
Price
It looks like these were originally $95. The one I have here for review is a loaner, and so I haven’t paid anything for it. I will say that I can’t imagine what I was thinking when these came out that caused me to not buy one at $95….
Short Review
Tiny tidbit of backstory here. At one point, I held a Synergy2 in my hands (another loaner). I was thoroughly disinterested. It was not bad but it was just not my thing. Since I didn’t already have a Frelux Synergy1 flashlight at that point, my experience with the S2 caused me to never chase a Synergy1. Just like regretting not buying a Synergy1 when they were available new, I wish I hadn’t let my thoughts on the S2 affect my S1 decision. The Synergy1 is great. It’s a wonderful size and the output levels are fantastic too… All in all certainly worth the price. Well built and also I believe made completely in the USA.
Long Review
The Big Table
| Frelux Synergy1 Flashlight | |
|---|---|
| Emitter: | Nichia 219c (4000K, High CRI) |
| Price in USD at publication time: | $95.00 |
| Cell: | 2xAAA |
| High Runtime Graph | Medium Runtime Graph |
| LVP? | No |
| Switch Type: | Mechanical |
| On-Board Charging? | No |
| Claimed Lumens (lm) | – |
| Measured Lumens (at 30s) | 112 |
| Candela per Lumen | 6.4 |
| Claimed Throw (m) | – |
| Candela (Calculated) in cd (at 30s) | 53lux @ 3.189m = 539cd |
| Throw (Calculated) (m) | 46.4 |
| Claimed CCT | – |
| Measured CCT Range (K) | 3900 Kelvin |
| Item provided for review by: | A friend! Thanks u/barry_baltimore for the loaner! |
| All my Frelux reviews! | |
^ Measurement disclaimer: Testing flashlights is my hobby. I use hobbyist-level equipment for testing, including some I made myself. Try not to get buried in the details of manufacturer specifications versus measurements recorded here; A certain amount of difference (say, 10 or 15%) is perfectly reasonable.
What’s Included

Mine isn’t really a retail package, so I’m not sure what comes with the full kit. I have only the light. I believe originally it shipped in a little tin, though.
Package and Manual
See above. I didn’t receive the full package. I don’t know if a manual is included, but I believe this little graphic was part of the original package.
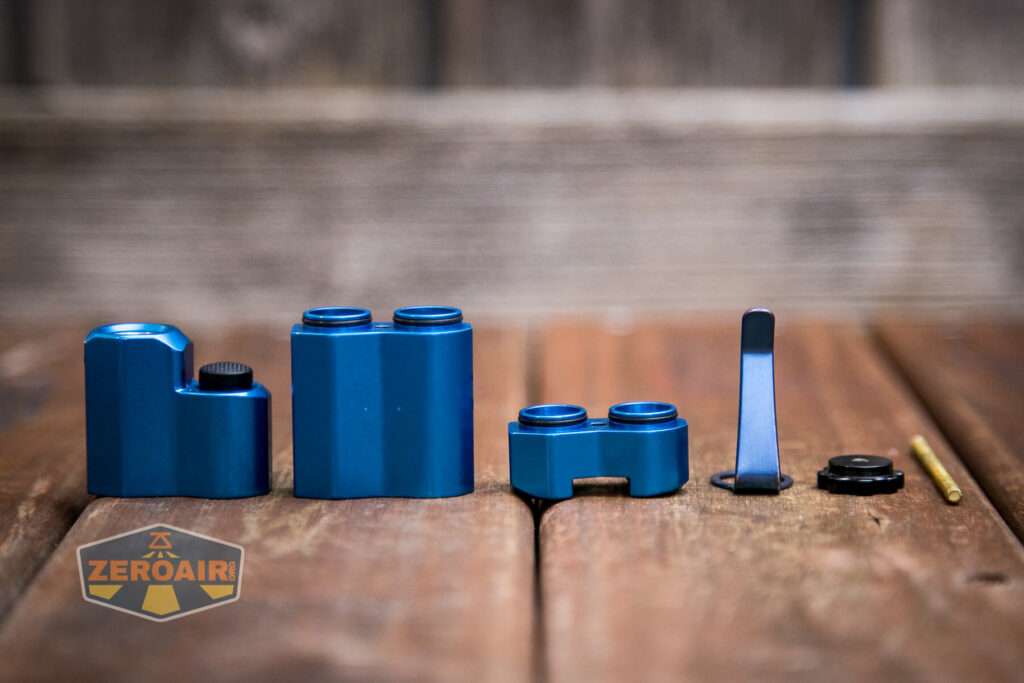
Build Quality and Disassembly
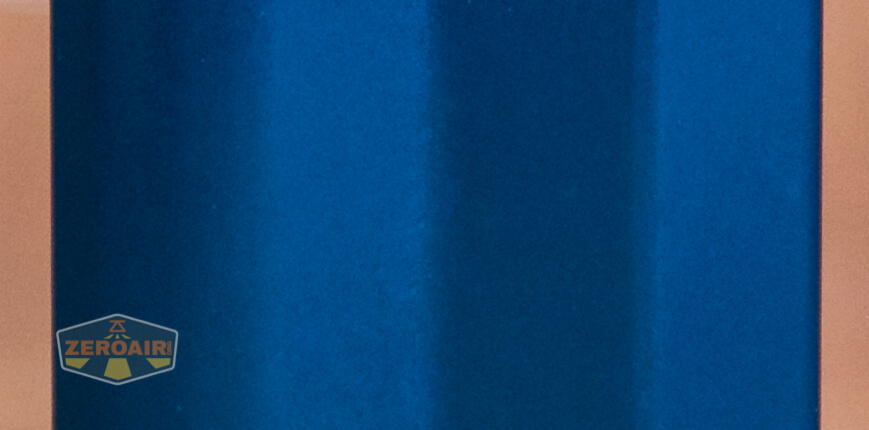
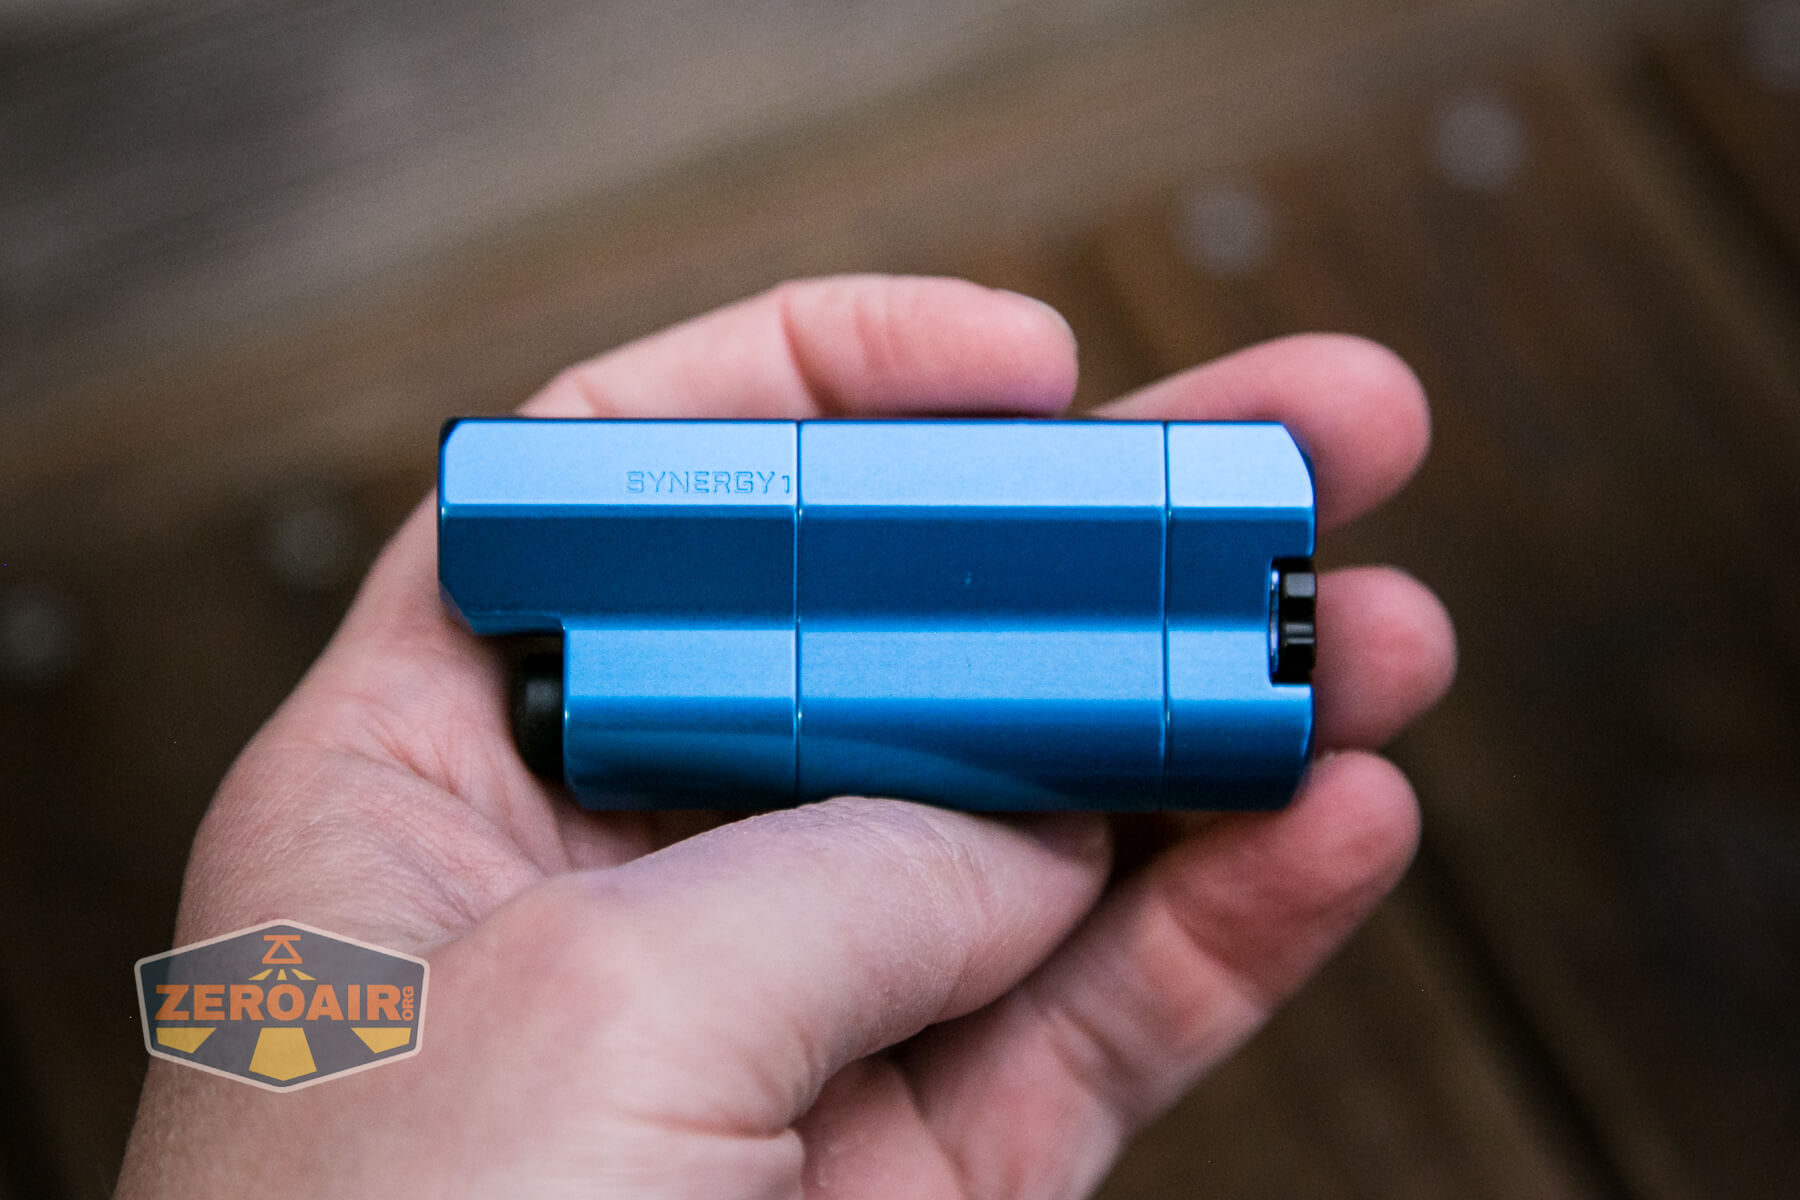
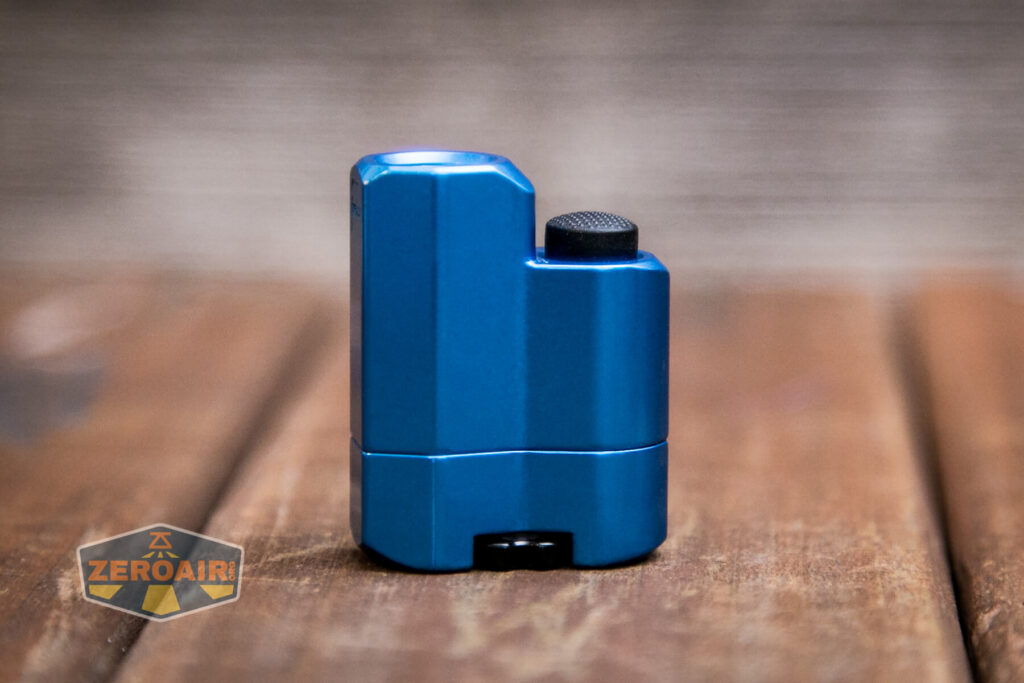
First of all, check out this anodizing. This is some of the nicest anodizing I can recall. It feels like high-quality anodizing, but I don’t have a measure for that. I will say that since there’s no knurling, we probably get a better feel for the anodizing, so that’s not nothing.
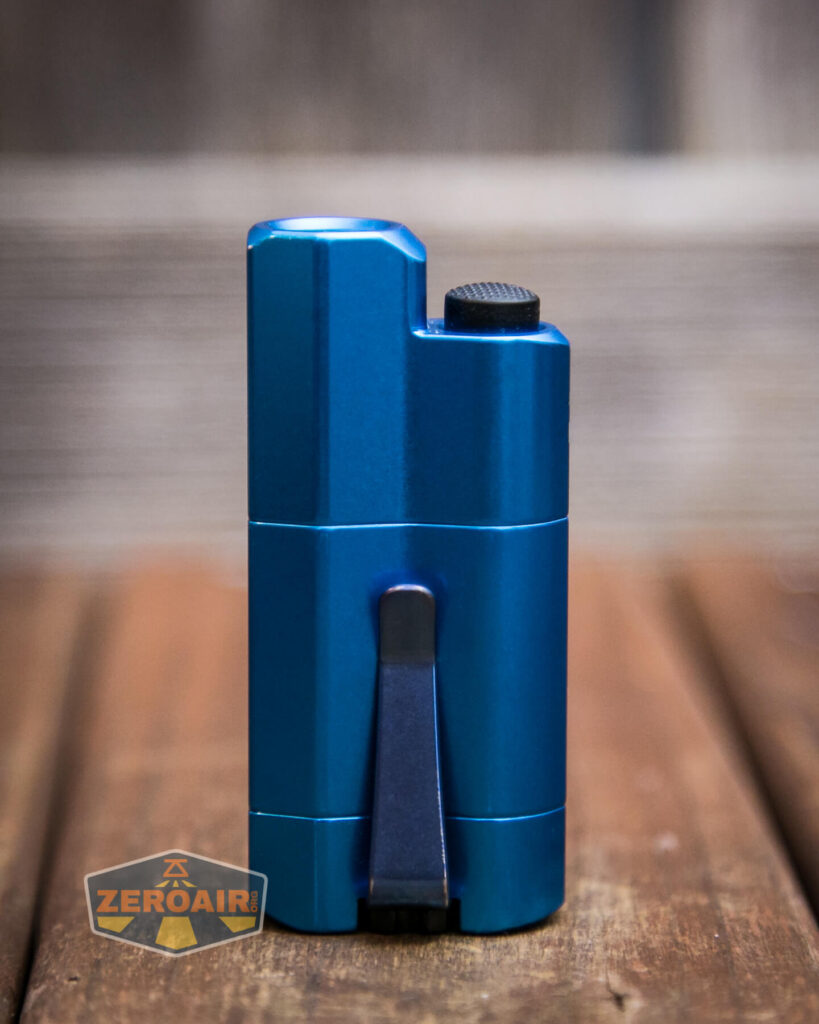


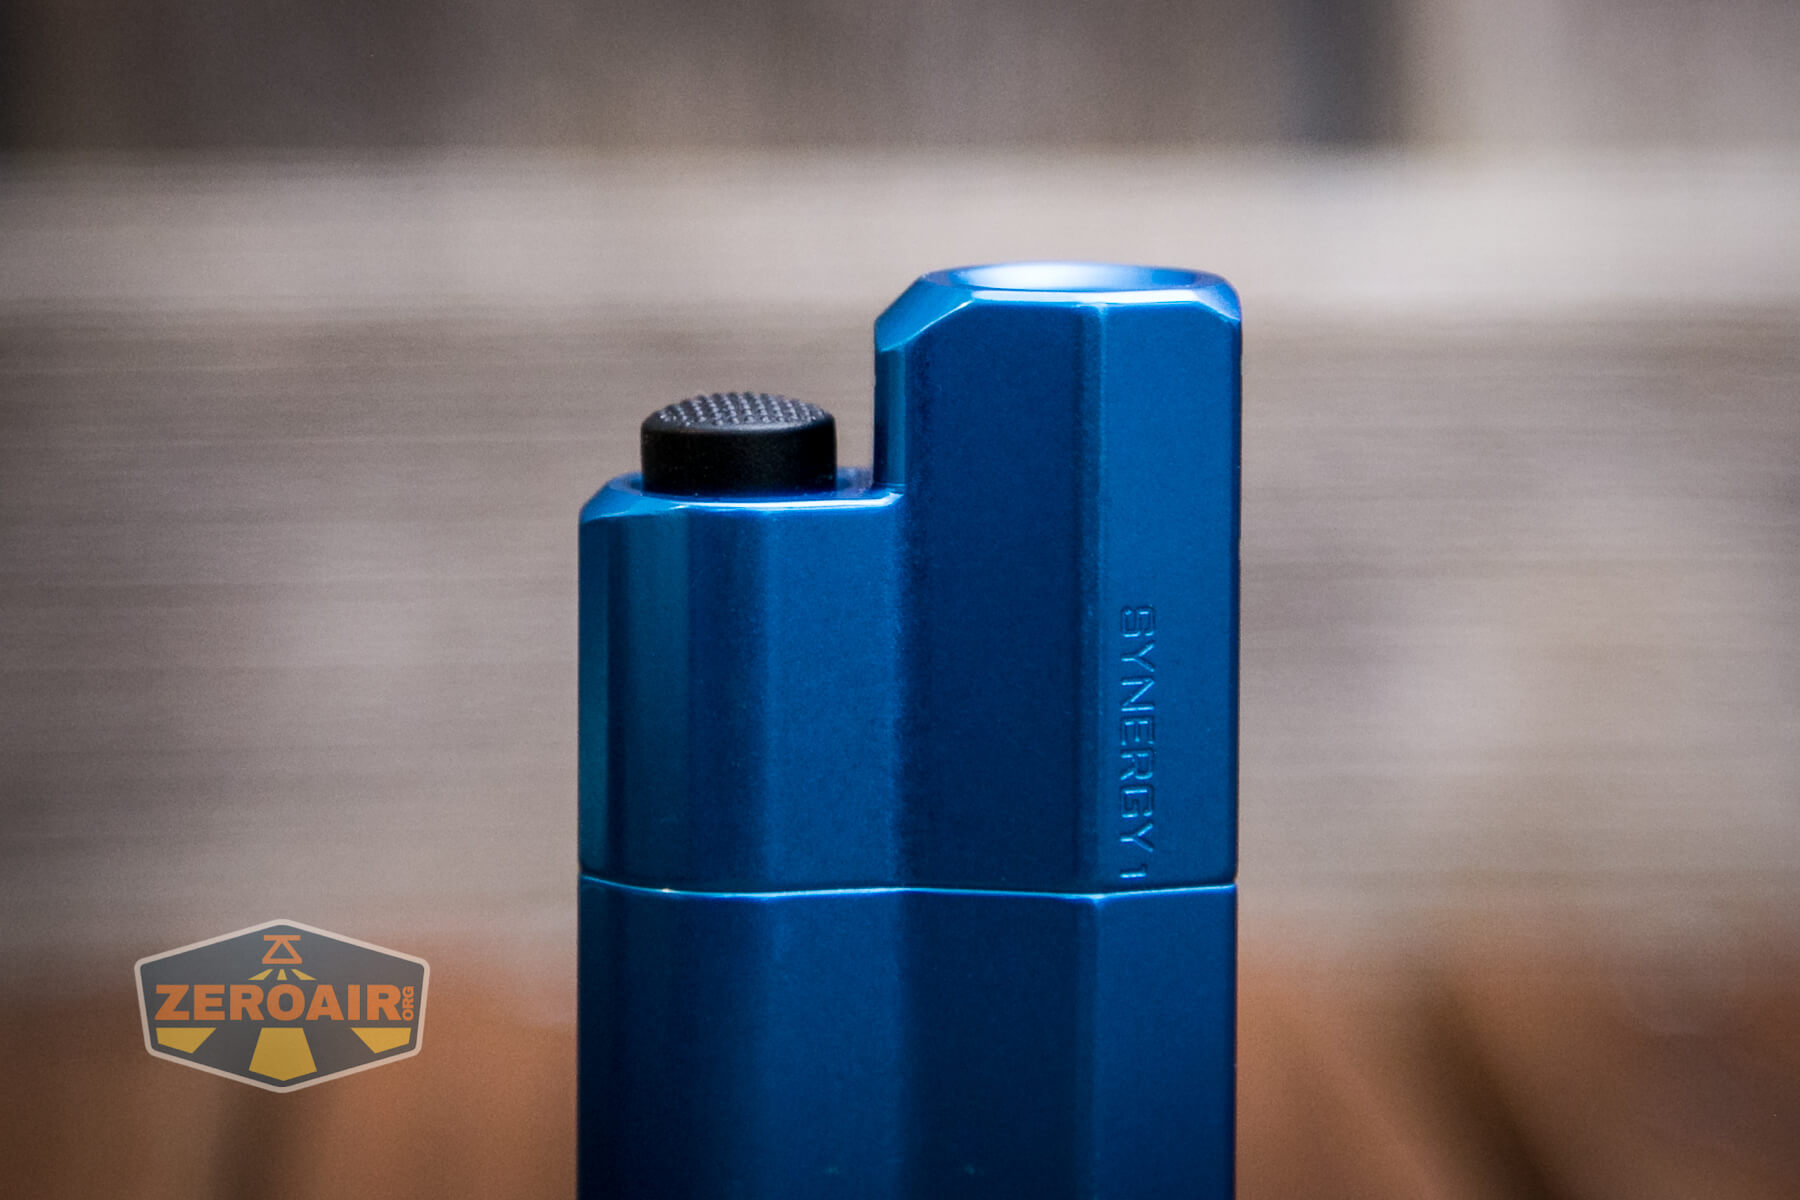
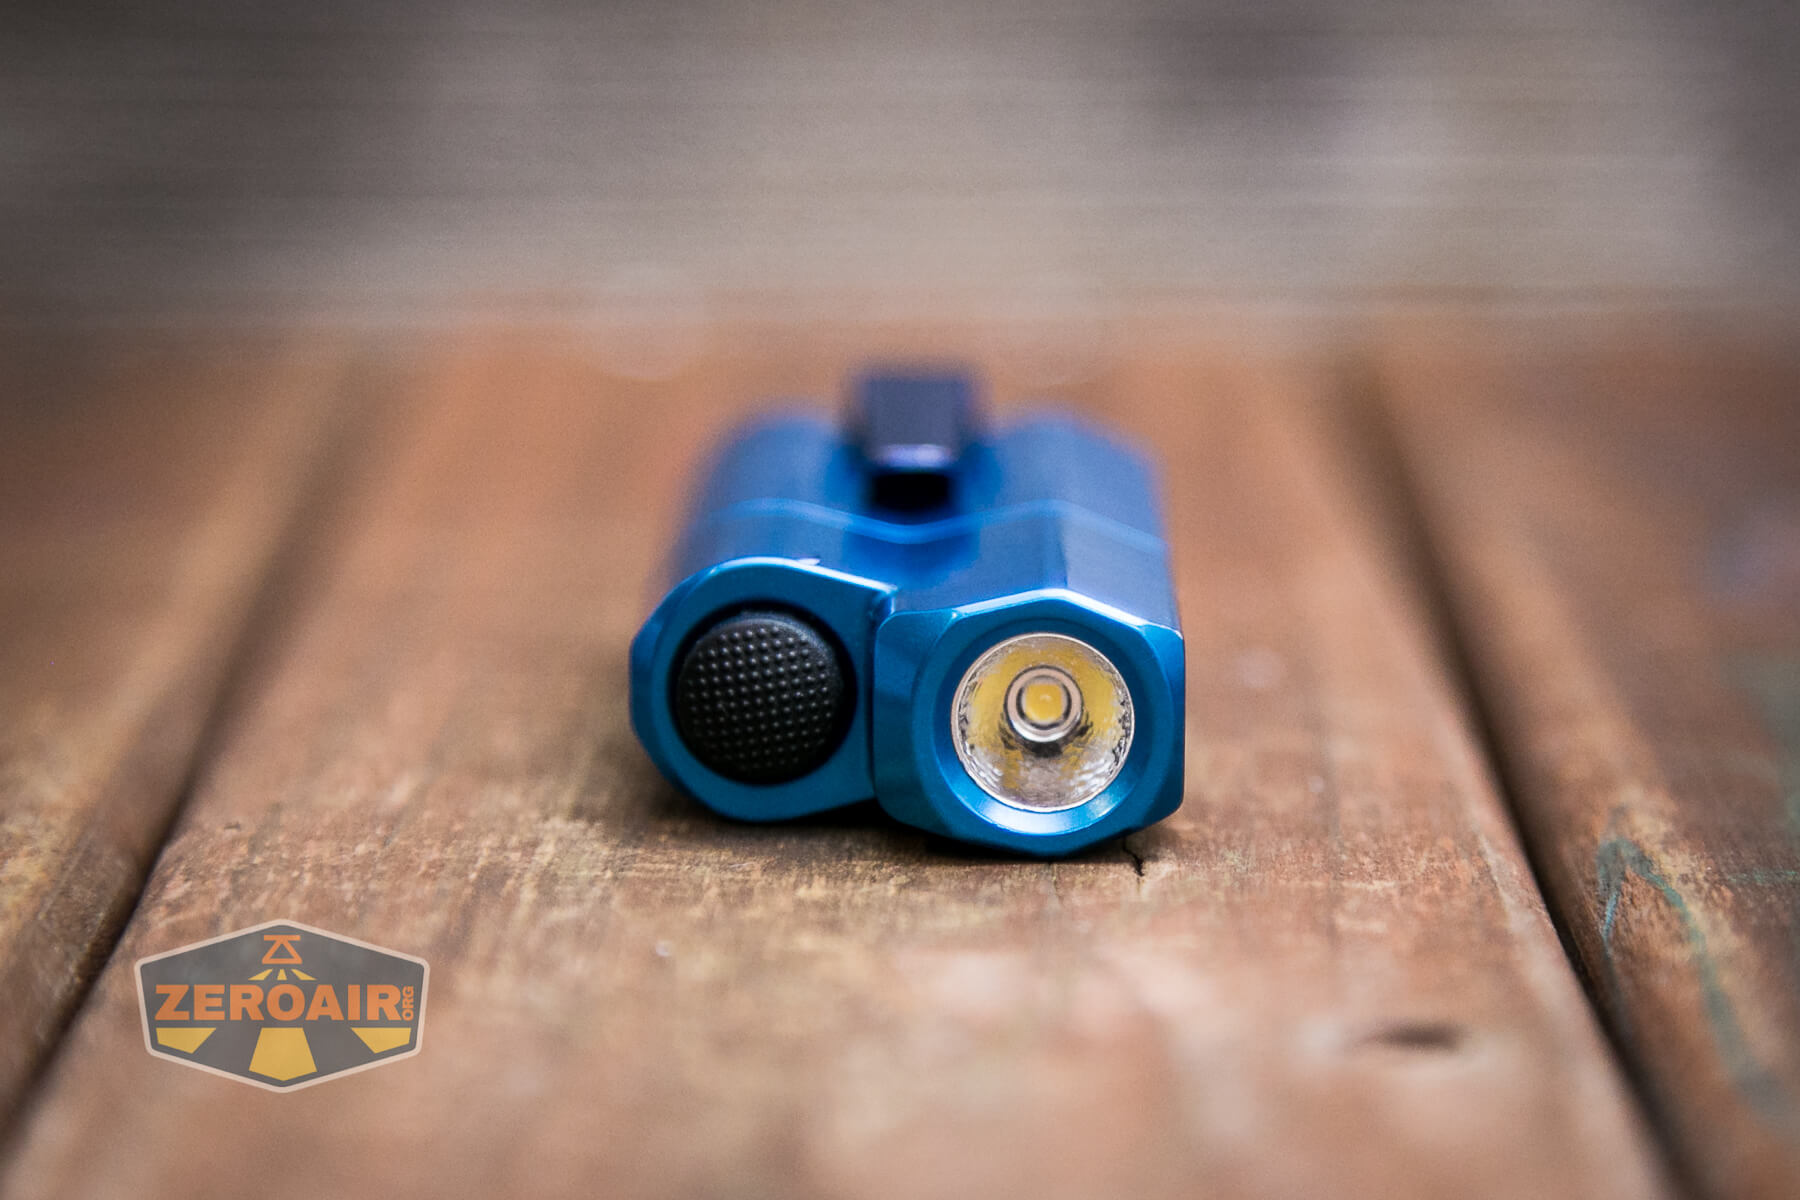
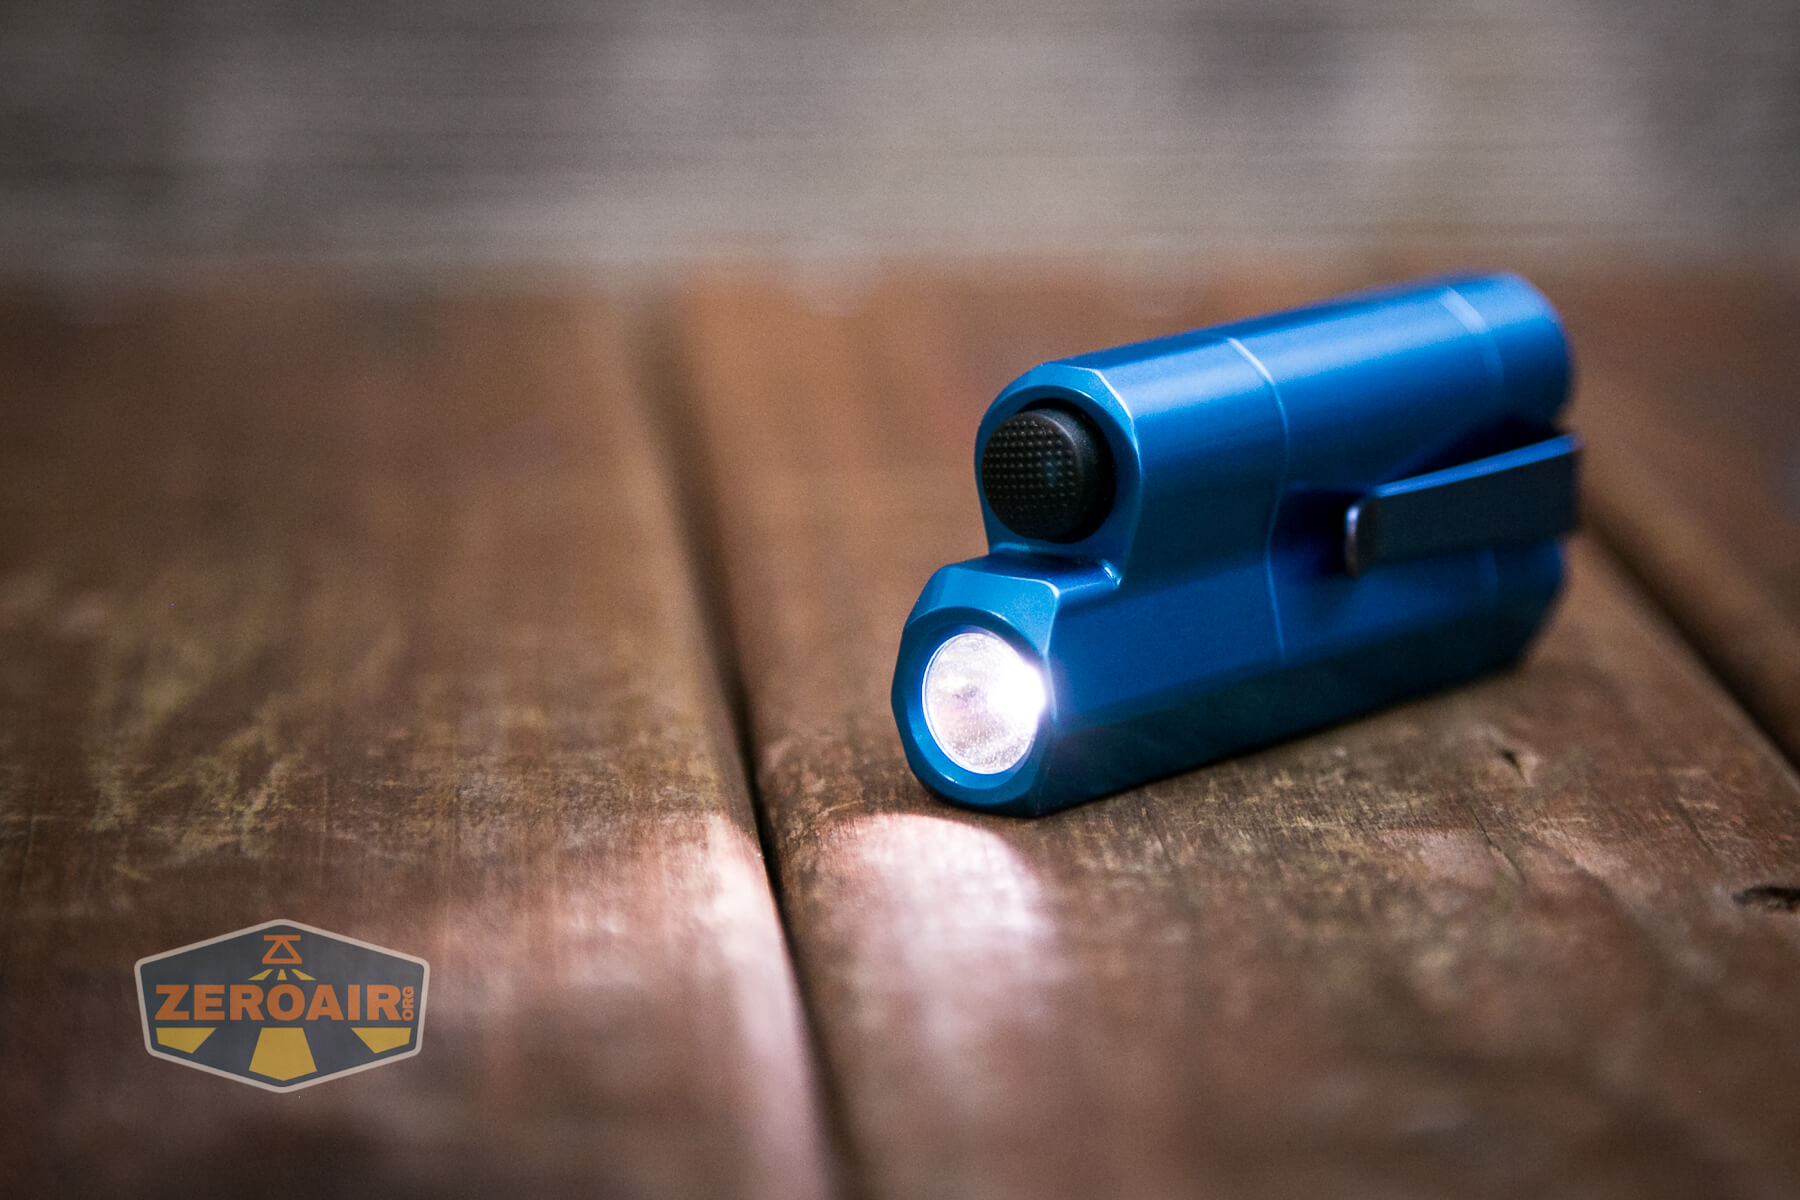
Second to how the anodizing feels is the actual design of this light. It’s an unusual shape. The switch actuation is also unusual. It’s almost like the Synergy1 is designed to resemble a pistol, and the switch actuation is not unlike pulling a trigger.

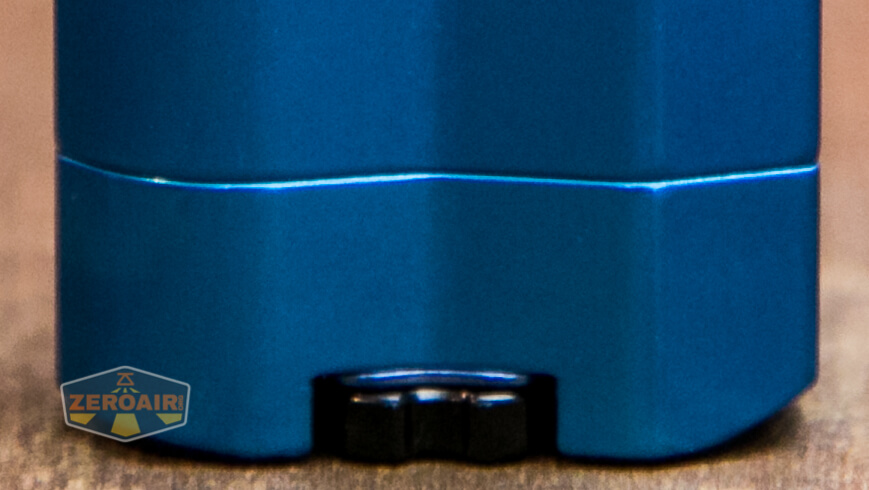
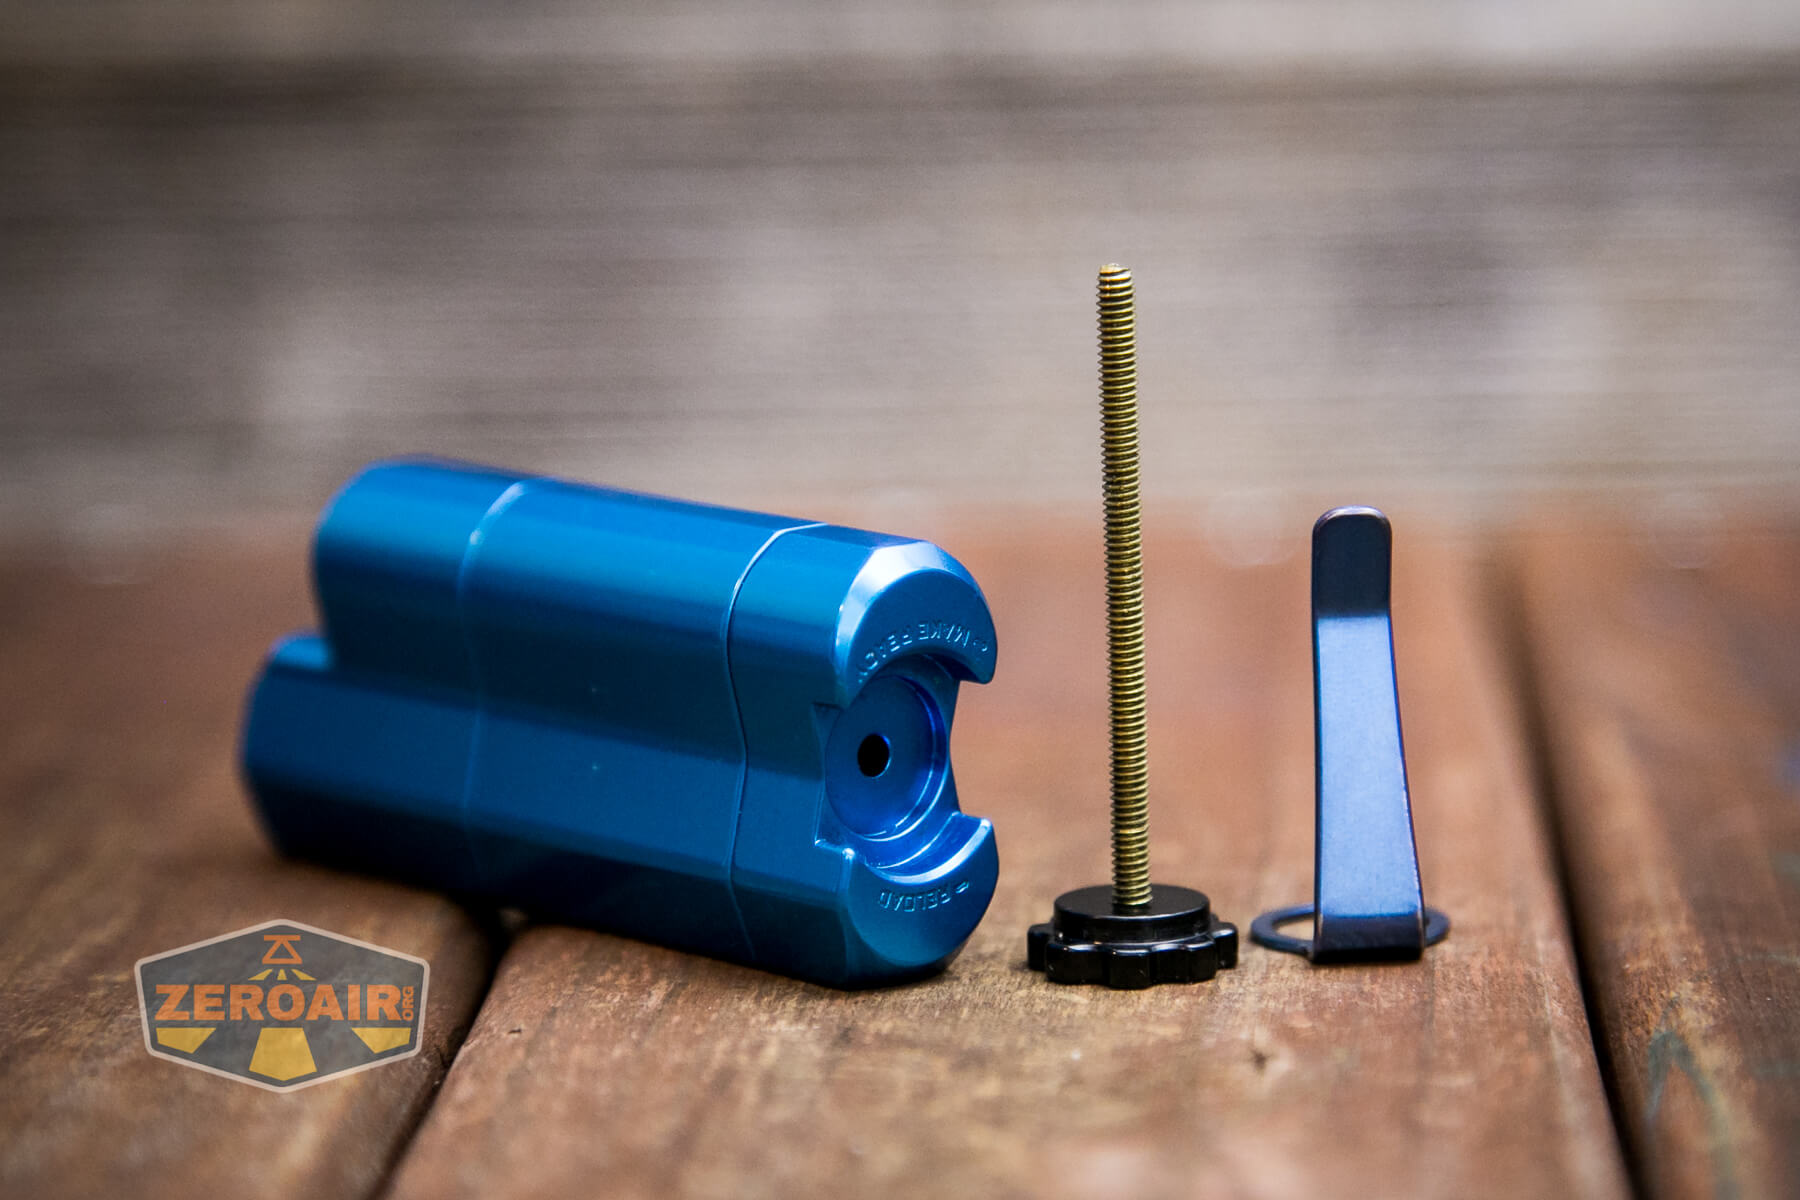
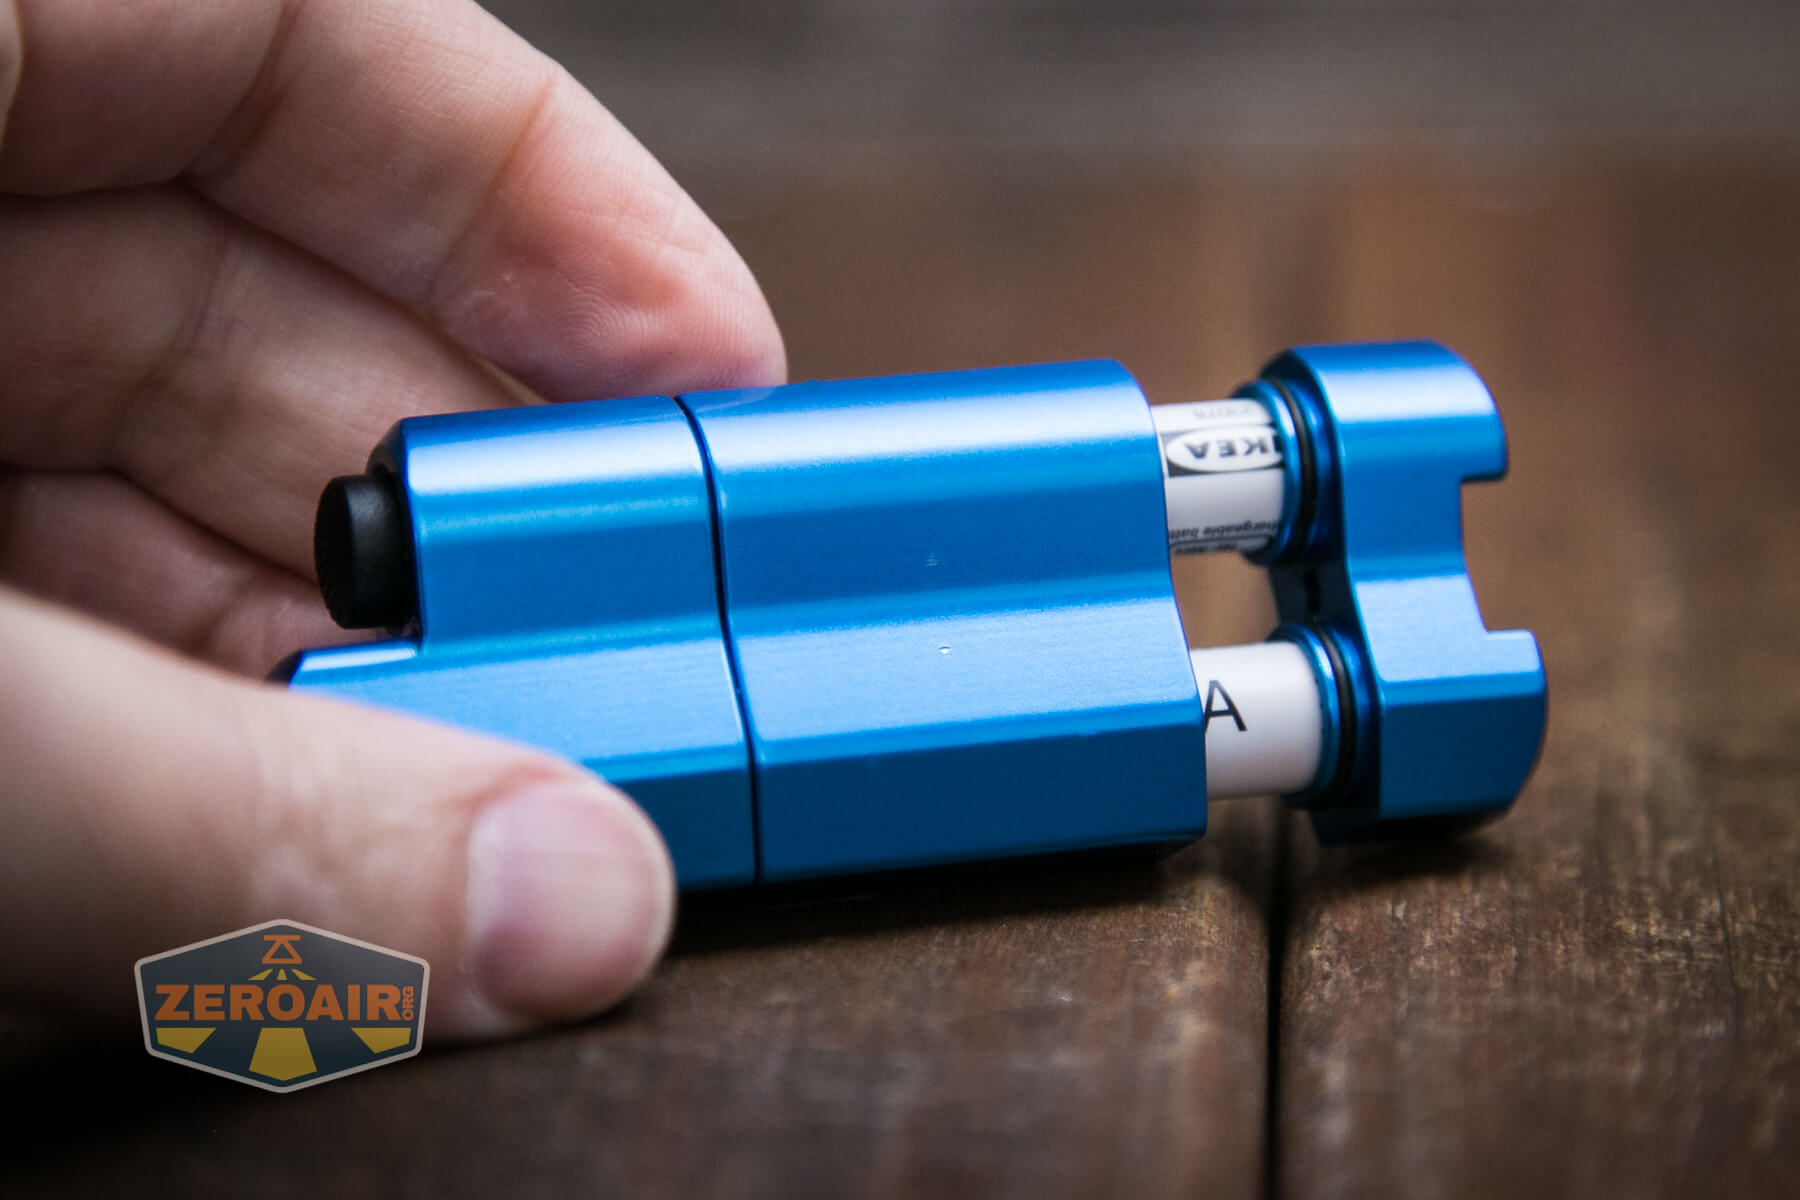
Now on to disassembly. Really this is just a teardown of parts, as I haven’t removed the engine and other head-end parts. This is what you’ll do for swapping cells, for example. To remove the tailcap you must unscrew the little black part on the tail end. This is one of my gripes about the Frelux Synergy1. In fact, that gripe carries over to the Synergy2, too. The mechanism is the same. Unscrew that black bit and you can pop off the tailcap. This is sealed by a couple of o-rings.

Since I haven’t said it elsewhere, I’ll say it here – this whole flashlight (excepting the threaded rod, probably) is aluminum. There have been titanium versions, too, in a limited run of “Firefly” models.

The cell tubes are actually held in place the same way; by the same screw, too. They have the same o-rings to seal the parts together, too.

Here’s the head end. Both parts here are held in by aluminum retaining rings. It’s possible to buy a complete replacement engine if you want to swap the emitter – I believe these are even remarkably inexpensive, at (maybe?) $15.
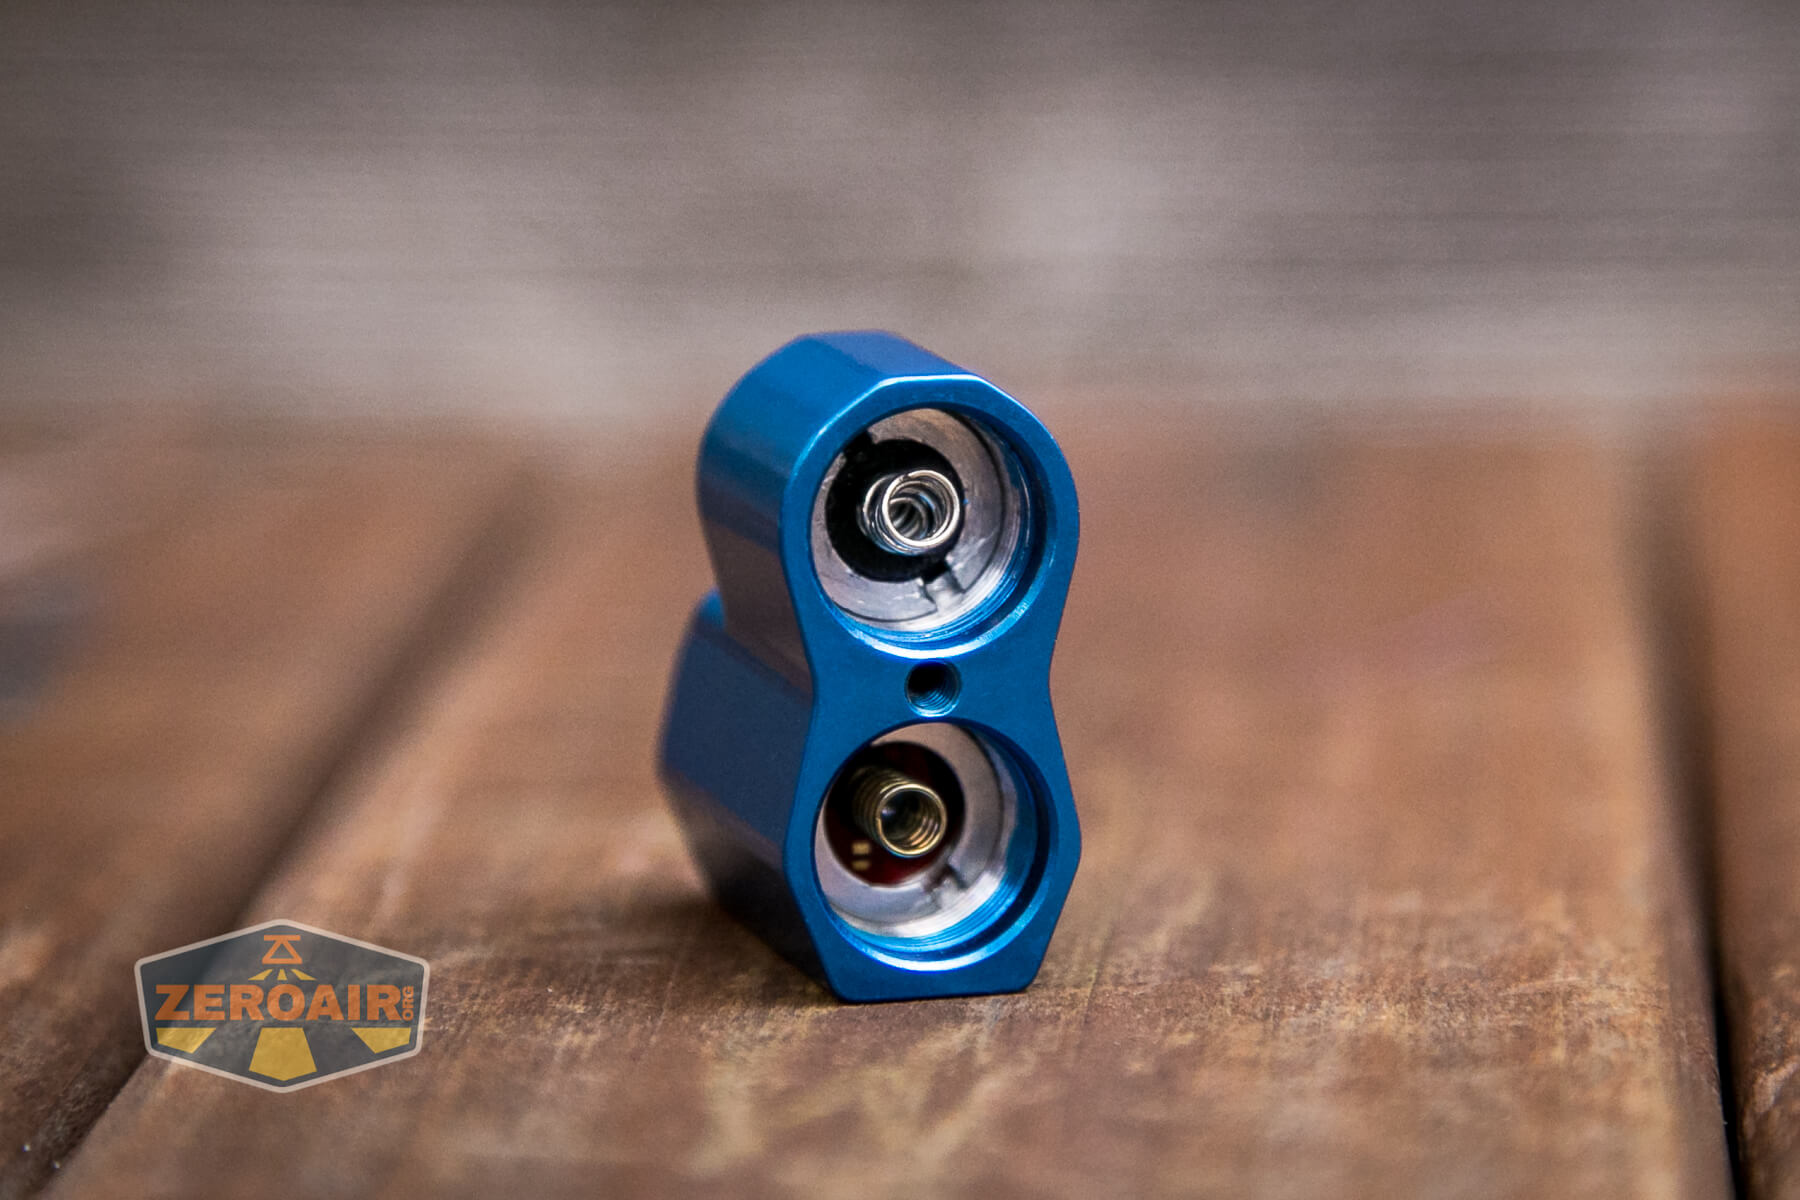
The head end contains all of everything – switch, emitter, electronics, etc. The tail is just a dummy connector.
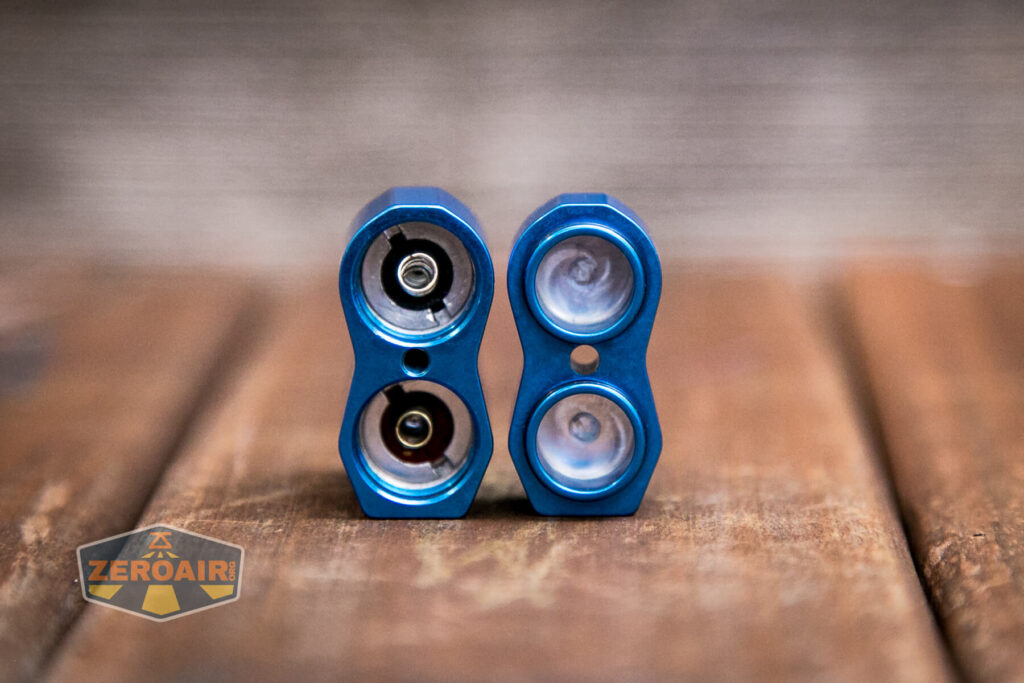
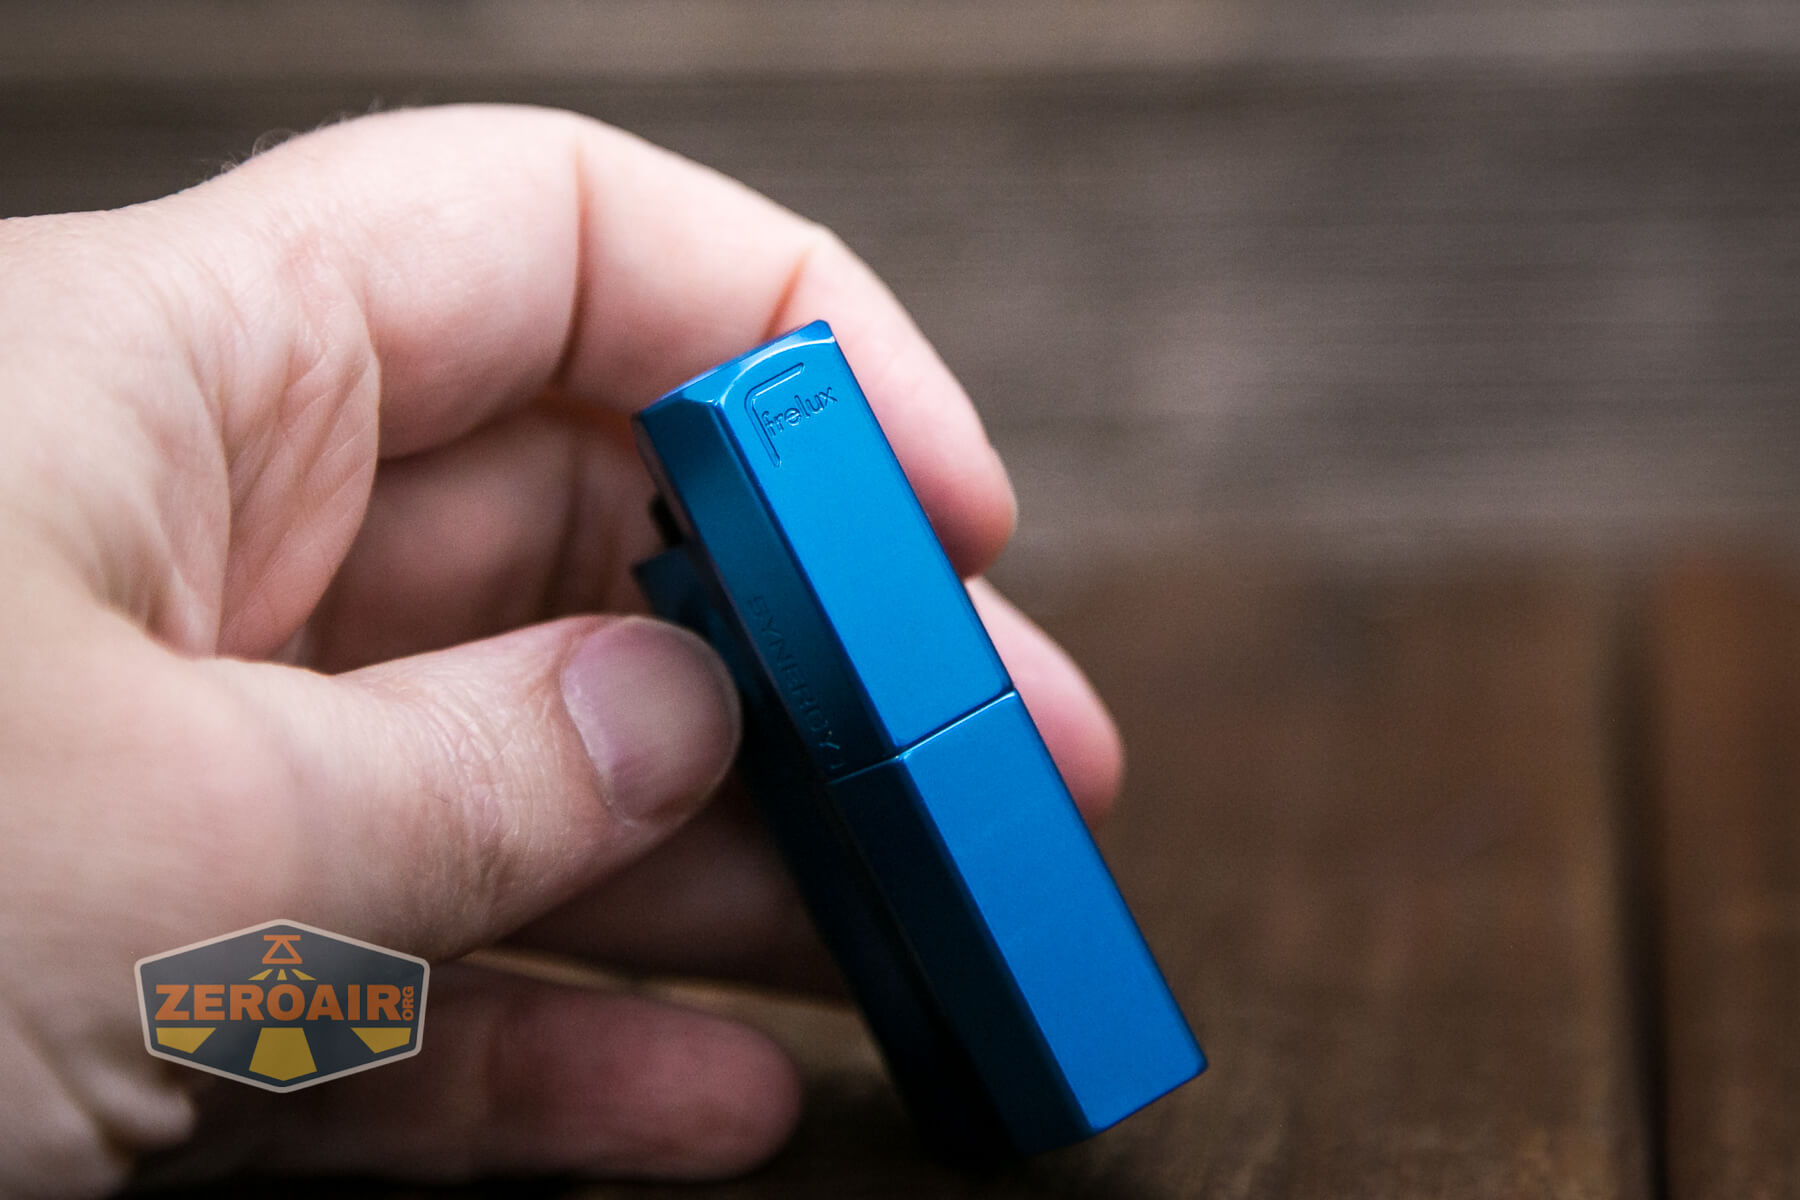
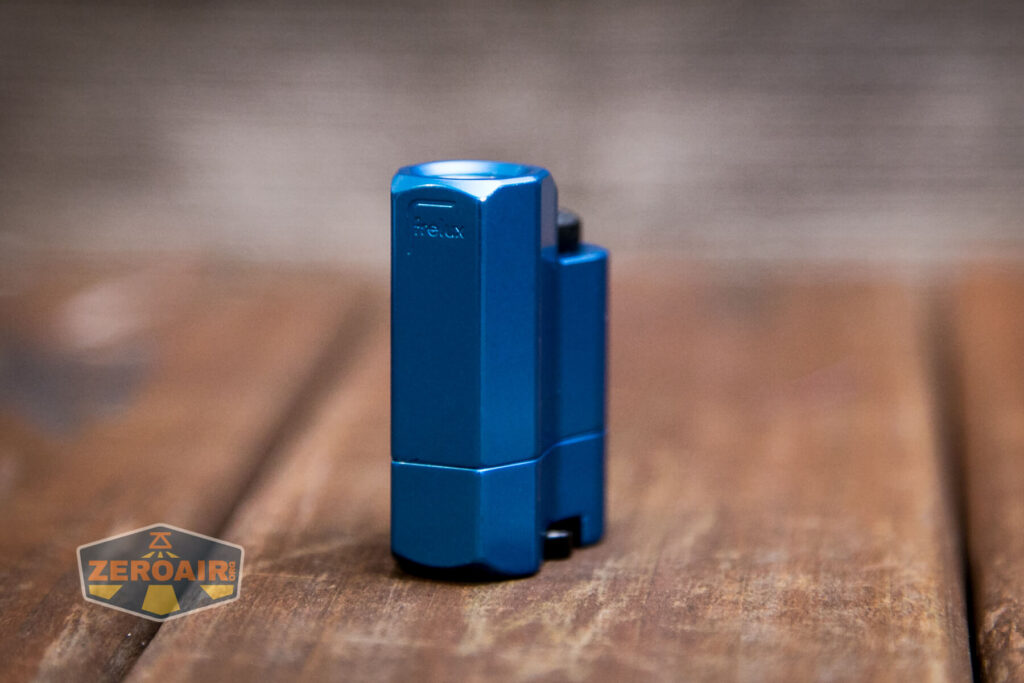
The Frelux logo is seen here on the … top? of the light, emitter side.
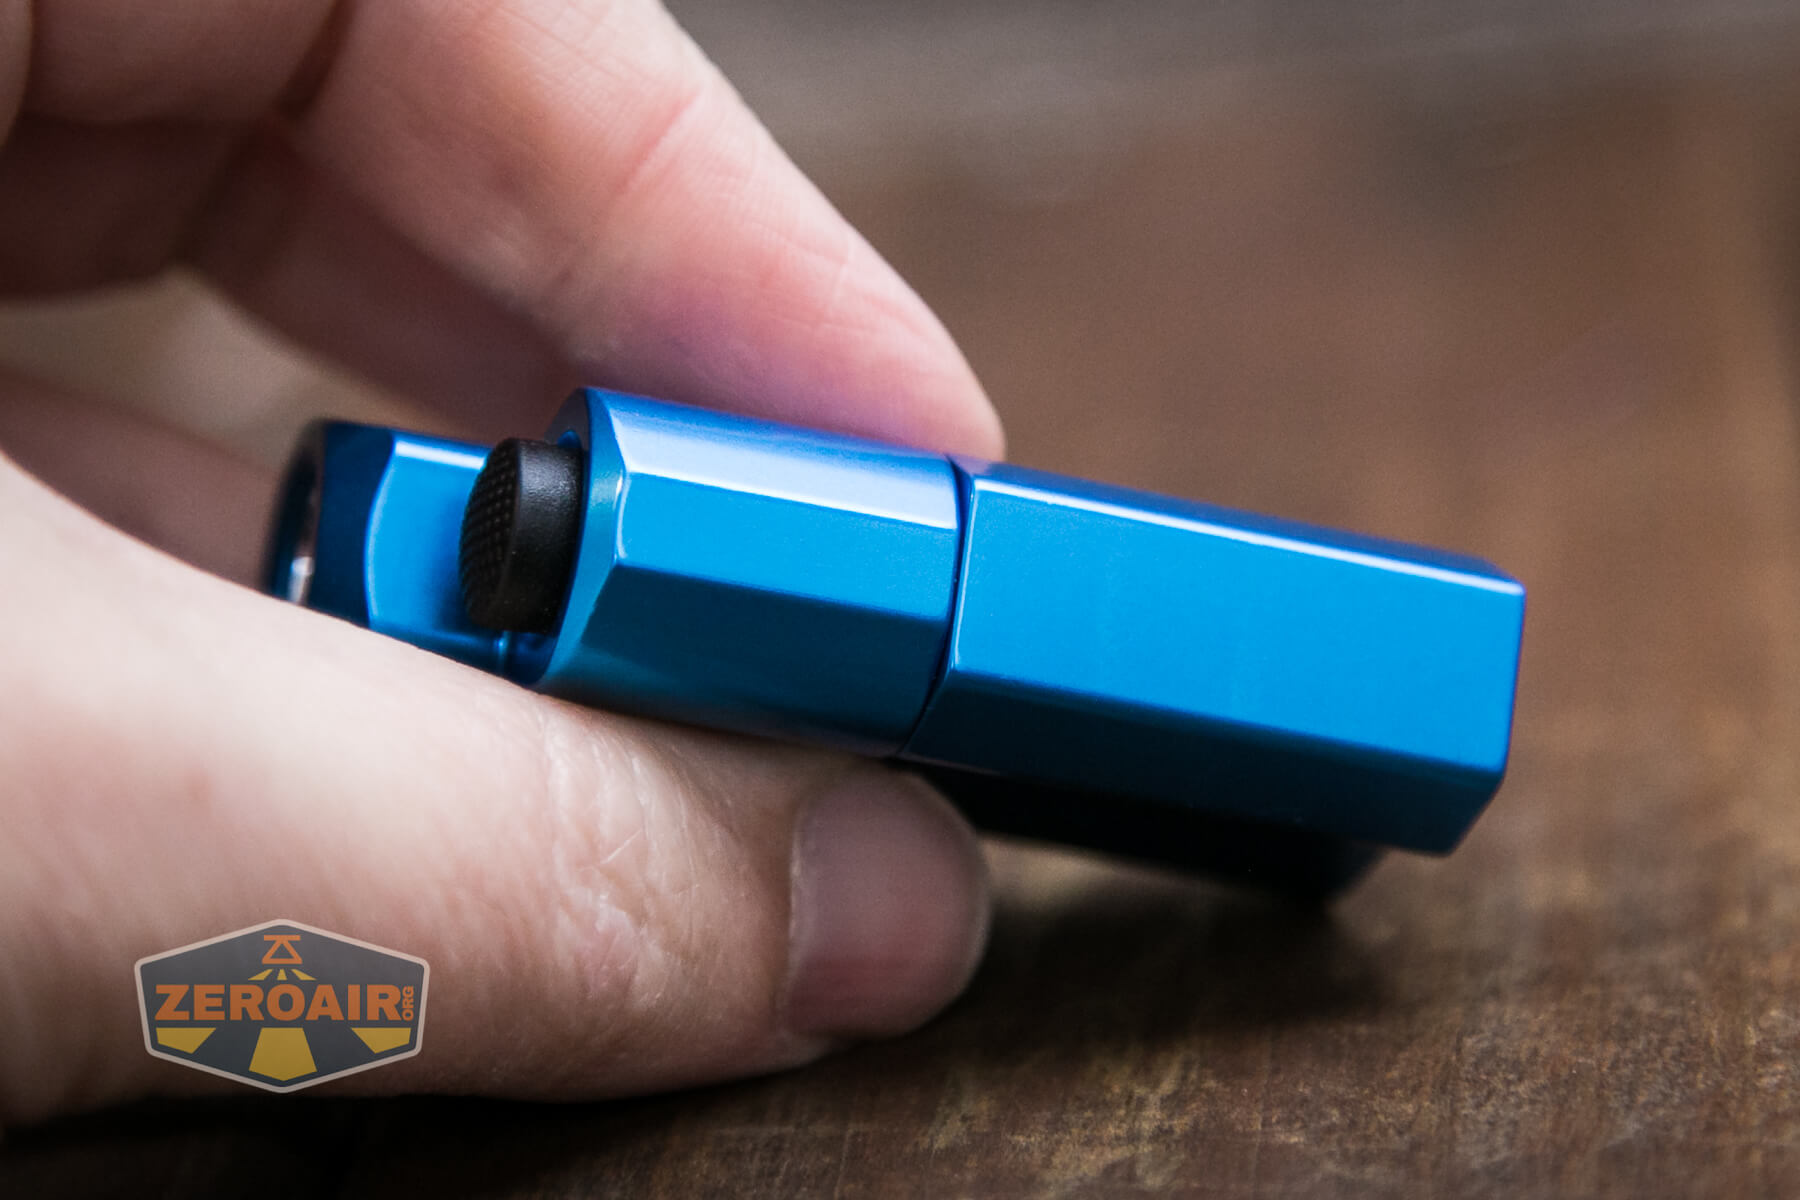
The bottom spine is seen here – this is switch-side.
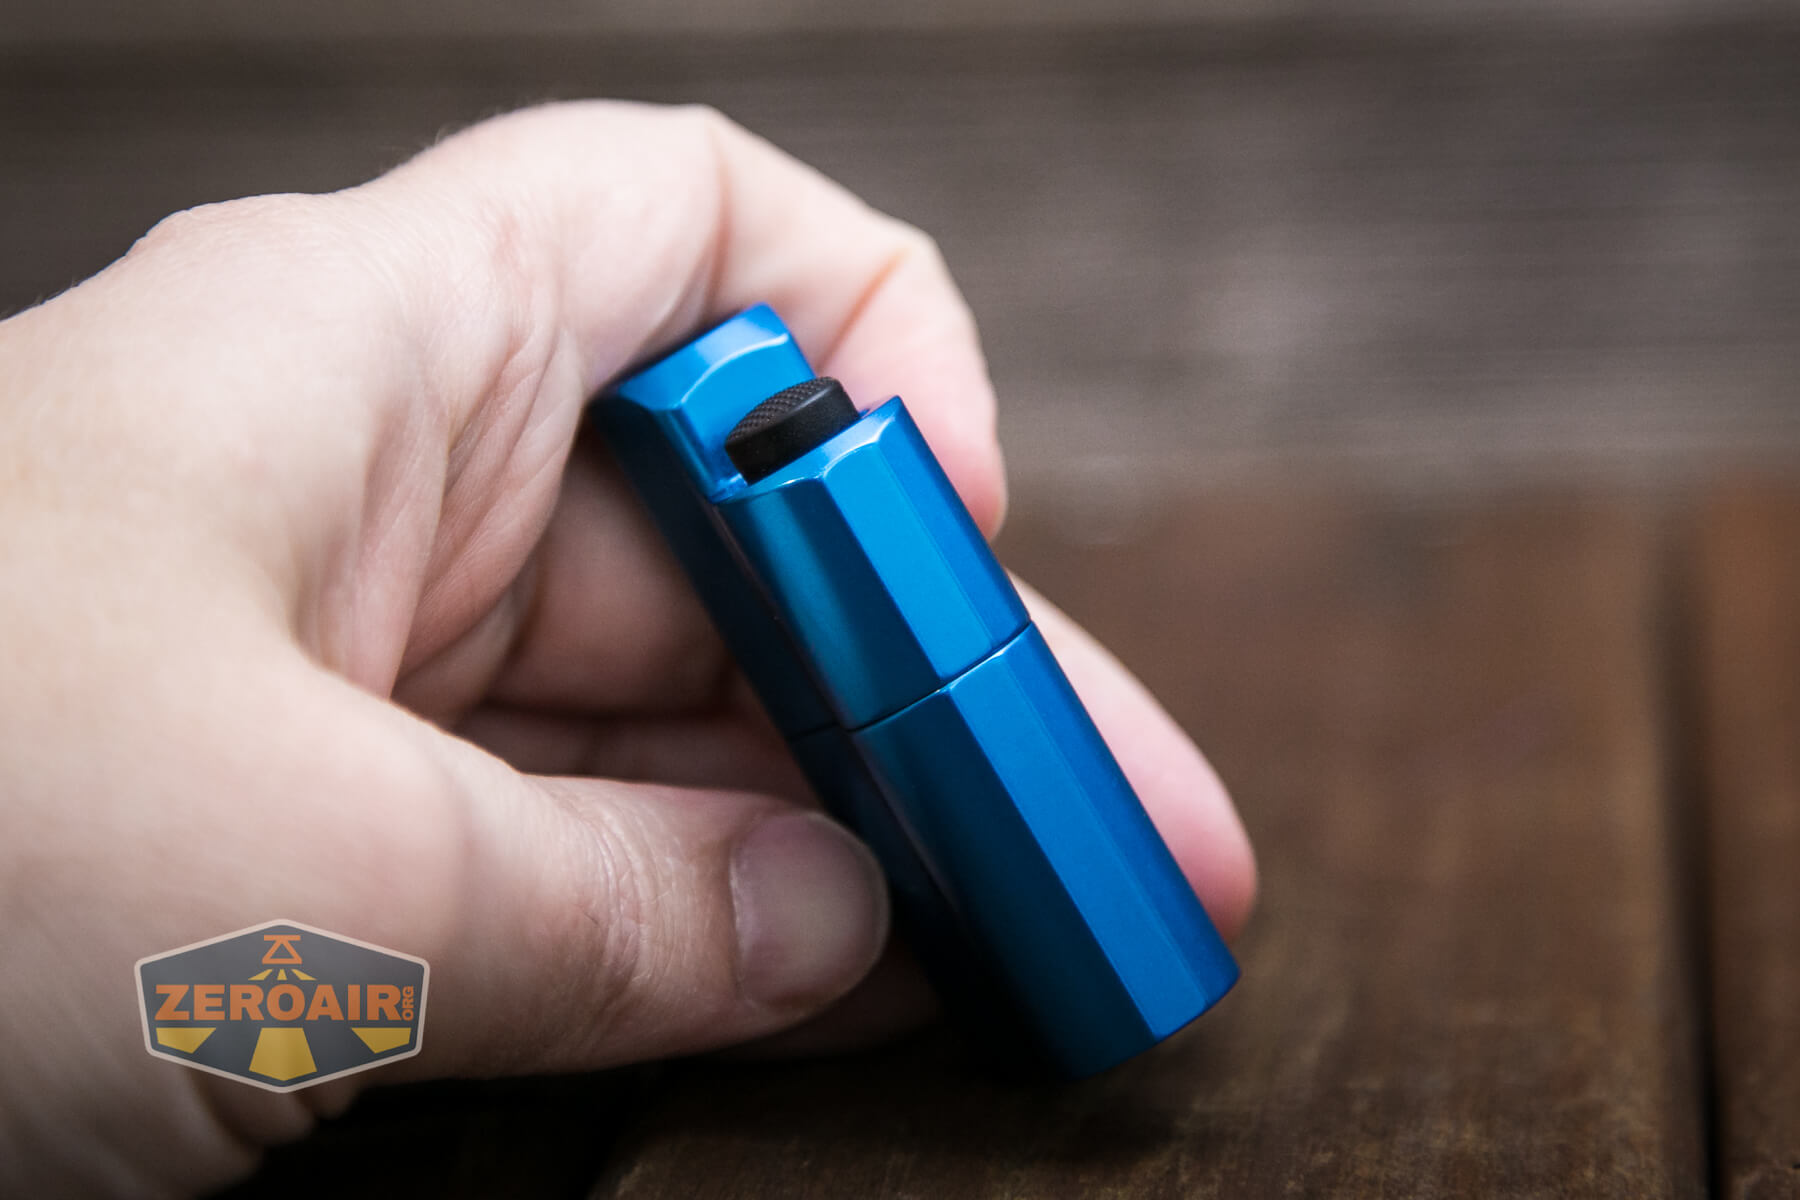
Related to the two photos above is the photo below – these two parts are not keyed (internally) and will fit together mechanically, they are easily distinguishable by the spine width.
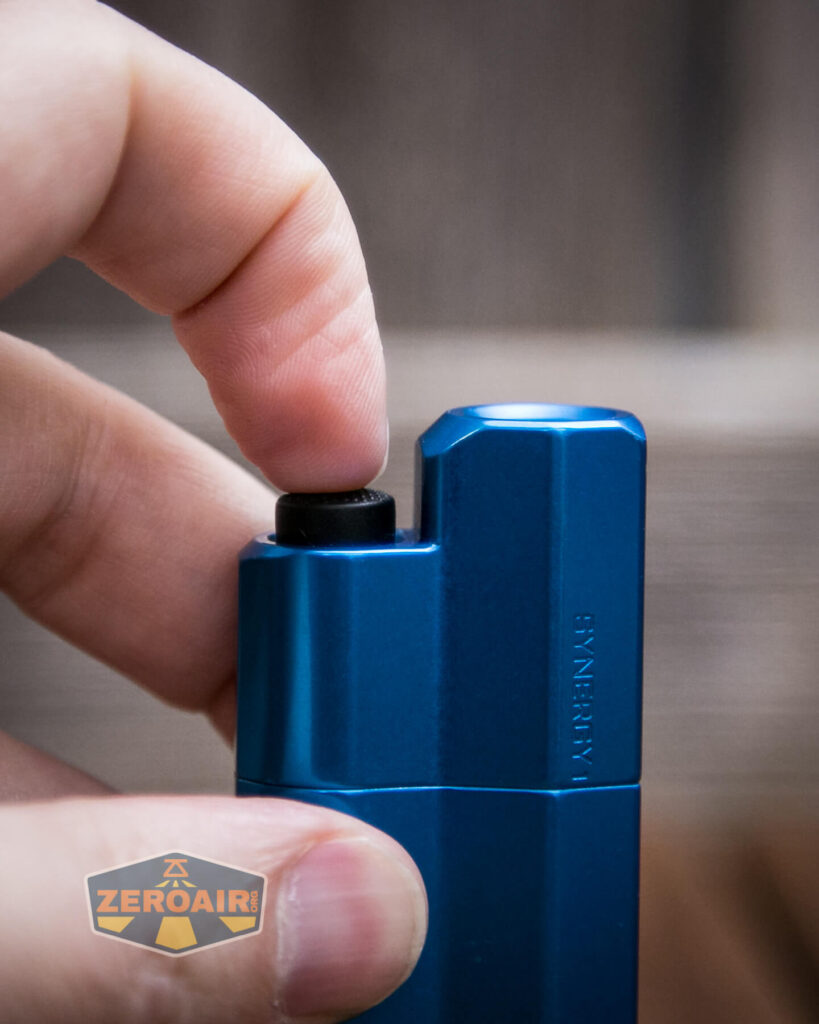
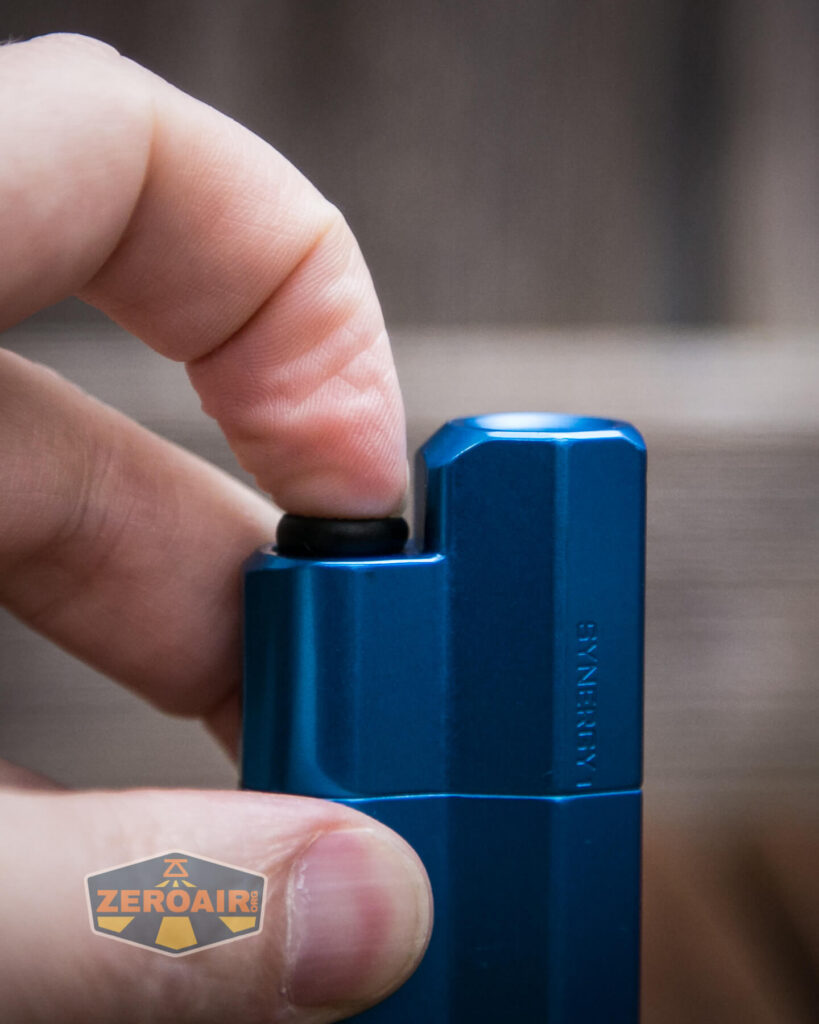
Here’s the little bit you need to unscrew for cell swaps or to remove the pocket clip. This is a part of the Frelux Synergy1 flashlight that I positively do not like. I found this hard to unscrew. I found it hard to get tight. I found myself having to fight against the spring pressure from the head and the cell length to get even get the threads started. I do not like this aspect of Synergy1. This is clearly designed as a tool-less removal part. I’d rather it just have a Hex option right there in the center so that I can at least use a tool. I understand that this complicates the long threaded rod that goes down the center… I still want a tool option. Or even a coin slot. Something. Anything.

Now let me hasten to add one point here. The Synergy1 is sold out, probably never to be available again. The Synergy3 is upcoming, and specifically answers this complaint about the S1. No more do you have to unscrew this little retainer in order to swap cells. The S3 will have a flip-up front for cell swaps! Fantastic change right there.
The head also has a bit of branding, seen here. “SYNERGY1” is engraved on the side.
Here you can see this long threaded rod that goes down the center of the S1. I’m showing it this way for a reason. There are two ways you can disassemble the S1. First, you can unscrew the black dial off of the threaded rod. Second, you can unscrew the rod from the head connection. Now how you make this happen is up to you. If this was my personal light I’d be inclined to Loctite the black dial to the threaded rod. Alternatively, you can just carefully unscrew the dial so that the rod stays connected (it’s magic, you’ll figure it out.)
Keeping the rod connected to the dial accomplishes a few things. First, it makes reinstalling the parts easier. The black dial is already connected, and you end up with better leverage to push downward (or “squeeze the parts together”) so that the rod will grab the threads internally. Secondly, you don’t need another reason.

Just to give you an idea of how much you need to compress the parts when installing cells, here’s a shot of the resting state with cells installed.

And below you can see sort of how much you need to compress the body parts together all while screwing down this rod and dial. The lack of knurling on the body does not help here. And don’t forget that this is really a fairly small light, too.

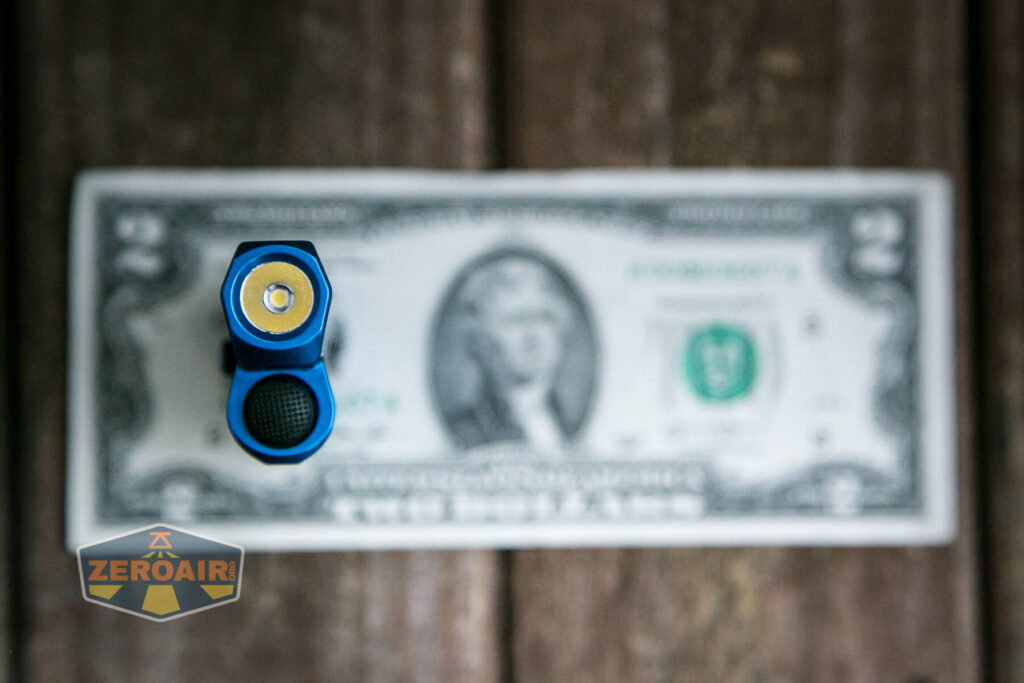
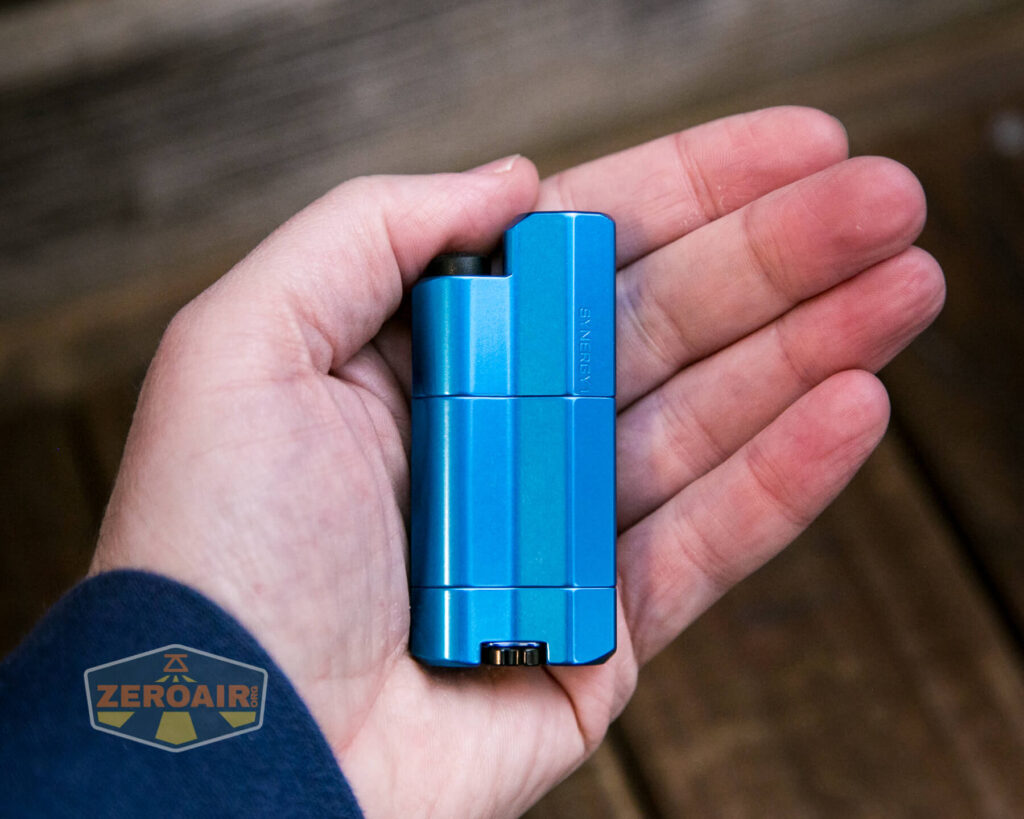
Size and Comps
I don’t see any official measurements. And while you can take my word for it that this little guy is smaller than you were guessing, here are my measurements.
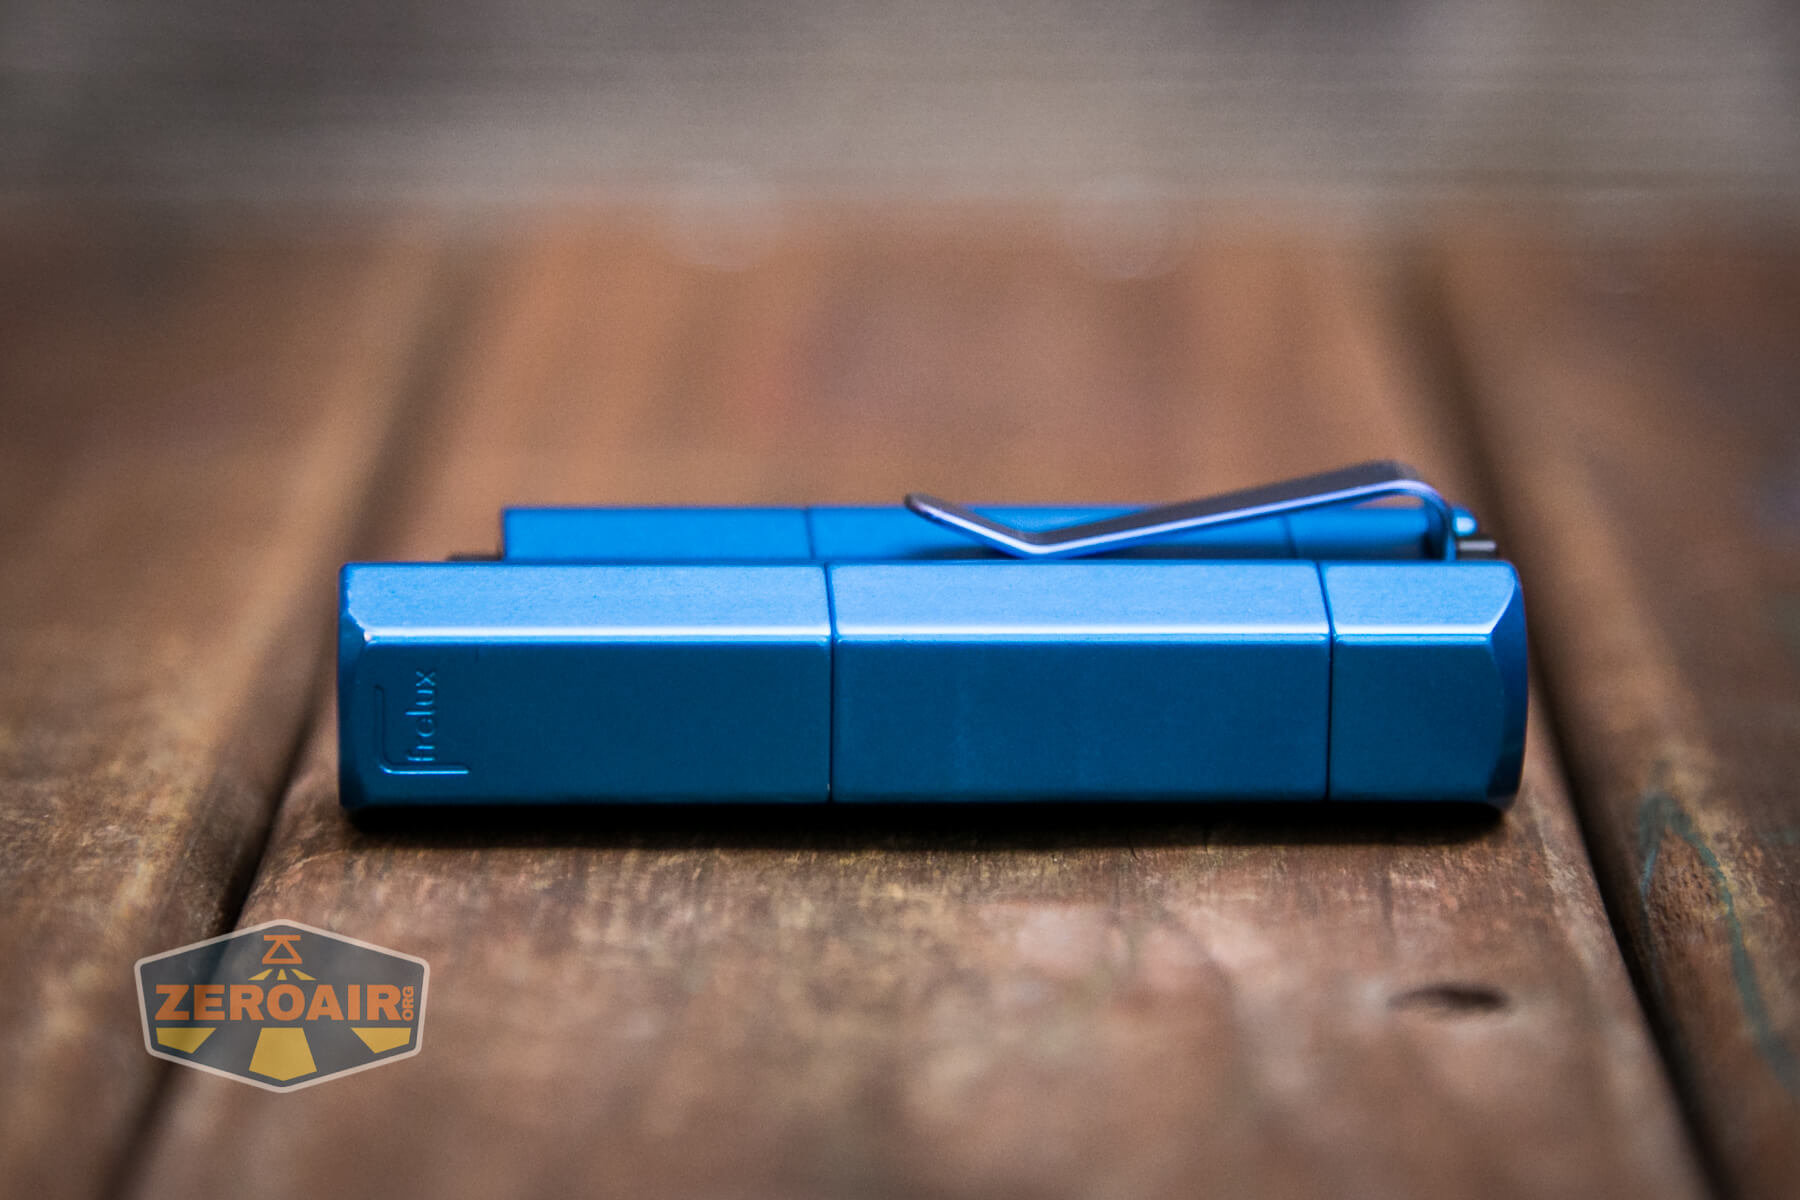
Longest length: 74.5mm
Length with switch included: 68.3mm
Lenght of body on switch side: 63.87mm
Height: 33.84mm
Height of emitter protrusion: 18.73mm
Width: 16.62mm
You can use your engineer mind to sort out where these dimension imply, if it’s not clear by my naming.


If the flashlight will headstand, I’ll show it here (usually the third photo). If the flashlight will tailstand, I’ll show that here, too (usually the fourth photo).

Here’s the test light with the venerable Convoy S2+. Mine’s a custom “baked” edition Nichia 219b triple. A very nice 18650 light.
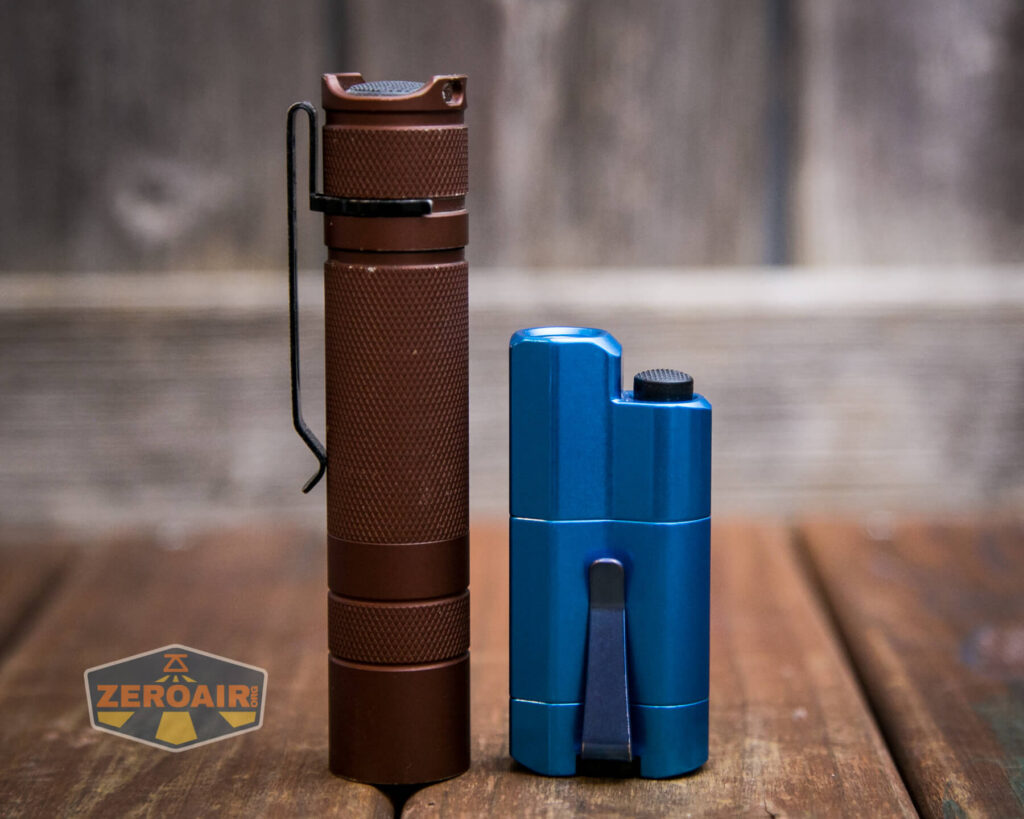


And here’s the light beside my custom-engraved TorchLAB BOSS 35, an 18350 light. I reviewed the aluminum version of that light in both 35 and 70 formats.


I hinted at this above, but yes, the head and tail do fit together perfectly. There’s no rod in here though, so the parts are held together only by compression.
Retention and Carry
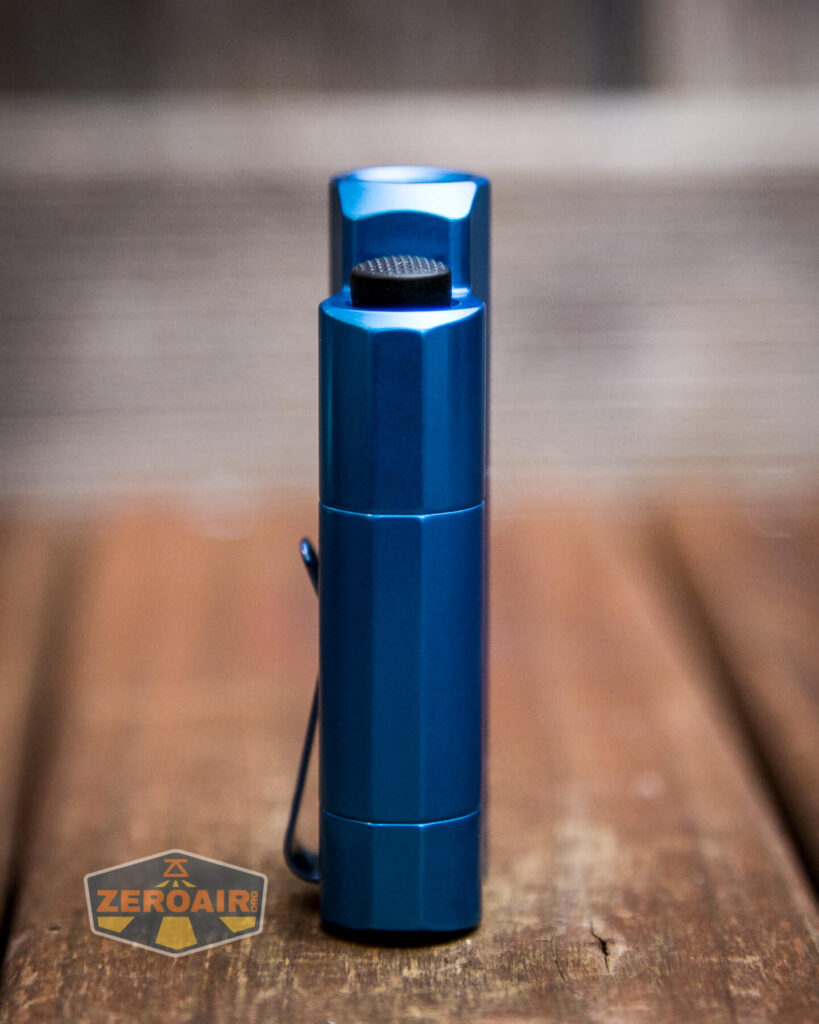
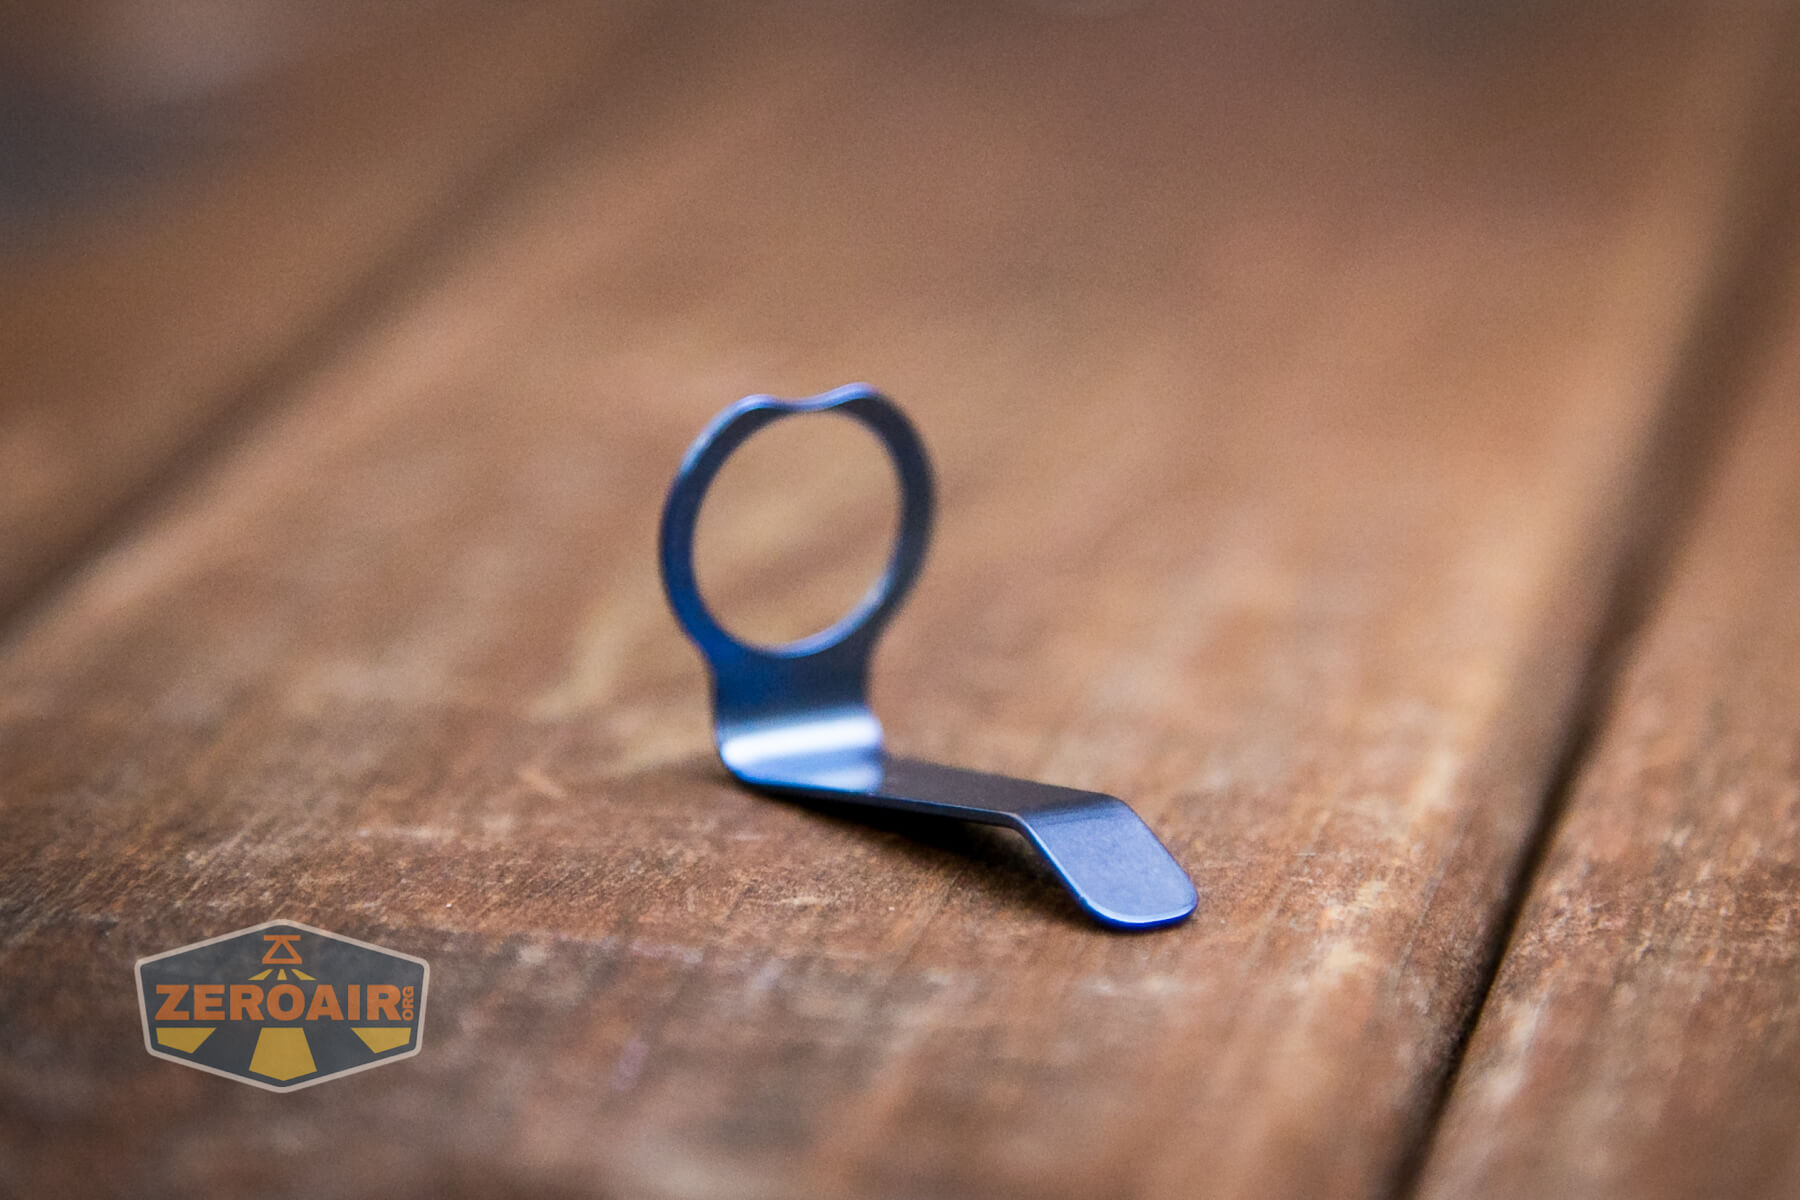
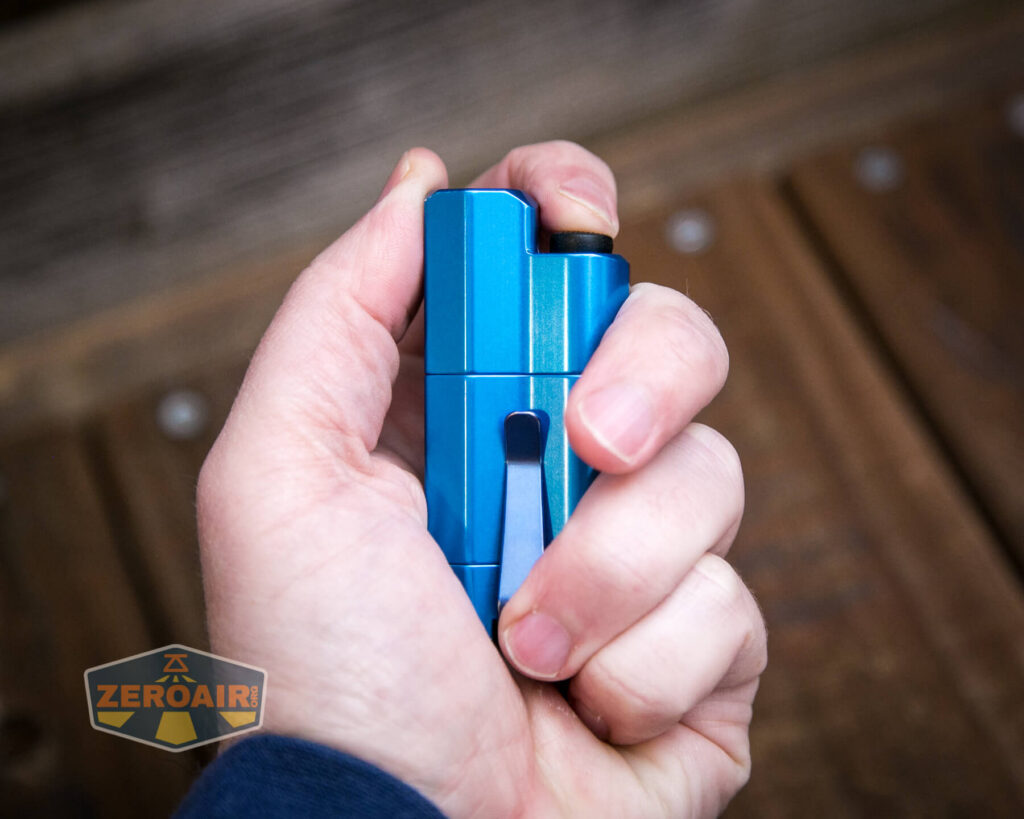
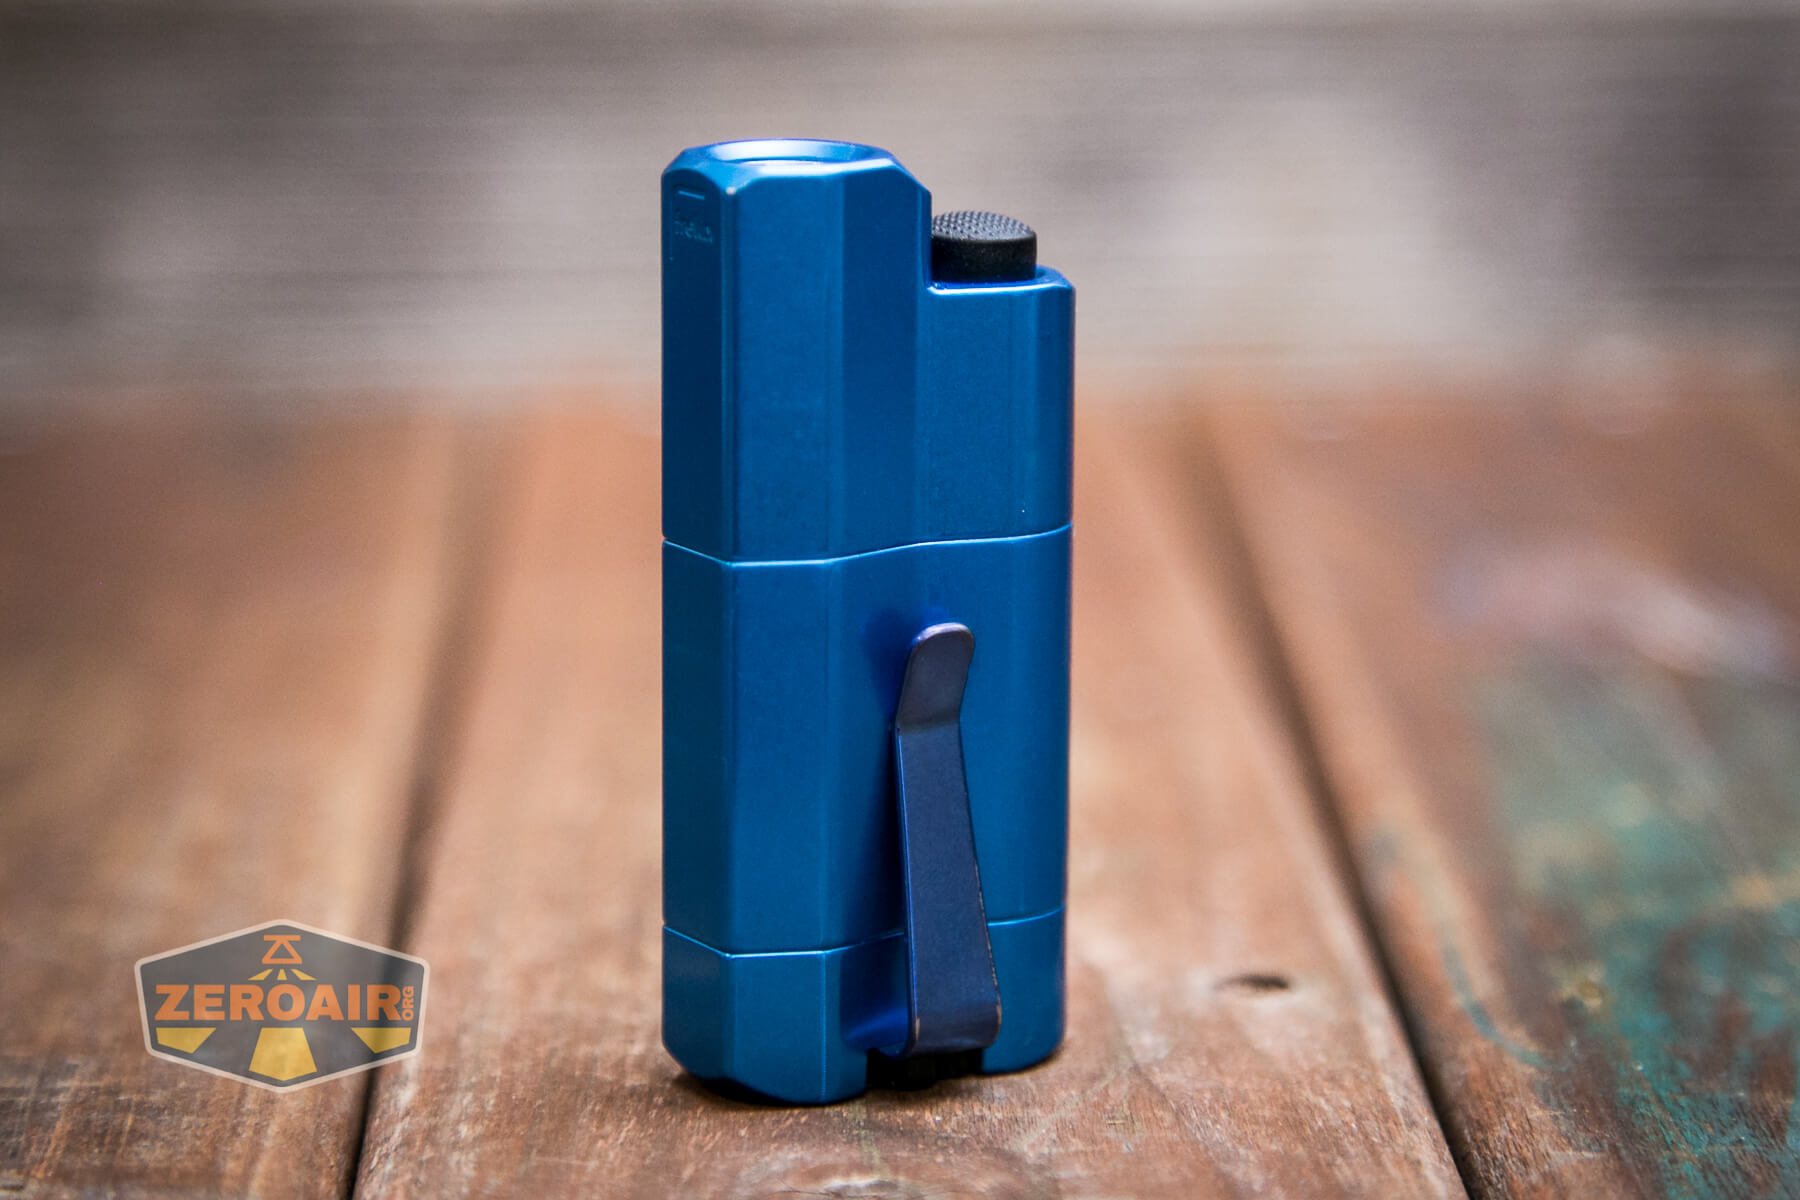
Ah the pocket clip. The pocket clip is really the only included way to carry the Frelux Synergy1 flashlight. Below you can see the clip in blue. There’s also a loop option. This allows connection of a lanyard.

The loop looks quite nice, but the pocket clip is good too. I would love to see a hole added to the pocket clip so it could double as a loop/lanyard attachment too. I can’t imagine you’d lose enough structural integrity for putting a hole in the clip to be a real concern. Or even a clip option that has a clip on one side (as seen below) and the other side with a loop. You’d really lose nothing by adding this option, but carrying a third part might not be ideal.
Here’s me demonstrating that I hate installing this dial over the clip. In fact, through all of my testing, I just left the clip off. Without a clip, the parts are much easier to screw together. In other words, if you never intend to use the clip, well then… you can just forget all my complaints about installing the clip! The light will work fine without the clip.
Here’s a second point that I dislike about the pocket clip. The Synergy1 body has a nice well where the clip hits. That’d be fine if the clip pointed to match this well. But it does not. The clip hits very specifically and somewhat dramatically into the sides of the perfectly beautiful anodizing on the body.
Below you can see the best photo I have of what the clip does. It digs into the body! Newer generations of the Synergy line have a protective piece (“sticker,” I think) and so your body can be protected. But I find that solution to lack the elegance of the rest of this light.
All of those complaints about the clip and installing the clip, and the clip damaging the anodizing notwithstanding, the clip is great for clipping.
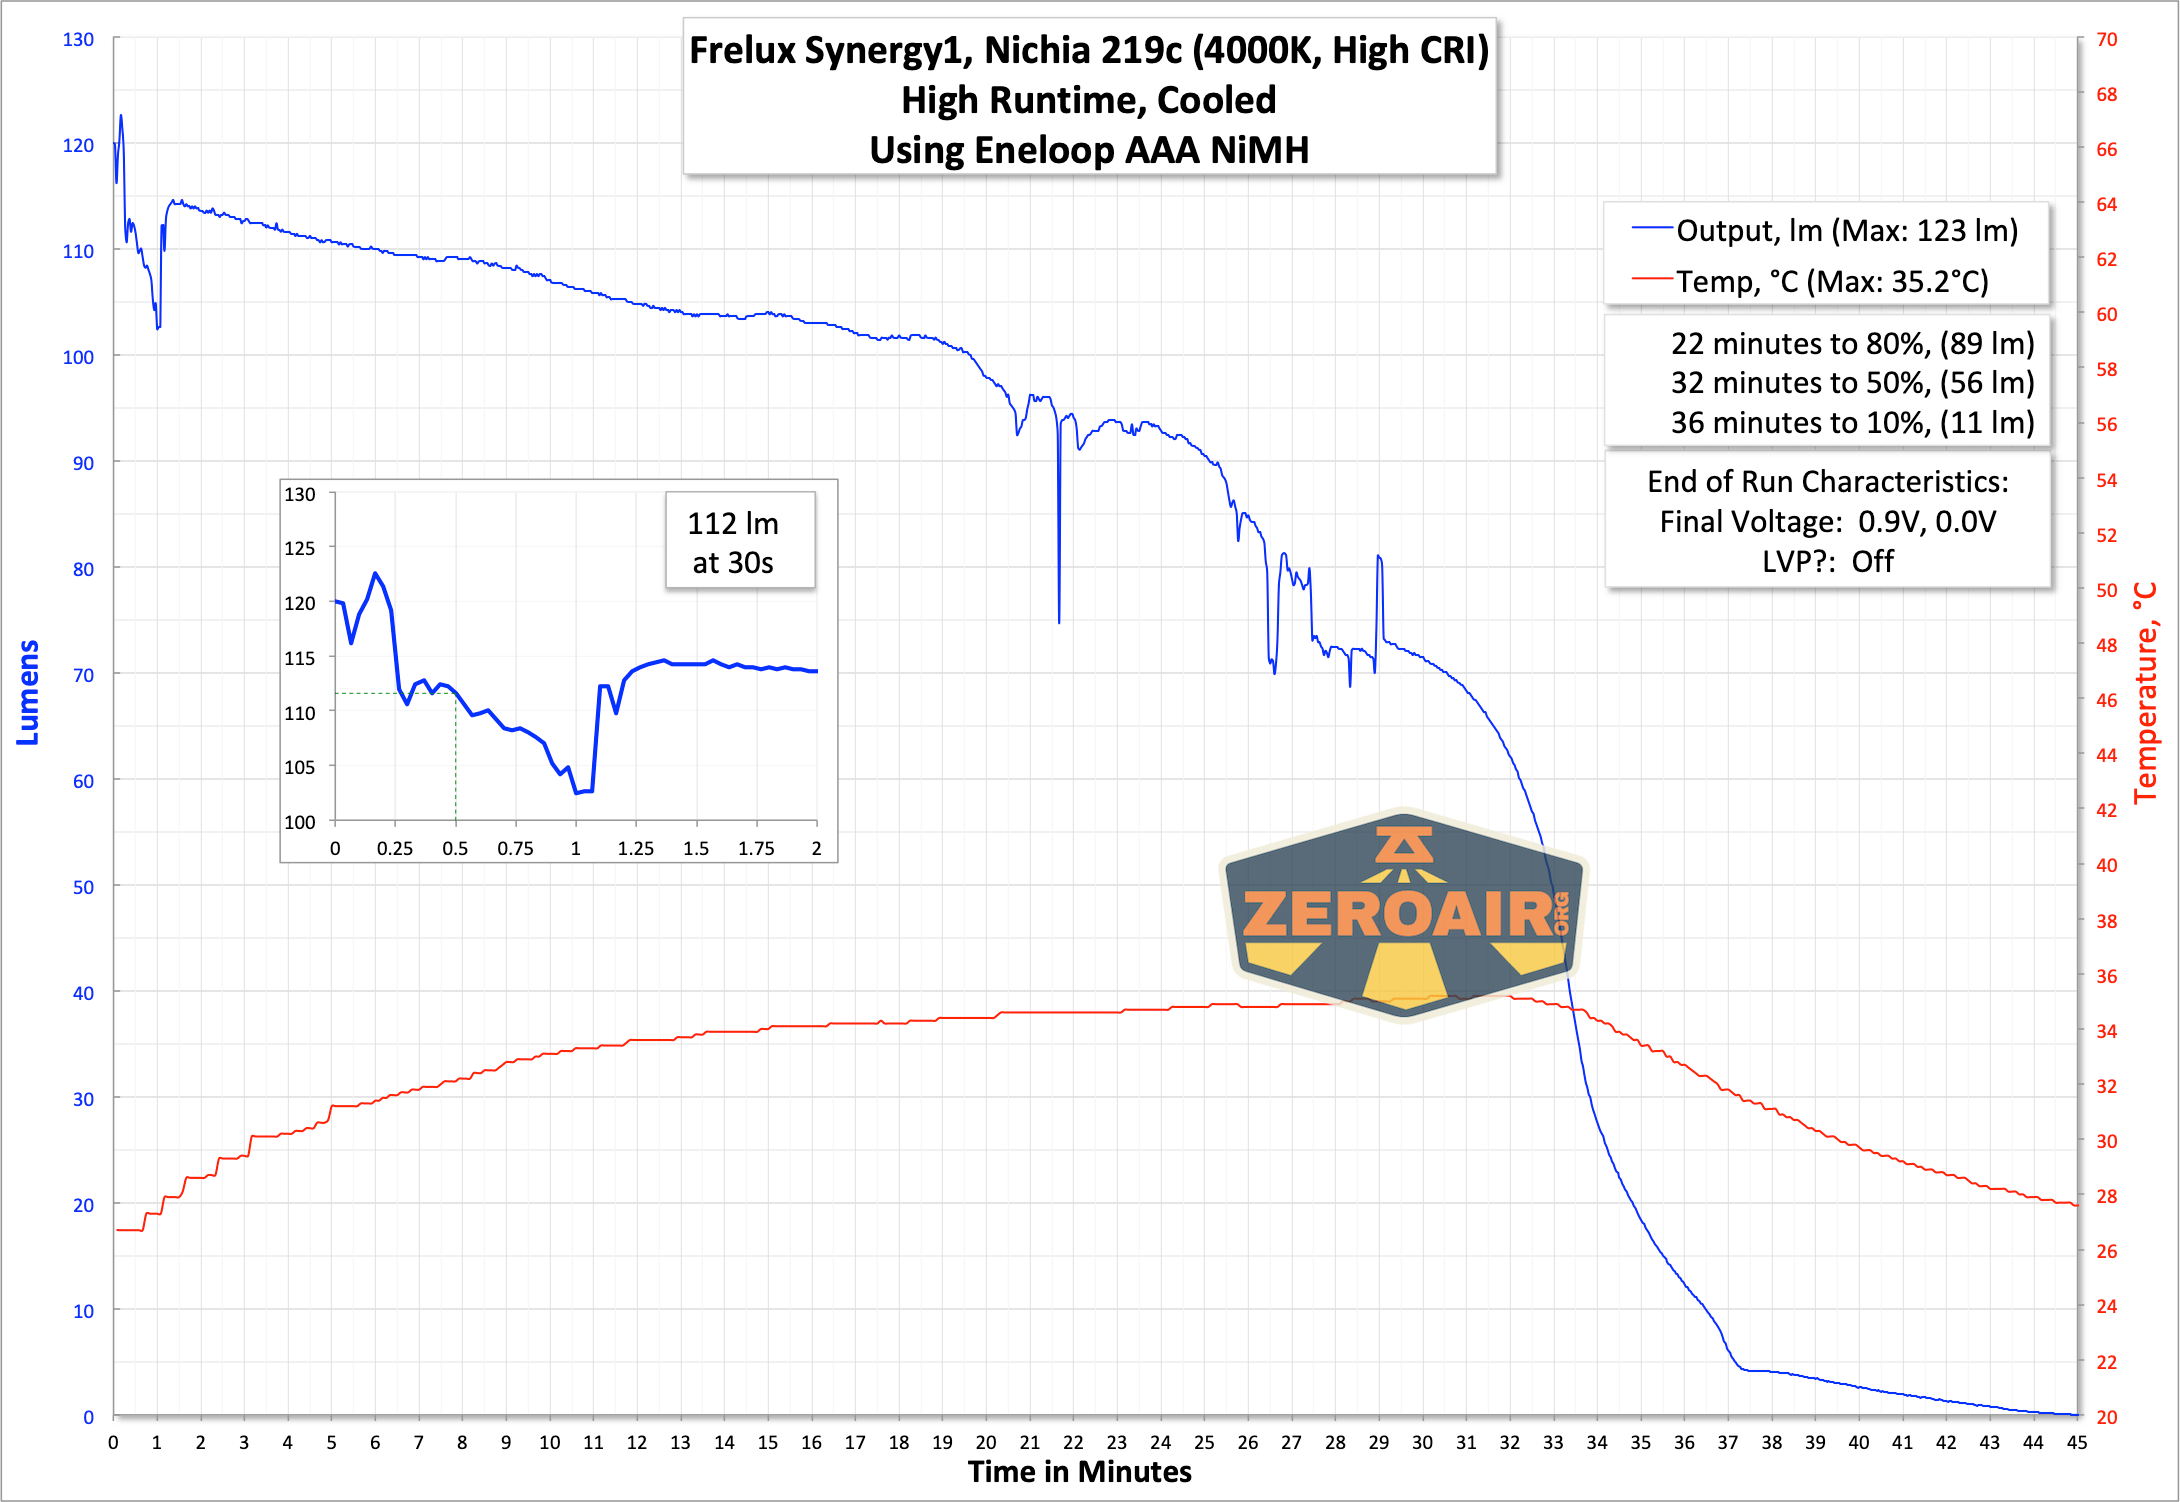
Power and Runtime
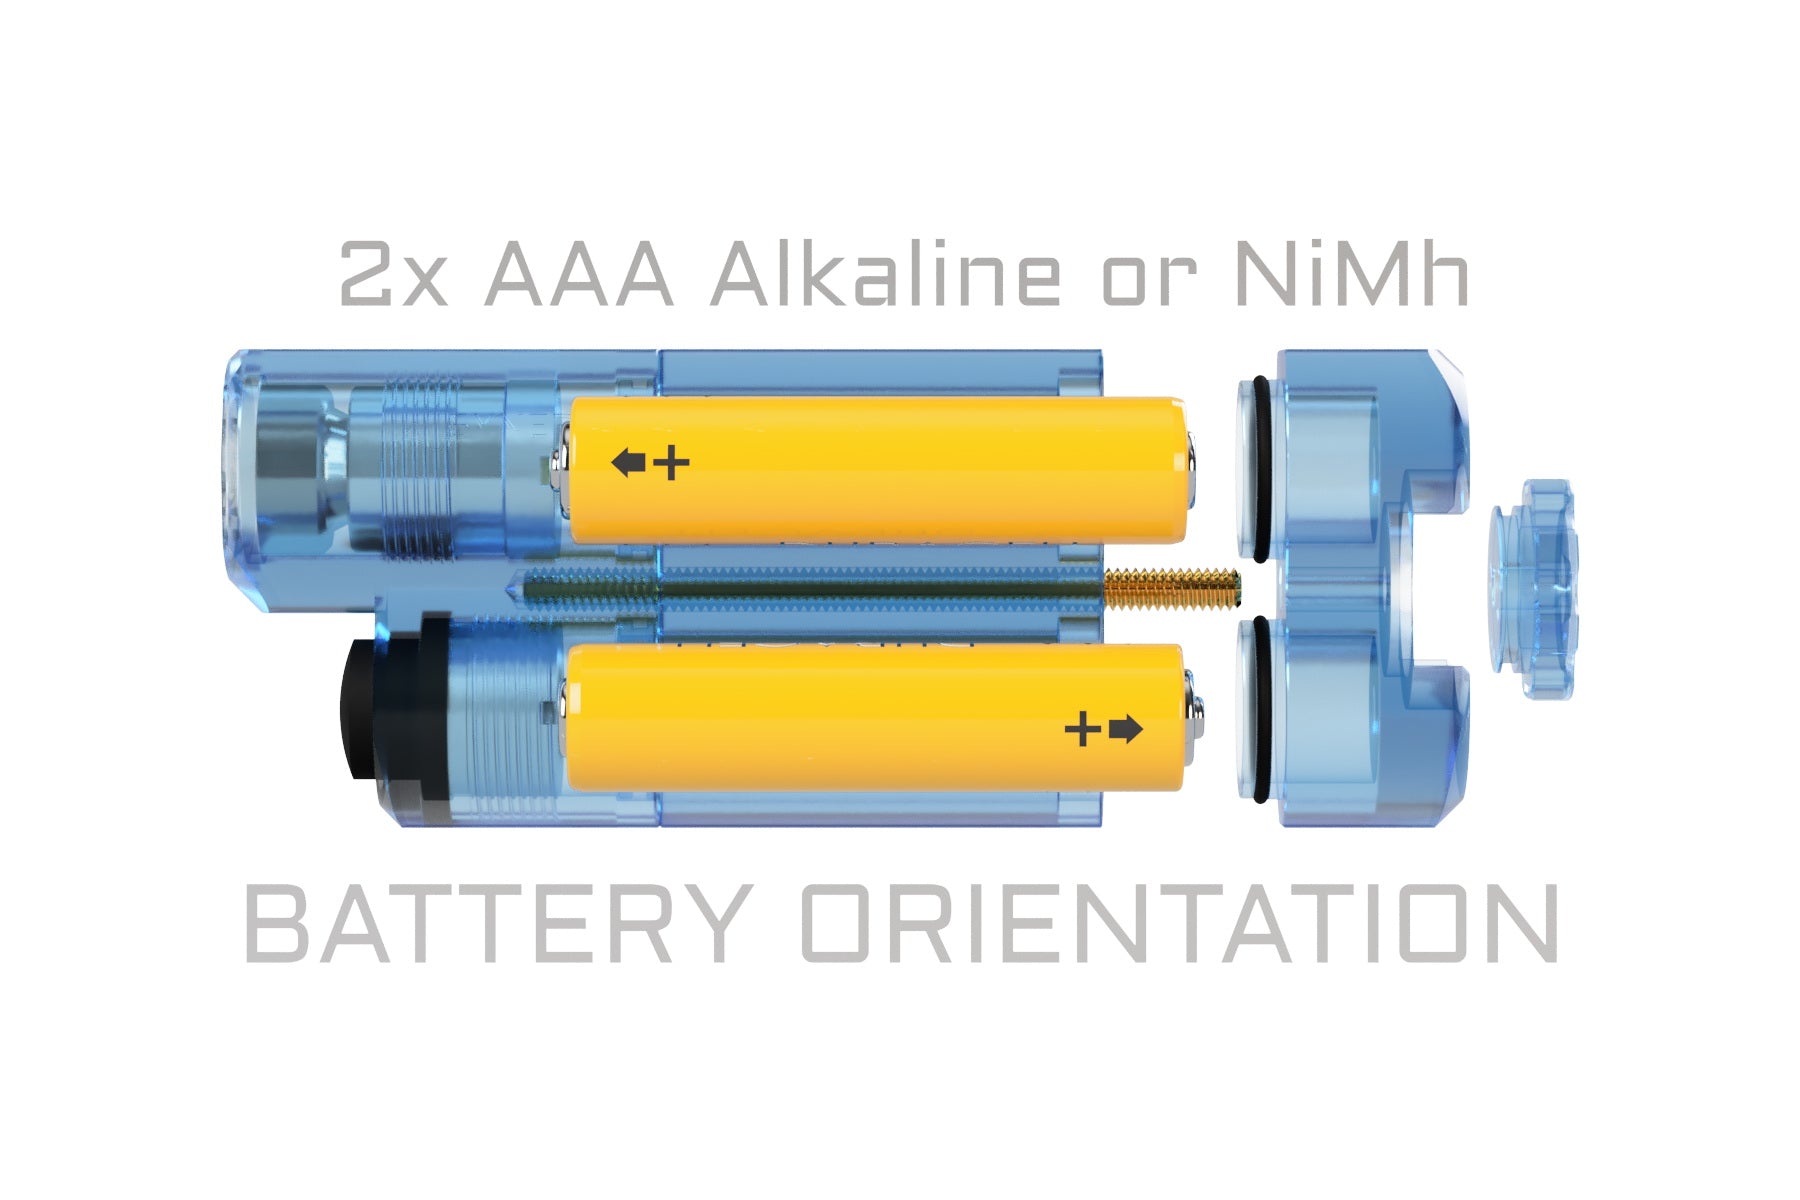
The Freluxy Synergy1 flashlight is powered by two AAA-sized cells. These must be 1.5V cells; lithium-ion cells are not supported in the S1. (So no 10440 cells!)

You have to use two cells, too – they’re in series. (“In series” means if you put only one cell in there, then the circuit can’t be completed, and the light won’t work.)
The cells go into the light in opposite orientation. One goes in head first and the other goes in tail first.

There’s an image from Frelux that covers this, but the body is marked too. Or you can remember two things. First, that they go in opposite. Second, that this light is like nearly every other light and the positive terminal goes toward the head. So the button on your AAA will be “head-most” and once you think of that everything else will fall into place.

I was sure I had a photo showing the plus/minus icons very clearly. But the body tube is marked with plus/minus, too. The marking indicates which cell terminal you should be able to see when they’re installed. So the side with the “+” circled, you should be able to look at the positive terminal of that cell.
There is no low voltage protection, it seems. 🙁

Modes and Currents
| Mode | Mode Claimed Output (lm) | Claimed Runtime | Measured Lumens | Tailcap Amps |
|---|---|---|---|---|
| High | – | – | 112 | 1.56 |
| Medium | – | – | 15.2 | 0.2? |
| Low | – | – | 1.1 | 0.2? |
Pulse Width Modulation
No PWM is seen on any mode.
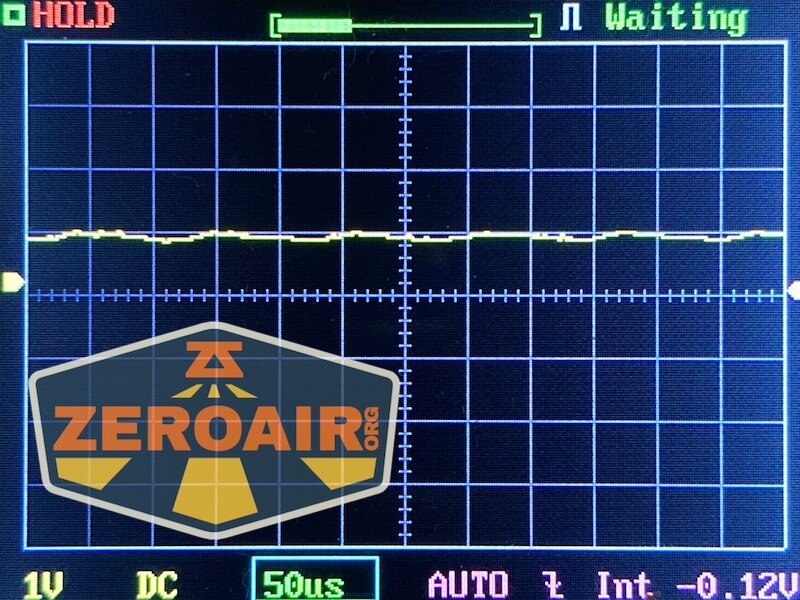
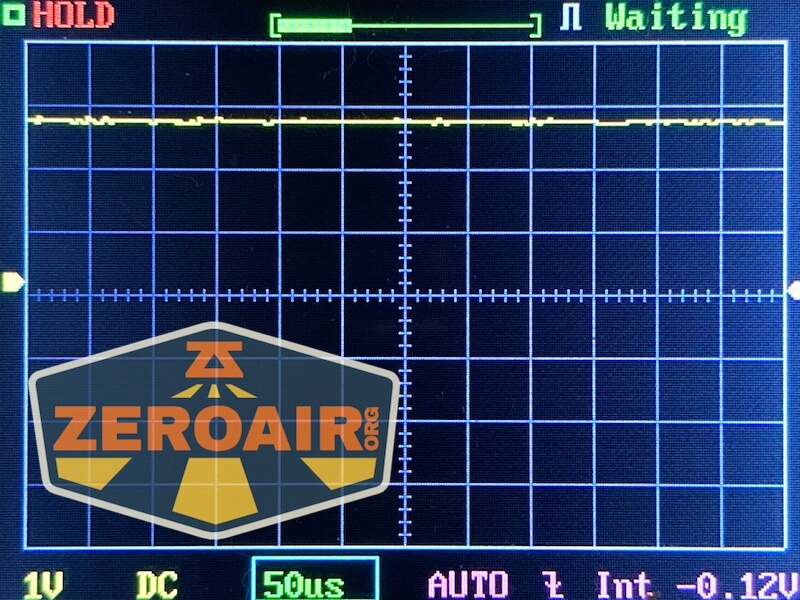

Here you can see a “baseline” – a chart with almost no light hitting the sensor.
Then there’s the Ultrafire WF-602C flashlight, which has some of the worst PWM I’ve seen. It’s so bad that I used a post about it to explain PWM! Here are multiple timescales (10ms, 5ms, 2ms, 1ms, 0.5ms, 0.2ms) to make comparing this “worst” PWM light to the test light easier. That post also explains why I didn’t test the WF-602C at the usual 50us scale.
User Interface and Operation
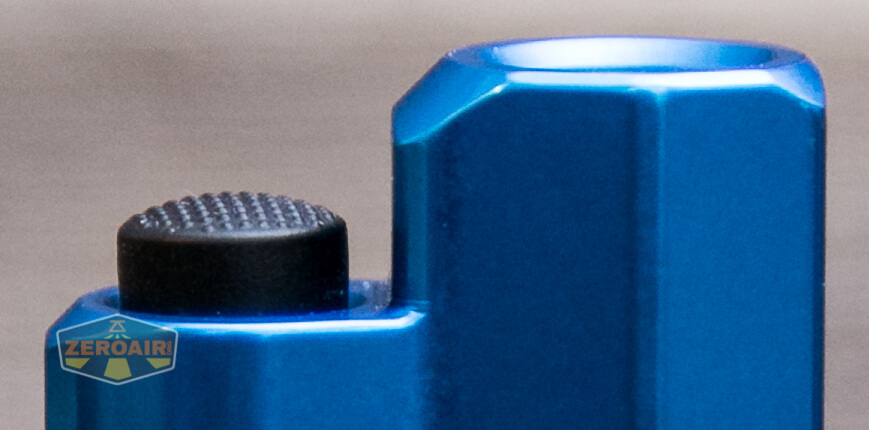
Frelux uses a mechanical clicky on the Synergy1 (and really on all his lights, I believe). The switch has a nice tall switch cover and is on the front of the body.
I’ll hesitate to say it’s a “weird” way to actuate the switch but it’s very gun-like. If you don’t like that, then you won’t like the Synergy1. I won’t say it is or isn’t my jam, but I will say that while I didn’t think I would like it (and didn’t love it on the S2), I adapted to the difference very easily for the S1.
Here’s a user interface table!
| State | Action | Result |
|---|---|---|
| Off | Click | Low |
| Off | Half-press | No action |
| On | Half-press | Mode advance (LMH) |
| On | Repeated Quick Clicks | Mode advance (LMH) |
| On | Click | Off |
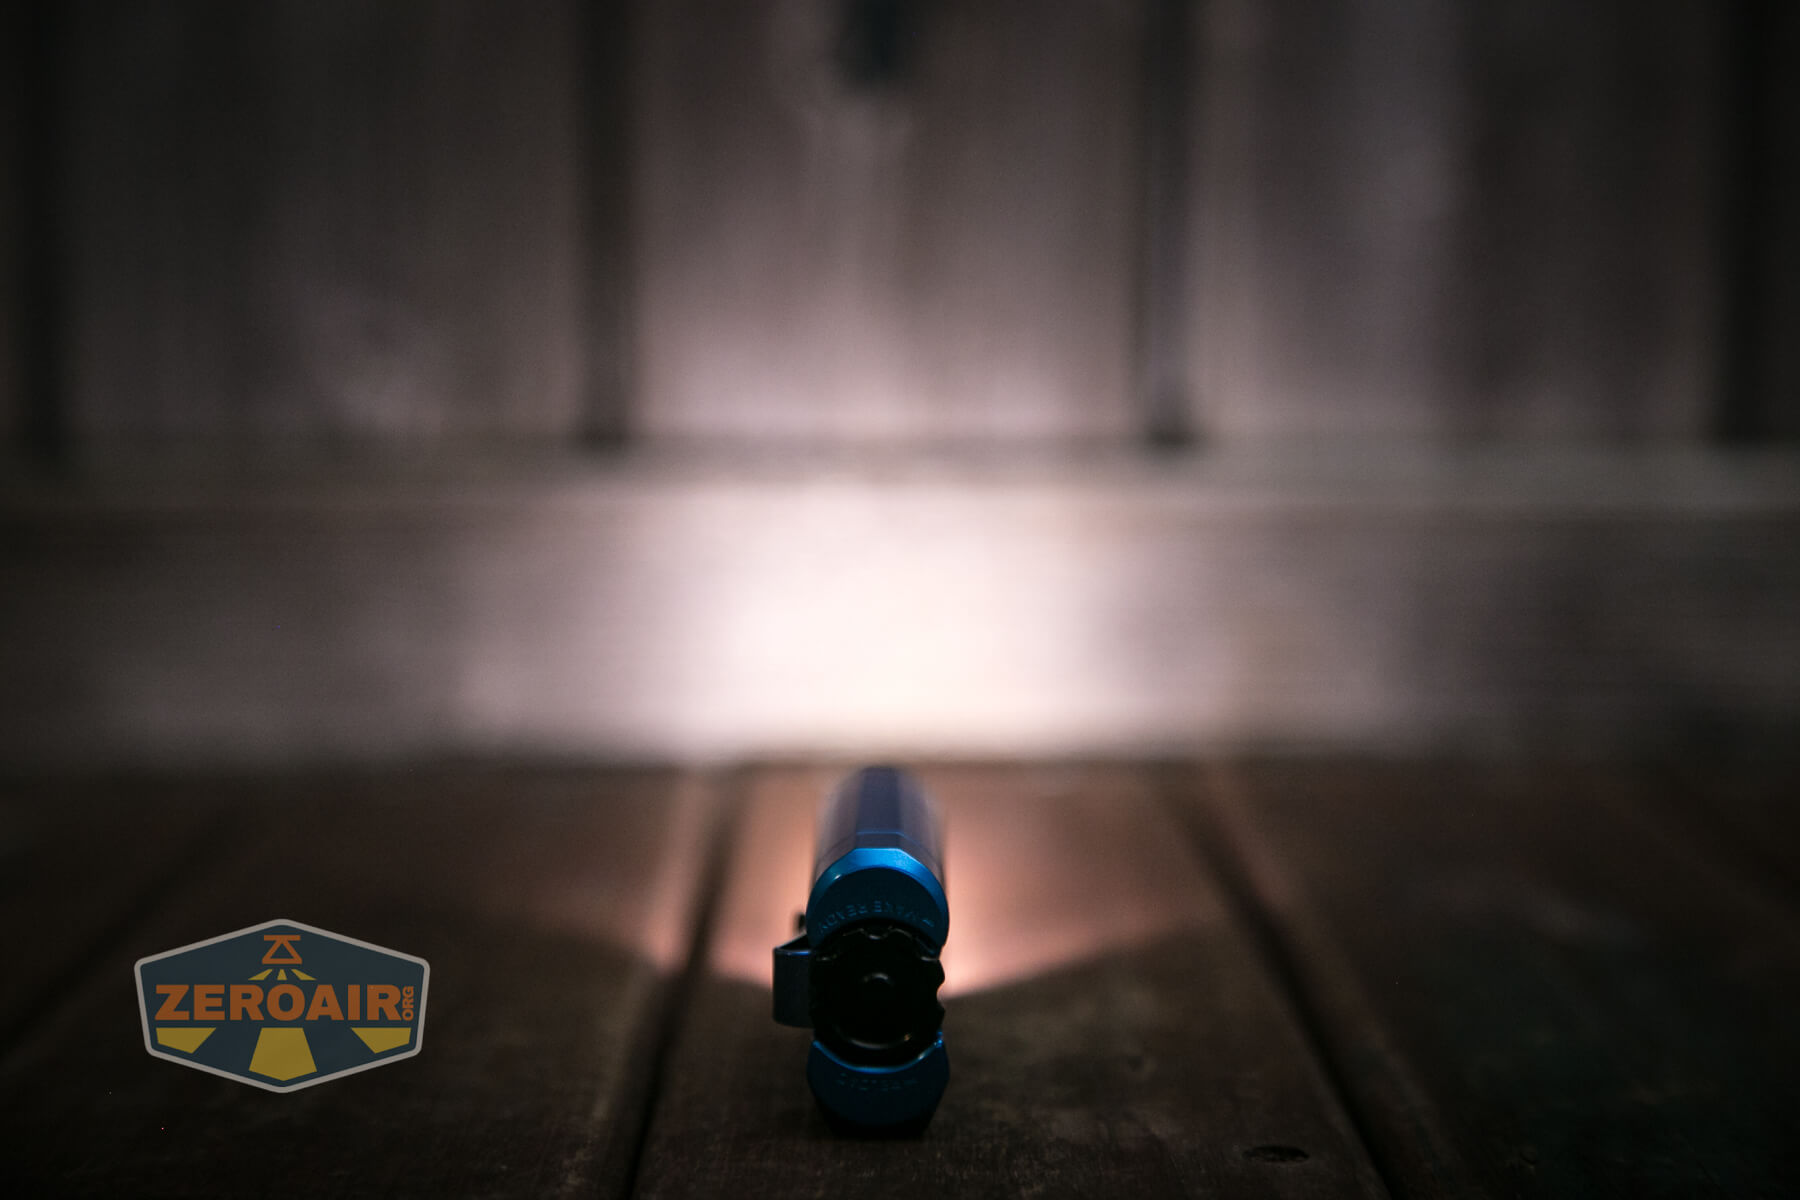
LED and Beam
In this borrowed copy of the Frelux Synergy1 flashlight is a Nichia 219c emitter. There’s a small reflector with a bit of orange peel texture.


I don’t see any specs from this emitter on the Frelux site. The other option was Cree XP-G2, which is adequately covered there.
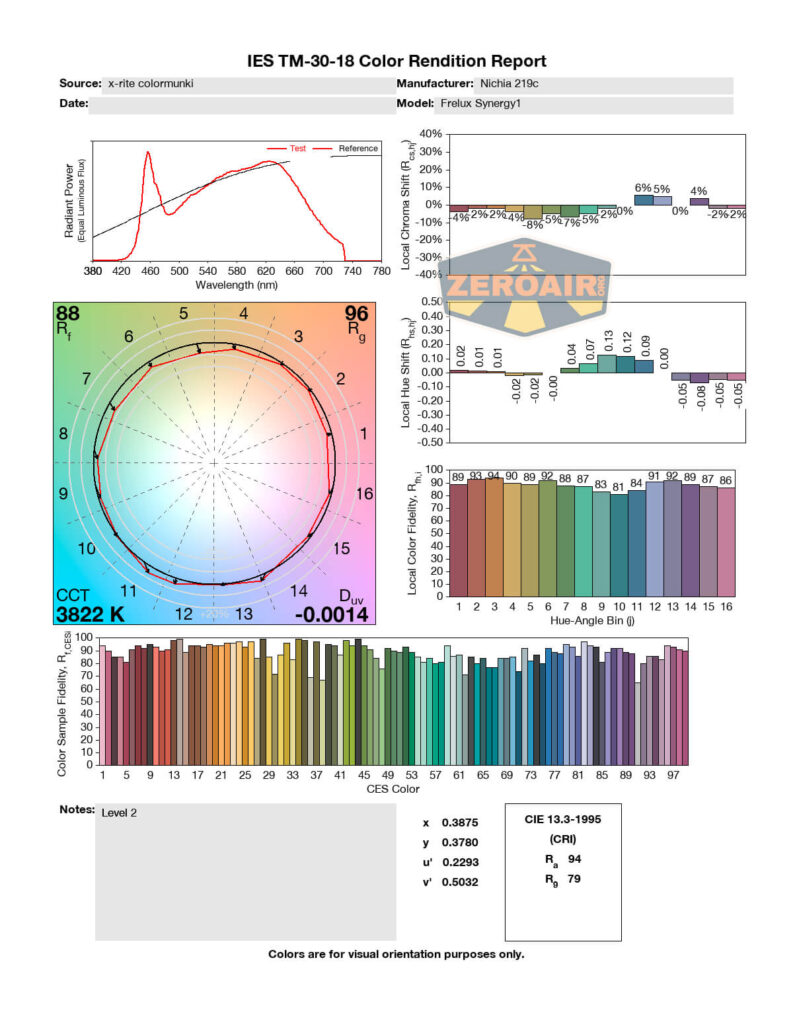
LED Color Report (CRI and CCT)
I’d expect the Nichia 219c to be “better” (or at least more favorable to someone like me), and I think these CCT/CRI reports bear that out. This emitter stays under 3900K, which puts it firmly under “neutral white” and also the CRI is reported here at over 93. This is very, very good.


Beamshots
These beamshots always have the following settings: f8, ISO100, 0.3s shutter, and manual 5000K exposure. These photos are taken at floor level, and the beam hits the ceiling around 9 feet away.


Tint vs BLF-348 (KillzoneFlashlights.com 219b version) (affiliate link)
I keep the test flashlight on the left and the BLF-348 reference flashlight on the right.
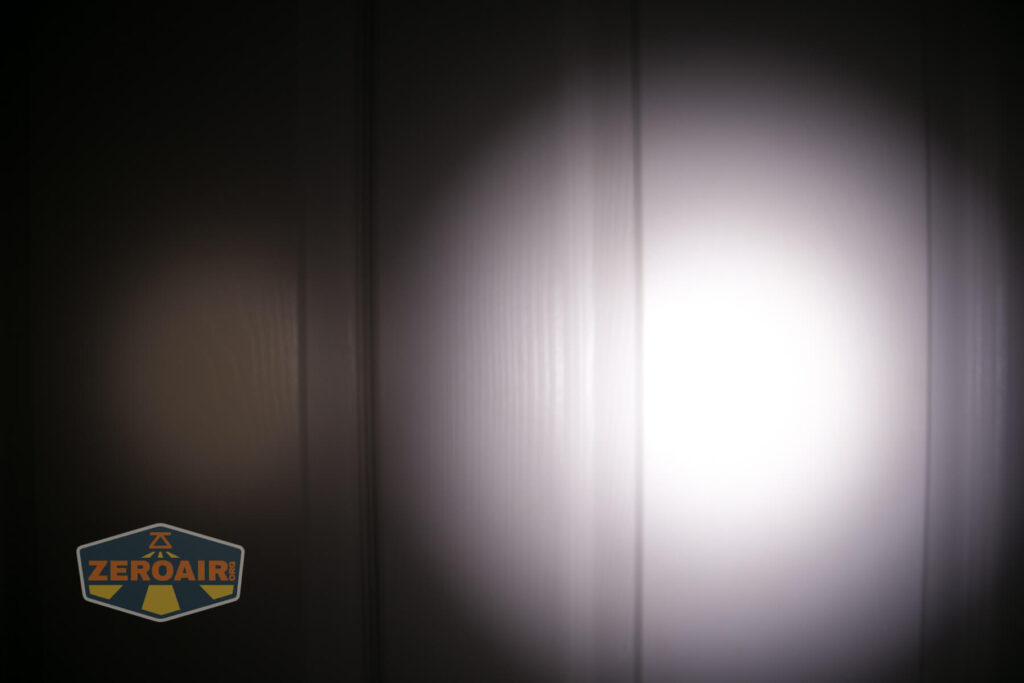

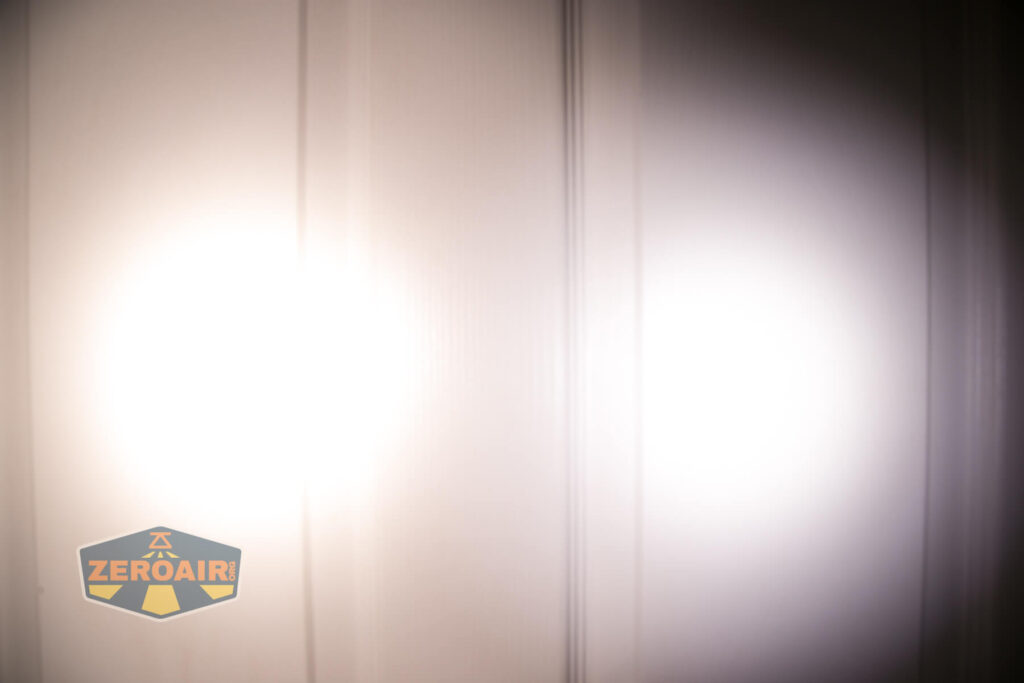
I compare everything to the KillzoneFlashlights.com 219b BLF-348 because it’s inexpensive and has the best tint!
Conclusion
What I like
- Size
- Anodizing is fantastic
- Uses 1.5V cells (2)
- Initial price was great
- Very simple user interface
- Uniquie design
What I don’t like
- Pocket clip attachment mechanism
- Swapping cells with the pocket clip installed
- No 10440 support
- Lack of low voltage protection
Notes
- This content originally appeared at zeroair.org. Please visit there for the best experience!
- For flashlight-related patches, stickers, and gear, head over to PhotonPhreaks.com!
- Please use my Amazon.com referral link to help support zeroair.org!
- Please support me on Patreon! I deeply appreciate your support!