
LoopGear SK-05 Pro Flashlight Review
The LoopGear SK-05 Pro flashlight features easily accessible standard 18650 cells (included) as well as a high-CRI triple setup and throwy single, too. Read on!
Official Specs and Features
Here’s a link to the LoopGear SK-05 Pro flashlight product page.
Versions
There are at least two versions of the LoopGear SK-05 Pro flashlight. Two body colors are available – black and grey. There’s a non-Pro version too. This Pro version comes with two flood emitter options – Nichia 519a or higher output Luminus SST25.
Price
This version of the LoopGear SK-05 Pro flashlight comes in at an MSRP of $152.99. It’s available now.
What’s Included

- LoopGear SK-05 Pro flashlight
- LoopGear 4000mAh 18650 (2)
- Charging cable
- Pocket clip (with screws and tool for mounting)
- Manual
Package and Manual


Build Quality and Disassembly

The LoopGear SK-05 Pro flashlight is very much like the LoopGear SK-05 (non-Pro). There are a few differences, most of which are important later in the review. But general build quality is the same between models – very good.


Of course, one of the biggest differences is that the cells are accessible! So inside the light, you can see that the positive contact is a big button.

And the other end, where negative contact is made, there are dual springs.

Size and Comps
106mm x 47.8mm x 22.5mm and 235g. Notably, this is the same size as the non-Pro. (And 10 grams heavier.)


If the flashlight will headstand, I’ll show it here. If the flashlight will tailstand, I’ll also show that here too!


Here’s the test light with the venerable Convoy S2+. The version below is a custom laser-engraved Convoy S2+ host by GadgetConnections.com. I did a full post on an engraved orange host right here! Or go straight to GadgetConnections.com to buy your Convoy S2+ now!


In the photo above, you may note that the SRM (standard reference material) flashlight for comparison has changed! I used a TorchLAB BOSS 35 for ages. Now, what you can see as the 18350 SRM is the Hanko Machine Works Trident. While I have not reviewed or tested the Gunner Grip version seen here, I have tested a Hanko Machine Works Trident Total Tesseract in brass. I love the Trident, and it’s a striking contrast next to the inexpensive Convoy S2+, which also makes a great standard reference material.
Retention and Carry
Unlike the non-Pro, there’s a pocket clip included here. It’s not attached, but two screws (and two extra) are included. A screwdriver (TORX) is also included, too!

A little sticky sticker is included. The manual doesn’t say where it goes, nor is there any real instruction on how to install the pocket clip. But it’s not hard to understand.

I believe the clip is formed so that it could be installed in either direction. Opposite to how I have it below might be better, and allow a deeper carry.

There’s a strong magnet in the tailcap. It’s perfectly sufficient for holding the LoopGear SK-05 Pro flashlight horizontally or vertically.

Above, you may note a new holder for my magnetic-tailcap items. That’s the Exceed Designs Hyzer Titanium Mini Hatchet D2 axe. The handle (as the name suggests) is titanium. But the blade is D2 steel and perfect for retaining magnetic tailcap flashlights! The Hyzer is available in a bunch of cerakote body colors as well as different thickness D2 heads.
In the same tailcap area, there’s a loop where a lanyard could be attached, but no lanyard is included.

Power and Runtime
The LoopGear SK-05 Pro flashlight uses two 18650 cells. The two that are included are 4000mAh standard 18650 cells.

The cells go into the light with the button (positive end) toward the head. They are parallel, too, so they both go in the same direction. This does mean that the light can run with just one cell!

Here’s the little lever where you can access the hinged cell cover. There’s a lock switch for this cover, too.


Runtime tests are below. I tested the higher two modes with both types of output (spot and flood). I didn’t test the output with both emitters, though. I don’t believe the manual makes any claim about that output level.


The light shuts off with low voltage protection. There’s a prominent side RGB COB that alerts the user to the approximate cell voltage at startup. In fact, you don’t even have to turn the light on – just switch the rotary dial away from lockout mode, and the indicator will display the charge level. It’s basically a power meter. Red means basically empty (“0%”), and anything blue is higher than that. So, for example, if the indicator is half blue and half off, the charge is approximately 50%.
Charging
UBS-C charging is used for the Loop Gear SK-05 Pro flashlight. The port is near the head and has a press-in silicone cover.

A C to C charging cable is included.

Charging looks fine – While C to C delivers less current, it’s delivered at 12V, so is overall much quicker. A to C also works fine, but at 5V and a higher current still takes over 3 hours.

The RGB COB on the side indicates the charging status.
Powerbank
The LoopGear SK-05 Pro flashlight is capable of being used as a powerbank. Below you can see the side markings – the light can be charged at 5, 9, or 12V, and can also output (powerbank) at 5, 9, and 12V.


I tested the powerbank only at 5V, but it seems to perform just fine.

Output proceeds at around 3.3A for over an hour. At that point, the powerbank is basically depleted (around 3V) but it’ll still output at lower currents for a little while.

Modes and Currents
| Mode | Mode Claimed Output (lm) | Claimed Runtime | Measured Lumens | Tailcap Amps |
|---|---|---|---|---|
| Turbo – Flood | 2100-630-35 | 40s+5.5h+30m | 1922 (0s) 1751 (30s) |
8.76 |
| High – Flood | 630-35 | 6h+30m | 582 (0s) 579 (30s) |
1.55 |
| Med – Flood | 230 | 20h | 216 | 0.51 |
| Low – Flood | 35 | >20d | 37 | 0.12 |
| Turbo – Spot | 1300-600-40 | 40s+5.5h+30m | 1472 (0s) 1321 (30s) |
6.24 |
| High – Spot | 600+40 | 5.5h+30m | 630 (0s) 626 (30s) |
1.50 |
| Med – Spot | 220 | 19h | 234 | 0.45 |
| Low – Spot | 40 | >20d | 30 | 0.08 |
Pulse Width Modulation
Only the highest mode for each output uses PWM. That’s striking. The off-cycle is very brief, though, so it’d be nearly impossible to notice this PWM.
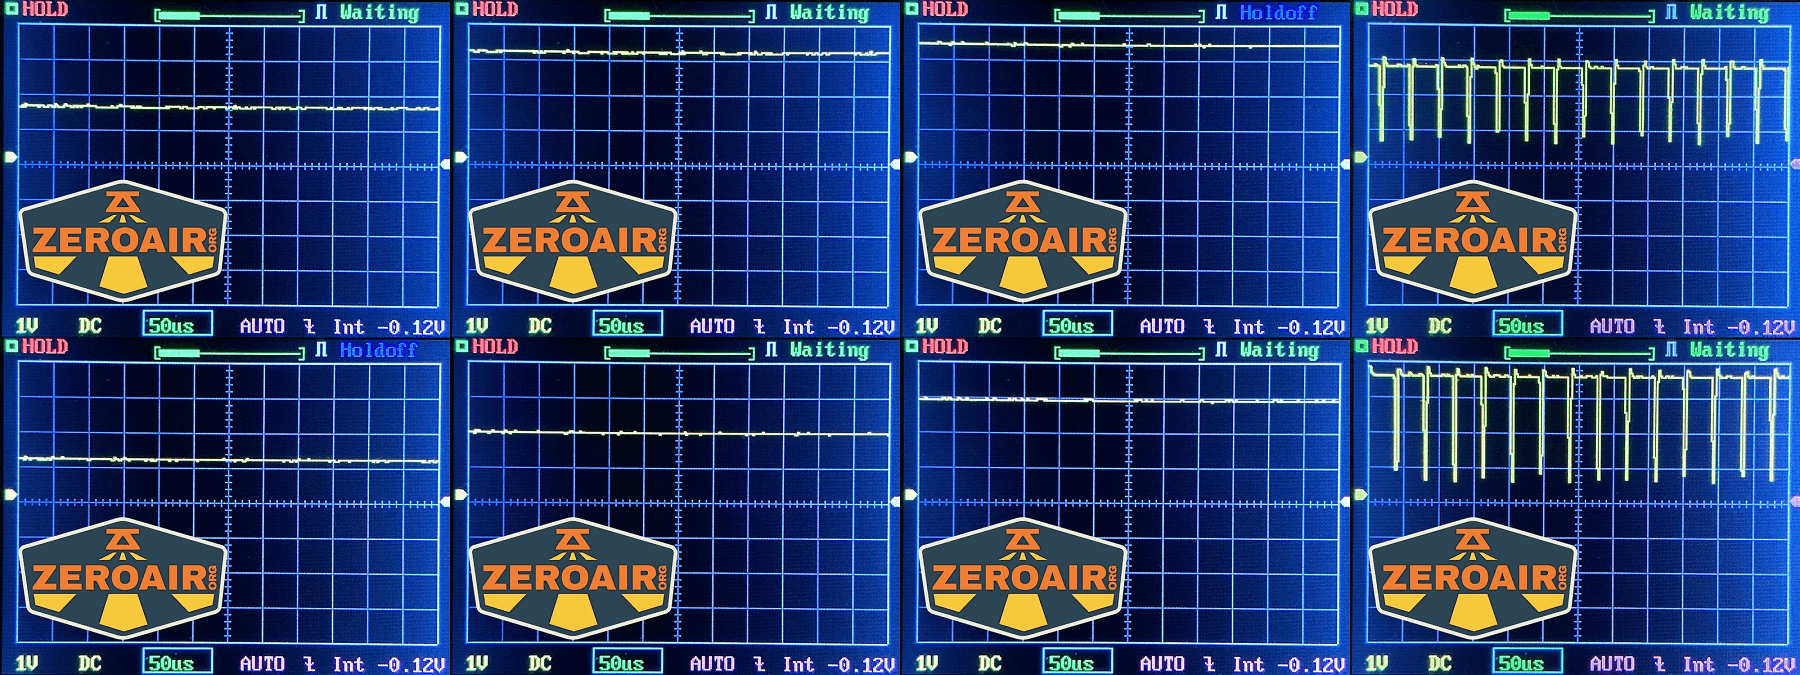
Here you can see a “baseline” – a chart with almost no light hitting the sensor.
Then there’s the Ultrafire WF-602C flashlight, which has some of the worst PWM I’ve seen. It’s so bad that I used a post about it to explain PWM! Here are multiple timescales (10ms, 5ms, 2ms, 1ms, 0.5ms, 0.2ms) to make comparing this “worst” PWM light to the test light easier. That post also explains why I didn’t test the WF-602C at the usual 50us scale.
User Interface and Operation
There are two ways to interact with the Loop Gear SK-05 Pro flashlight. First, there’s a rotary dial. It has four positions. Locked (seen below), flood, spot, and side RGB.


Next is the e-switch, right in the center of that rotary dial. It’s a very big switch with good action.


As stated above, there’s a rotary dial with four positions. You’ll want to rotate this dial to your output of choice, then follow the actions in the user interface table below! Note that the user interface for Spot and Flood seems to be the same.
One update to this Pro version is that there seems to be a delay. This is probably to prevent accidental activation. So in every case, the dial will need to have been rotated before the e-switch will work.
| State | Action | Result |
|---|---|---|
| Off | Click | On (Mode memory) |
| On | Click | Off |
| Off | Hold | Momentary Turbo (both emitters) |
| Rotary set to Floodlight or Spotlight Off |
Double click | Turbo (selected emitter(s)) |
| Rotary set to Floodlight or Spotlight On |
Hold | Mode advance (LMH only) |
| Rotary set to Floodlight or Spotlight Any |
Click 3x | Strobe (both emitters) |
| Rotary set to Floodlight or Spotlight Strobe |
Click then hold | SOS (reverse direction works too) |
| Rotary set to Special Mode Off |
Click | RGB COB On (Mode memory) |
| Rotary set to Special Mode Off |
Click 3x | Red-blue flash warning light mode |
| Rotary set to Special Mode
On |
Double click | Advance through Lighting options (Steady White > Steady Color > Fade in/out Color > Slide Color > Dash Color > Rainbow Slide) |
| Rotary set to Special Mode On |
Hold | Advance through Color options for specific lighting options (or advance through 3 lighting levels for COB White). |
| Side white on | Click 4x | Advance through: Warm white, Neutral White, Cool White (side light) |
| RGB on | Hold | RGB mode advance for that output style |
Various clicks can perform various things for the RGB levels. Suffice to say that the RGB options are greatly increased for the Pro version. You can speed up the cycling of some RGB options. Many of the RGB options have low/medium/high, too. It’s pretty impressive!
Loop Gear SK-05 Pro Flashlight LED and Beam
There are two options here for output. In the photo below, the left emitter is the “Spot” output – it’s a Luminus SFT25R. The triple on the right are three Nichia 519a emitters.

The side emitters are RGB, including three variations of white.


LED Color Report (CRI and CCT)
CRI and CCT are not mysteries – LoopGear claims the Nichia triple to be 5700K, and that’s approximately right – I measure it as 5500-5900 CCT. CRI is very high, at above 97. That’s very good!
The middle row is the spot emitter – CCT is cool or very cool, and CRI is low.
The last row is the side warm white. I didn’t test Neutral or Cool for this side emitter array. These are very unusual, in that they’re warm white and very low CRI. Possibly the lowest CRI I have ever observed on a “white” emitter.


CCT (Correlated Color Temperature) refers to the measurement of the color appearance of light, expressed in Kelvins (K), which indicates whether the light is warm (yellowish) or cool (bluish). A lower CCT (below 3000K) is considered warm light, while a higher CCT (above 5000K) gives cooler, bluish light.
CRI (Color Rendering Index) is a measure of how accurately a light source renders colors in comparison to natural sunlight. Scored on a scale from 0 to 100, higher CRI values indicate that colors appear more true to life and vibrant, similar to how they would look under the sun.
Beamshots
These beamshots always have the following settings: f8, ISO100, 0.3s shutter, and manual 5000K exposure. These photos are taken at floor level, and the beam hits the ceiling around 9 feet away.


Tint vs BLF-348 (KillzoneFlashlights.com 219b version) (affiliate link)
I keep the test flashlight on the left and the BLF-348 reference flashlight on the right. These photos are taken around 18 inches from the door.


I compare everything to the KillzoneFlashlights.com 219b BLF-348 because it’s inexpensive and has the best tint!
Summary and Conclusion
The LoopGear SK-05 Pro flashlight is surely a step up from the original (or “non-Pro”) SK-05. Having replaceable batteries alone is enough to make this one better. Power Deliver output from the powerbank is a standout feature, too! I like all the RGB output changes, and that there are three CCT from the side white. It would be nice if the light worked while charging. This is a great improvement from the original, and a solid light, too.
The Big Table
| LoopGear SK-05 Pro flashlight | |
|---|---|
| Emitter: | Luminus SFT25R (Spot) |
| Price in USD at publication time: | $152.99 |
| Cell: | 2×18650 |
| Runtime Graphs | |
| LVP? | Yes |
| Switch Type: | E-Switch |
| Quiescent Current (mA): | ? |
| On-Board Charging? | Yes |
| Charge Port Type: | USB-C |
| Charge Graph | |
| Power off Charge Port | No |
| Claimed Lumens (lm) | 1300 |
| Measured Lumens (at 30s) | 1321 (101.6% of claim)^ |
| Candela per Lumen | 39.64 |
| Claimed Throw (m) | 405 |
| Candela (Calculated) in cd (at 30s) | 1500lux @ 5.76m = 49766cd |
| Throw (Calculated) (m) | 446.2 (110.2% of claim)^ |
| Claimed CCT | – |
| Measured CCT Range (K) | 5800-7000 Kelvin |
| Item provided for review by: | LoopGear |
| All my Loopgear reviews! | |
| LoopGear SK-05 Pro flashlight | |
|---|---|
| Emitter: | Nichia 519a (5700K) (Flood) |
| Price in USD at publication time: | $152.99 |
| Cell: | 2×18650 |
| Runtime Graphs | |
| LVP? | Yes |
| Switch Type: | E-Switch |
| Quiescent Current (mA): | ? |
| On-Board Charging? | Yes |
| Charge Port Type: | USB-C |
| Charge Graph | |
| Power off Charge Port | No |
| Claimed Lumens (lm) | 2100 |
| Measured Lumens (at 30s) | 1751 (83.4% of claim)^ |
| Candela per Lumen | 3.29 |
| Claimed Throw (m) | 150 |
| Candela (Calculated) in cd (at 30s) | 277lux @ 5.044m = 7047cd |
| Throw (Calculated) (m) | 167.9 (111.9% of claim)^ |
| Claimed CCT | 5700 |
| Measured CCT Range (K) | 5500-5900 Kelvin |
| Item provided for review by: | LoopGear |
| All my Loopgear reviews! | |
^ Measurement disclaimer: Testing flashlights is my hobby. I use hobbyist-level equipment for testing, including some I made myself. Try not to get buried in the details of manufacturer specifications versus measurements recorded here; A certain amount of difference (say, 10 or 15%) is perfectly reasonable.
What I like
- Solid build quality
- Cells are easily accessible
- Uses standard flat-top cells
- Intuitive user interface
- RGB side options are fun!
- C to C charging works very well
- Can run off just one cell
What I don’t like
- Very cool white
- Low CRI
Notes
- This content originally appeared at zeroair.org. Please visit there for the best experience!
- Please use my Amazon.com referral link to help support zeroair.org!
- Please support me on Patreon! I deeply appreciate your support!
Discover more from ZeroAir Reviews
Subscribe to get the latest posts sent to your email.
How does it only last 3 hours on medium mode when it has a 8000 mah capacity? The batteries must be wired in series..that’s so disappointing
that’s high mode @600lm