Zebralight SC600Fd Mk III Plus Flashlight Review
The Zebralight SC600Fd Mk III Plus flashlight runs on a single 18650 cell and has an incredible user interface. Also, high CRI! Read on!
I am very excited to do this review, and more excited to have this SC600!!
Official Specs
Here’s a link to the Zebralight SC600Fd Mk III Plus Flashlight product page.
- PID thermal-regulated outputs (three highest output levels) using 384 internal brightness levels and a calibrated 0.1°C resolution temperature sensor
- Programmable PID thermal regulation temperature target value
- Built-in battery protections with continuously monitored temperature, current, and voltage, plus a (2.7V) low voltage cutoff
- Battery capacity indicator (LED flashes 1-4 times, 4 short clicks to start)
- Automatic stepping down from High to Medium, and from Medium to Low when battery capacity is low
- Durable electronic soft-touch switch
- Smart user interface provides fast and easy access to all brightness levels and beacon-strobes
- Precision-machined unibody casing from premium-grade aluminum bar stocks
- Proprietary heat-sinking design
- Durable natural hard anodized finish (Type III Class I)
- Sealed and potted LED driver circuitry
- Tempered optical grade glass
- Battery reverse polarity protection
- Pocket clip
- Lanyard ring
- Waterproof to IPX7 (2 meters, 30 minutes)
Output & Runtime Claim
| Mode | Output (lm) | Runtime (h) |
|---|---|---|
| High (H1) | 1500 | 2.3 (PID) |
| High (H2a) | 666 | 2.7 (PID) |
| High (H2b^) | 429 | 2.9 (PID) |
| High (H2c^) | 270 | 4.1 |
| Med (M1) | 100 | 12.5 |
| Med (M2a) | 34 | 36 |
| Med (M2b^) | 19 | 2.6d |
| Med (M2c^) | 10.4 | 4.6d |
| Low (L1) | 2.9 | 15.5d |
| Low (L2a) | 0.76 | 1.9 months |
| Low (L2b^) | 0.37 | 2.7 months |
| Low (L2c^) | 0.18 | 4 months |
^ Author note: This naming convention is mine, and I’ve added it here just for clarity in later discussions.
Versions
There are many versions of the SC600, but this is the only SC600Fd Mk III Plus. All the other lights are unique enough not call them “versions,” but they do mostly share a body. Those other versions are:
SC600 Mk III 18650 XHP35 Flashlight Cool White
SC600w Mk III 18650 XHP35 Flashlight Neutral White
SC600w Mk III HI 18650 Flashlight with Neutral White High Intensity XHP35
Short Review
I love Zebralight, I won’t even try to hide that. I was initially skeptical of only using unprotected cells, but I got over that, and I love this SC600. It’s exactly what it should be, and works perfectly for its niche.
Long Review
The Big Table
| Zebralight SC600F Mk III Plus | |
|---|---|
| Emitter: | Cree XHP50 (Floody NW, CRI 93-95) |
| Price in USD at publication time: | Around $100 |
| Cell: | 1×18650 |
| Turbo Runtime (many more runtimes below) | |
| LVP? | Yes |
| Switch Type: | E-Switch |
| Quiescent Current (A): | ? |
| On-Board Charging? | No |
| Claimed Lumens (lm) | 1800 |
| Claimed Throw (m) | – |
| Candela (Calculated) in cd (at 30s) | 412lux @ 3.12m = 4011cd |
| Throw (Calculated) (m) | 126.7^ |
| All my Zebralight reviews! | |
^ Measurement disclaimer: Testing flashlights is my hobby. I use hobbyist-level equipment for testing, including some I made myself. Try not to get buried in the details of manufacturer specifications versus measurements recorded here; A certain amount of difference (say, 10 or 15%) is perfectly reasonable.
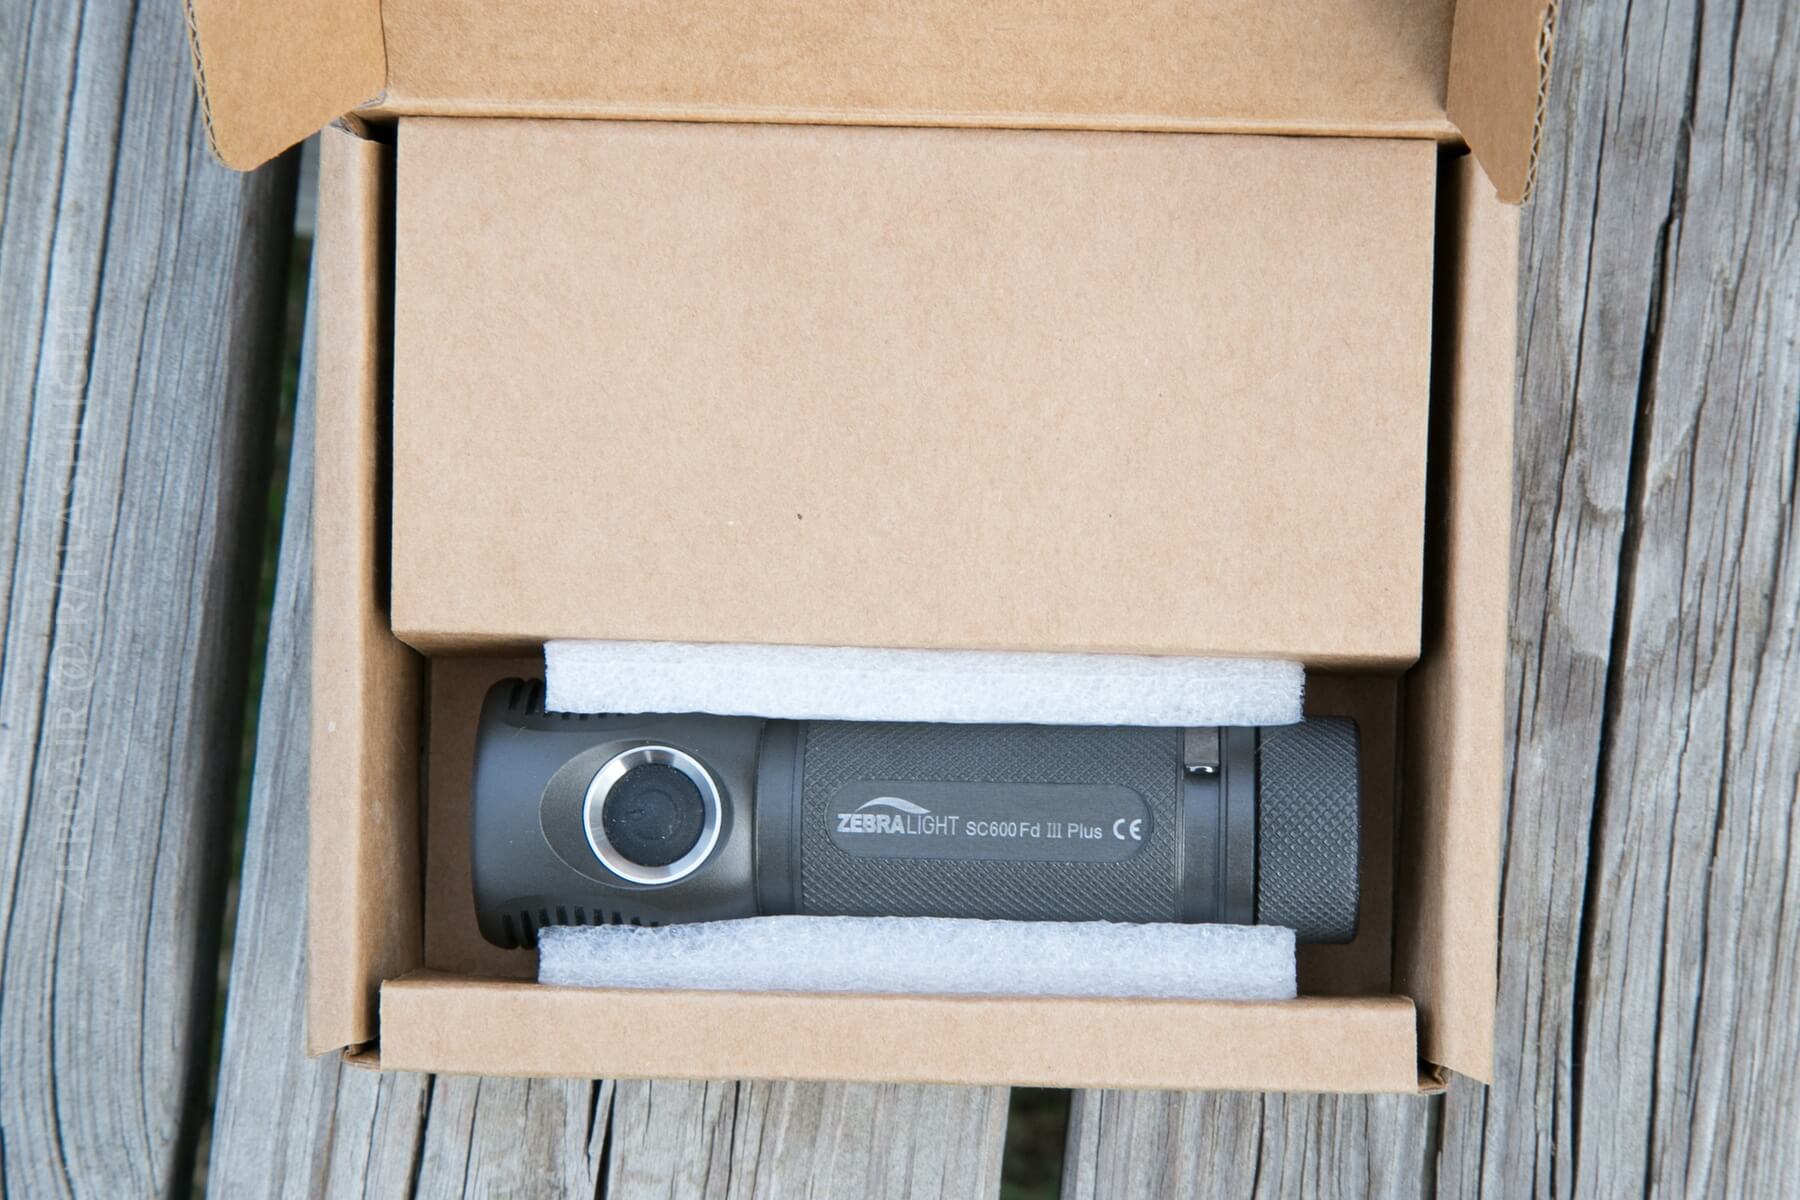
What’s Included
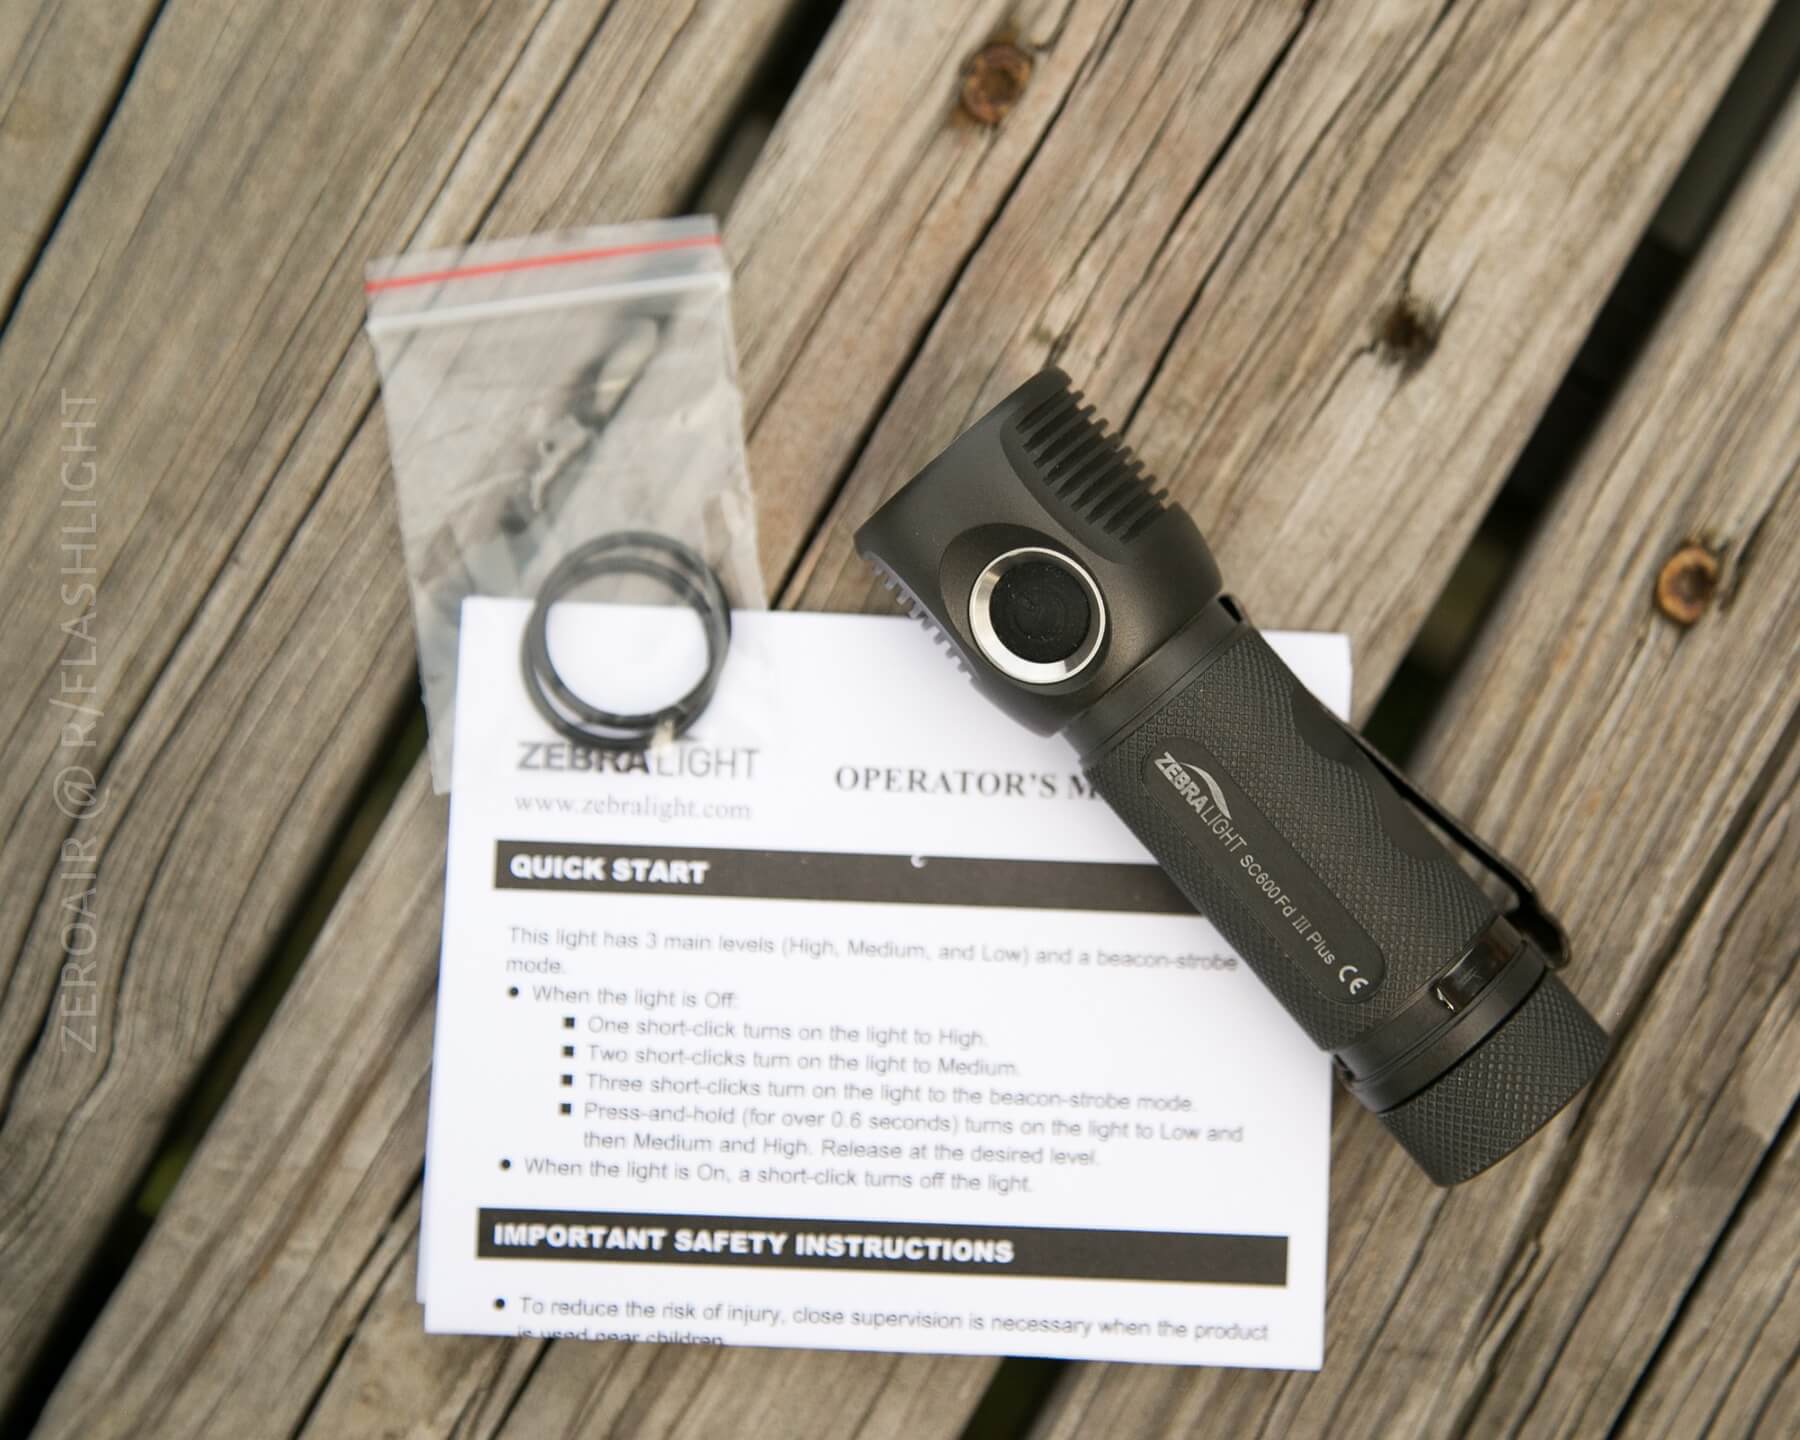
- Zebralight SC600Fd Mk III Plus XHP50 Floody NW
- Pocket clip
- Spare O-Rings (2)
- Manual
Package and Manual
I’ve said this in a ton of reviews to this point: My favorite packaging is a simple cardboard box.
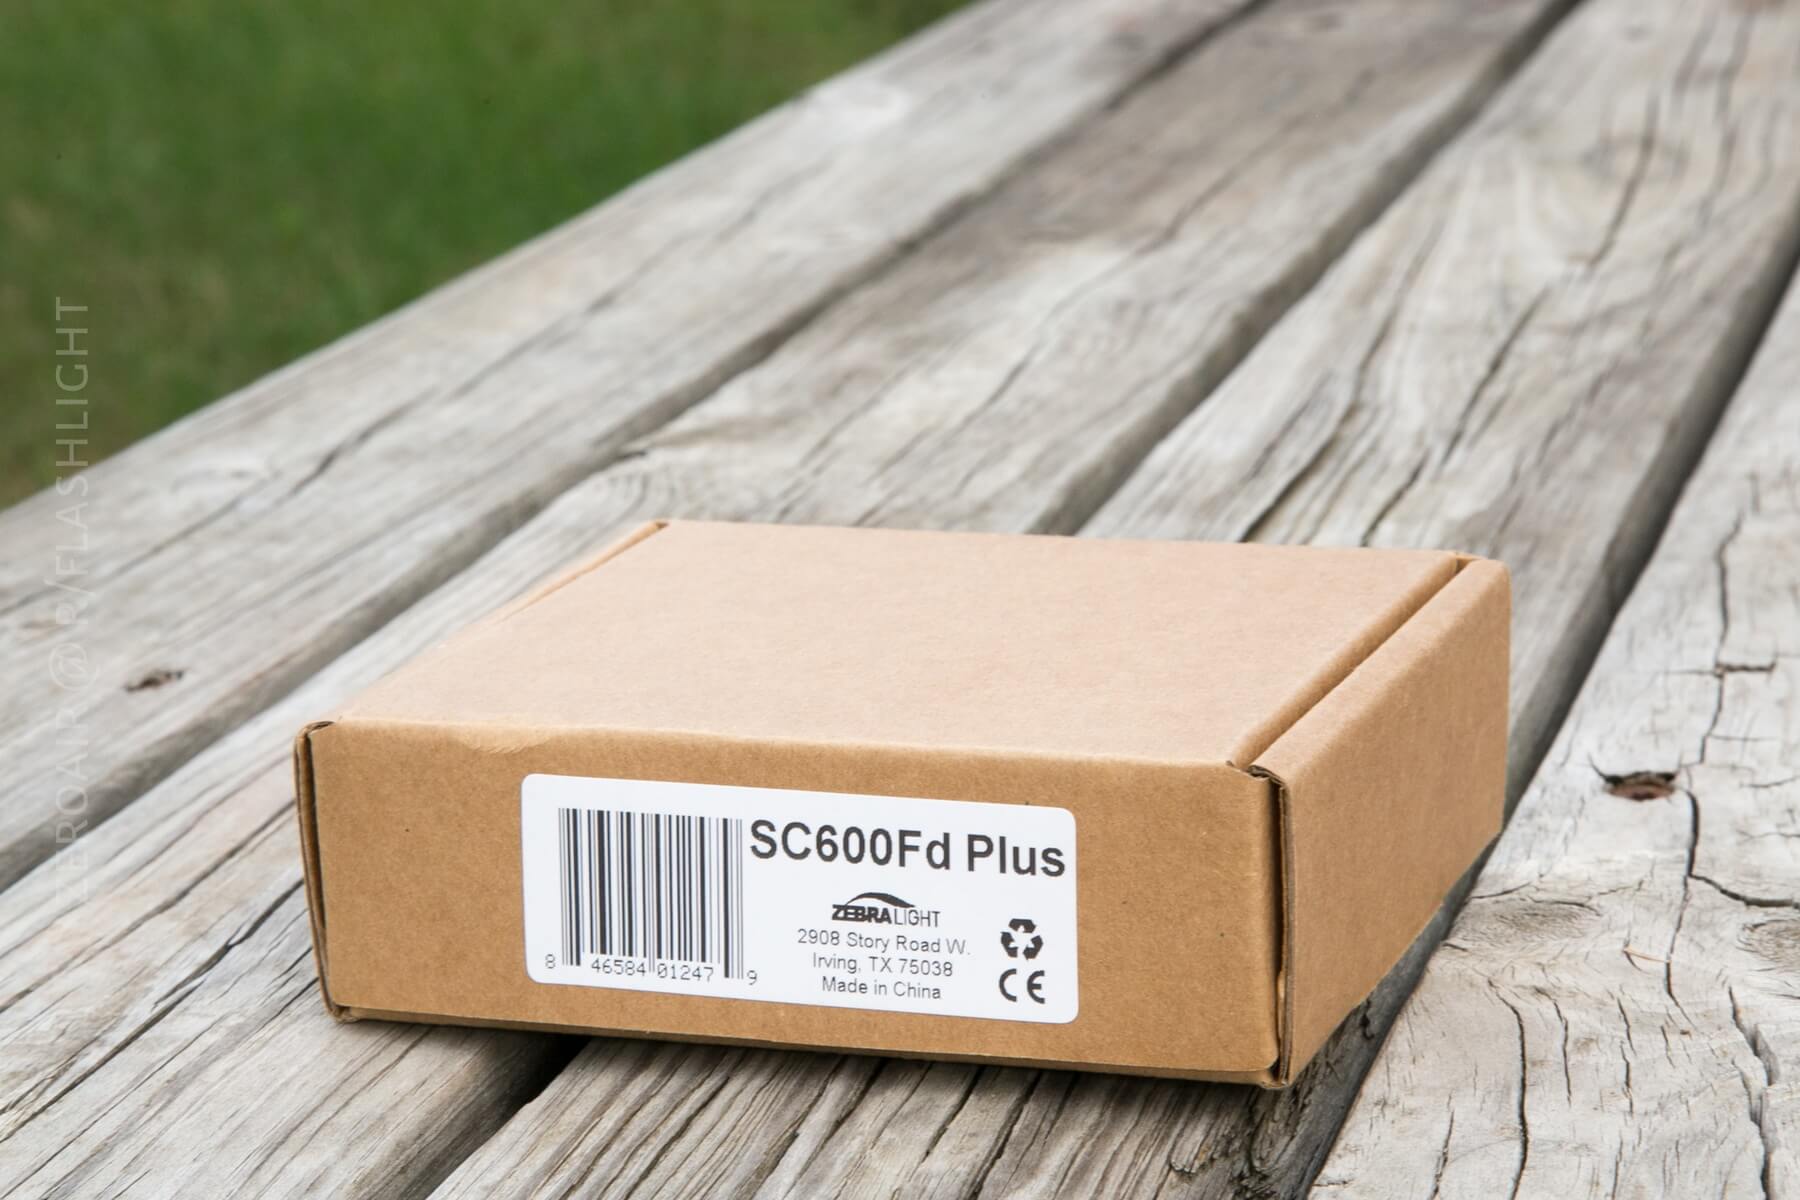
That’s what the SC600 comes in. There’s not much to it (not even a cardboard sleeve as seen on something like a Manker). This is perfect because it offers no resistance to getting to the light.
The manual (pdf warning) is descriptive but not long on text. Not quite terse, but there isn’t an extra explanation given for much of anything. The key to this and most Zebralights is holding one in your hand, seeing the user interface in action, and just getting it. The manual will get you there!
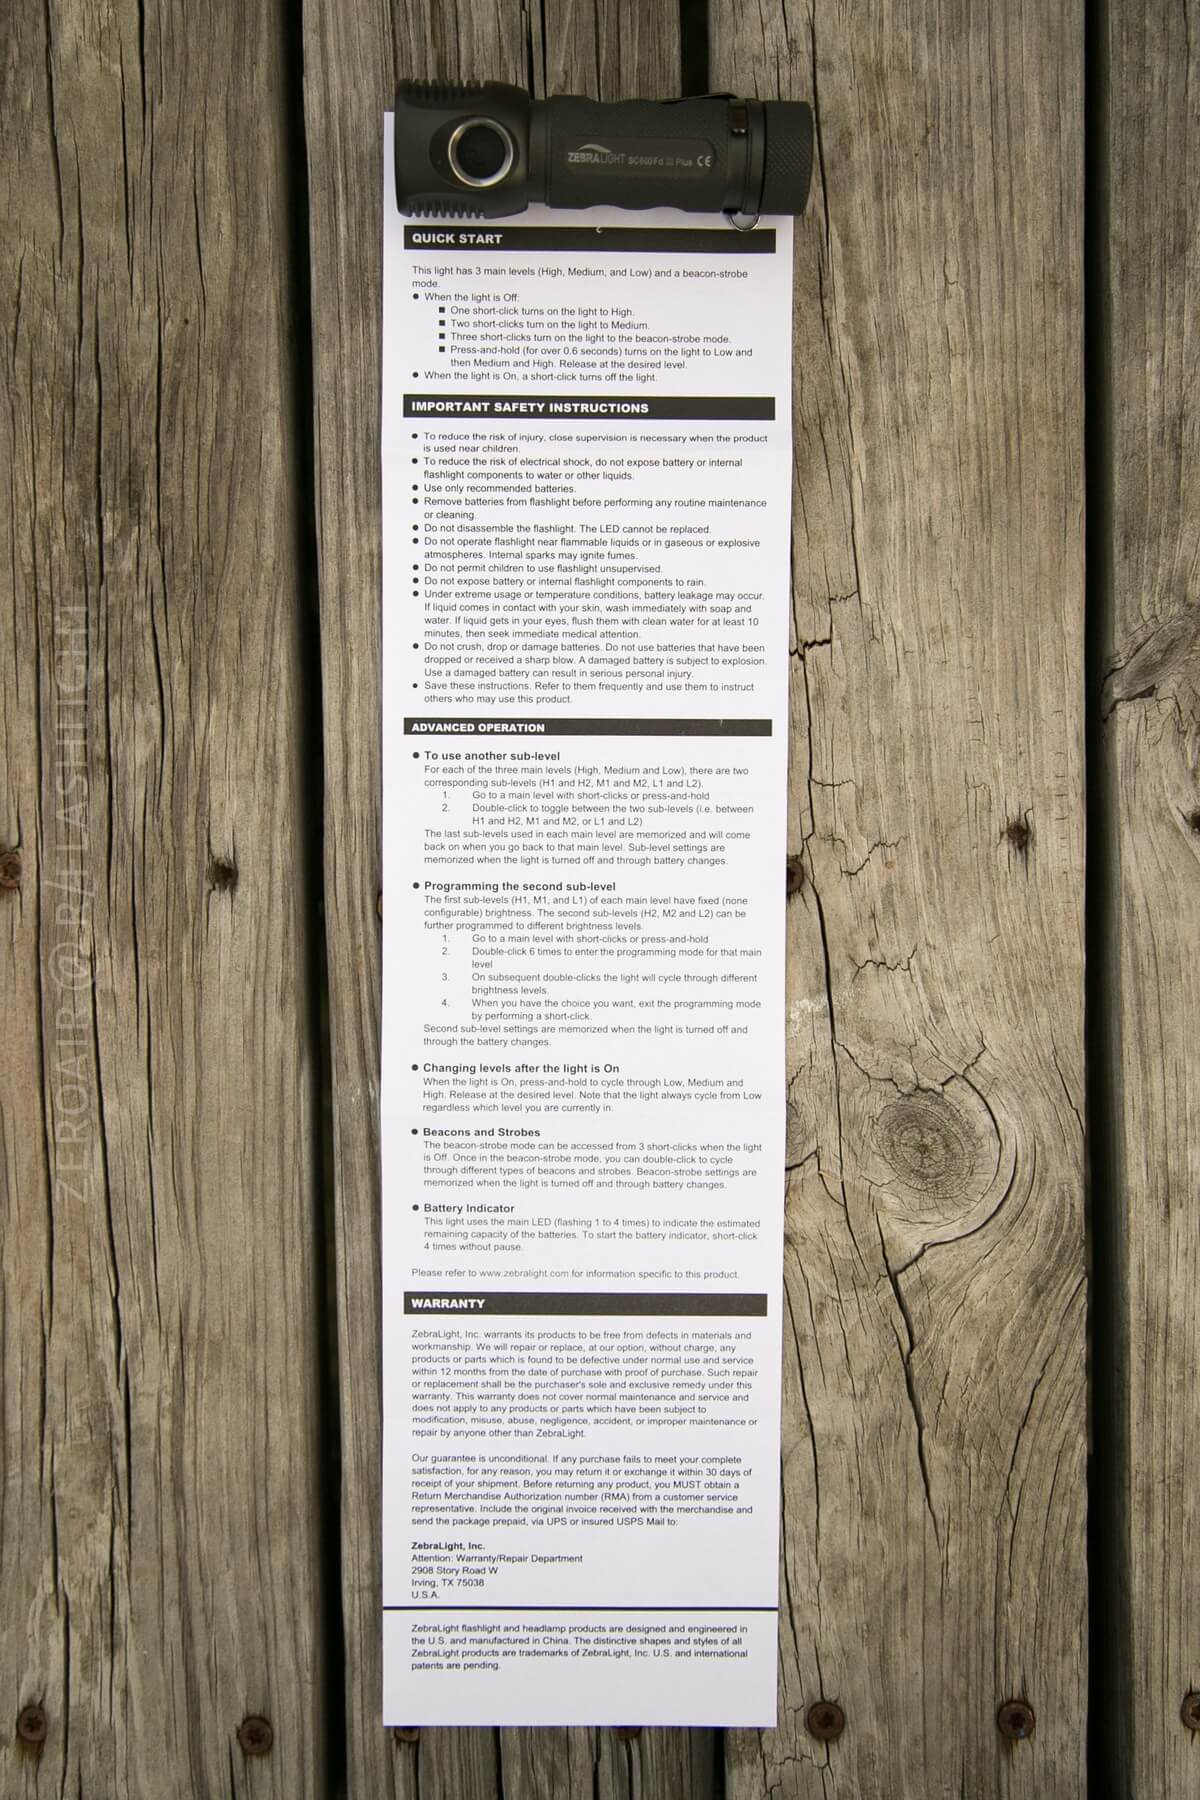
But some hands-on figuring will do much better, much quicker.
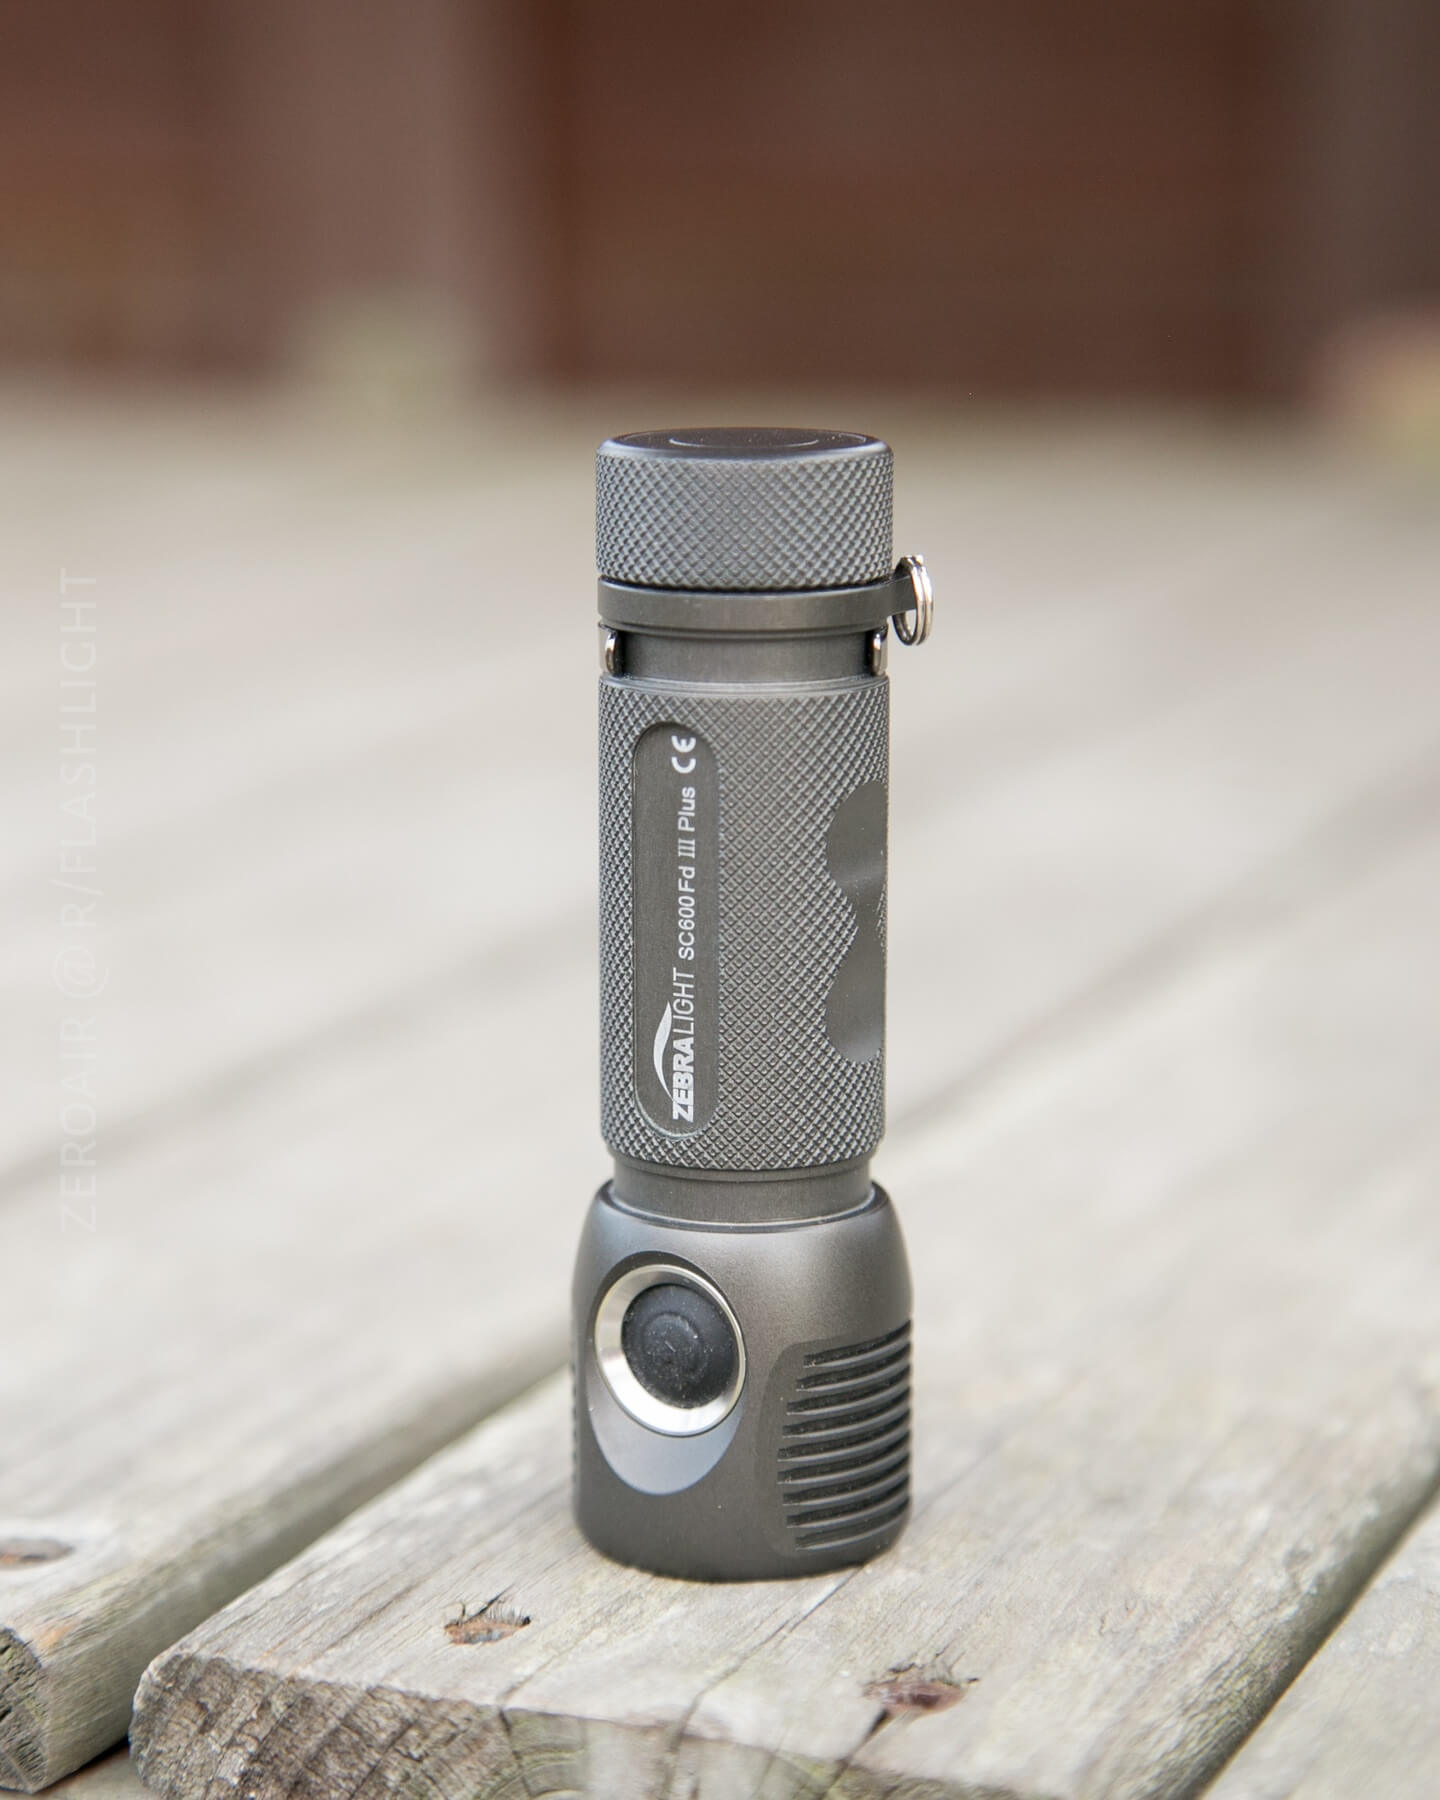
Build Quality and Disassembly
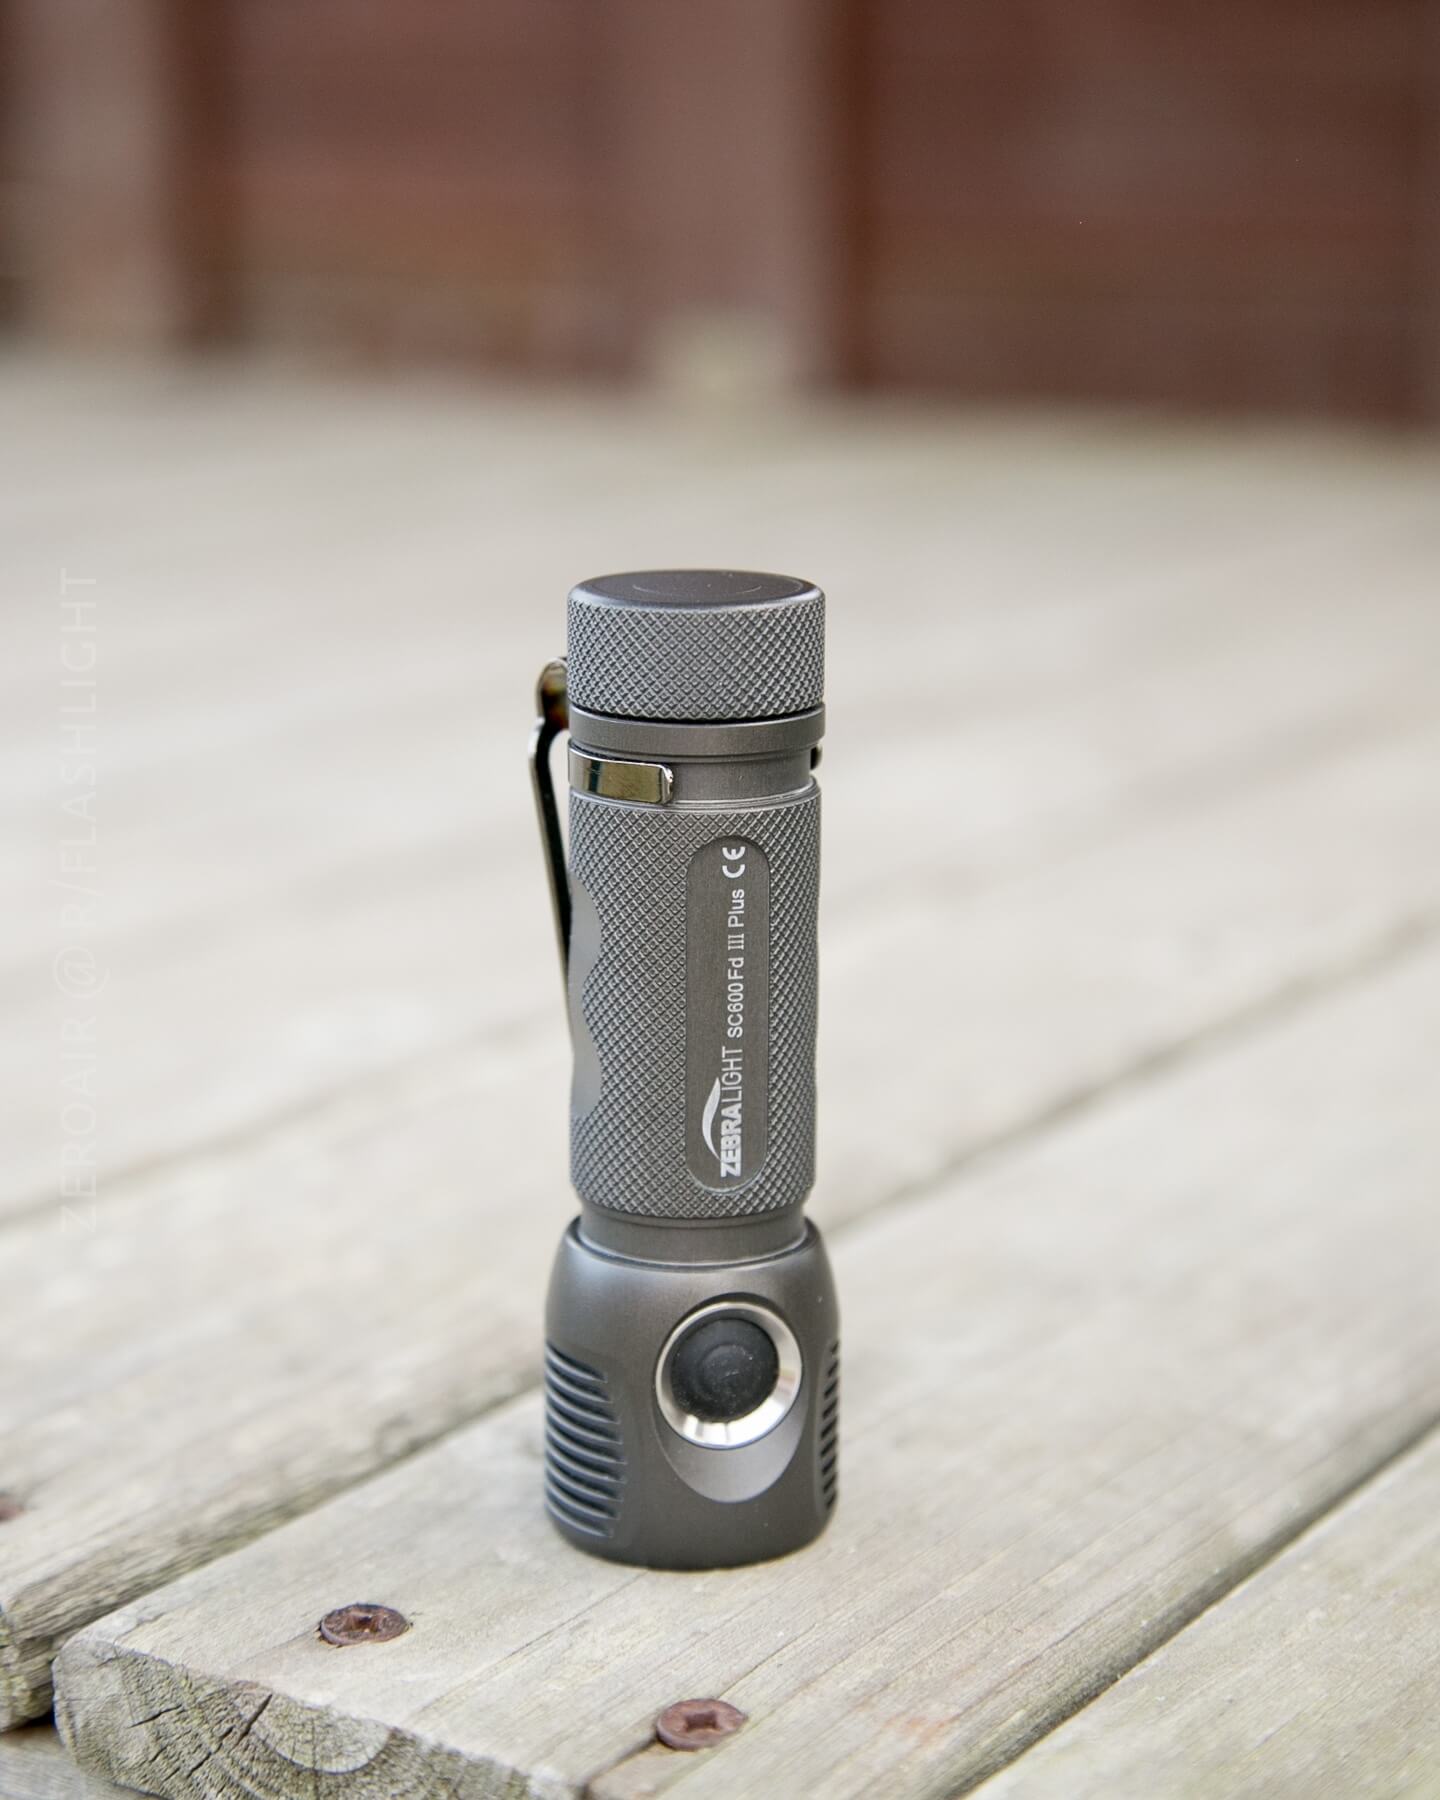
Zebralight is well known for high-quality lights, and this SC600 is no exception. My sample is flawless in the body. The anodizing is the perfect Zebralight color. The tailcap has perfect knurling and makes unscrewing the tailcap very easy.
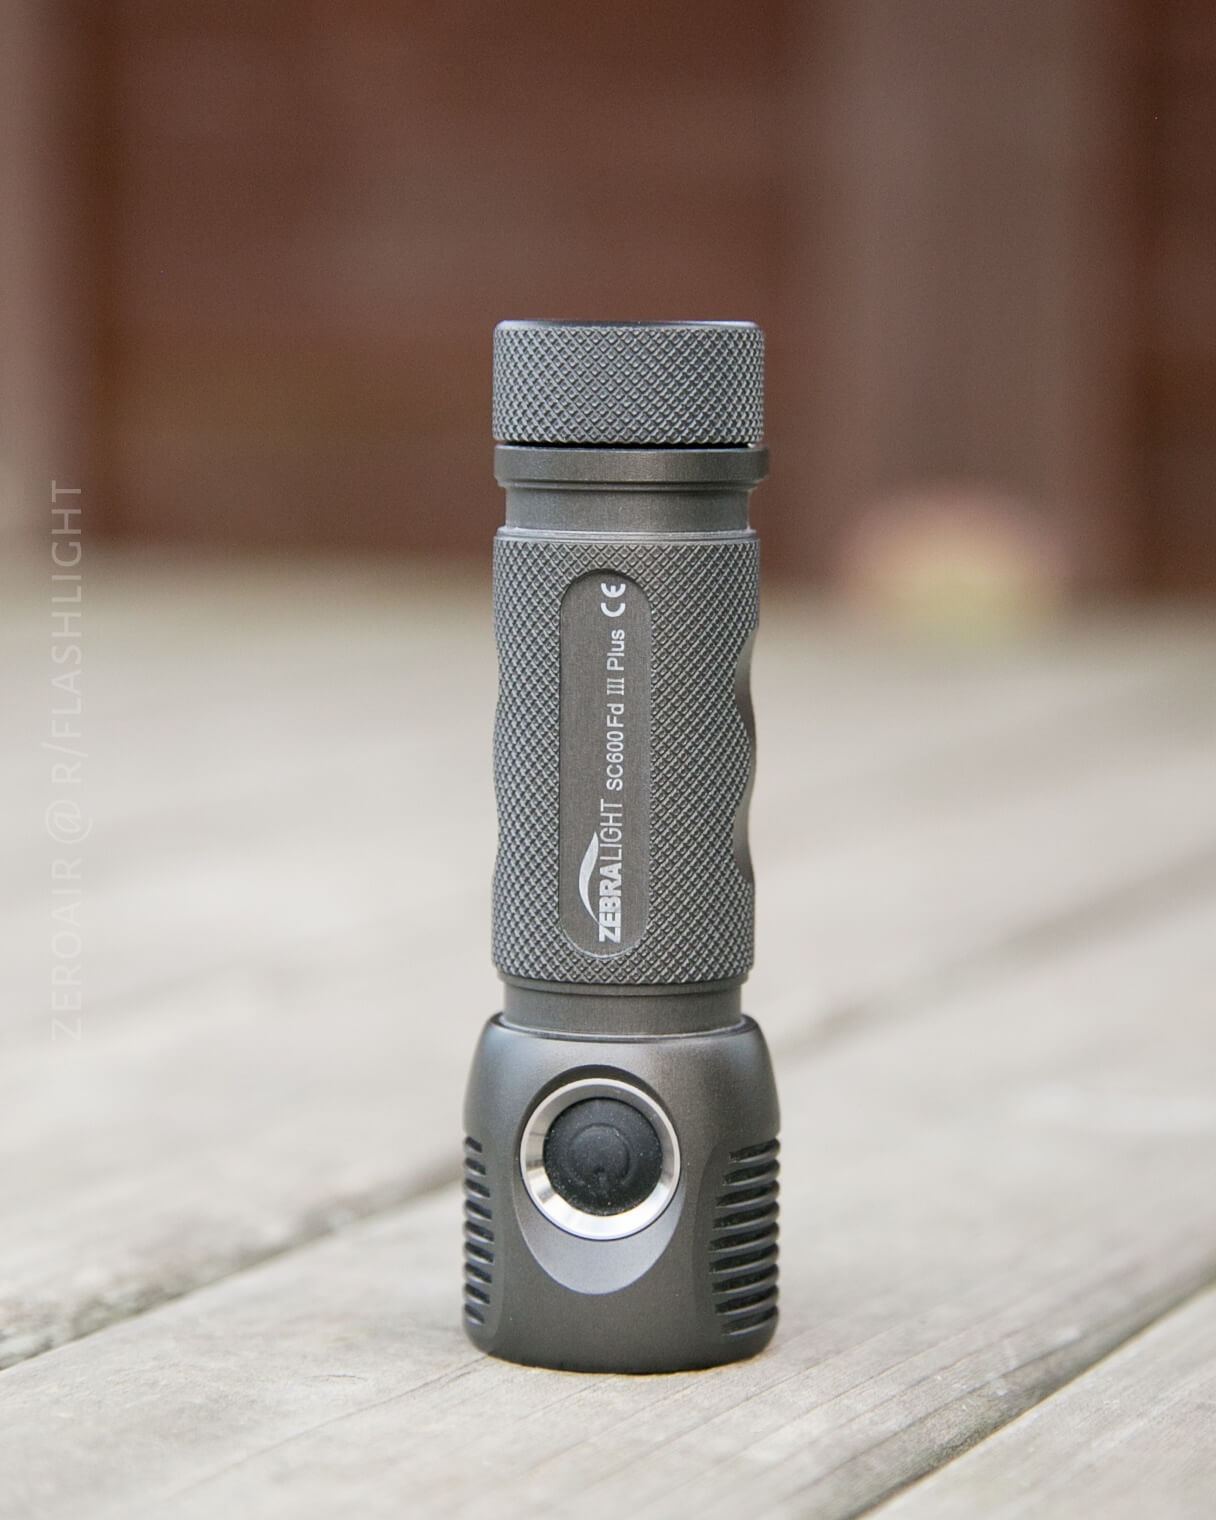
It’s hard to describe how smooth the threads are – this is the standard all my other lights will be judged by.
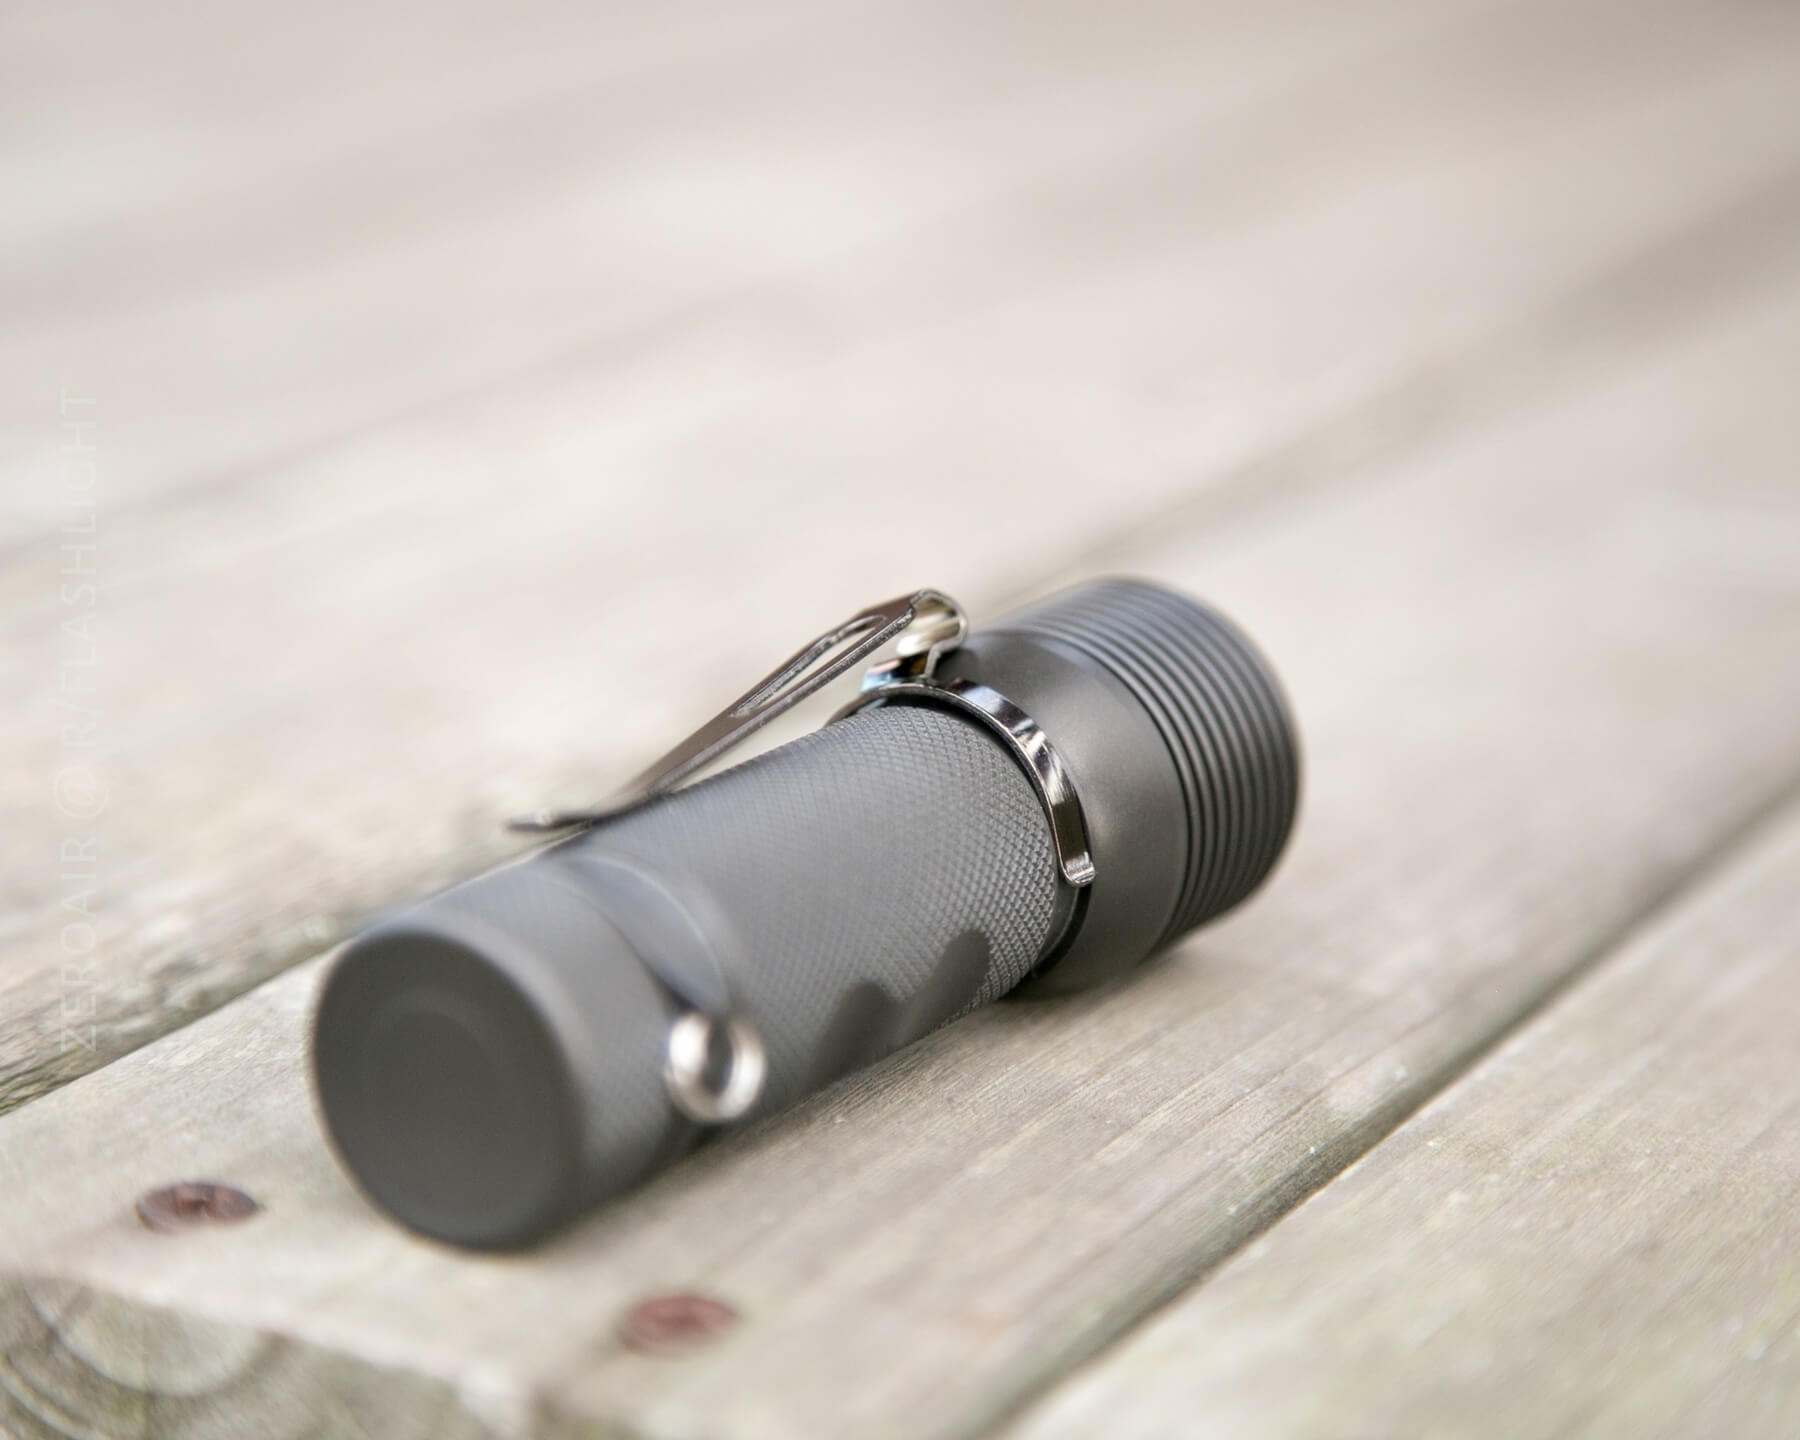
The threads are also anodized, which (in my experience) makes them all that much smoother. And a personal preference, but I love the tailcap – it’s knurled, and it provides a large enough contact patch to make screwing the light together very easy. Also, note how beefy that o-ring is in the picture above.
The frosted lens is frosted on the inside surface, so the outside surface feels just like smooth glass on any other flashlight.
So I am not sure what actually makes this lens frosted. I would guess it’s etched, but I suppose it could also be a film (though I highly, highly doubt that it’s a film).
The fins on the head are anodized completely and uniformly.
Unlike previous versions, the lip of this SC600 is rounded. Like previous versions, the bezel is press-fit and recessed.
As a result of the press-fit bezel, which holds the frosted lens in, the bezel isn’t removable. The button is similarly press-fit and is also not removable. Standard “not with that attitude” disclaimer – it’s probably possible, but most, if not all, reports indicate that it’s not really possible to disassemble this light non-destructively. It’s my opinion that there are enough versions, to just allow the stock purchase of exactly the desired setup. But if you’re fussy about tint, well…
This thought doesn’t really fit in any other category, so I’ll drop it here. I used to say that I like to use flashlights that look like flashlights. For the longest time, I didn’t think tube lights “look like flashlights”. Well, this SC600 looks like a flashlight. No one would confuse this for something else. I like that. It only marginally affects performance, but I enjoy the LOOK of this light because it LOOKS like a flashlight. Maybe it’s simply nostalgia. Maybe it’s vanity. Maybe it’s Maybelline.
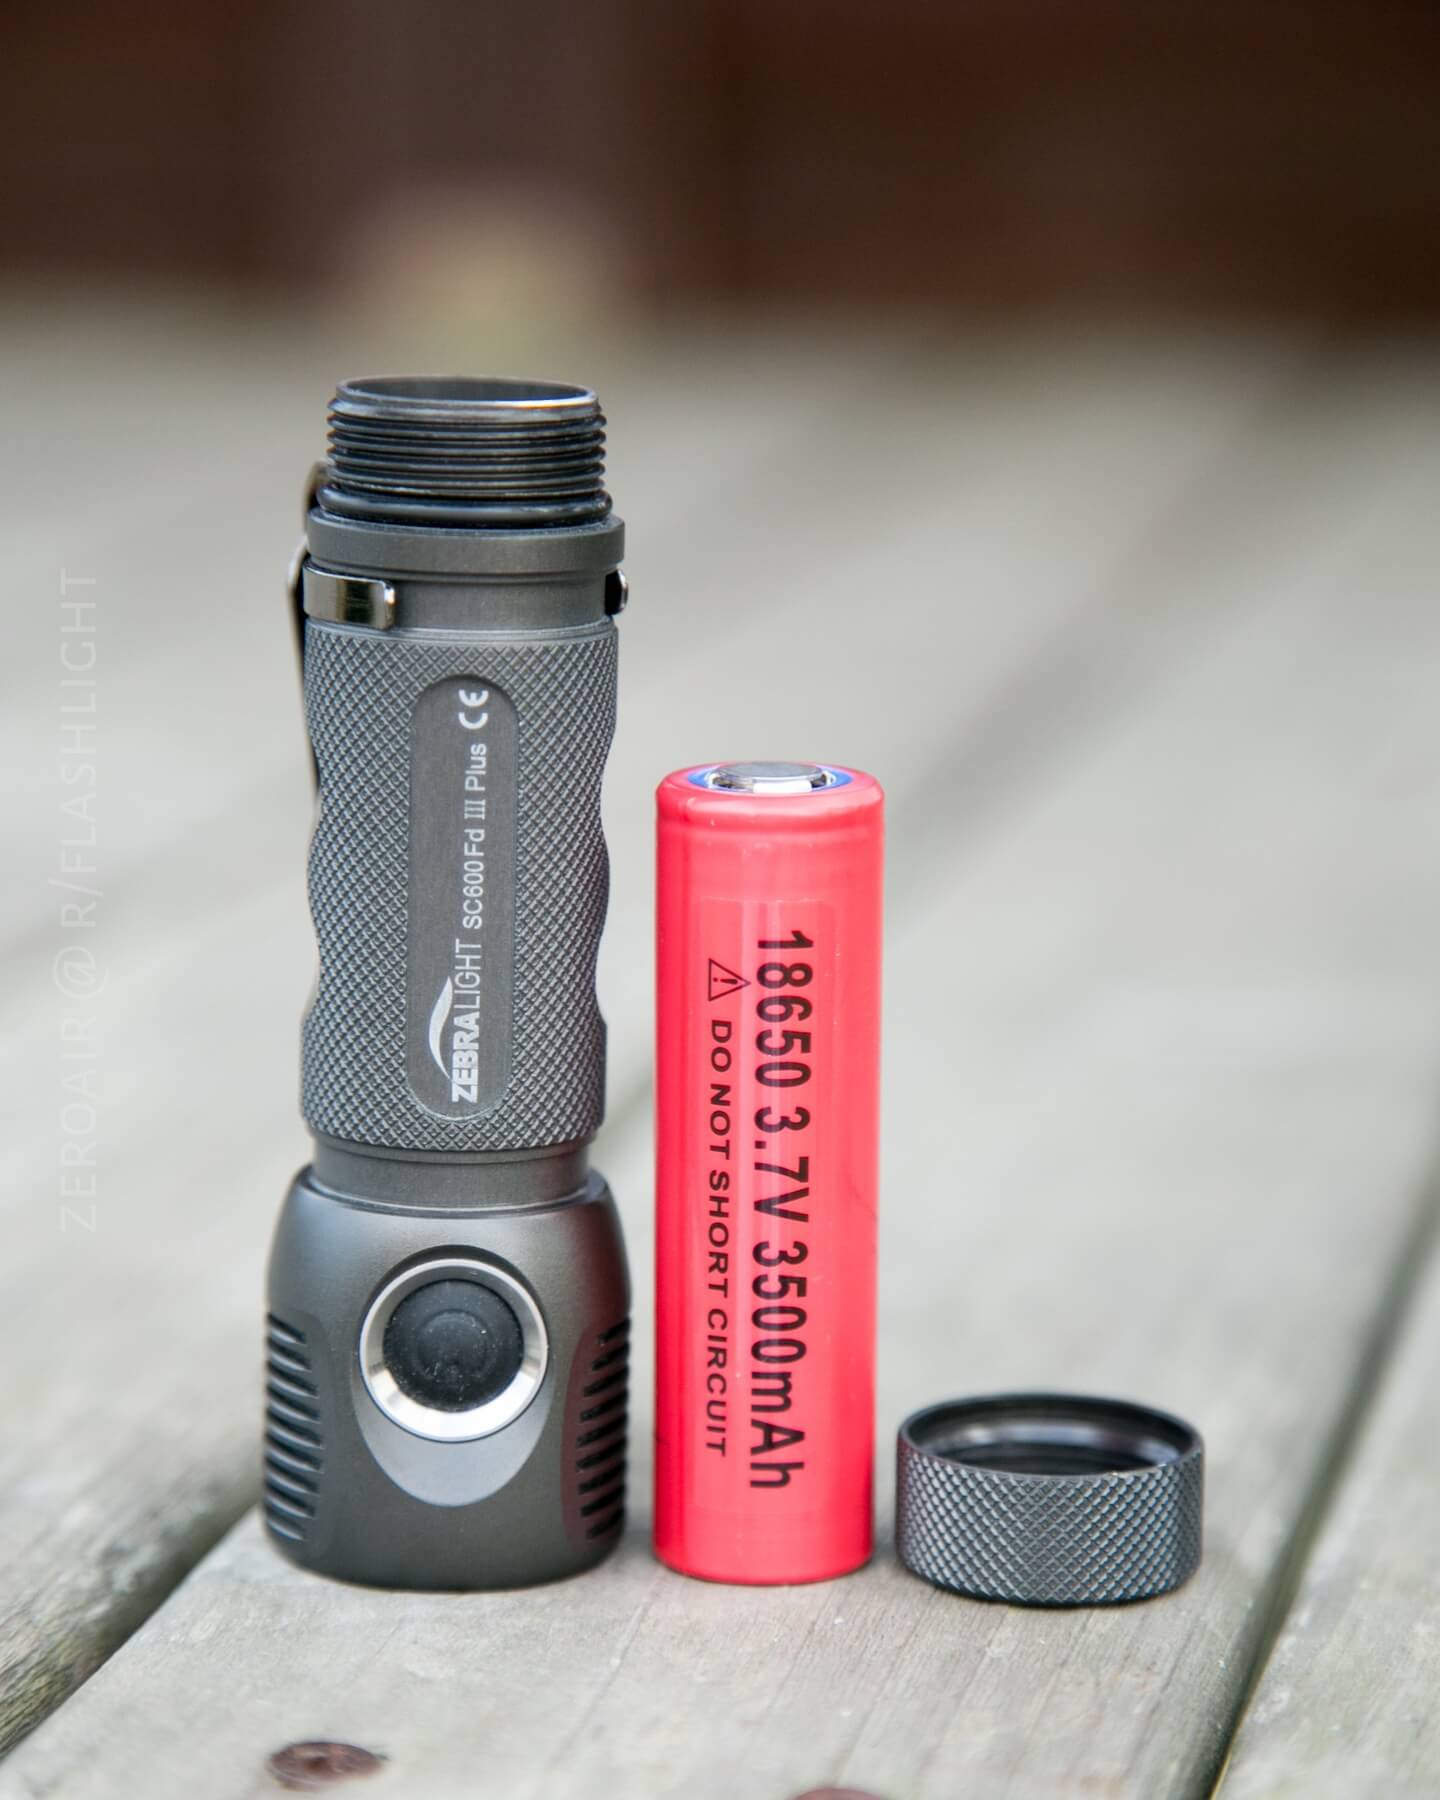
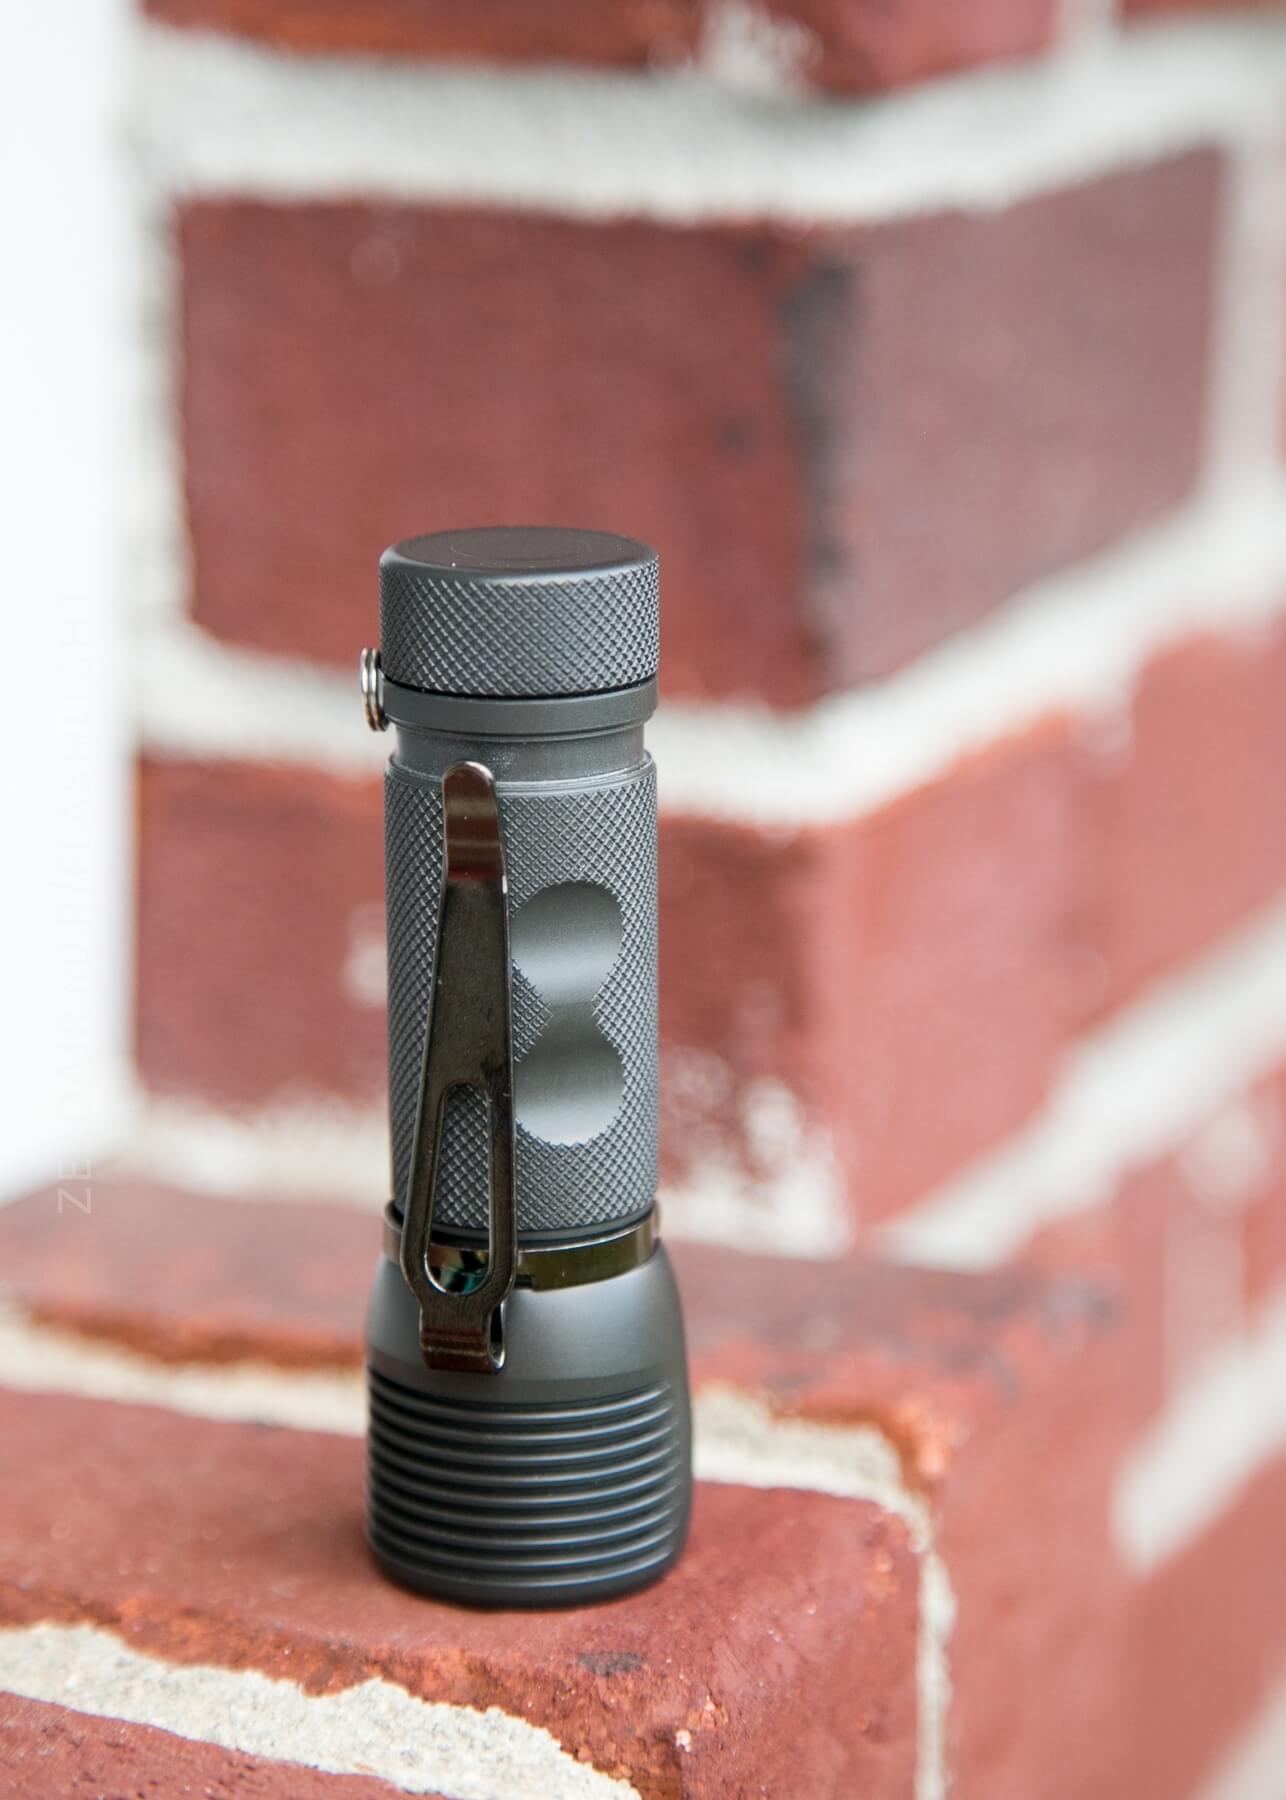
Size
This (and all Mk III) SC600 has a 1.2-inch head, a 0.98-inch body, and is 3.8 inches long. (or 30/25x96mm). It’s a compact light for the features it packs. I normally wouldn’t carry a light this size, but I have to say, it’s basically my go-to light these days. I carry three, sometimes four lights, and … this light makes it clipped into the pocket almost every single time. I’ve actually been quite frustrated by all these runtimes I’ve done. During those runtimes, I haven’t been able to carry the light, and I hate that. This is a light I want on me all the time.
Retention
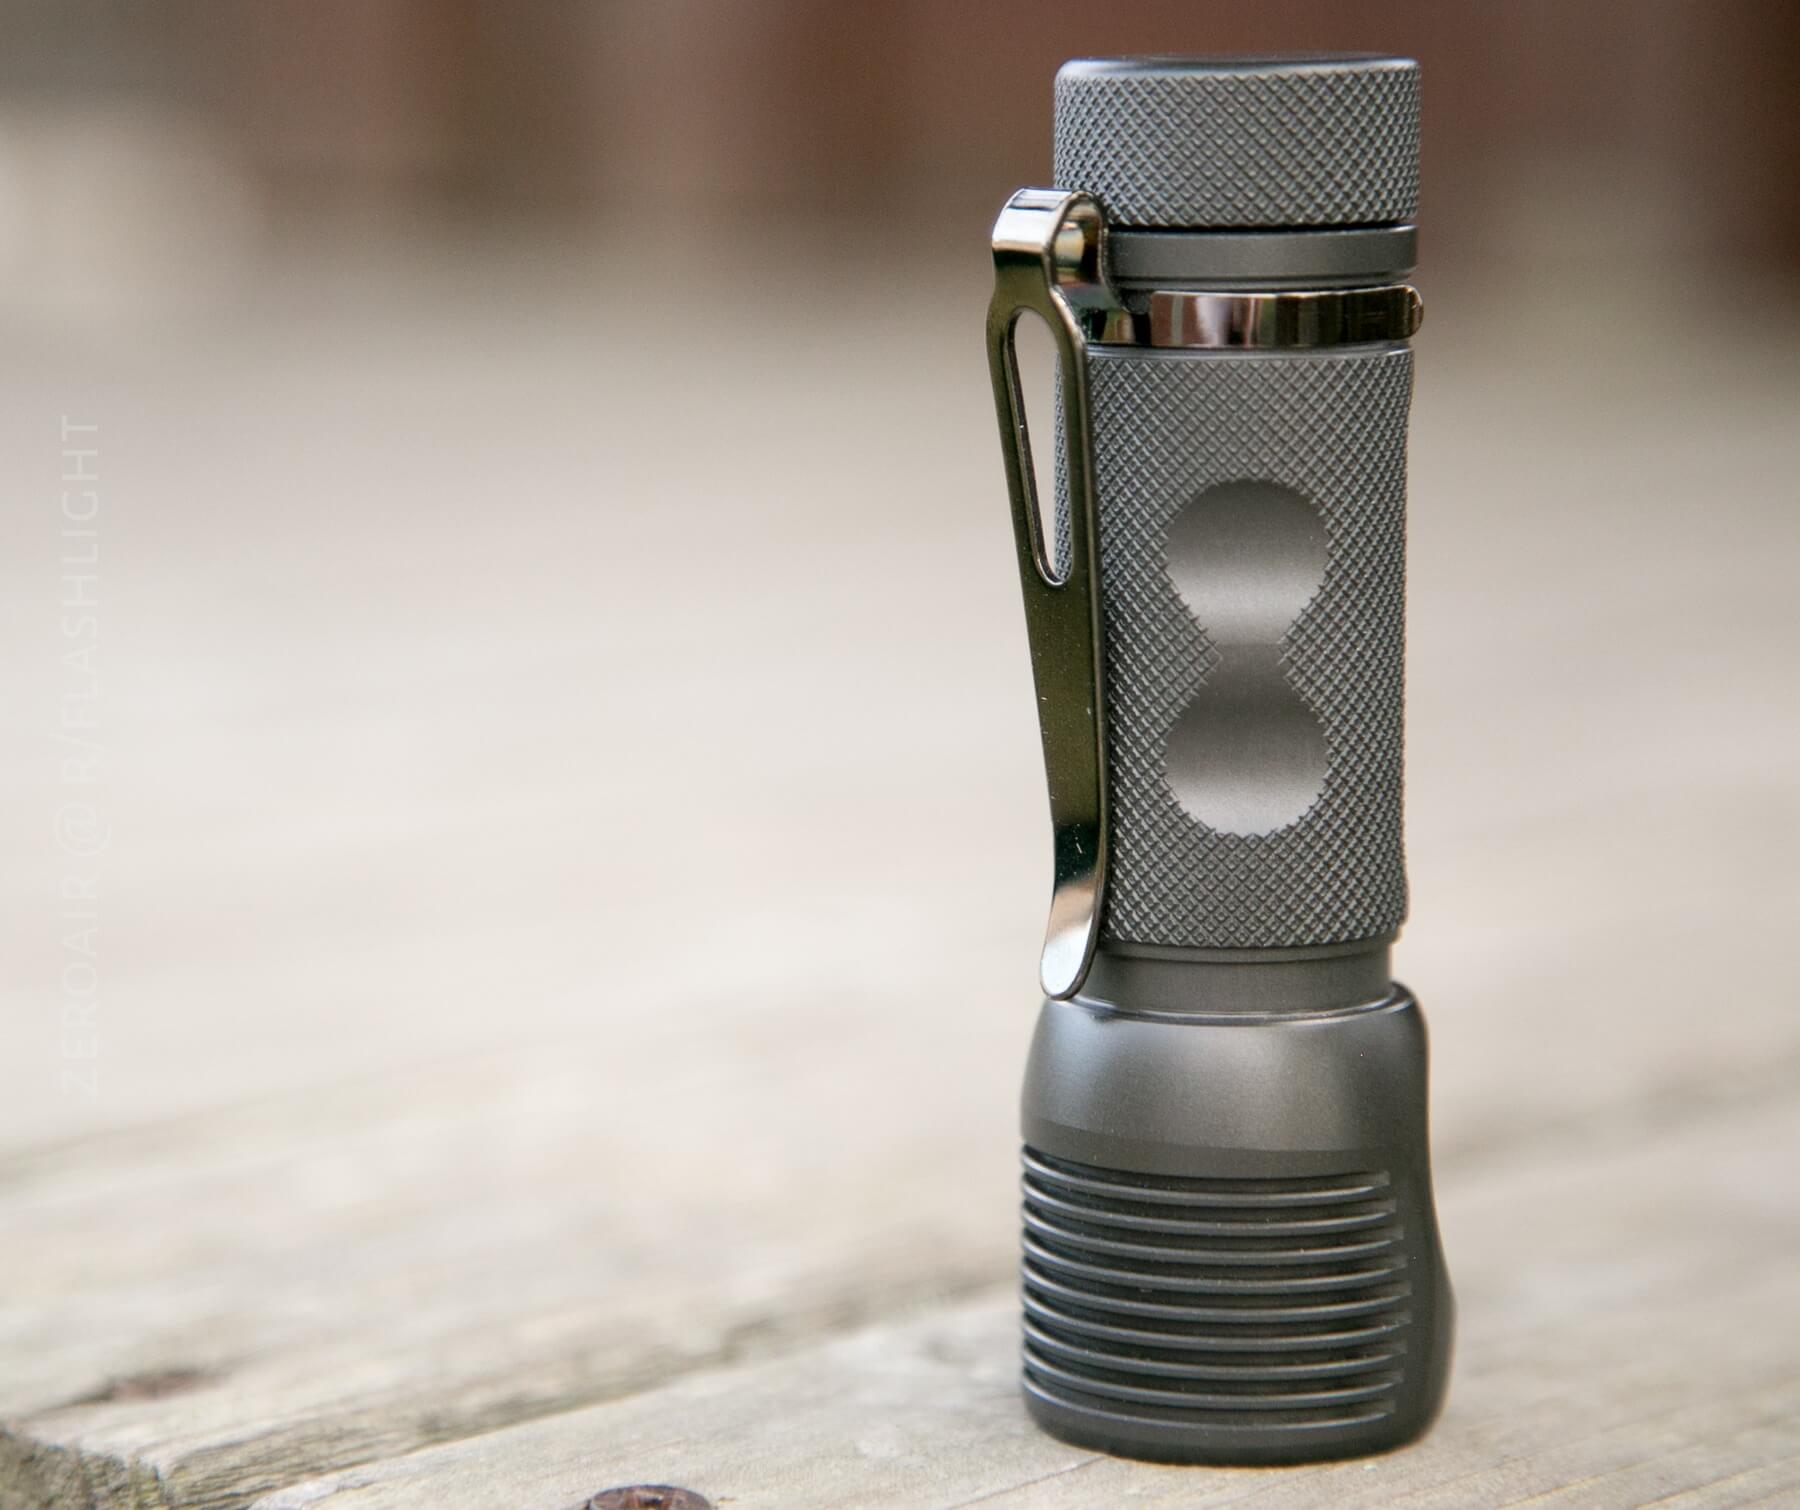
There’s a removable clip with the SC600 and a tiny (4mm) split ring for lanyard/key attachment. First, about the clip: This is not the run-of-the-mill clip that is on so many lights lately. Those clips are good, but this clip is better. It’s more of a deep carry clip and also has a shiny finish that makes it easy to get on and off a pocket. The carry is almost deep enough to put the light flush with the top edge of the pocket – the light sticks over the clip by just a few mm. I like those ubiquitous clips just fine: I really like this clip. (Note this isn’t just Zebralight fanboy talking: the JETBeam Jet-II Pro had a clip in this same style, and I loved that clip too.) The clip is technically reversible (there is a groove on both ends of the light for it), but really only works on the tail end, for bezel-down carry.
On the head end, the clip doesn’t sit quite flush.
It works, just not great.
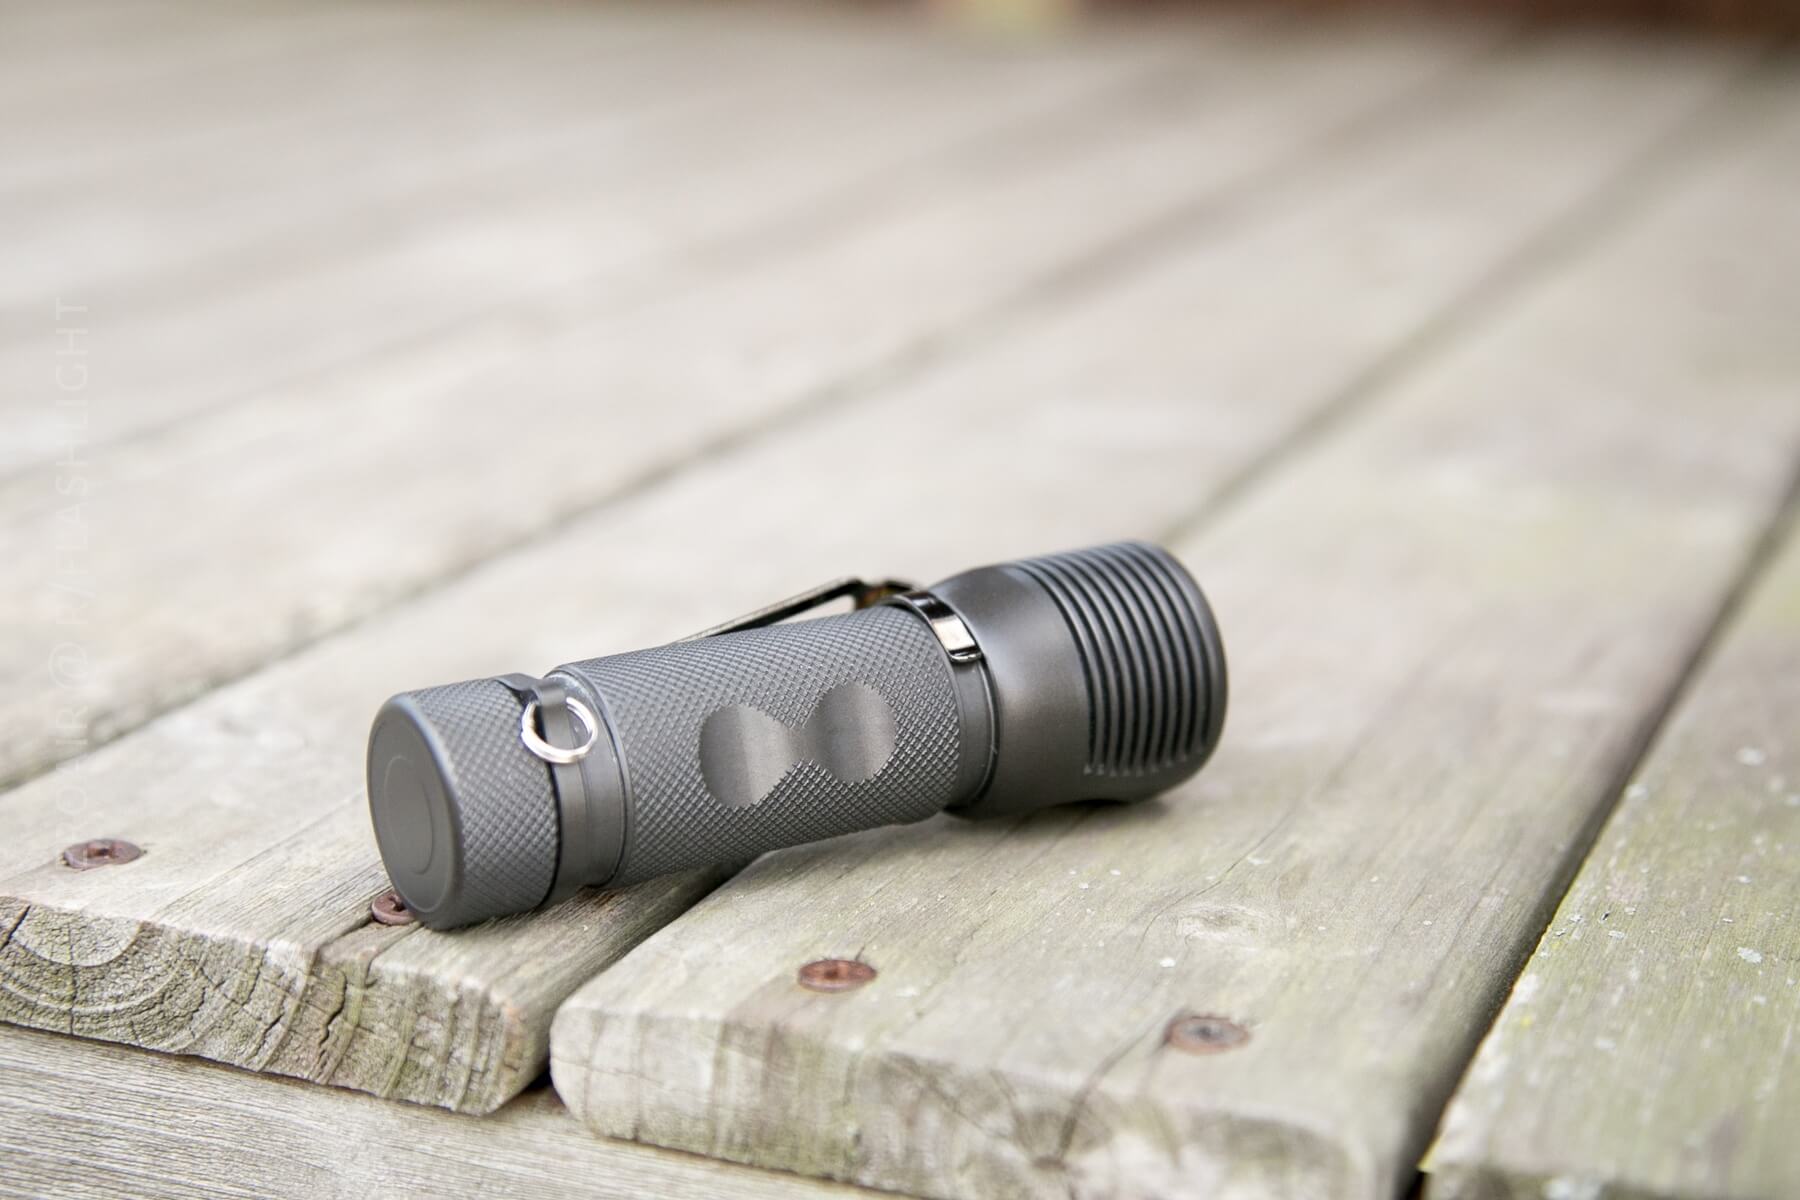
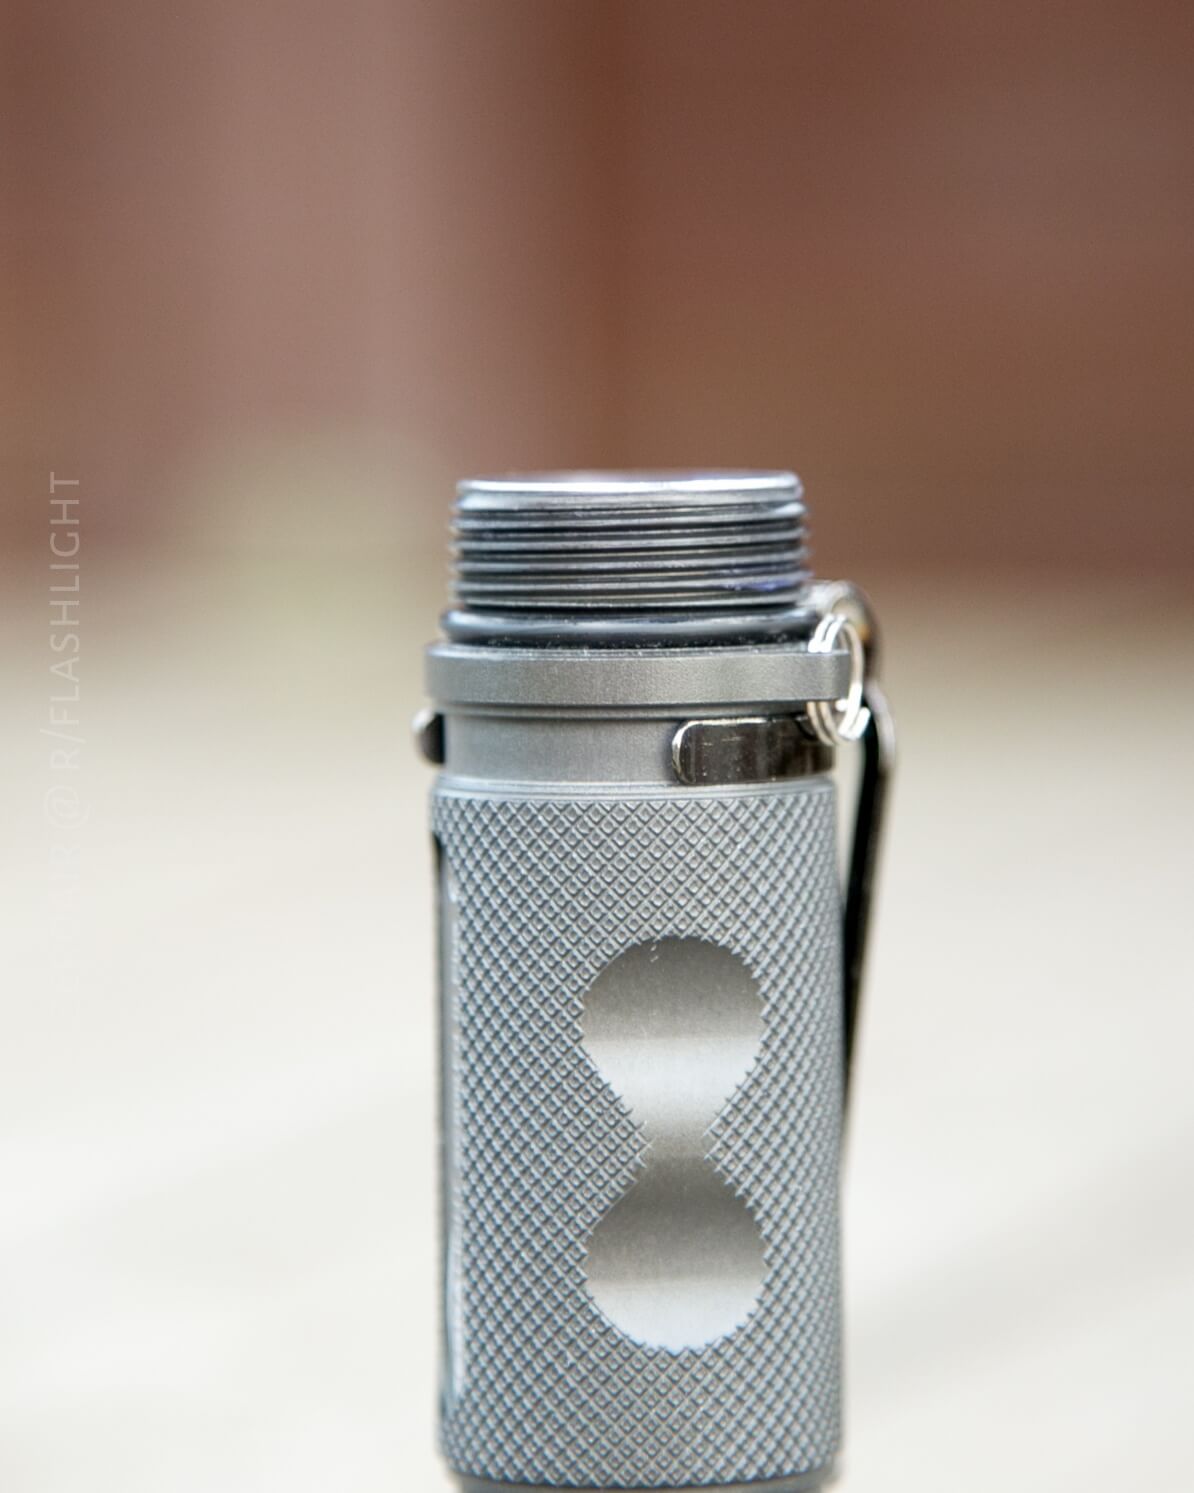
The split ring is a different story. The split ring attaches to a hole that juts off from the body of the light, just around the tailcap.
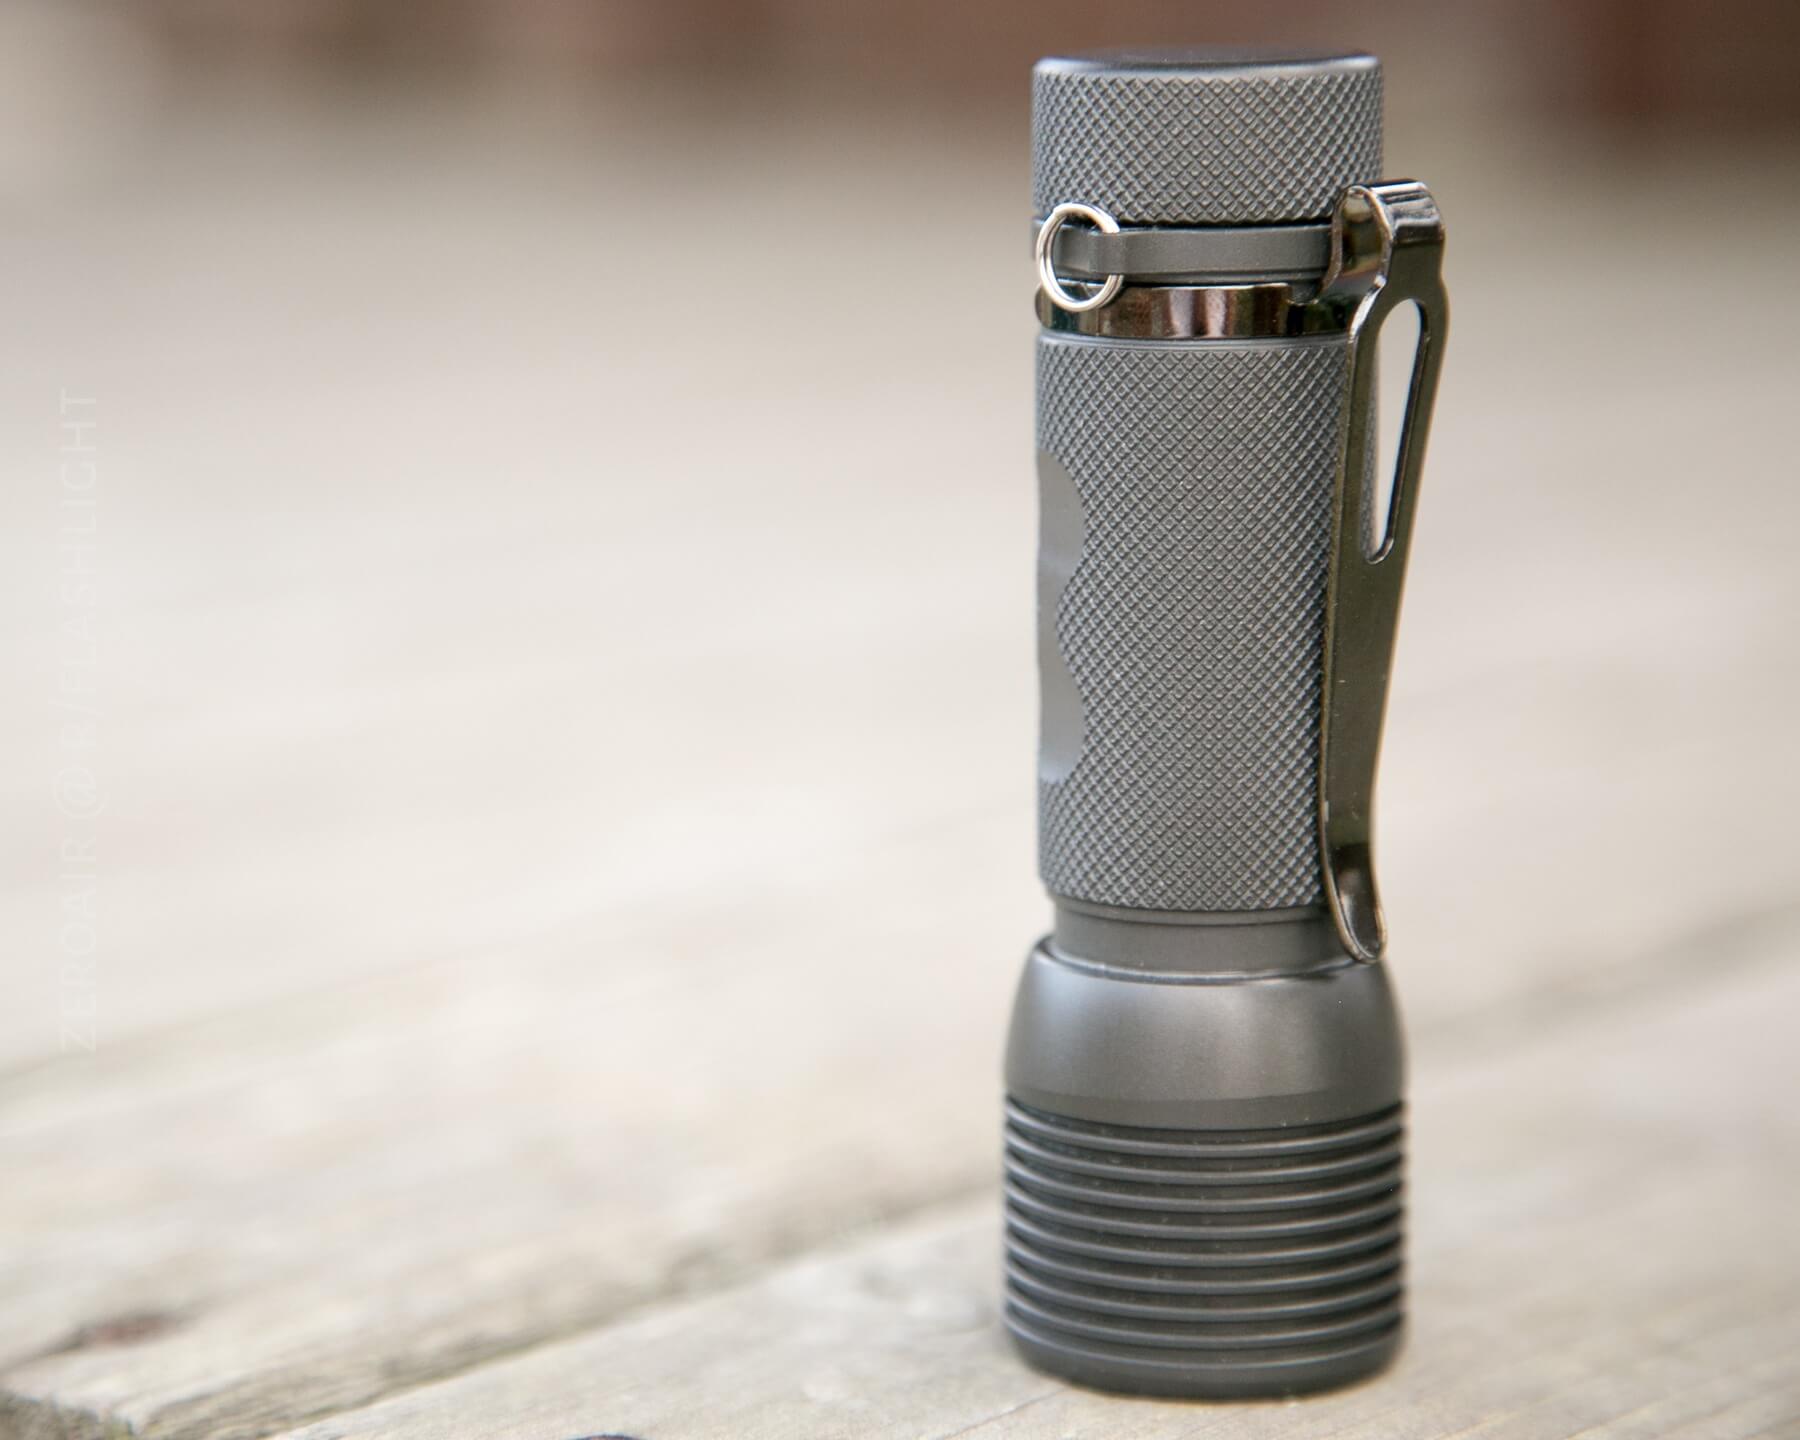
That’s not a removable bit of metal, where the split ring attaches. If one never intends to use the split ring, then this whole apparatus is annoying. It’s not unheard of for users to take this bit of metal to a grinding wheel, and remove it… It doesn’t get in the way of much, and it doesn’t affect carry; it just messes with the flow and feel of the light (if I can say it that way). It’s just unnecessary.
There’s no magnet in this light, no pouch, and no other retention mechanisms. The clip is the way to go, and if the clip could be removed to have a completely symmetrical light, that’d be great.
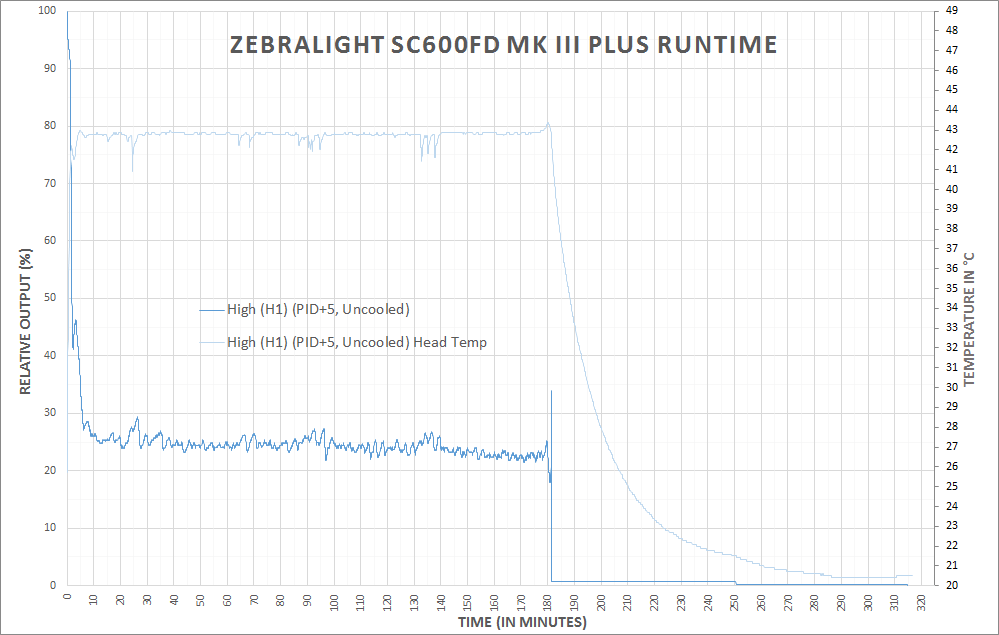
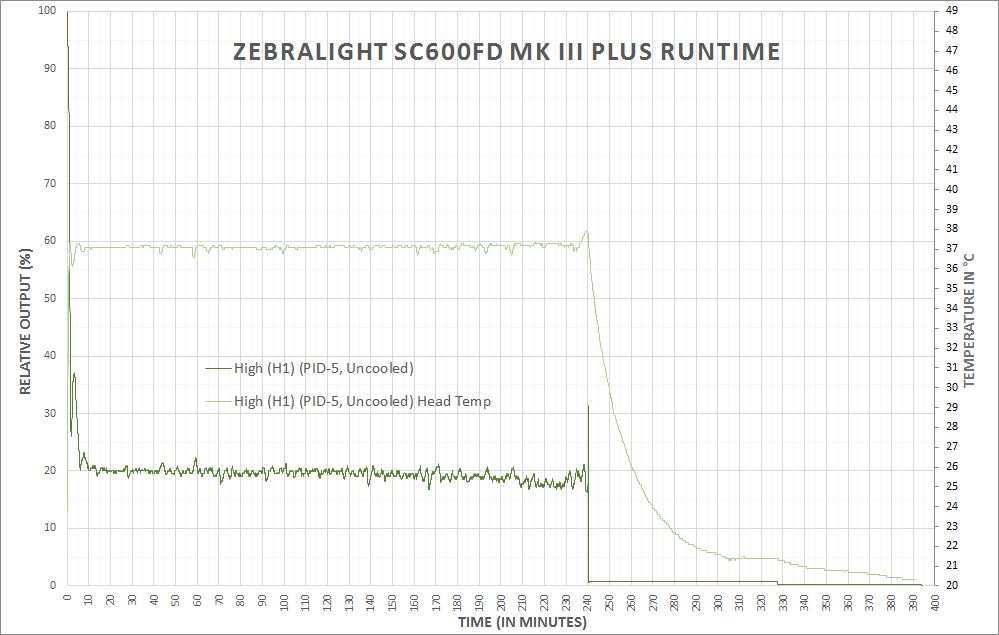
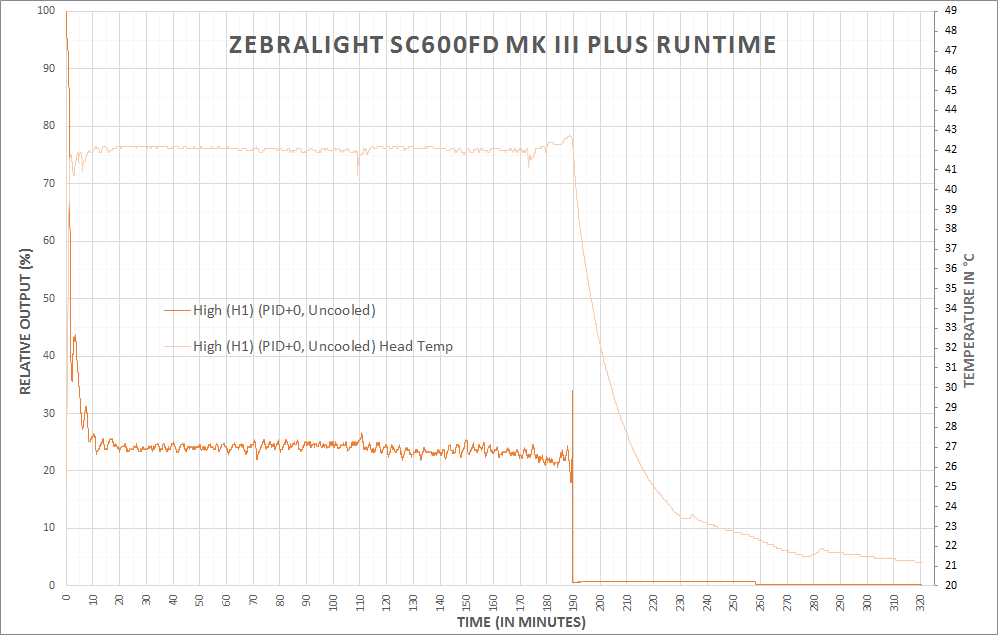
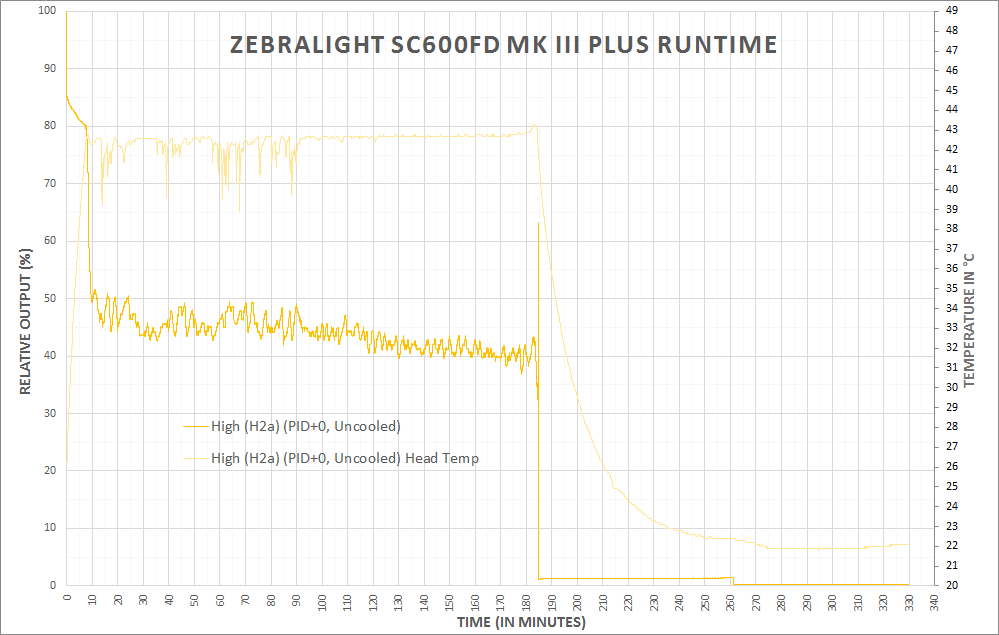
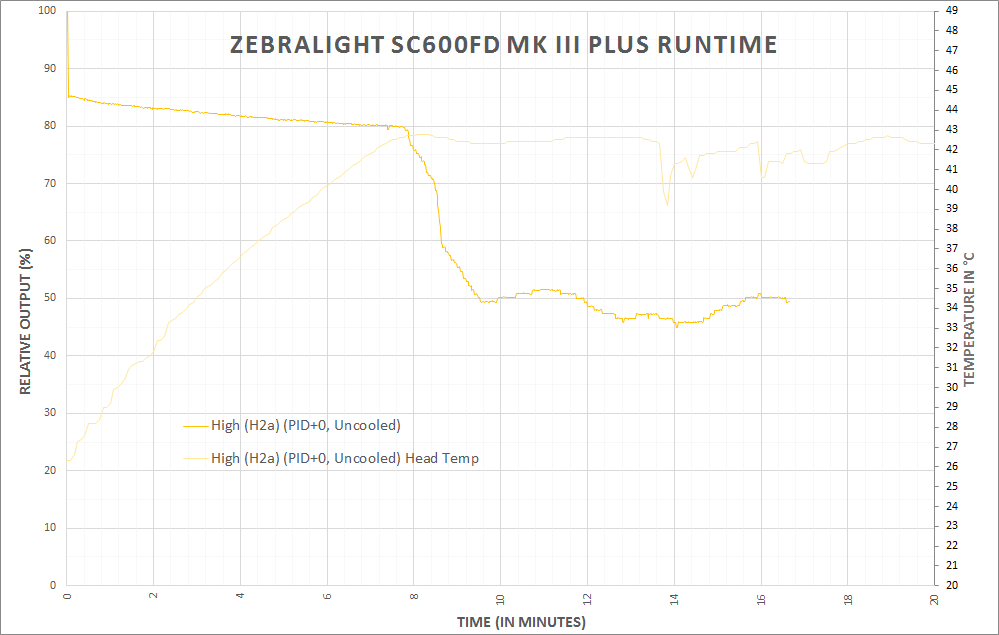
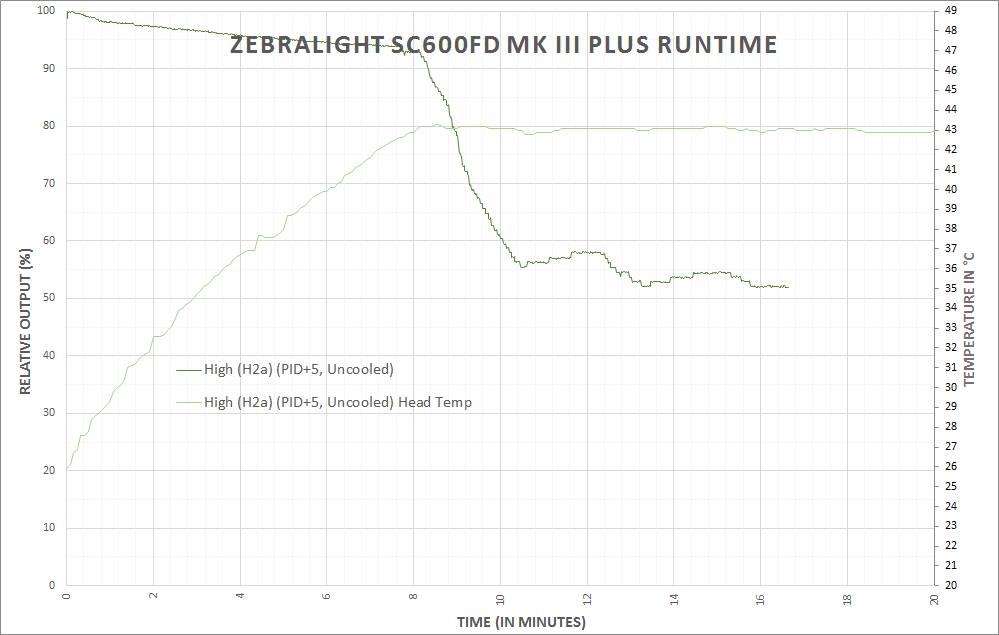
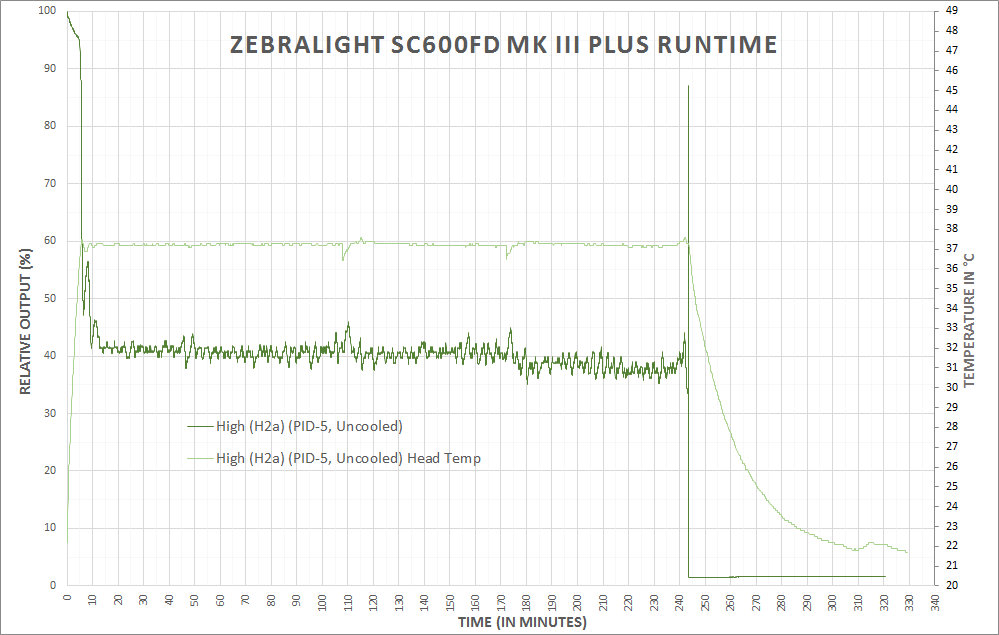
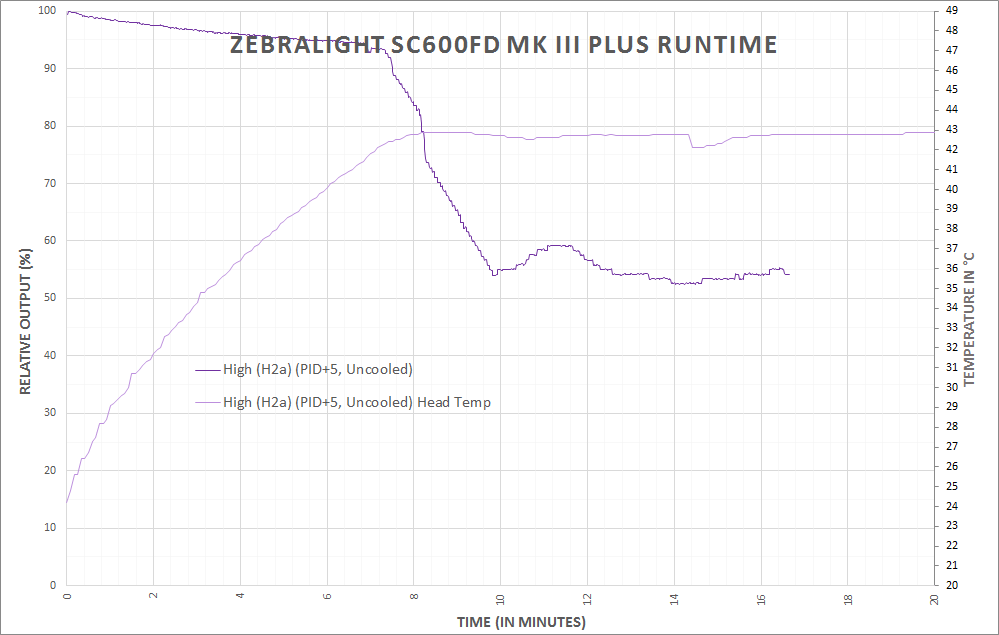
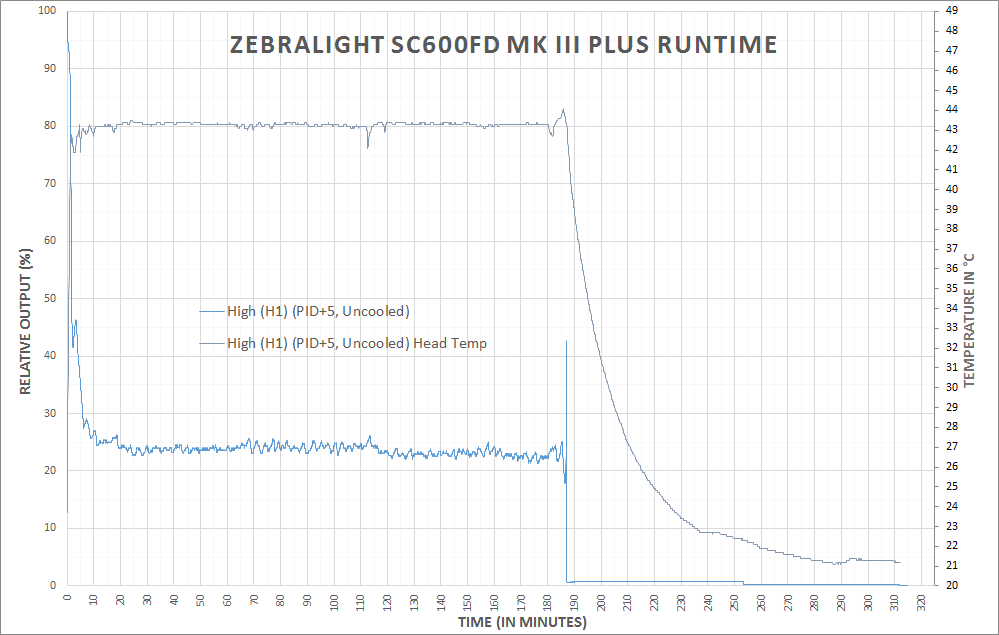
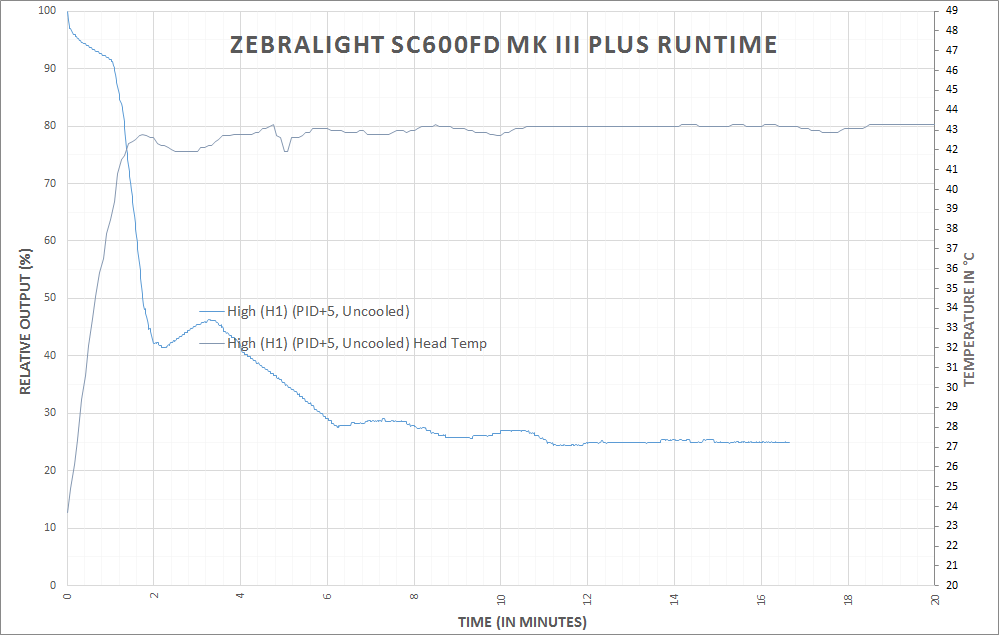
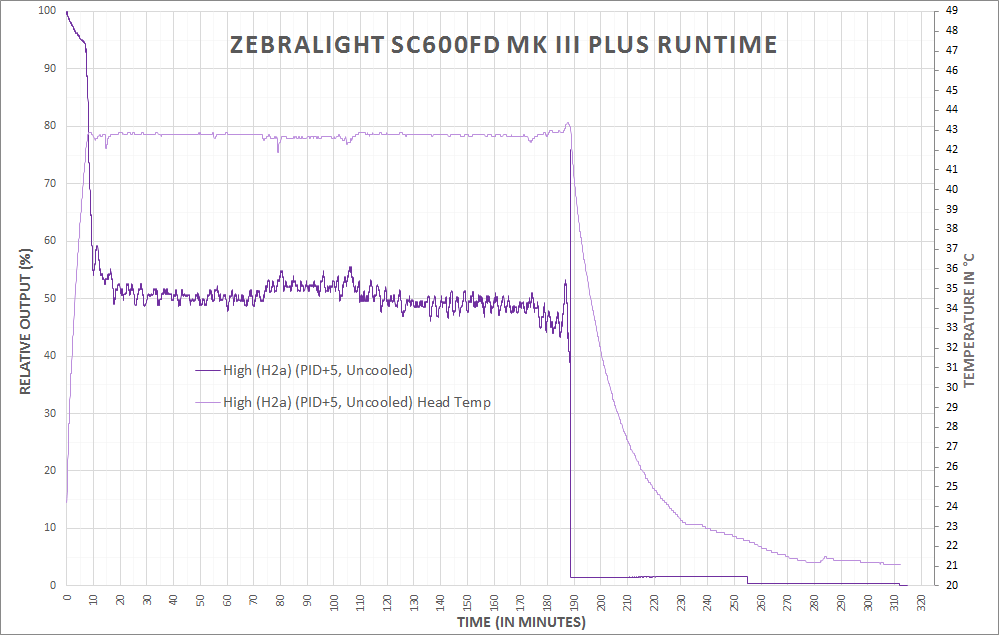
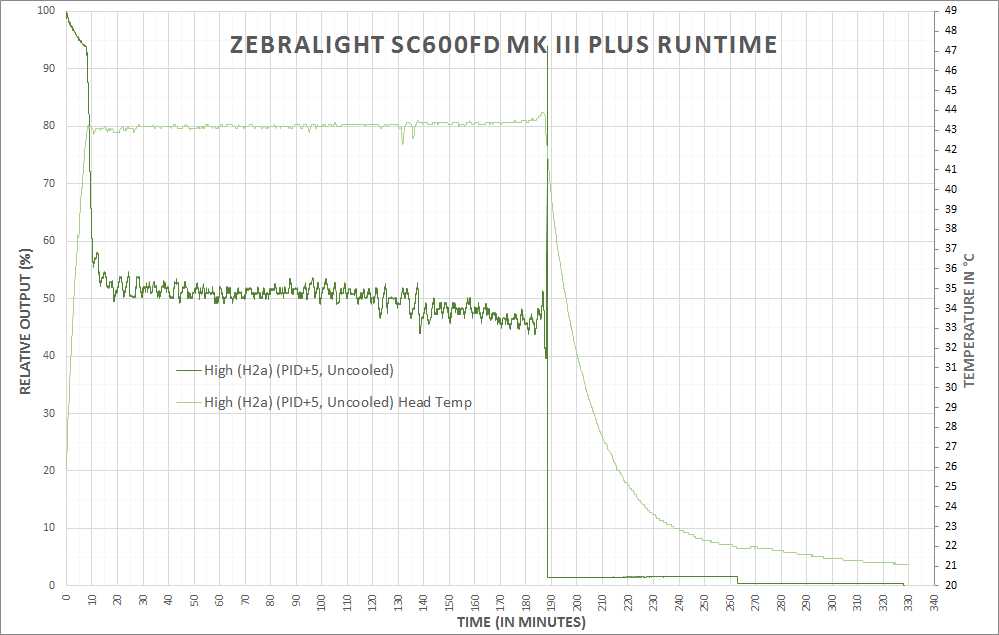
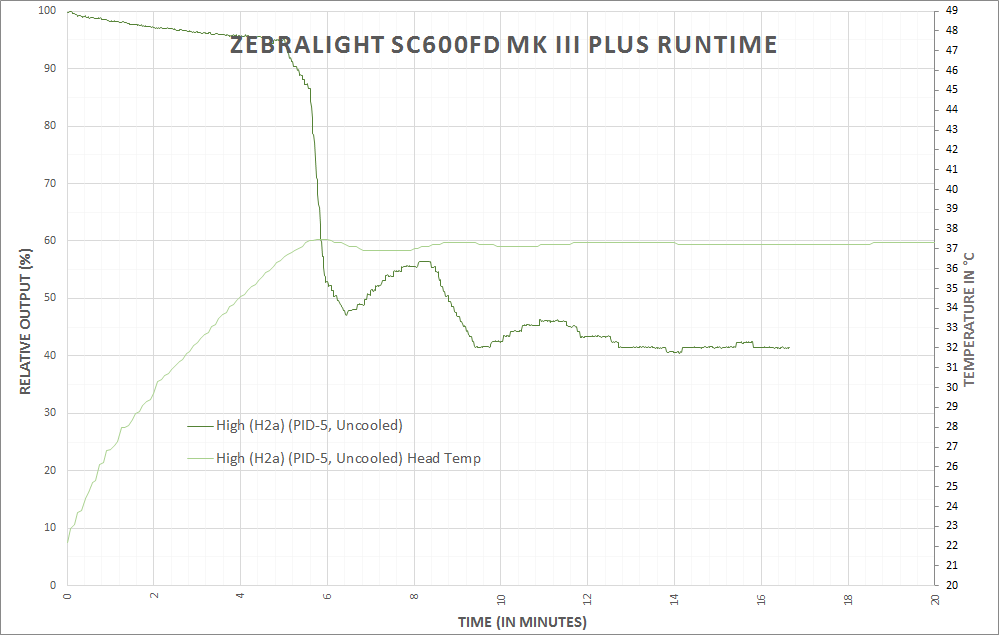
Power and Runtimes
With the size of this light, and its power needs to make 1500 [rated] lumens, come some pretty specific power requirements. Foremost is that the SC600 MK III will only accept unprotected cells. Furthermore, those must be flat top cells. Furthermore, those unprotected flat-top cells must be capable of ≥8A discharge.
The reason for the unprotected requirement is that the bits that connect to the cell aren’t springs (which give some leeway in cell size) – they’re brass pins, aka by Zebralight as “pogo-pins.”
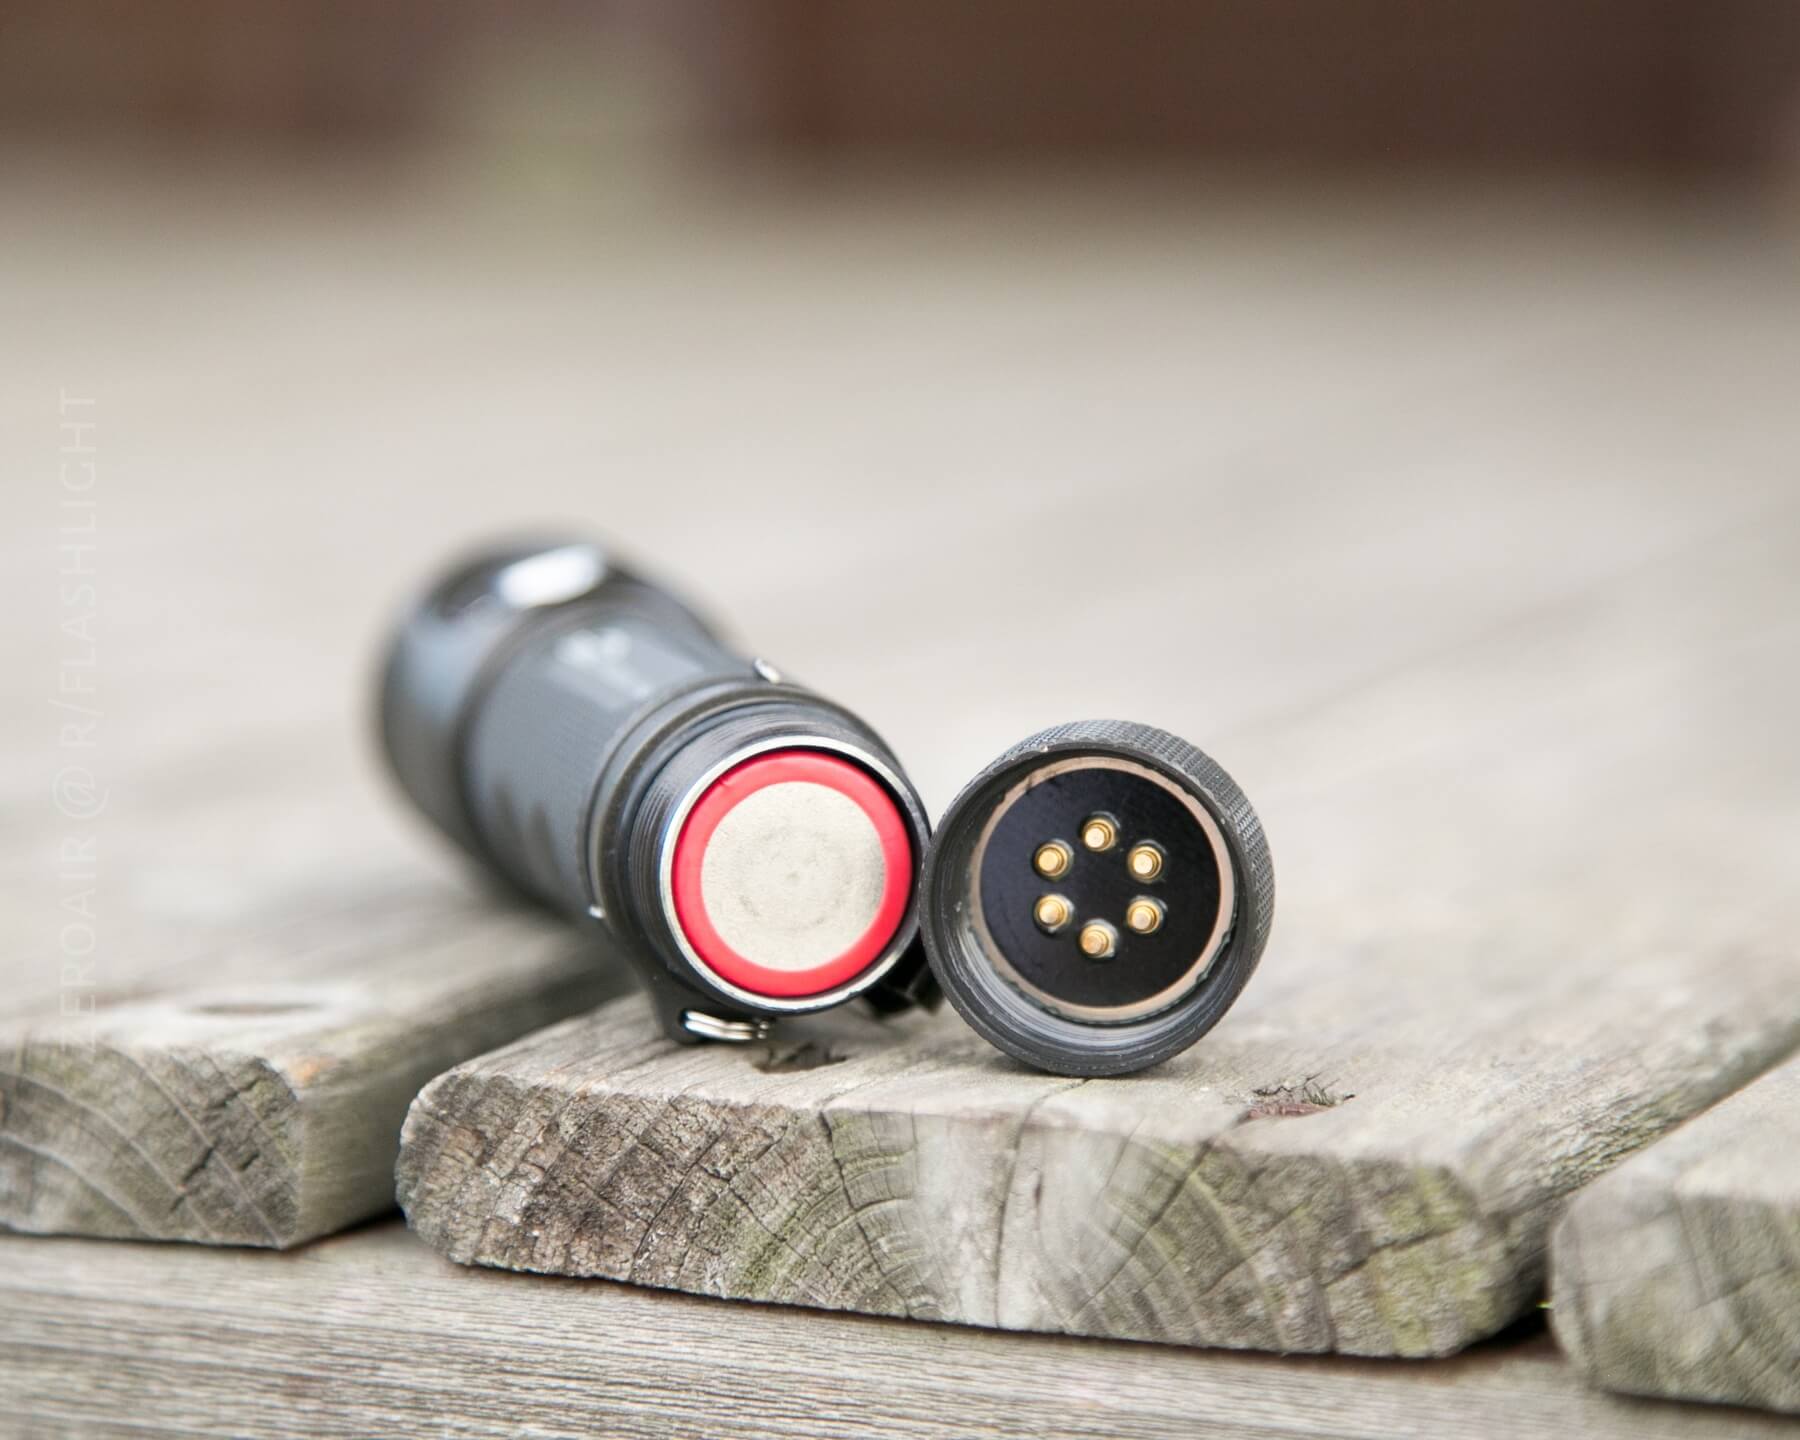
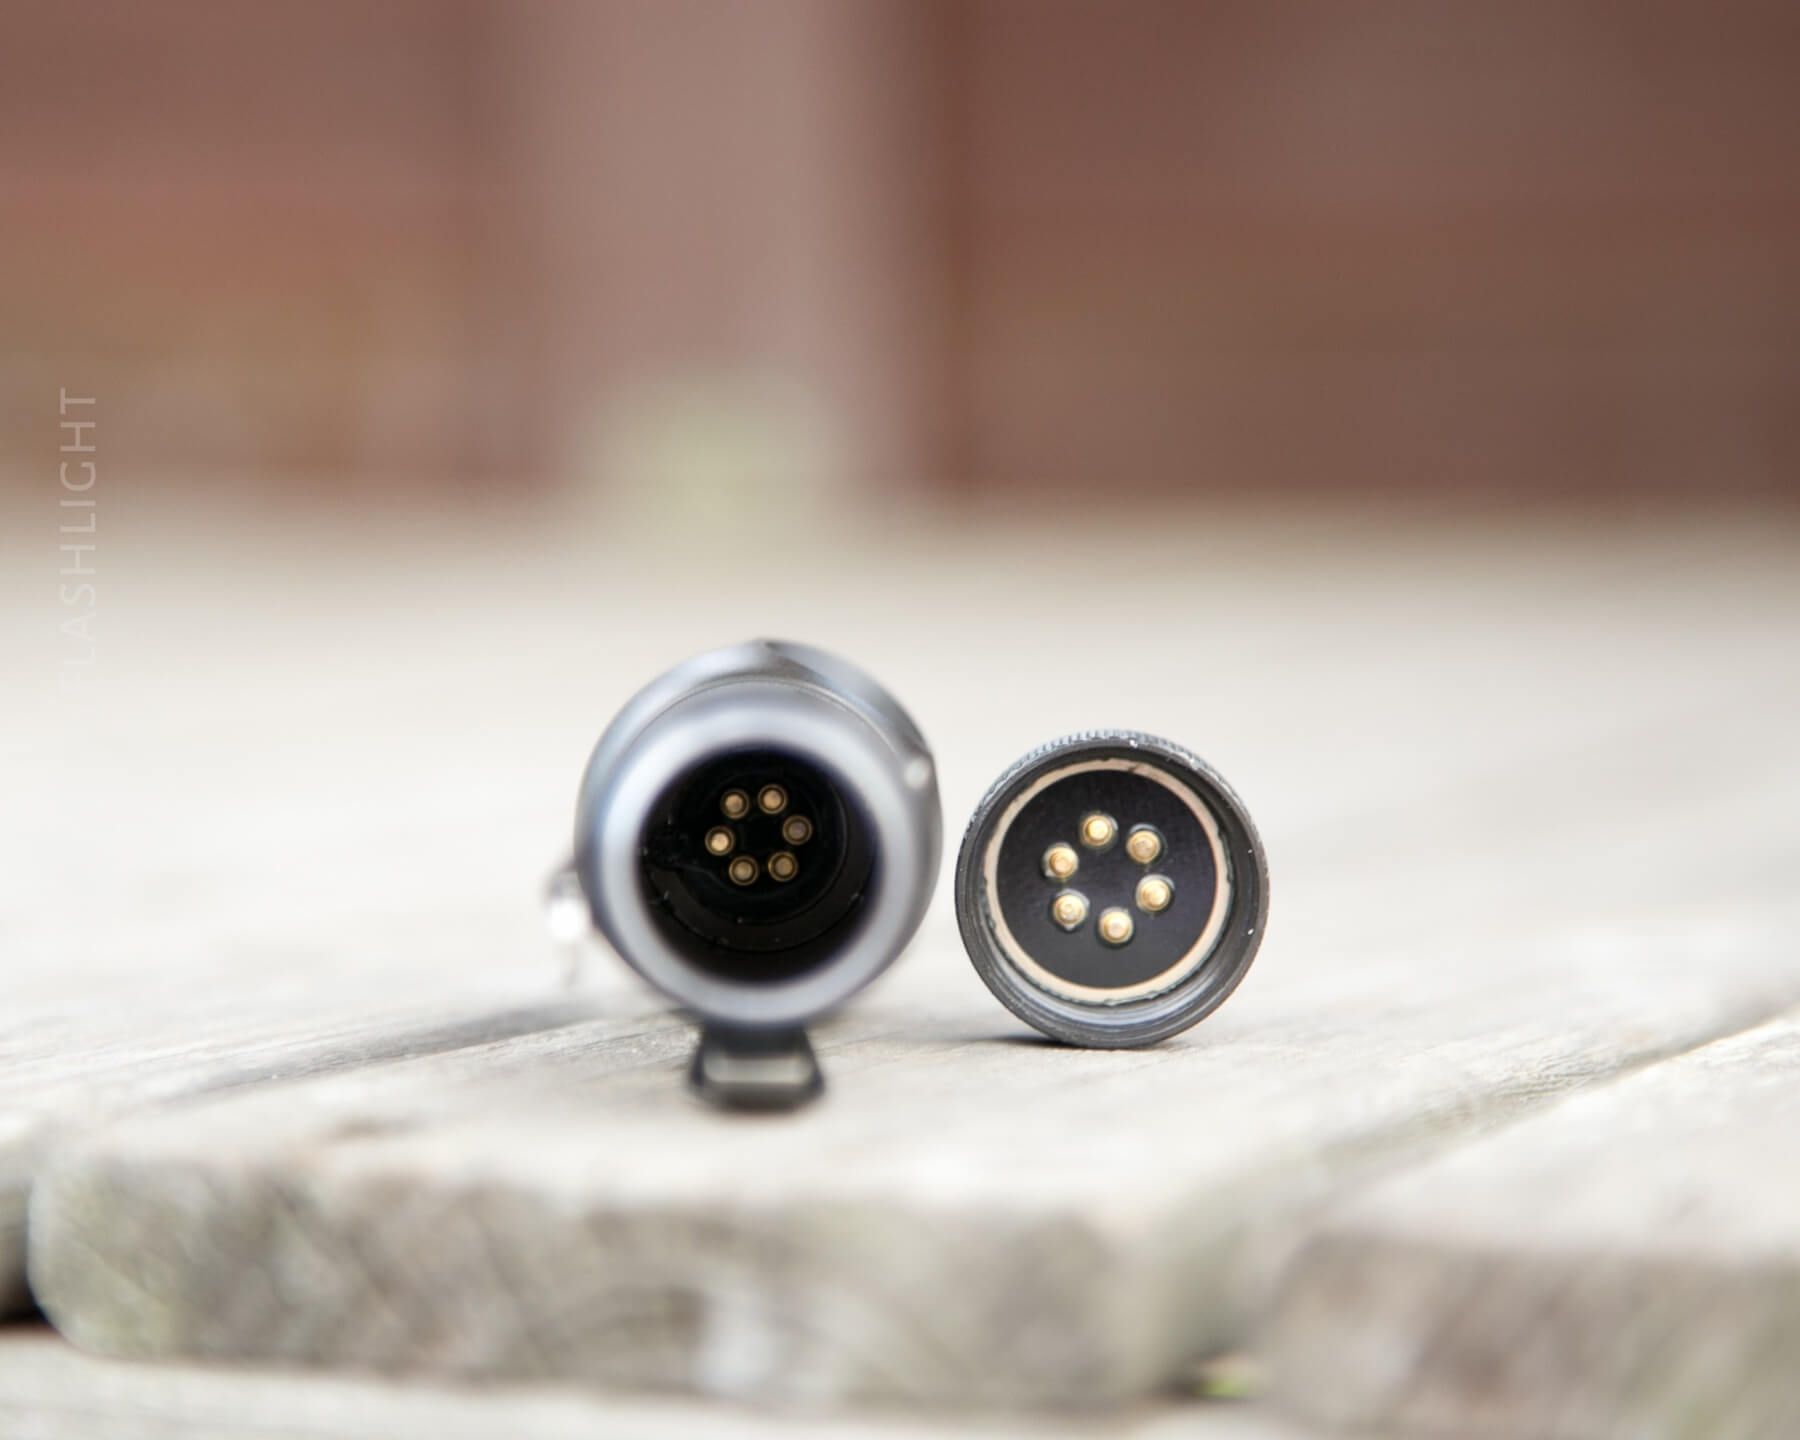
These are springy, but there’s just a very slight amount of movement (1mm at most) in these pogo-pins. The result of this is a shorter cell tube and a shorter light.
But more importantly than just fitting: the [recommended] unprotected cells can provide enough amperage to drive this light. I did find that other unprotected cells work (for example, my NCR18650B’s). But these cells won’t provide the current needed for the high modes in this light. (Still, if you’re in a pinch, or really don’t care about high, then the light will work with those cells. Protected cells, however, will simply not fit.
Zebralight does sell a cell that works in this light – the cell they recommend to use in this light. That’s the red (with blue trim) NCR18650GA.
| PID | H1 (V) | H2A (V) |
|---|---|---|
| +0 | 2.82 | 2.84 |
| +5 | 2.82 | 2.86 |
| -5 | 2.78 | 2.84 |
2.8-ish volts is within my comfort zone for a flashlight to manage an unprotected cell. That these lights require unprotected cells was my original hangup about them… But this flashlight seems incredibly smart about cell management, so I no longer have any issues with using unprotected cells in this light. I did a fair amount of other runtimes that aren’t included in this review, and all the termination voltages were around 2.8V.
For lack of anywhere else better to put this information, it’s worth noting that the use of an XHP50 in a single 18650 light is unusual. The XHP50 is a 6V emitter, and a single 18650 outputs nowhere near that. So Zebralight has done something special to boost that voltage up to what the XHP50 needs – something no one else seems to be doing right now. All credit to Zebralight for this, and it does make a unique and fantastic light. I make no claim to understanding this fully, but I could guess this is why the cells are so specific: 8A minimum drain is needed for that boost circuit.
Below are a bunch of runtimes. I did all these to test the PID adjustment, and they were posted in another format originally. I’m just dumping them all here, in line.
User Interface and Operation
The Zebralight user interface is a thing of legend. I’ll try to break this user interface discussion into manageable bits. It might take two or more tables. Bear with me. There’s just one button – it’s a domed silicone button with a power symbol on it.
Easy to locate without looking, and very responsive to clicks. There are two ways to interact with this button: a short click and a long click (where “long” is >0.6 seconds). These two clicks are fairly natural, and the timing is well thought out.
Basically, the user interface is simple if you want a simple 3-mode light. It’s one of the simpler UI’s we face in r/flashlight. You could stop there and have a light as functional and more useful than many current lights. But wait, there’s more!

Every one of the main modes (L, M, H) has modes. That’s what the Specs table with runtimes above in the mfg. The claims section means: Low really has “L1 and L2”. Medium really has “M1 and M2”. High really has “H1 and H2”. The light ships with the “1” mode selected. Furthermore, once selected, these modes are remembered when the light is off, or the cell is changed, etc.
But we need to go deeper.

All of the “2” modes have sub modes…. H2 really has H2a, H2b, H2c – THREE options of brightness in H2, making the “High” grouping have a total of FOUR options. And each mode is this way. That’s a total of TWELVE brightness options.
The default for every mode is the brightest option. So within every group, the “1” is higher than the “2” and the 2a is higher than the 2b and 2b is higher than 2c. Furthermore, every “c” mode is higher than the next lower group’s “1” mode. So H2c is higher than M1.
The default 3 choices are very well spaced. And the Default six choices give so much flexibility that you may never even care that there are 6 whole other modes out there for your use….
Each of these modes is memorized, but the light doesn’t have traditional mode memory (it doesn’t need it, since H, M, and L are available from off anyway). For example, the light ships with H1, M1, L1. If you change M1 to M2 (which would require a double click while on M1), then turn the light off: when you turn the light back on and cycle the modes, you’ll have H1, M2, L1. And no matter what selection of any of those 12 modes you select, they’ll be remembered. So you can have any combination of L, M, and H: H2c, M1, L2b. Or H2a, M2a, L2a. On and on. Some math majors tell me how many choices that is? (Some mix of permutations and combinations, but my math is years old….) . I can tell you from experience: It’s unlikely that you’ll ever need this extremely granular control of the modes of this light. It’s not even “12 outputs!!??”, it’s 12 actual, disparate outputs, all of which are well thought out and useful. I’ve frequently used the main 6 modes, but I’ve never felt the need to change the n2 mode to a lower level. I have just been playing around, but not because I needed to.
Programming n2 (where n=H, M, or L) to its sub levels involves quite a bit of clicking…. While in the n2 mode, six double clicks will enter the n2 programming mode. Double-clicking once in the programming mode switches between n2a>n2b>n2c. To accept a mode, just click, and the light will turn off, and the mode is remembered.
| State | Action | Result |
|---|---|---|
| Off | Click | High |
| Off | Double Click | Medium* |
| Off | Triple Click | Beacon-strobe mode |
| Off | Four Quick Clicks | Battery Indicator$ |
| On | Hold | Mode cycle, L>M>H (release at desired level) |
| -# | – | – |
| n**1 | Double Click | n2*** |
| – | – | – |
| n2 | Double Click | n1 |
| – | – | – |
| n2 | Double Click x 6 | Enters n2 programming mode |
| n2 Programming mode | Double Click | n2a>n2b>n2c (release on desired mode to select it) |
- * Clicking to medium actually goes through “High” so there’s a flash of the “High mode – if you’ve H1 selected and it’s at the highest mode, and you have M2c selected, it’s quite low… then this flash will be quite jarring.
- $ 1-4 flashes from the main (only) LED, where 4 is the most filled battery, and 1 is the least.
- # I want the whole user interface in one table, so I’m going to separate each level of user interface depth this way.
- ** “n” = L, M, or H
- *** Whichever n2 you’ve selected. By default, n2a.
Note about the memory being so good on this light: it’s not easy to return the modes to the factory settings. There’s no hard reset button – if you want the light back to (the very good) default settings, you must reprogram it manually. Something to think about when your finger starts getting all click-happy. 🙂 (Note, for PID, there is a reset to the default option, as described.)
The PID adjustment doesn’t really fit neatly into the user interface table. Here’s how to do it:
- If the light is set for any high except H1, set it to H1.
- Turn the light on to H1.
- Turn the light off, in H1.
- Turn the light back on to H1, then without turning the light off begin to cycle the modes by holding down the switch.
- Hold the switch through 6 full cycles of modes (L, M, H). After the 6th cycle, the opportunity to program PID begins:
Release on Low to subtract 1 degree C (up to 5 max)
Release on Mid to revert back to the factory default
Release on High to add 1 degree C (up to 5 max)
In practice, I have to say, this isn’t all that clean of a process. There is absolutely zero feedback to indicate what level PID is at, or if any change was made. If I hadn’t been literally testing the temperature, I’d have never really been able to know if I was making changes. And honestly, even then, it was difficult at times, and I won’t even tell you how many runtimes I reran because I was unsure of the facts of the PID setting.
There’s an added question of why one might want to adjust the PID. The difference is approximately 35 degrees C head temp to appx. 45 degrees C head temp. Would you be able to feel this temp difference? Probably. Ideally, setting the PID to max (+5) would allow the light to run on the highest possible output without stepping down for longer. But that difference is going to be very minimal, and holding the light in-hand will certainly confound the PID settings in a general sense.
I’ll also note that the manual that comes with the light nor the product page, actually describes how to change the PID on this light. Other SC600’s do describe how, and that’s where I got the information.
Does that mean I don’t like the addition of user-programmable PID? No, I think it’s neat. I do wish programming were simpler, and there was some feedback, however.
Finally, regarding my description of this user interface: I know there are many other descriptions of it, but I’m just throwing this out there as my way to describe it. No point in my just pasting it here. I hope the table is stand-alone enough, and the extra verbiage is just an accessory to the fact. I want to make a good flow chart too. I am hopeful that will happen if Zebralight sends me another light to test. 🙂
LED and Beam
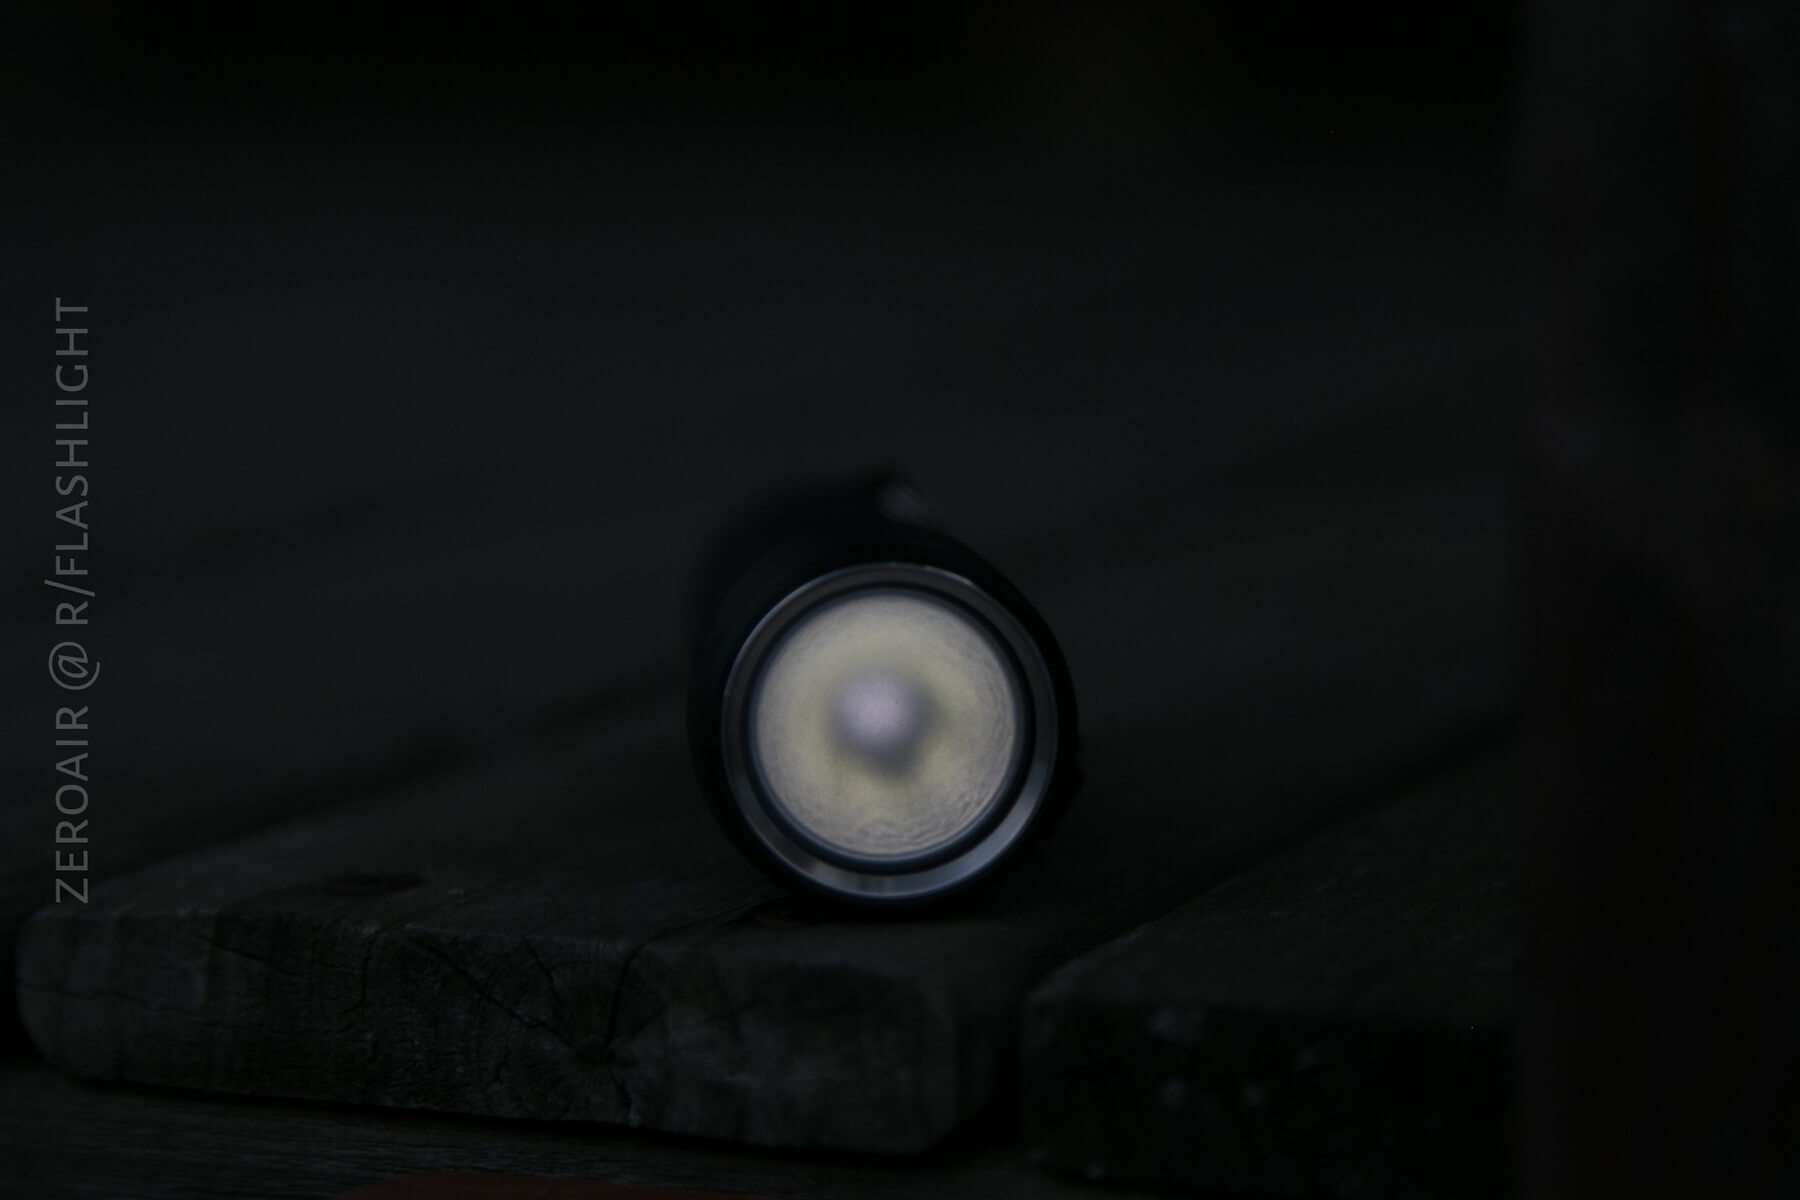
Under the frosted lens of the SC600F is a Cree XHP50.
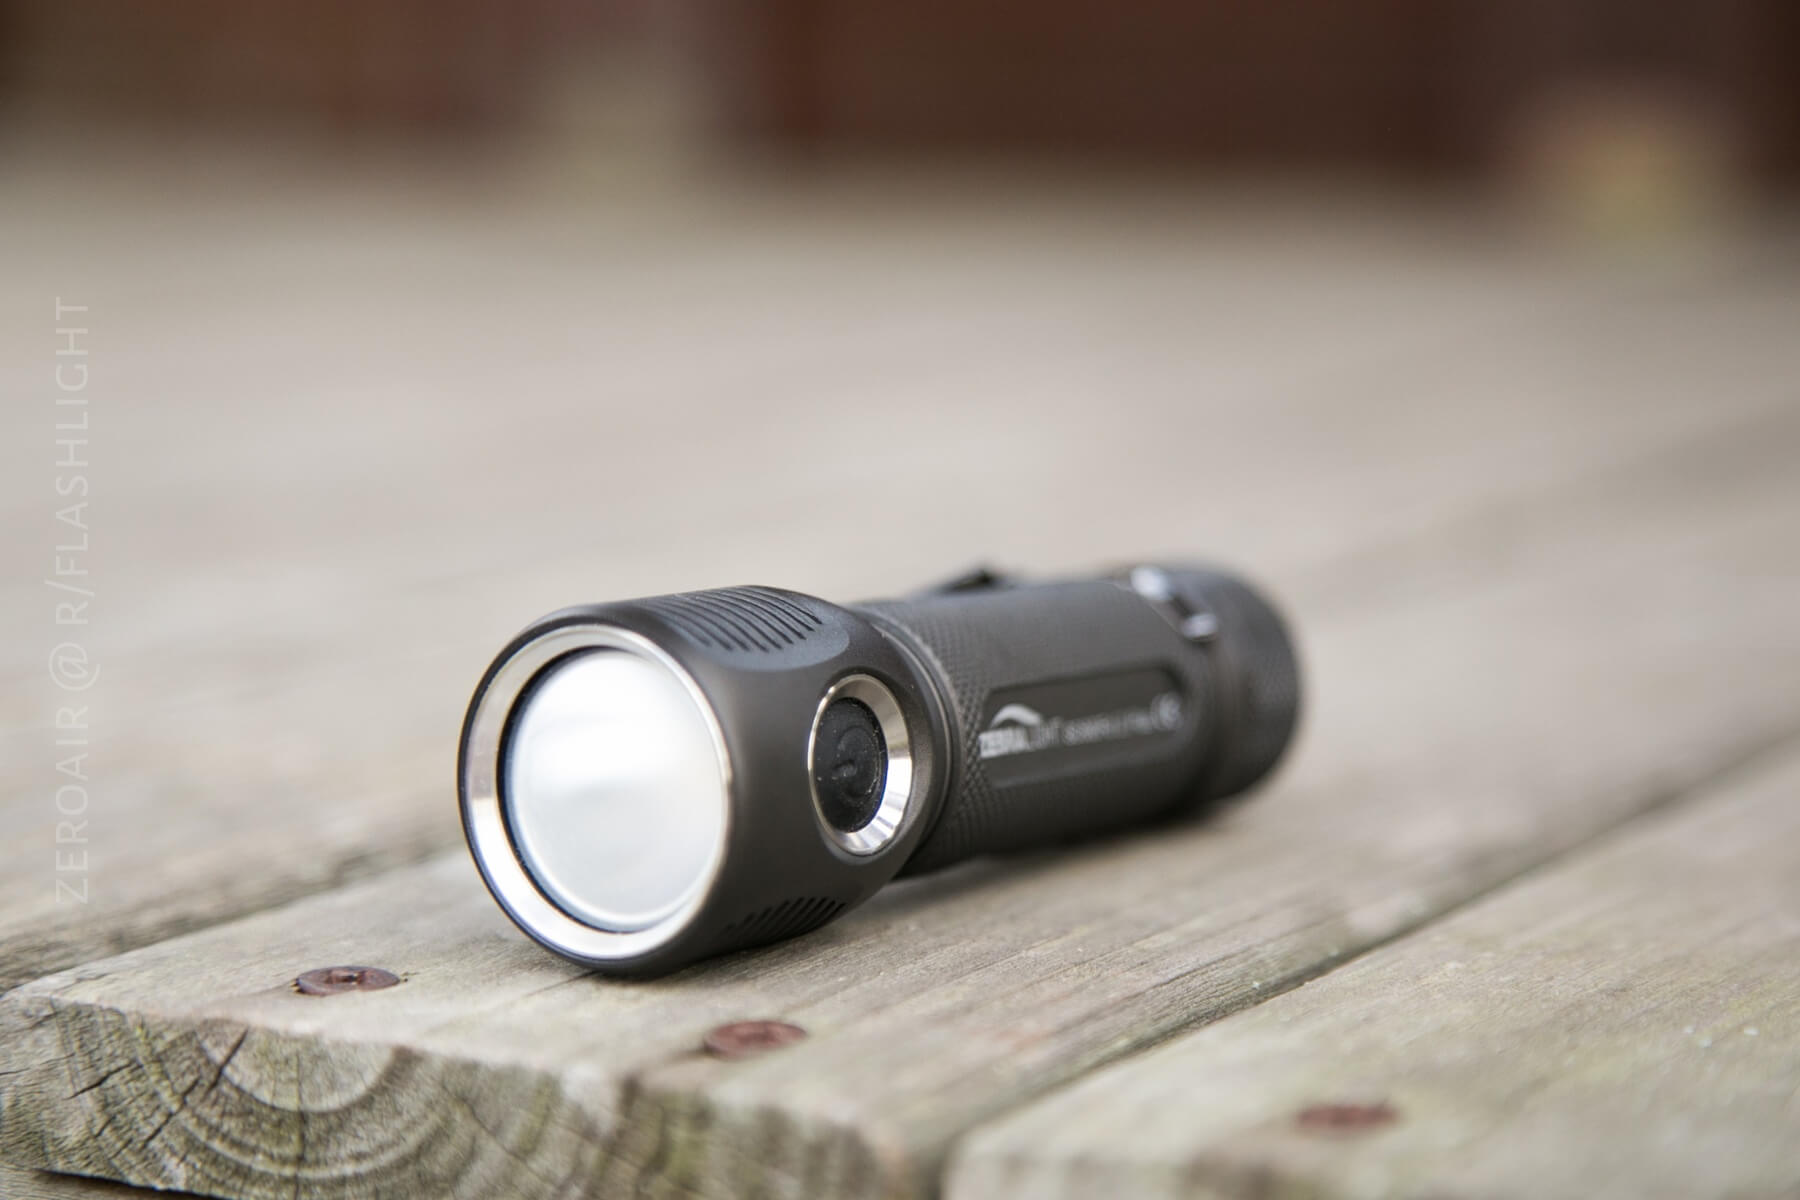
This XHP50 is a High CRI Variant, with CRI rated to be 93-95. That’s very high. The frosted lens is frosted on the underside of the lens, so the frosting isn’t something that you can feel on the surface, or possibly scratch off or remove. It’s there for good. That’s a good thing, but it has downsides, since it’s not removable. This light is a floody light once and for all.
Of course, the XHP50 is an emitter with a big “plus” symbol down the middle. The frosted lens eliminates that.
Beamshots
These beamshots always have the following settings: f8, ISO100, 0.3s shutter, and manual 5000K exposure. These photos are taken at floor level, and the beam hits the ceiling around 9 feet away.


Random Comparisons and Competitive Options
Let’s not fool ourselves about this light: There’s really nothing in this category out there. Sure, there are a bajillion single 18650 lights. There are a few XHP50 lights. But this light is a complete package of High CRI, small form factor, and high output that just isn’t available elsewhere.
Conclusion
What I like
- High CRI
- The shape
- The output
- The pocket clip
- Adjustable PID
- Battery check
- Reliable LVP
- Build is extremely high quality
What I don’t like
- Lack of notification on PID adjustment
- Tint lottery (mine’s slightly green)
- Unprotected cell
- Floody light is very specific in application and leaves room for a thrower
- Logo fades a bit quickly
Final Thoughts
I really love this light. I’m happy to have it and carry it, and the build quality is ridiculous (ly great). The floody is great, but I do like a light with a little bit of throw – this light achieves throw by just making tons of light. Since it’s temperature-controlled, and also on a single 18650, it can’t make that max light for TOO long. Because of that, if I were about to buy a light, I might lean toward the non-Floody version. If I could change a thing or two about this light, I’ll be honest, I’d put some GITD touches (inside the bezel, or the button). I also would love to see some copper versions of this light, or at least some exclusive versions.
No matter all of that, I still love this light. I normally say I carry up to 4 lights at a time, at least one of those including an 18650 light? This is that 18650 light.
Parting Shot
Girl, look at that body.
I… I work out.
Notes
- Special thanks to Zebralight for sending this light (and an NCR18650GA!) to me at no cost, for review. I was not paid to write this review.
- This content originally appeared at zeroair.org. Please visit there for the best experience!
- Use my amazon.com referral link if you’re willing to help support making more reviews like this one!
- Please support me on Patreon! I deeply appreciate your support!
Discover more from ZeroAir Reviews
Subscribe to get the latest posts sent to your email.
Pingback: Zebralight SC63w Flashlight Review – ZeroAir Reviews
Pingback: Zebralight SC63w Flashlight Review - ZeroAir Reviews
Pingback: Zebralight SC700d Flashlight Review - ZeroAir Reviews